Cloud Analytics
ITC6460
Amazon Athena: Query for SQL (Amazon S3)
What is Amazon Athena
Amazon Athena is an interactive query service that makes it easy to analyze data directly in Amazon Simple Storage Service (Amazon S3) using standard SQL. With a few actions in the AWS Management Console, you can point Athena at your data stored in Amazon S3 and begin using standard SQL to run ad-hoc queries and get results in seconds.
Athena is serverless, so there is no infrastructure to set up or manage, and you pay only for the queries you run. Athena scales automatically—executing queries in parallel—so results are fast, even with large data sets and complex queries.
Benefits
- Quickly query data from Amazon S3 (automatically executes queries in parallel)
- Serverless
- No need to prepare data
- Standard SQL
- No need complex ETL
- is out-of-the-box integrated with AWS Glue Data Catalog
- highly available
- Executes queries using compute resources across multiple facilities and multiple devices in each facility.
- interactive performance
- support unstructured, semi-structured, and structured data (stored in Amazon S3)
- integrates with Amazon QuickSight for easy data visualization
- integrates with the AWS Glue Data Catalog, which offers a persistent metadata store for your data in Amazon S3
ETL & ELT
ETL: extract, transform, load. One tool with three database functions to pull data out of one database and place into another database.
ELT: extract, load, transform.
- ELT no staging system involved
About Amazon Athena
- built on Presto
- runs standard SQL
- Presto with ANSI SQL, support variety of standard data formats: CSV, JSON, ORC, Avro, Parquet
- support complex analysis, including large joins, window functions, and arrays.
Pay Per Query:
- Only pay for data scanned;
- pay for the queries that you run
- charged 5 per terabyte scanned by your queries
Access Athena
You can access Athena using the AWS Management Console, through a JDBC or ODBC connection, using the Athena API, or using the Athena CLI.
Athena Integrations
AWS Service Integrations with Athena
Amazon Rekognition
What Is Amazon Rekognition?
Amazon Rekognition makes it easy to add image and video analysis to your applications. You just provide an image or video to the Amazon Rekognition API, and the service can identify objects, people, text, scenes, and activities.
- Searchable image and video libraries
- Face-based user verification
- Sentiment and demographic analysis
- Facial recognition
1.Index the faces.
2.Search the faces. - Unsafe content detection
- Celebrity recognition
- Text detection
- Custom labels
Benefits:
- Integrating powerful image and video recognition into your apps
- Deep learning-based image and video analysis
- Scalable image analysis
- Integration with other AWS services
- Low cost
Amazon Lex
Amazon Lex is a service for building conversational interfaces into any application using voice and text.
Benefits
- Easy to use
- Seamlessly deploy and scale
- Built in integration with AWS
- Cost effective


How it works
Powered by the same technology as Alexa, Amazon Lex provides you with the tools to tackle challenging deep learning problems, such as speech recognition and language understanding, through an easy-to-use fully managed service. Amazon Lex integrates with AWS Lambda which you can use to easily trigger functions for execution of your back-end business logic for data retrieval and updates. Once built, your bot can be deployed directly to chat platforms, mobile clients, and IoT devices. You can also use the reports provided to track metrics for your bot. Amazon Lex provides a scalable, secure, easy to use, end-to-end solution to build, publish and monitor your bots.
Developing Bots
1.Amazon Lex uses AWS Key Management Service customer master keys (CMK) to encrypt the information
2.The first time that you create a channel to one
Amazon Polly
Amazon Polly is a service that turns text into lifelike speech, allowing you to create applications that talk, and build entirely new categories of speech-enabled products. Polly’s Text-to-Speech (TTS) service uses advanced deep learning technologies to synthesize speech that sounds like a human voice.
Benefits
- Natural sounding voices
- Store & redistribute speech
- Real-time streaming
- Customize & control speech output
- Low cost
Use cases


Labs
Amazon Athena
Setting Up
Setting Up
Remember following the instruction to create a IAM user avoiding no permission to do anything.
Basically, before we using Amazon Athena, we need create a Bucket in Amazon S3 to store the Query Result. Additionally, for security, we need create groups and users to distribute the right, the User Rights Management.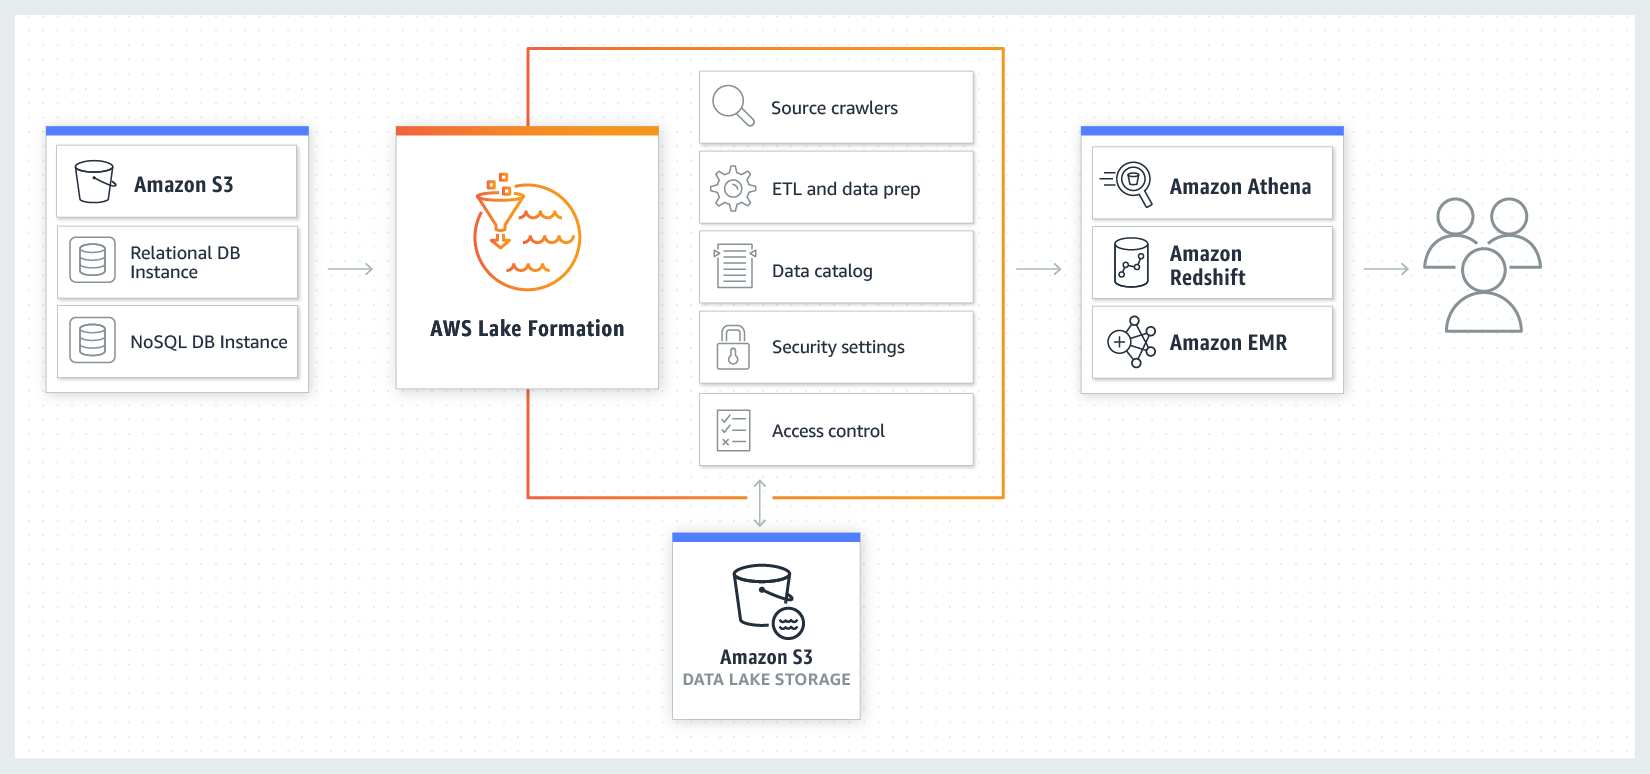
User Rights Management
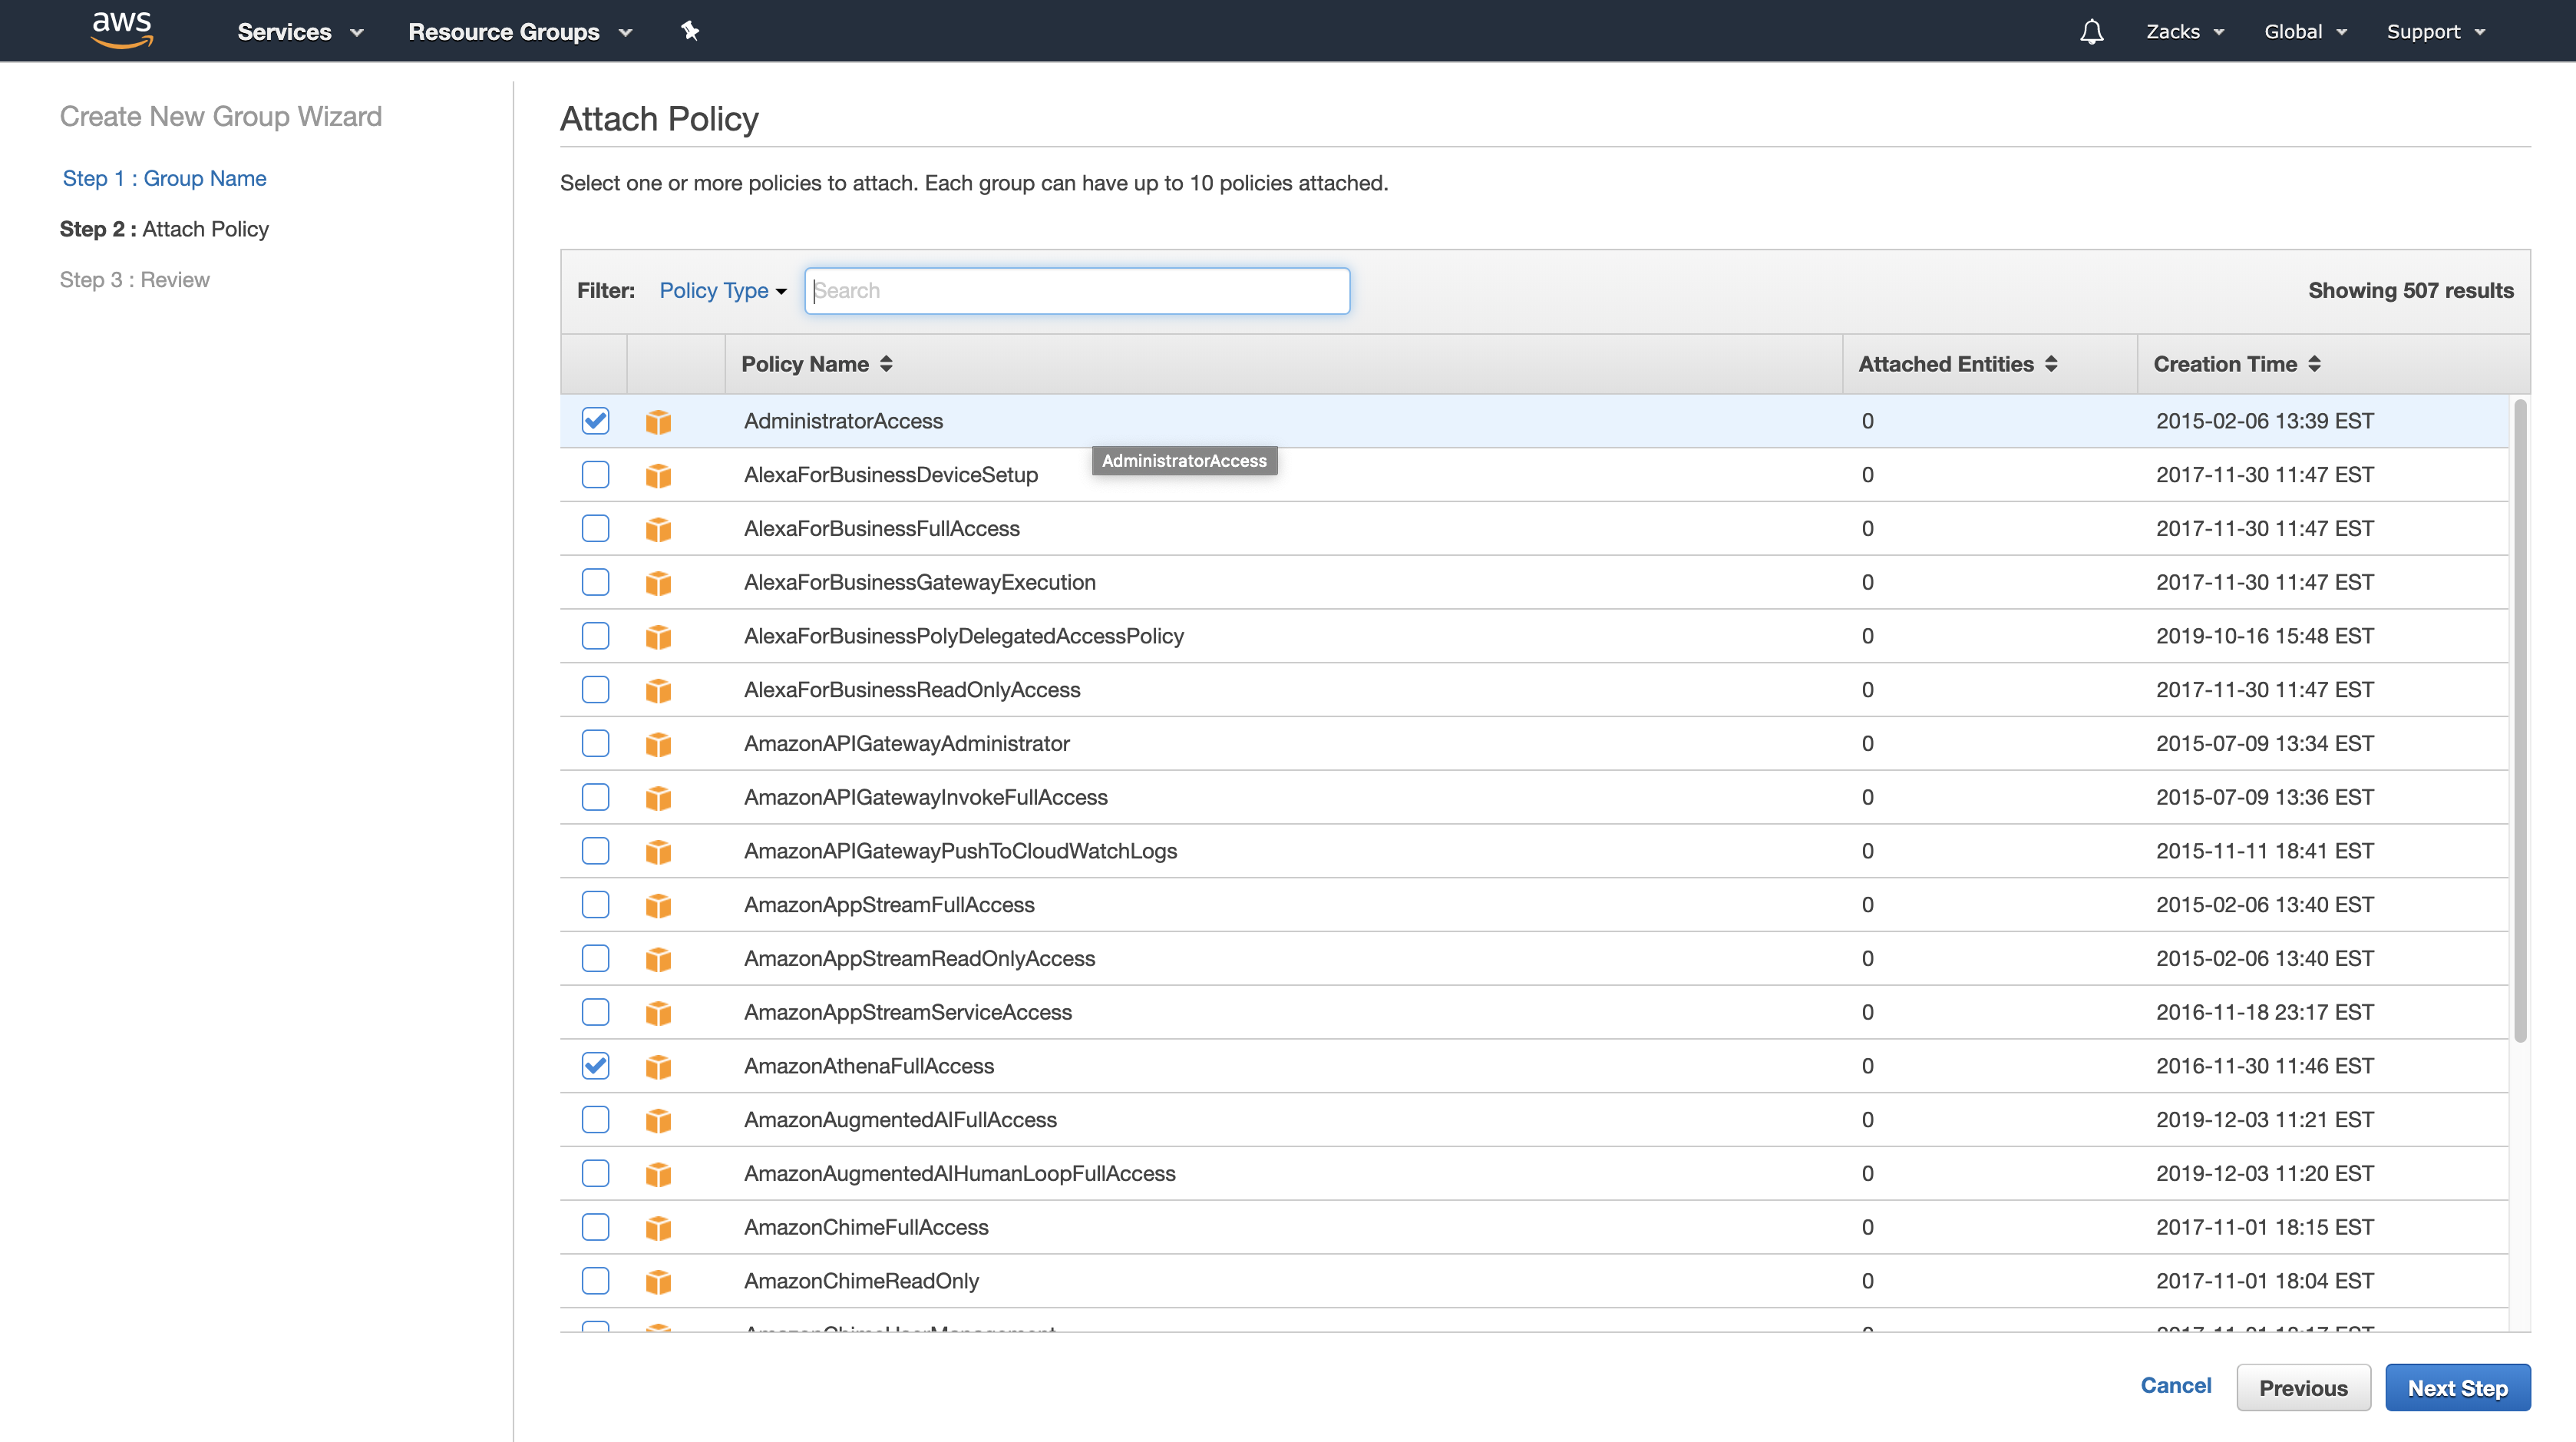
Go to IAM page at https://console.aws.amazon.com/iam/. In the navigation pane, choose Groups, Create New Group.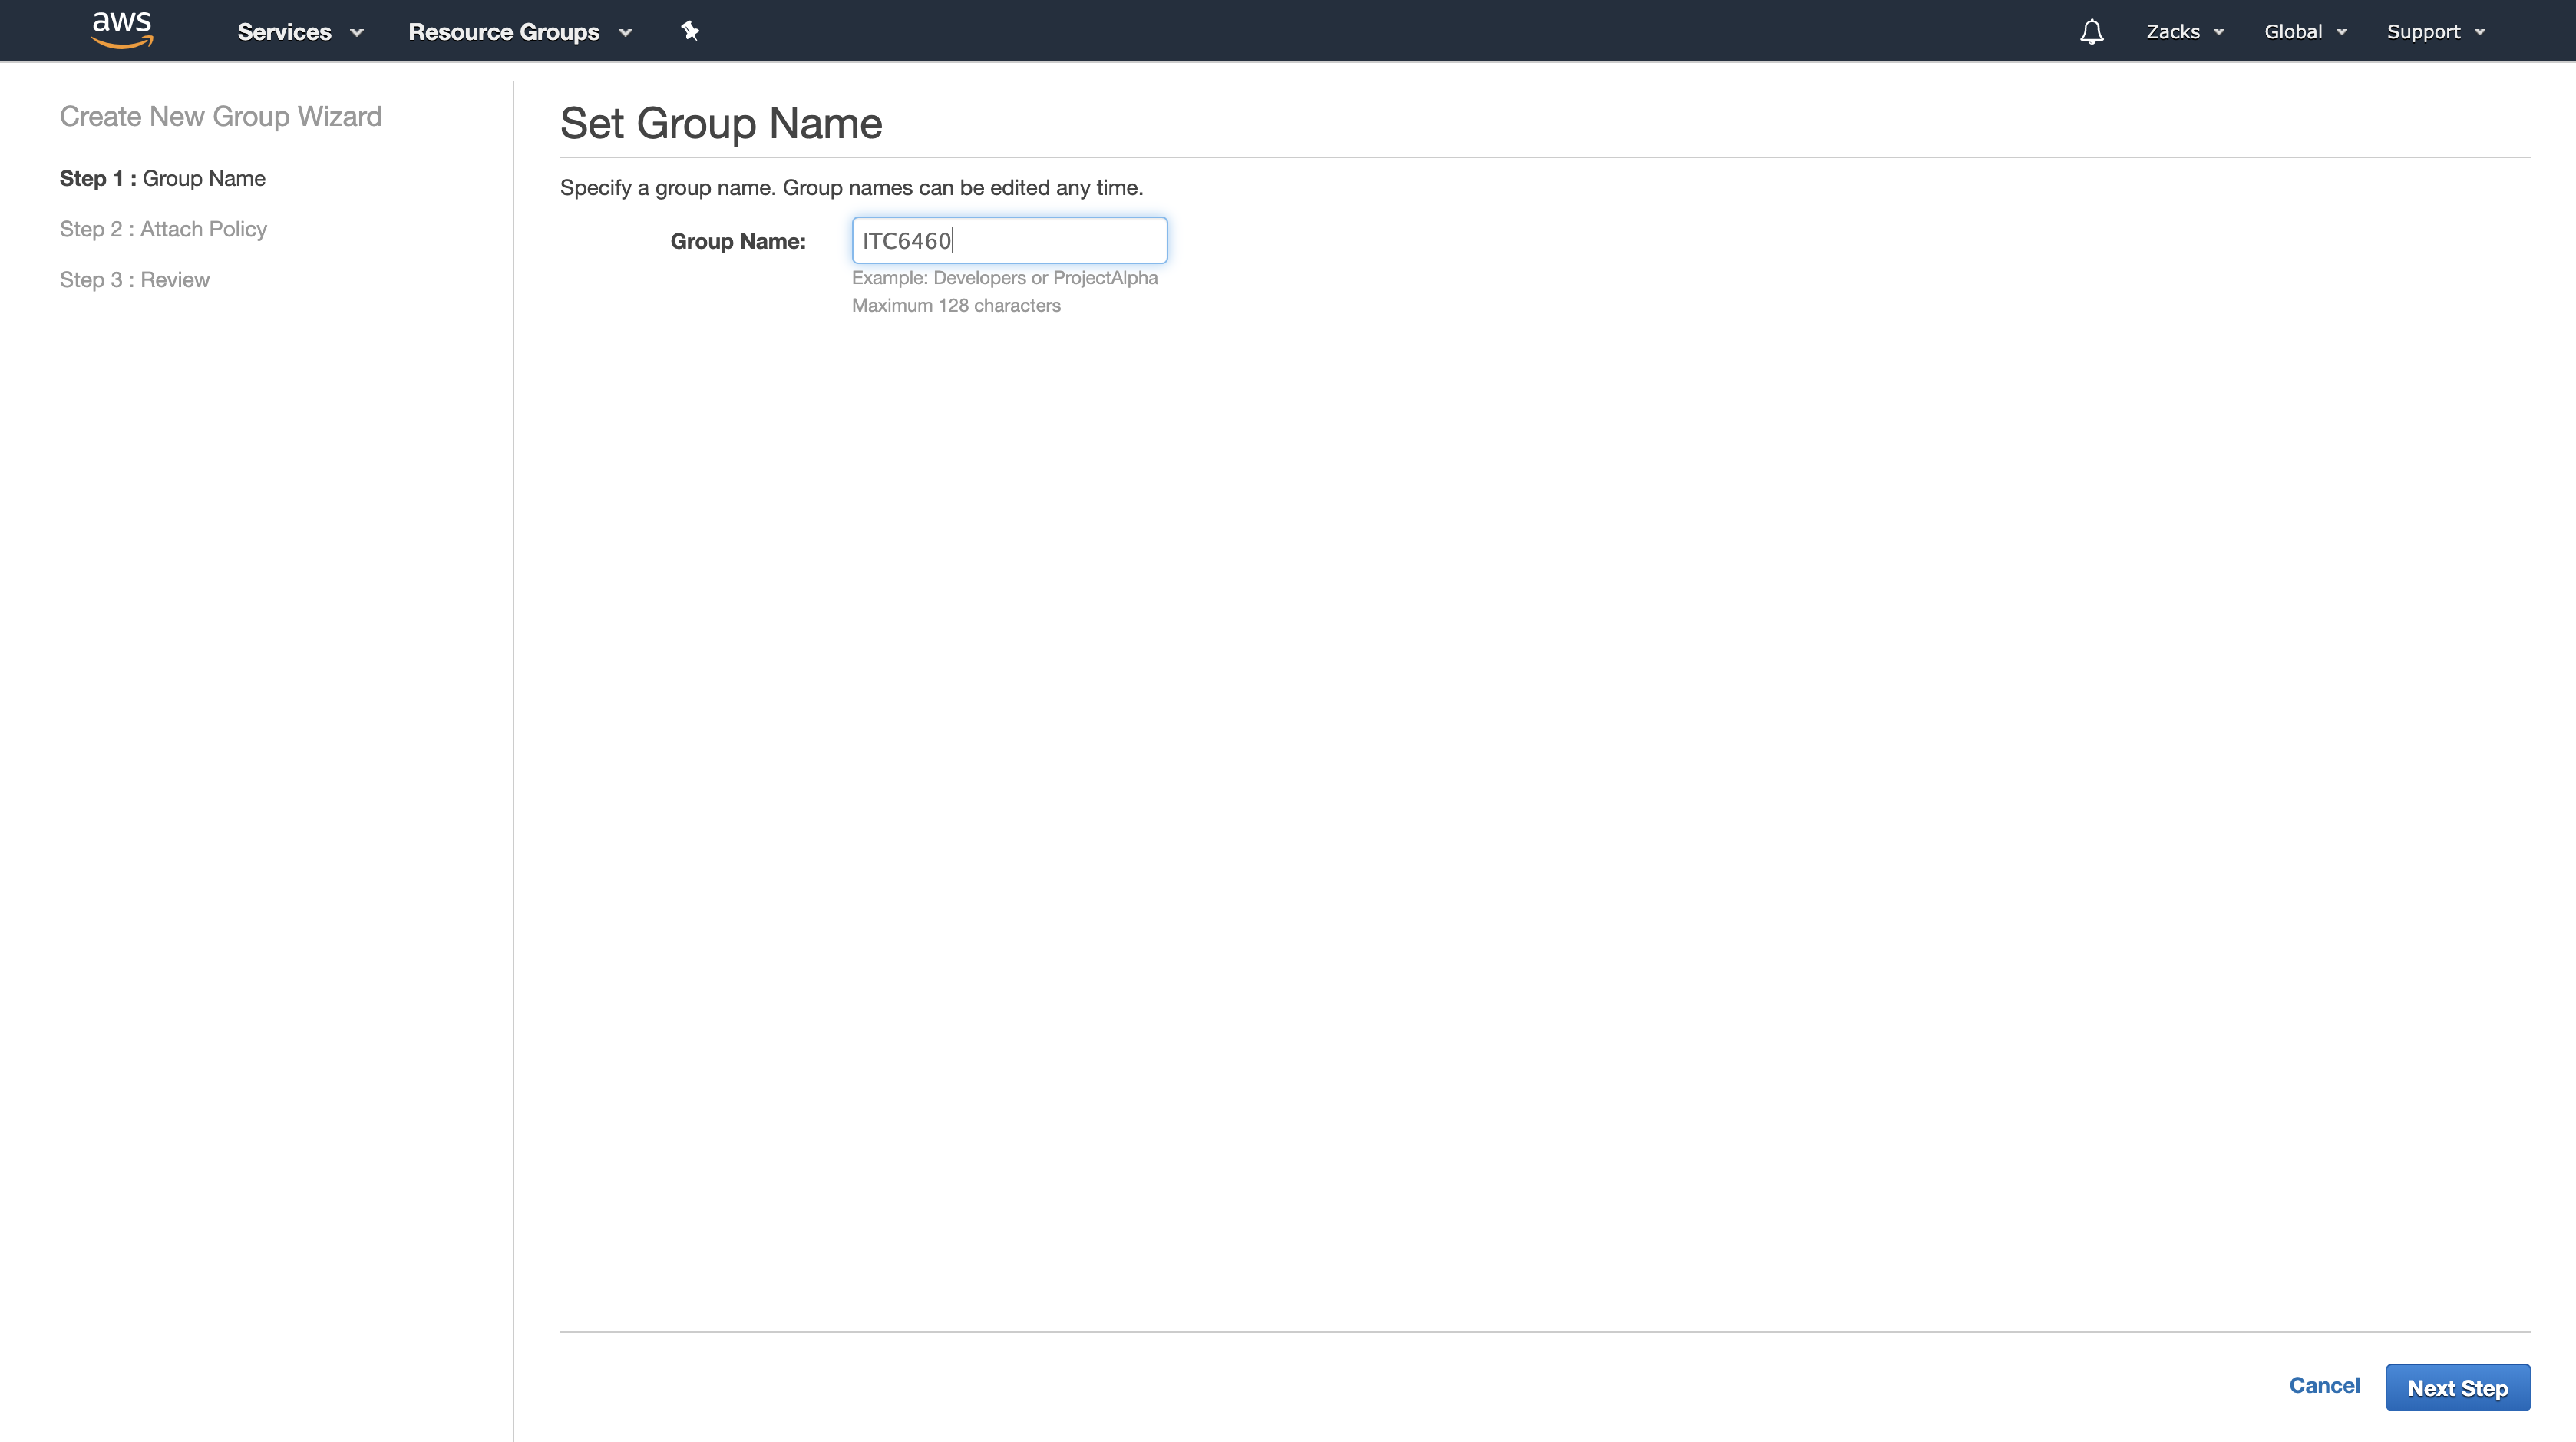
Give an administratorAccess, S3, and EC2 related permission. (Use filter menu)
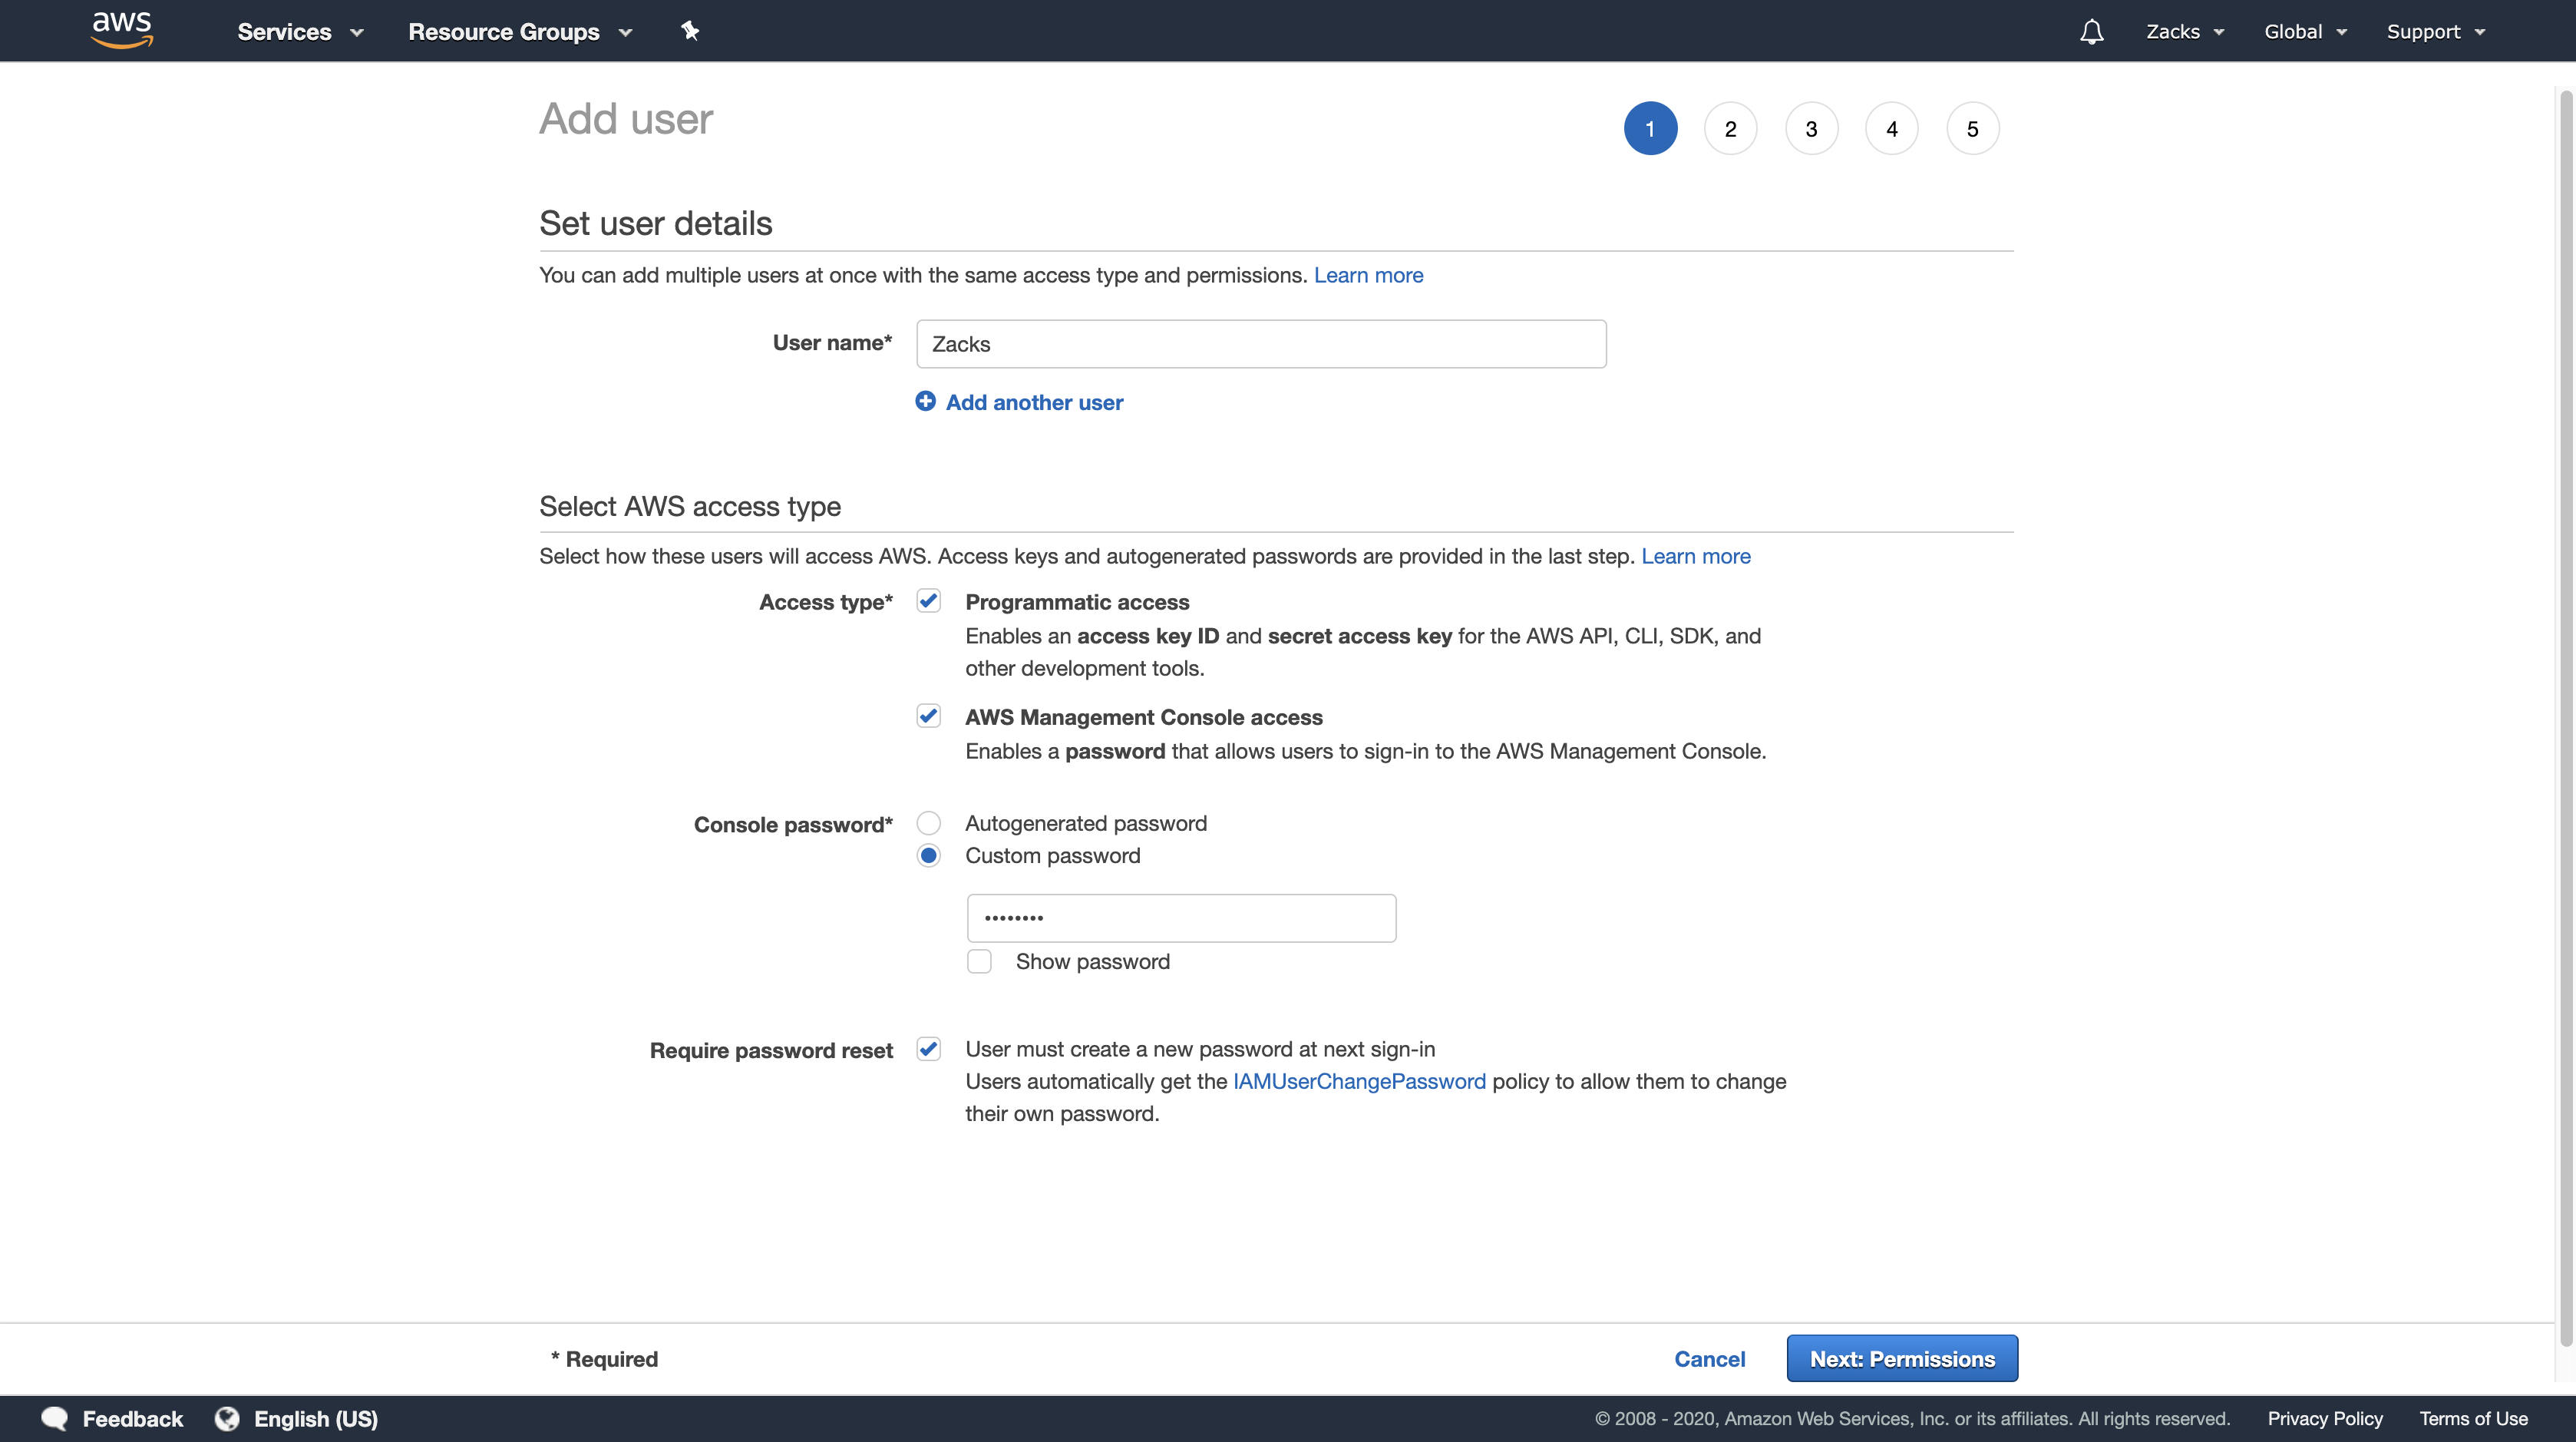
In the navigation pane, choose Users, and then Create New Users.
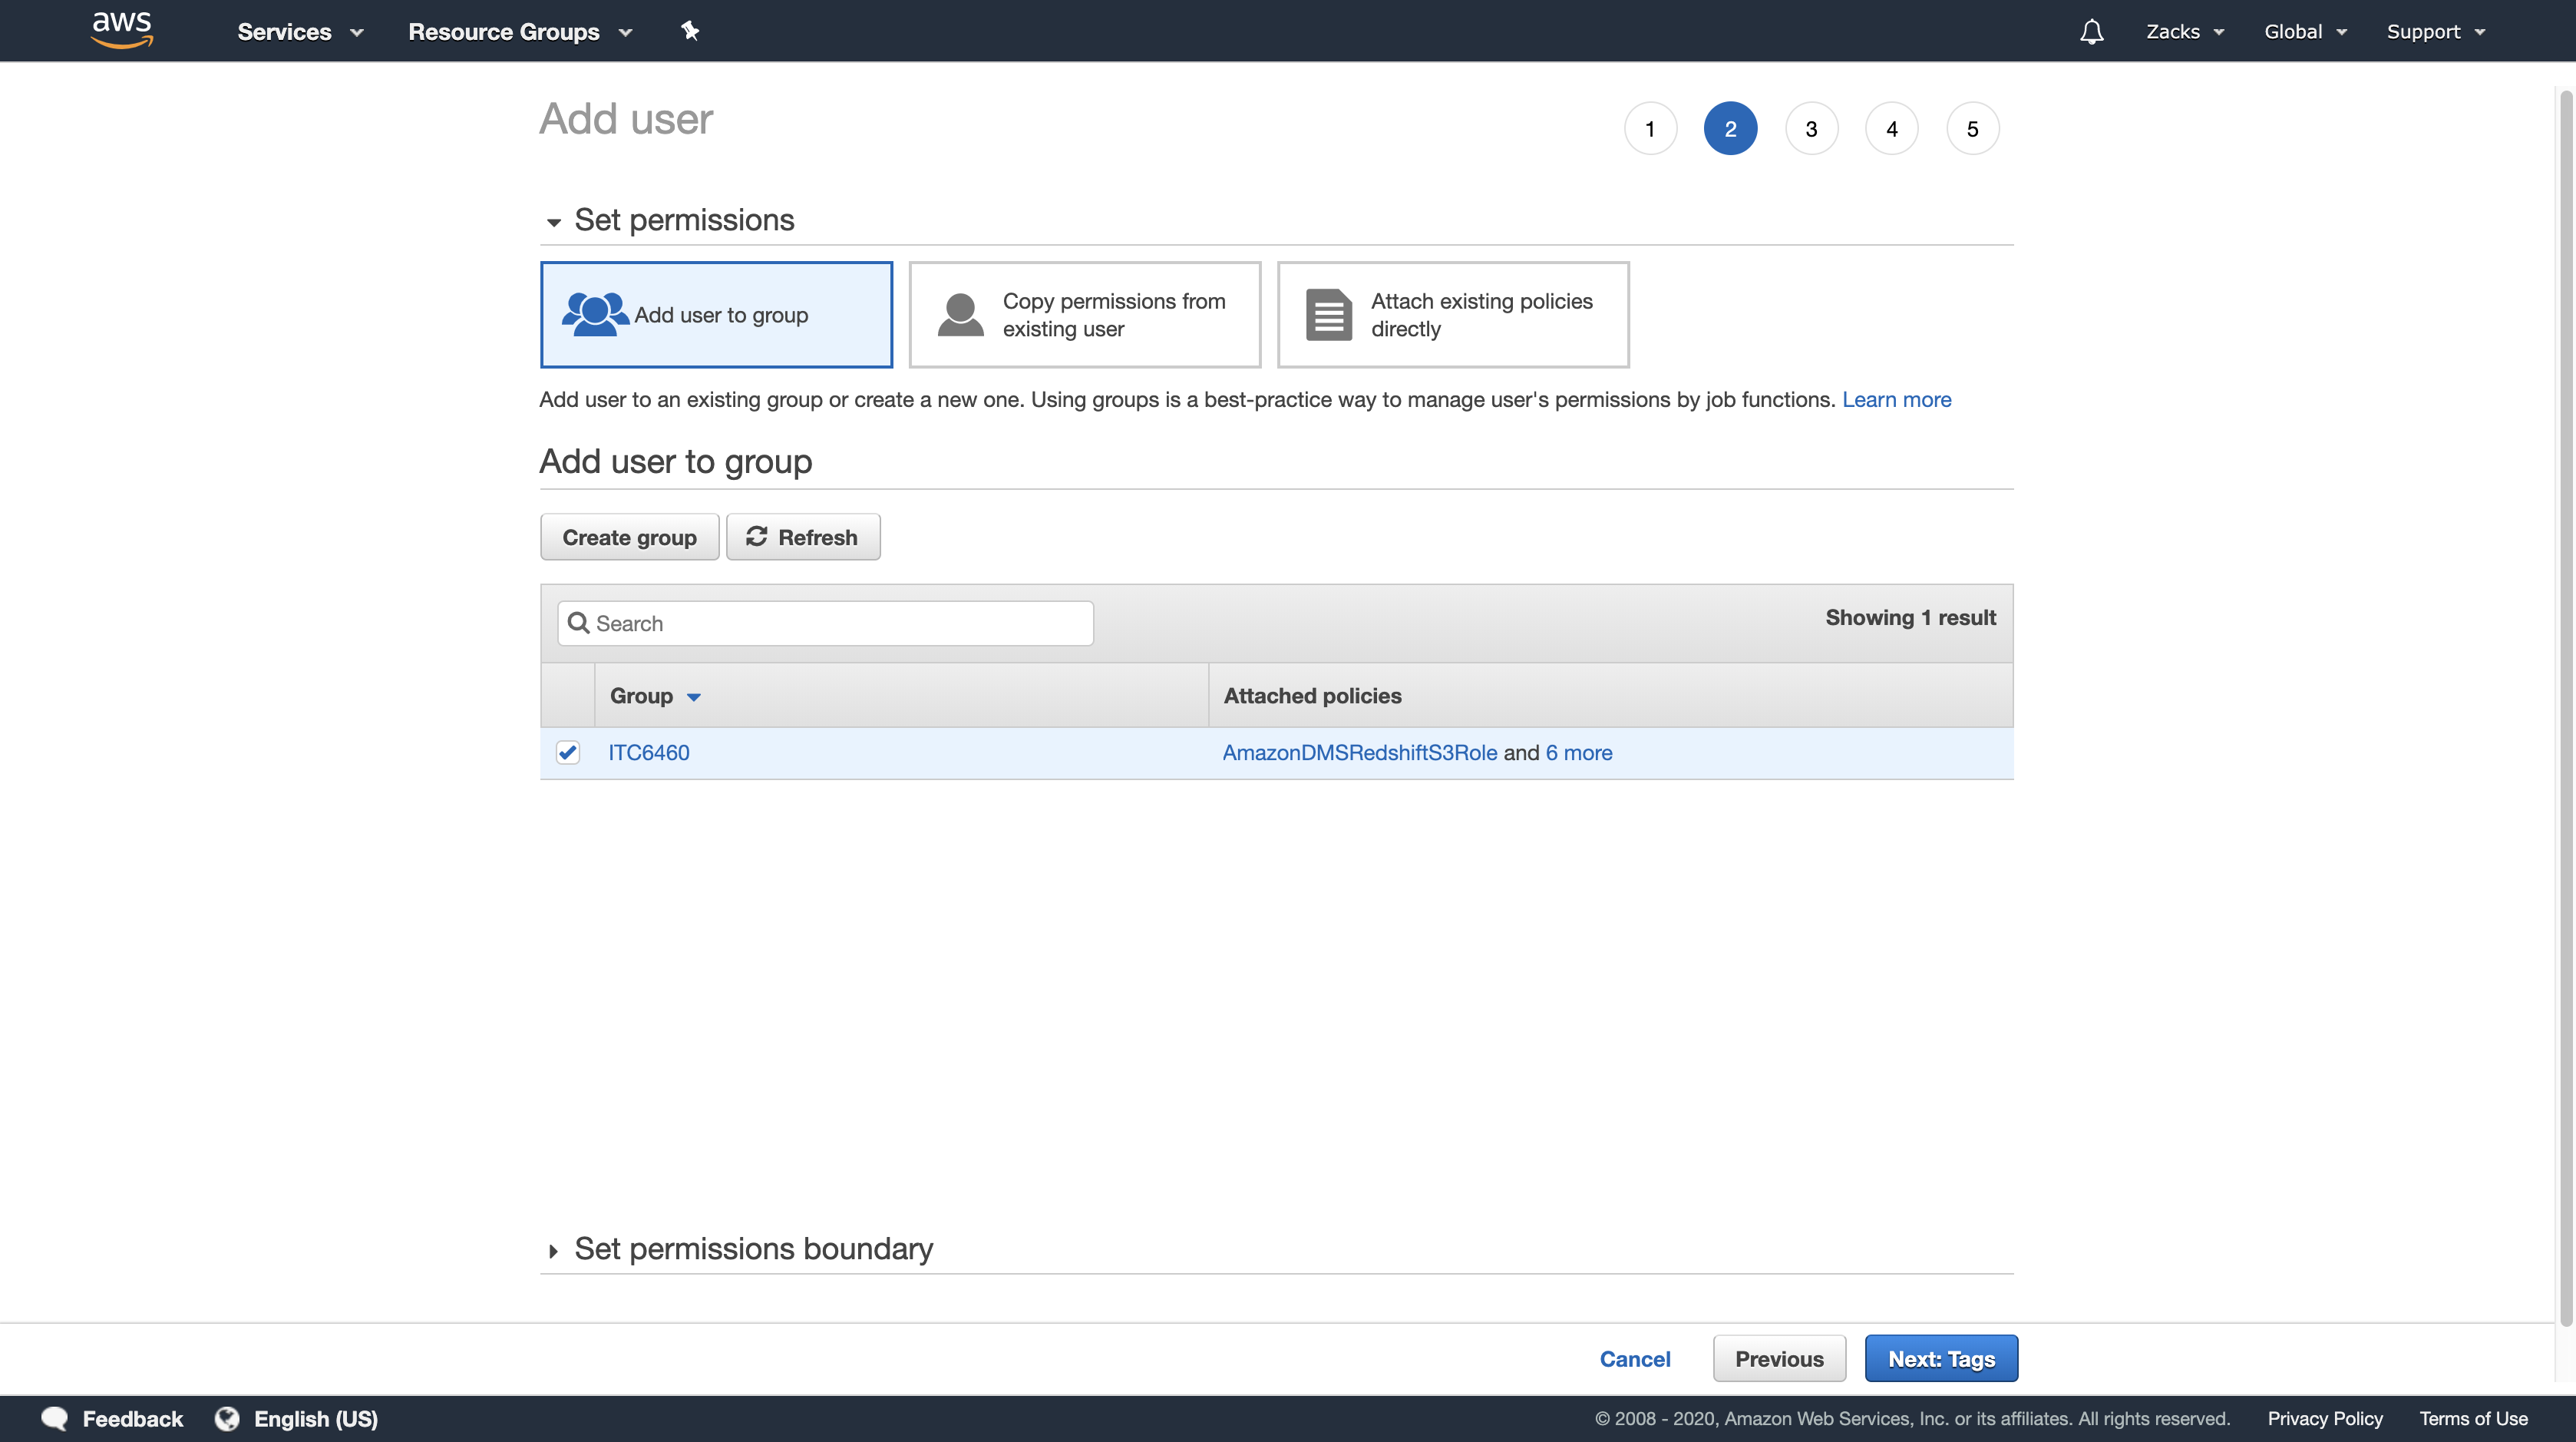
Add user to group
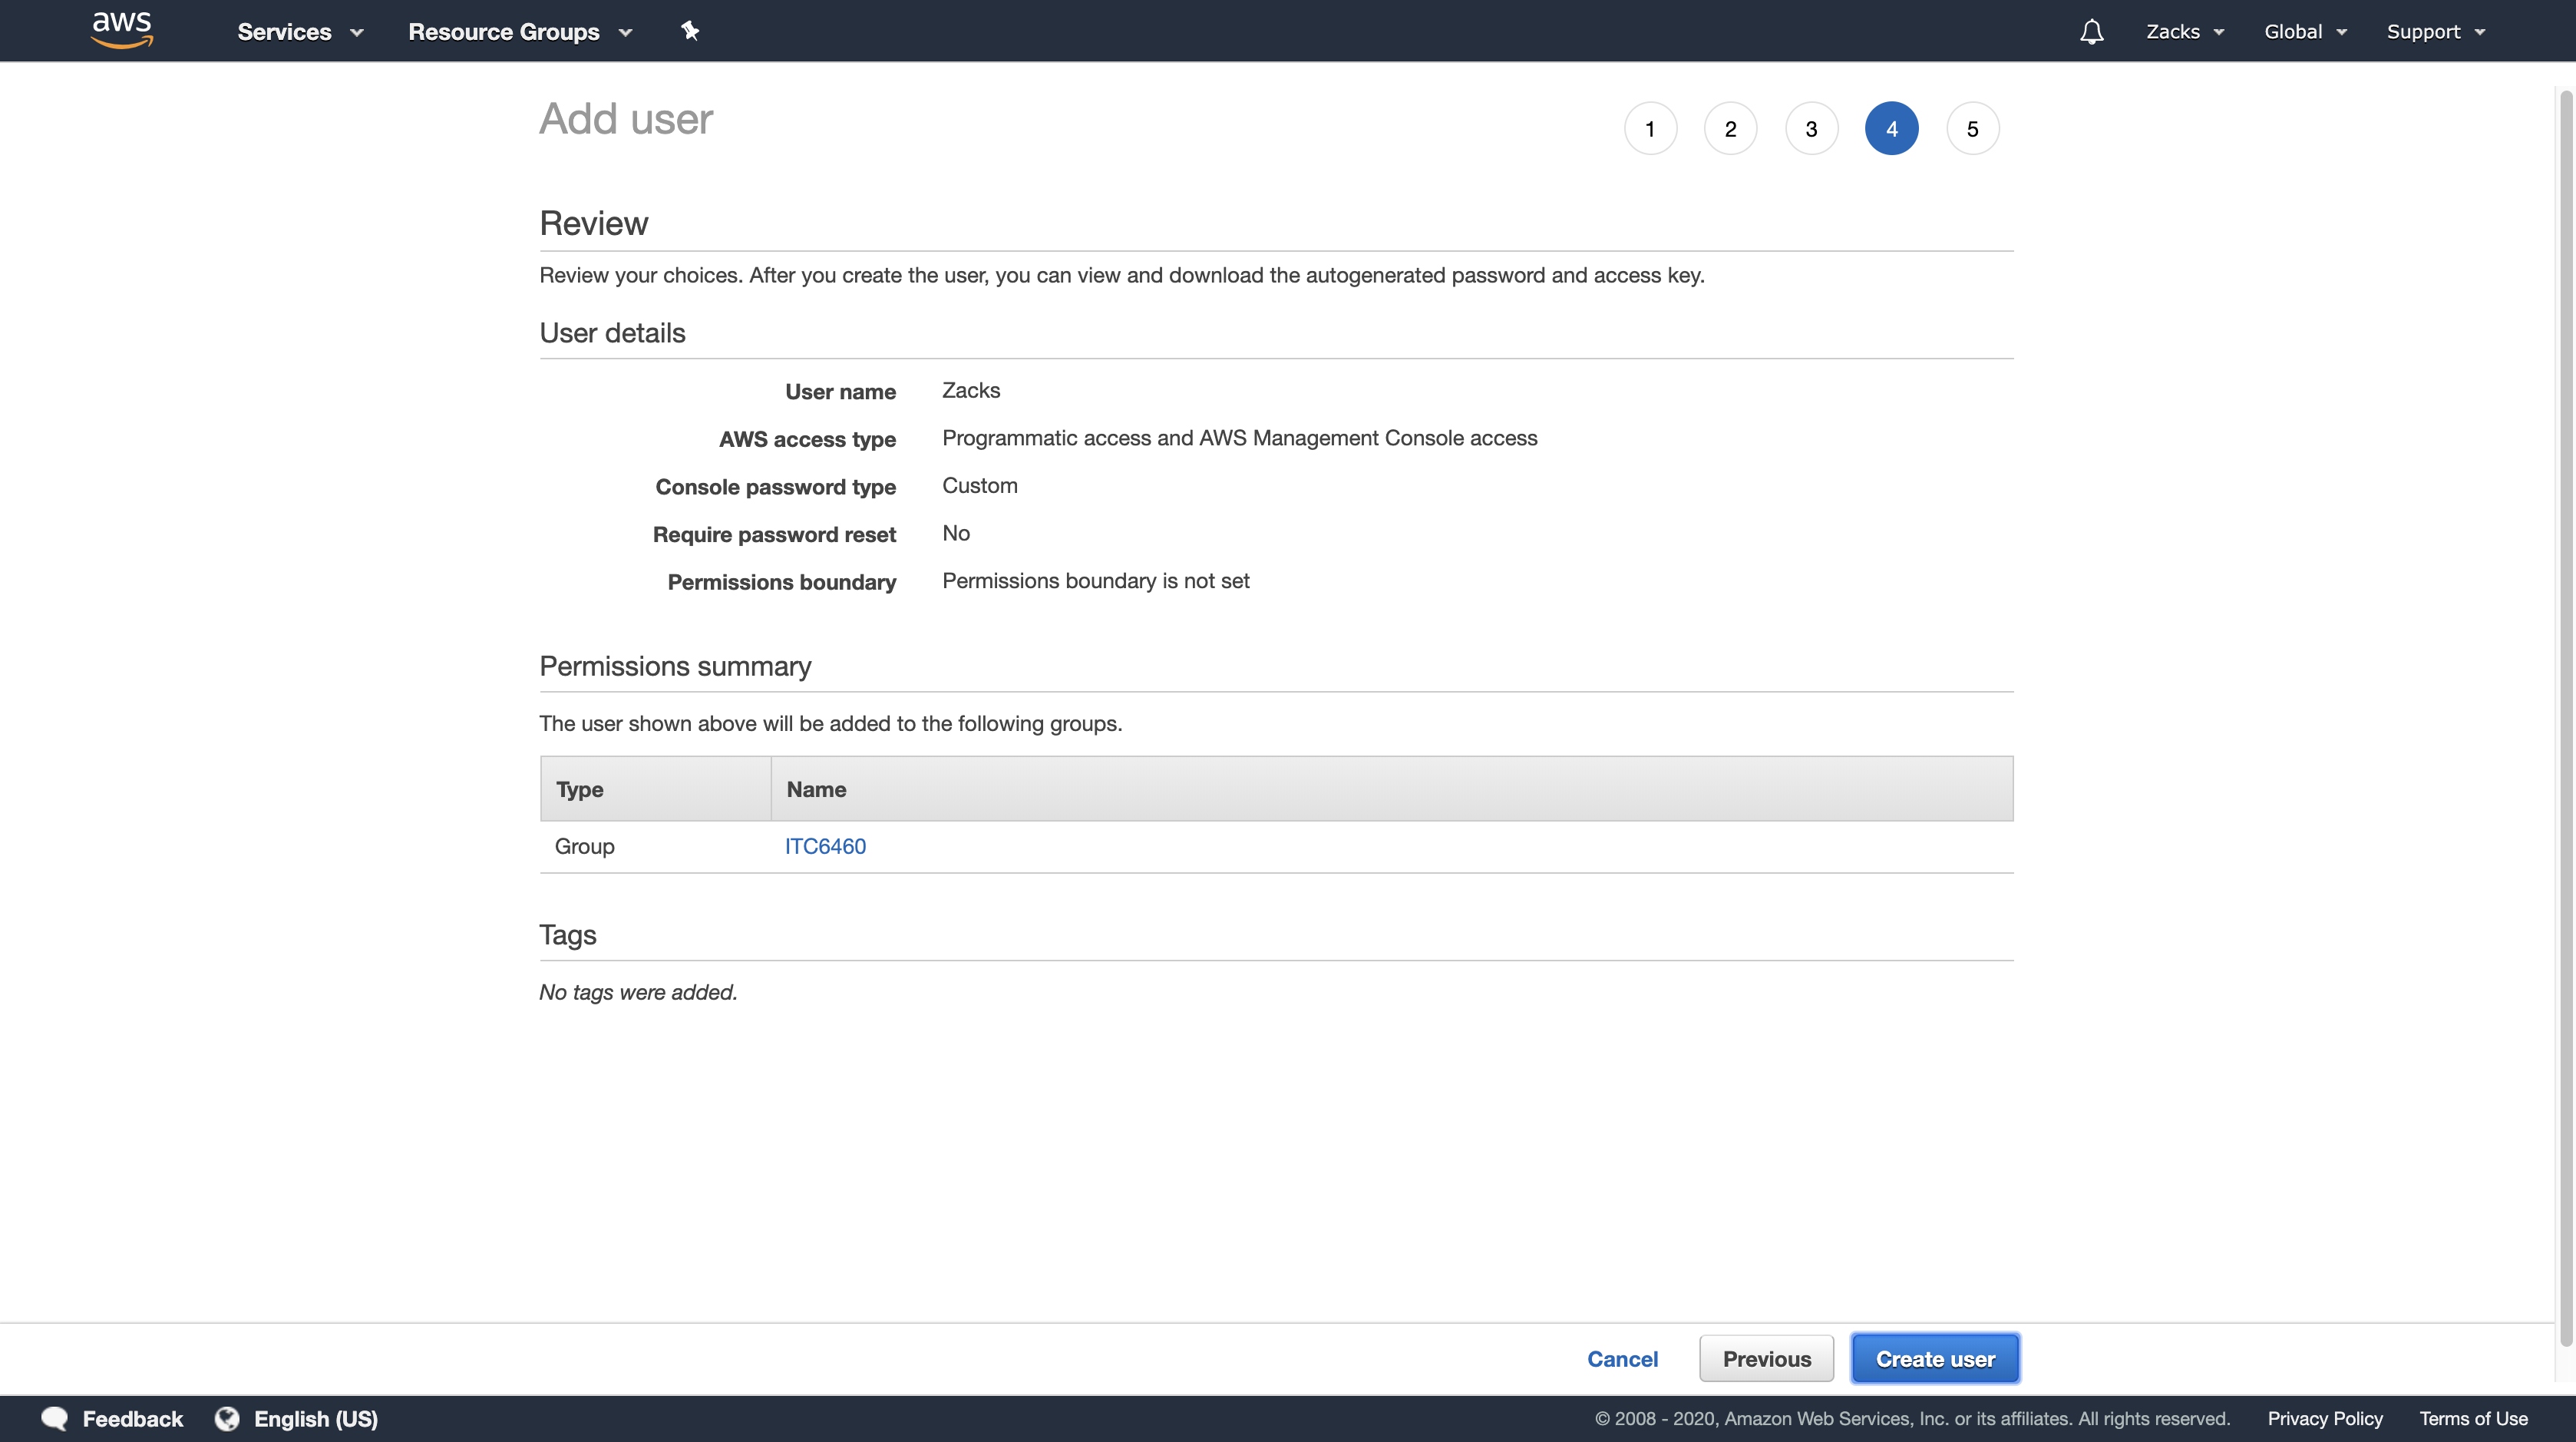
Create user
Go to https://your_account_alias.signin.aws.amazon.com/console/ and sign in. (sign in as the root user and rename your_account_id at the homepage and get your_account_alias)
Getting Start
Getting start
This tutorial walks you through using Amazon Athena to query data. You’ll create a table based on sample data stored in Amazon Simple Storage Service, query the table, and check the results of the query.
The tutorial is using live resources, so you are charged for the queries that you run. You aren’t charged for the sample data sets that you use, but if you upload your own data files to Amazon S3, charges do apply.
Bucket
Log in to https://your_account_alias.signin.aws.amazon.com/console/ and search for S3.
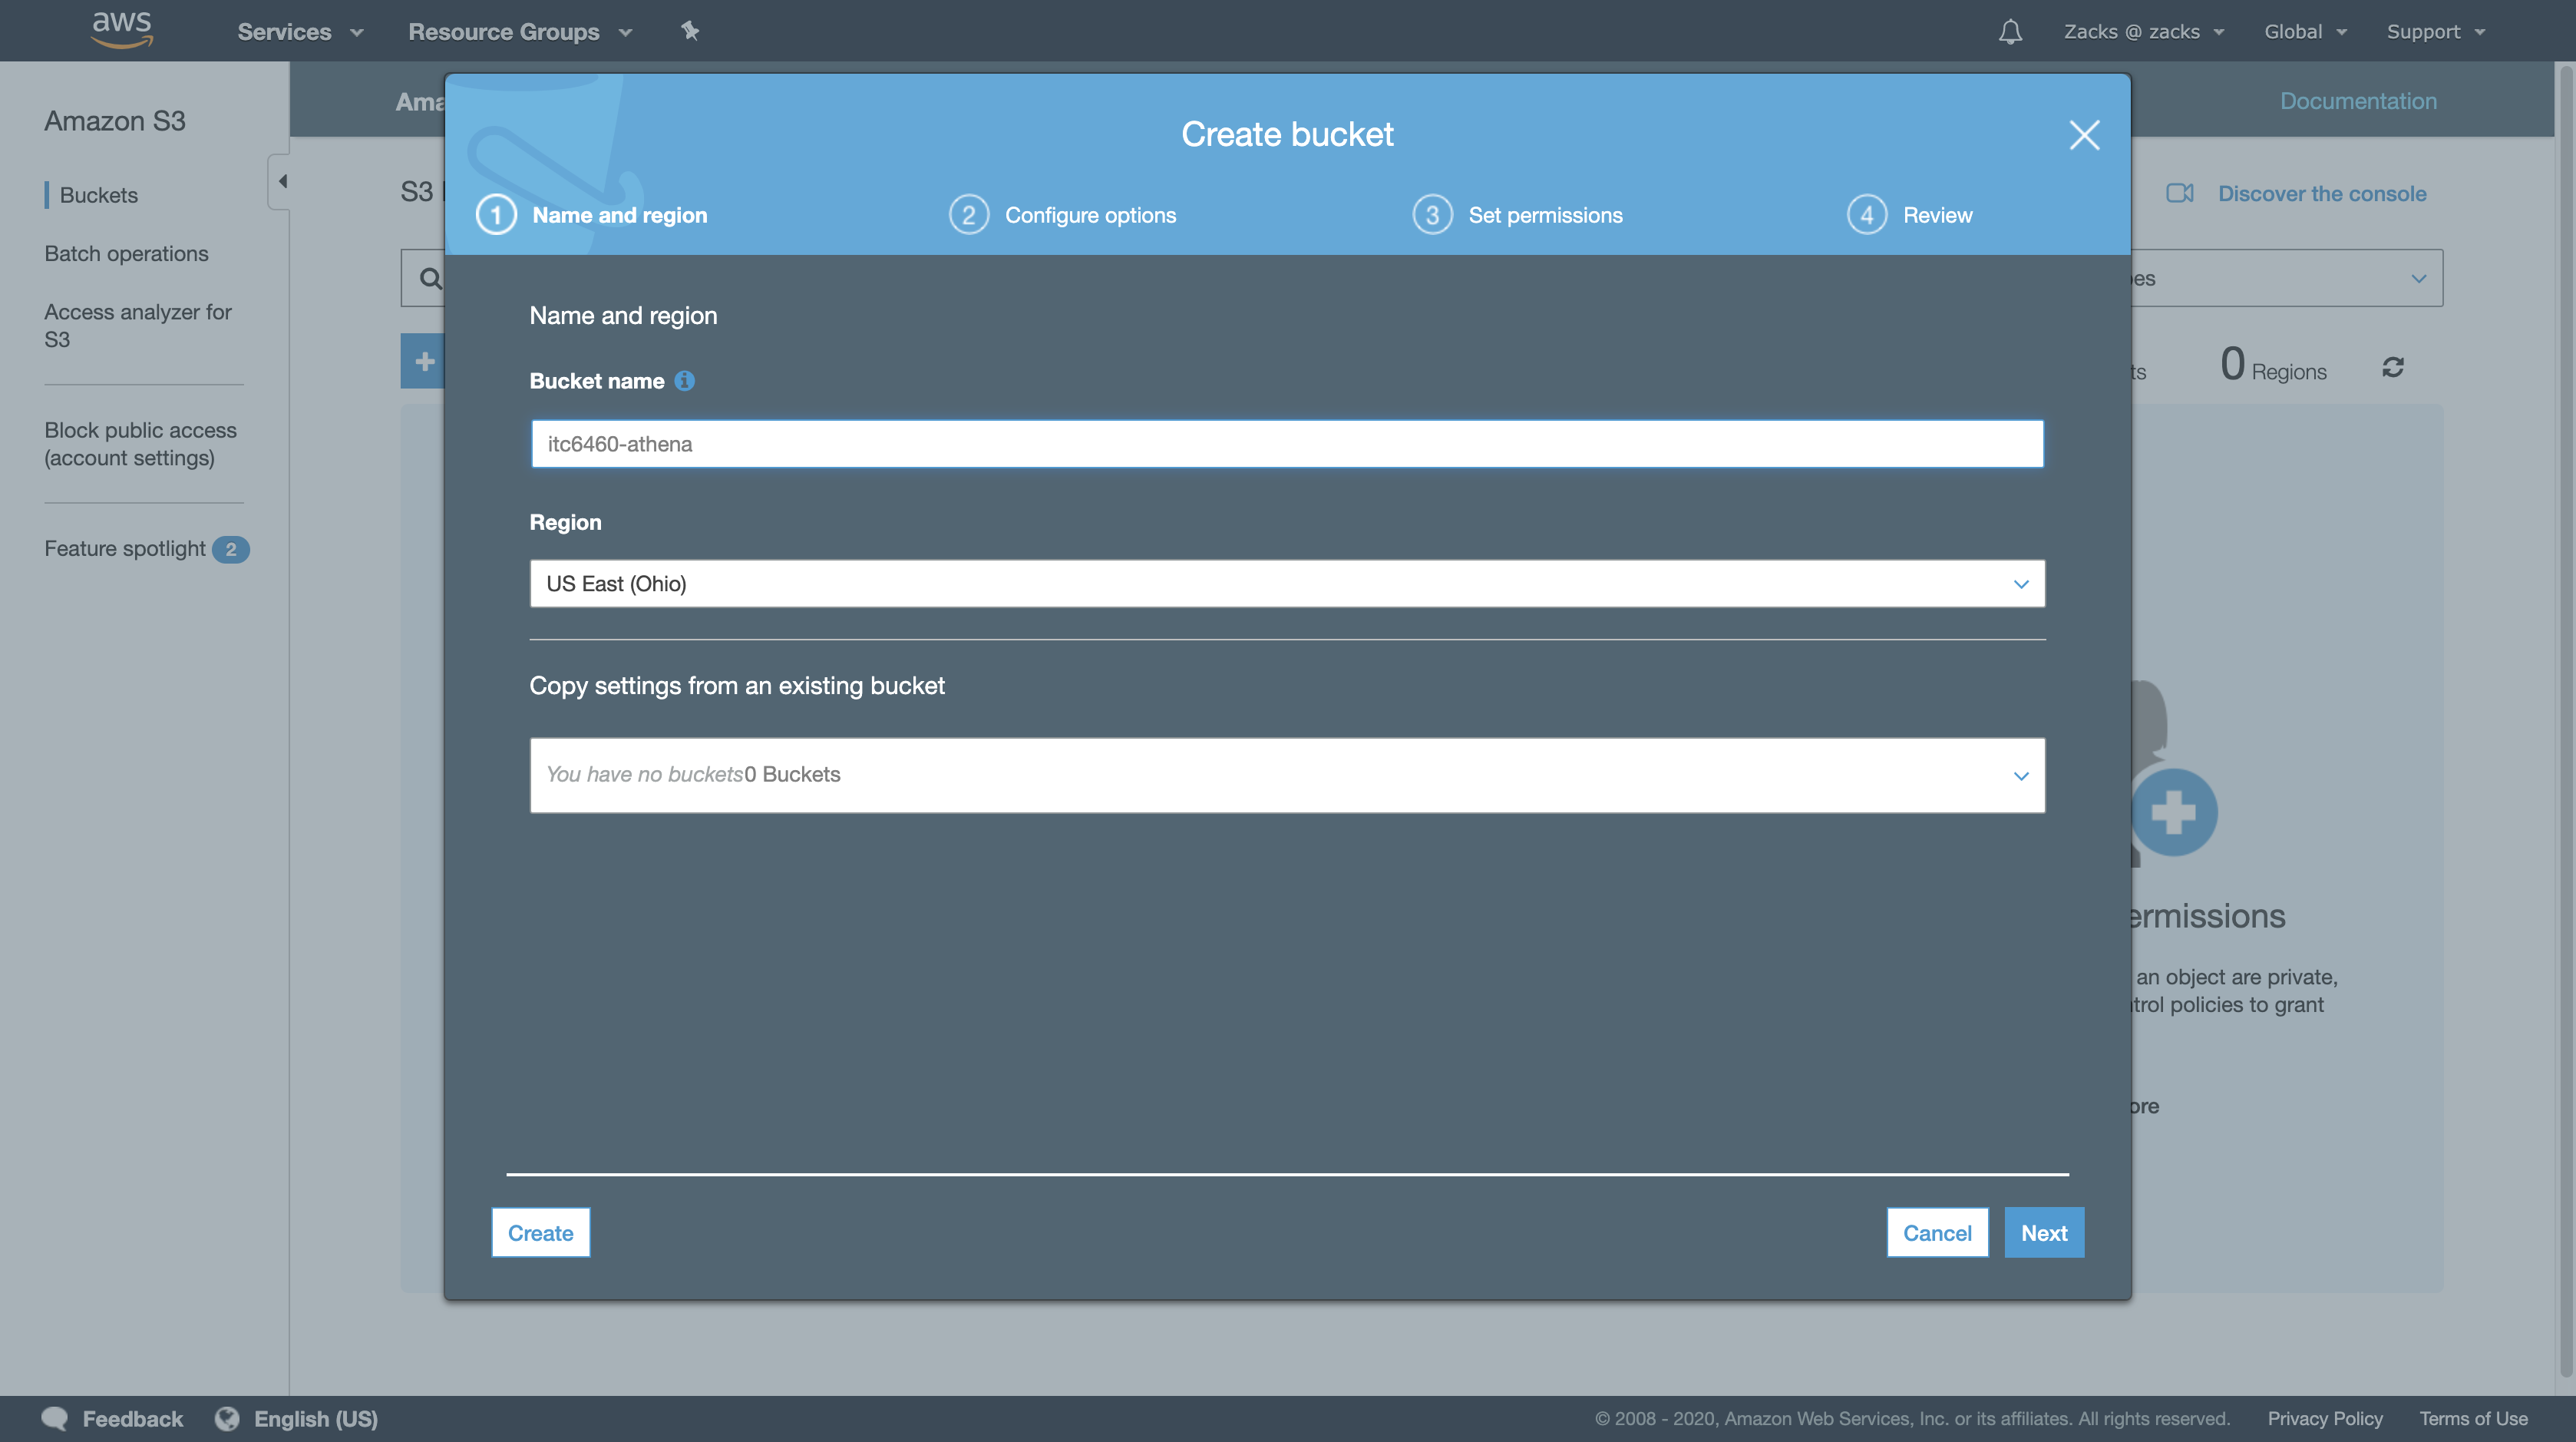
In any AWS page, click the Services on the top left of the page. Then open AWS S3 page and create a bucket. Bucket is storage just like a logical disk for your future data. (e.g., distribute disk name and split hard disk on the Windows OS)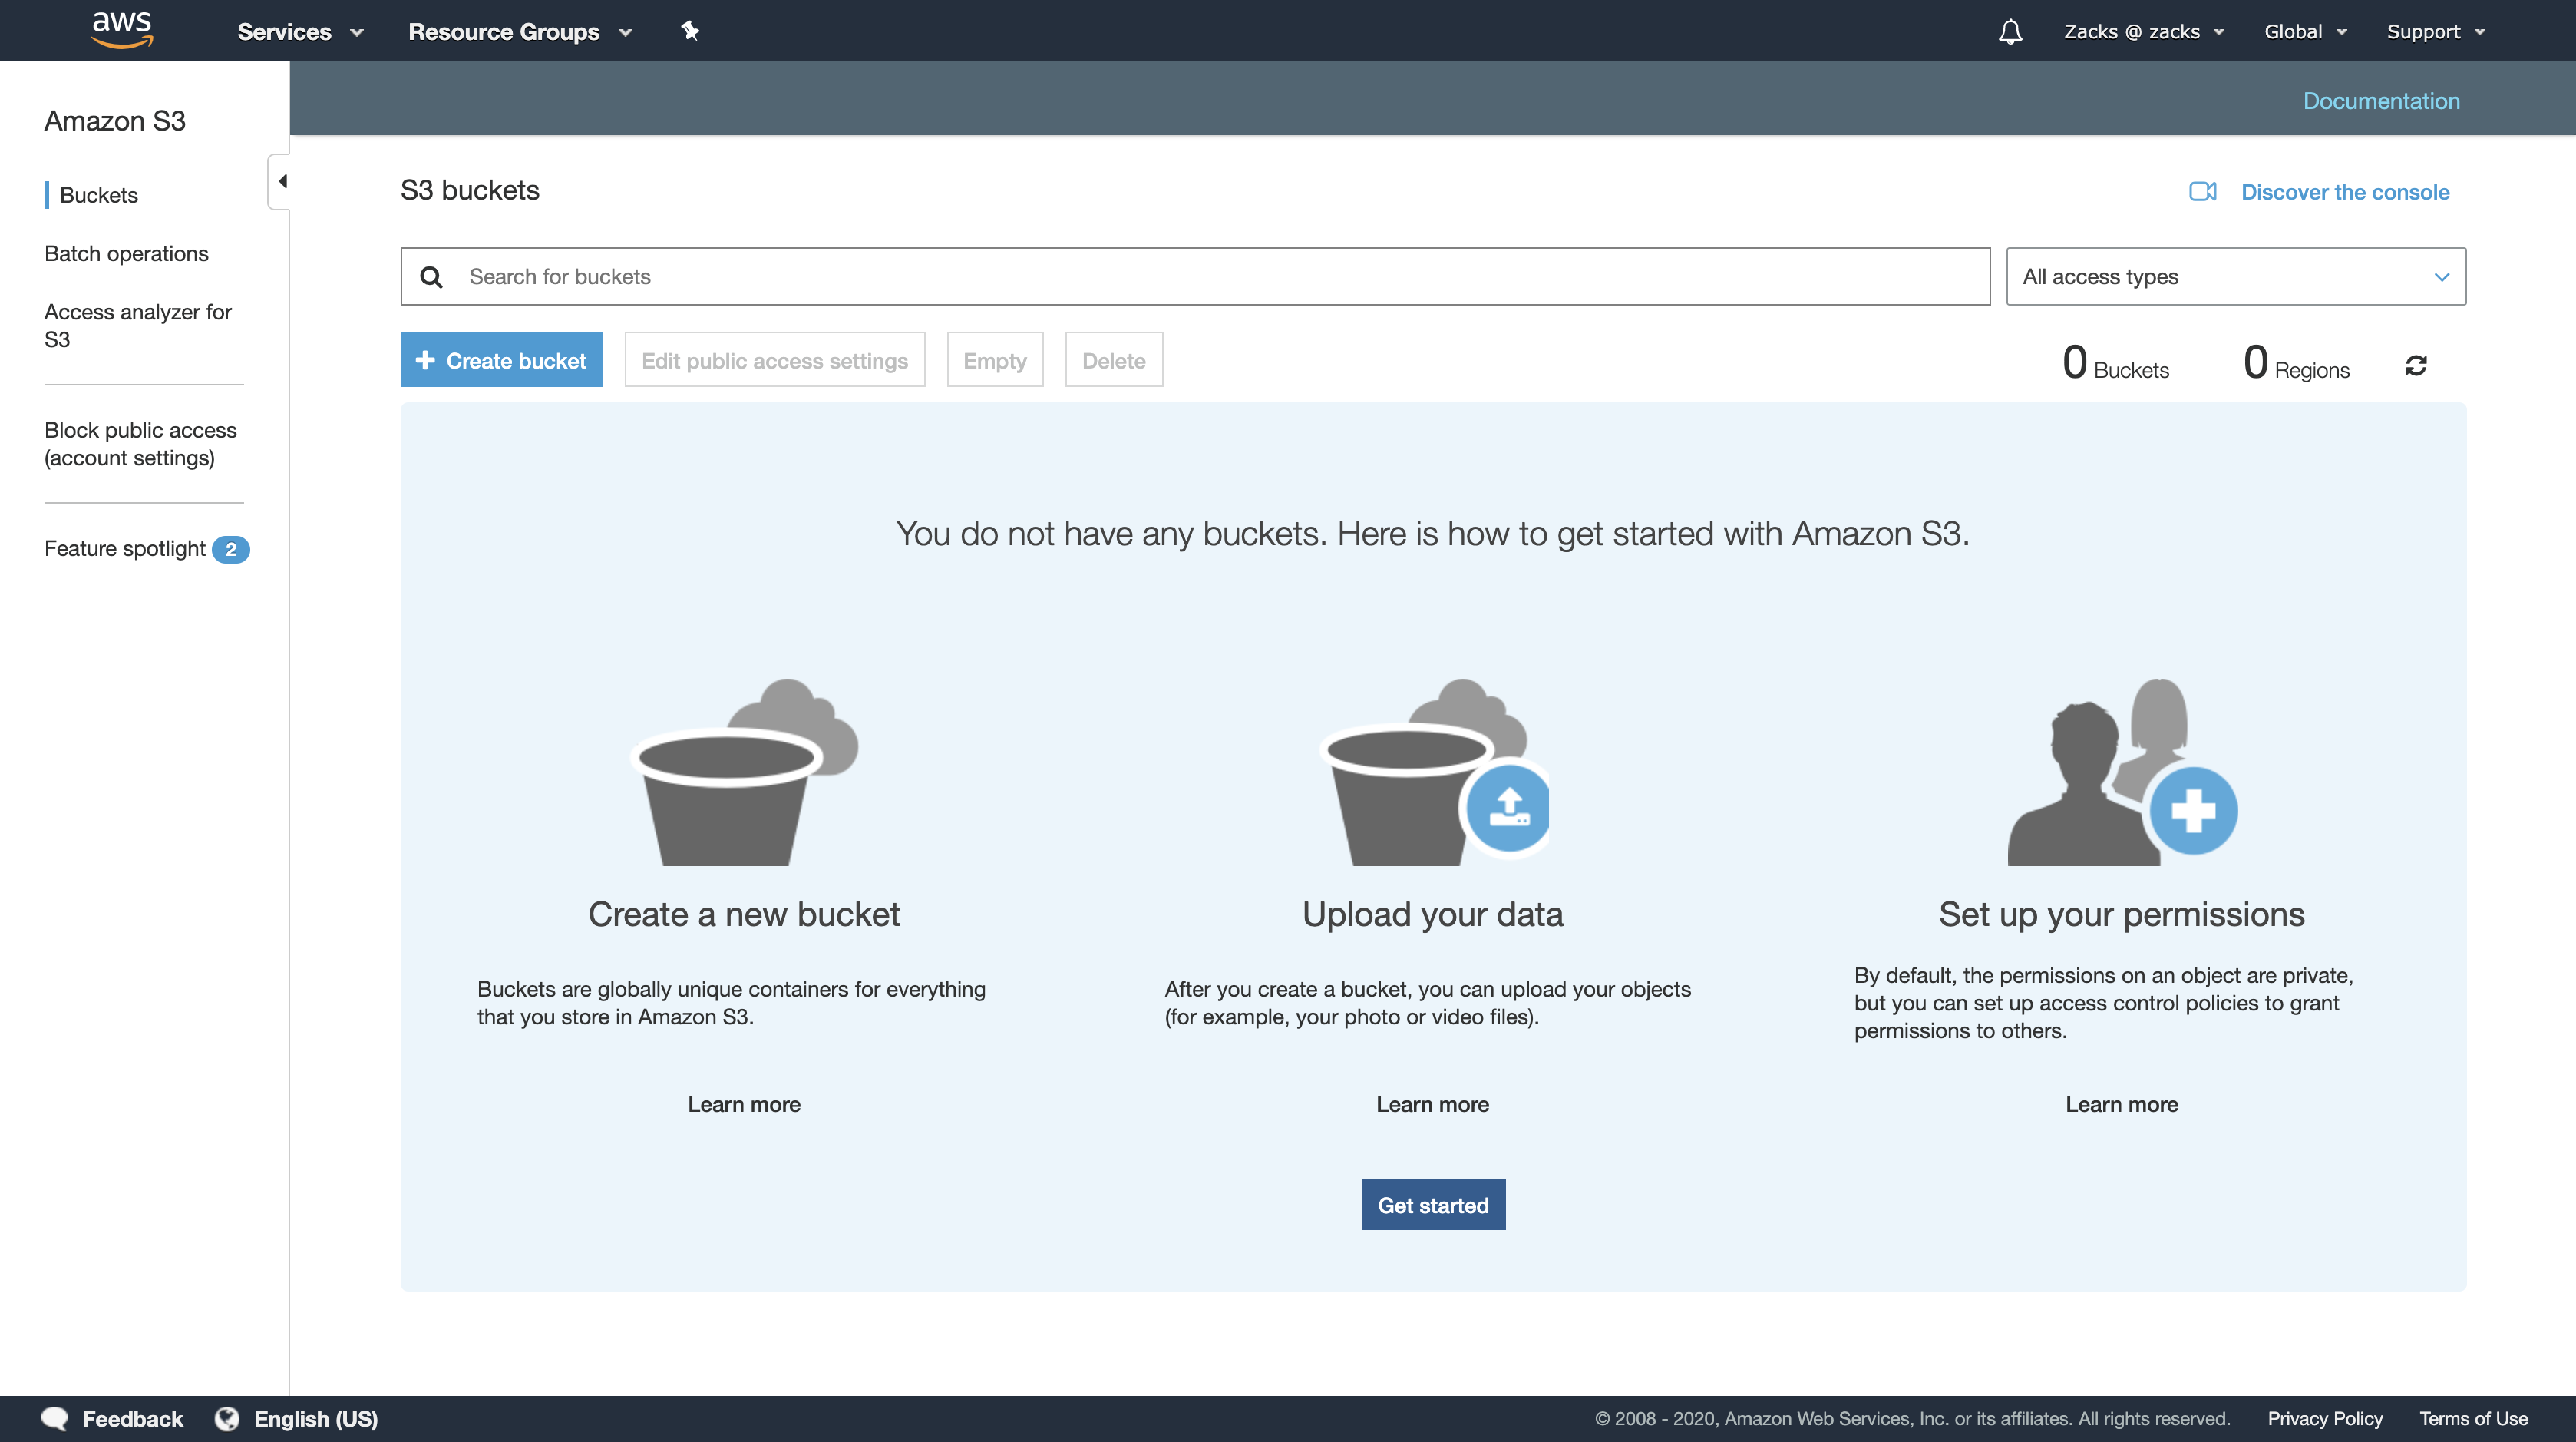
No additional properties or permissions are required for Athena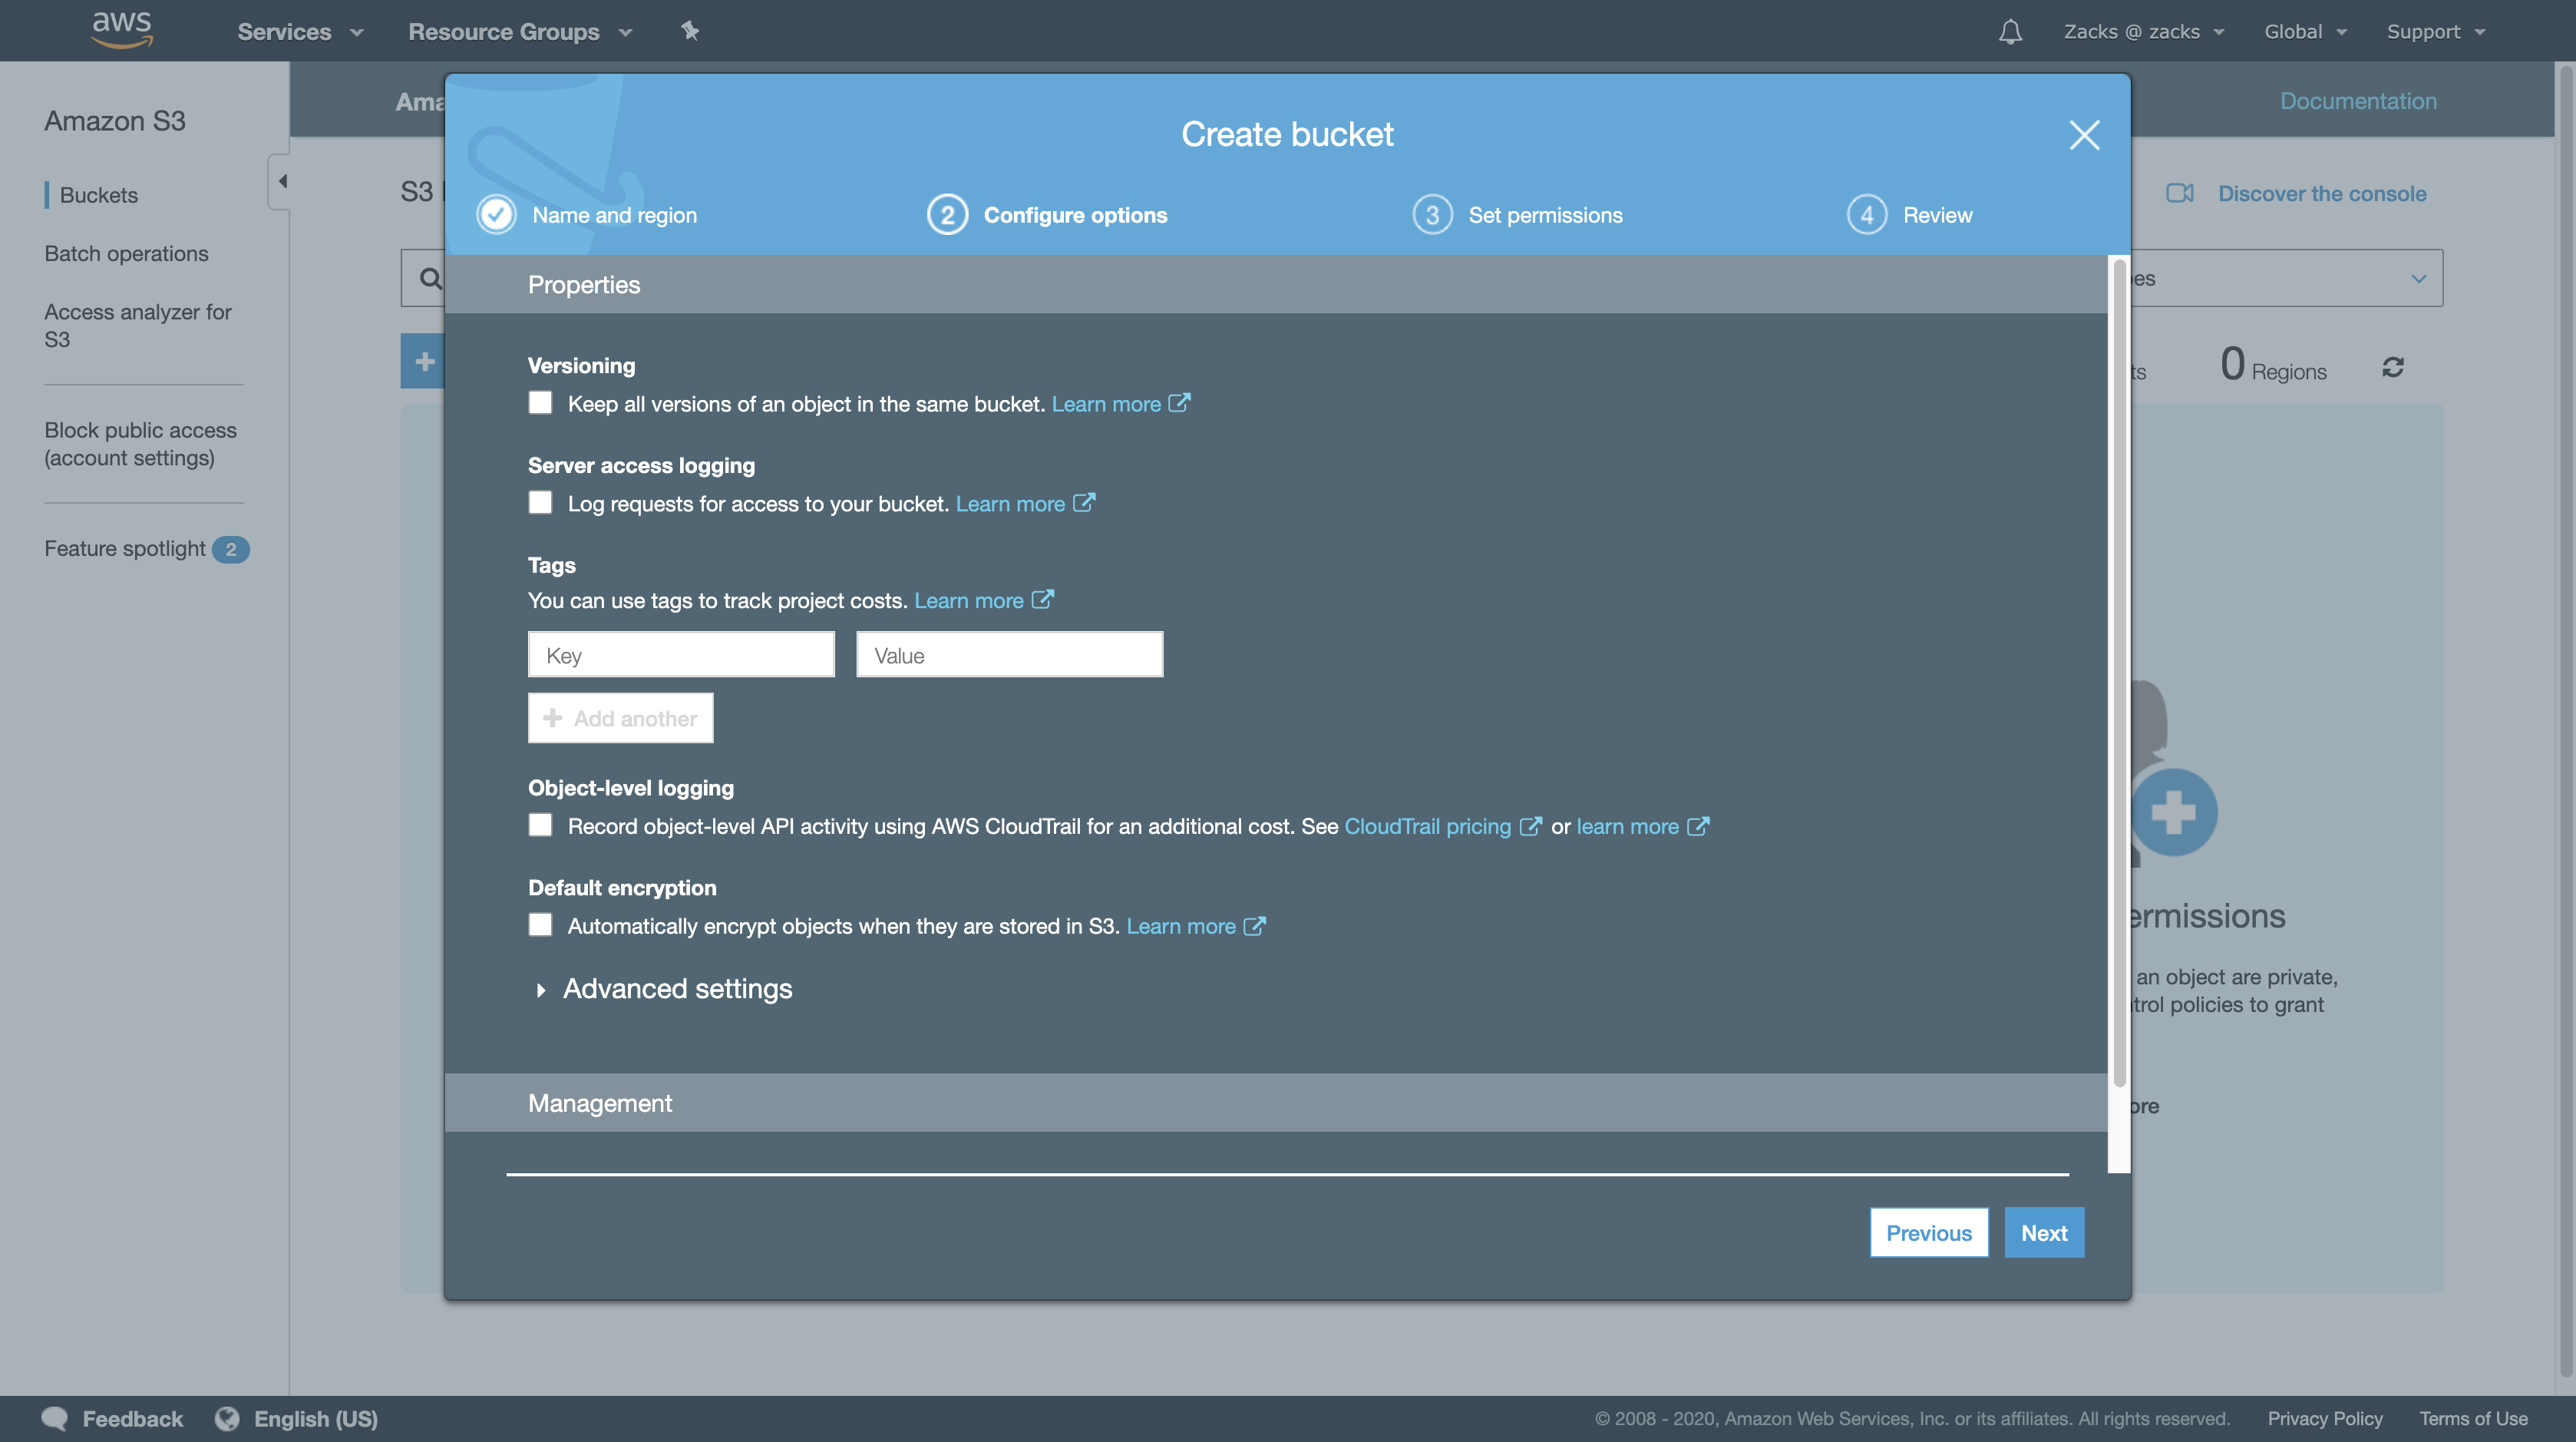
Create a folder for query result location.
P.S. This folder is a part of our S3 url.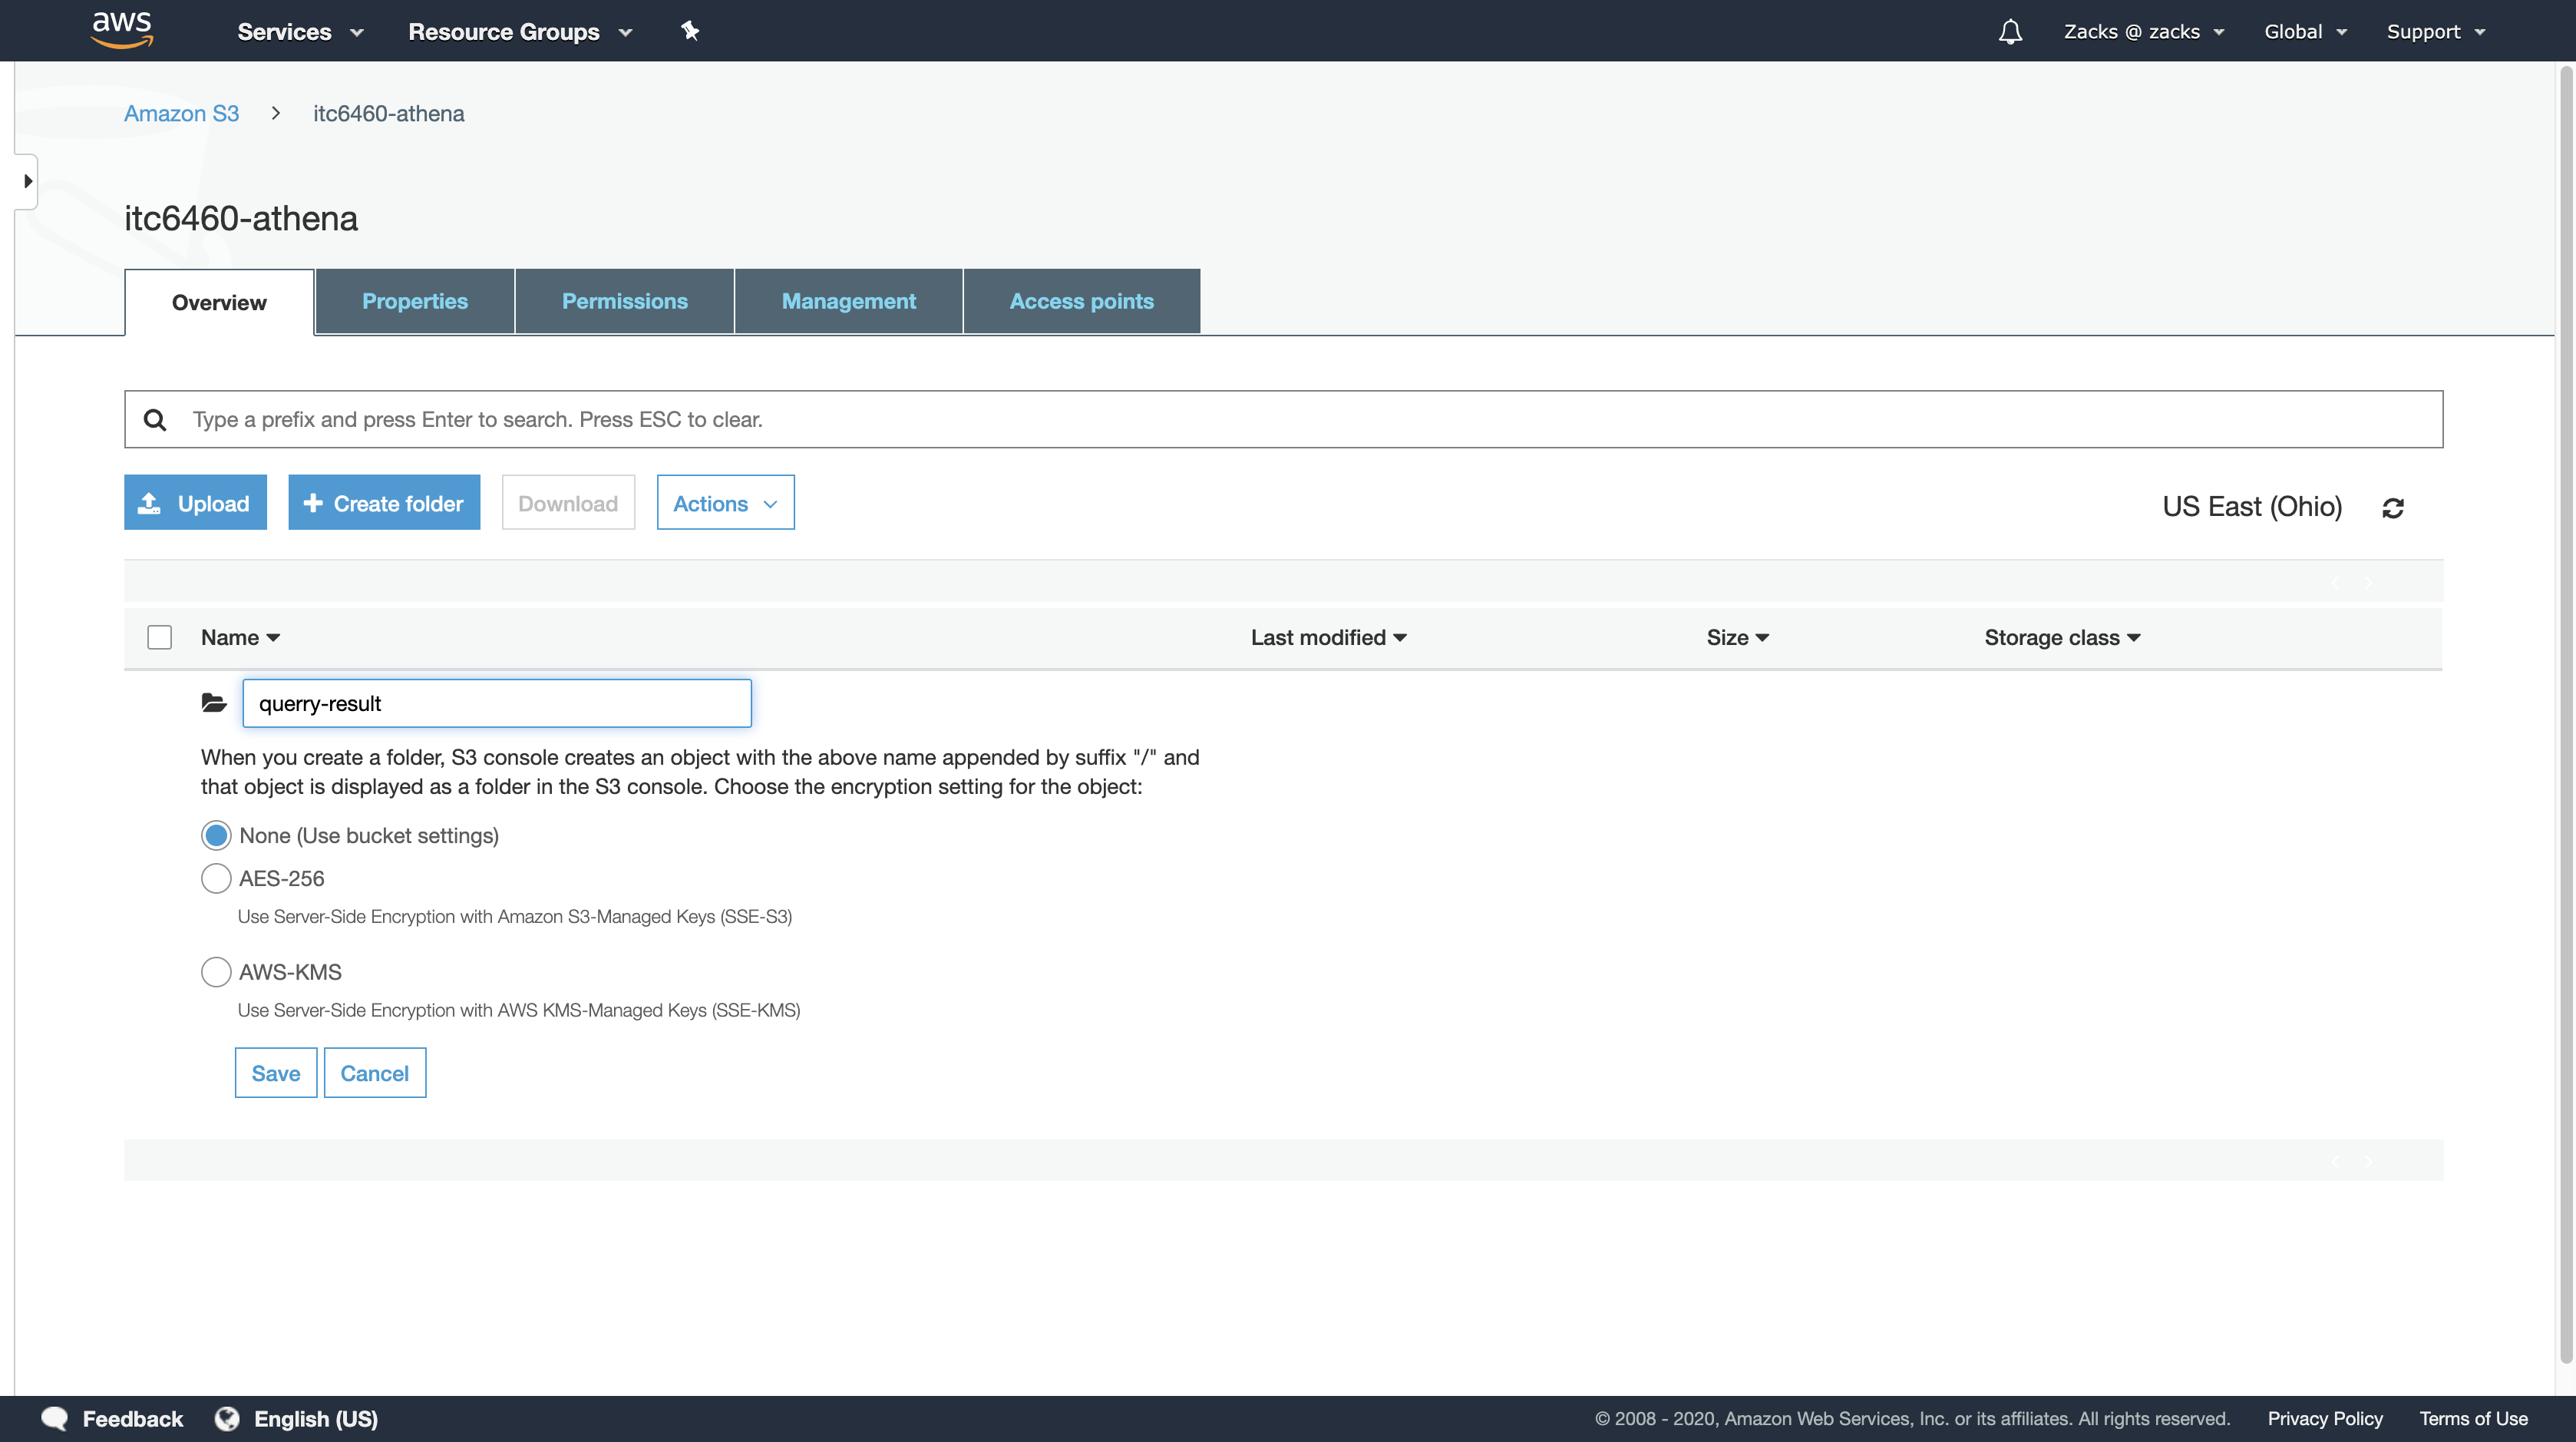
Back to Amazon Athena
Log in to https://your_account_alias.signin.aws.amazon.com/console/ and search for Athena. Using the user you just created to log in instead of the root user.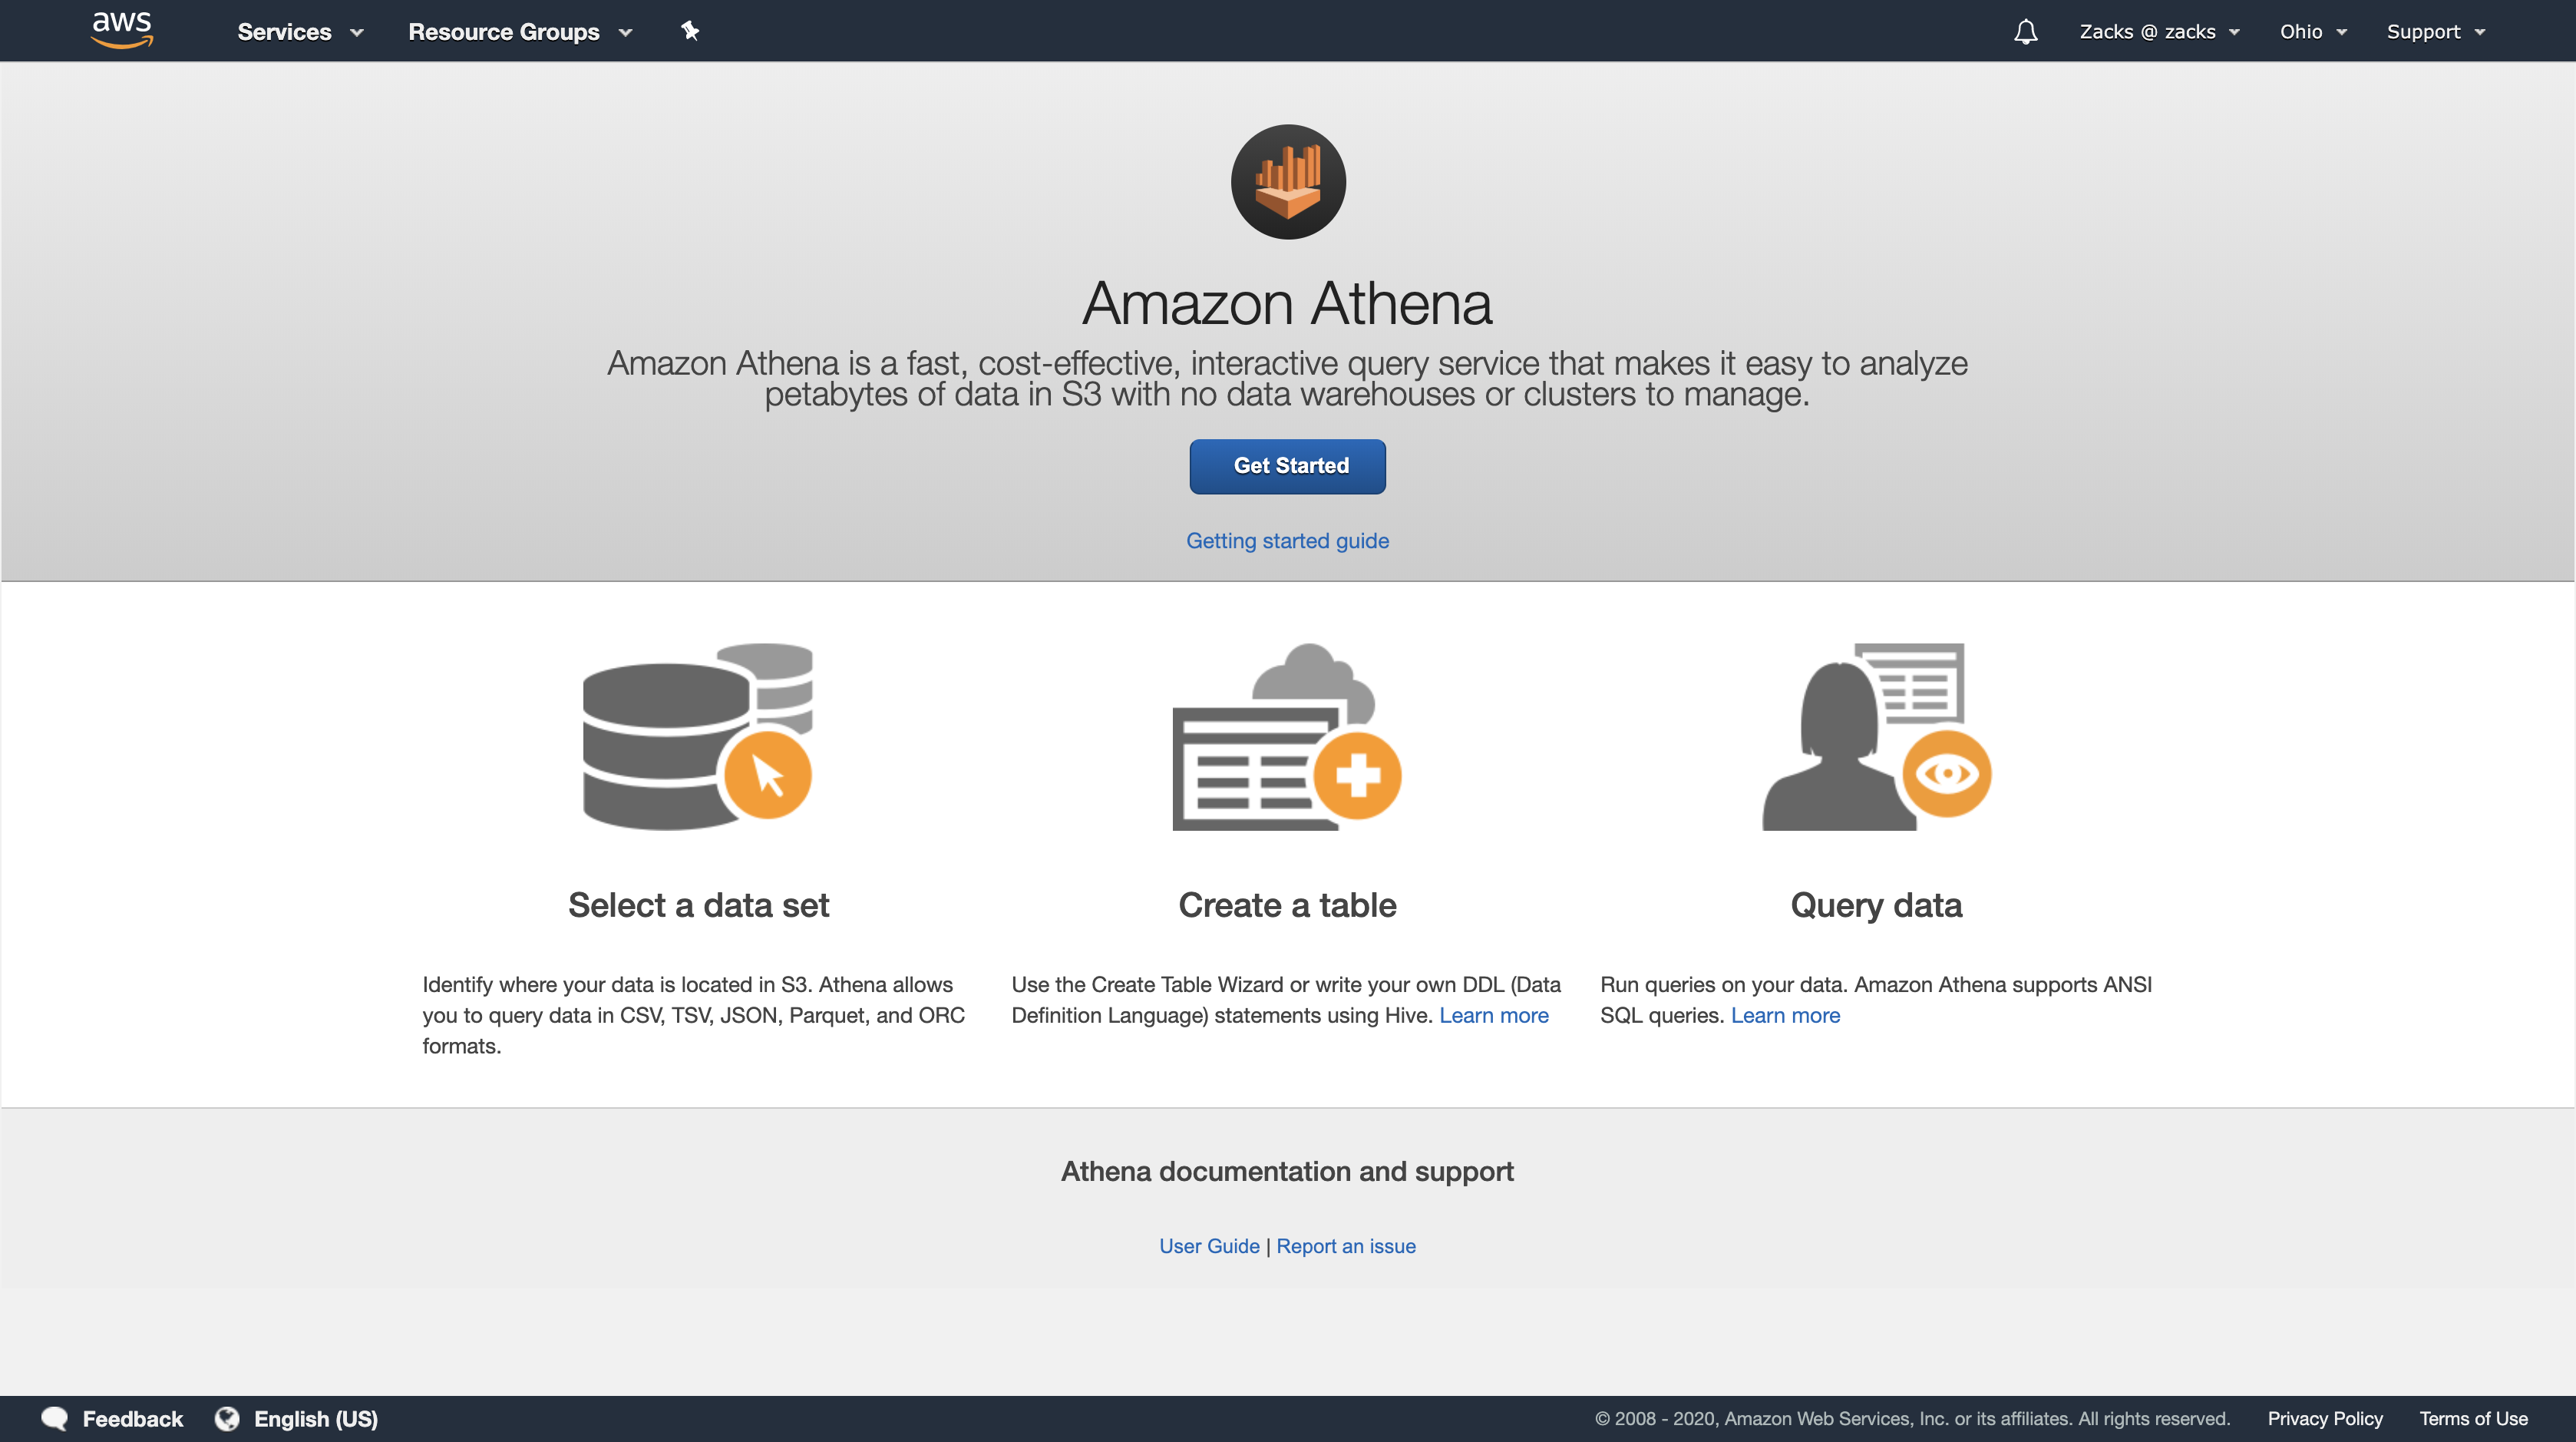
Click Settings and set a query location, this url is we created on the above steps. Remember ‘/‘ must be on the end of the url.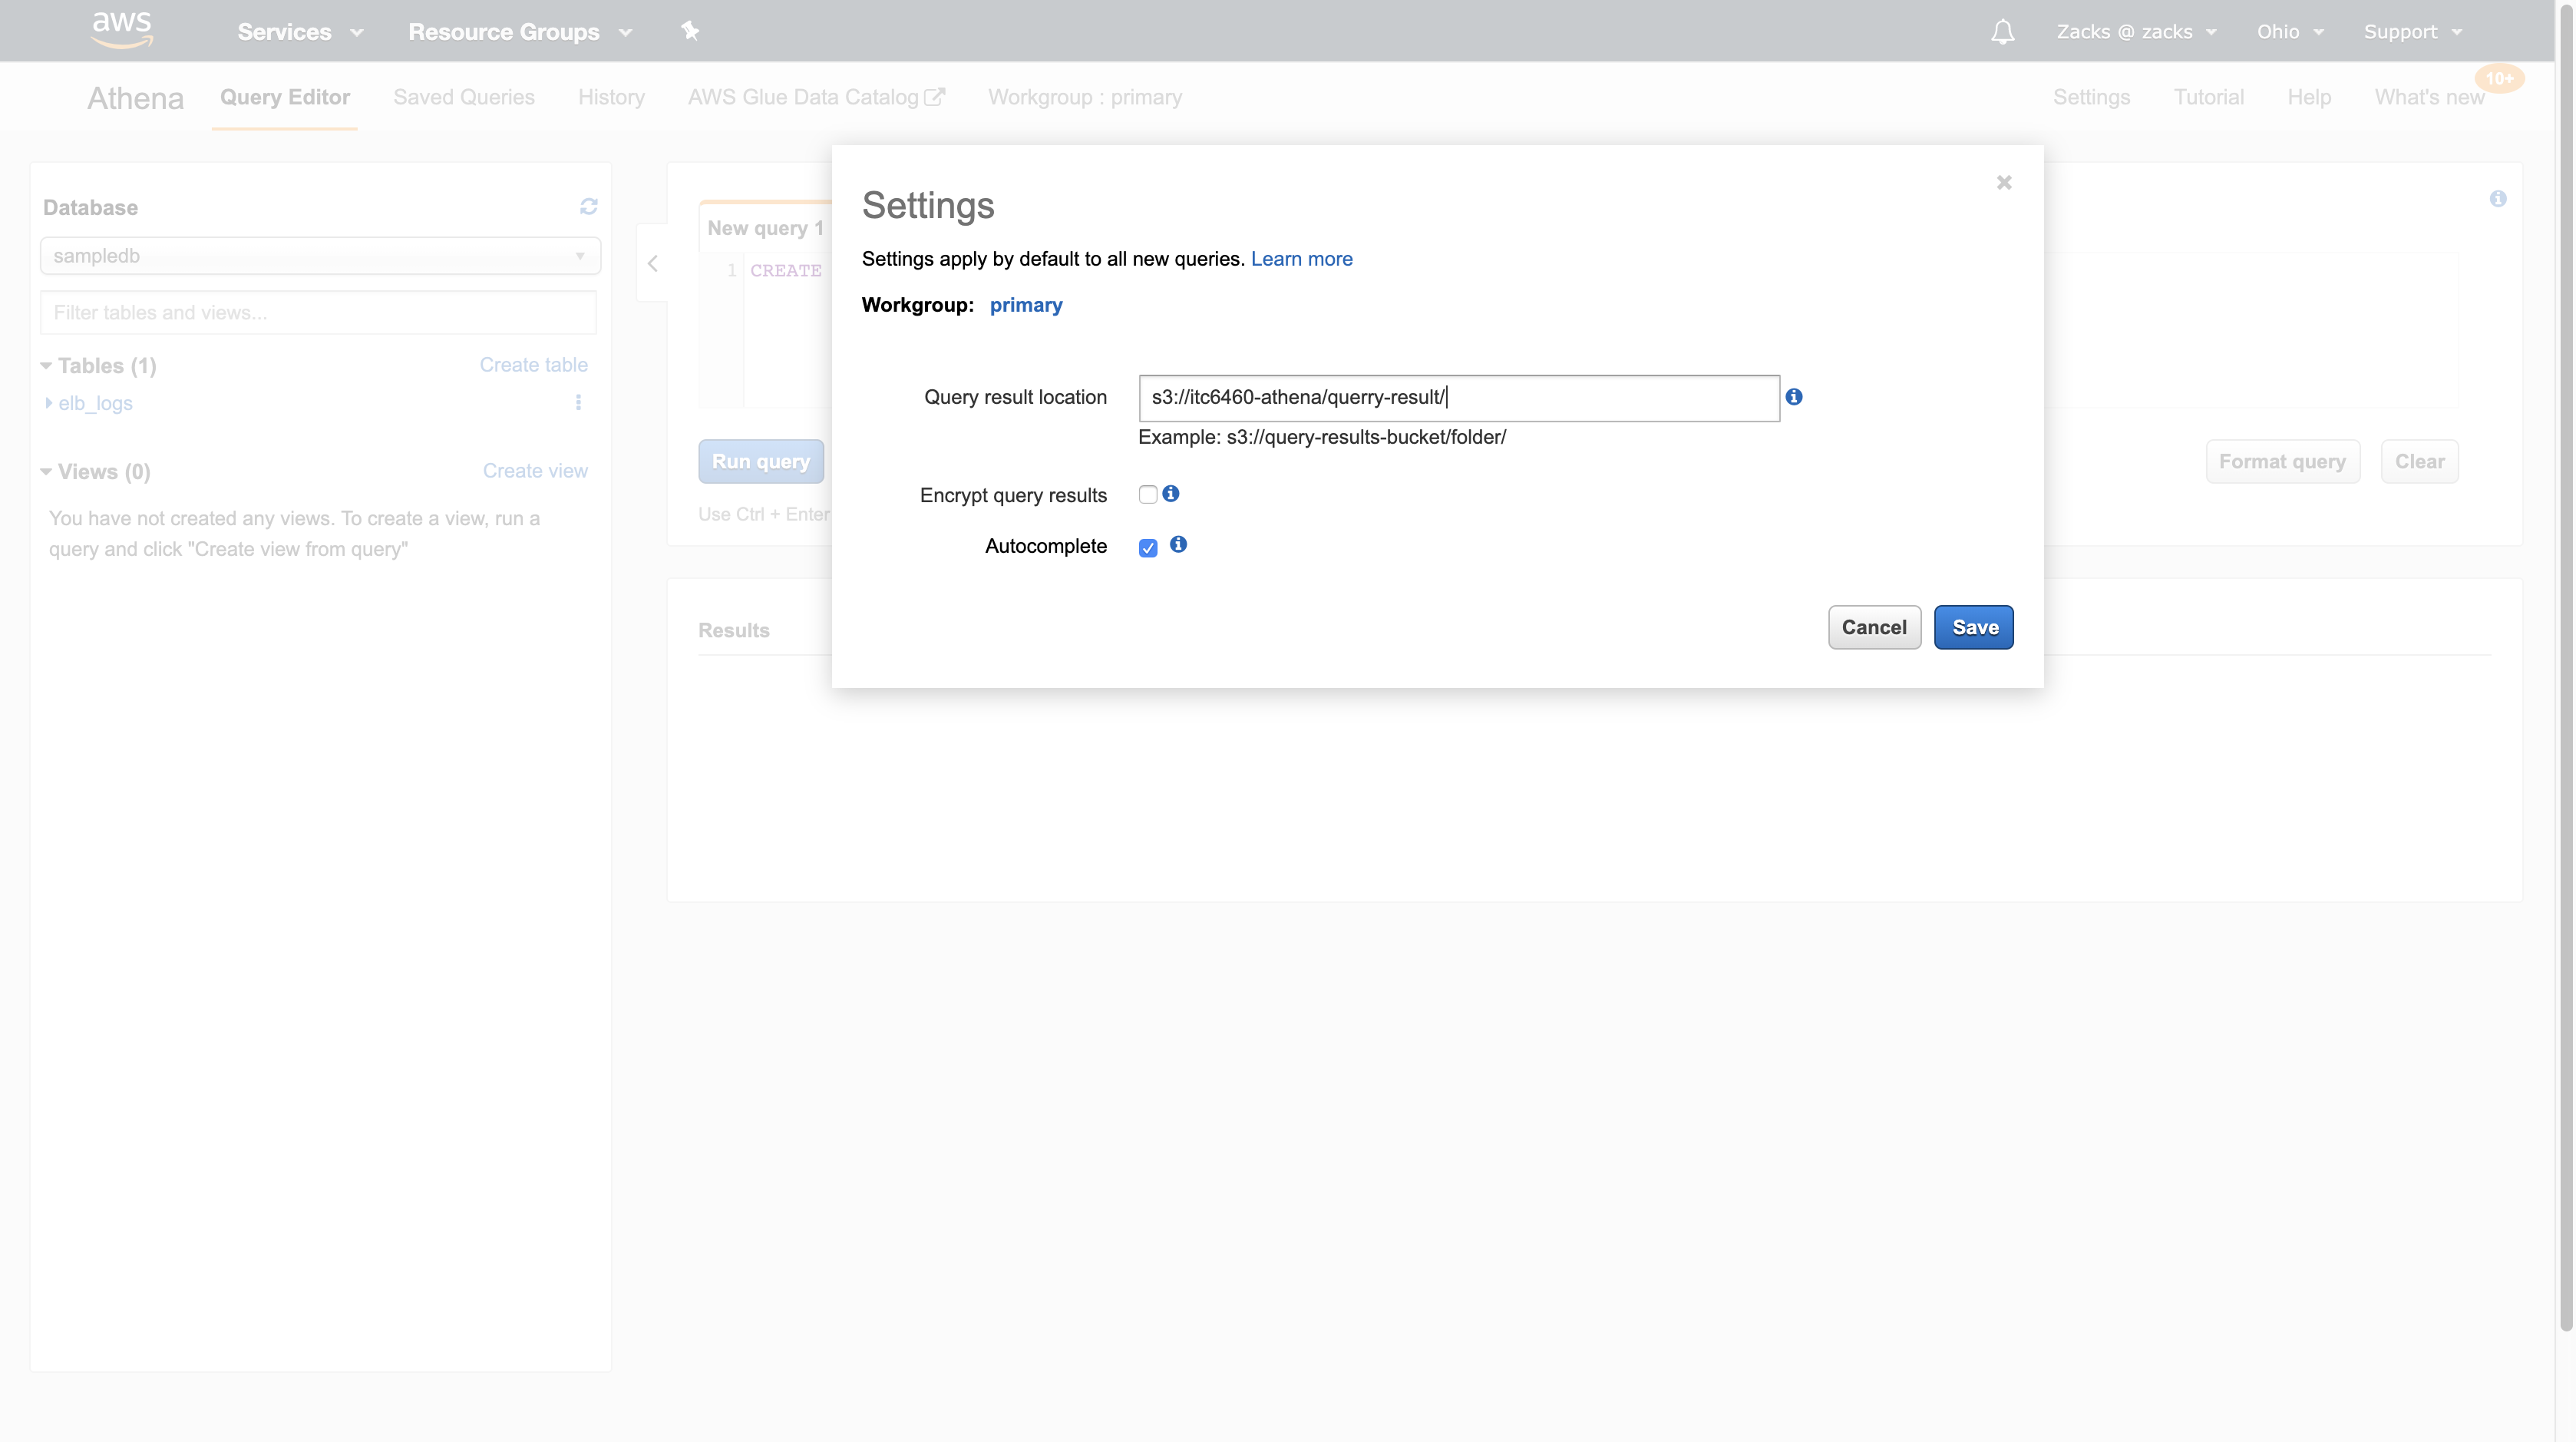
Create a database in Query Editor. Notice the Results panel.
1 | CREATE DATABASE DATABASE_NAME |
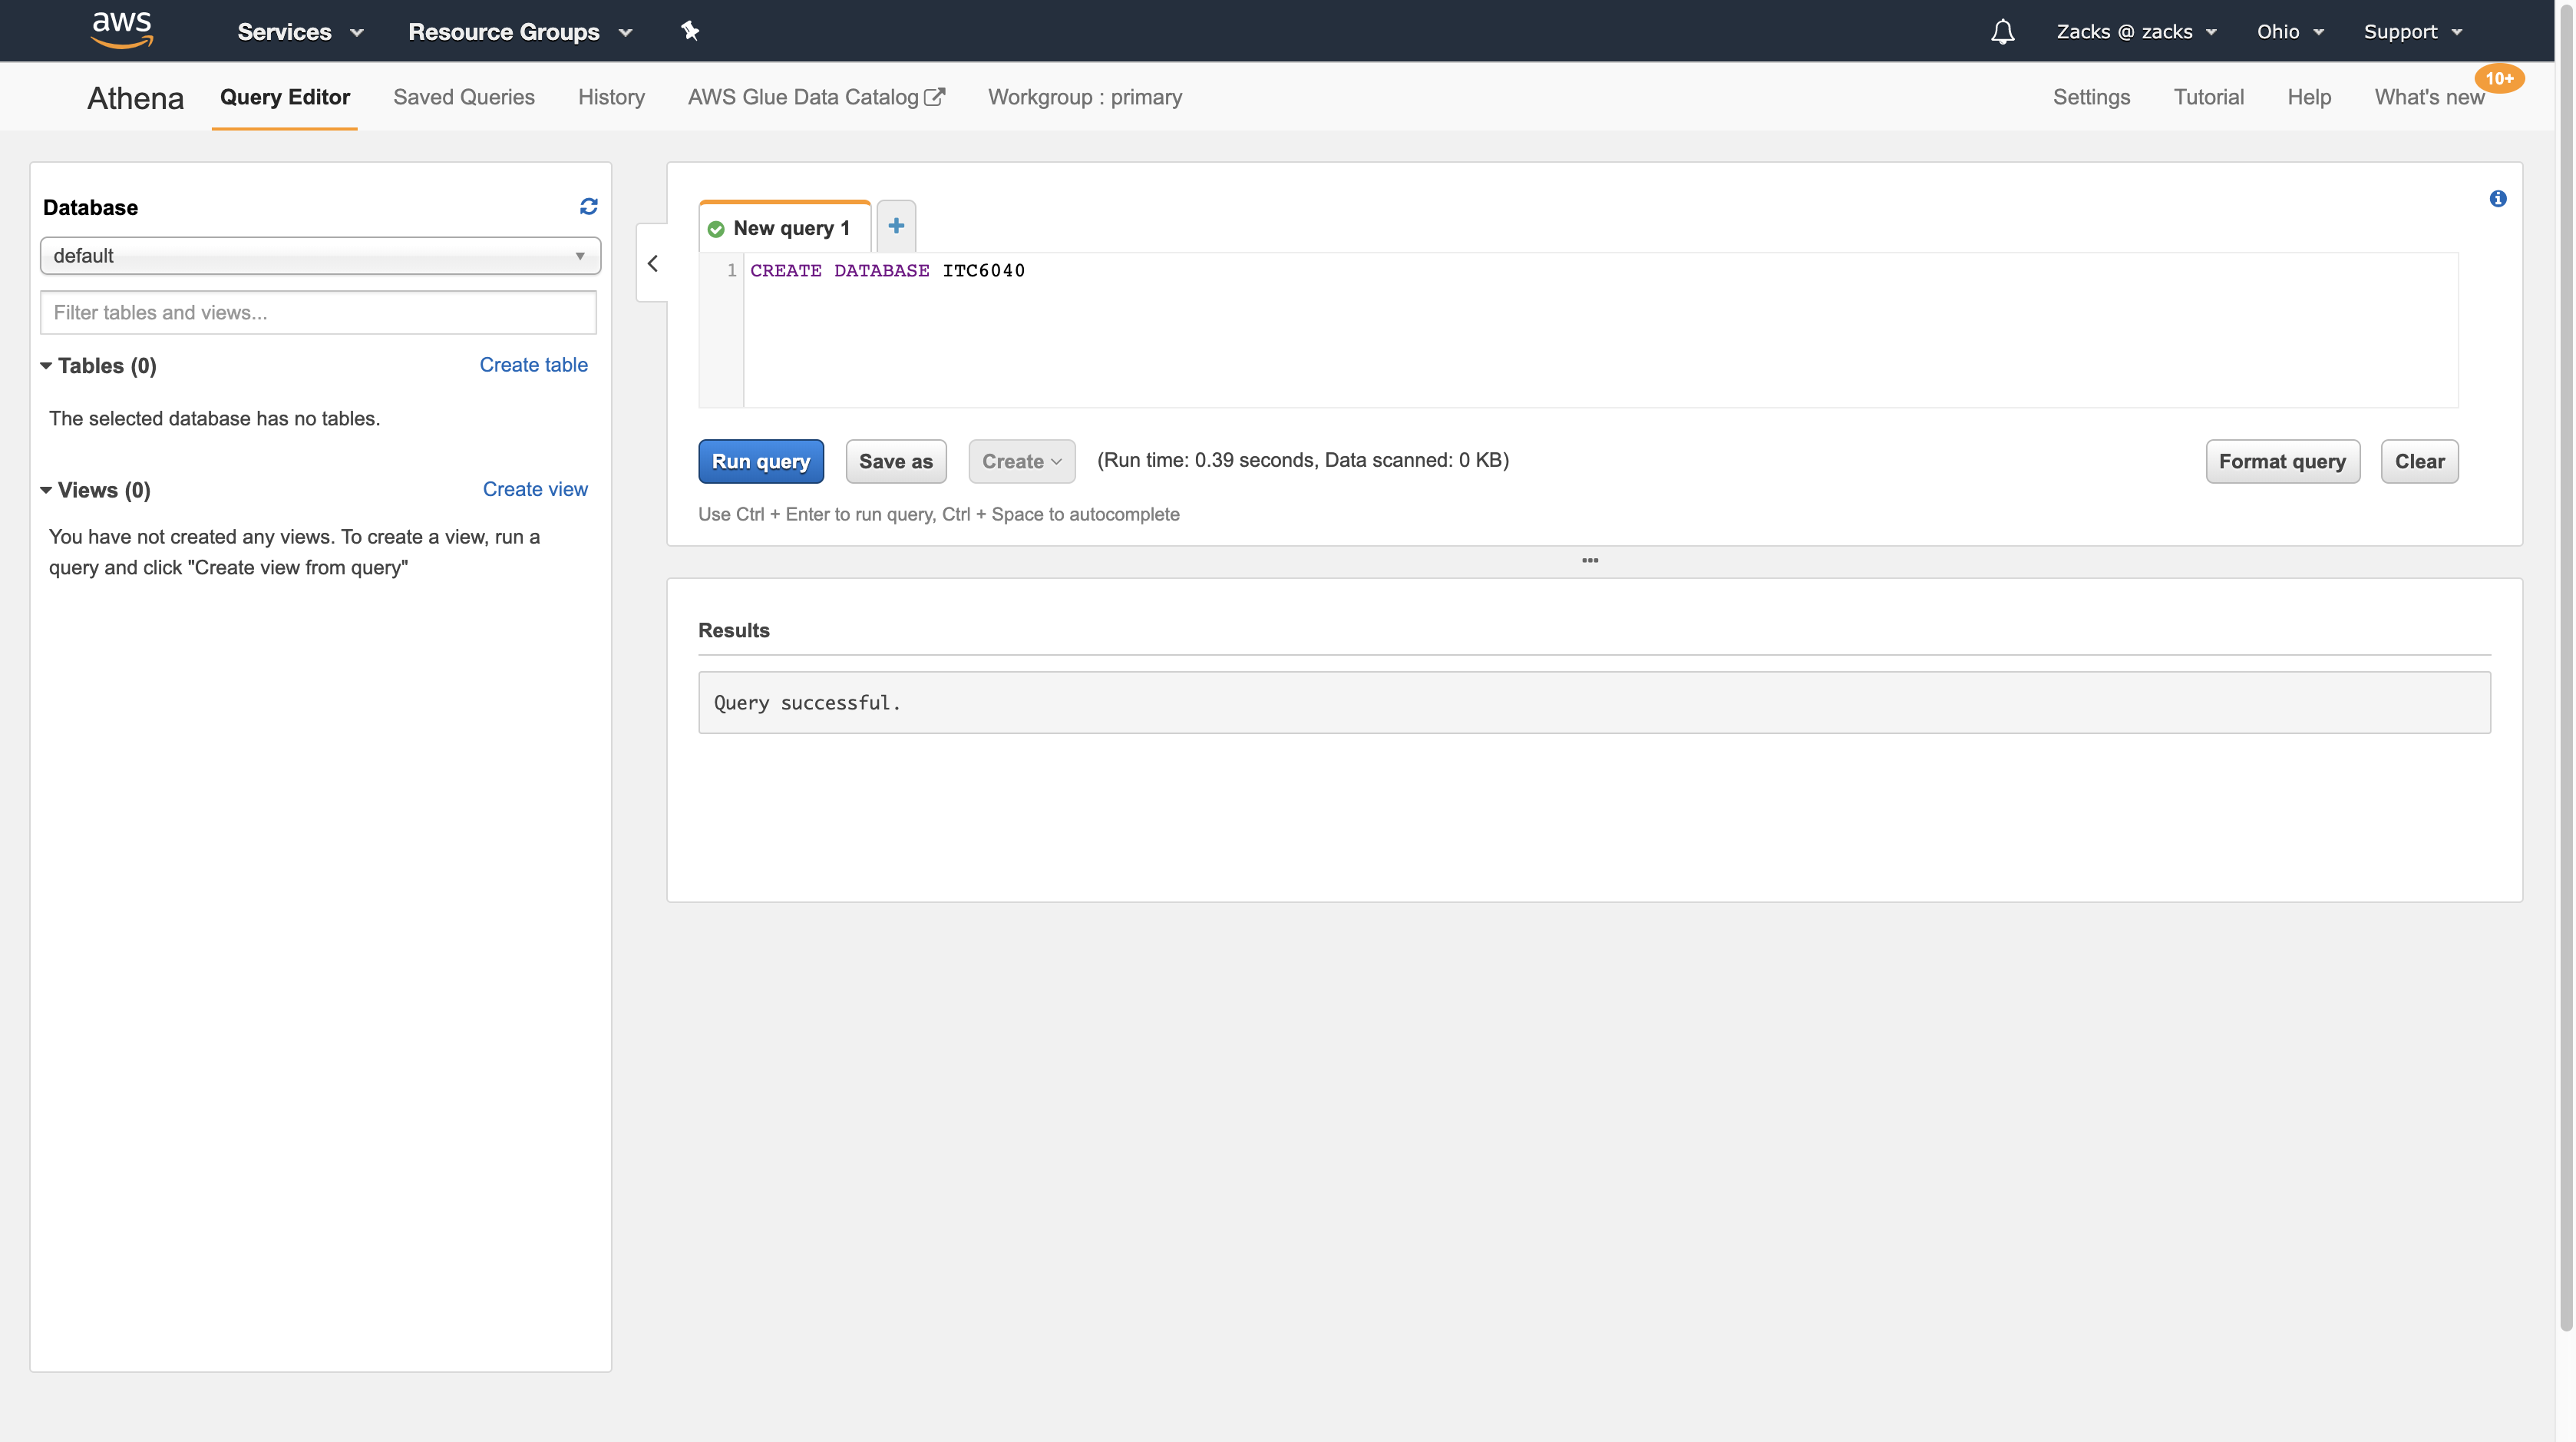
Now we can see our newest database, on the Database panel.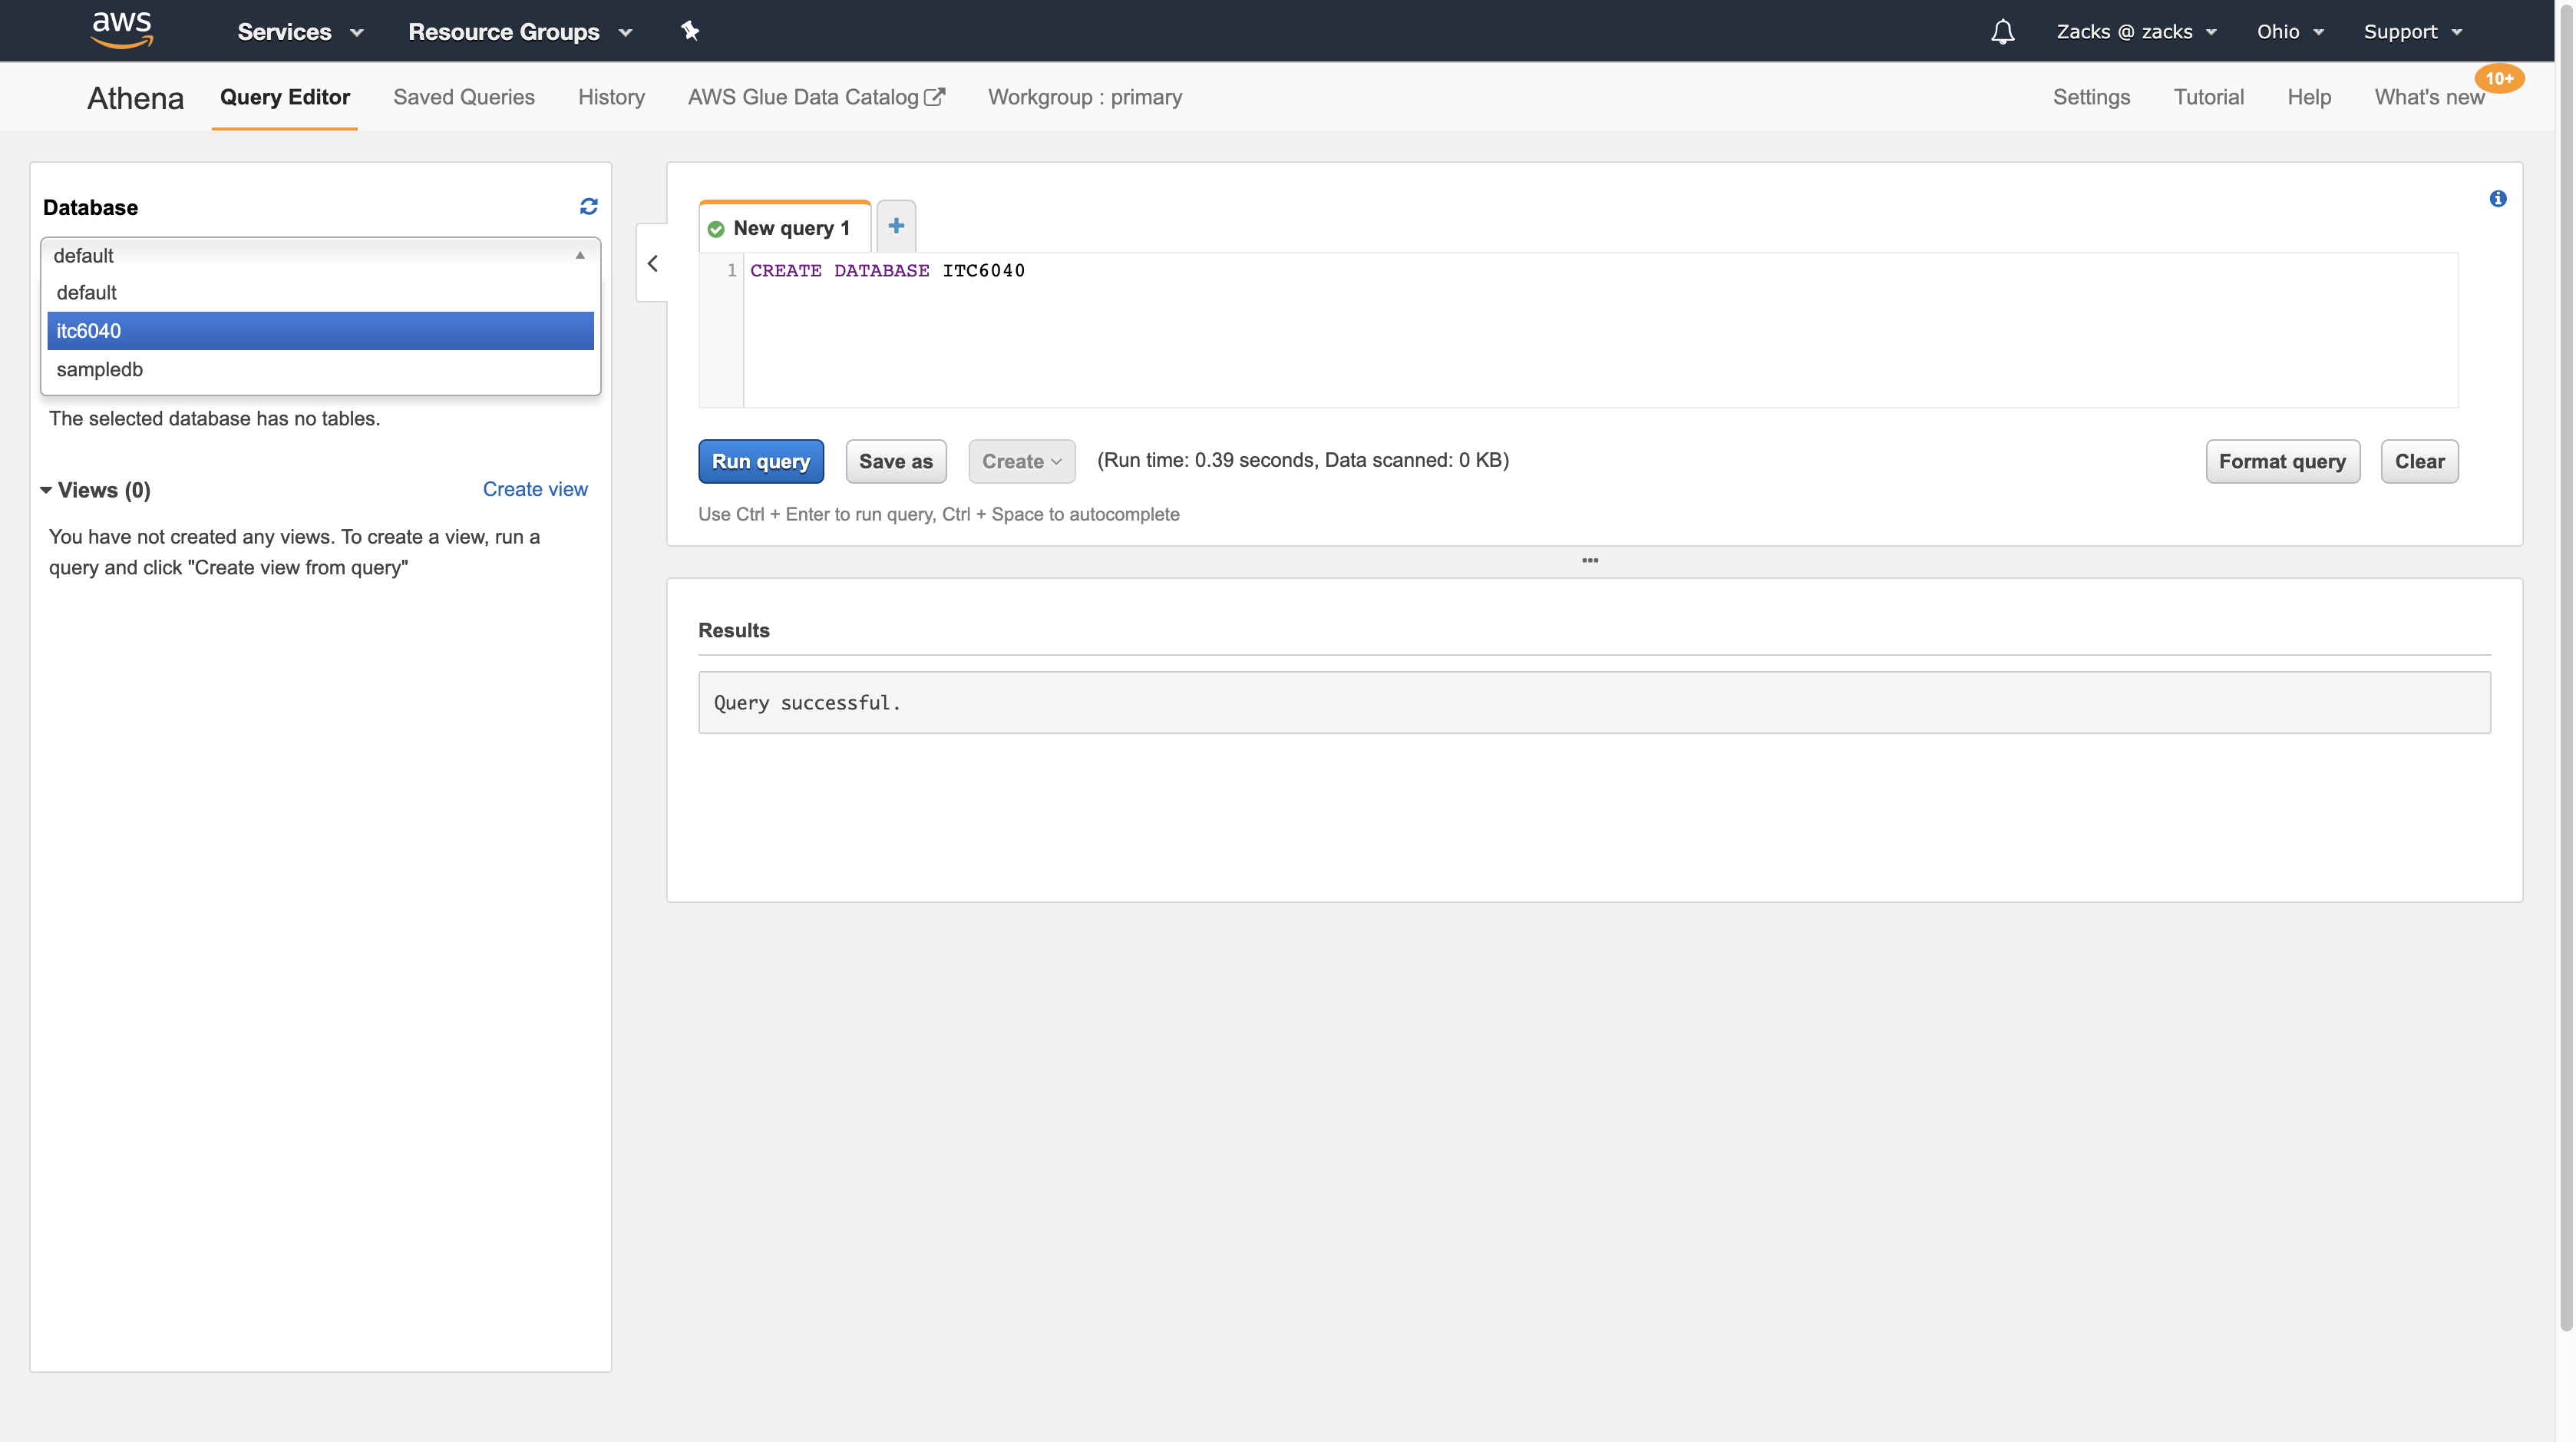
You can query data in regions other than the region where you run Athena. Standard inter-region data transfer rates for Amazon S3 apply in addition to standard Athena charges. To reduce data transfer charges, replace myregion in s3://athena-examples-myregion/path/to/data/ with the region identifier where you run Athena, for example, s3://athena-examples-us-east-2/path/to/data/.
1 | CREATE EXTERNAL TABLE IF NOT EXISTS cloudfront_logs ( |
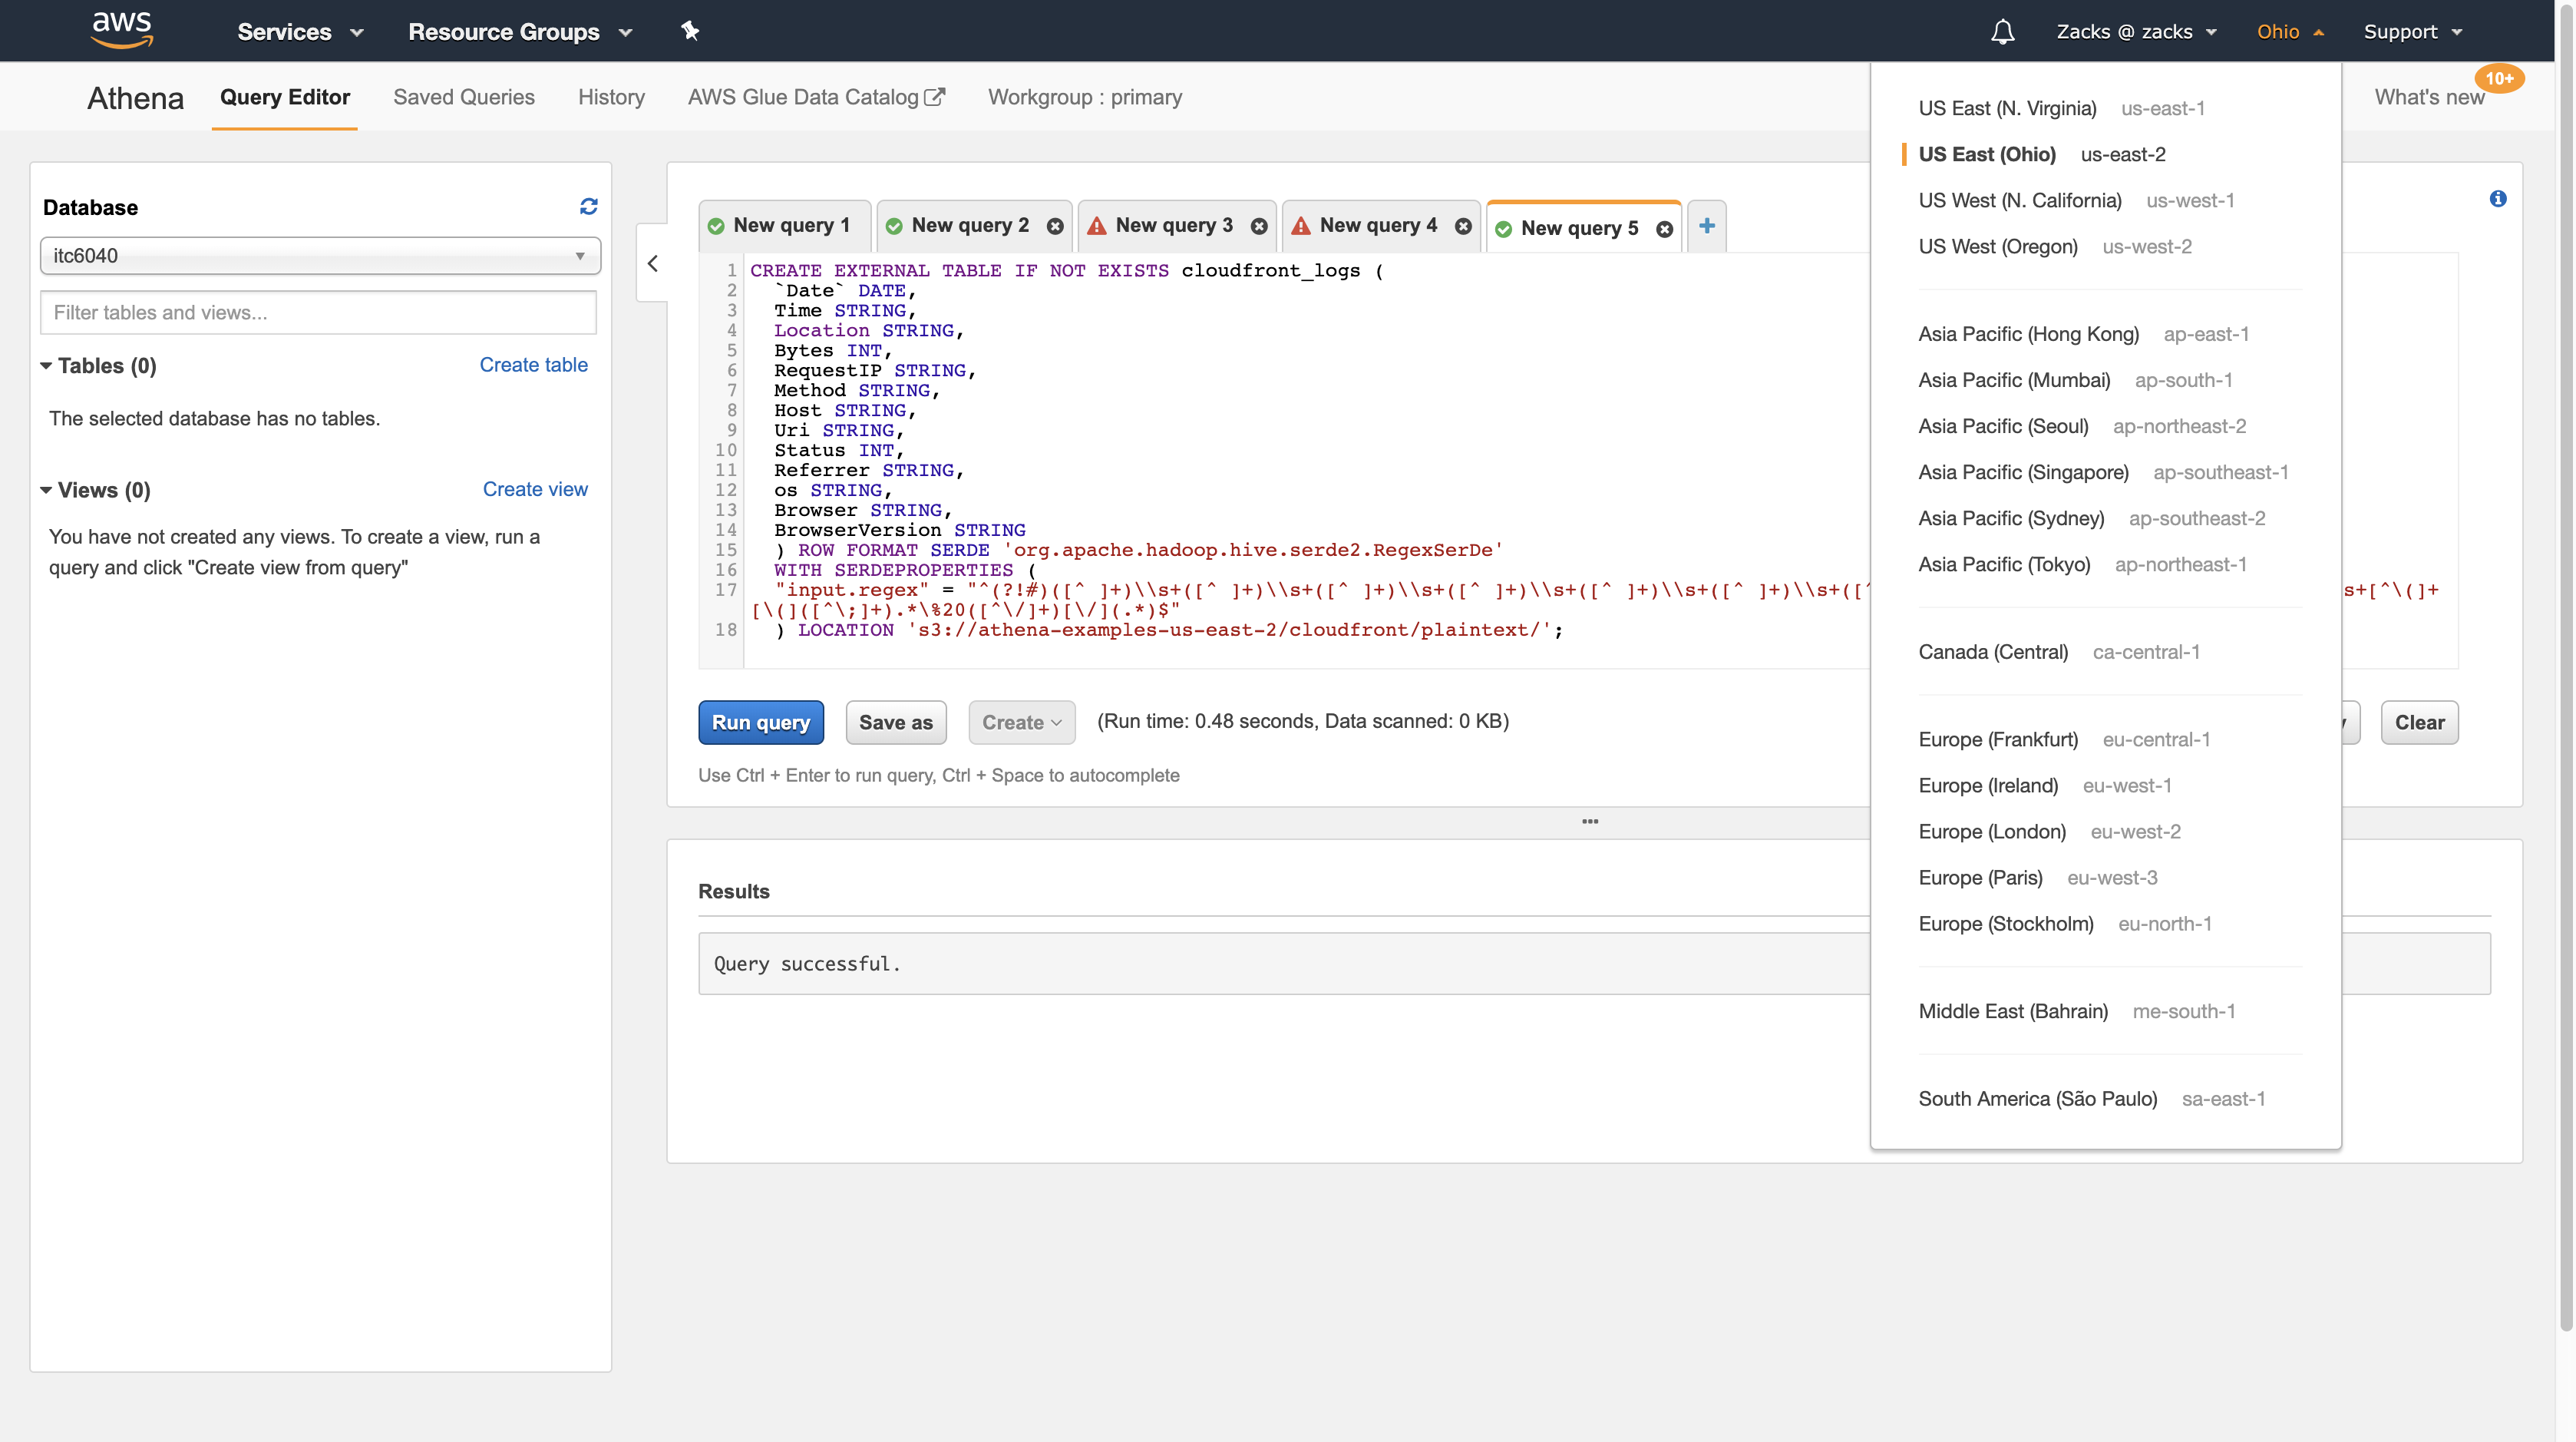
To check myregion, click the area on the left of the Support, then you can get the location of your server. Replace myregion in your region code. For example, mine is (Ohio) us-east-2.
1 | 's3://athena-examples-us-east-2/cloudfront/plaintext/' |
Try to query data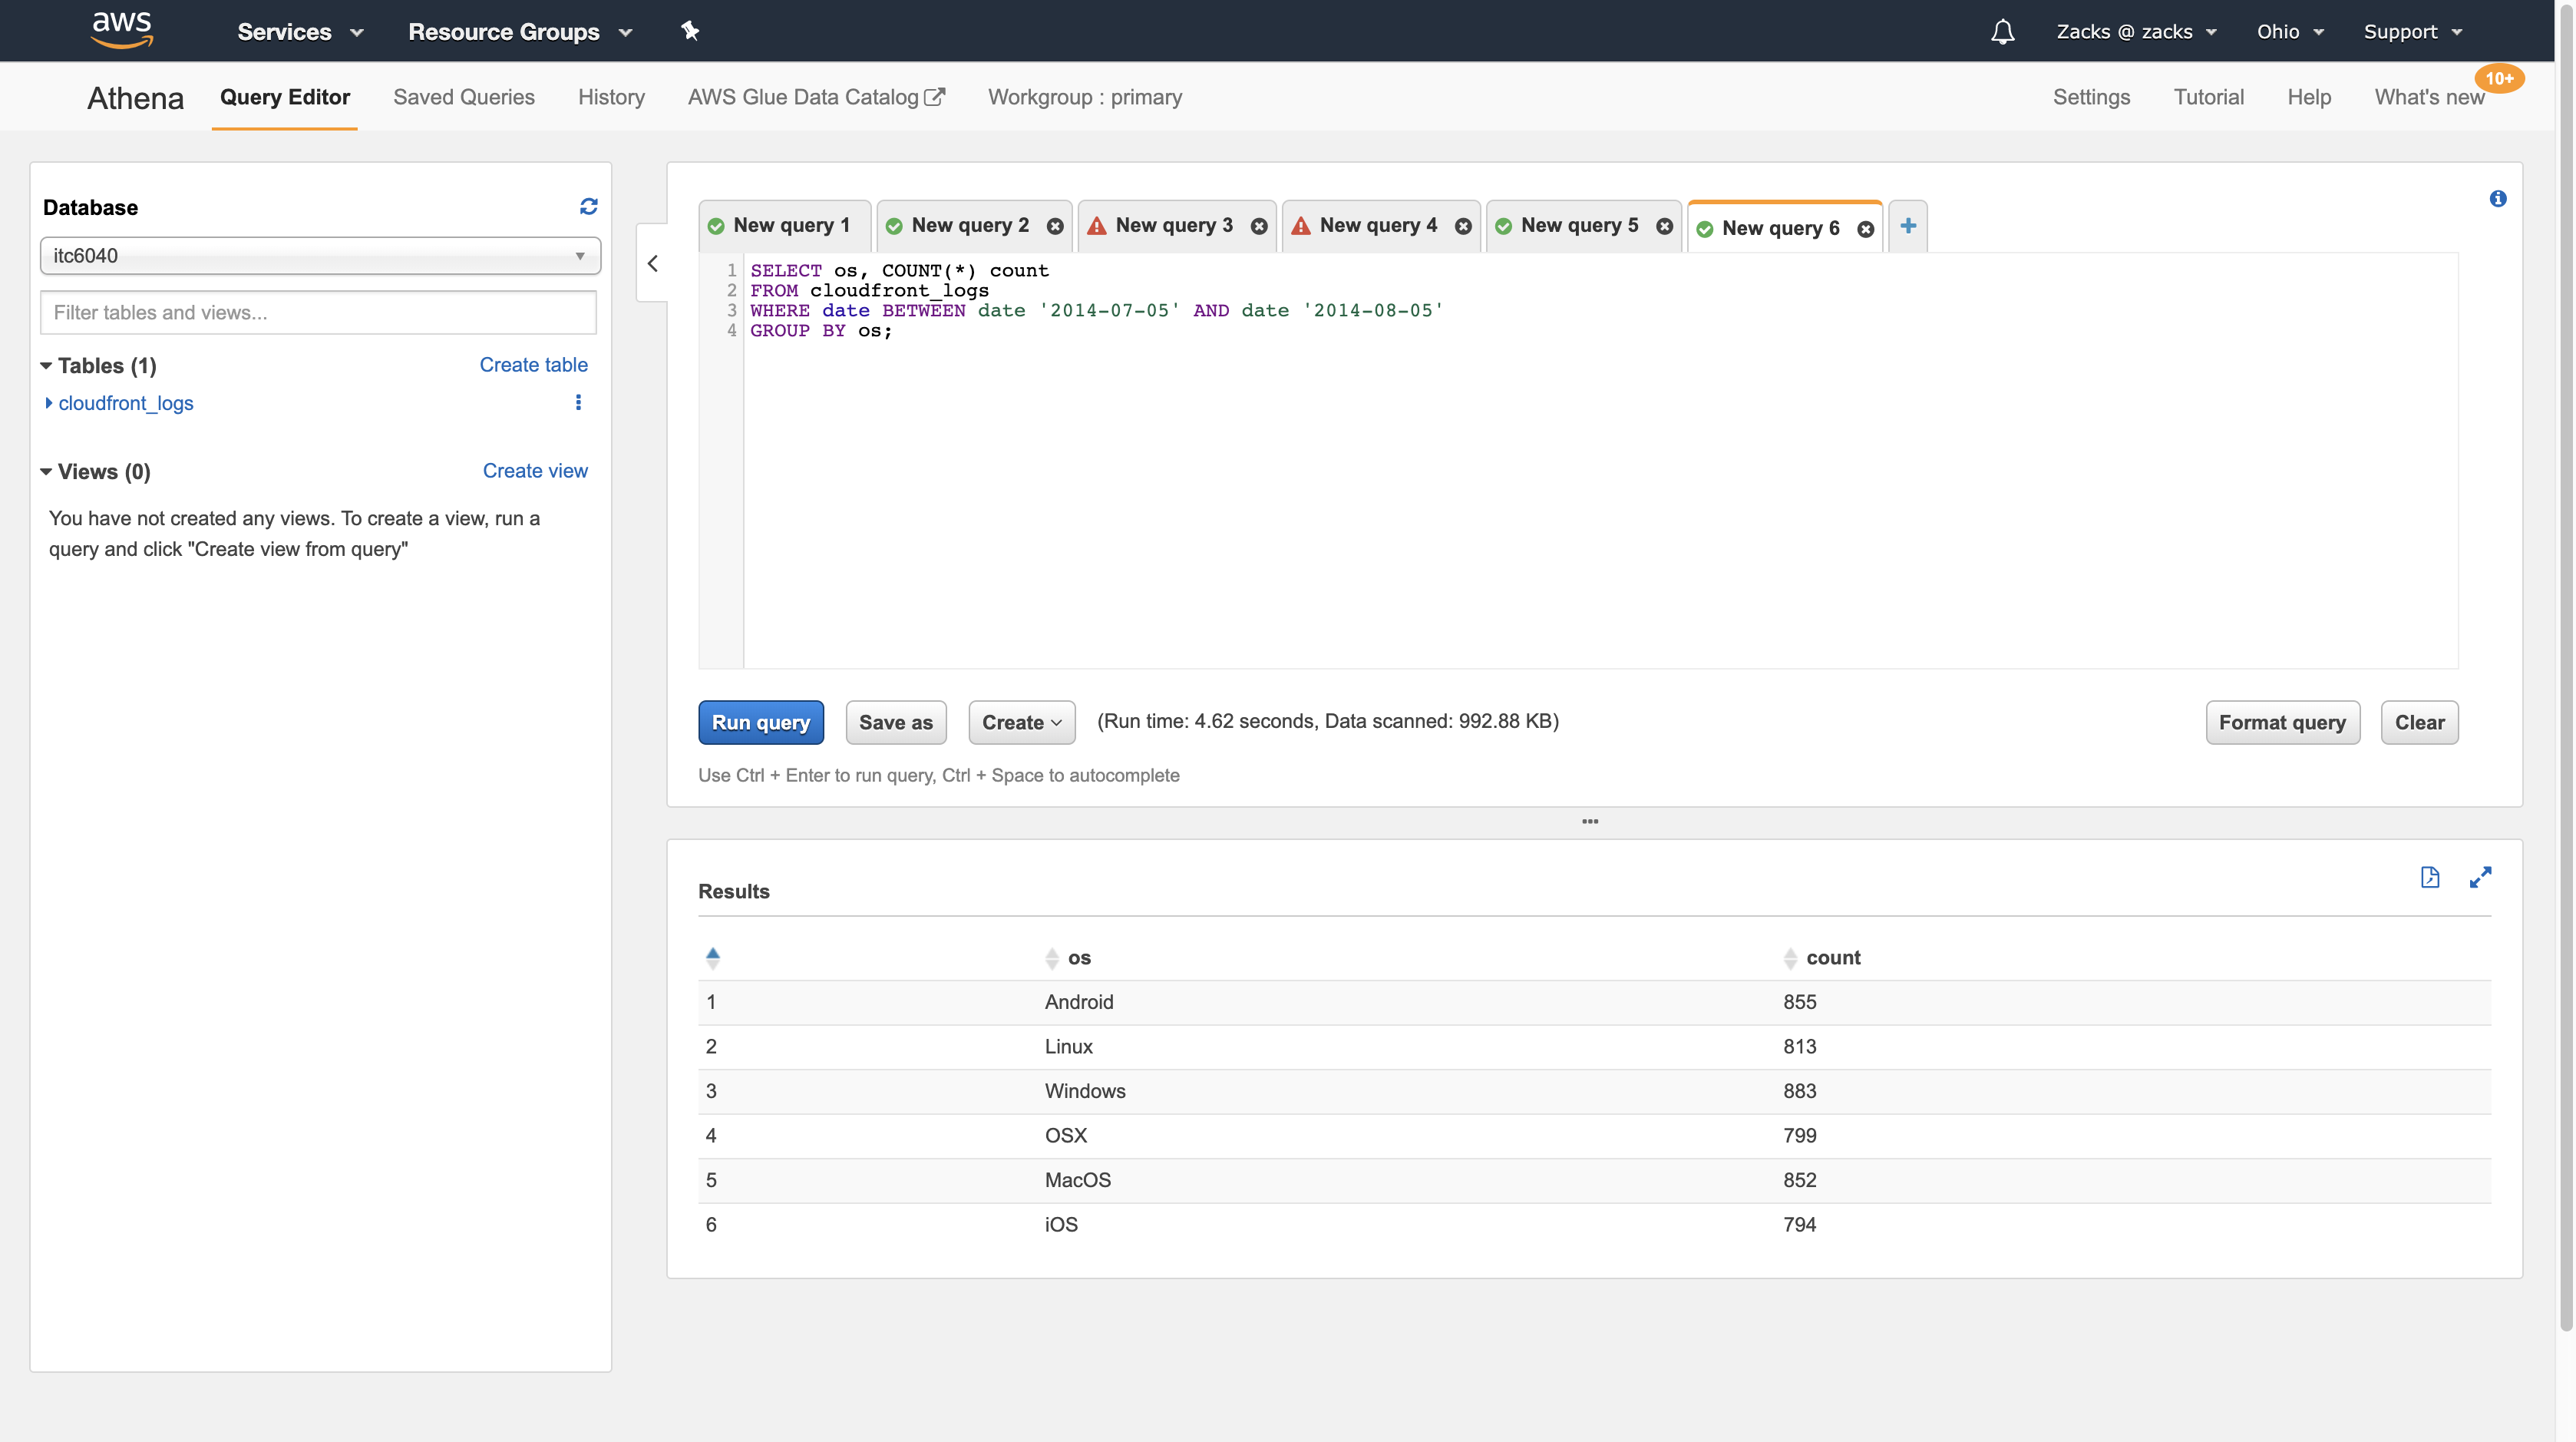
We can see that the query results have been saved in our specified location.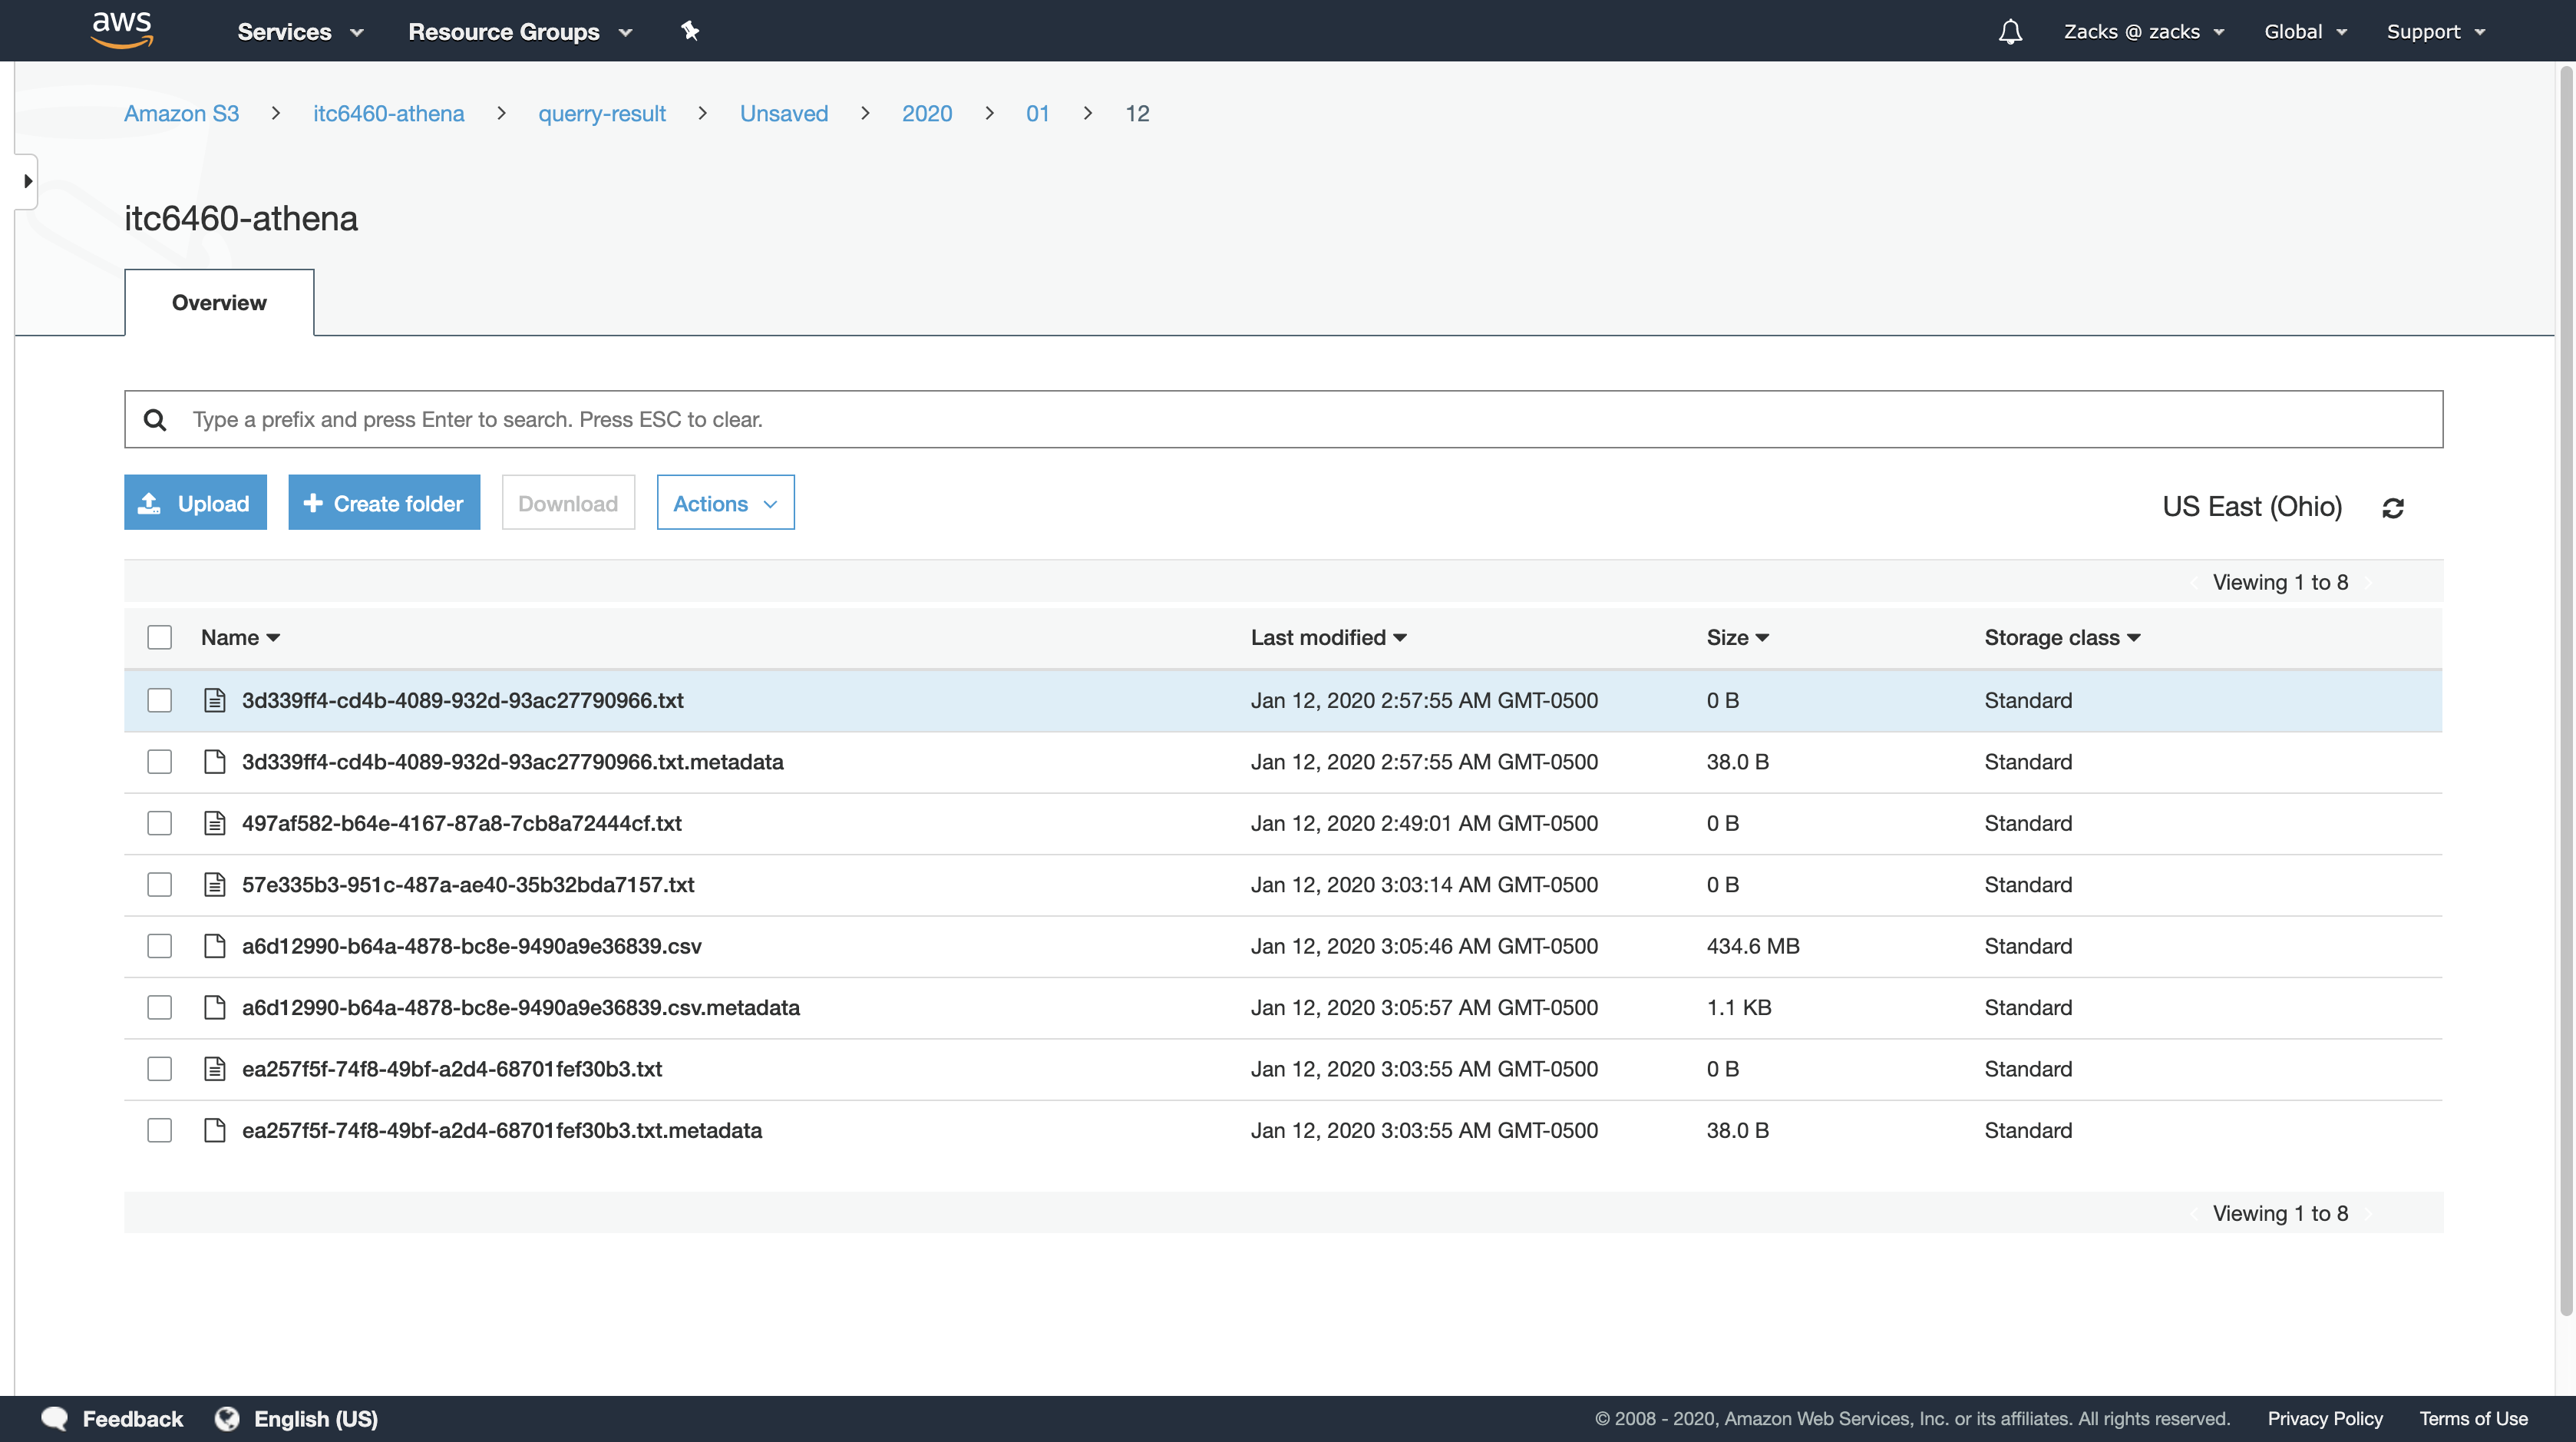
Work with data
Names for Tables, Databases, and Columns
Table names and table column names in Athena must be lowercase
If you are interacting with Apache Spark, then your table names and table column names must be lowercase. Athena is case-insensitive and turns table names and column names to lower case, but Spark requires lowercase table and column names.
Queries with mixedCase column names, such as profileURI, or upper case column names do not work.
Names that begin with an underscore
Use backtics to enclose view, or column names that begin with an underscore. DO NOT name a table begin with an underscore For example:
1 | CREATE TABLE `_table_name` ( # it does not work |
Table or view names that include numbers
Table names and column names that include numbers are OK. For example:
1 | CREATE EXTERNAL TABLE IF NOT EXISTS tmp123 ( |
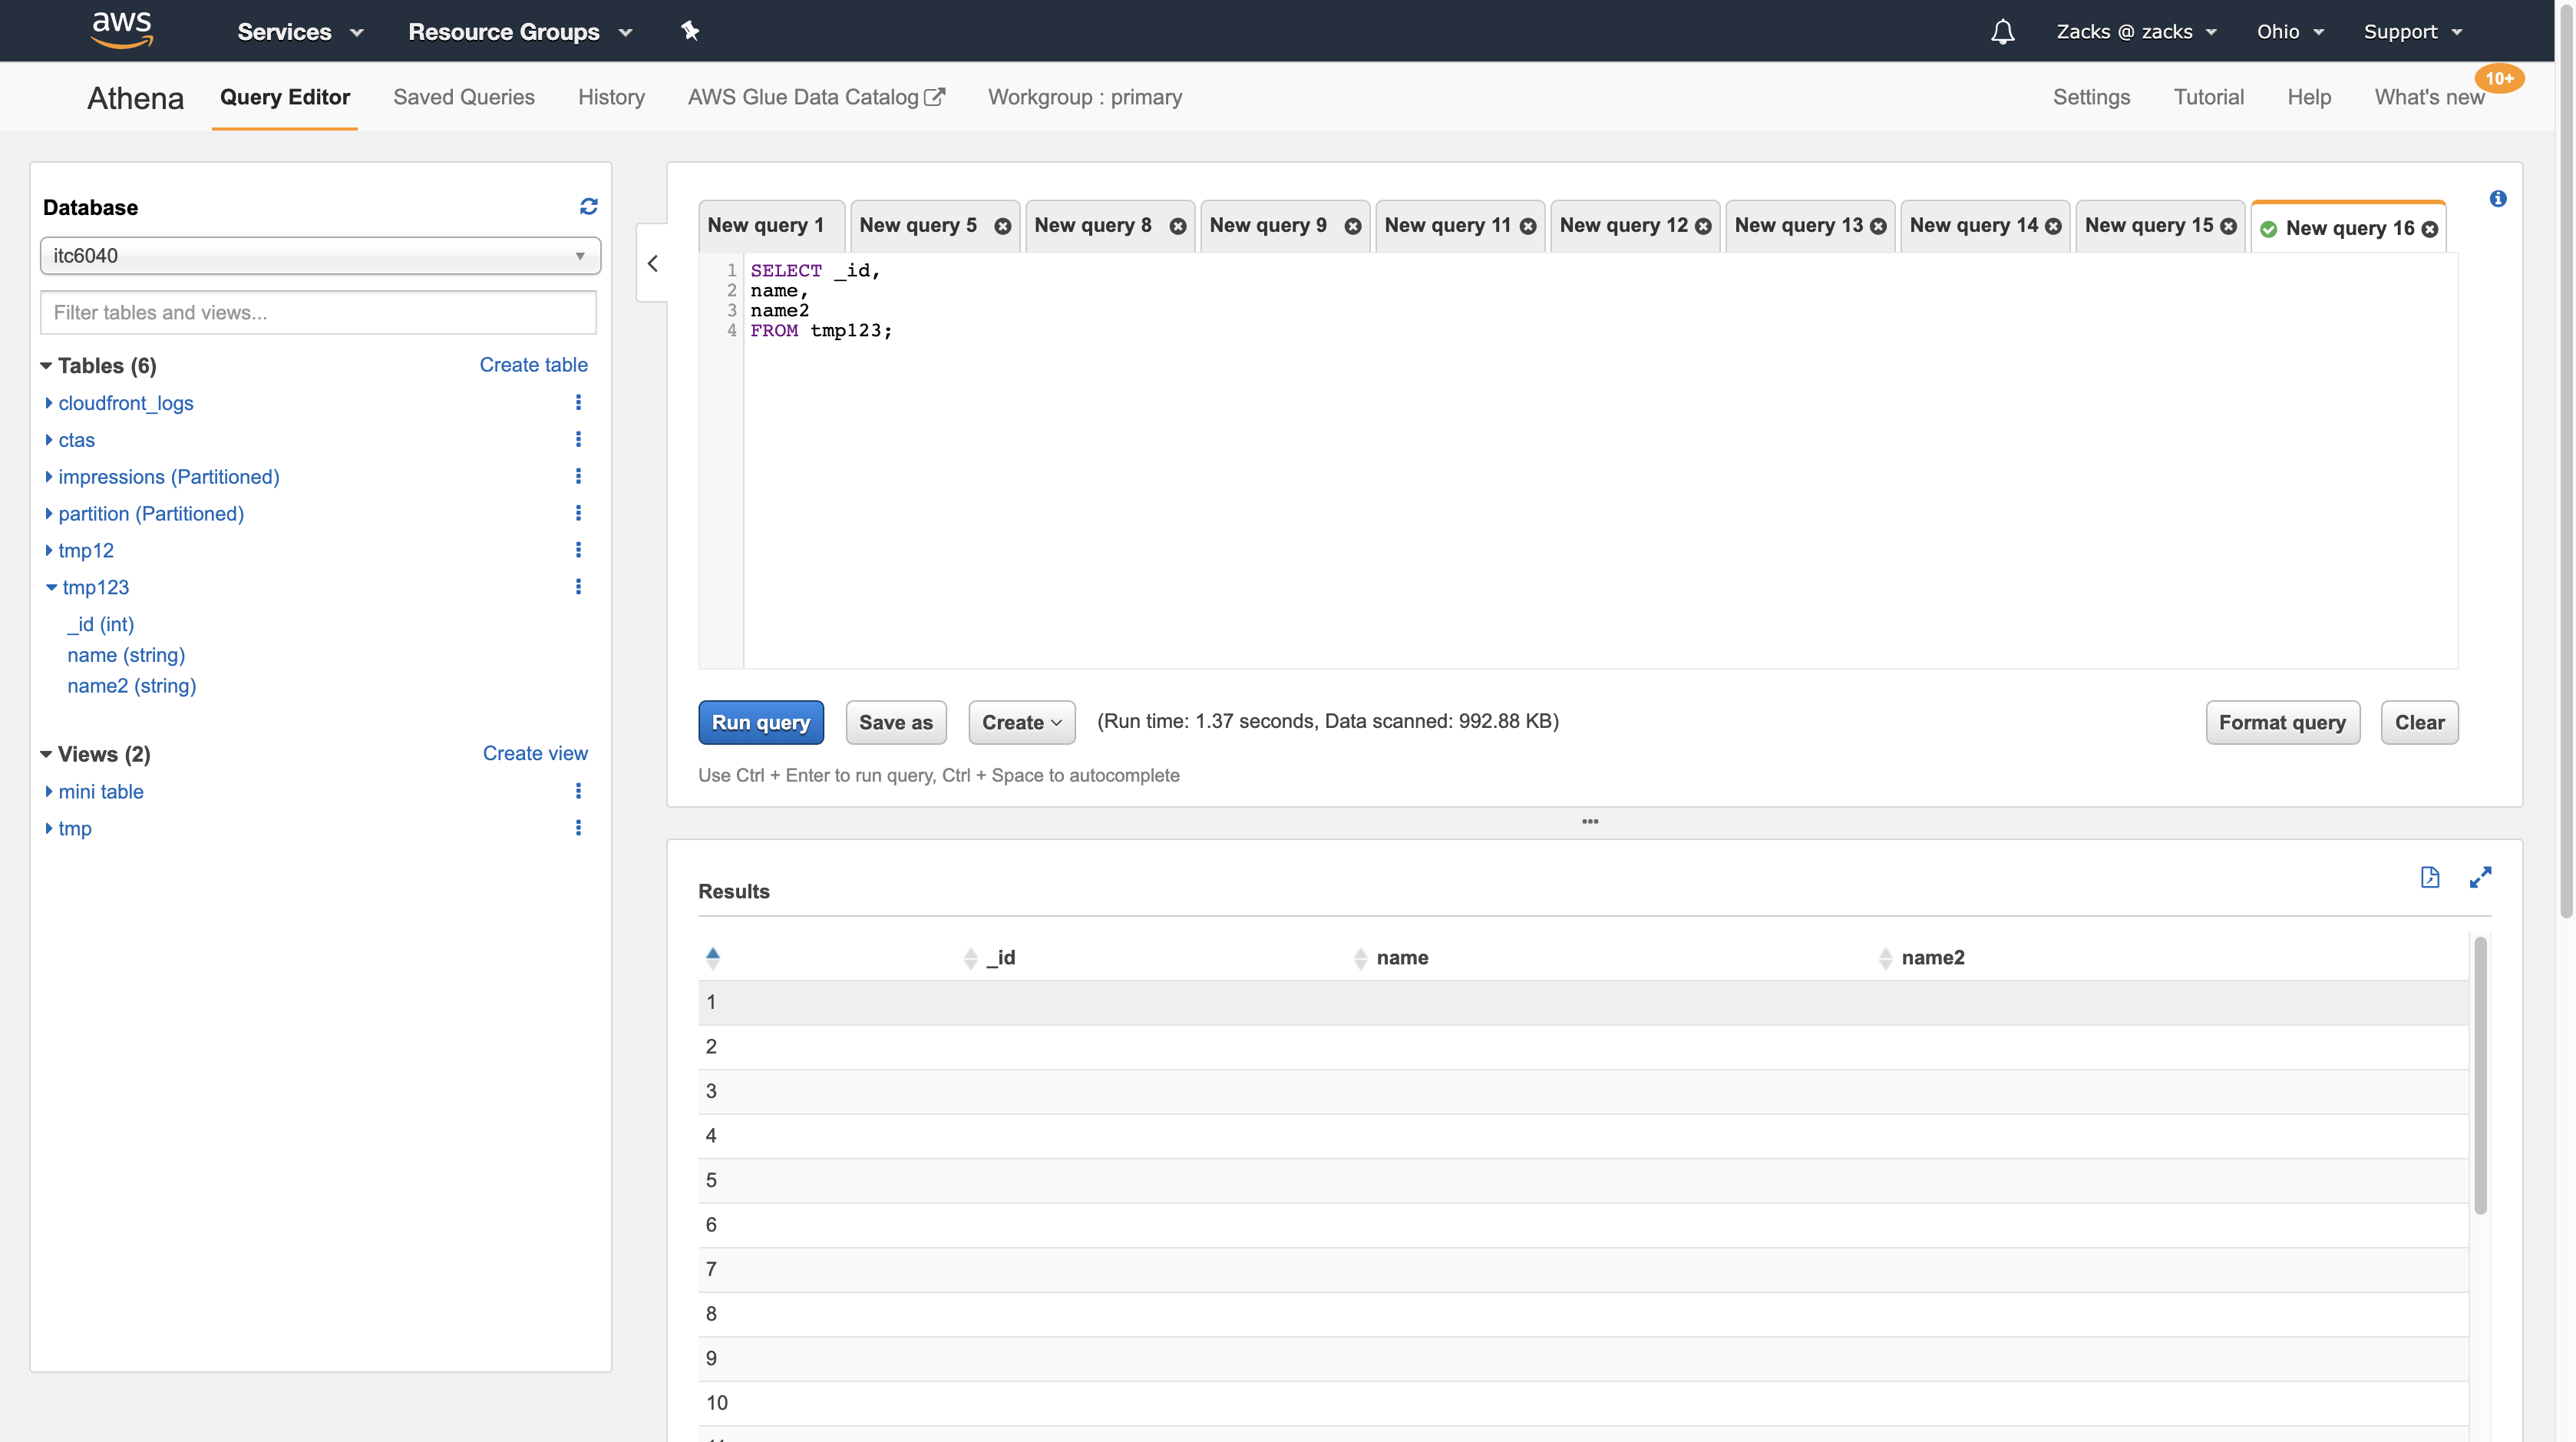
Try to create a table with special character: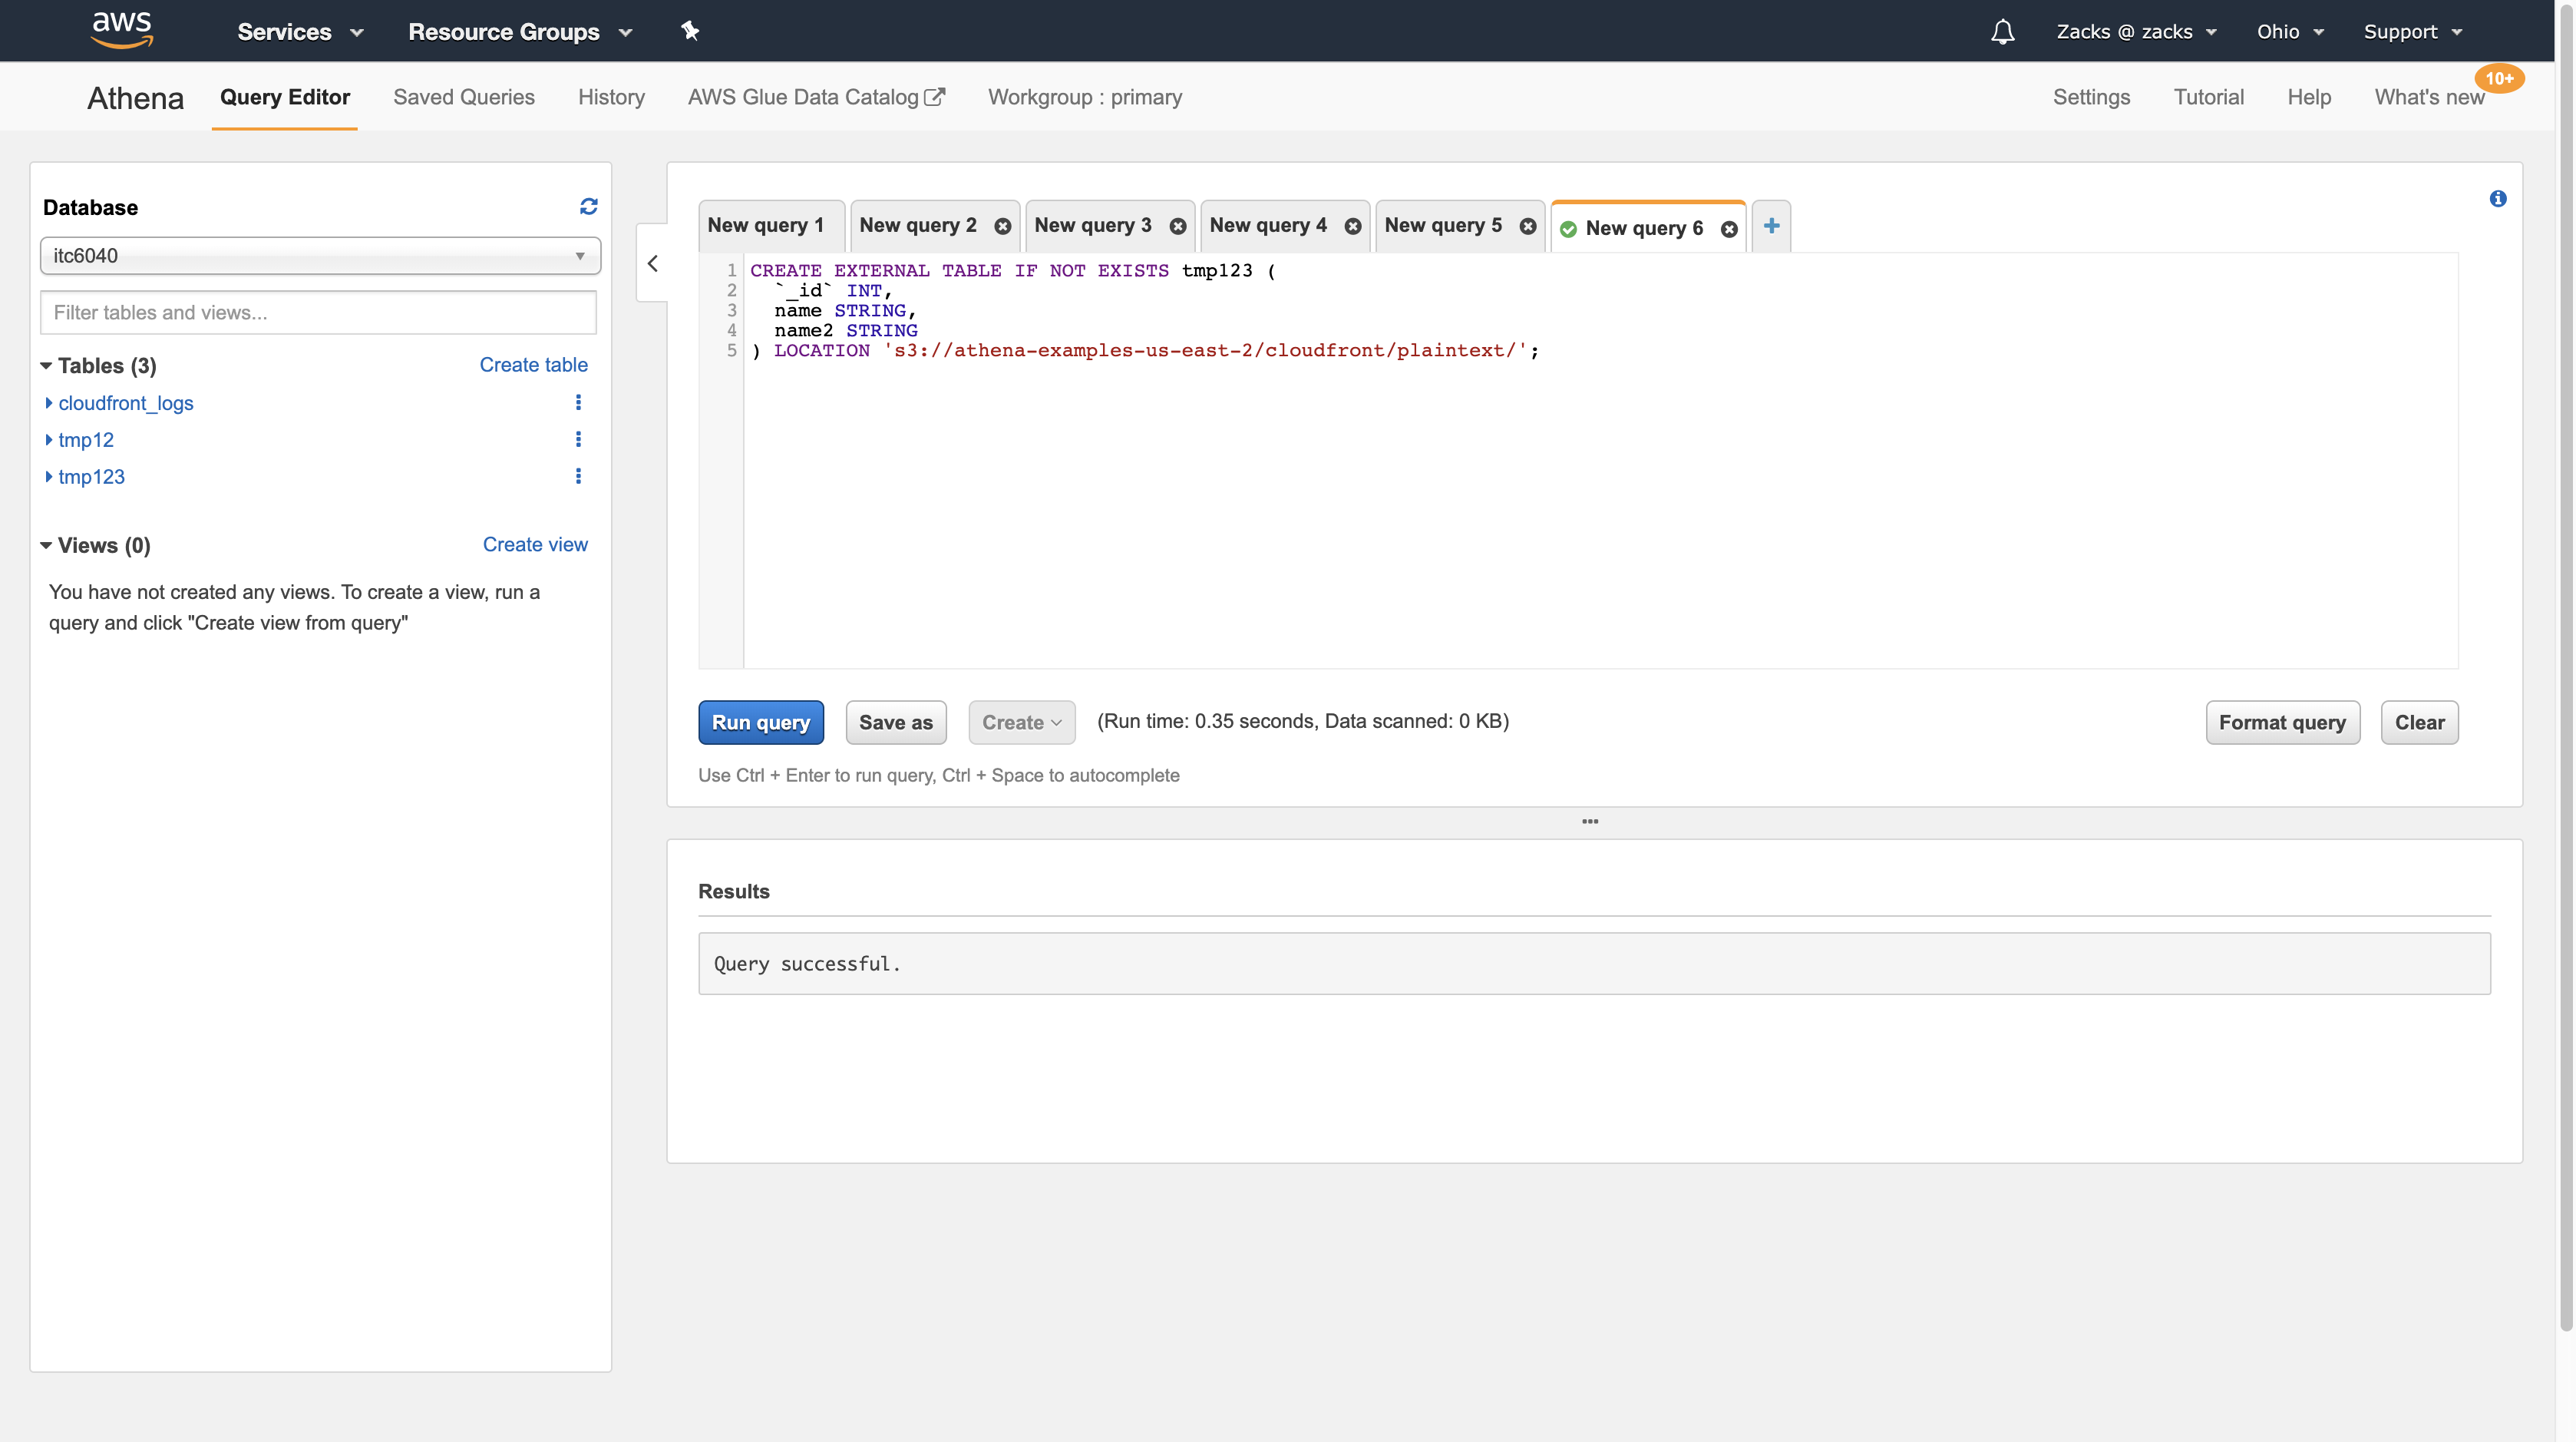
Try to query data with special character from a table with special character. No need to use backtics or quotation marks:
1 | SELECT _id, |
Examples of Queries with Reserved Words
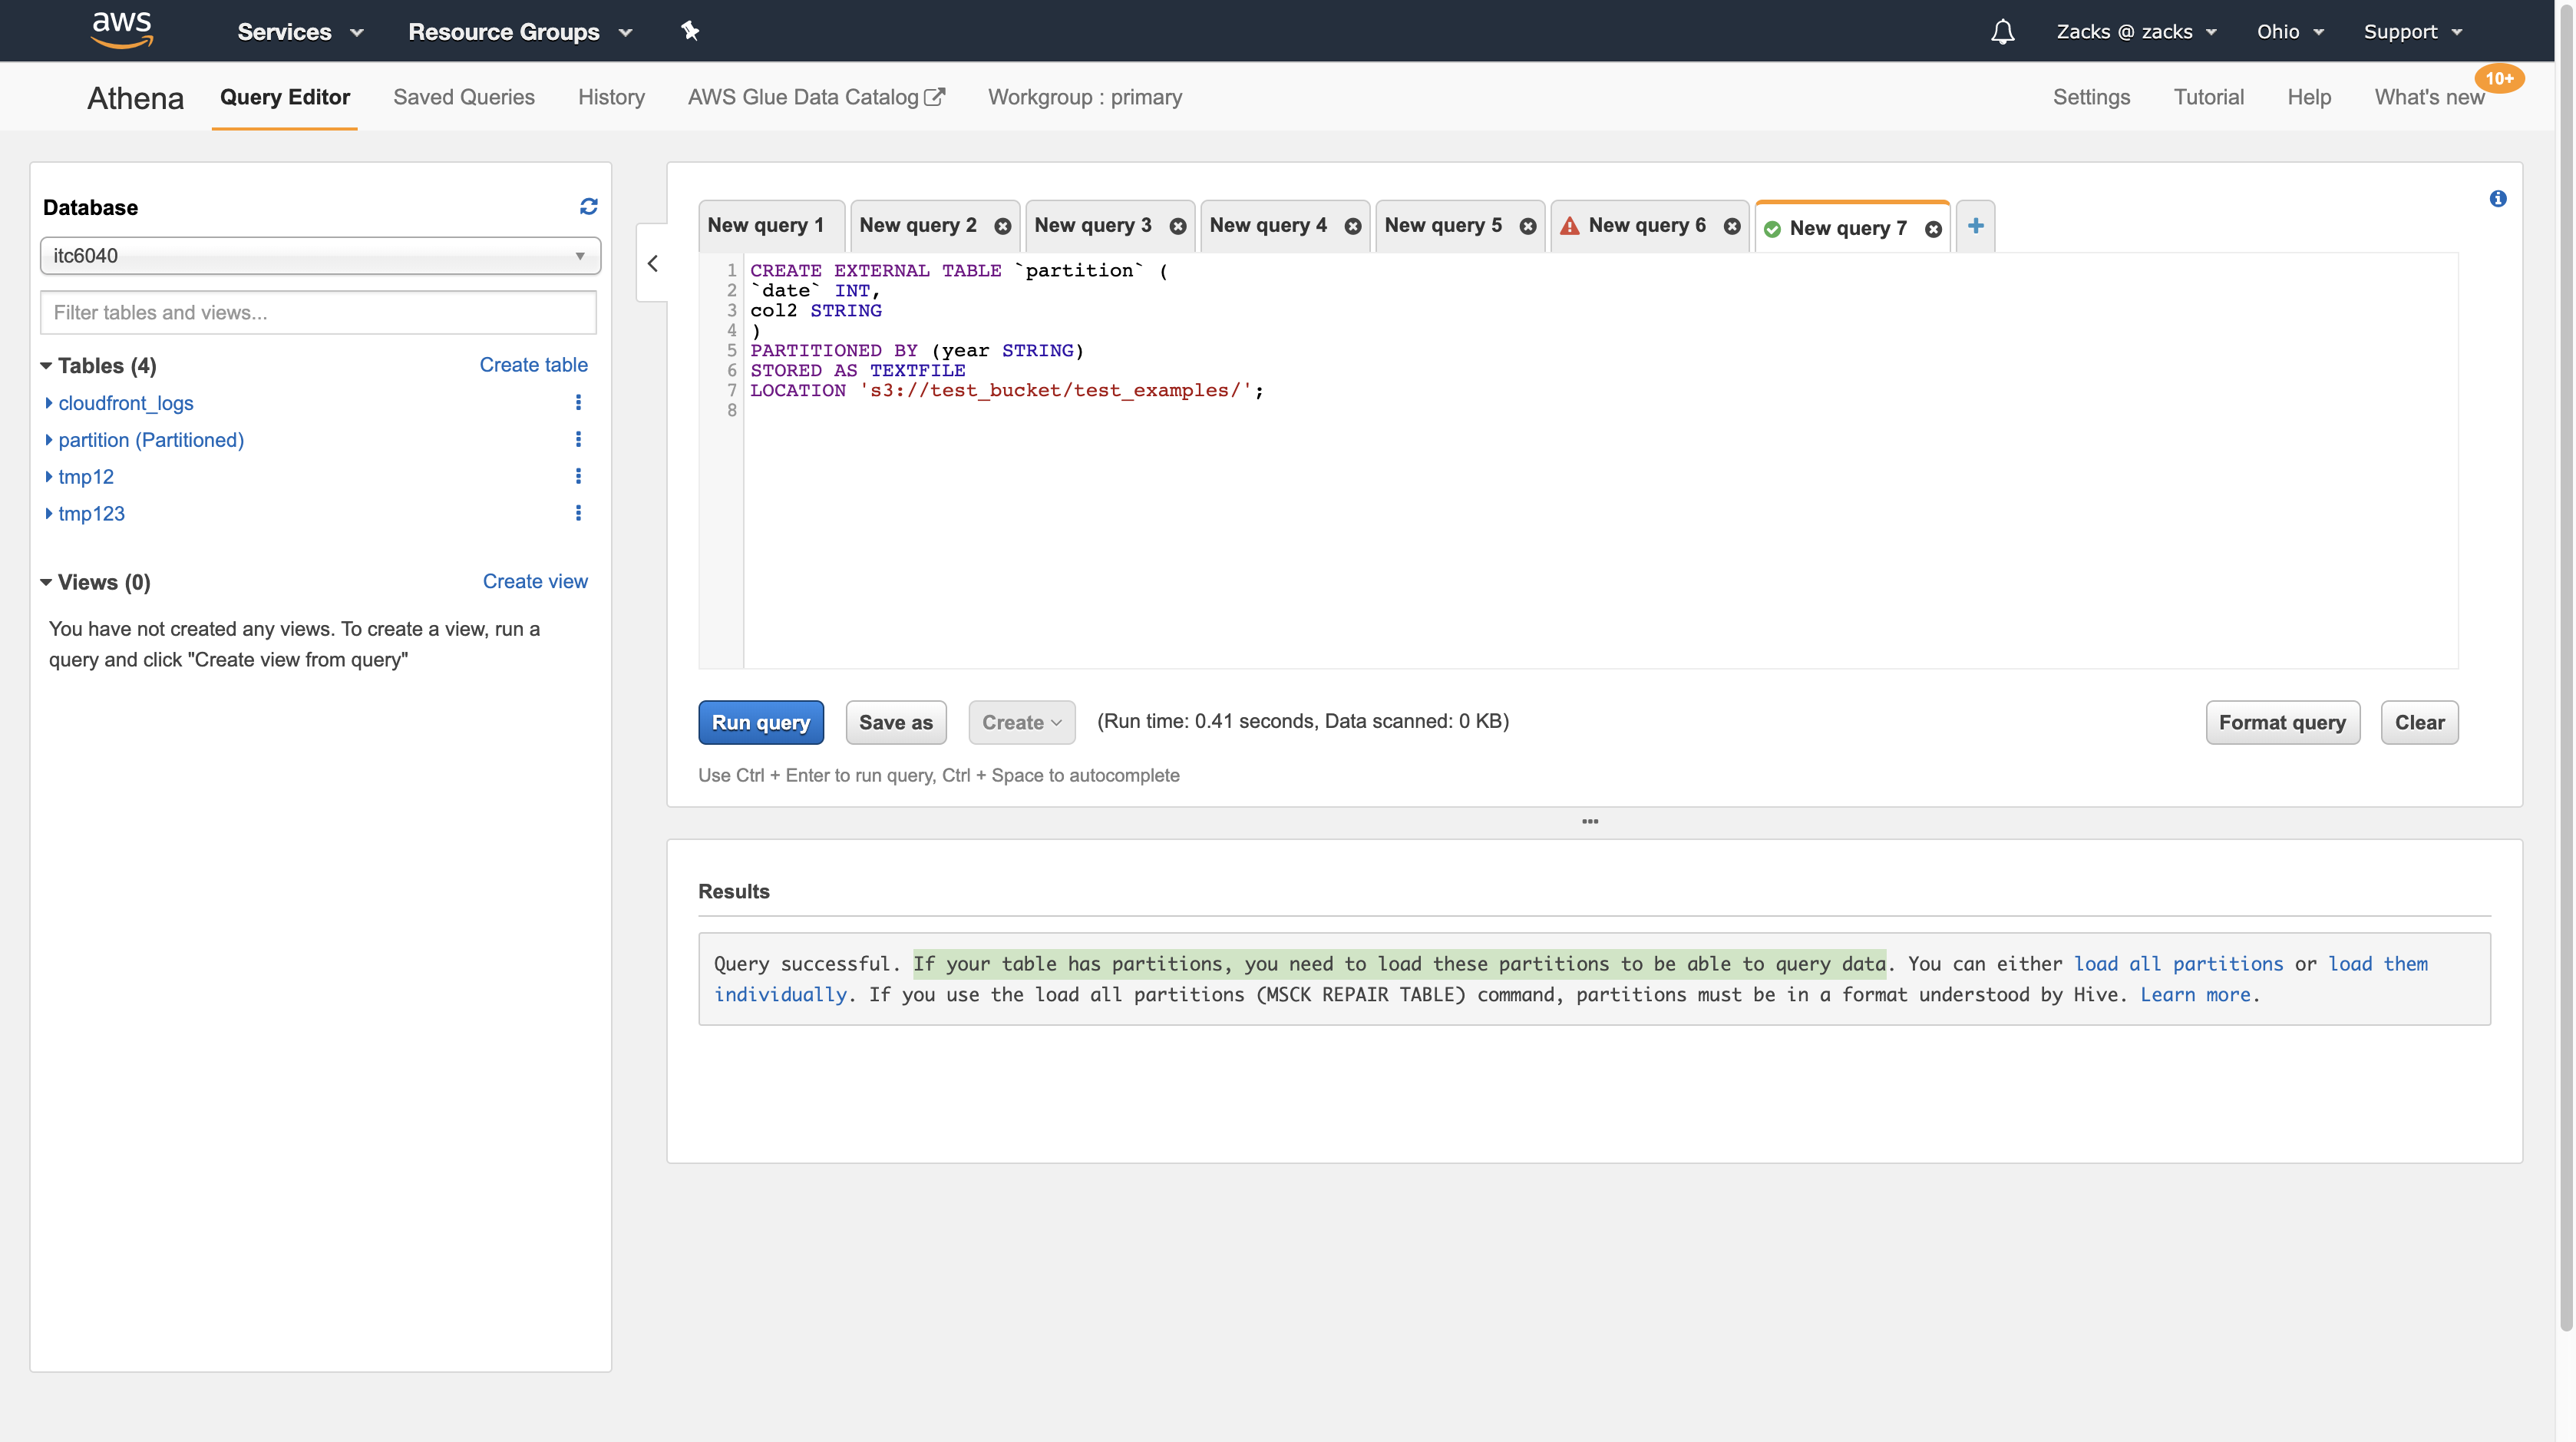
The query in the following example uses backticks (`) to escape the DDL-related reserved keywords partition and date that are used for a table name and one of the column names:
1 | CREATE EXTERNAL TABLE `partition` ( |
Try to query data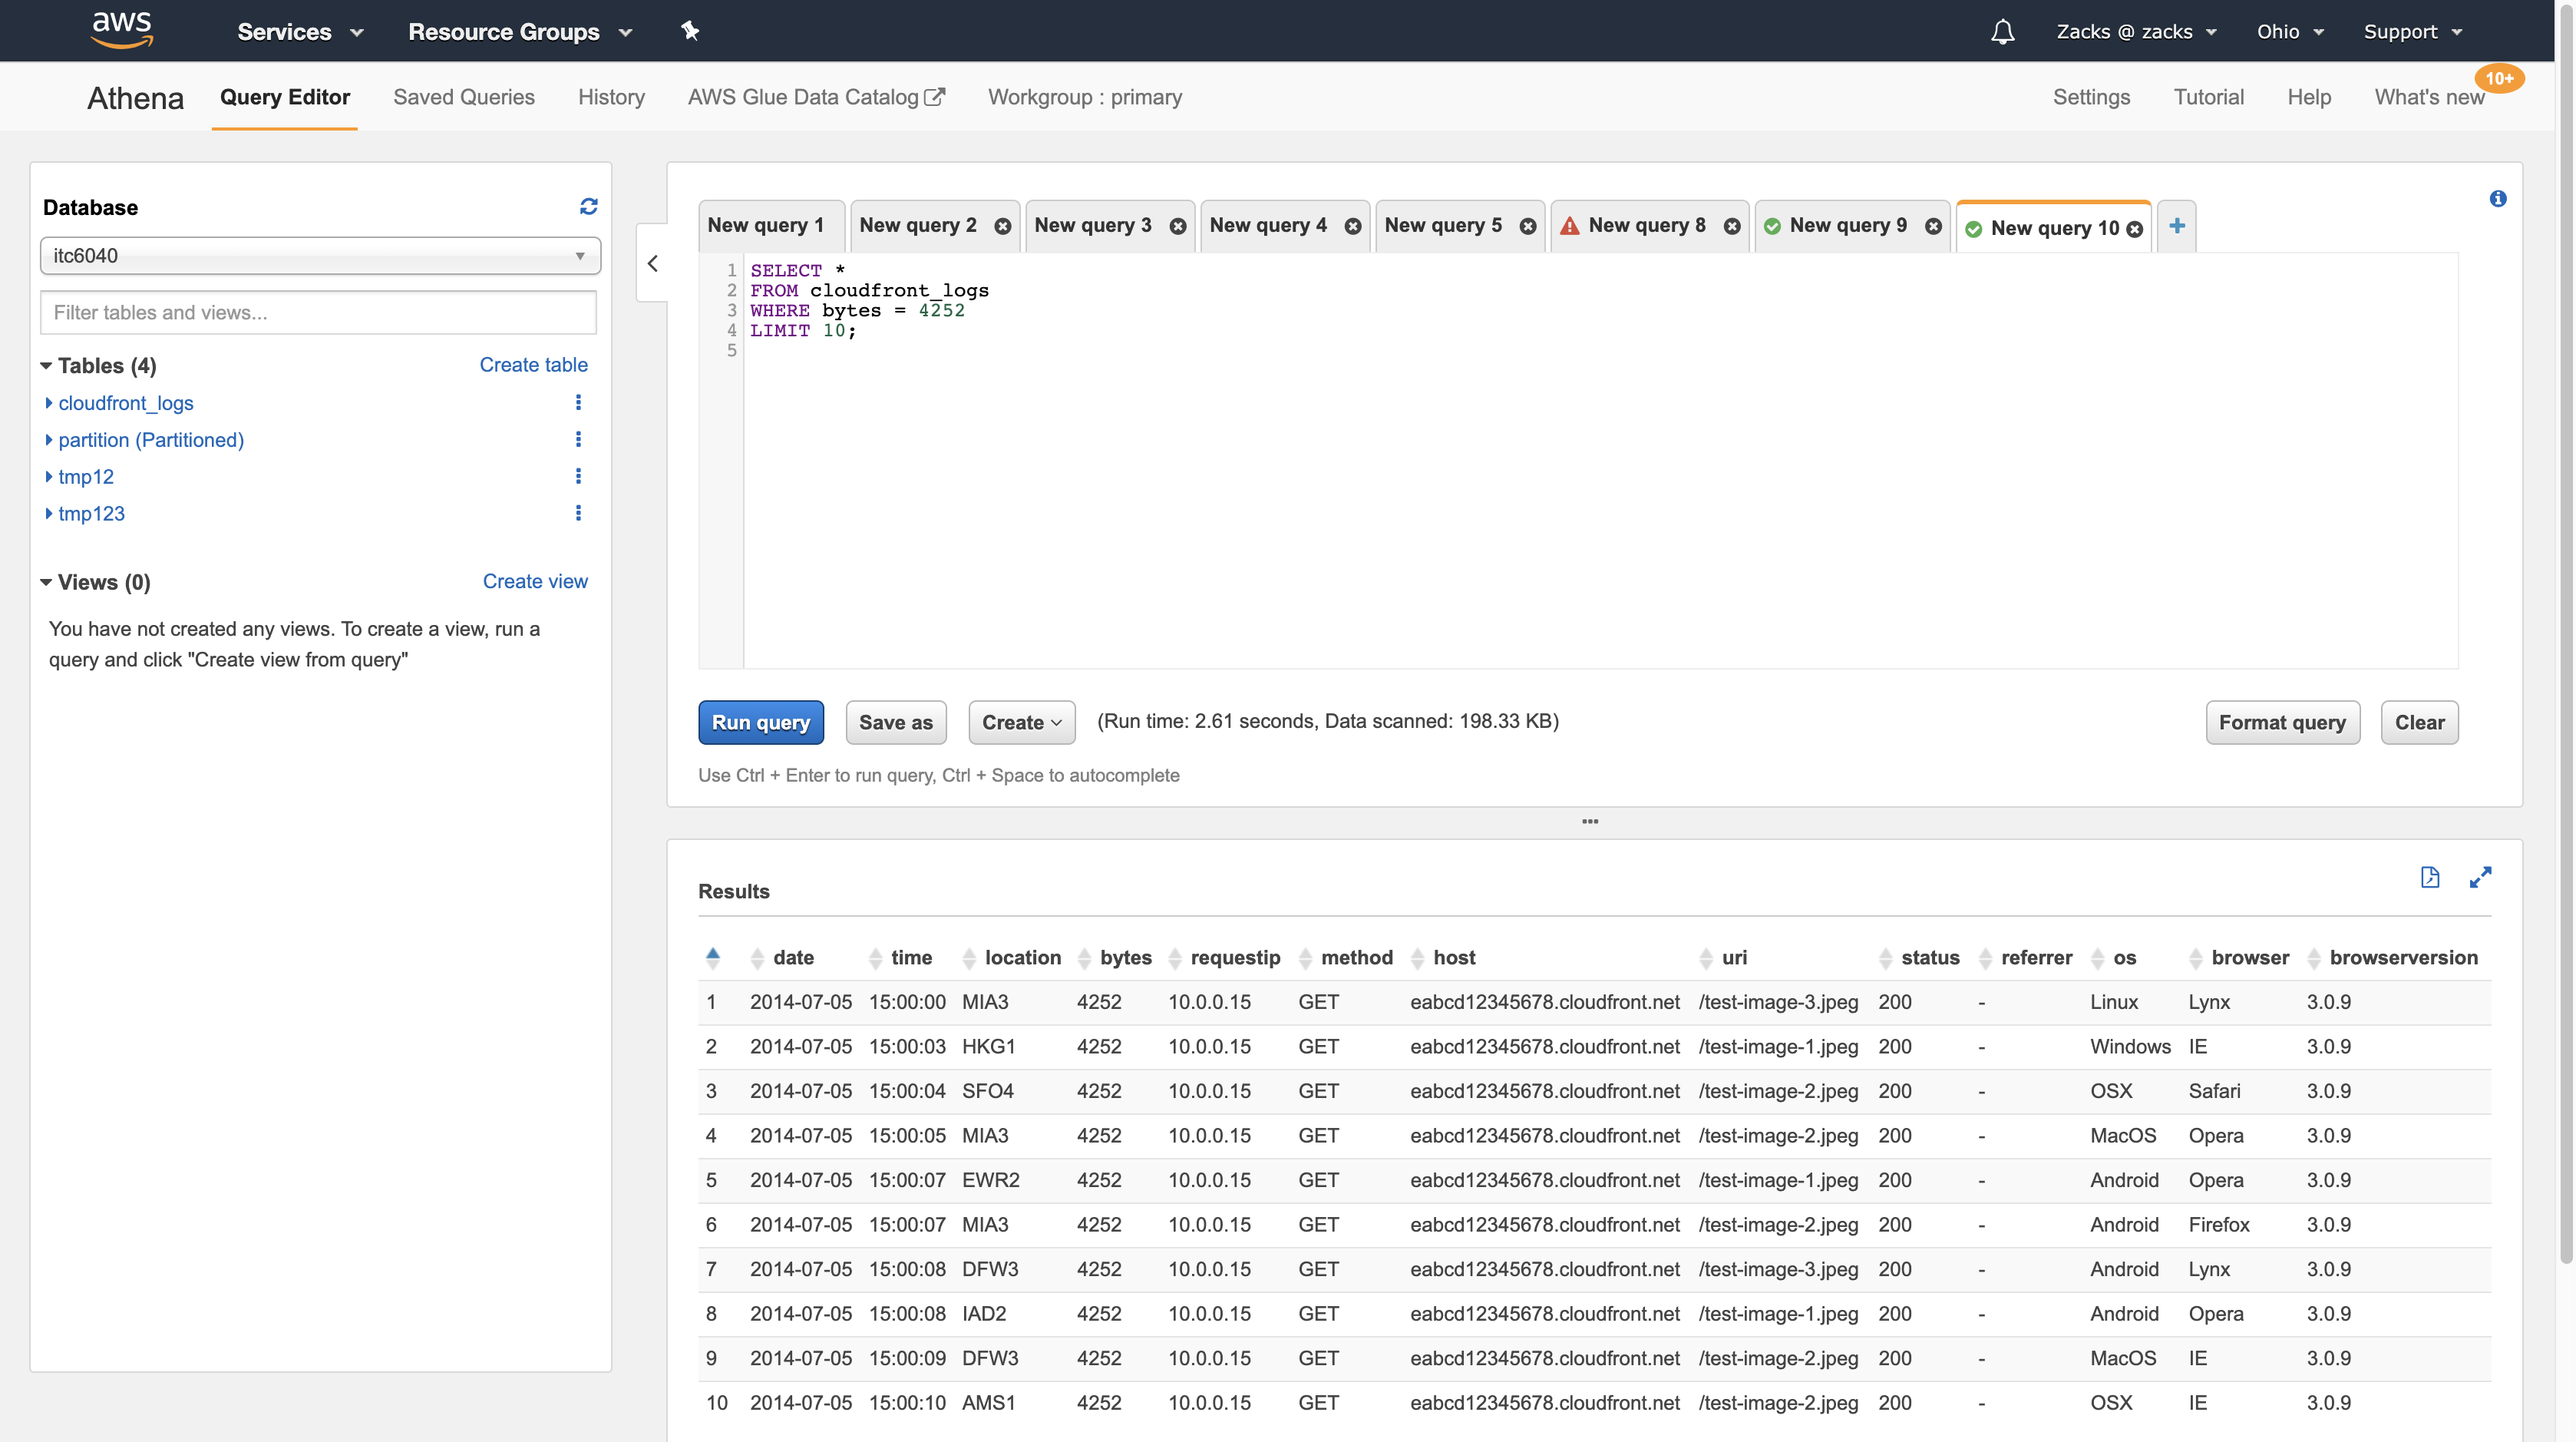
PARTITION
PARTITION is a concept to be partitioned from a large table into several small tables. To determine which table should be partitioned, one point is if the table contains too much data (e.g. more than 1 million). Another point is if the table has some parts of data that need always be edited but others only need to be read (e.g. data classified by time, old data always do not have to be edited).
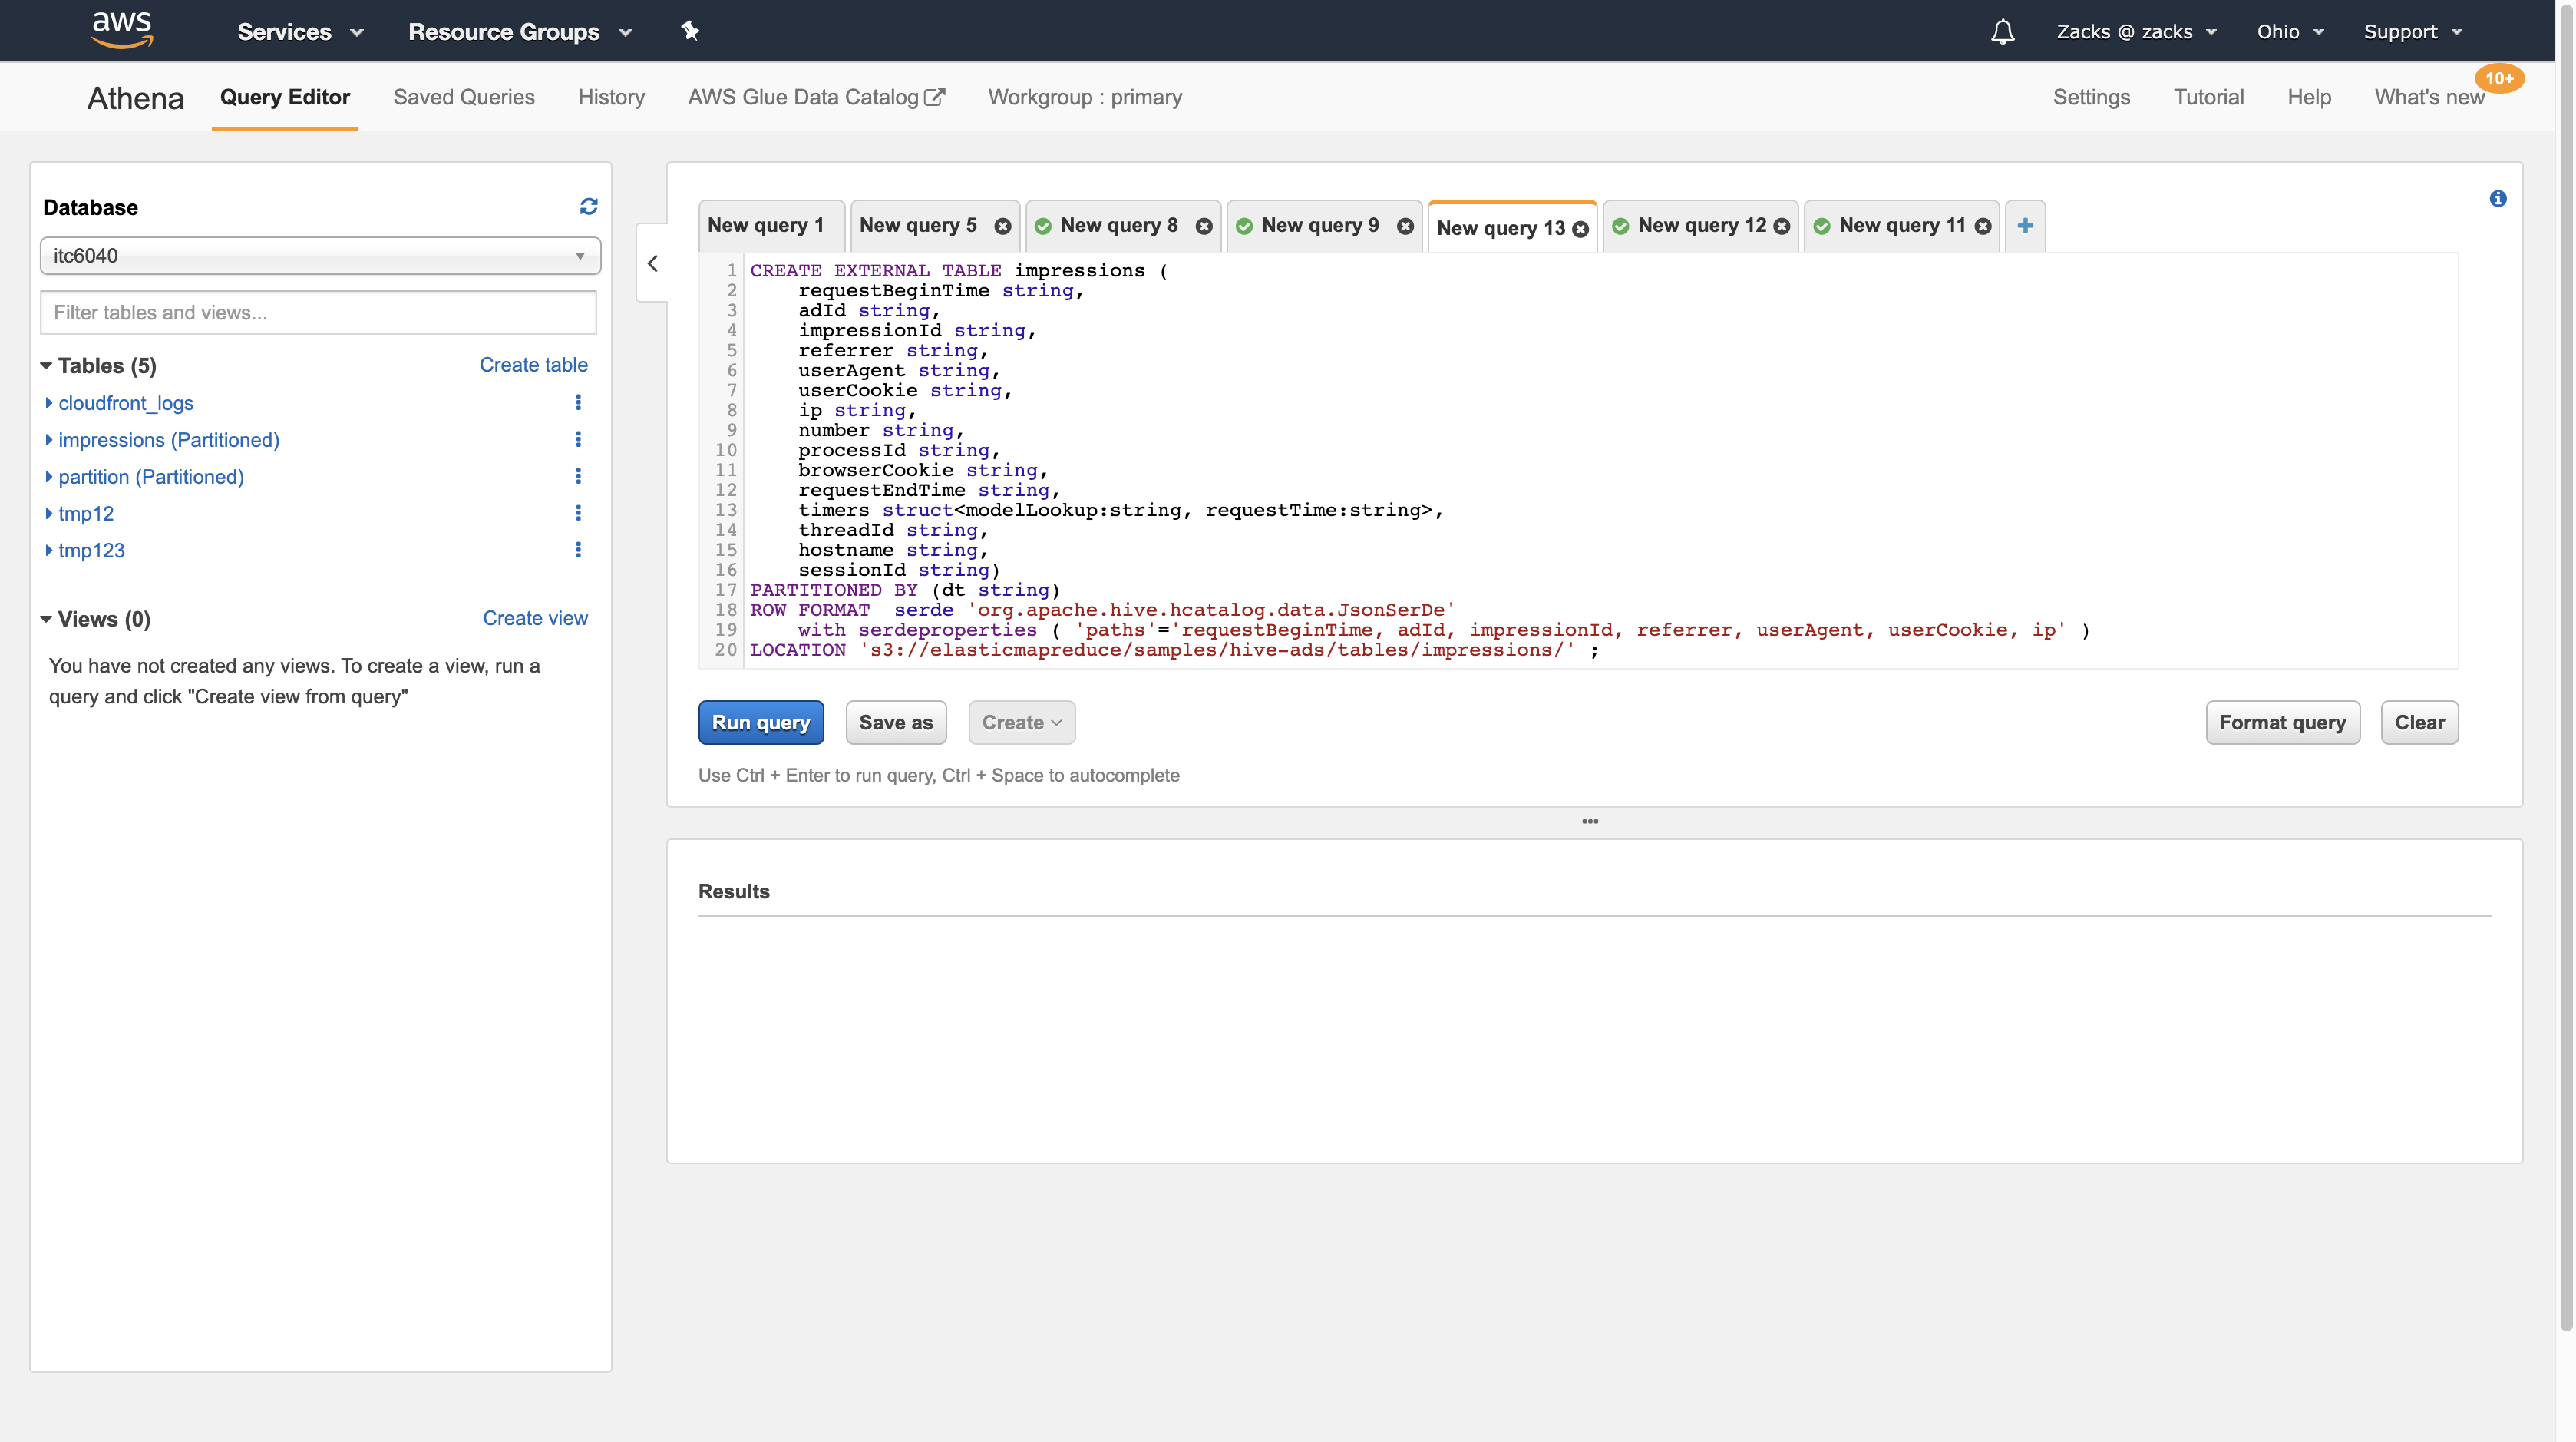
Create a partitioned table. dt(date) is the partition parameter.
1 | CREATE EXTERNAL TABLE impressions ( |
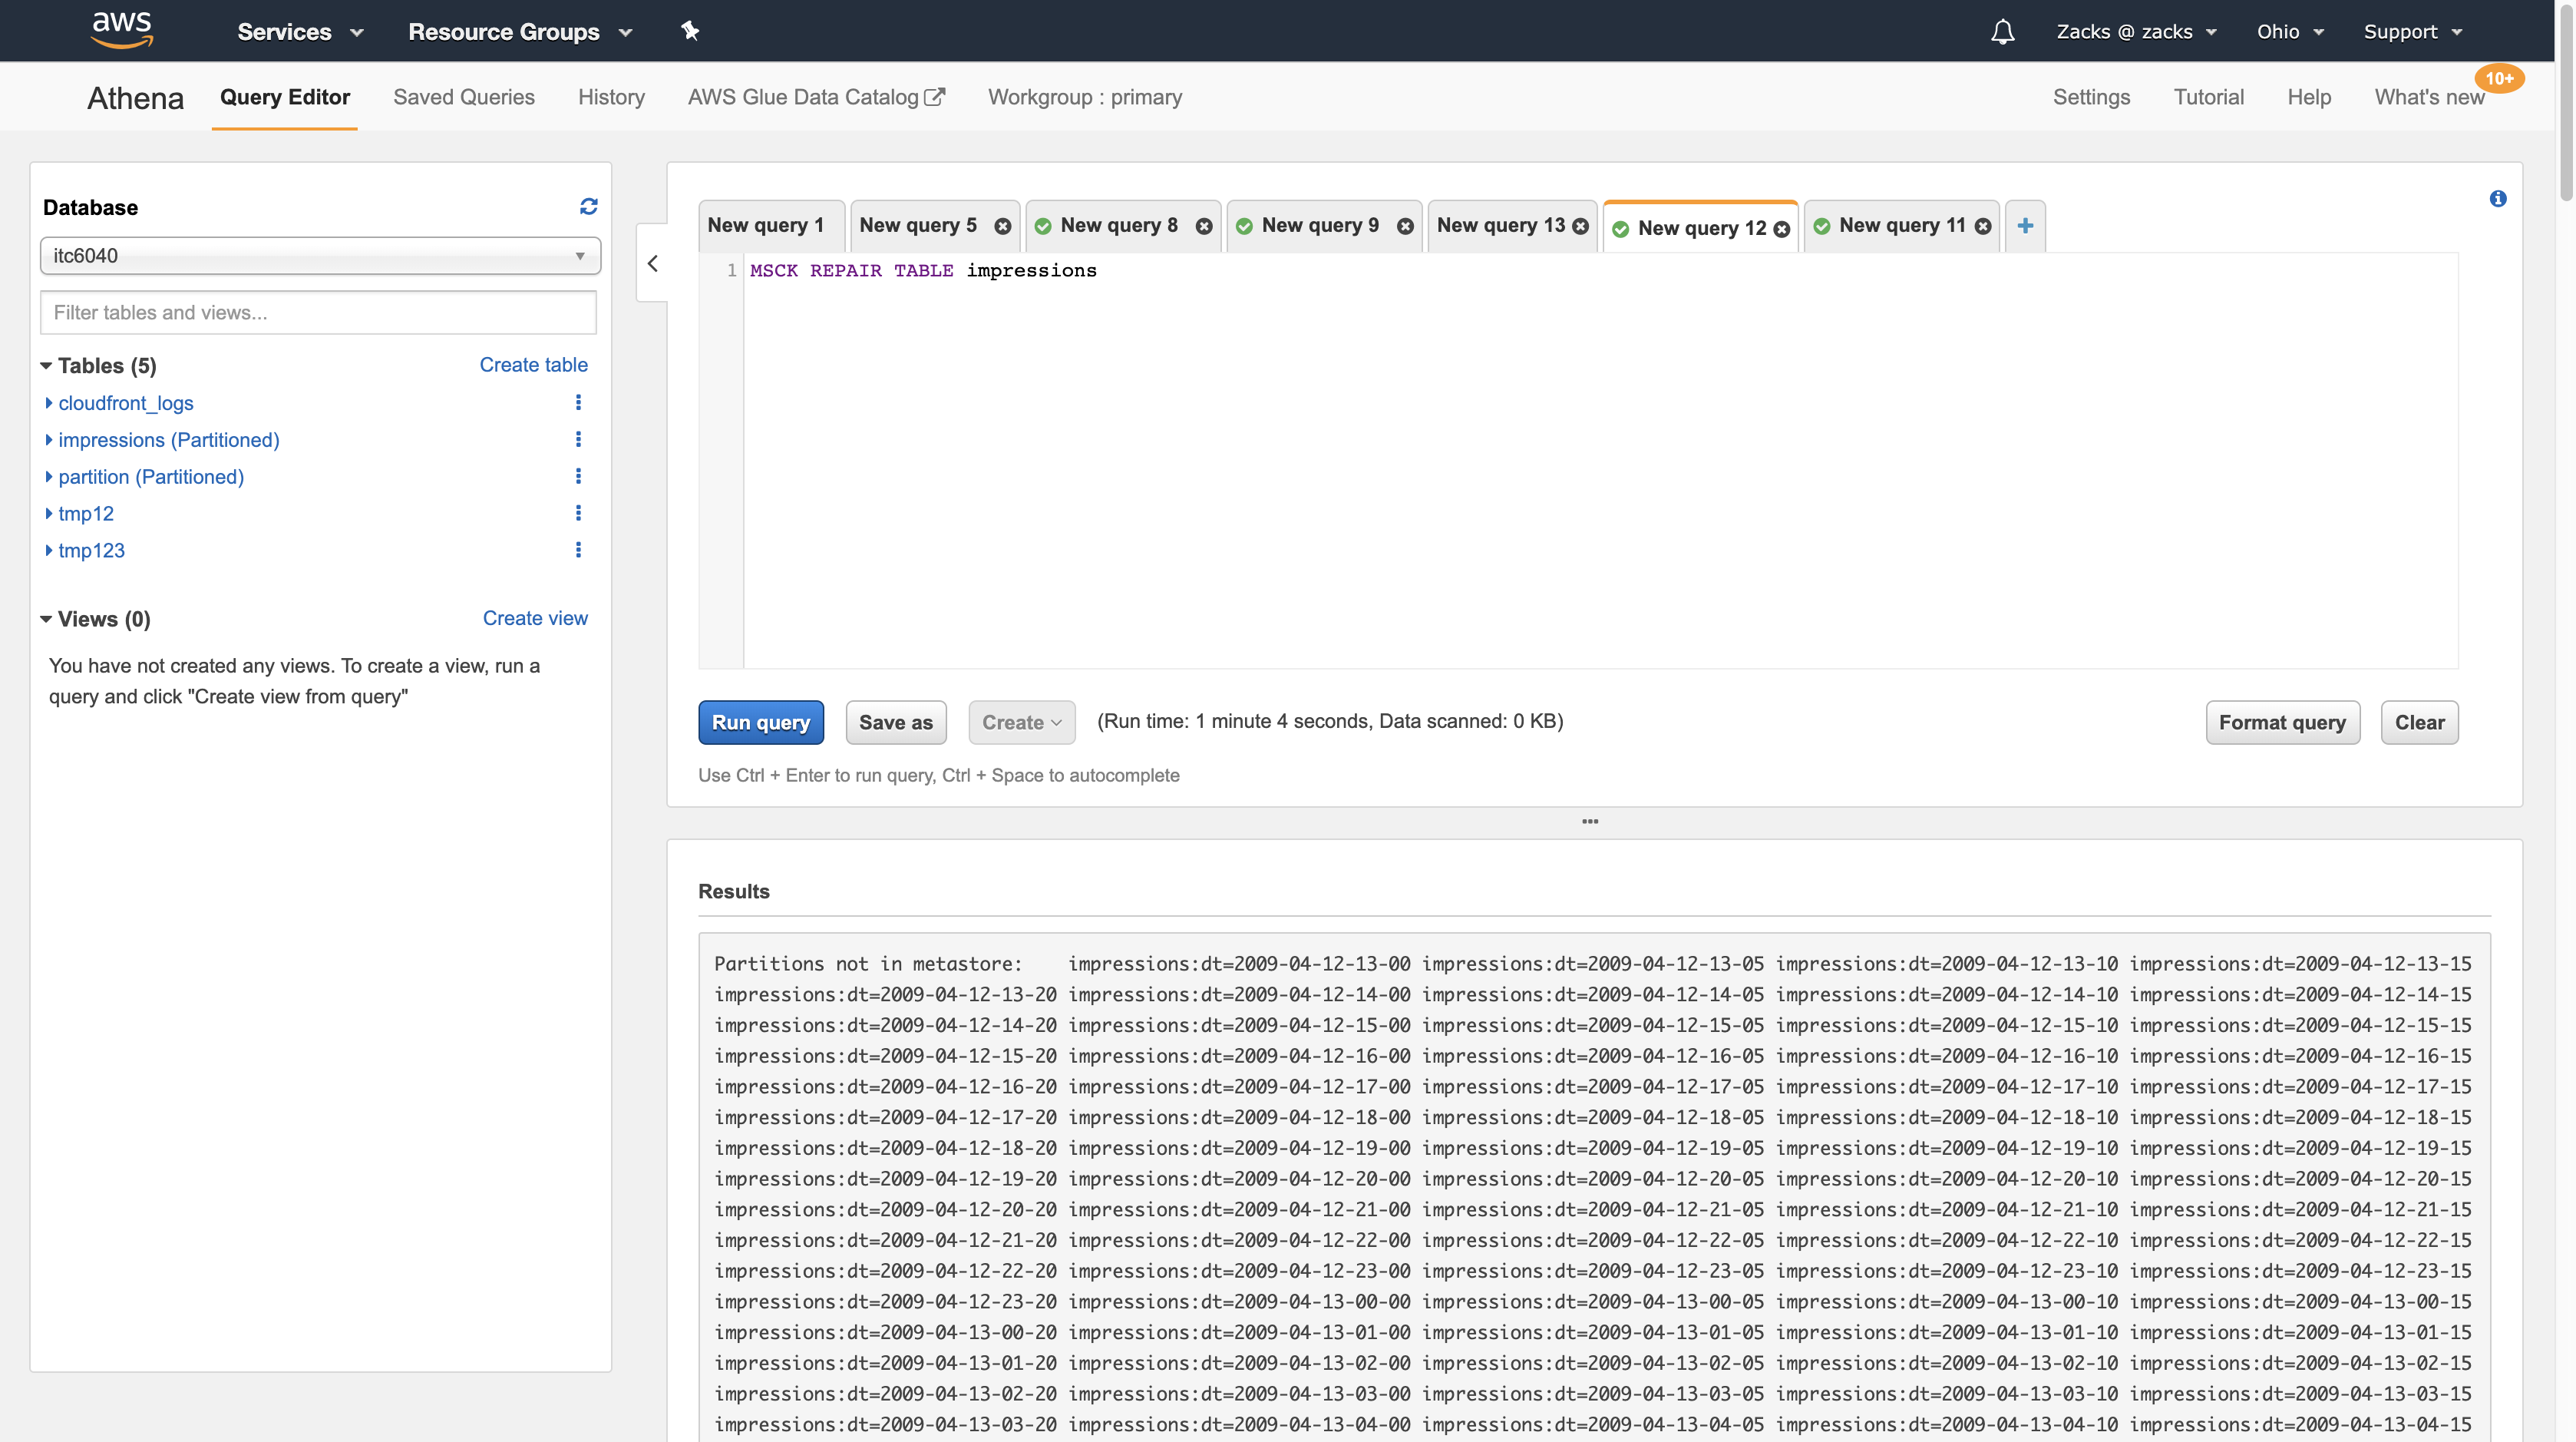
Athena loads the data in the partitions.
1 | MSCK REPAIR TABLE impressions |
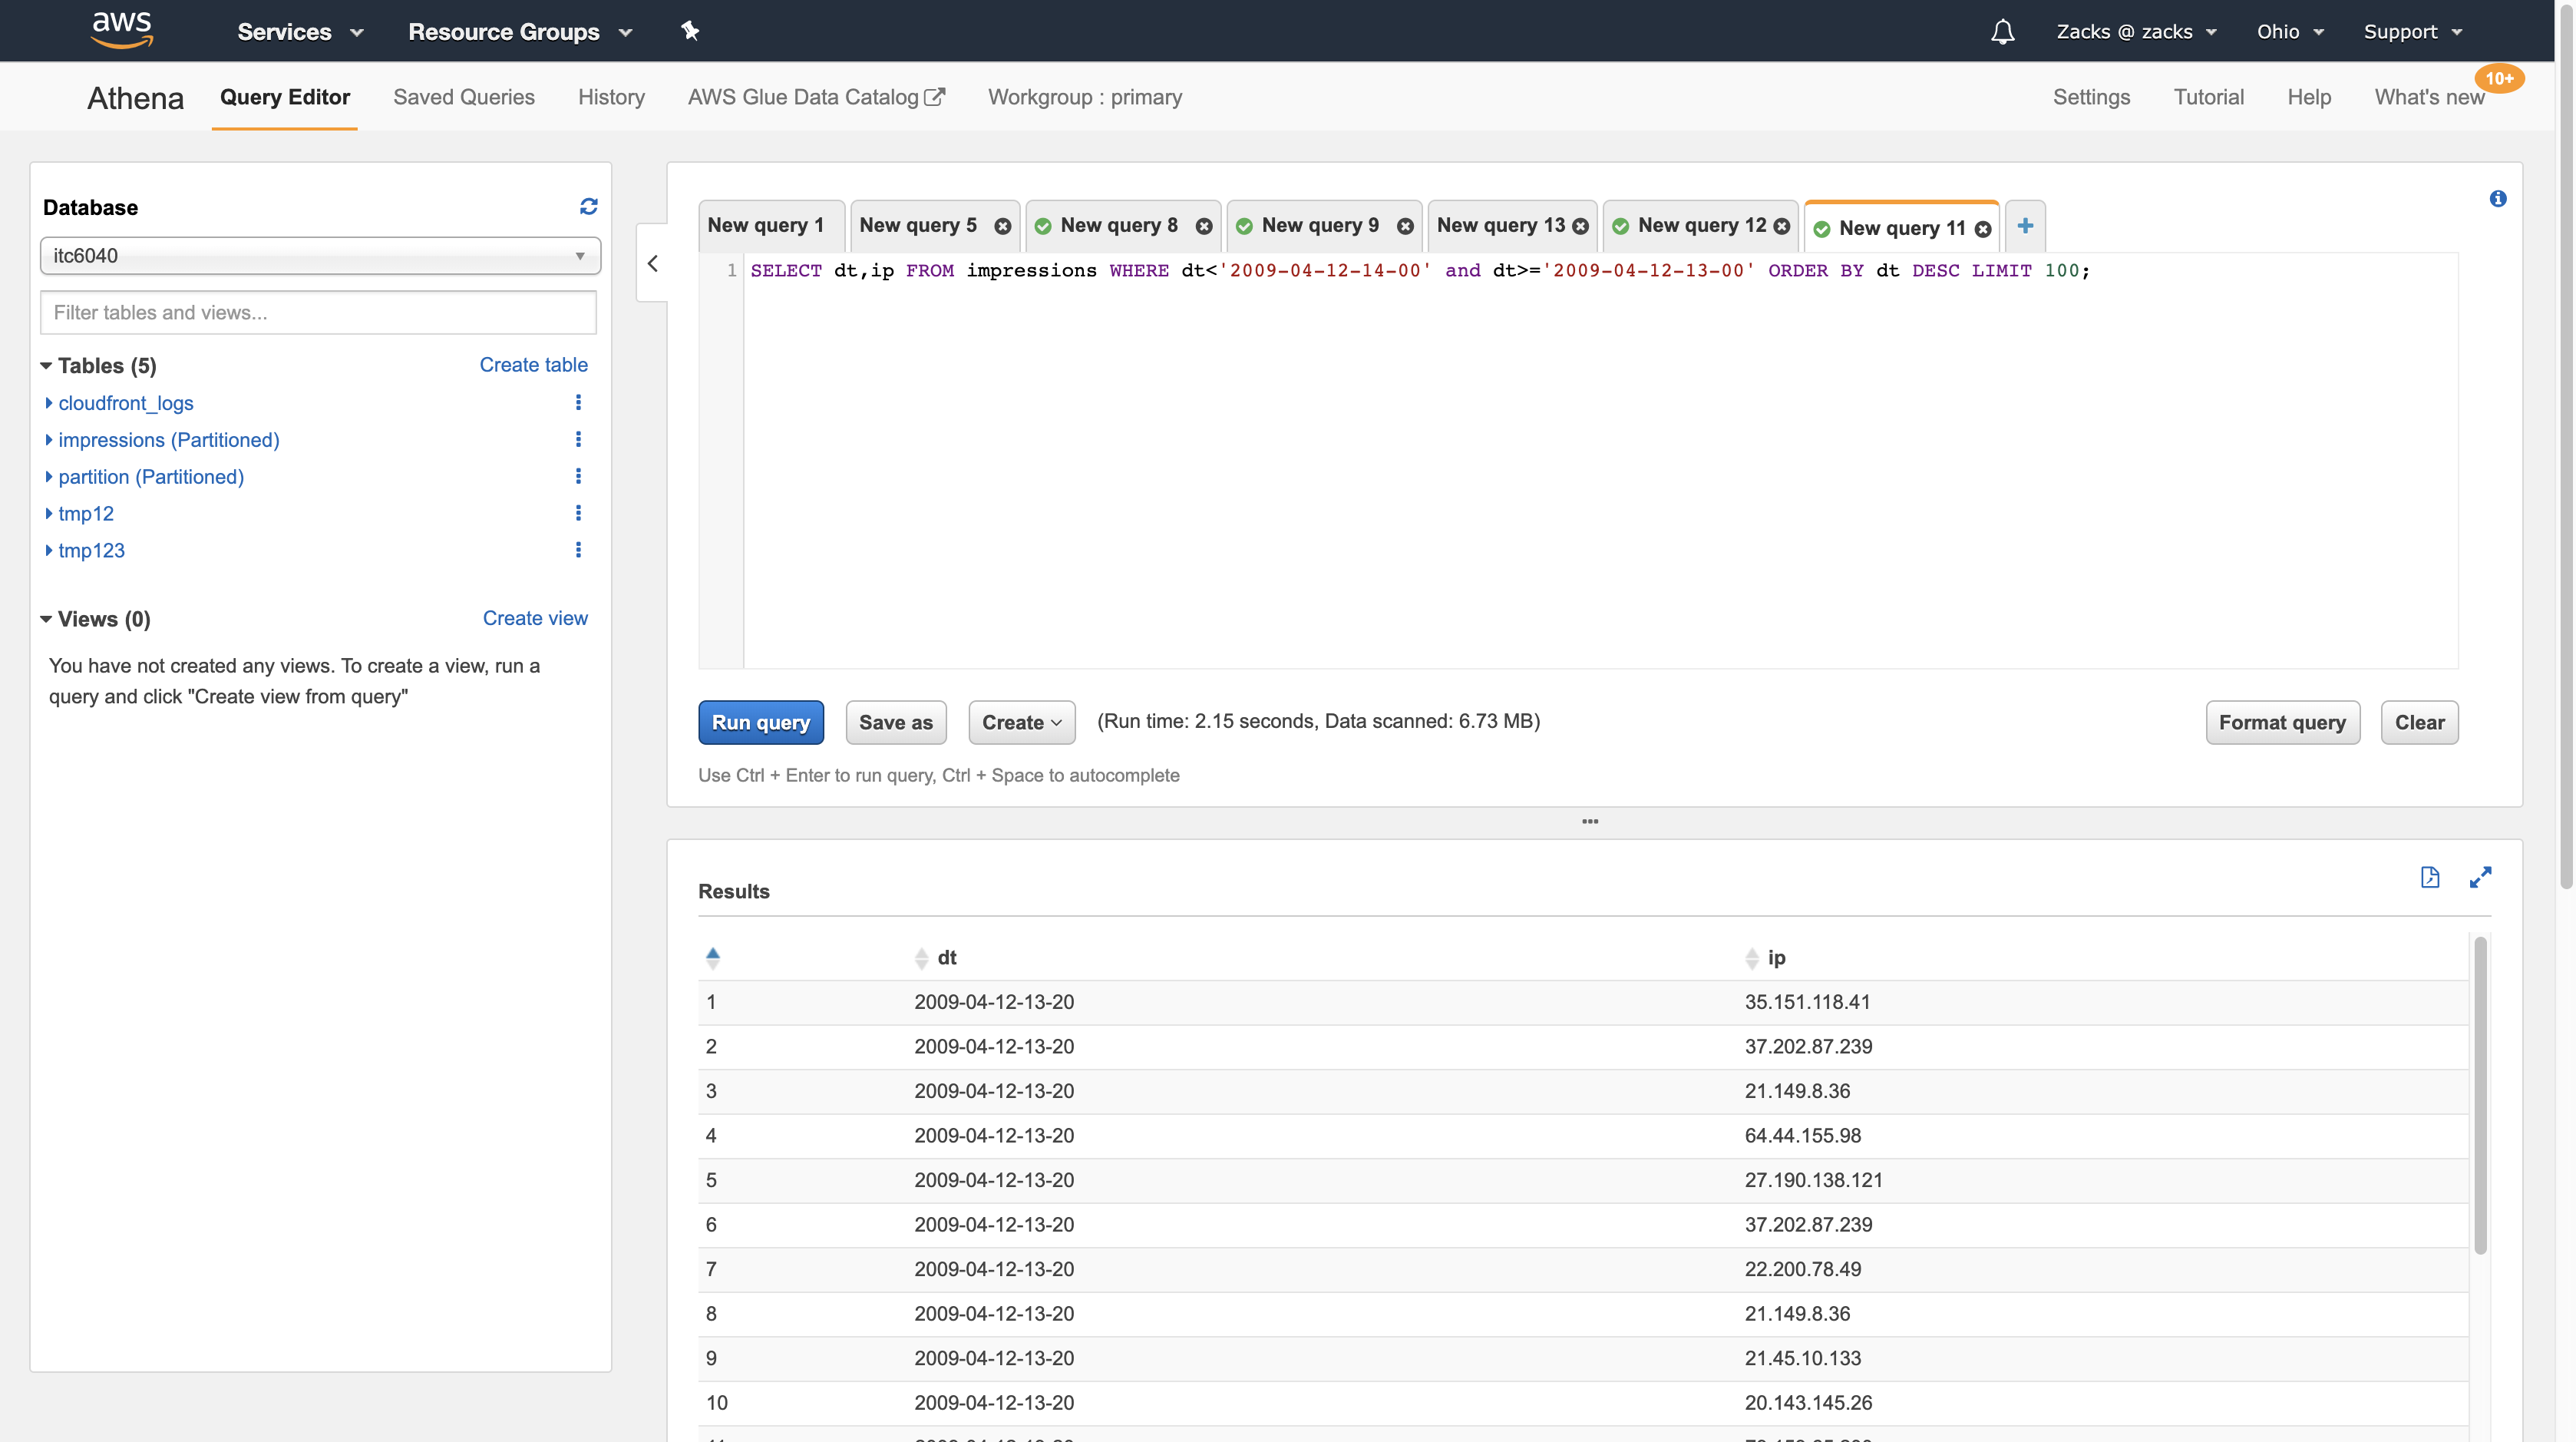
Query the data. In this query sentence, the server only search for data in the partition that larger or equal than 2009-04-12-13-00 and less than 2009-04-12-14-00, which means the table was partitioned by date(dt).
1 | SELECT dt,ip FROM impressions WHERE dt<'2009-04-12-14-00' and dt>='2009-04-12-13-00' ORDER BY dt DESC LIMIT 100 |
Add partition to a exist not partitioned table. For example, to load the data in s3://athena-examples-myregion/elb/plaintext/2015/01/01/, you can run the following:
1 | ALTER TABLE elb_logs_raw_native_part ADD PARTITION (year='2015',month='01',day='01') location 's3://athena-examples-us-west-1/elb/plaintext/2015/01/01/' |
Running Queryies
Query Results and Query History
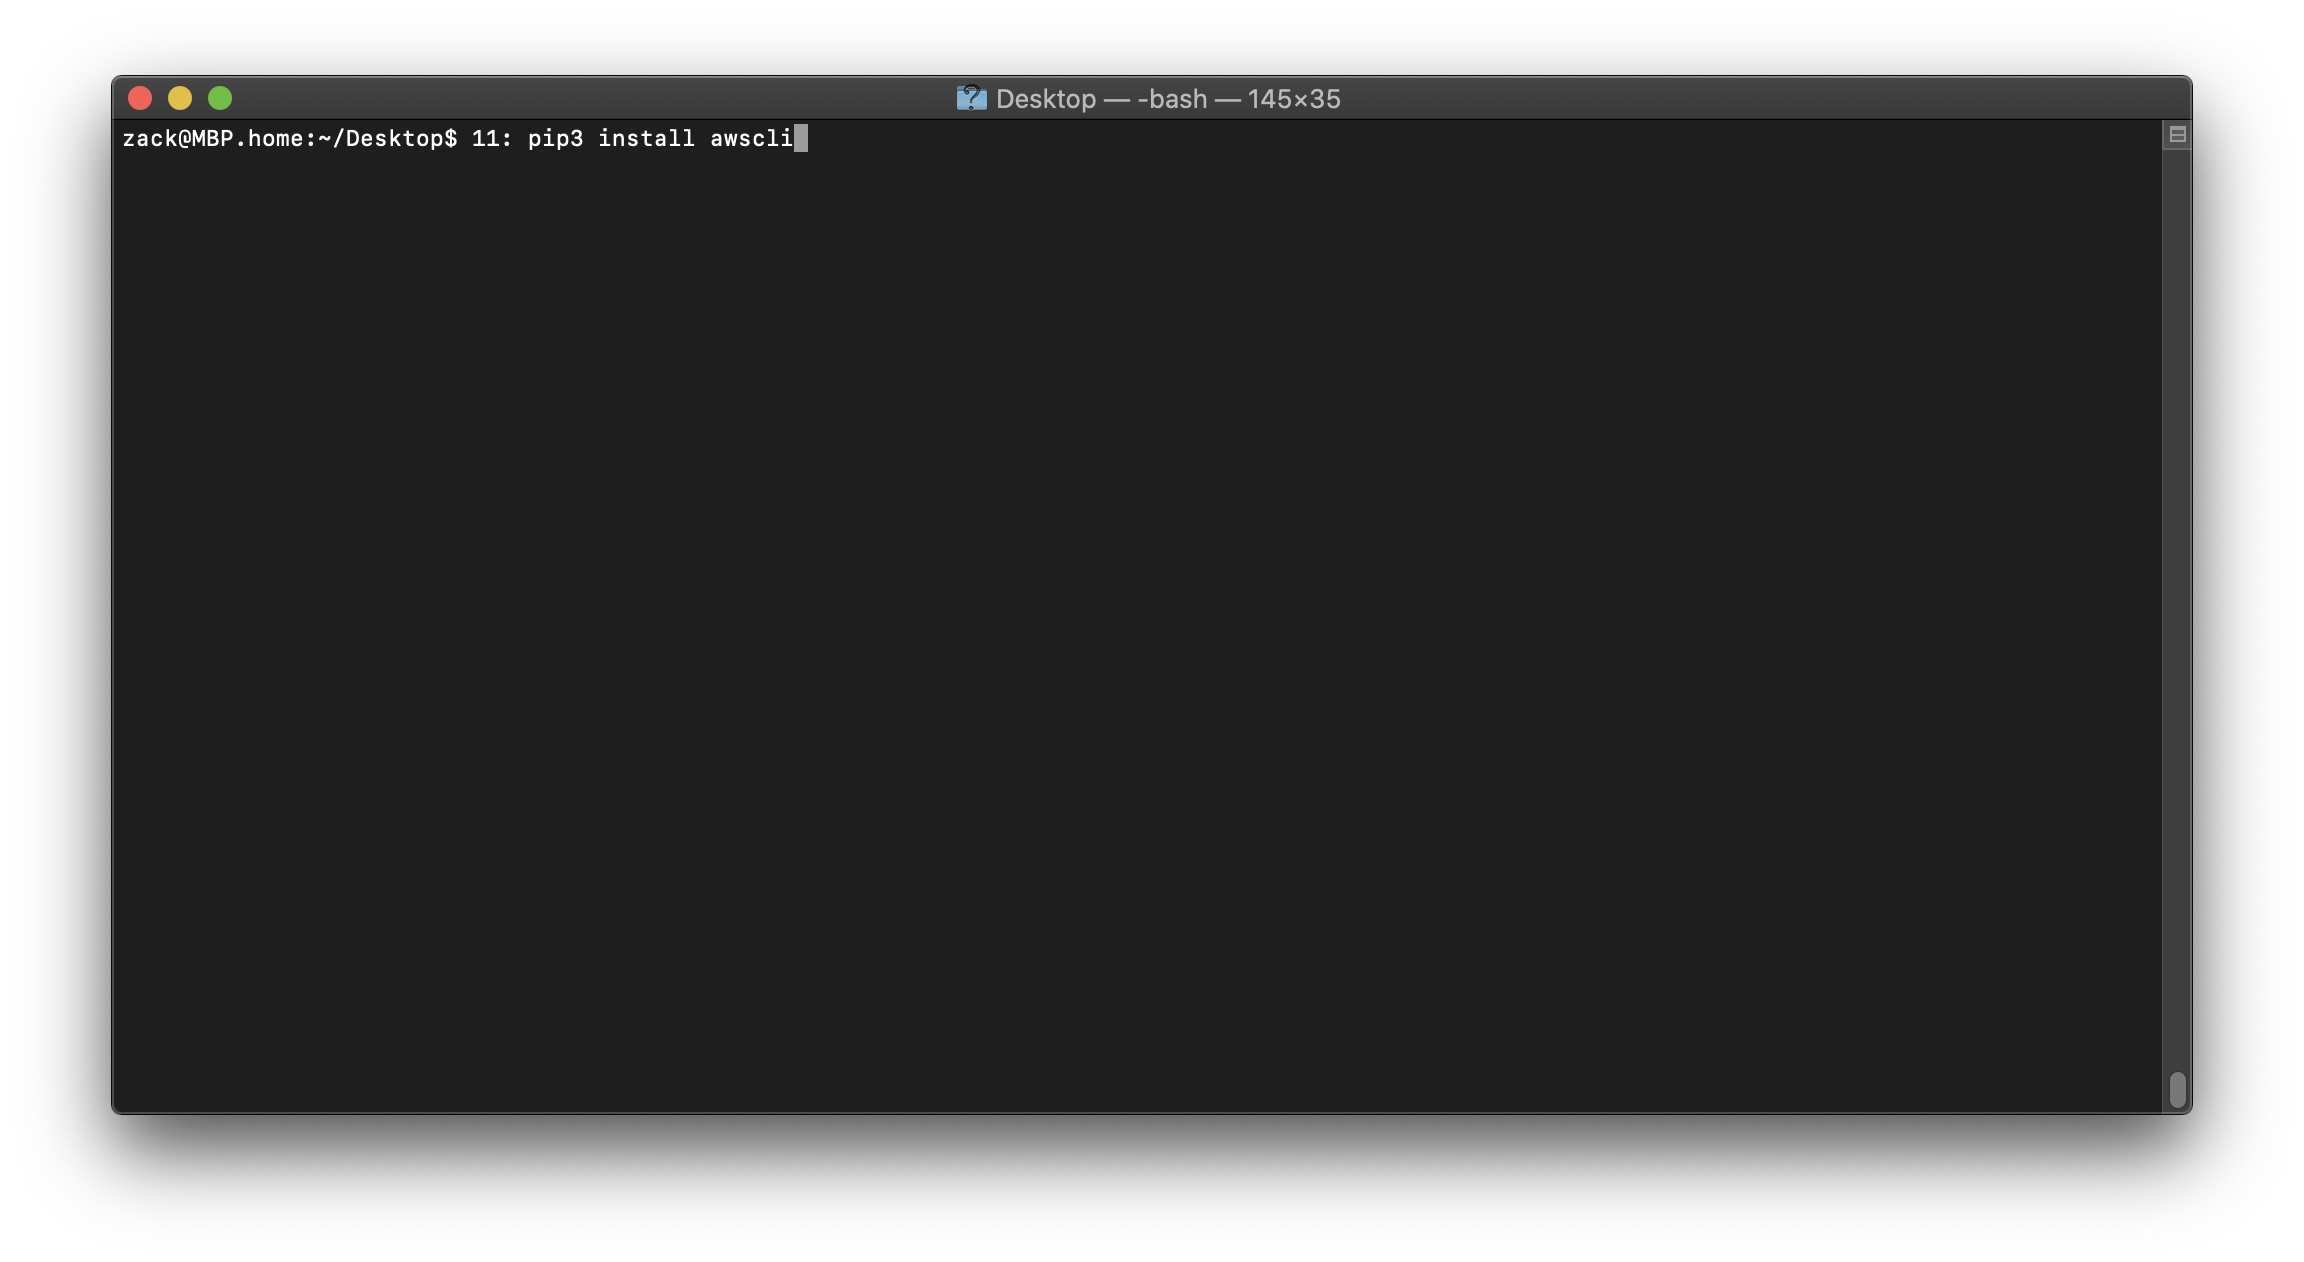
Install awscli (MacOS). Prerequisite: Python3 and pip3.
1 | pip3 install awscli |
Create an access key and copy the paired secret access key at console.aws.amazon.com/iam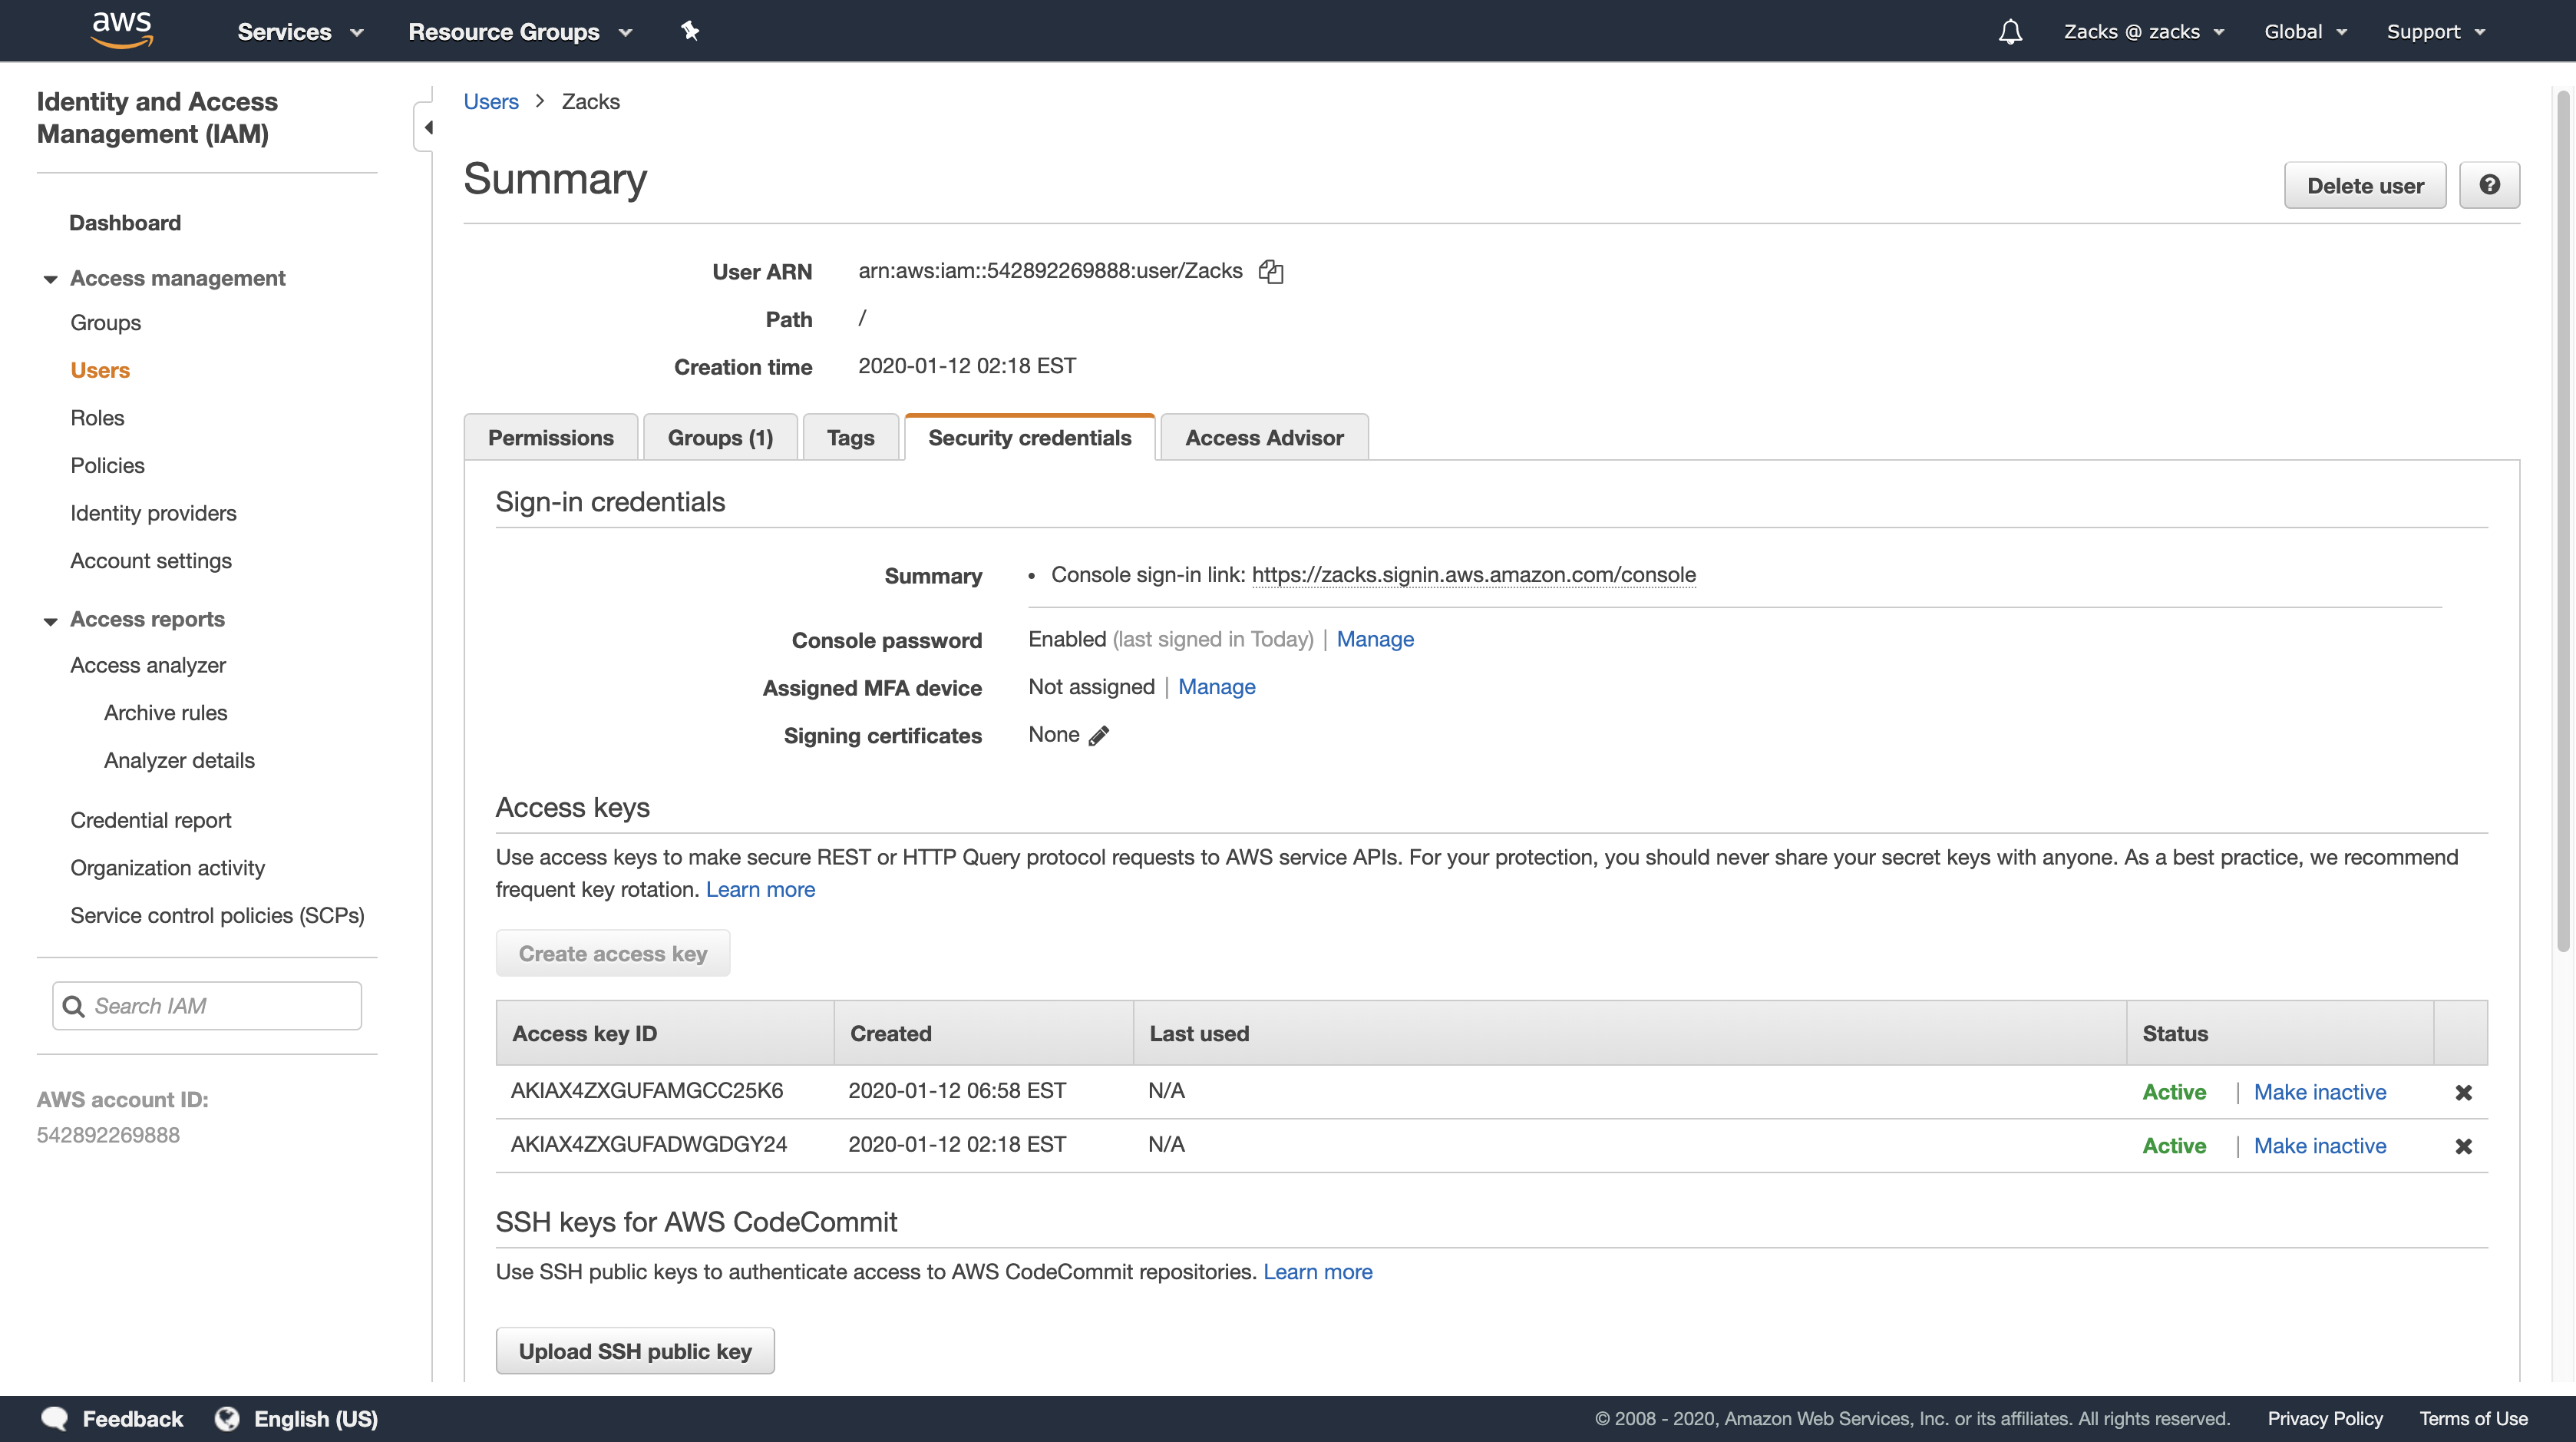
Configure aws cli.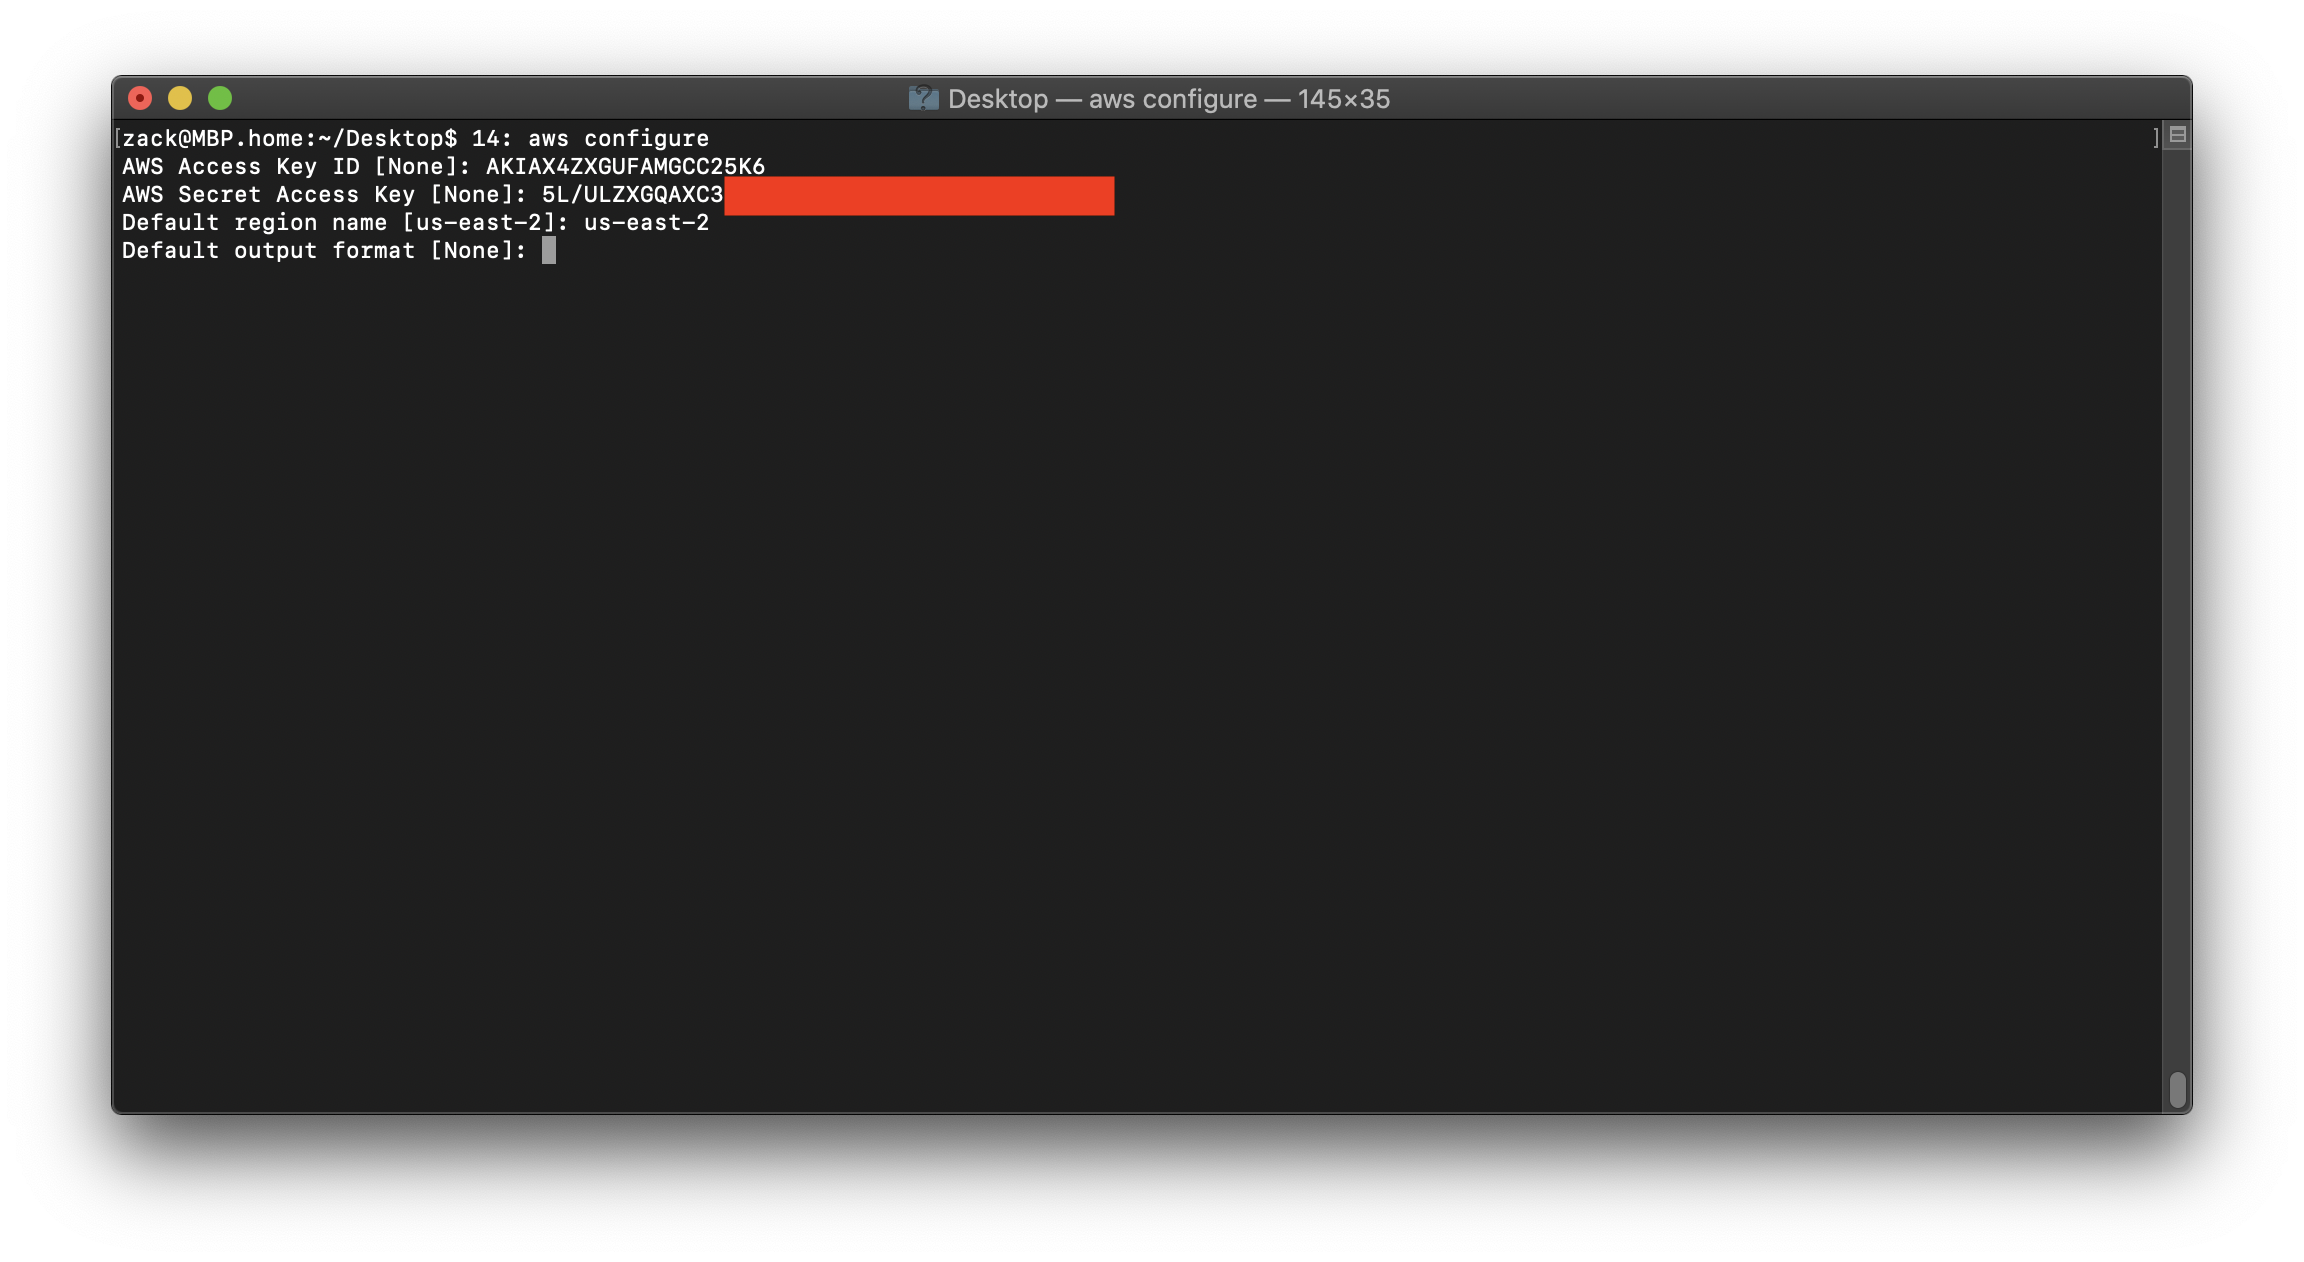
Back to AWS Athena. Click history and choose one query and copy the query id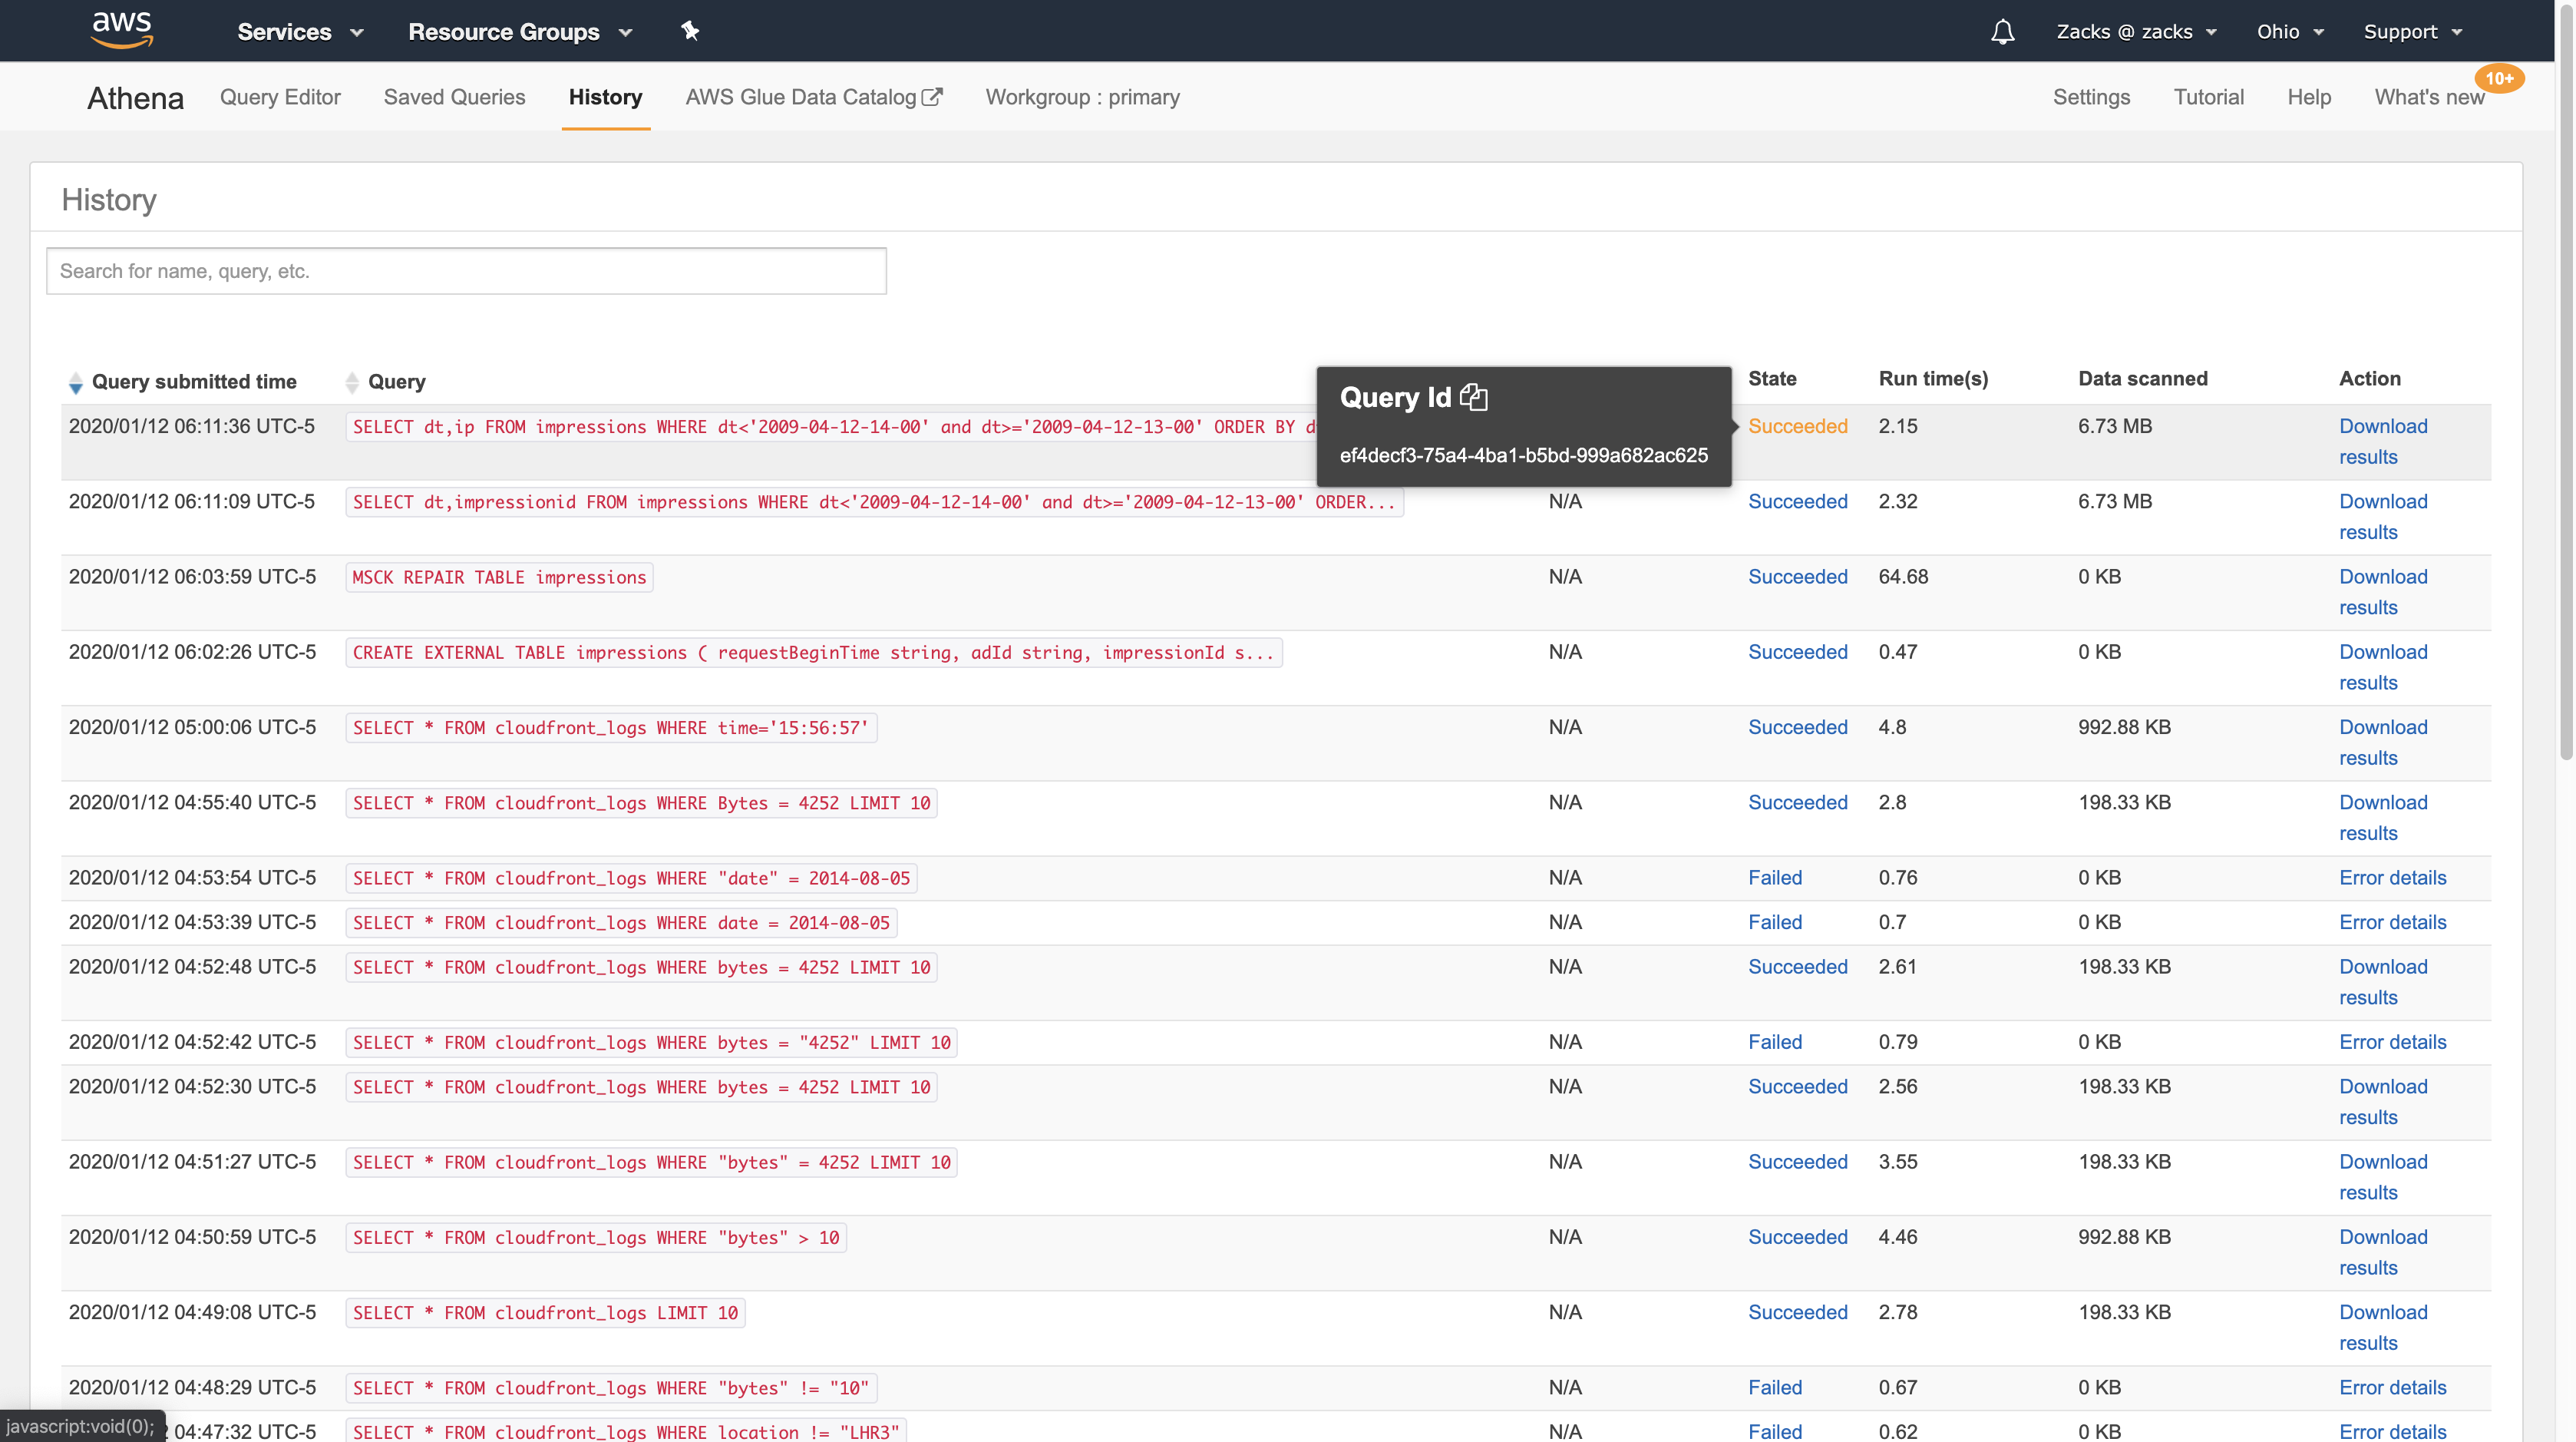
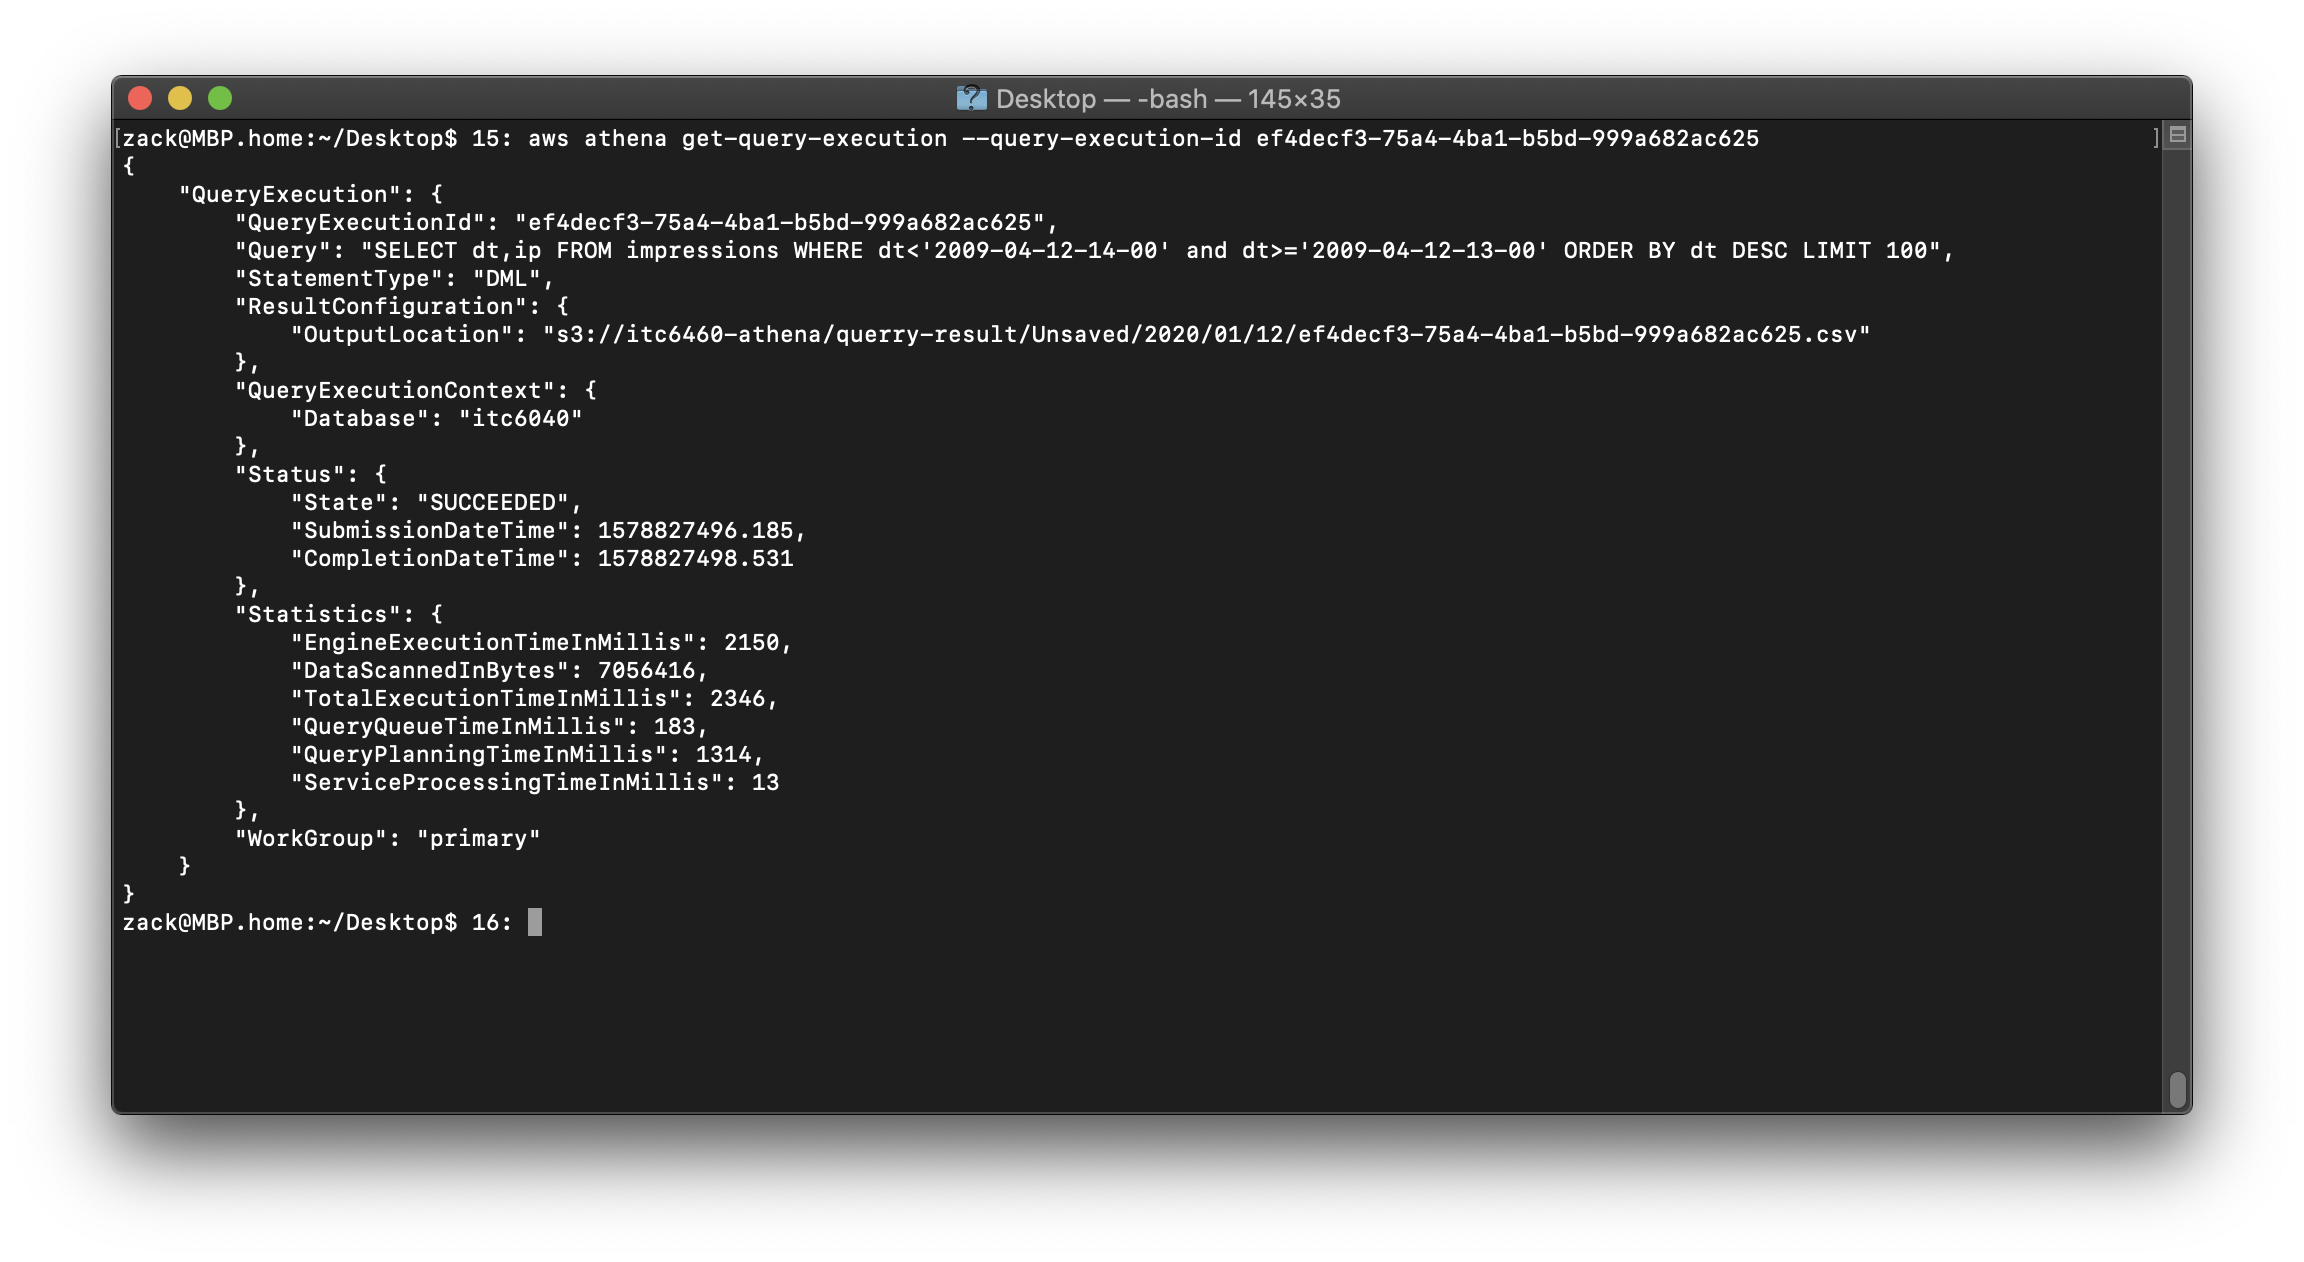
To identify the query output location and query result files using the AWS CLI.
1 | aws athena get-query-execution --query-execution-id ef4decf3-75a4-4ba1-b5bd-999a682ac625 |
Download the query result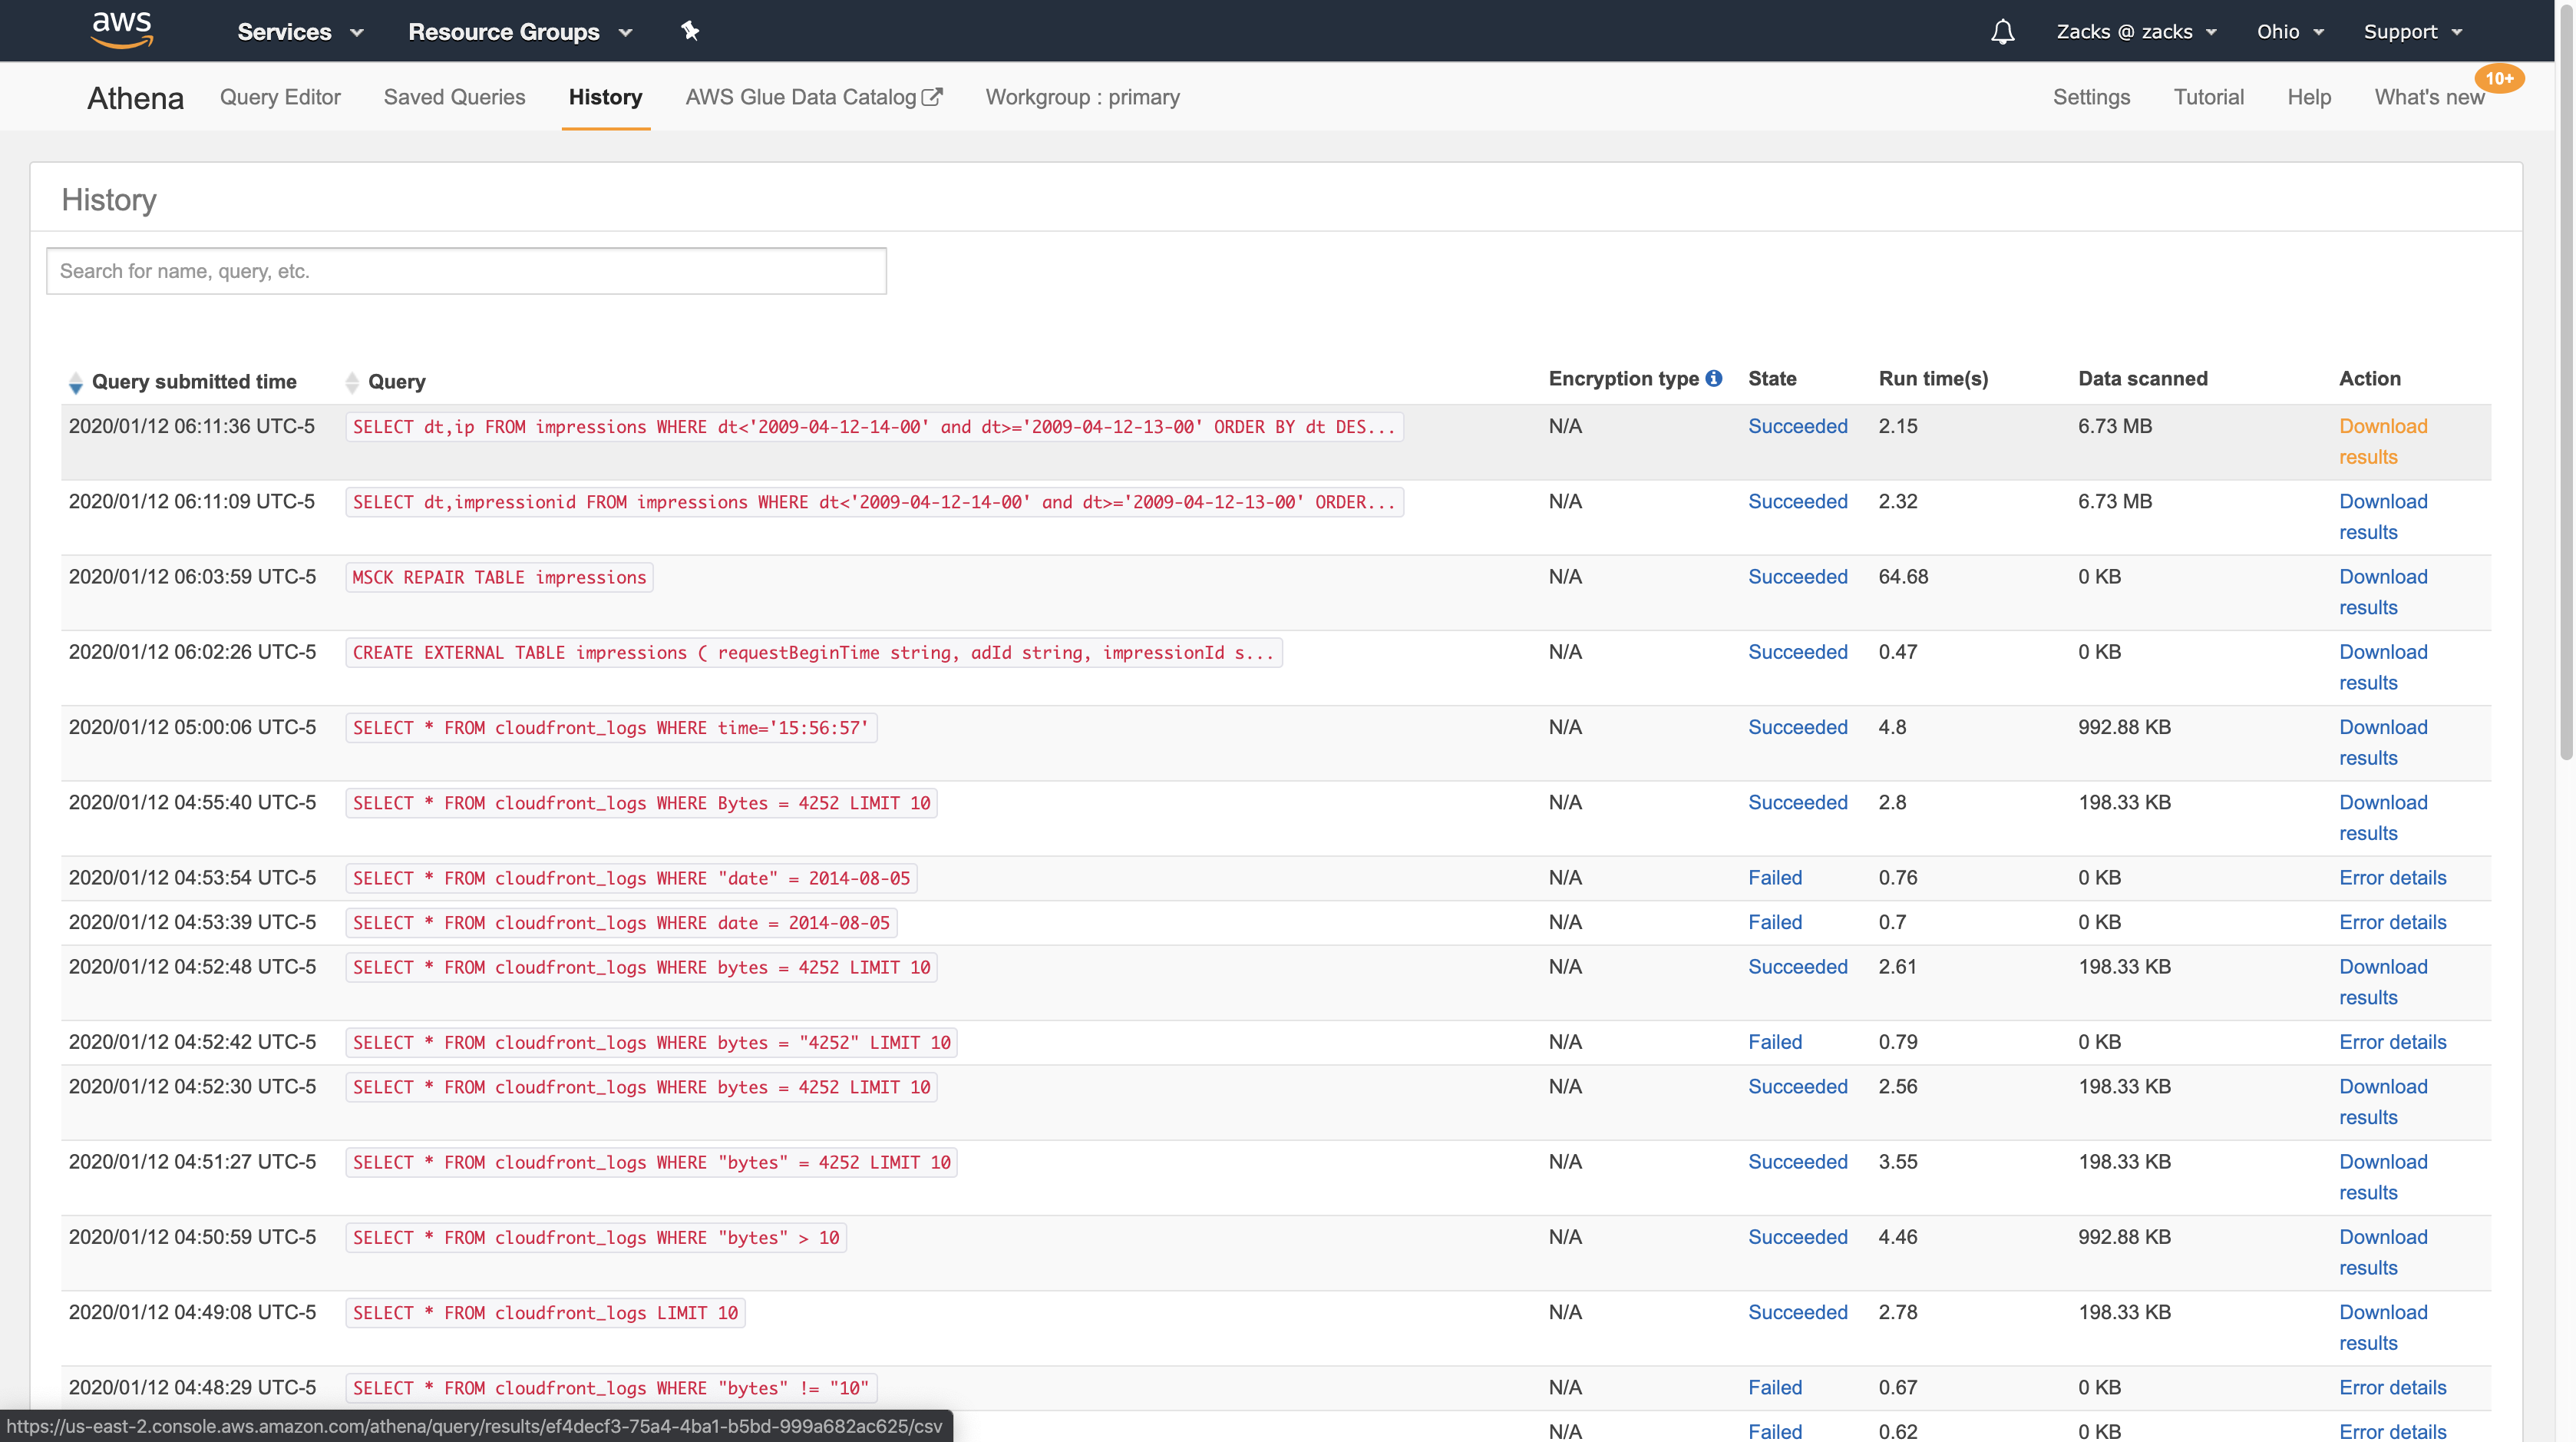
Working with views
Query and create a view
1 | SELECT * FROM cloudfront_logs |
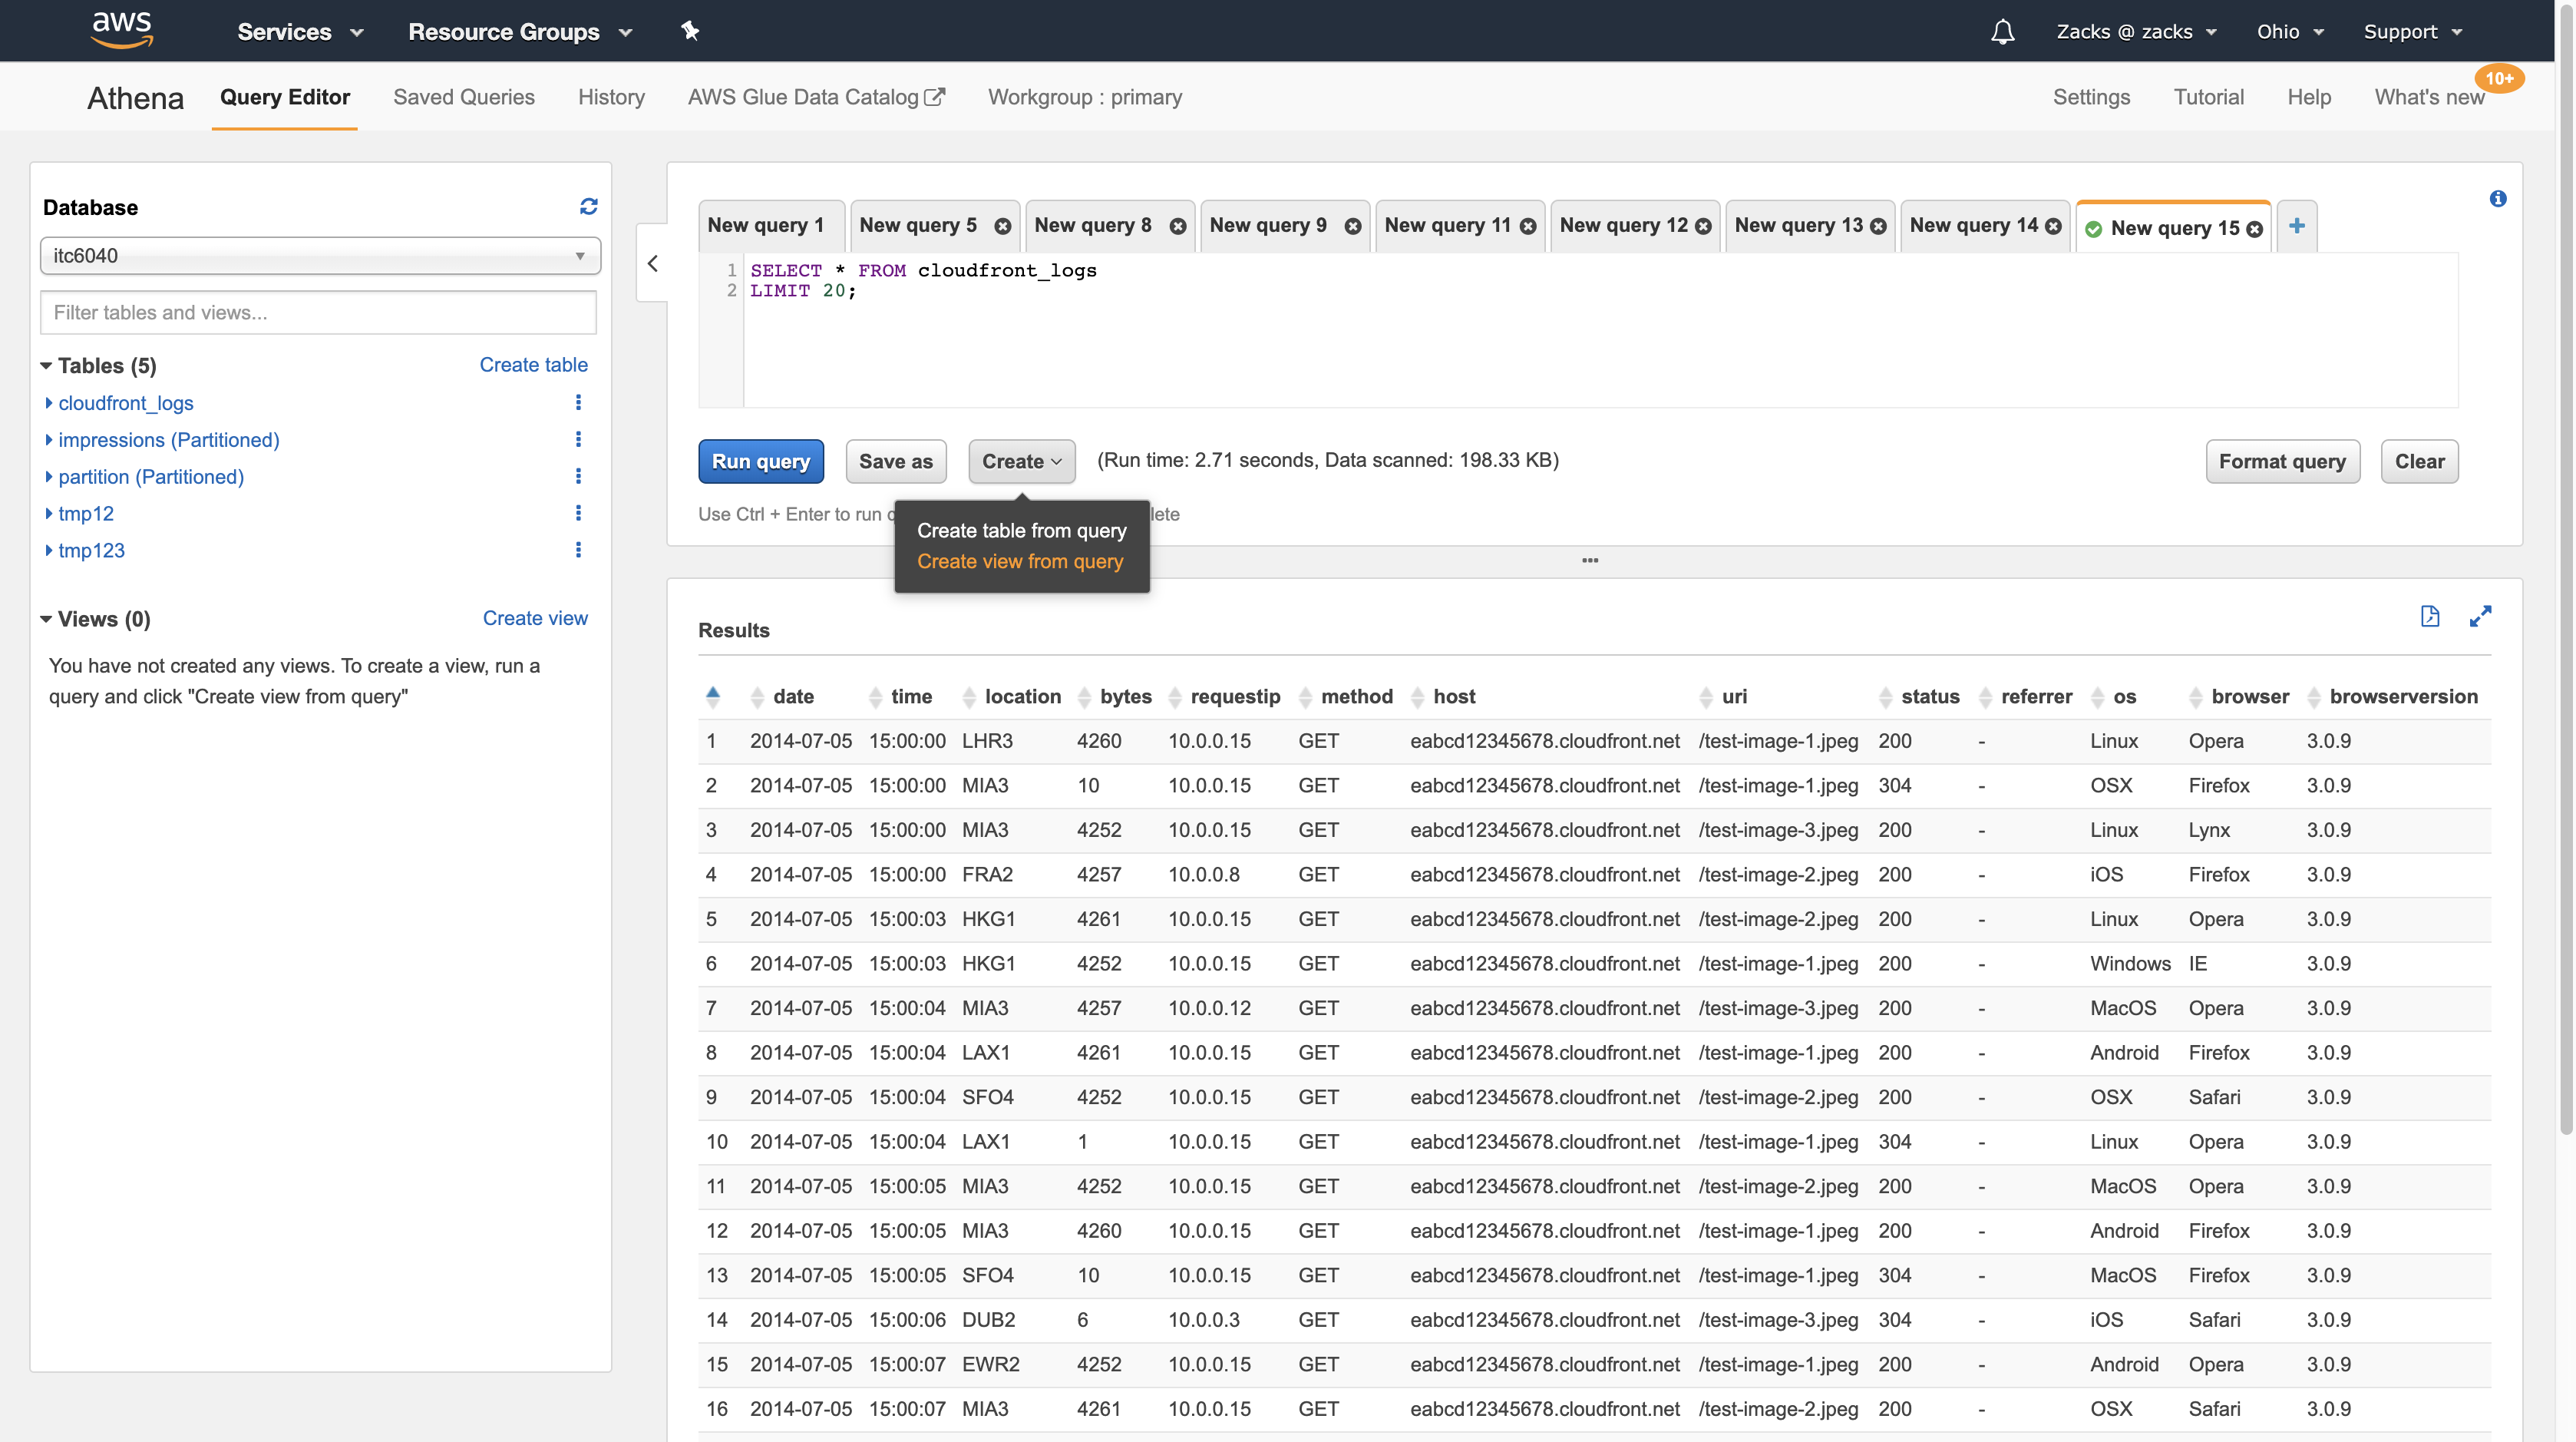
As we can see at the Views panel. It means we use * as the logical table’s columns.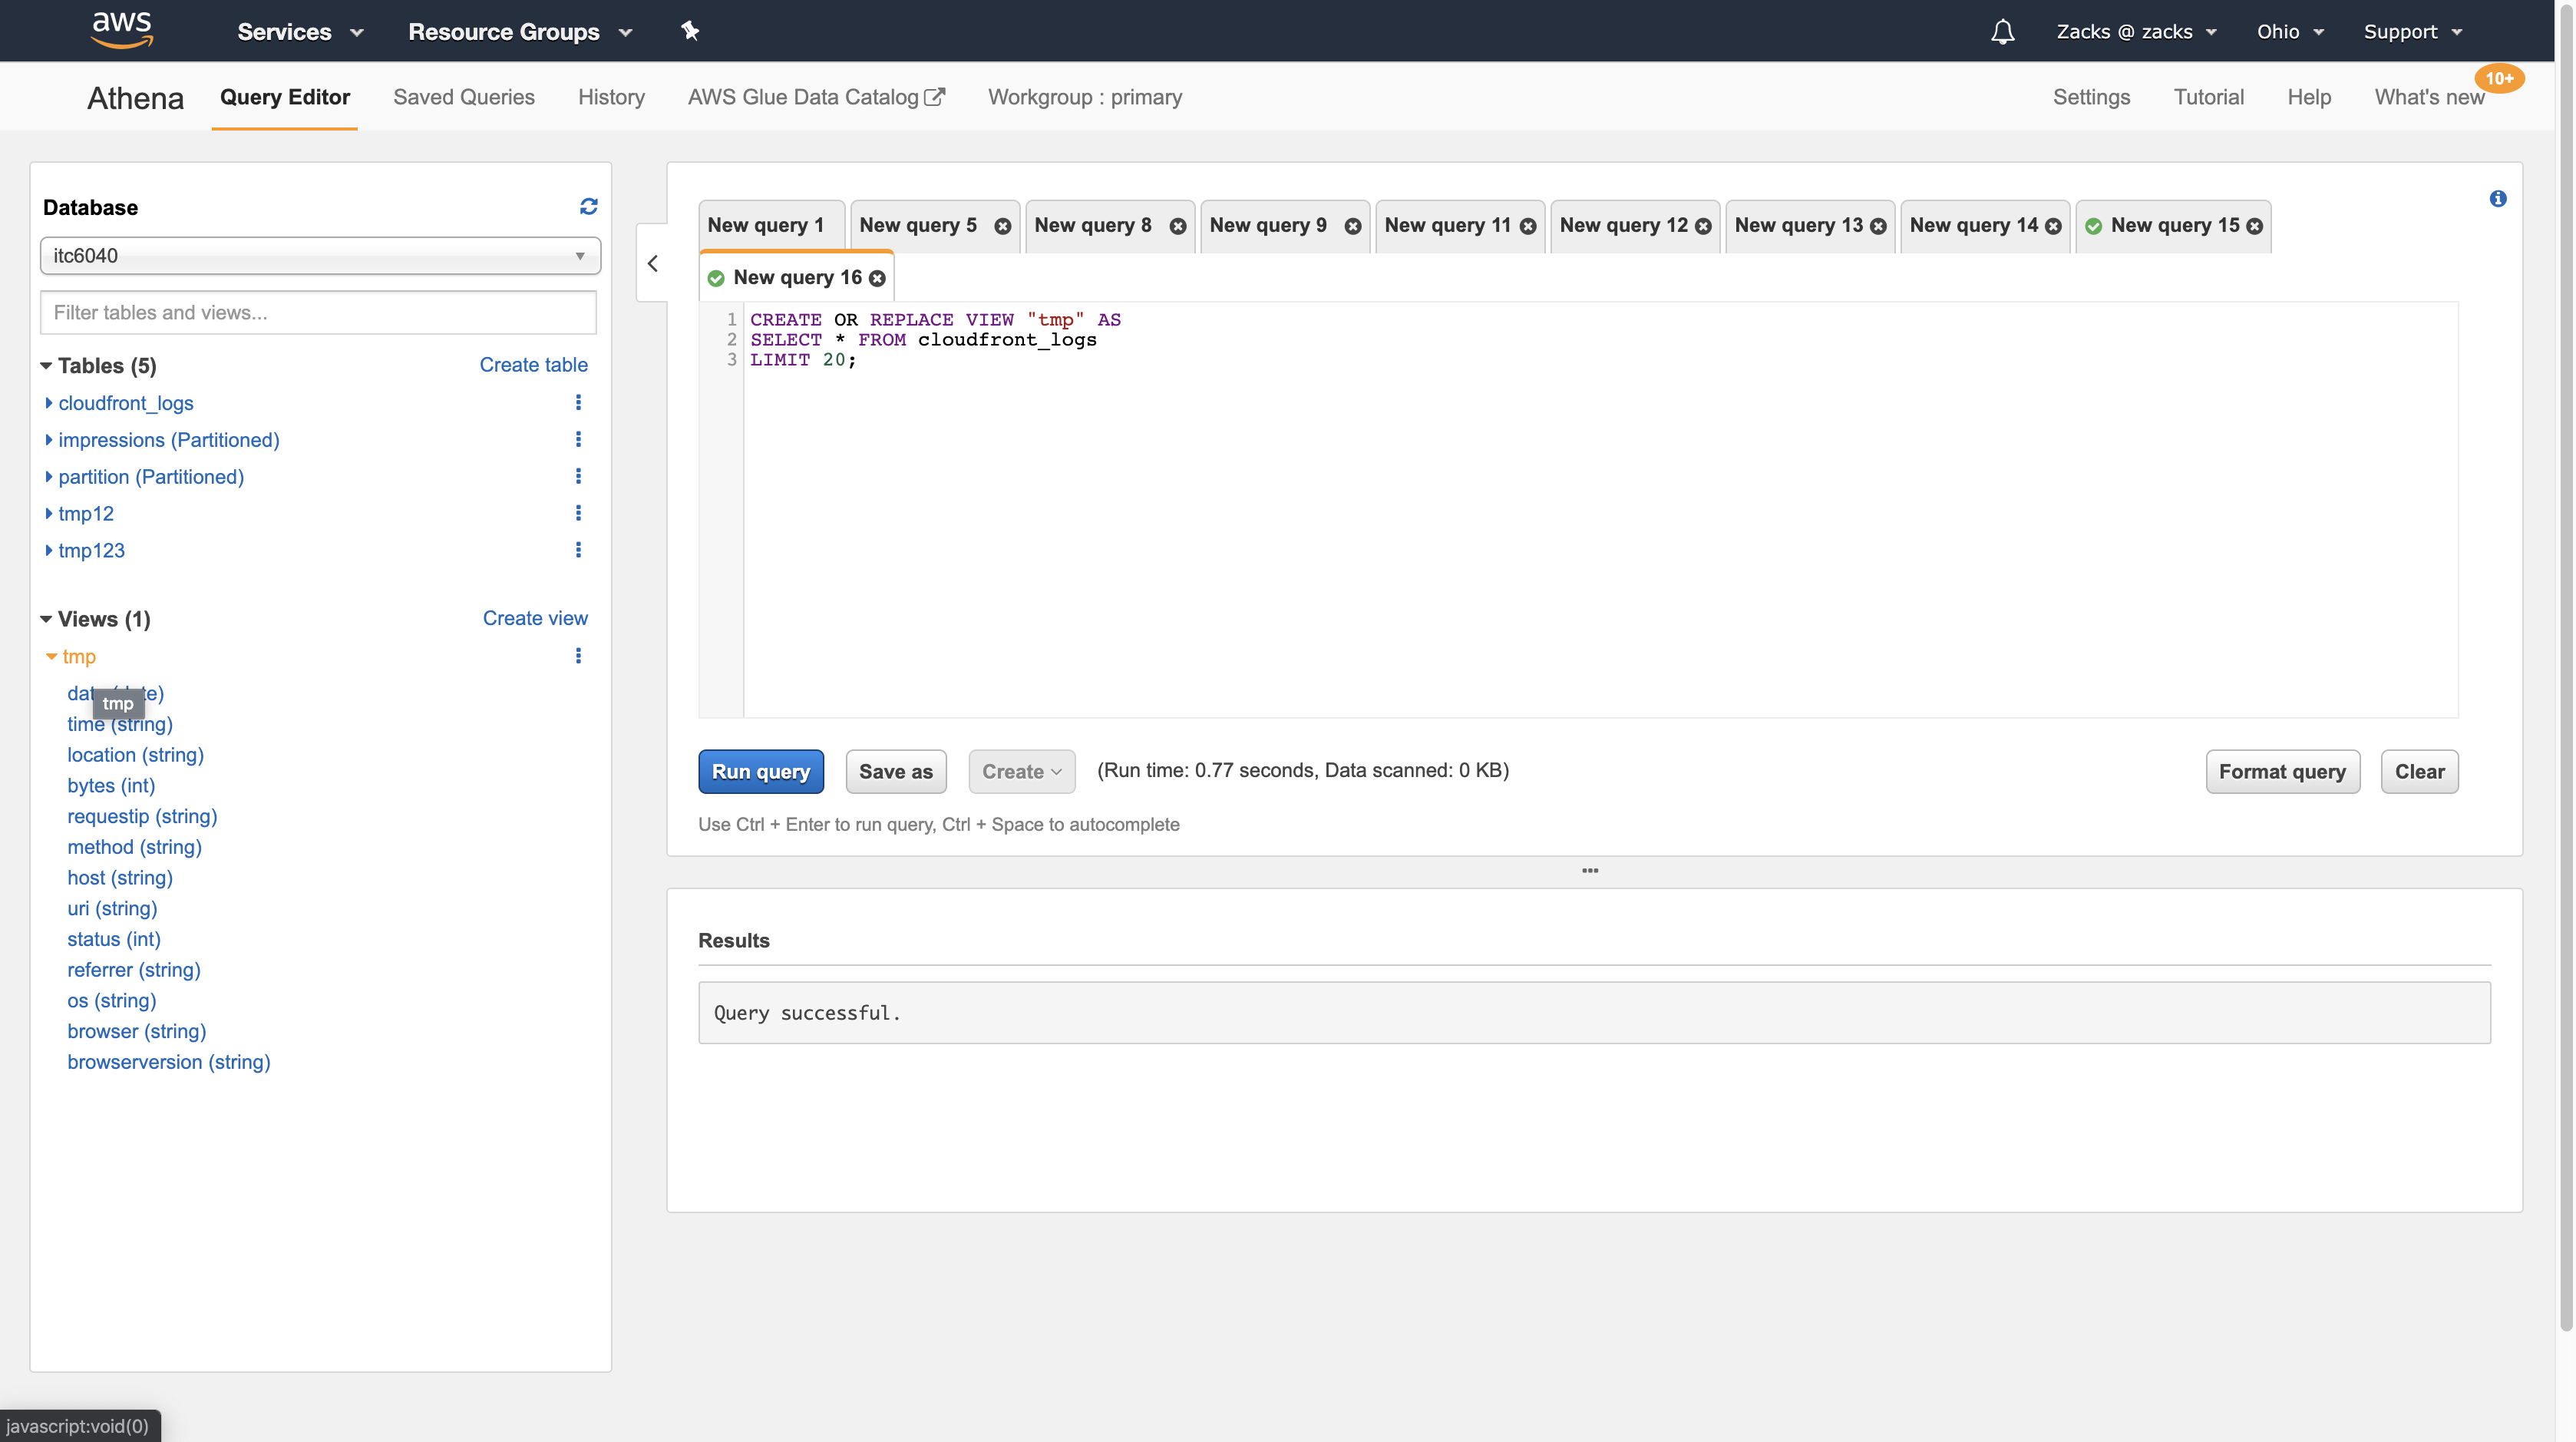
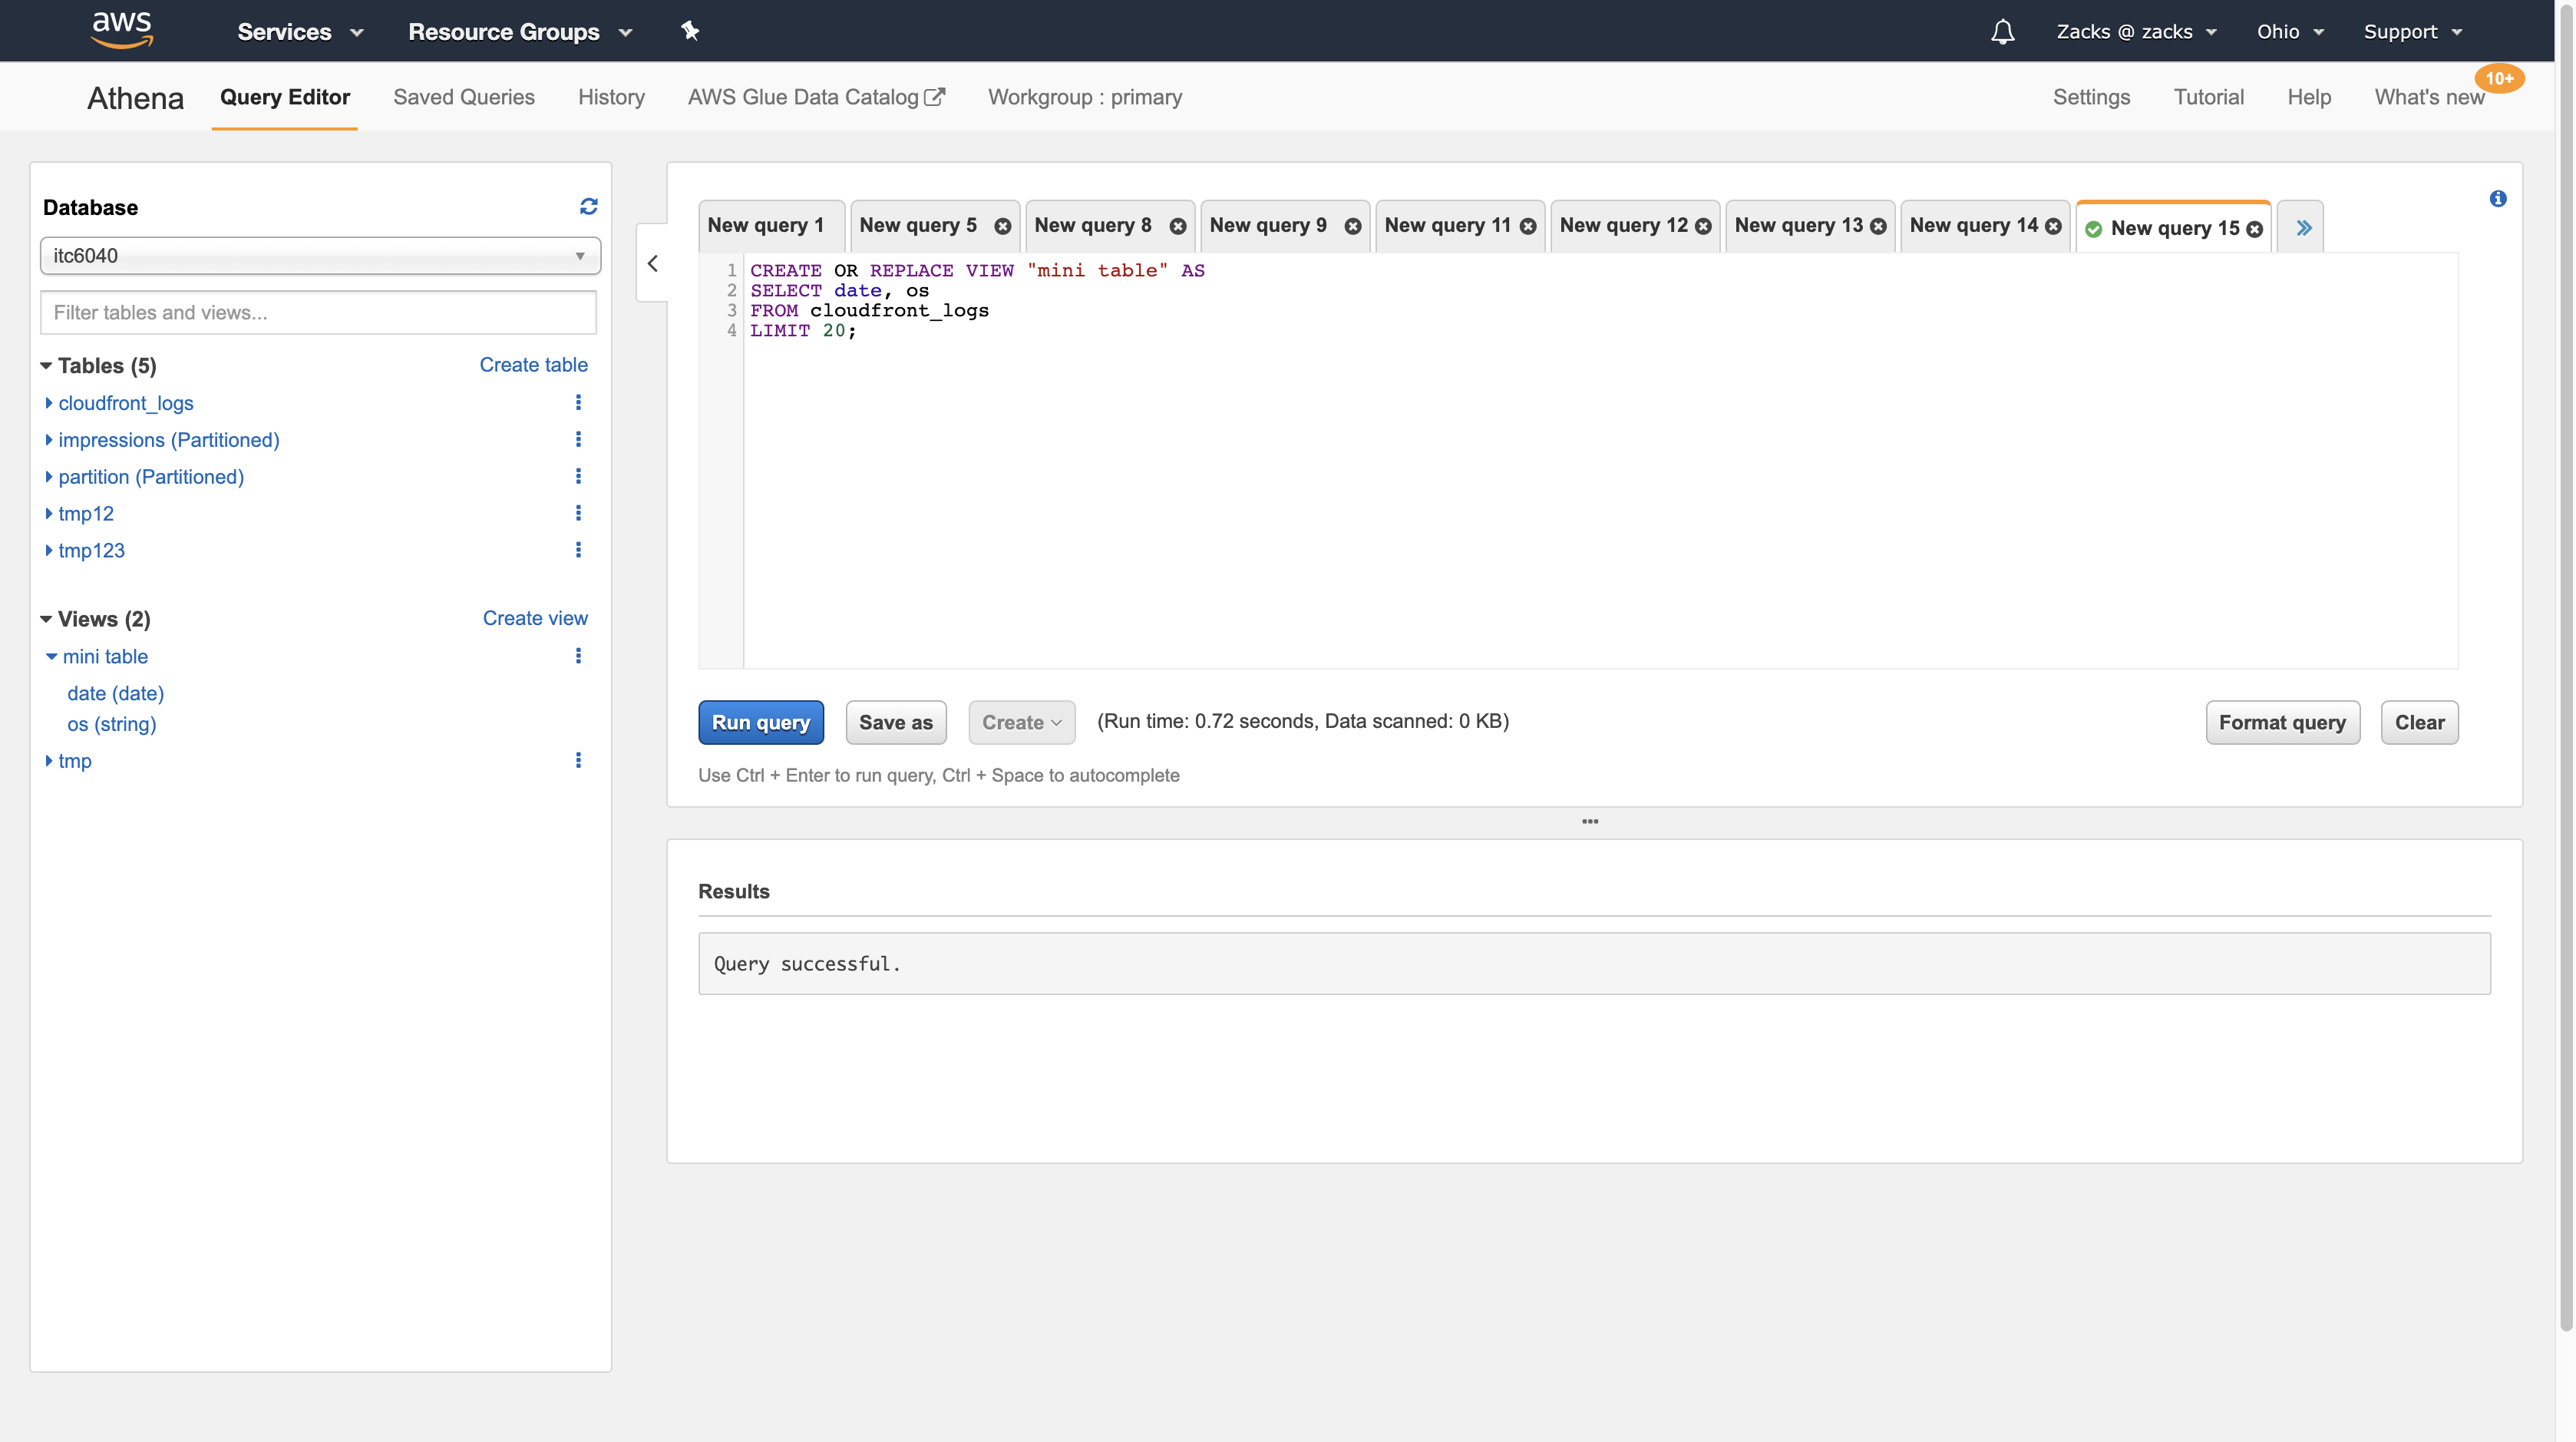
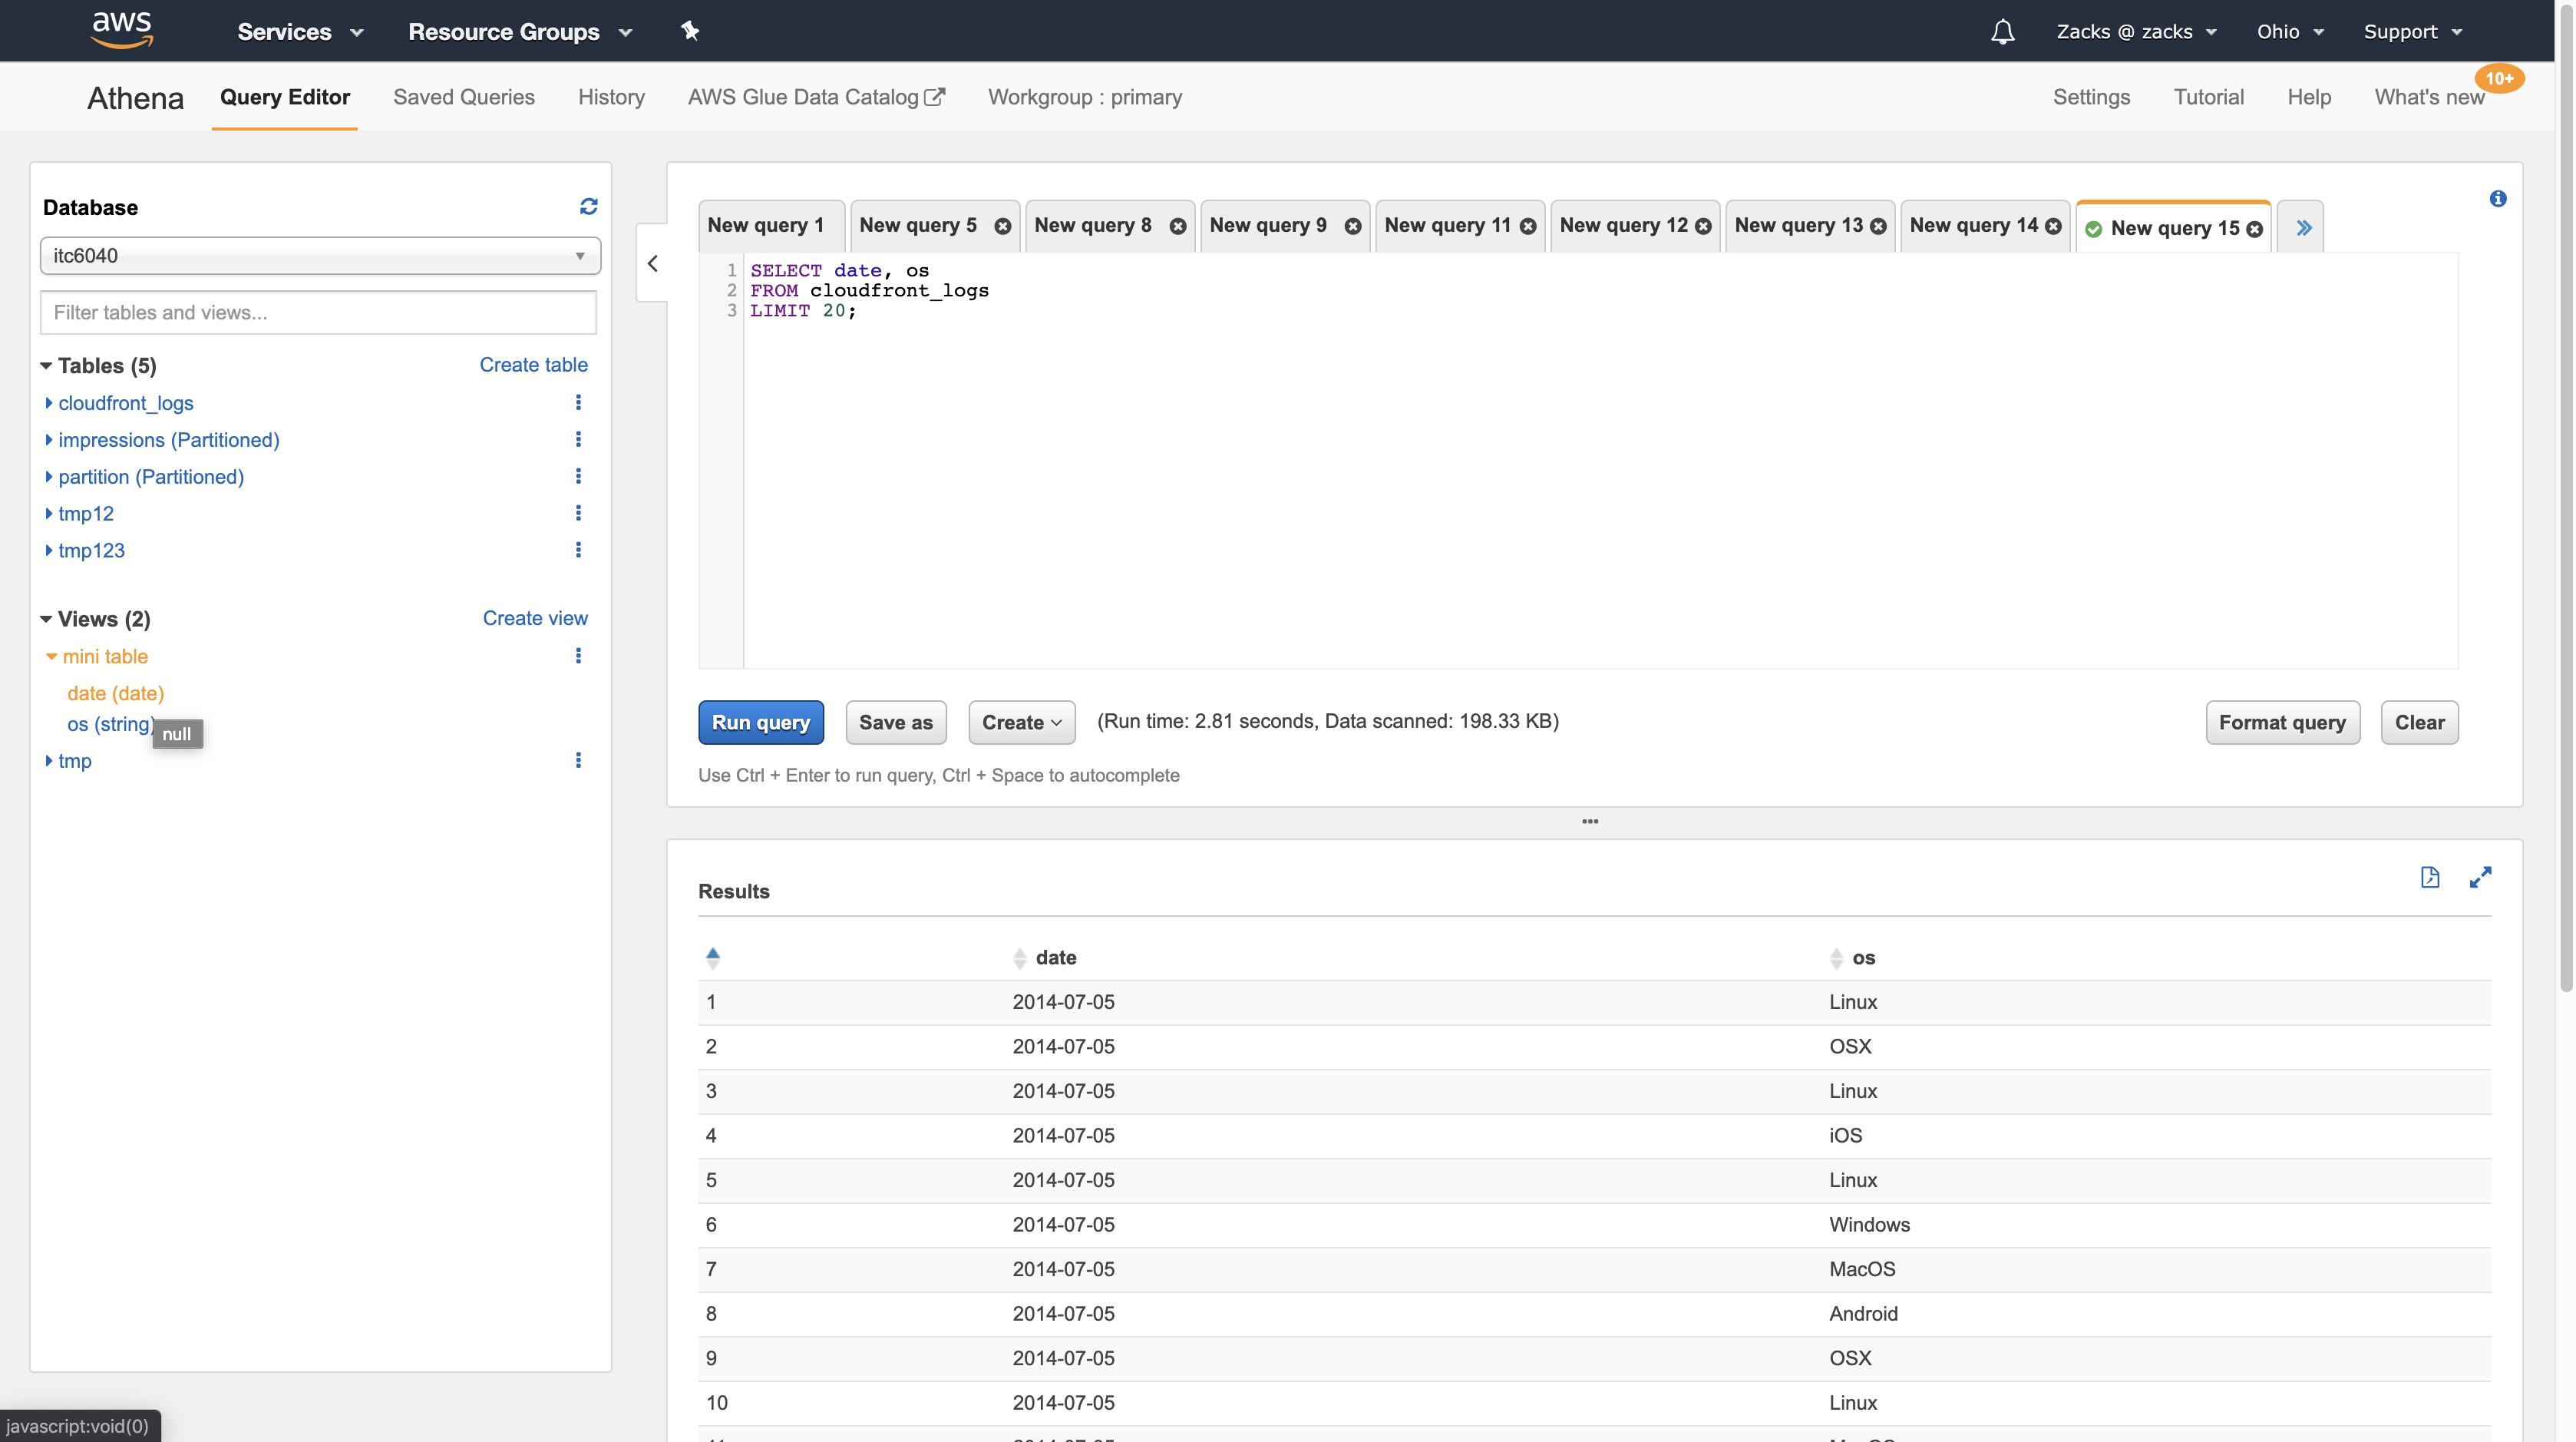
This time we create a mini table only contains date and os columns.
1 | SELECT date, os |
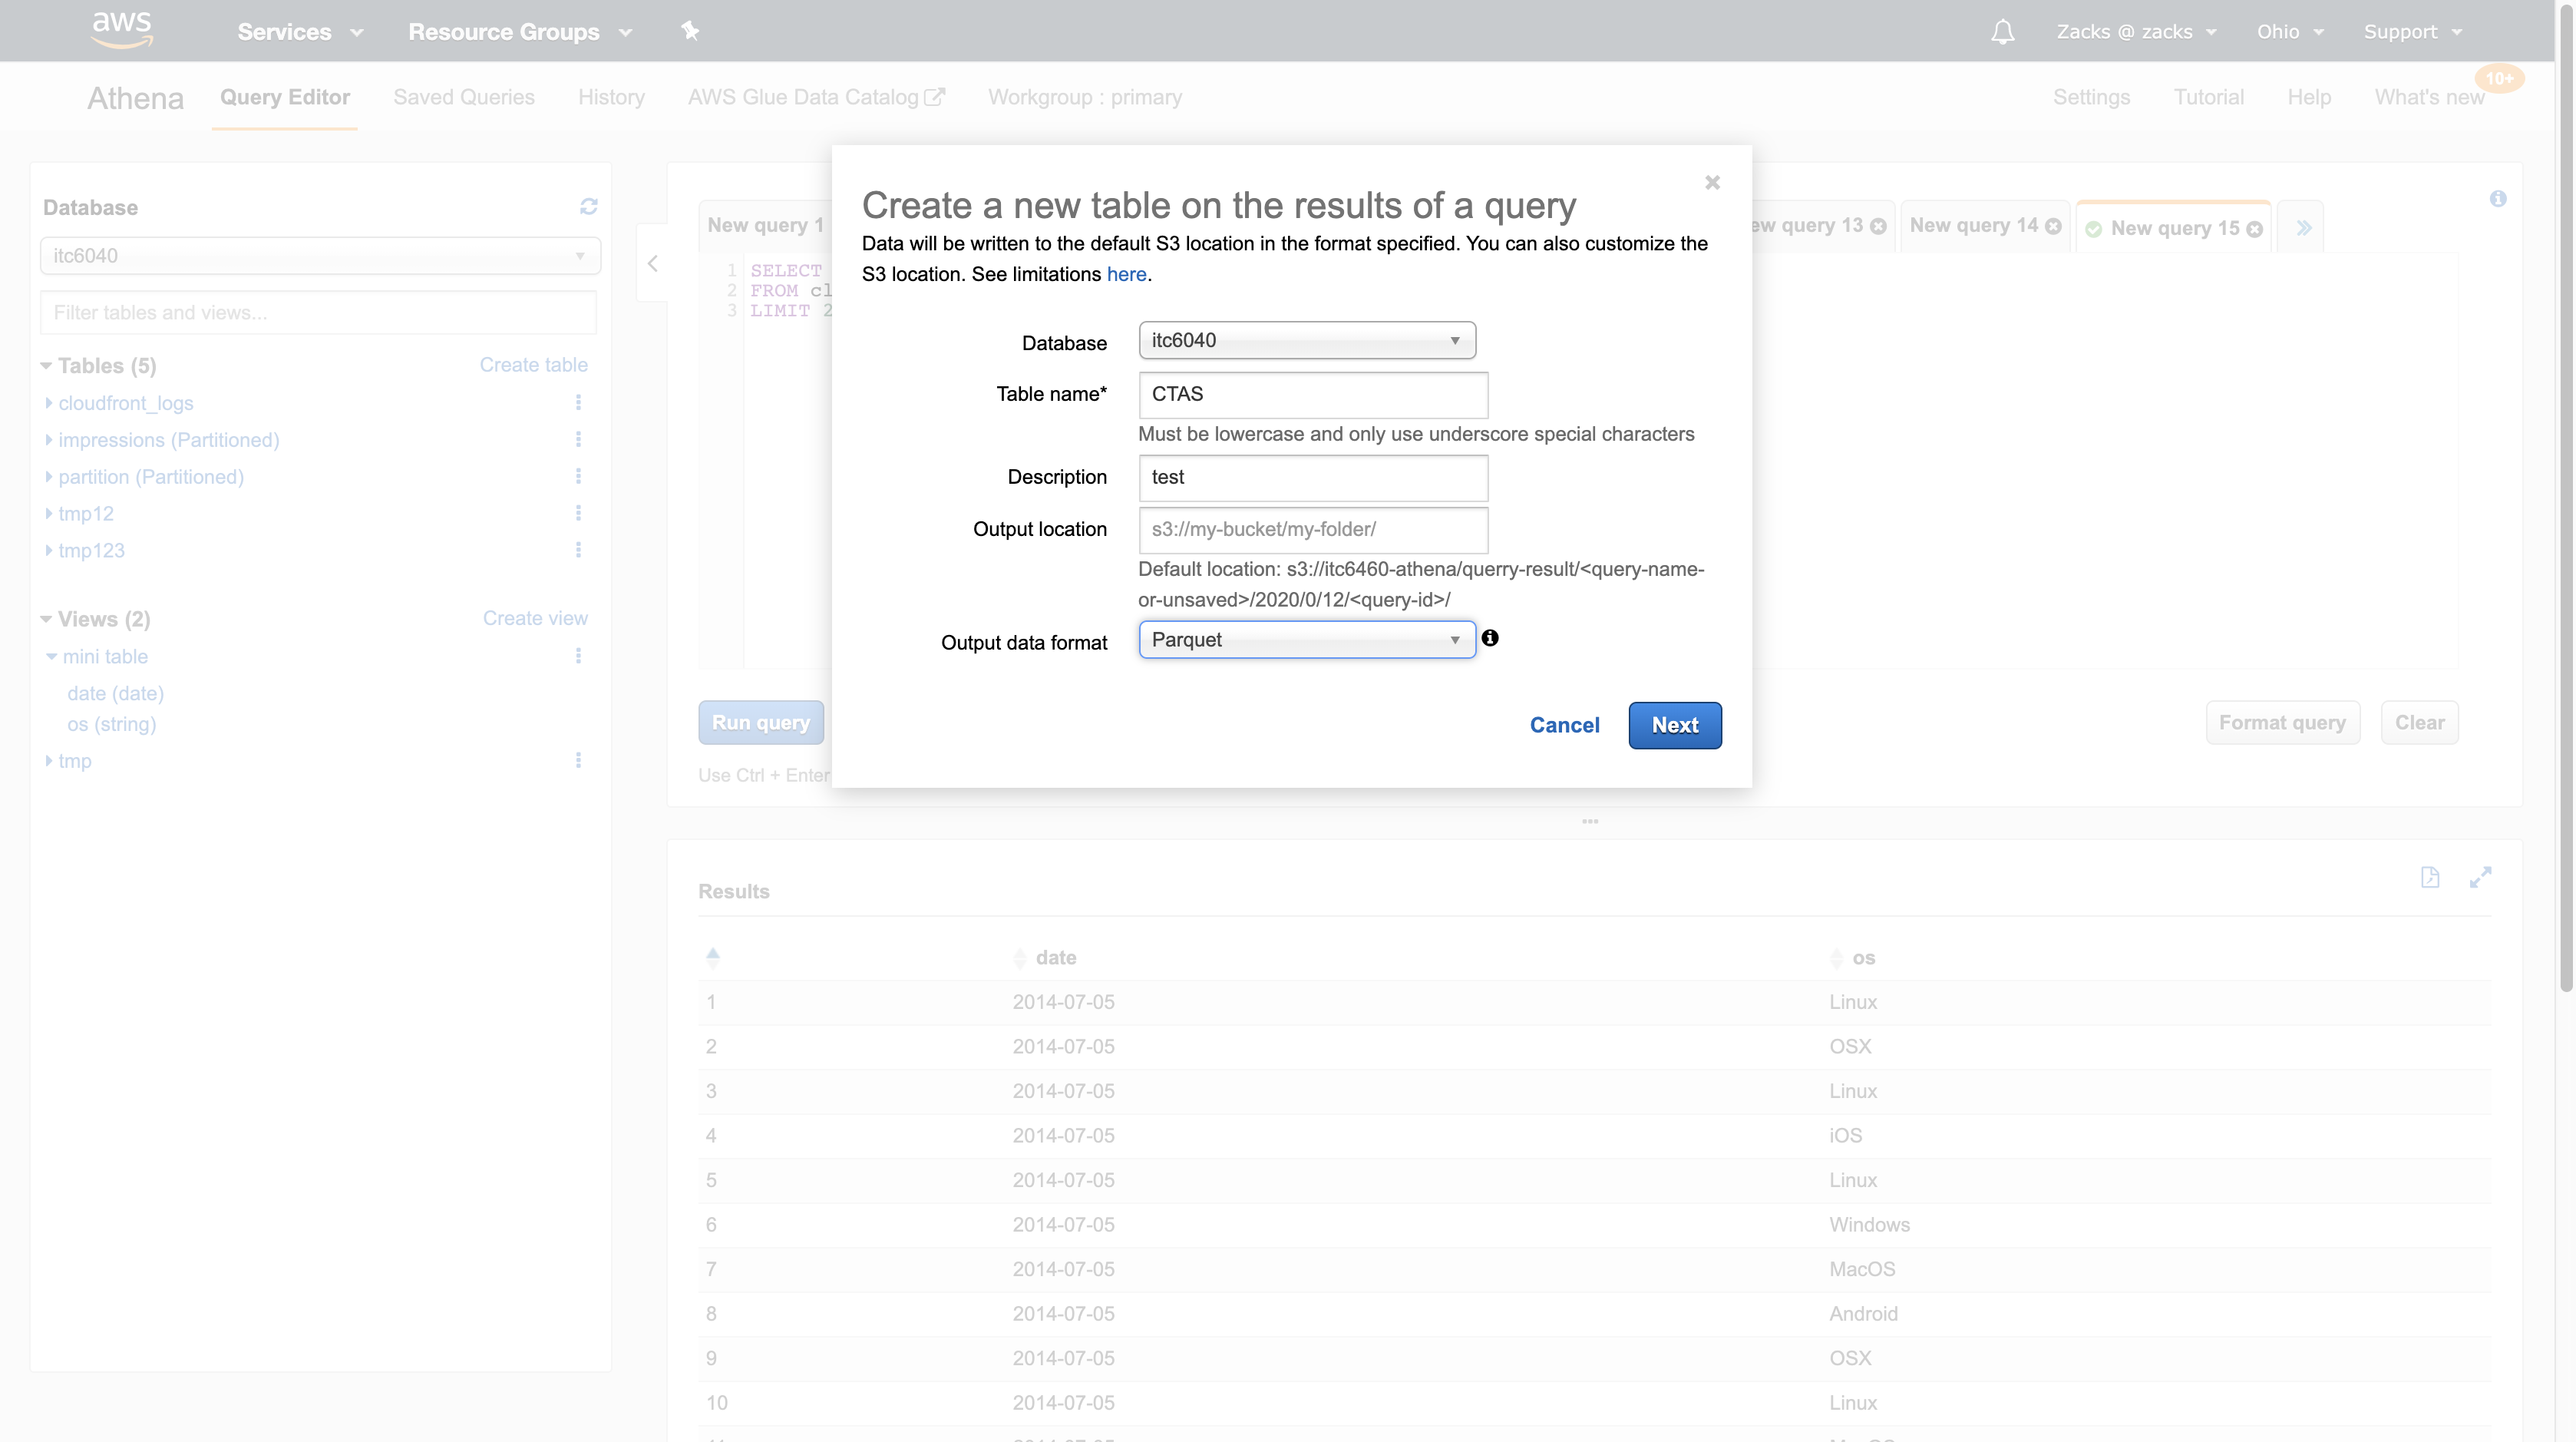
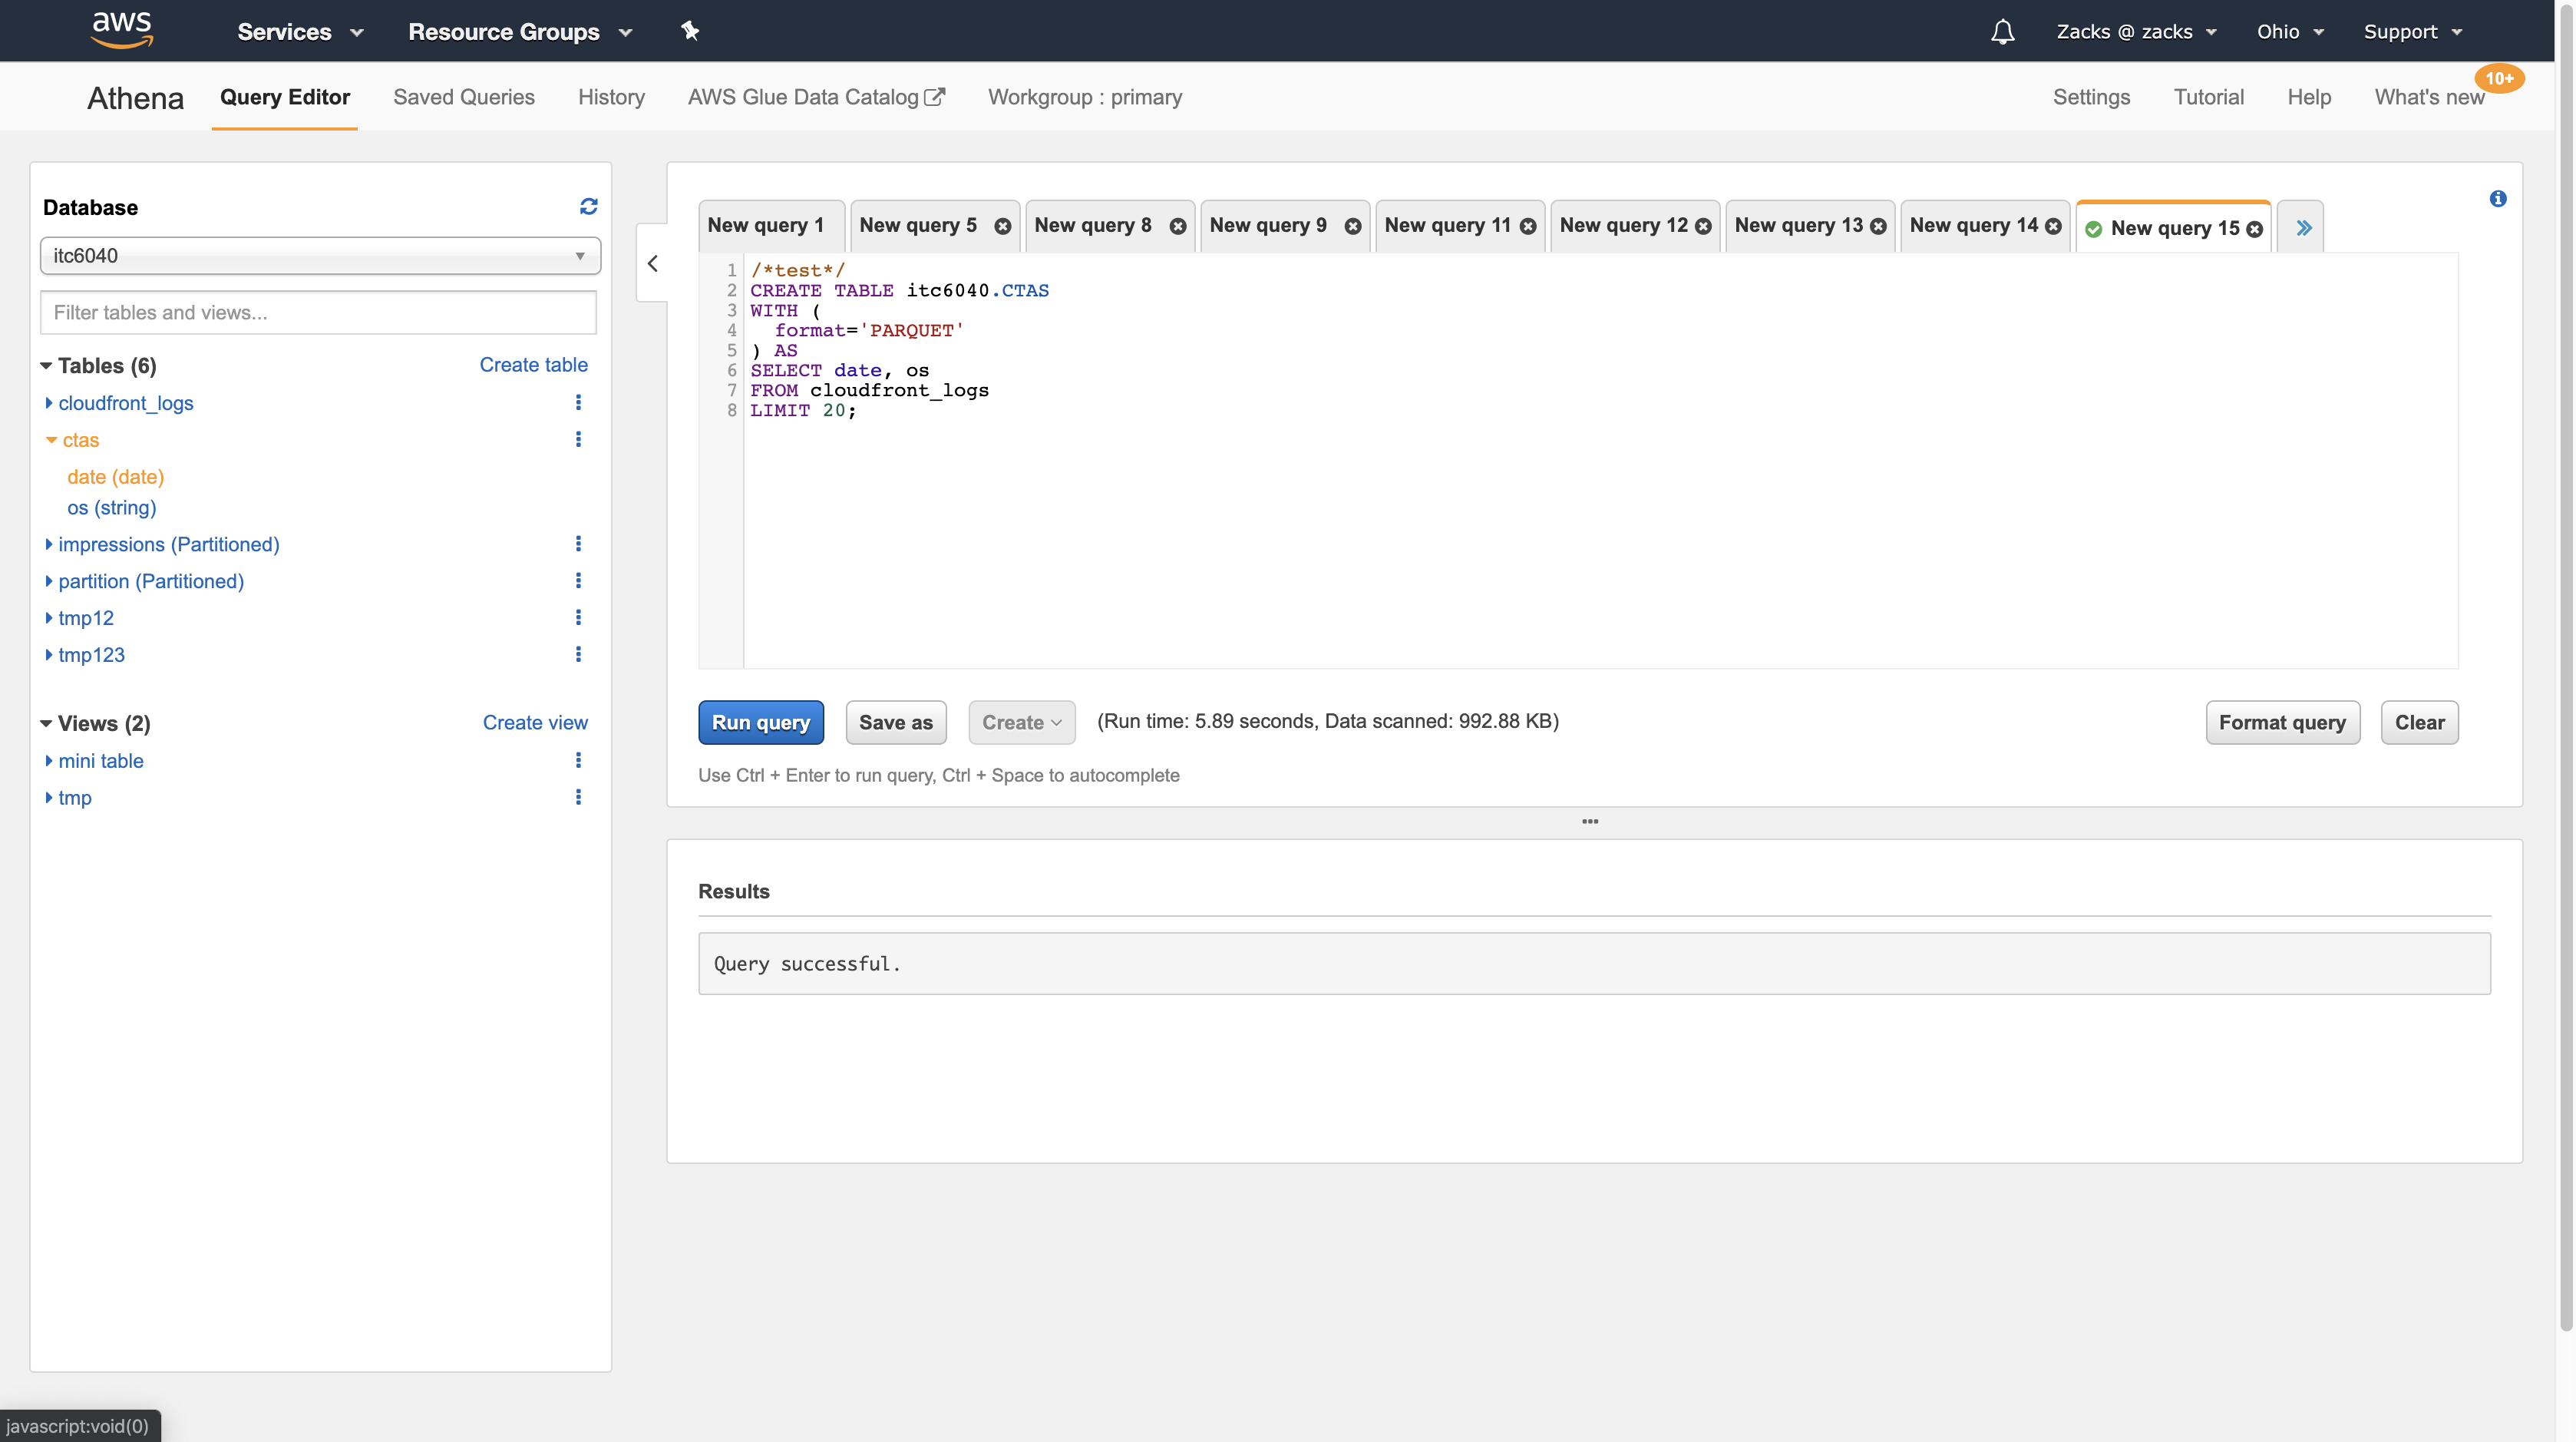
Creating a Table from Query Results (CTAS)
A CREATE TABLE AS SELECT (CTAS) query creates a new table in Athena from the results of a SELECT statement from another query. Athena stores data files created by the CTAS statement in a specified location in Amazon S3.For syntax, see CREATE TABLE AS.
Query and create a table at the same time. In other words, we use the query result to create a new table.
It seems like view but we get a totally new table from the query result.
1 | SELECT date, os |

Handling Schema Updates
Athena is a schema-on-read query engine. This means that when you create a table in Athena, it applies schemas when reading the data. It does not change or rewrite the underlying data.
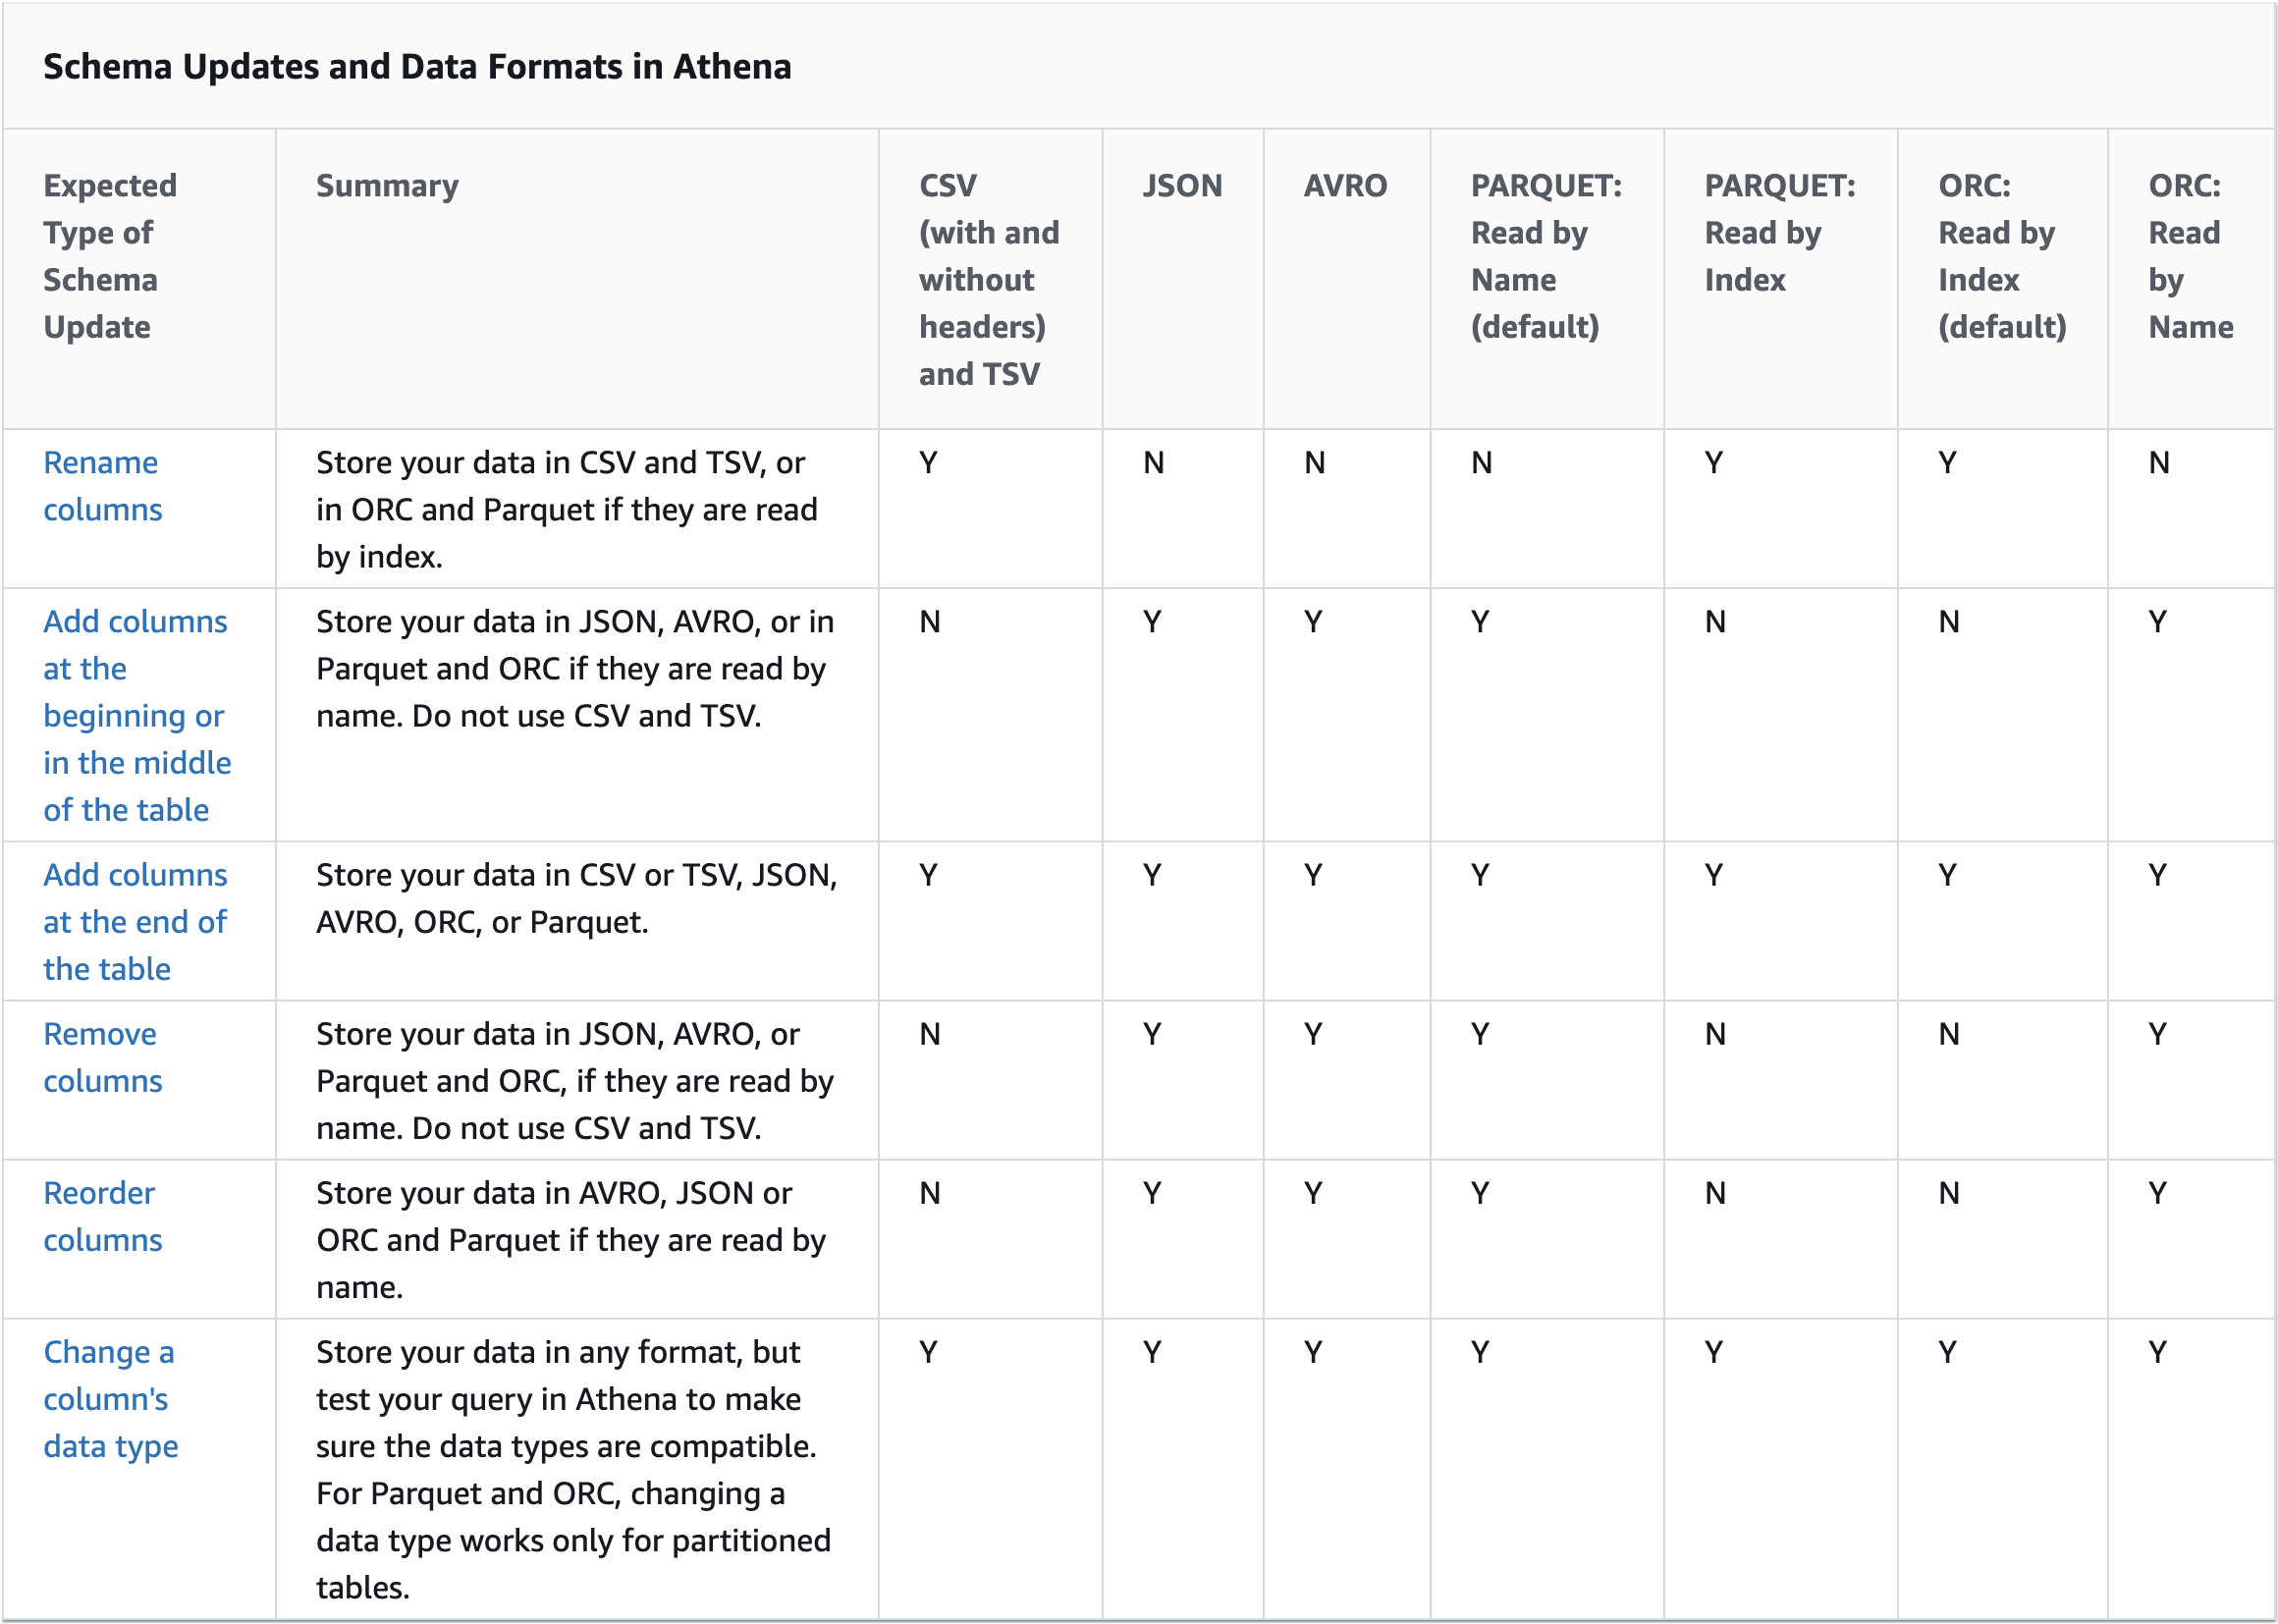
- Reading by index allows you to rename columns. But then you lose the ability to remove columns or add them in the middle of the table.R
- Reading by name allows you to add columns in the middle of the table and remove columns. But then you lose the ability to rename columns.
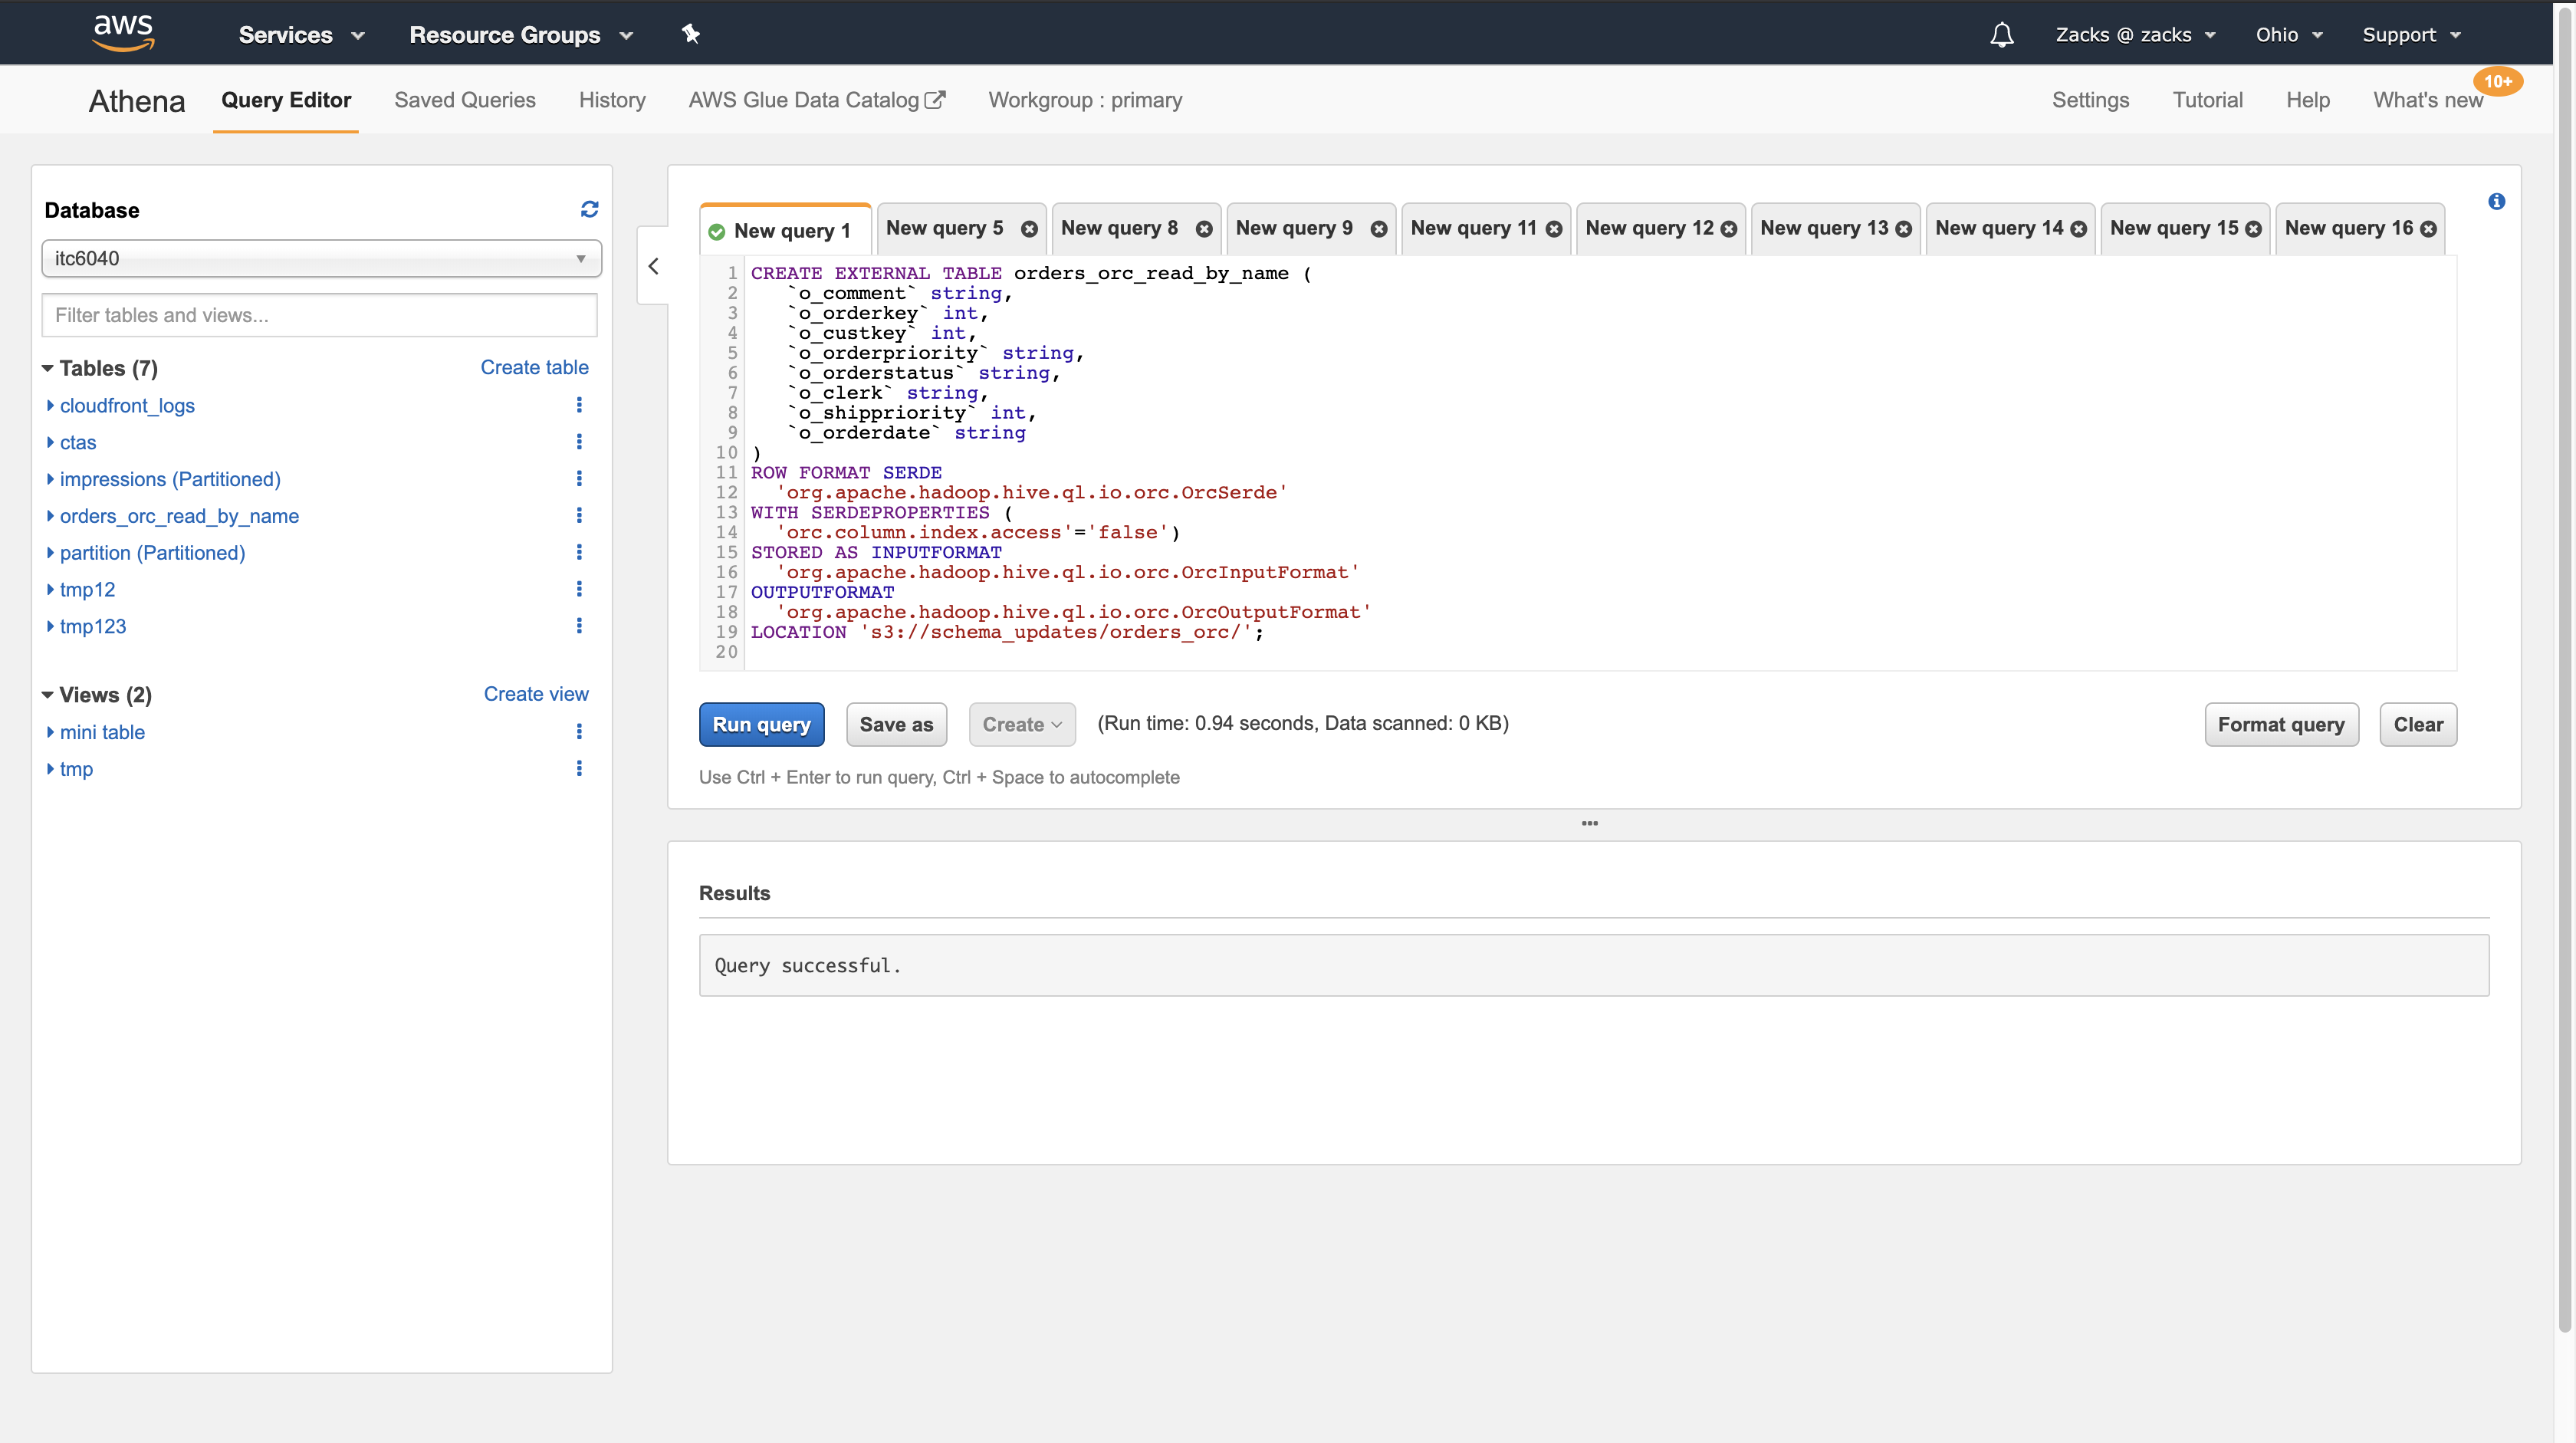
Index Access in ORC and Parquet
ORC: Read by Index
A table in ORC is read by index, by default. This is defined by the following syntax:
1 | WITH SERDEPROPERTIES ( |
Reading by index allows you to rename columns. But then you lose the ability to remove columns or add them in the middle of the table.
To make ORC read by name, which will allow you to add columns in the middle of the table or remove columns in ORC, set the SerDe property orc.column.index.access to FALSE in the CREATE TABLE statement. In this configuration, you will lose the ability to rename columns.
The following example illustrates how to change the ORC to make it read by name:
1 | CREATE EXTERNAL TABLE orders_orc_read_by_name ( |
Parquet: Read by Name
A table in Parquet is read by name, by default. This is defined by the following syntax:
1 | WITH SERDEPROPERTIES ( |
To make Parquet read by index, which will allow you to rename columns, you must create a table with parquet.column.index.access SerDe property set to TRUE.
####### Types of Updates
Depending on how you expect your schemas to evolve, to continue using Athena queries, choose a compatible data format.
Let’s consider an application that reads orders information from an orders table that exists in two formats: CSV and Parquet.
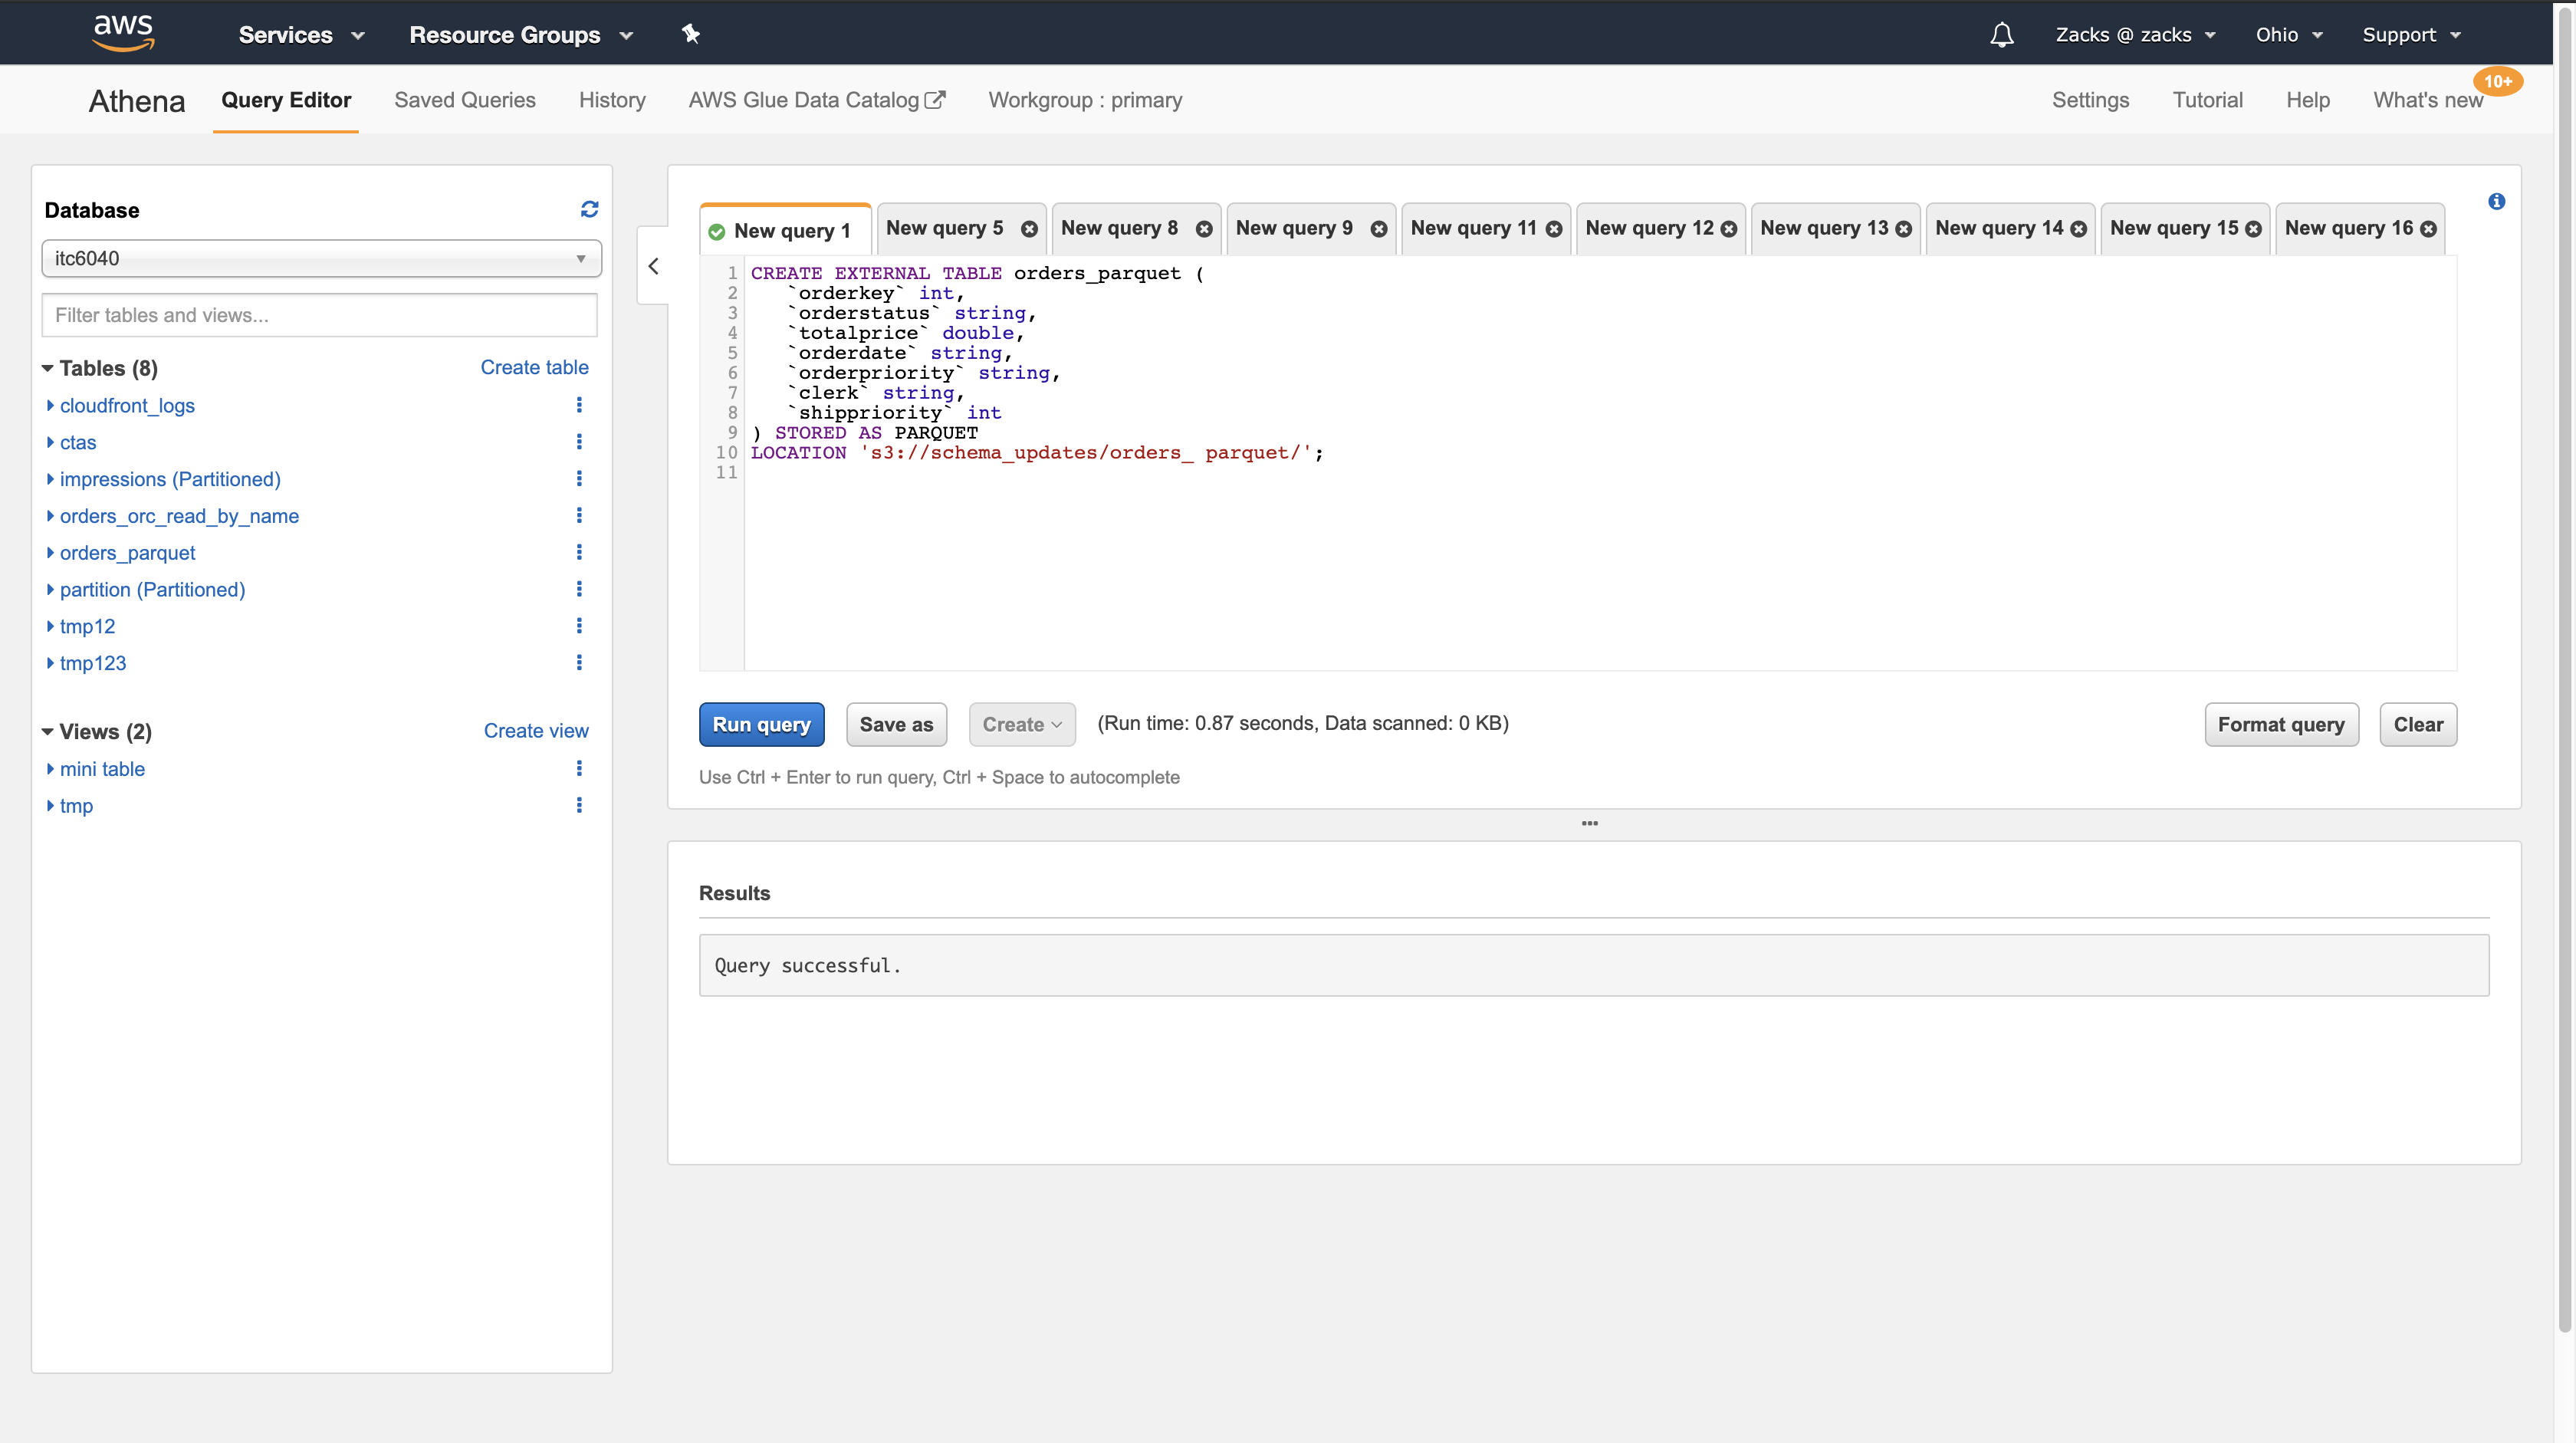
The following example creates a table in Parquet:
1 | CREATE EXTERNAL TABLE orders_parquet ( |
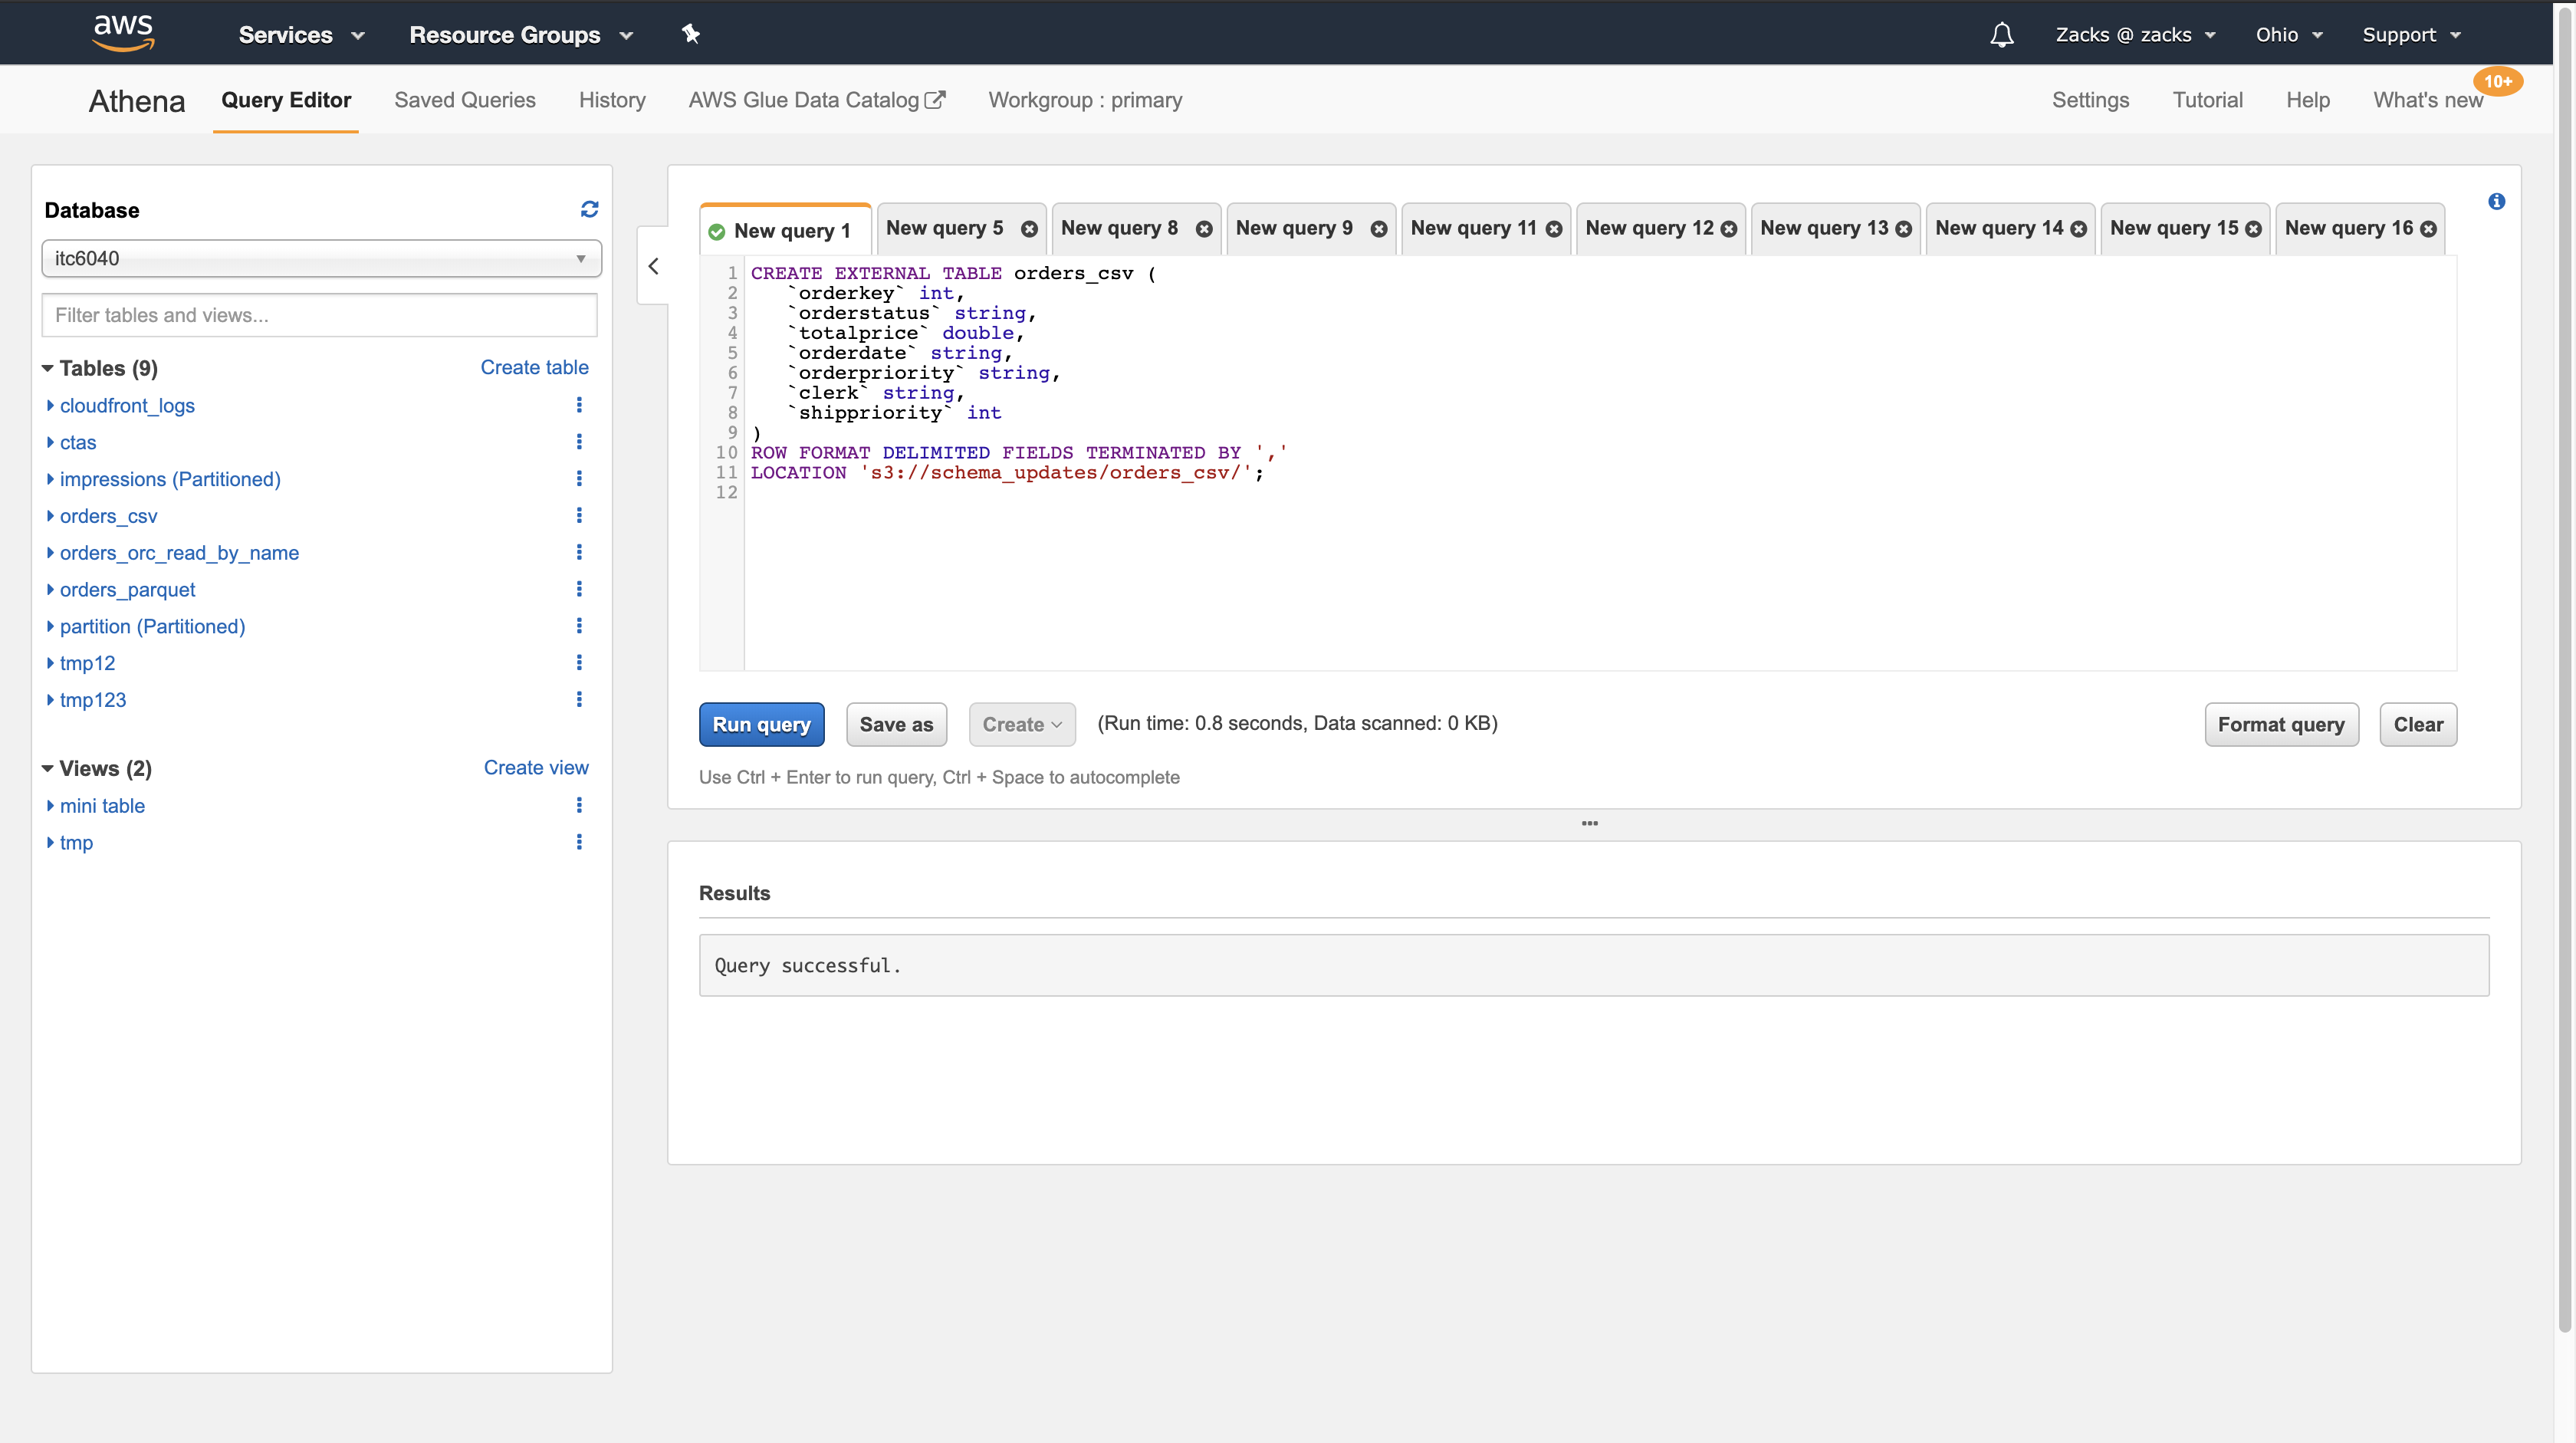
The following example creates the same table in CSV:
1 | CREATE EXTERNAL TABLE orders_csv ( |
Adding Columns at the Beginning or in the Middle of the Table
Adding columns is one of the most frequent schema changes. For example, you may add a new column to enrich the table with new data. Or, you may add a new column if the source for an existing column has changed, and keep the previous version of this column, to adjust applications that depend on them.
Do not add columns at the beginning or in the middle of the table in CSV and TSV, as these formats depend on ordering. Adding a column in such cases will lead to schema mismatch errors when the schema of partitions changes.
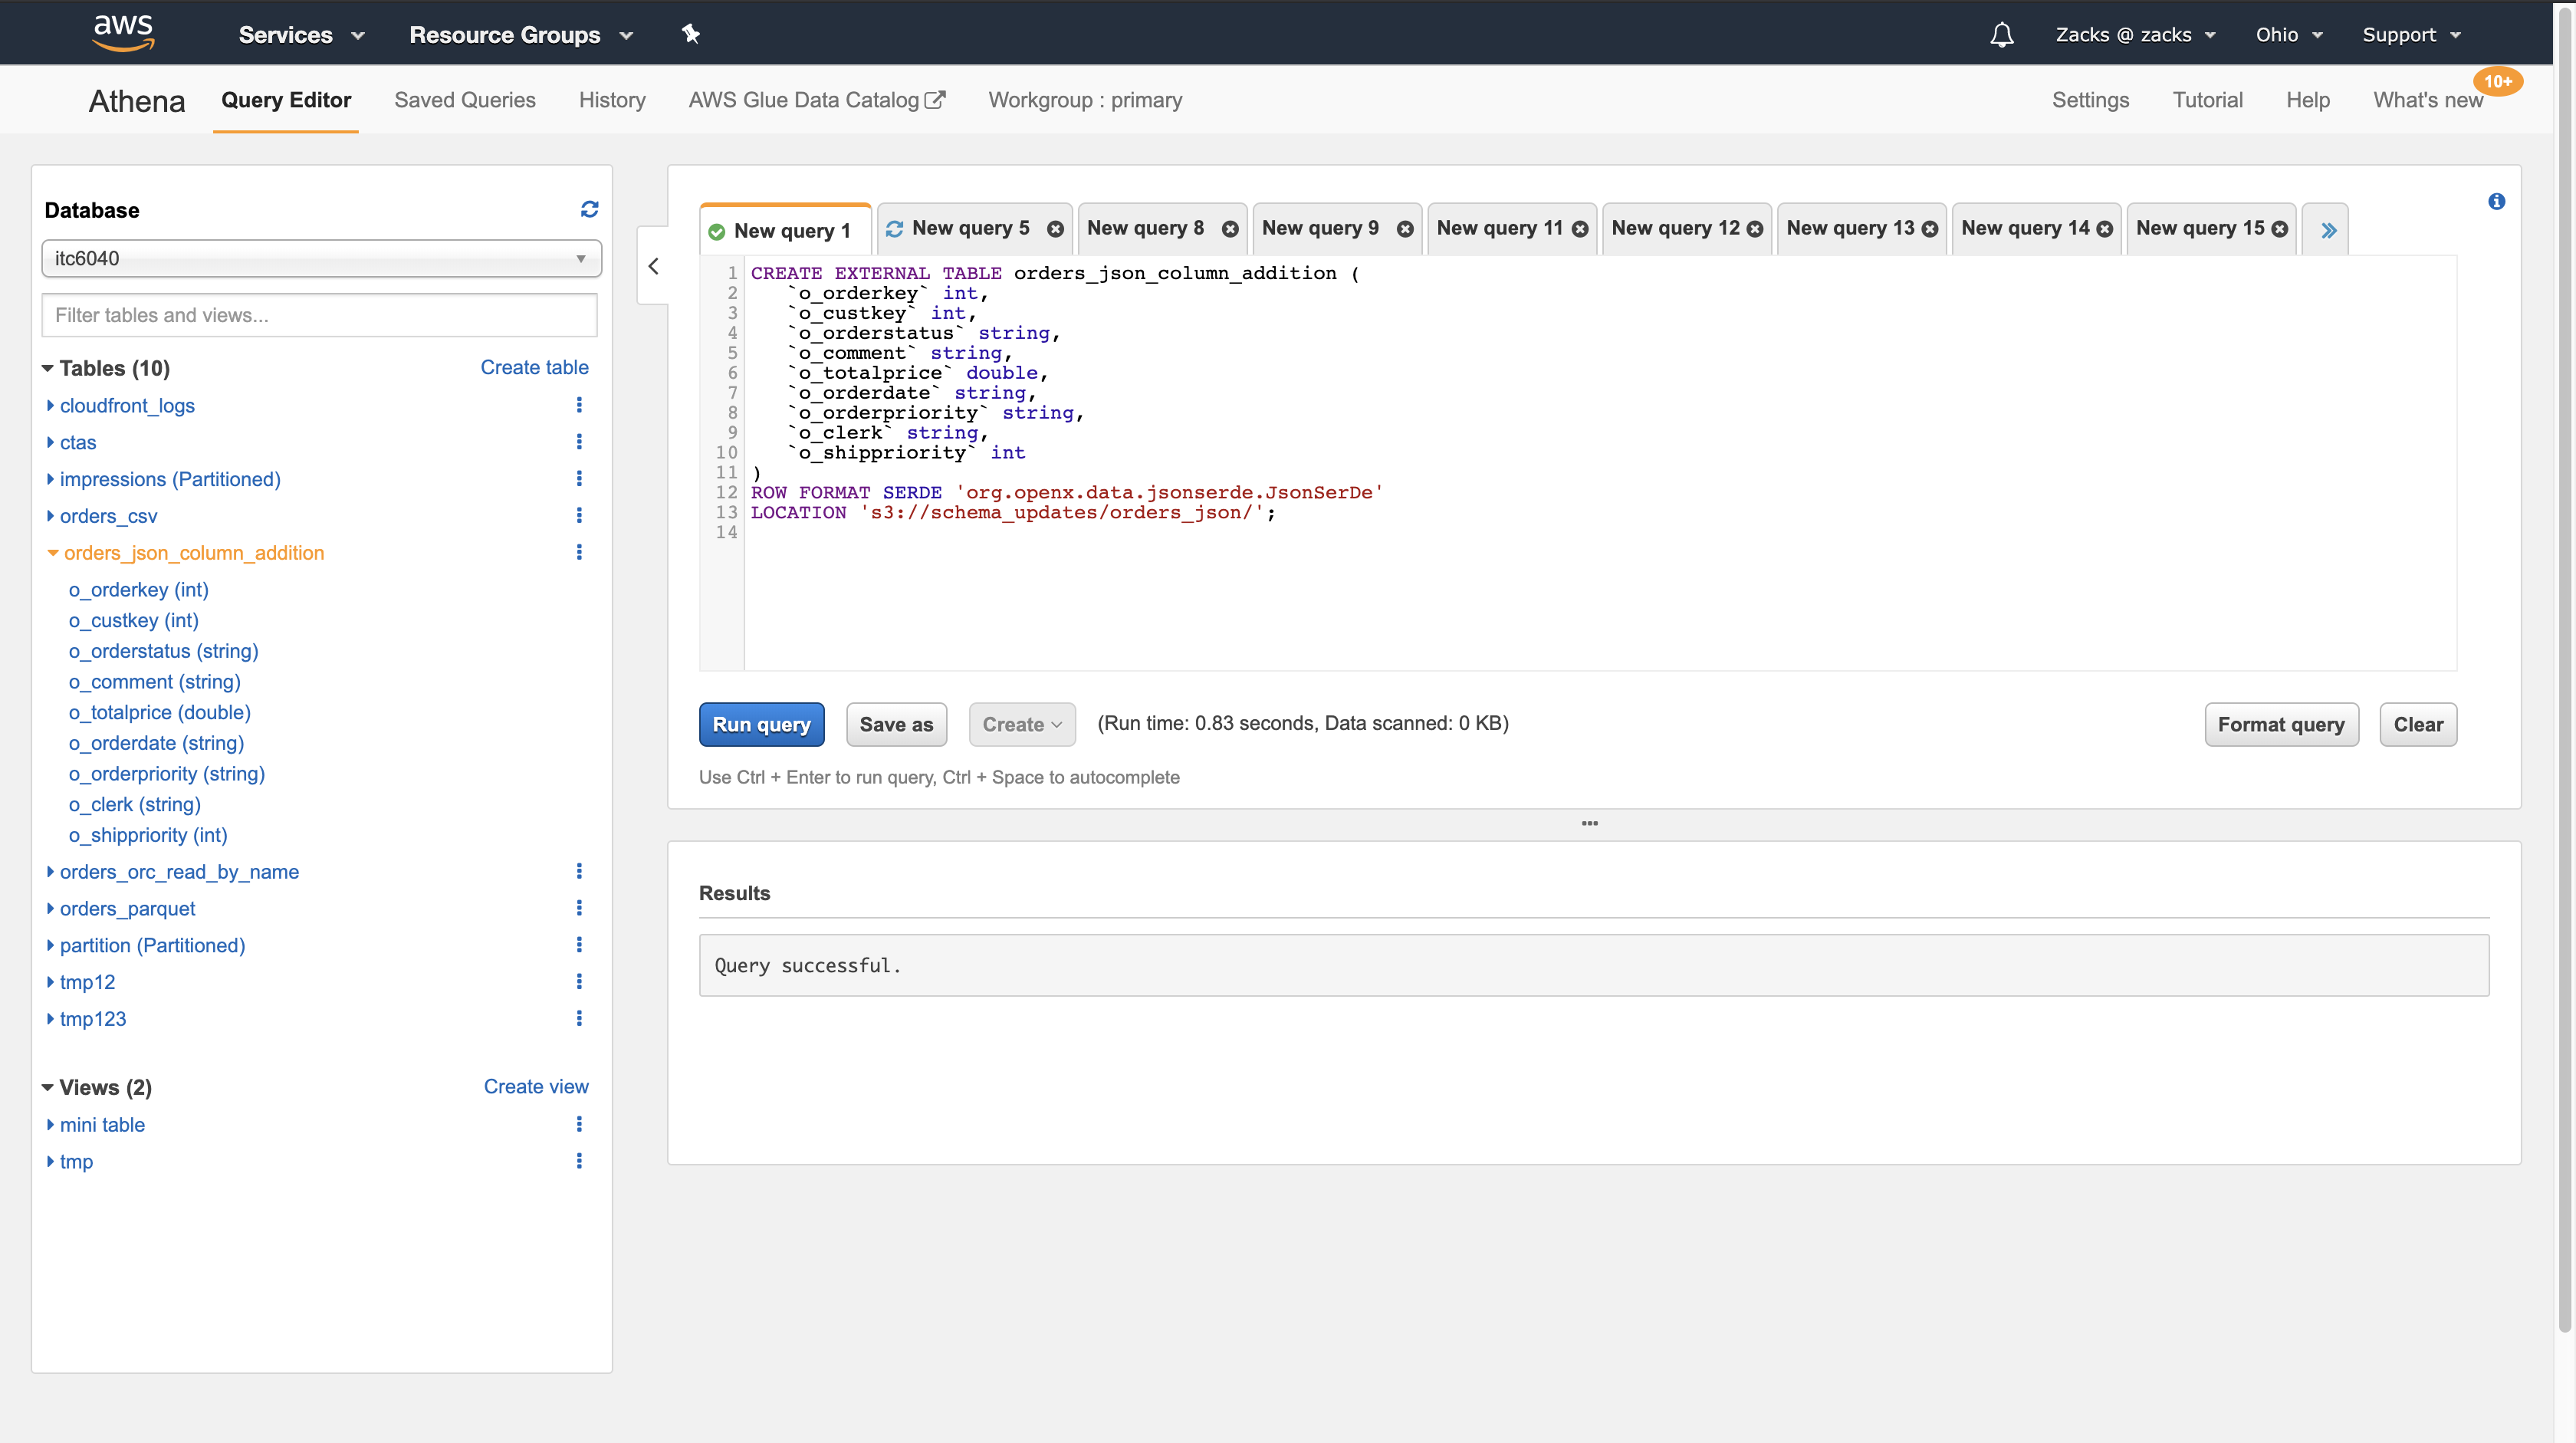
The following example shows adding a column to a JSON table in the middle of the table:
1 | CREATE EXTERNAL TABLE orders_json_column_addition ( |
Adding Columns at the End of the Table
If you create tables in any of the formats that Athena supports, such as Parquet, ORC, Avro, JSON, CSV, and TSV, you can add new columns at the end of the table. For tables in Parquet and ORC, you can add columns at the end of the table regardless of the type of index access they use.
In the following example, drop an existing table in Parquet, and add a new Parquet table with a new comment column at the end of the table:
1 | DROP TABLE orders_parquet; |
1 | CREATE EXTERNAL TABLE orders_parquet ( |
Amazon Athena SEEMS DO NOT SUPPORT DIRECTLY ADD, DELETE, AND RENAME COLUMNS AFTER YOU CREATE A TABLE. IT LOOKS DANGEROUS. I WILL DO A DEEPER RESEARCH AND FIND OUT ANOTHER BETTER WAY
Querying Arrays
[Querying Arrays](Querying Arrays)
Querying Geospatial Data
Querying AWS Service Logs
Amazon Rekognition
Step 1: Set Up an Account
AWS Management Console
Navigation Pane > Services > IAM
Click Groups > Permissions Tab
If you do not have any group, then create a new one.
Click Attach Policy
Make sure the group has following permission:
AmazonRekognitionFullAccessAmazonS3ReadOnlyAccessAmazonSQSFullAccess
P.S. The policies you have attached will NOT appear in the search bar.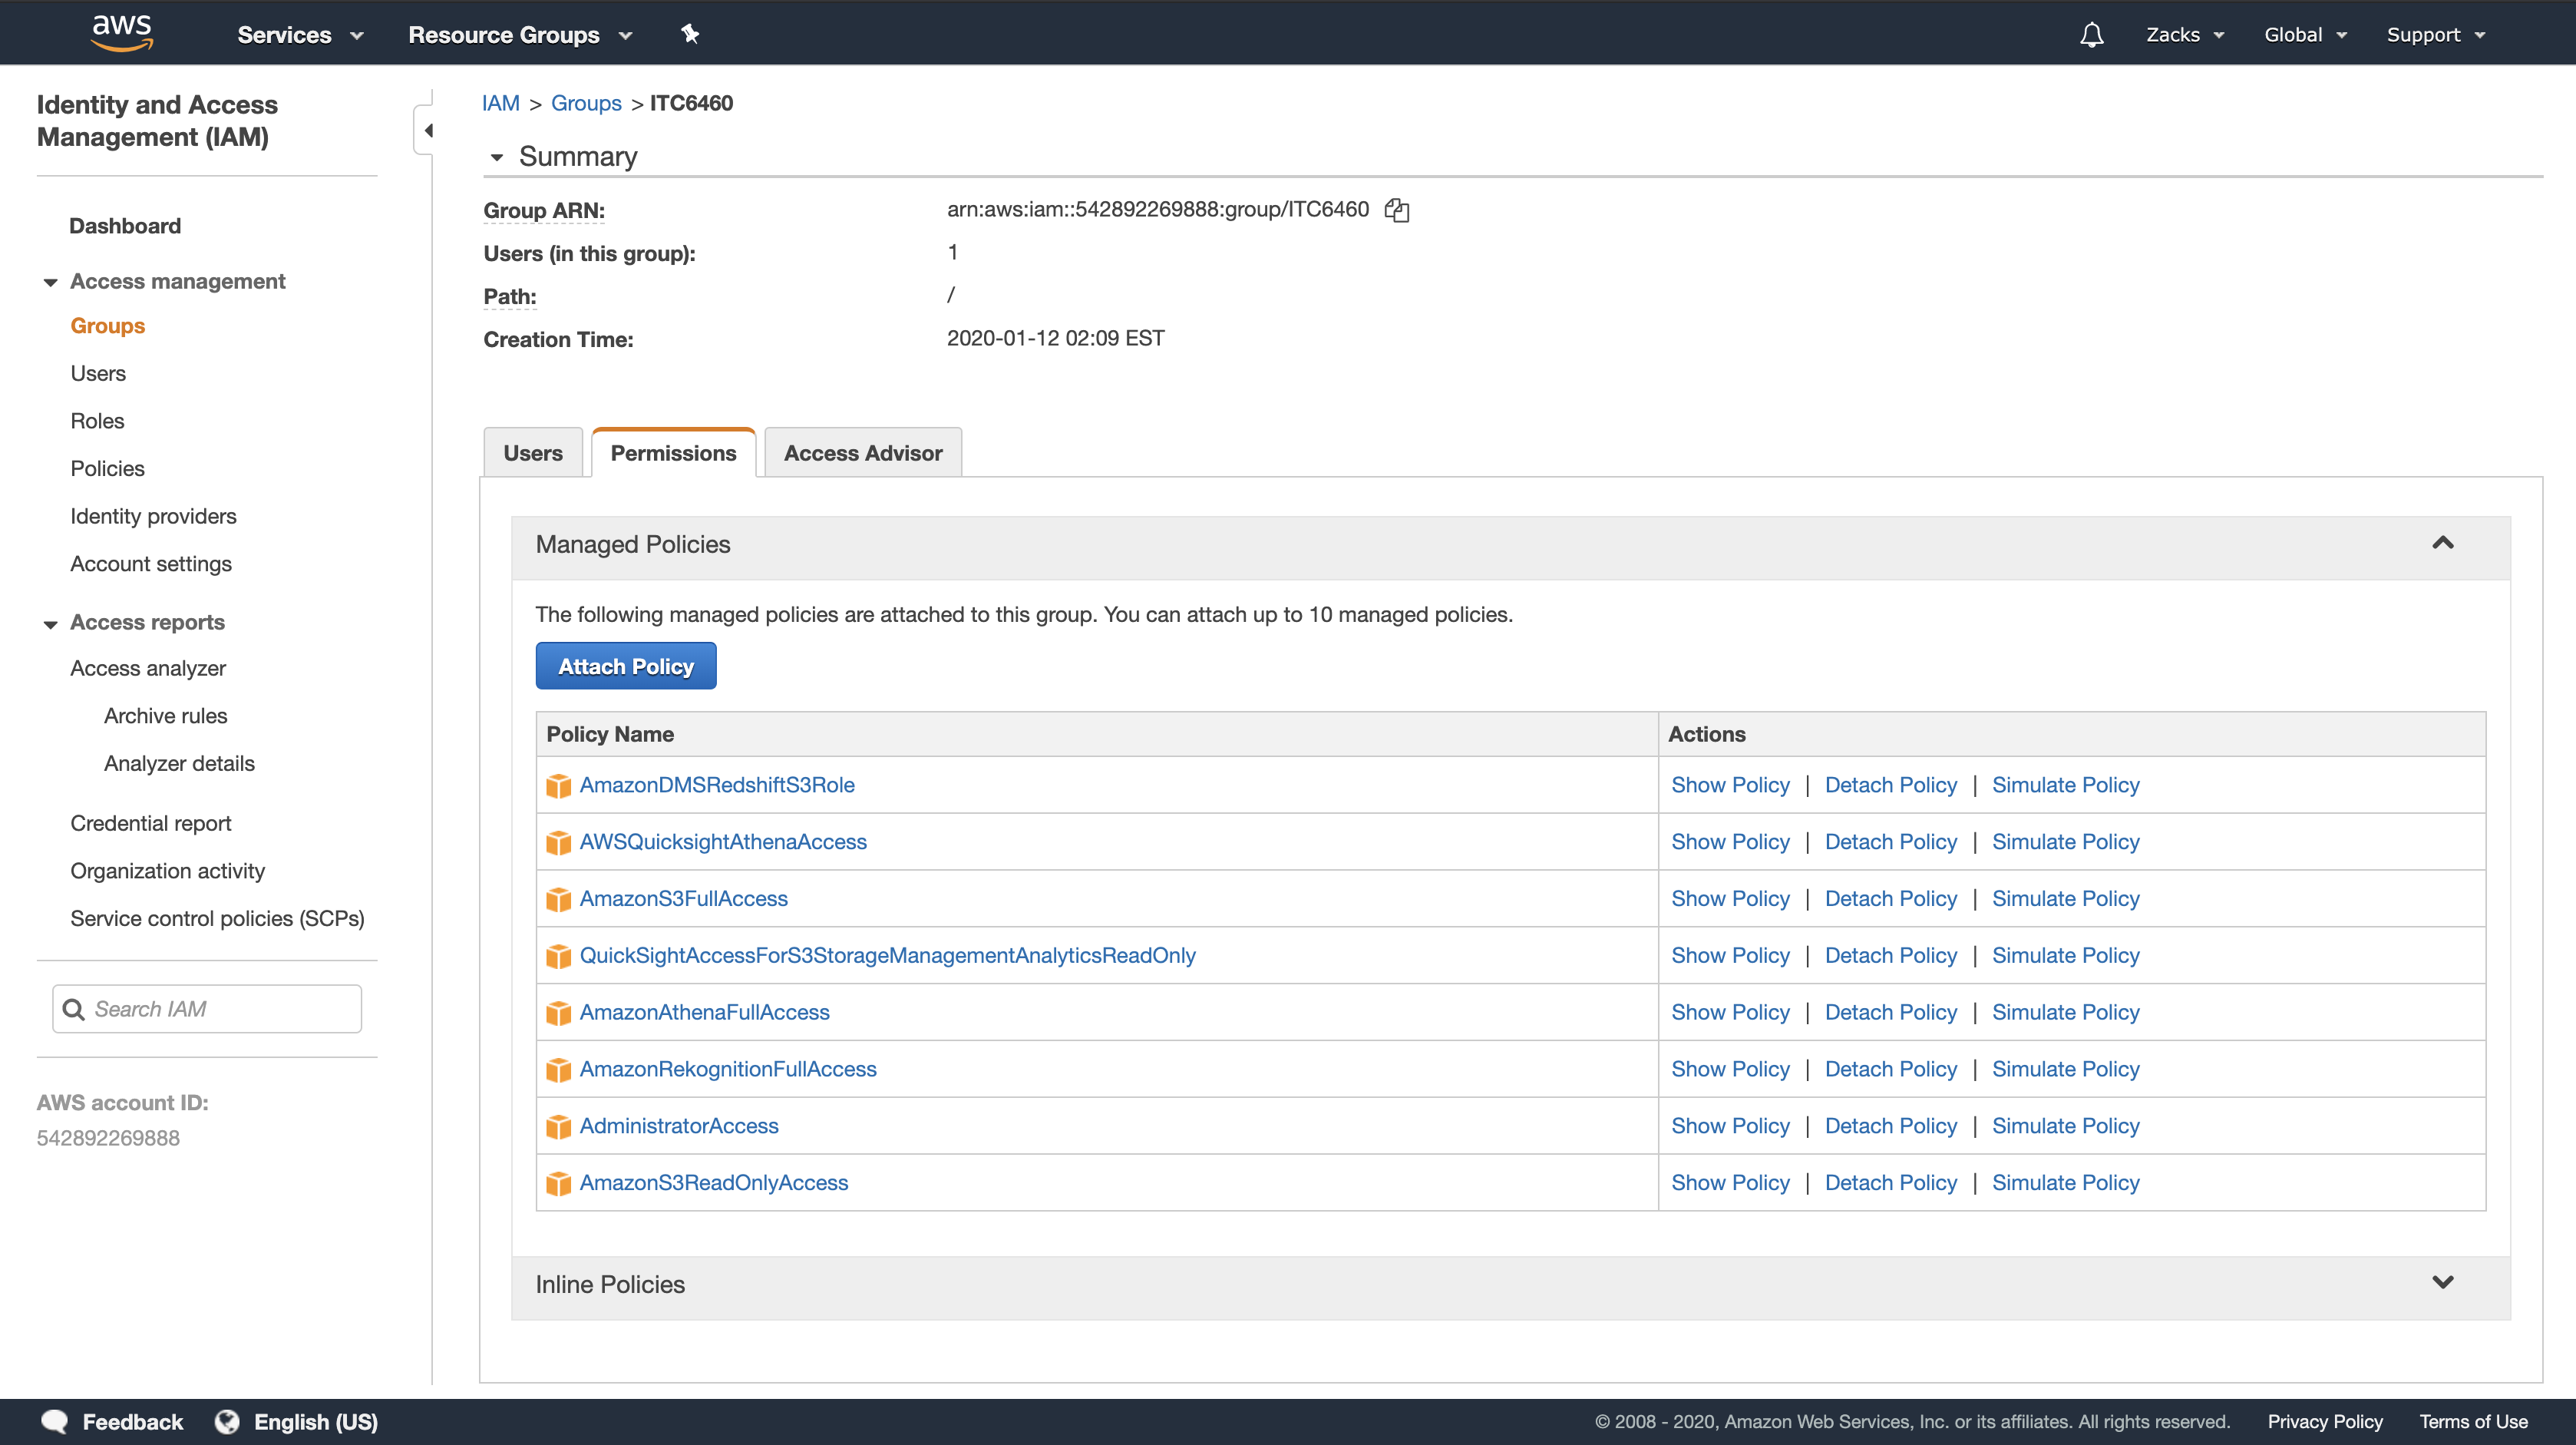
Step 2: Set Up the AWS CLI and AWS SDKs
https://docs.aws.amazon.com/rekognition/latest/dg/setup-awscli-sdk.html
Step 3: Getting Started Using the AWS CLI and AWS SDK API
https://docs.aws.amazon.com/rekognition/latest/dg/get-started-exercise.html
Step 4: Getting Started Using the Amazon Rekognition Console
This section shows you how to use a subset of Amazon Rekognition’s capabilities such as object and scene detection, facial analysis, and face comparison in a set of images.
Exercise 1: Detect Objects and Scenes in an Image (Console)
This section shows how, at a very high level, Amazon Rekognition’s objects and scenes detection capability works. When you specify an image as input, the service detects the objects and scenes in the image and returns them along with a percent confidence score for each object and scene.
For example, Amazon Rekognition detects the following objects and scenes in the sample image: skateboard, sport, person, auto, car and vehicle. To see all the confidence scores shown in this response, choose Show more in the Labels | Confidence pane.
Detect Objects and Scenes in an Image You Provide
You can upload an image that you own or provide the URL to an image as input in the Amazon Rekognition console. Amazon Rekognition returns the object and scenes, confidence scores for each object, and scene it detects in the image you provide.
Note: The image must be less than 5MB in size and must be of JPEG or PNG format.
To detect objects and scenes in an image you provide
1.Open the Amazon Rekognition console at https://console.aws.amazon.com/rekognition/.
2.Choose Object and scene detection.
3.Do one of the following:
- Upload an image – Choose Upload, go to the location where you stored your image, and then select the image.
- Use a URL – Type the URL in the text box, and then choose Go.
- View the confidence score of each label detected in the Labels | Confidence pane.
1.Detect uploaded image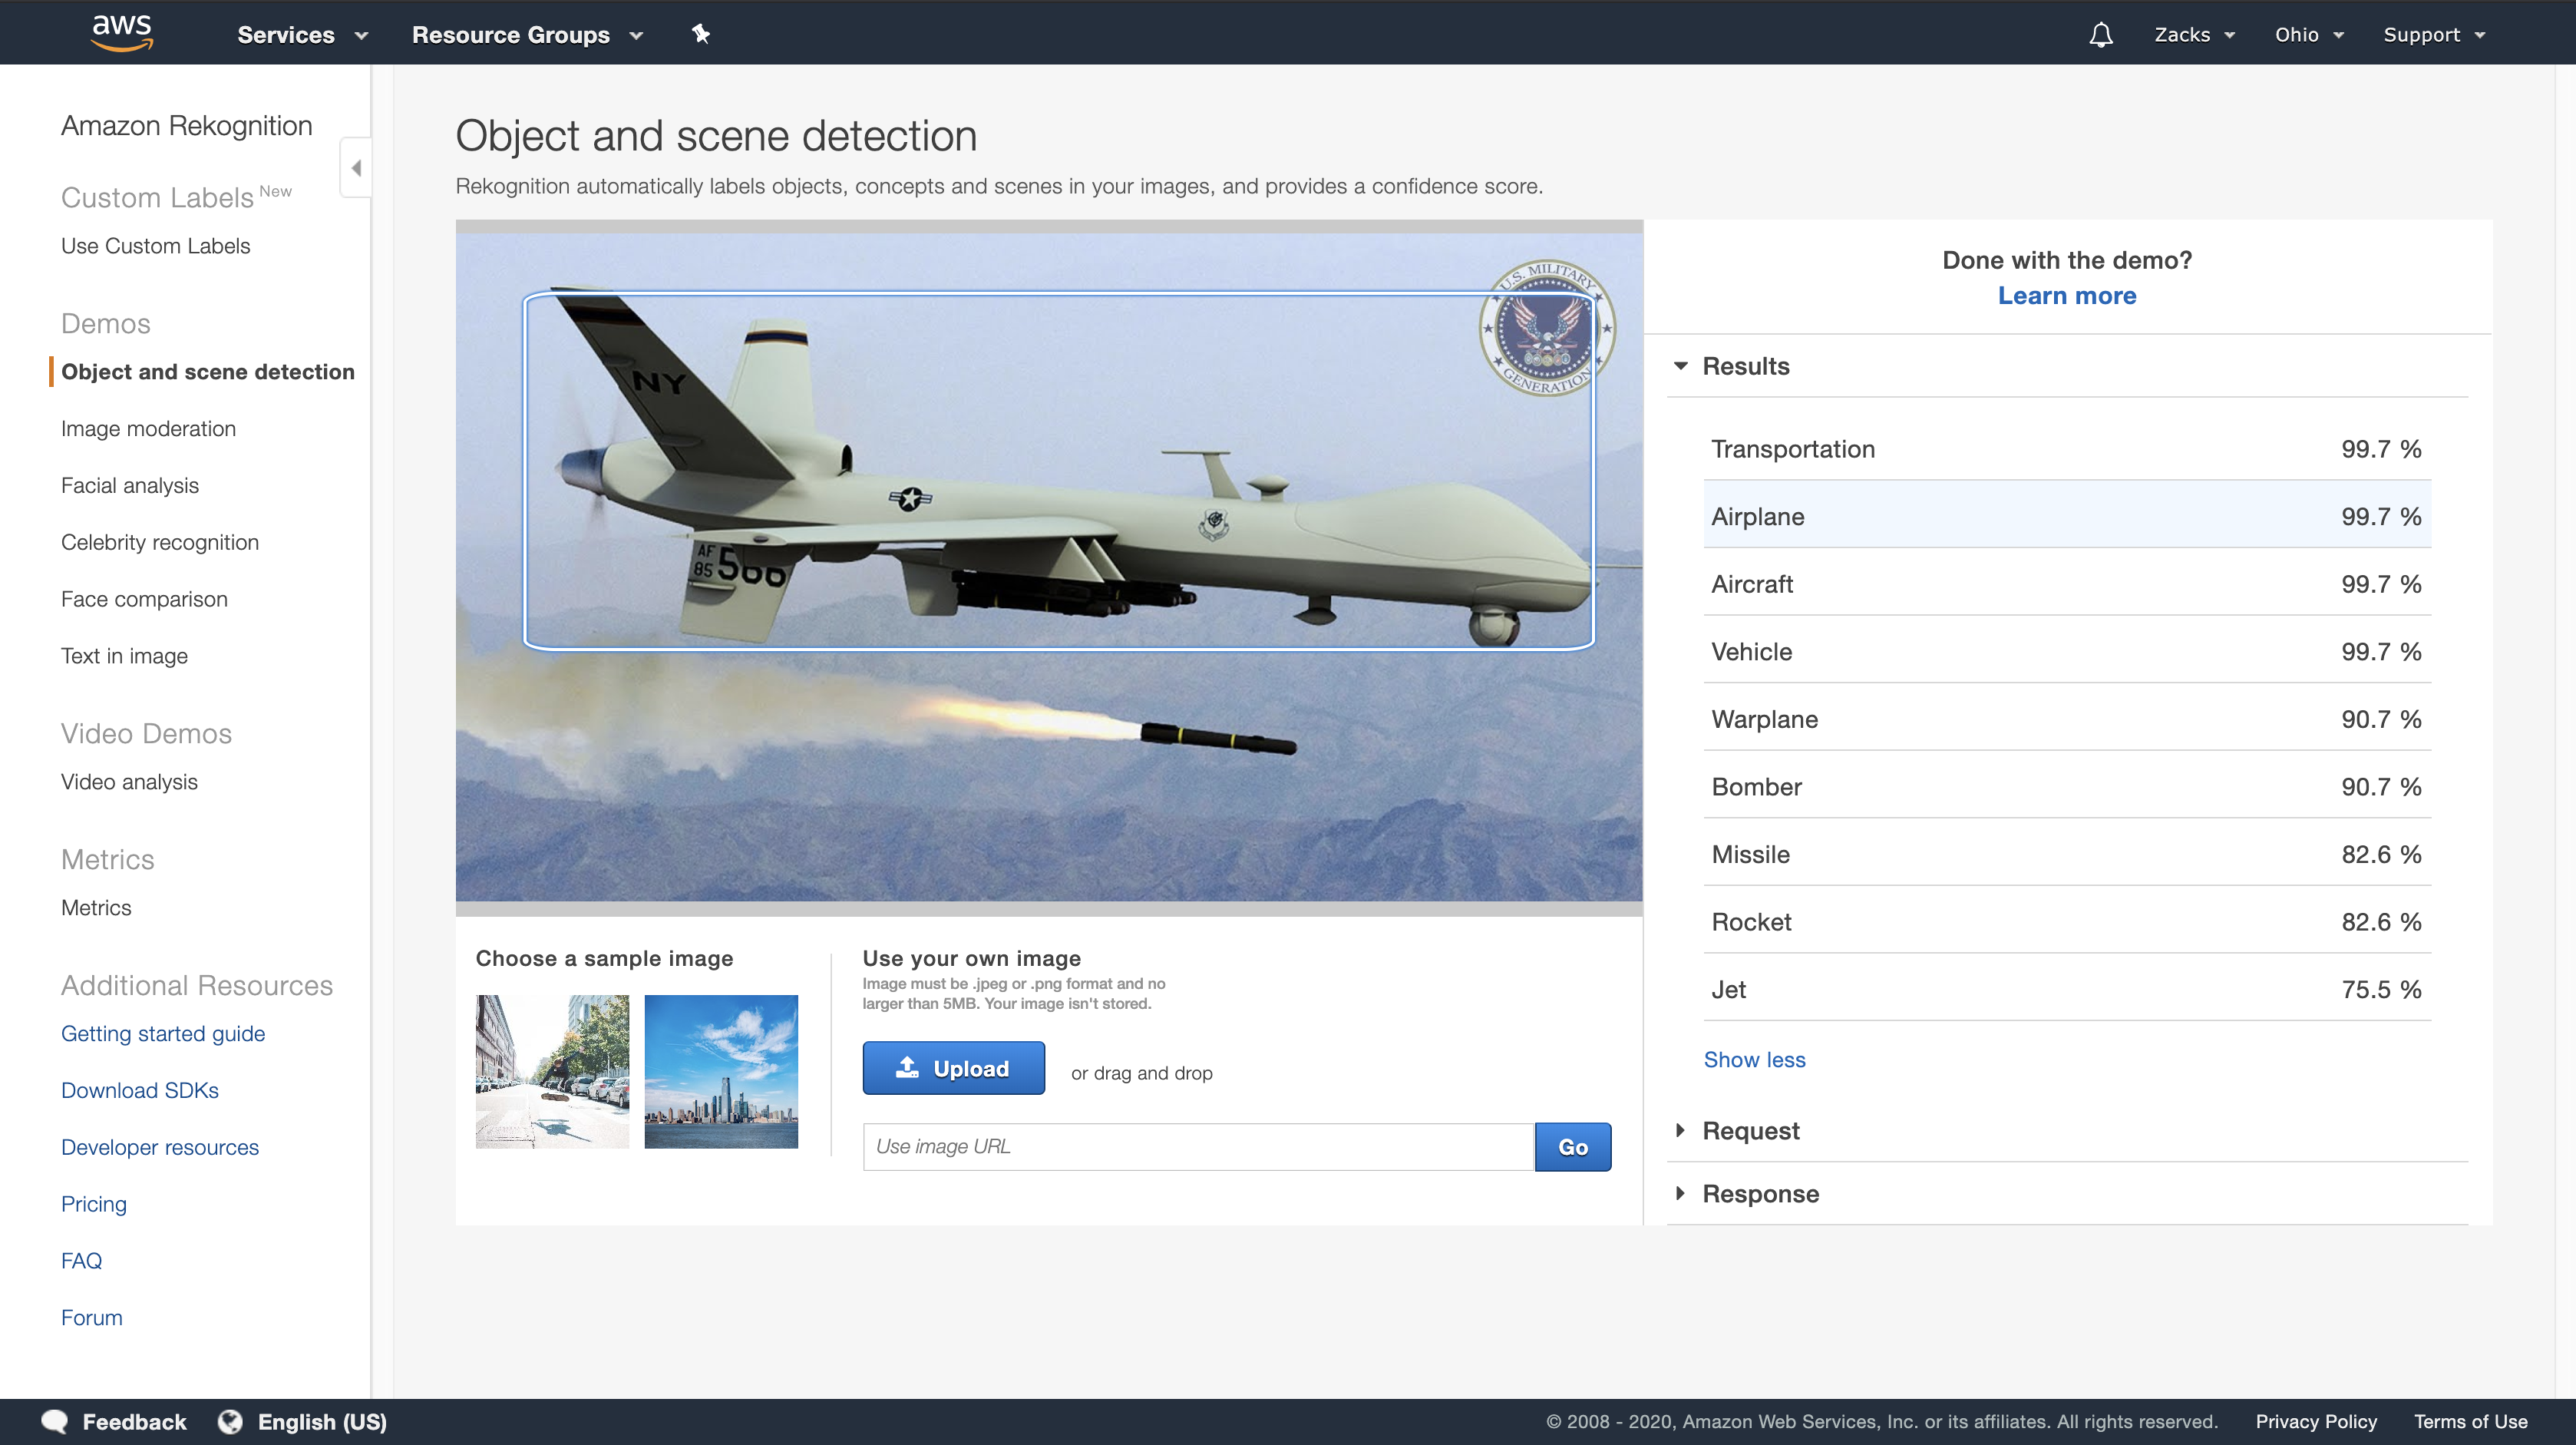
2.Detect image from external url
https://cdn.britannica.com/18/1918-050-0166D6BB/Martin-Luther-King-Jr.jpg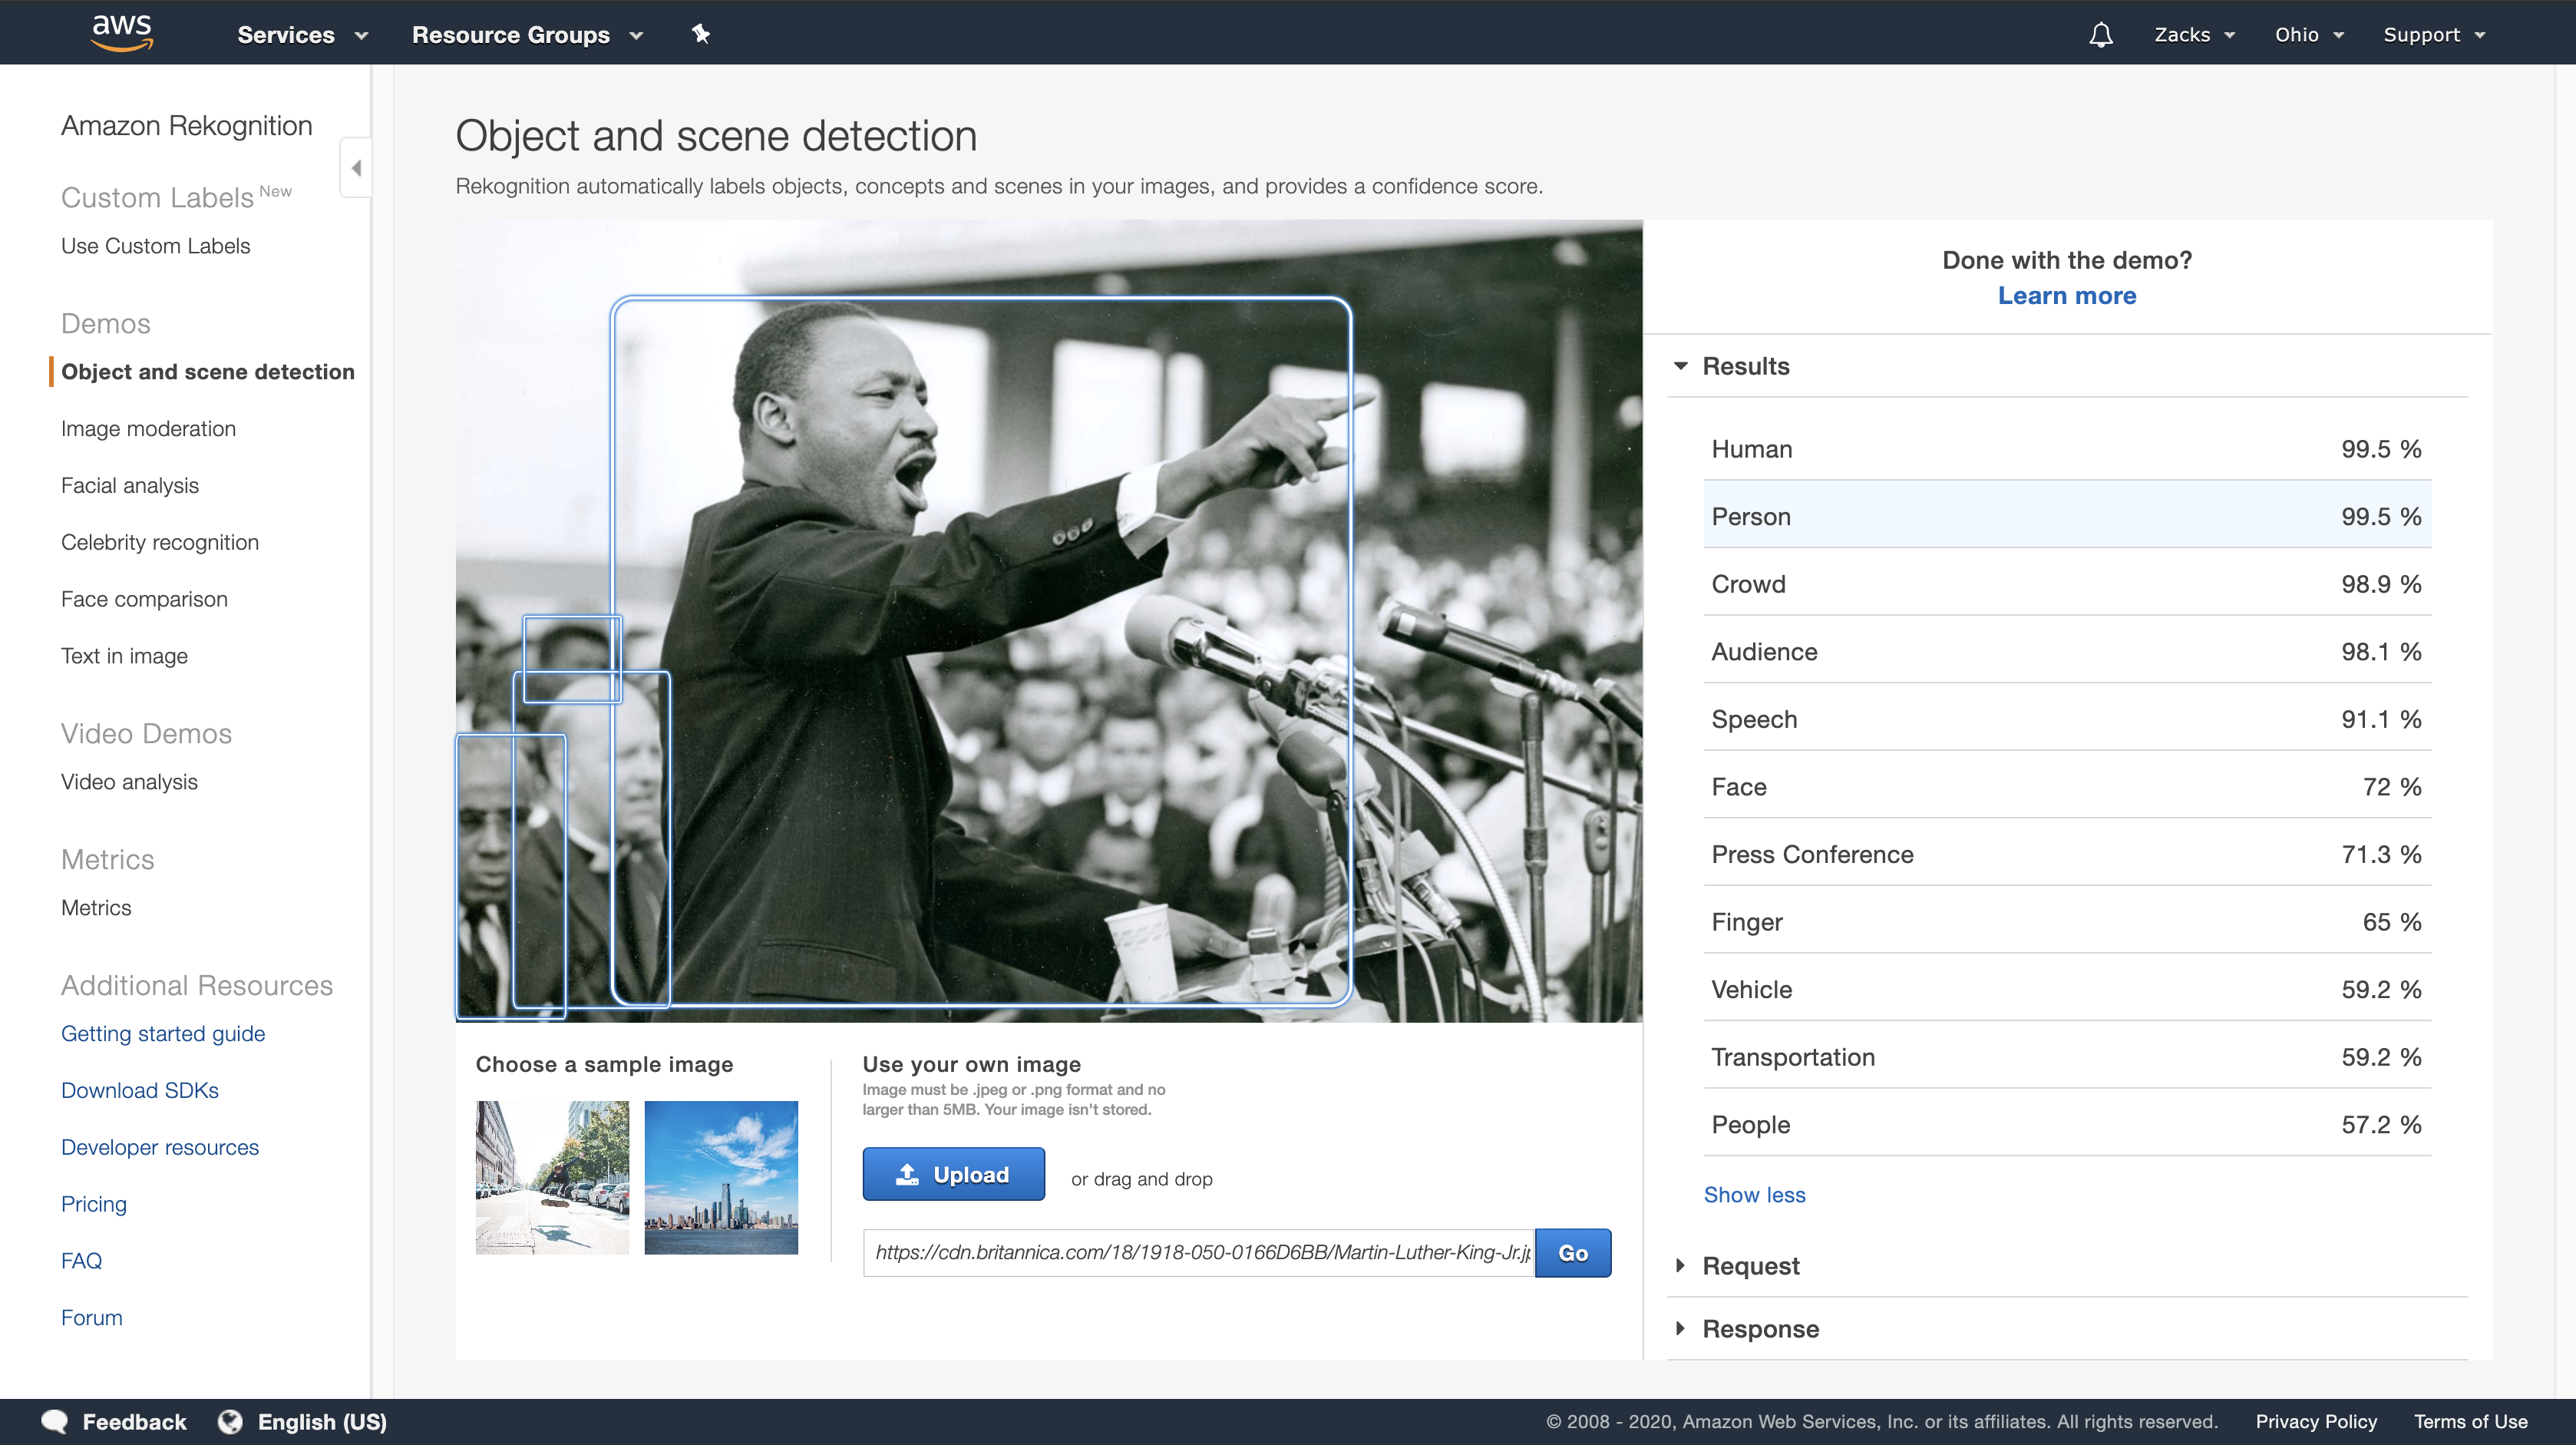
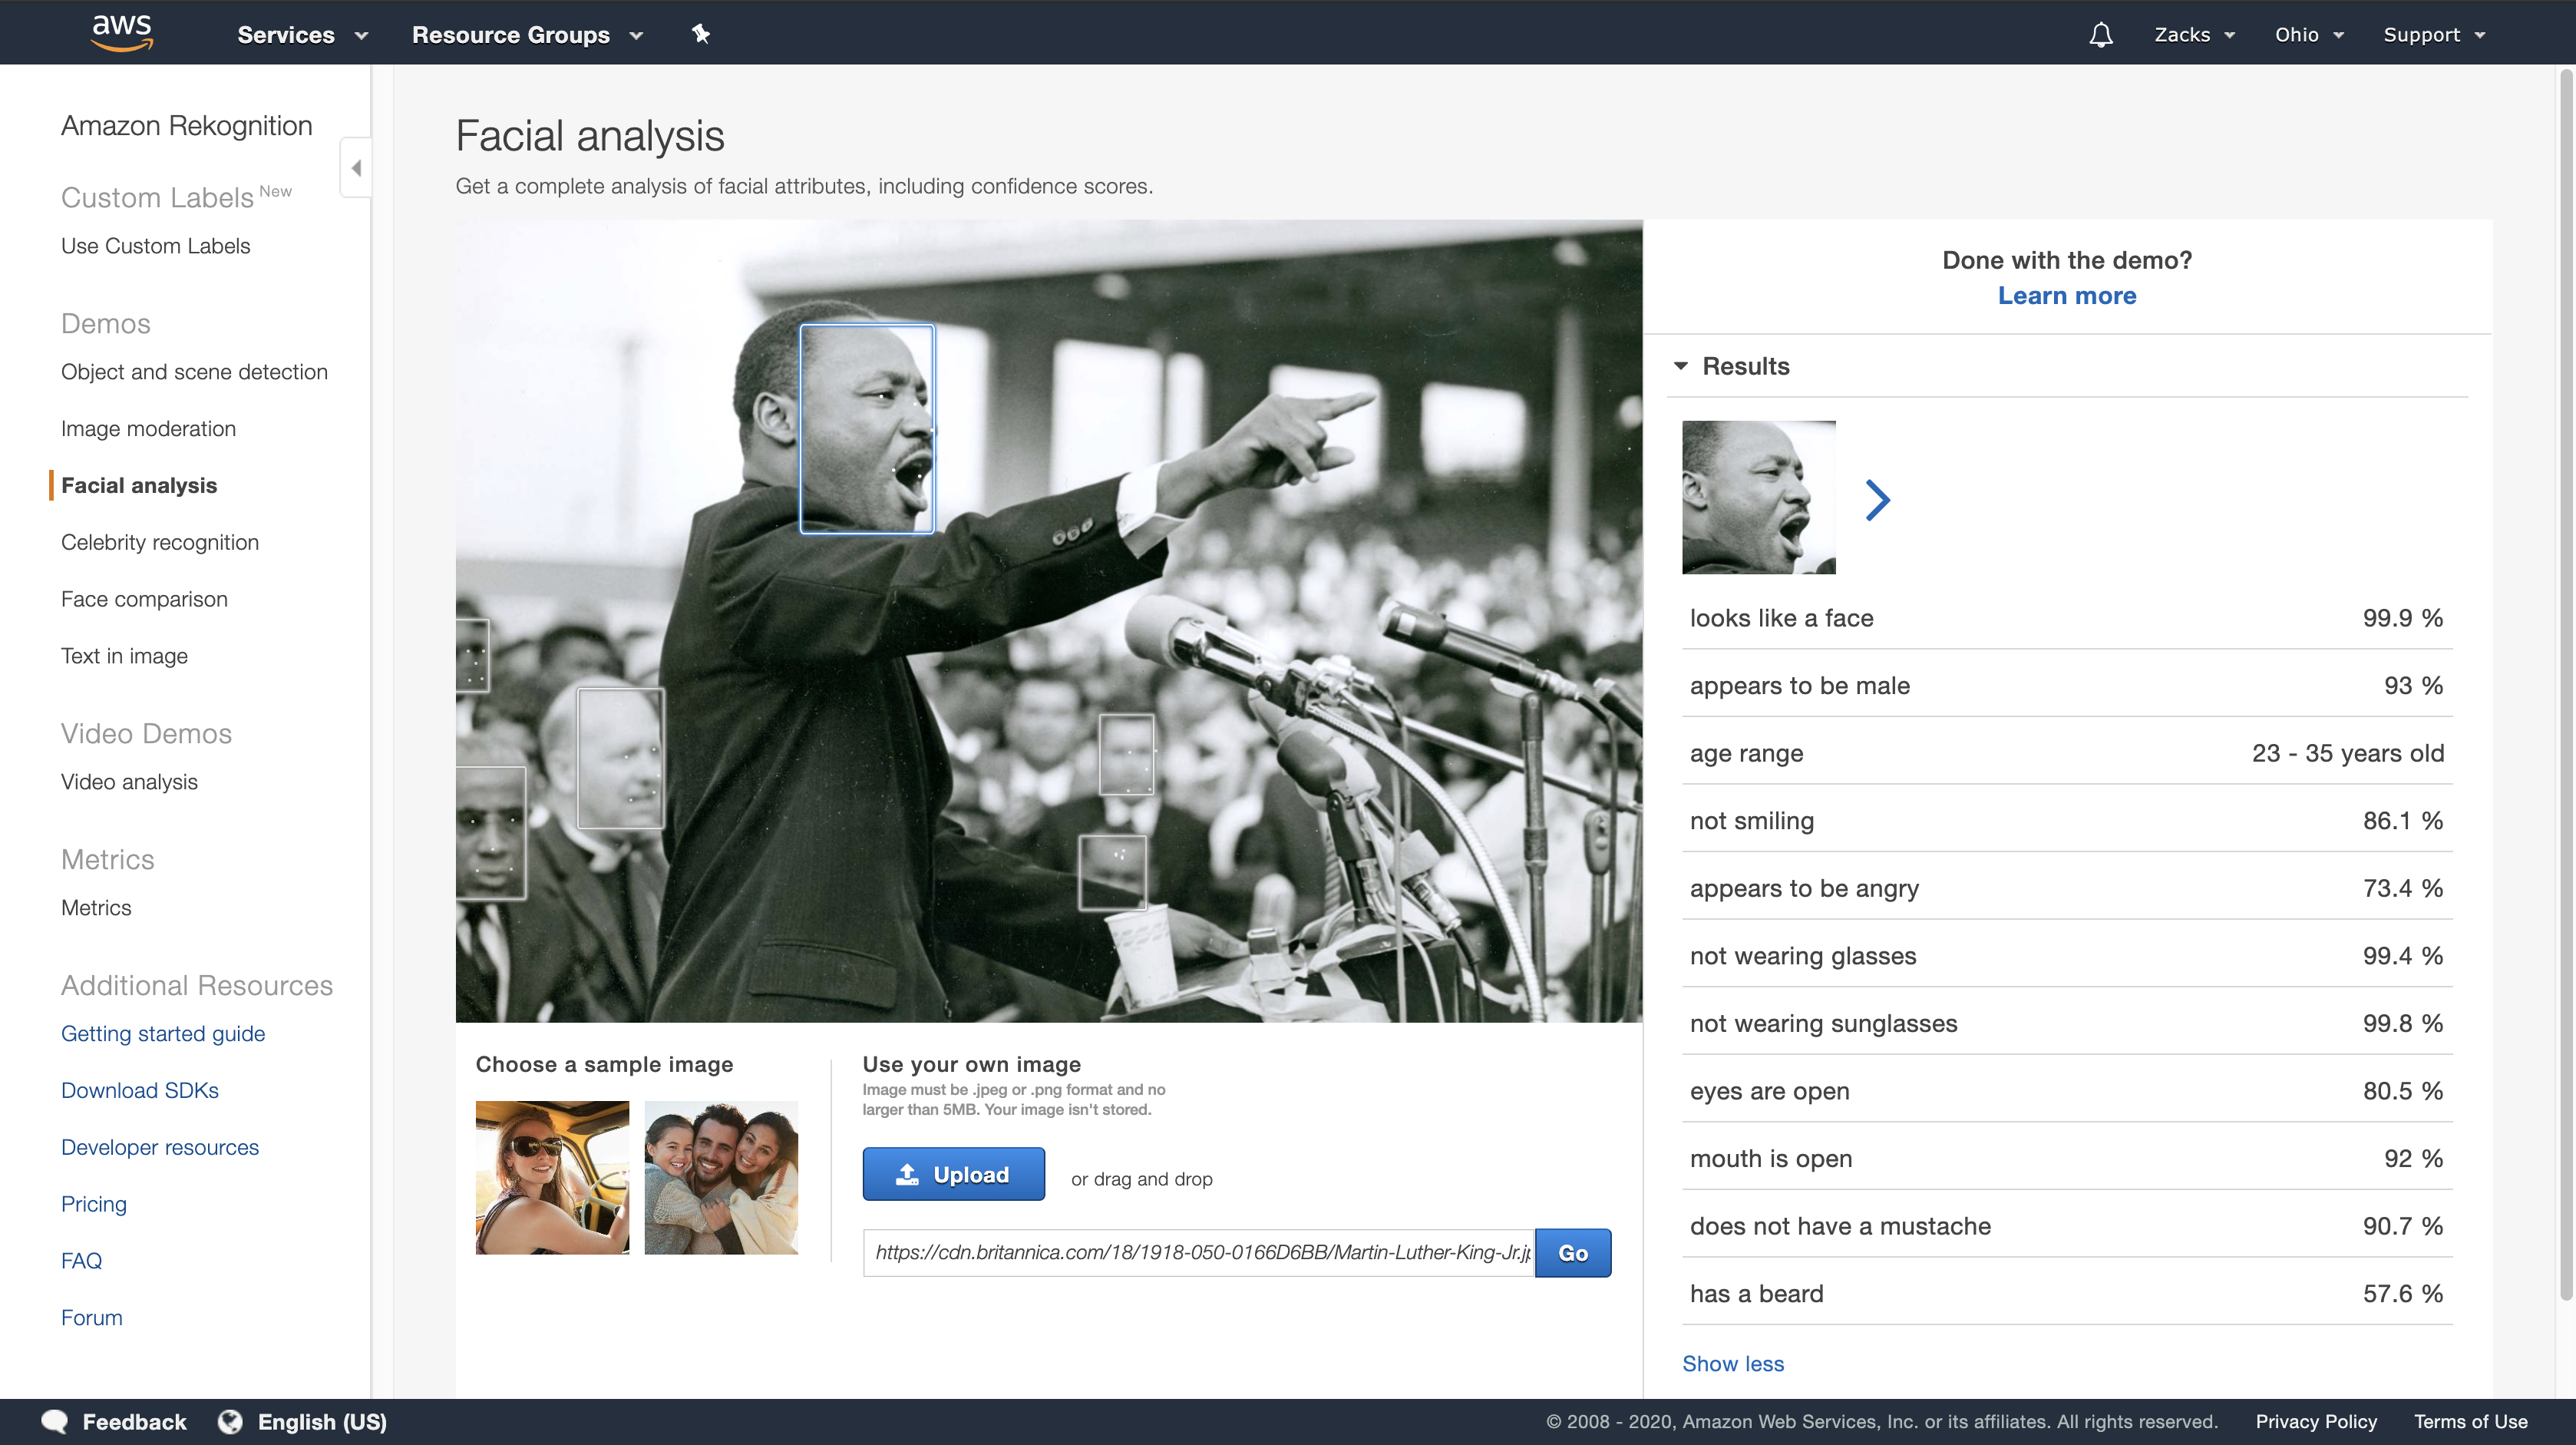
Exercise 2: Analyze Faces in an Image (Console)
https://docs.aws.amazon.com/rekognition/latest/dg/detect-faces-console.html
This section shows you how to use the Amazon Rekognition console to detect faces and analyze facial attributes in an image. When you provide an image that contains a face as input, the service detects the face in the image, analyzes the facial attributes of the face, and then returns a percent confidence score for the face and the facial attributes detected in the image.
If there are multiple faces in the input image, Rekognition detects up to 100 faces in the image. Each face detected is marked with a square. When you click the area marked with a square on a face, Rekognition displays the confidence score of that face and its attributes detected in the Faces | Confidence pane.
Analyze Faces in an Image You Provide
You can upload your own image or provide the URL to the image in the Amazon Rekognition console.
Note: The image must be less than 5MB in size and must be of JPEG or PNG format.
To analyze a face in an image you provide
1.Open the Amazon Rekognition console at https://console.aws.amazon.com/rekognition/.
2.Choose Facial analysis.
3.Do one of the following:
- Upload an image – Choose Upload, go to the location where you stored your image, and then select the image.
- Use a URL – Type the URL in the text box, and then choose Go.
4.View the confidence score of one the faces detected and its facial attributes in the Faces | Confidence pane.
5.If there are multiple faces in the image, choose one of the other faces to see its attributes and scores.
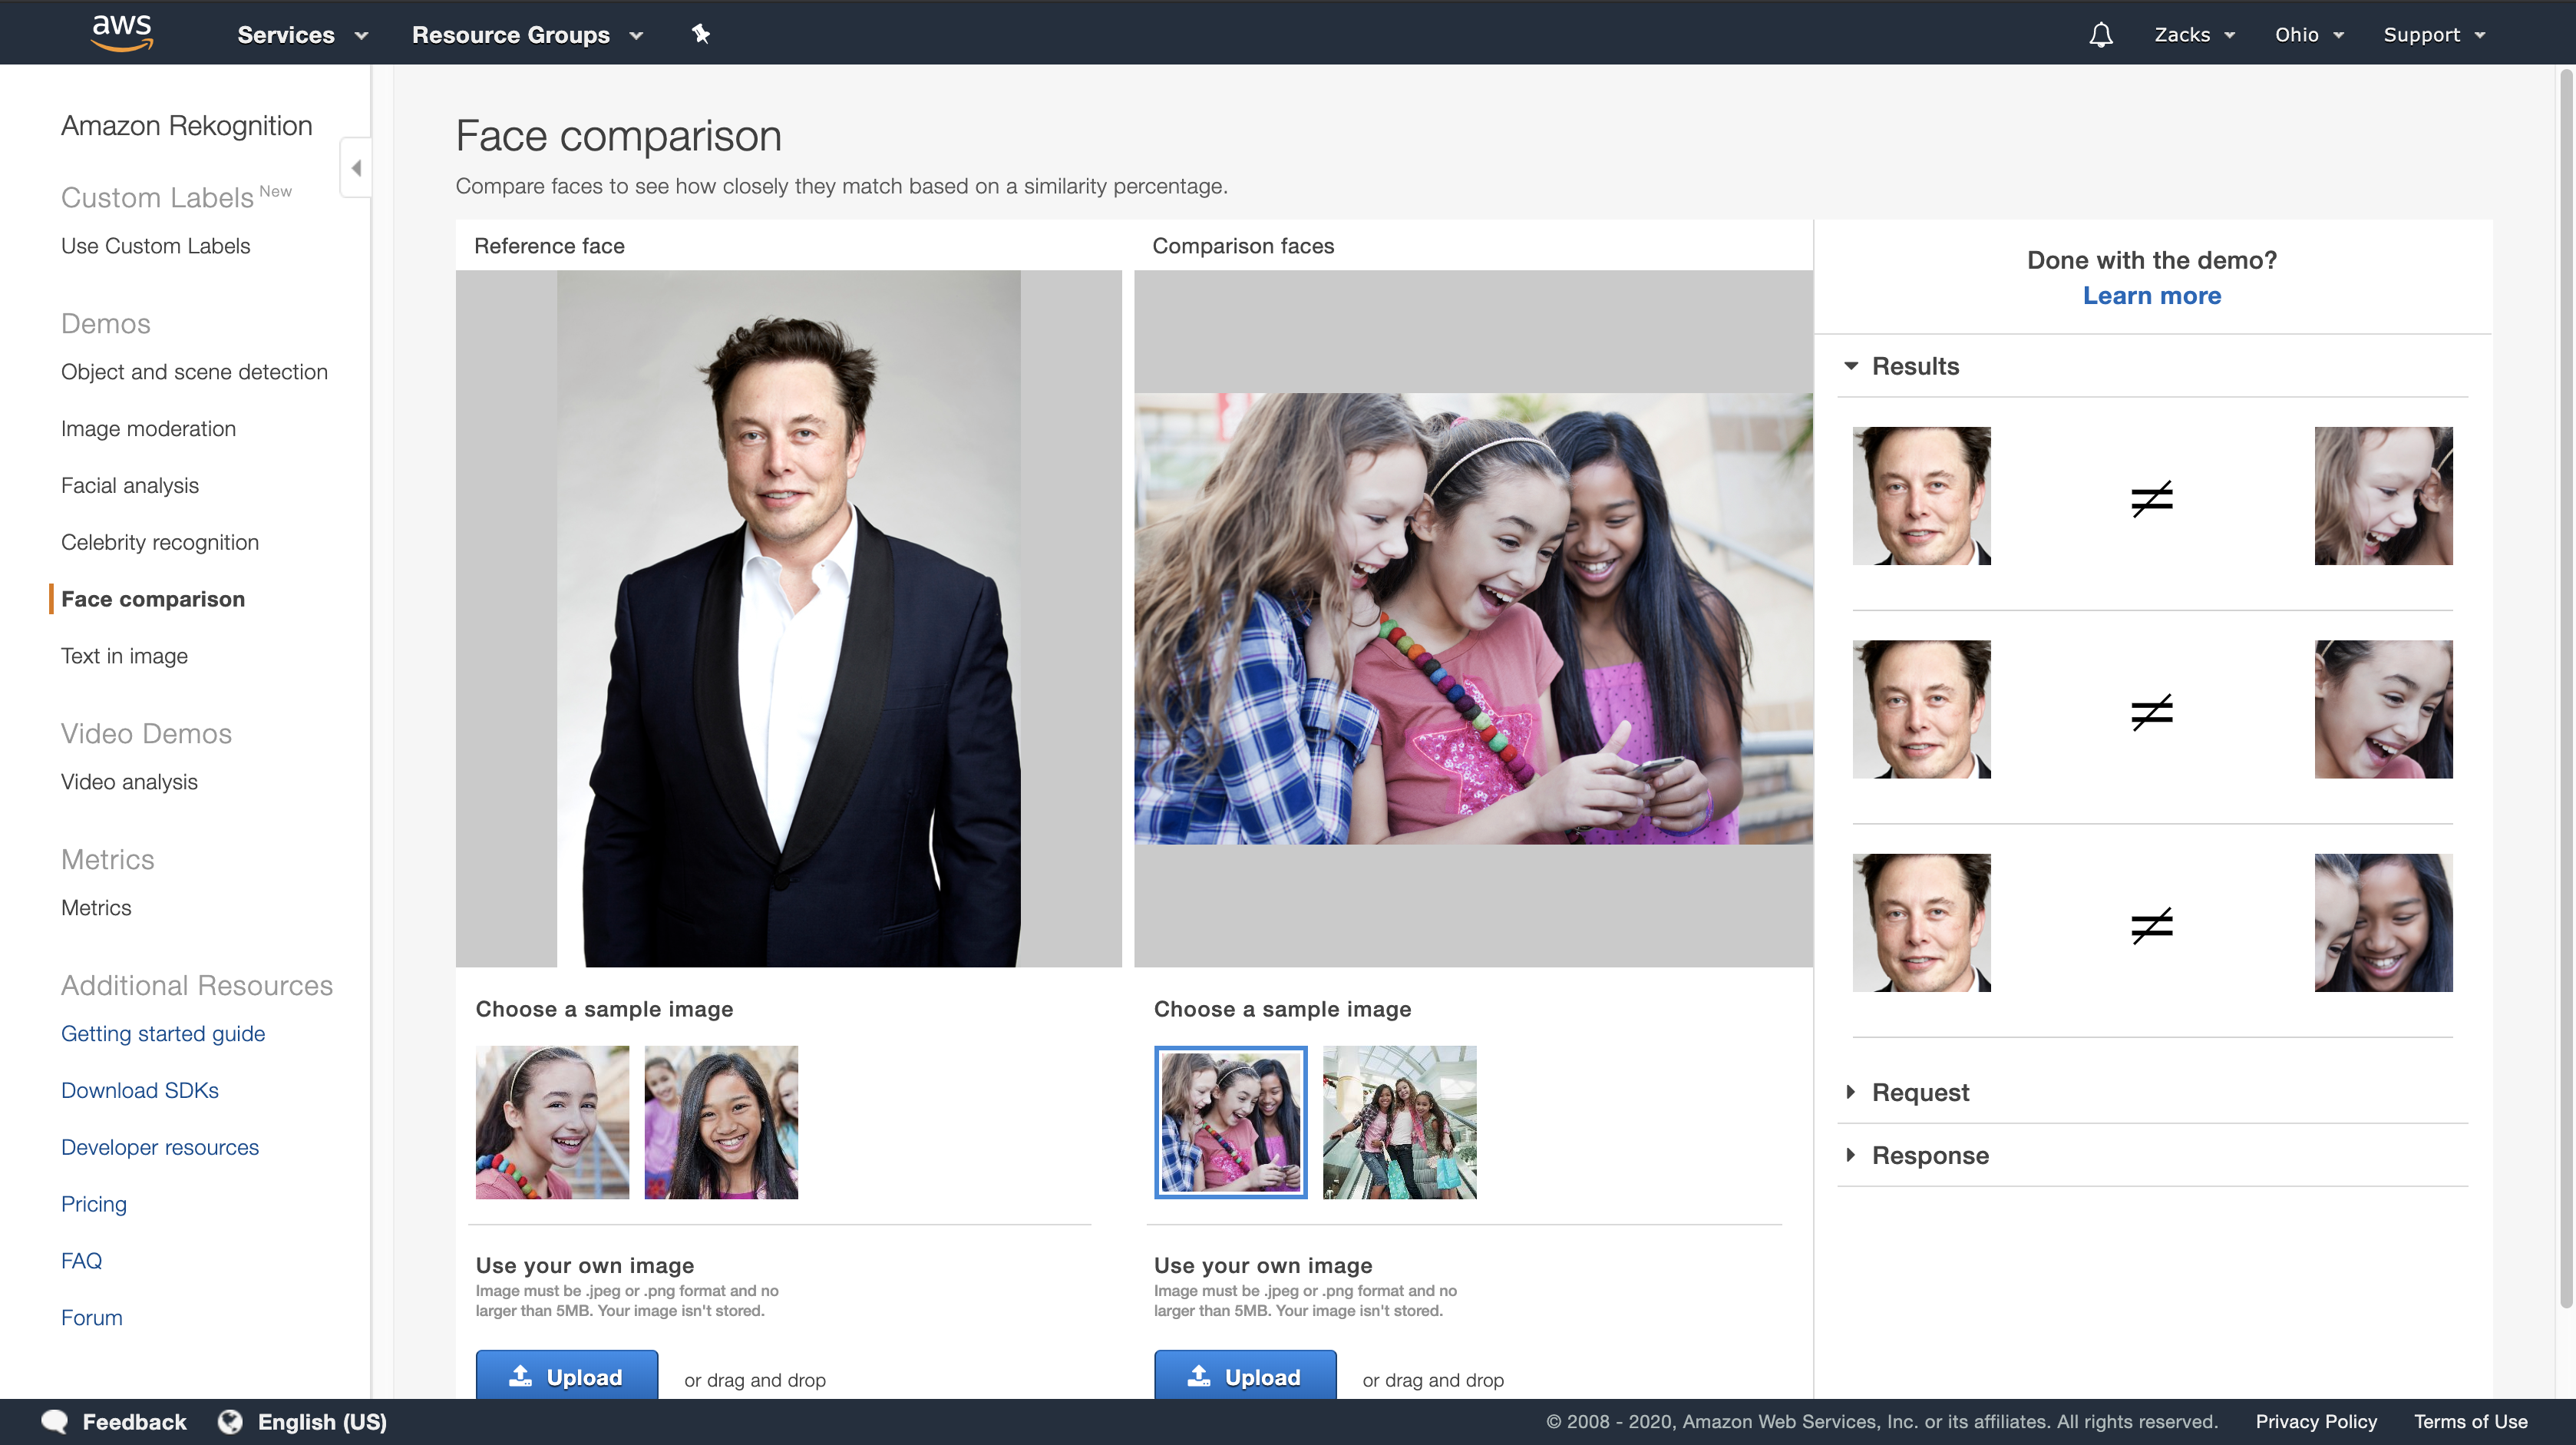
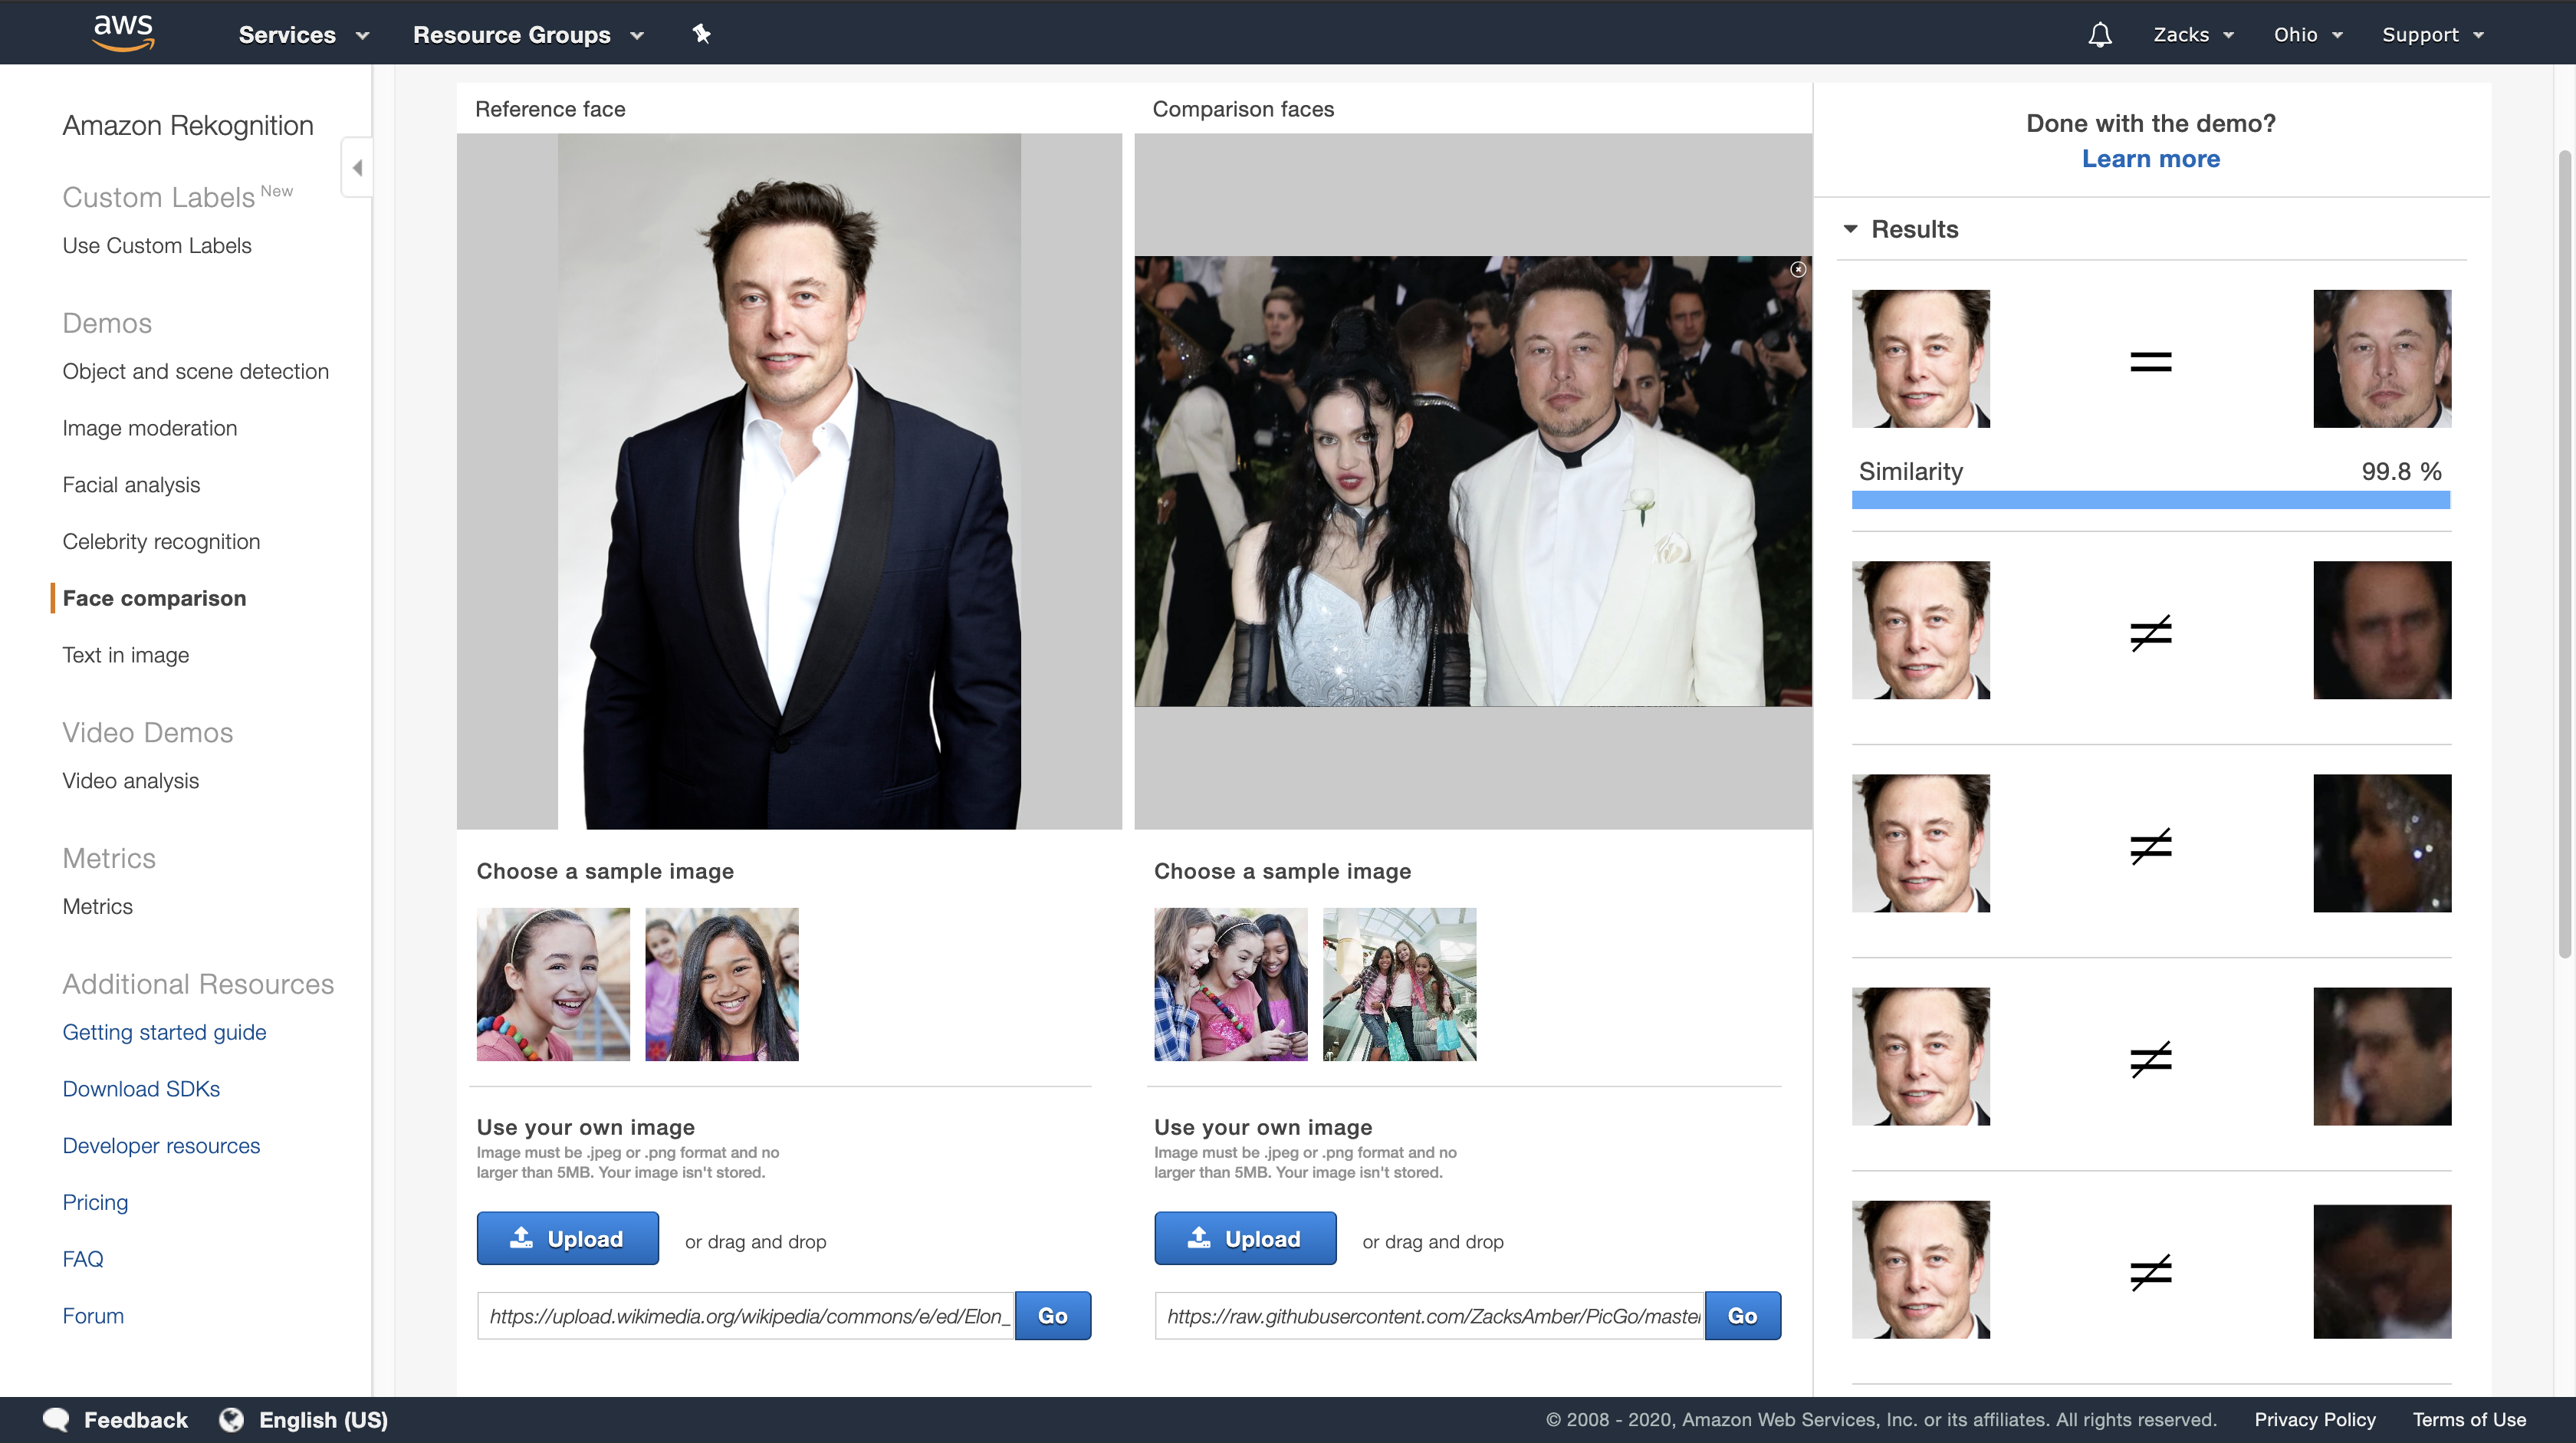
Exercise 3: Compare Faces in Images (Console)
https://docs.aws.amazon.com/rekognition/latest/dg/compare-faces-console.html
This section shows you how to use the Amazon Rekognition console to compare faces within a set of images with multiple faces in them. When you specify a Reference face (source) and a Comparison faces (target) image, Rekognition compares the largest face in the source image (that is, the reference face) with up to 100 faces detected in the target image (that is, the comparison faces), and then finds how closely the face in the source matches the faces in the target image. The similarity score for each comparison is displayed in the Results pane.
- If the target image contains multiple faces, Rekognition matches the face in the source image with up to 100 faces detected in target image, and then assigns a similarity score to each match.
- If the source image contains multiple faces, the service detects the largest face in the source image and uses it to compare with each face detected in the target image.
Compare Faces in an Image You Provide
To compare faces in your images
1.Open the Amazon Rekognition console at https://console.aws.amazon.com/rekognition/.
2.Choose Face comparison.
3.For your source image, do one of the following:
- Upload an image – Choose Upload on the left, go to the location where you stored your source image, and then select the image.
- Use a URL – Type the URL of your source image in the text box, and then choose Go.
4.For your target image, do one of the following:
- Upload an image – Choose Upload on the right, go to the location where you stored your source image, and then select the image.
- Use a URL – Type the URL of your source image in the text box, and then choose Go.
5.Rekognition matches the largest face in your source image with up to 100 faces in the target image and then displays the similarity score for each pair in the Results pane.
Reference Face: https://upload.wikimedia.org/wikipedia/commons/e/ed/Elon_Musk_Royal_Society.jpg
Comparison Faces: https://raw.githubusercontent.com/ZacksAmber/PicGo/master/img/20200121123553.png
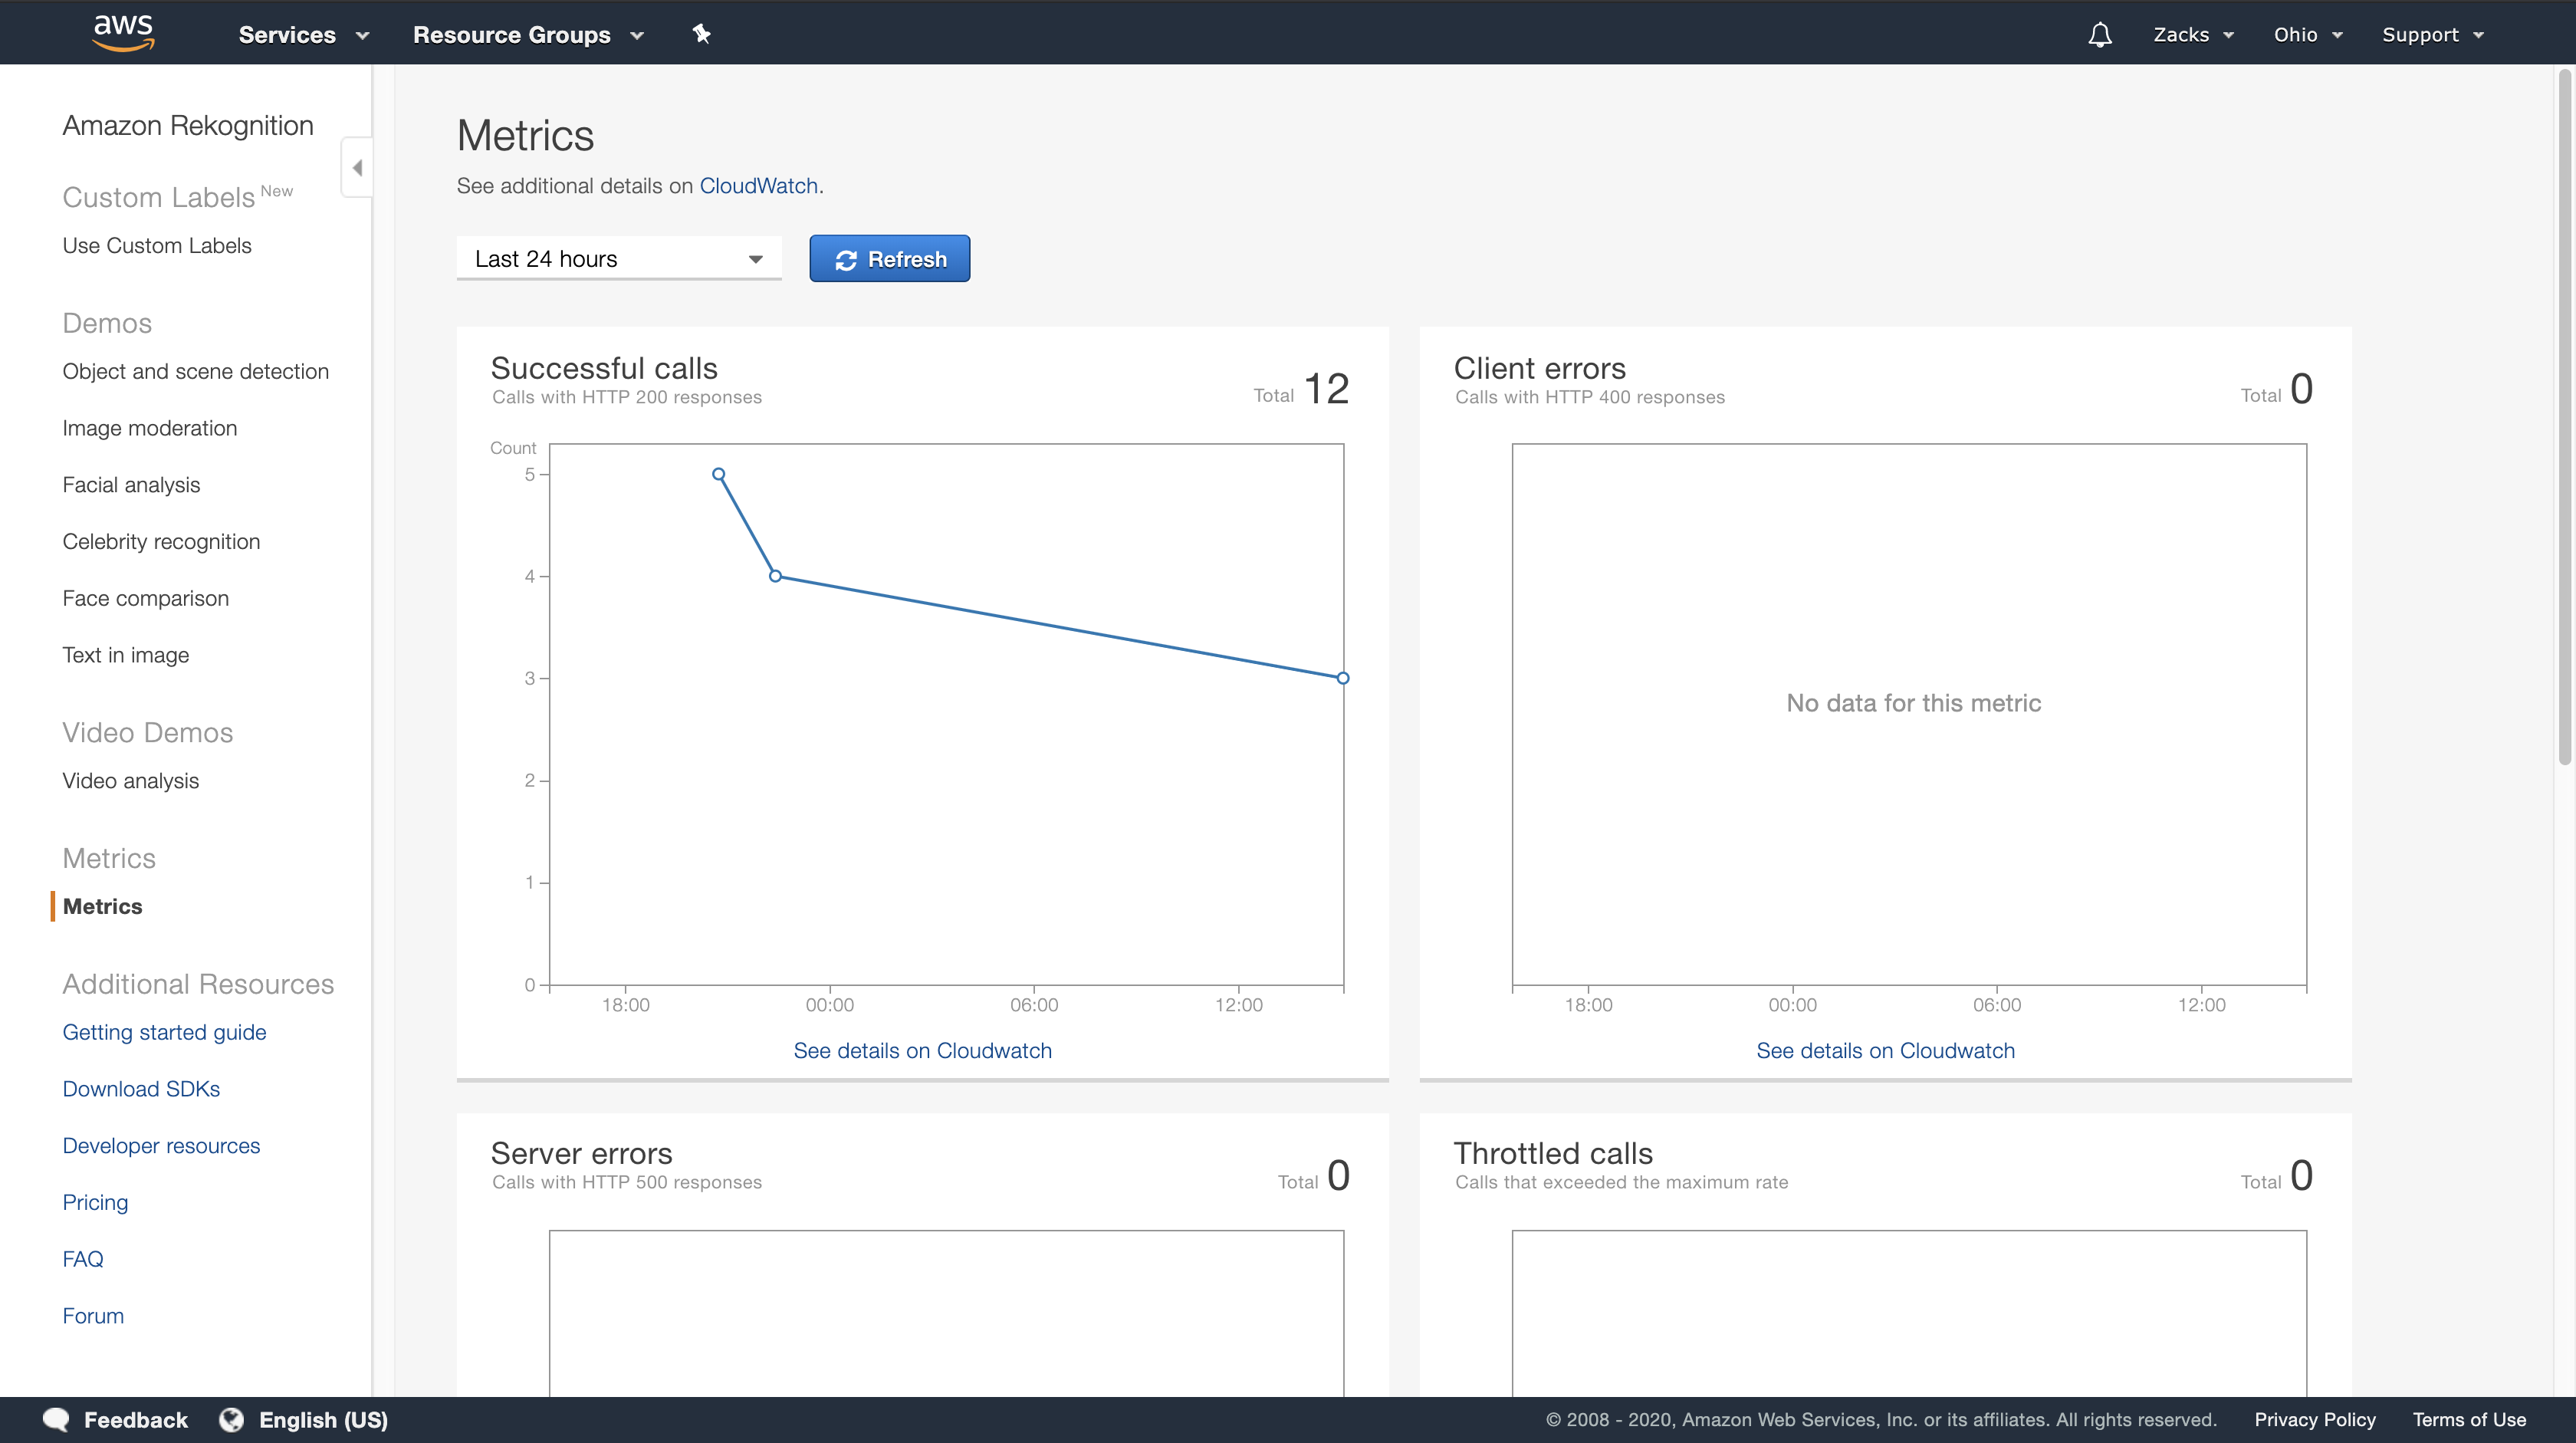
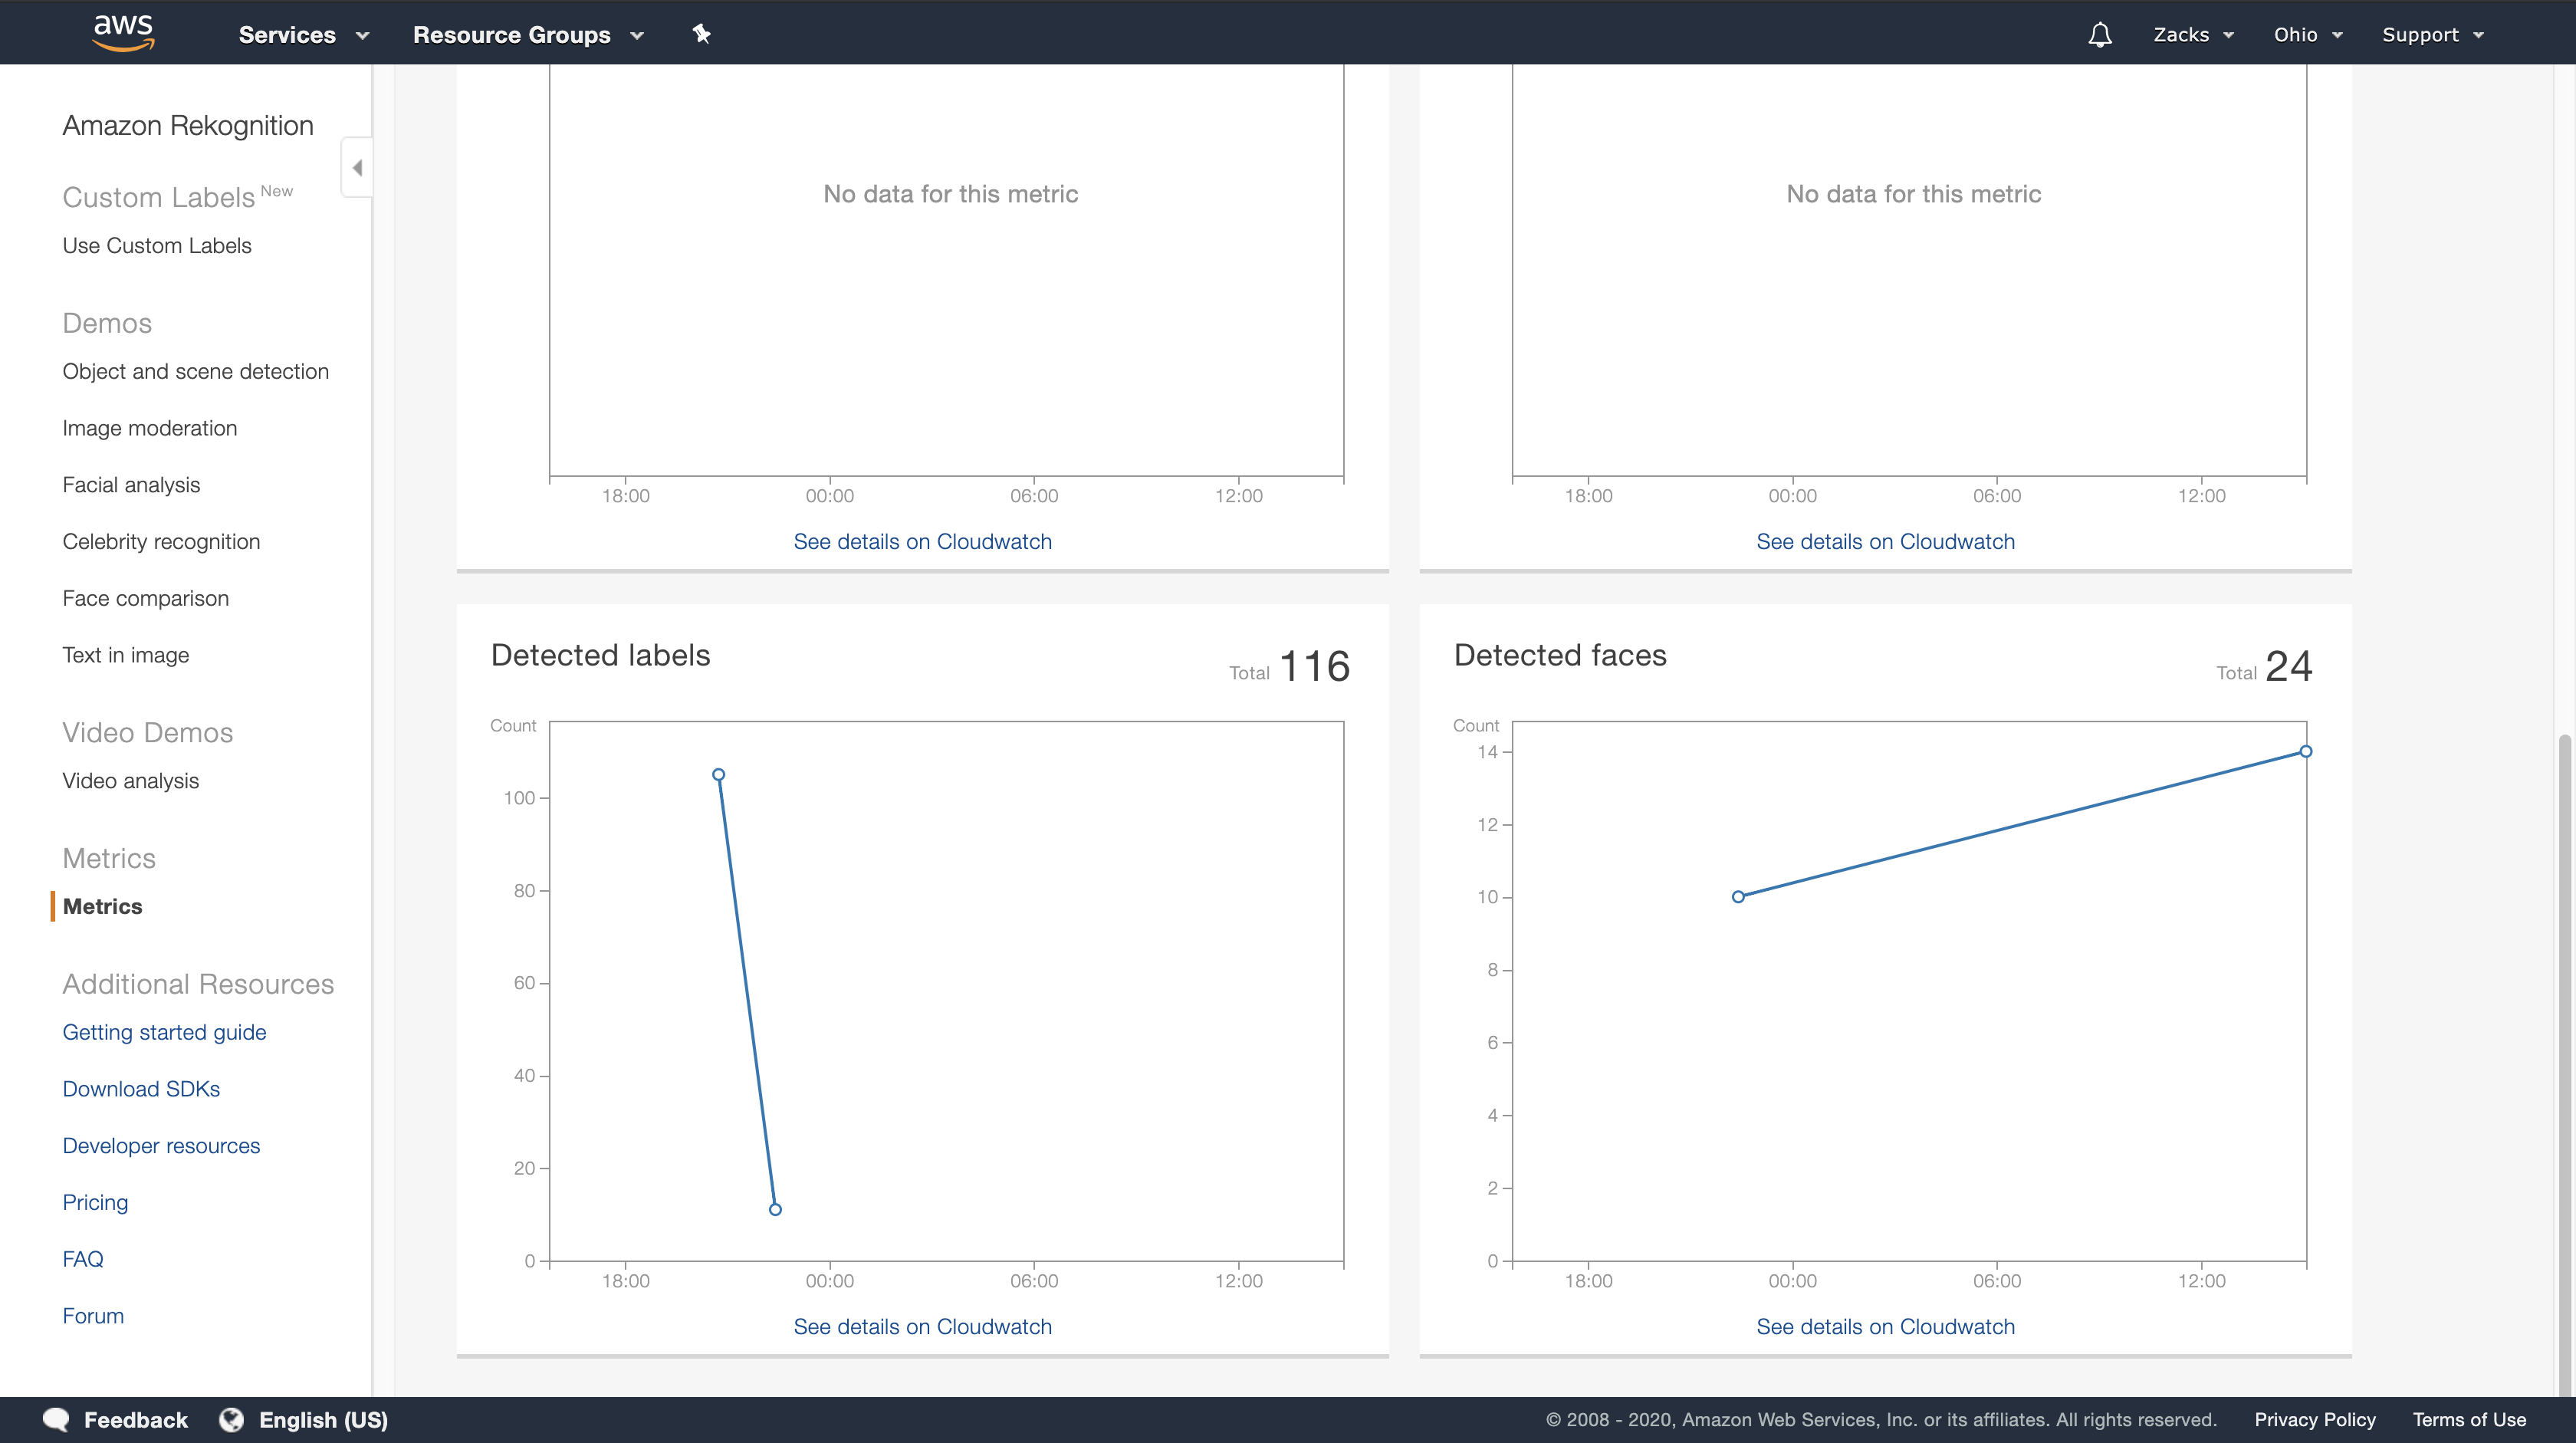
Exercise 4: See Aggregated Metrics (Console)
The Amazon Rekognition metrics pane shows activity graphs for an aggregate of individual Rekognition metrics over a specified period of time. For example, the SuccessfulRequestCount aggregated metric shows the total number of successful requests to all Rekognition API operations over the last seven days.
The following table lists the graphs displayed in the Rekognition metrics pane and the corresponding Rekognition metric. For more information, see CloudWatch Metrics for Rekognition.
| Graph | Aggregated Metric |
|---|---|
| Successful calls | SuccessfulRequestCount |
| Client errors | UserErrorCount |
| Server errors | ServerErrorCount |
| Throttled | ThrottledCount |
| Detected labels | DetectedLabelCount |
| Detected faces | DetectedFaceCount |
Each graph shows aggregated metric data collected over a specified period of time. A total count of aggregated metric data for the time period is also displayed. To see metrics for individual API calls, choose the link beneath each graph.
To allow users access to the Rekognition metrics pane, ensure that the user has appropriate CloudWatch and Rekognition permissions. For example, a user with AmazonRekognitionReadOnlyAccess and CloudWatchReadOnlyAccess managed policy permissions can see the metrics pane. If a user does not have the required permissions, when the user opens the metrics pane, no graphs appear. For more information, see Authentication and Access Control for Amazon Rekognition.
For more information about monitoring Rekognition with CloudWatch see Monitoring Rekognition.
To see aggregated metrics (console)
1.Open the Amazon Rekognition console at https://console.aws.amazon.com/rekognition/.
2.In the navigation pane, choose Metrics.
3.In the dropdown, select the period of time you want metrics for.
4.To update the graphs, choose the Refresh button.
5.To see detailed CloudWatch metrics for a specific aggregated metric, choose See details on CloudWatch beneath the metric graph.
Amazon Lex
How it works
https://docs.aws.amazon.com/lex/latest/dg/how-it-works.html
New – Amazon Connect and Amazon Lex Integration

Programming Model
https://docs.aws.amazon.com/lex/latest/dg/programming-model.html
Service Permissions
https://docs.aws.amazon.com/lex/latest/dg/howitworks-service-permissions.html
Amazon Lex uses AWS Identity and Access Management (IAM) service-linked roles. Amazon Lex assumes these roles to call AWS services on behalf of your bots and bot channels. The roles exist within your account, but are linked to Amazon Lex use cases and have predefined permissions. Only Amazon Lex can assume these roles, and you can’t modify their permissions. You can delete them after deleting their related resources using IAM. This protects your Amazon Lex resources because you can’t inadvertently remove necessary permissions.
Amazon Lex uses two IAM service-linked roles:
AWSServiceRoleForLexBots—Amazon Lex uses this service-linked role to invoke Amazon Polly to synthesize speech responses for your bot and to call Amazon Comprehend for sentiment analysis.AWSServiceRoleForLexChannels—Amazon Lex uses this service-linked role to post text to your bot when managing channels.
You don’t need to manually create either of these roles. When you create your first bot using the console, Amazon Lex creates the AWSServiceRoleForLexBots role for you. When you first associate a bot with a messaging channel, Amazon Lex creates the AWSServiceRoleForLexChannels role for you.
Creating Resource-Based Policies for AWS Lambda
When invoking Lambda functions, Amazon Lex uses resource-based policies. A resource-based policy is attached to a resource; it lets you specify who has access to the resource and which actions they can perform on it. This enables you to narrowly scope permissions between Lambda functions and the intents that you have created. It also allows you to see those permissions in a single policy when you manage Lambda functions that have many event sources.
For more information, see Using Resource-Based Polices for AWS Lambda (Lambda Function Policies) in the AWS Lambda Developer Guide.
To create resource-based policies for intents that you associate with a Lambda function, you can use the Amazon Lex console. Or, you can use the AWS command line interface (AWS CLI). In the AWS CLI, use the Lambda AddPermisssion API with the Principal field set to lex.amazonaws.com and the SourceArn set to the ARN of the intent that is allowed to invoke the function.
Sign in the IAM through root user
https://console.aws.amazon.com/iam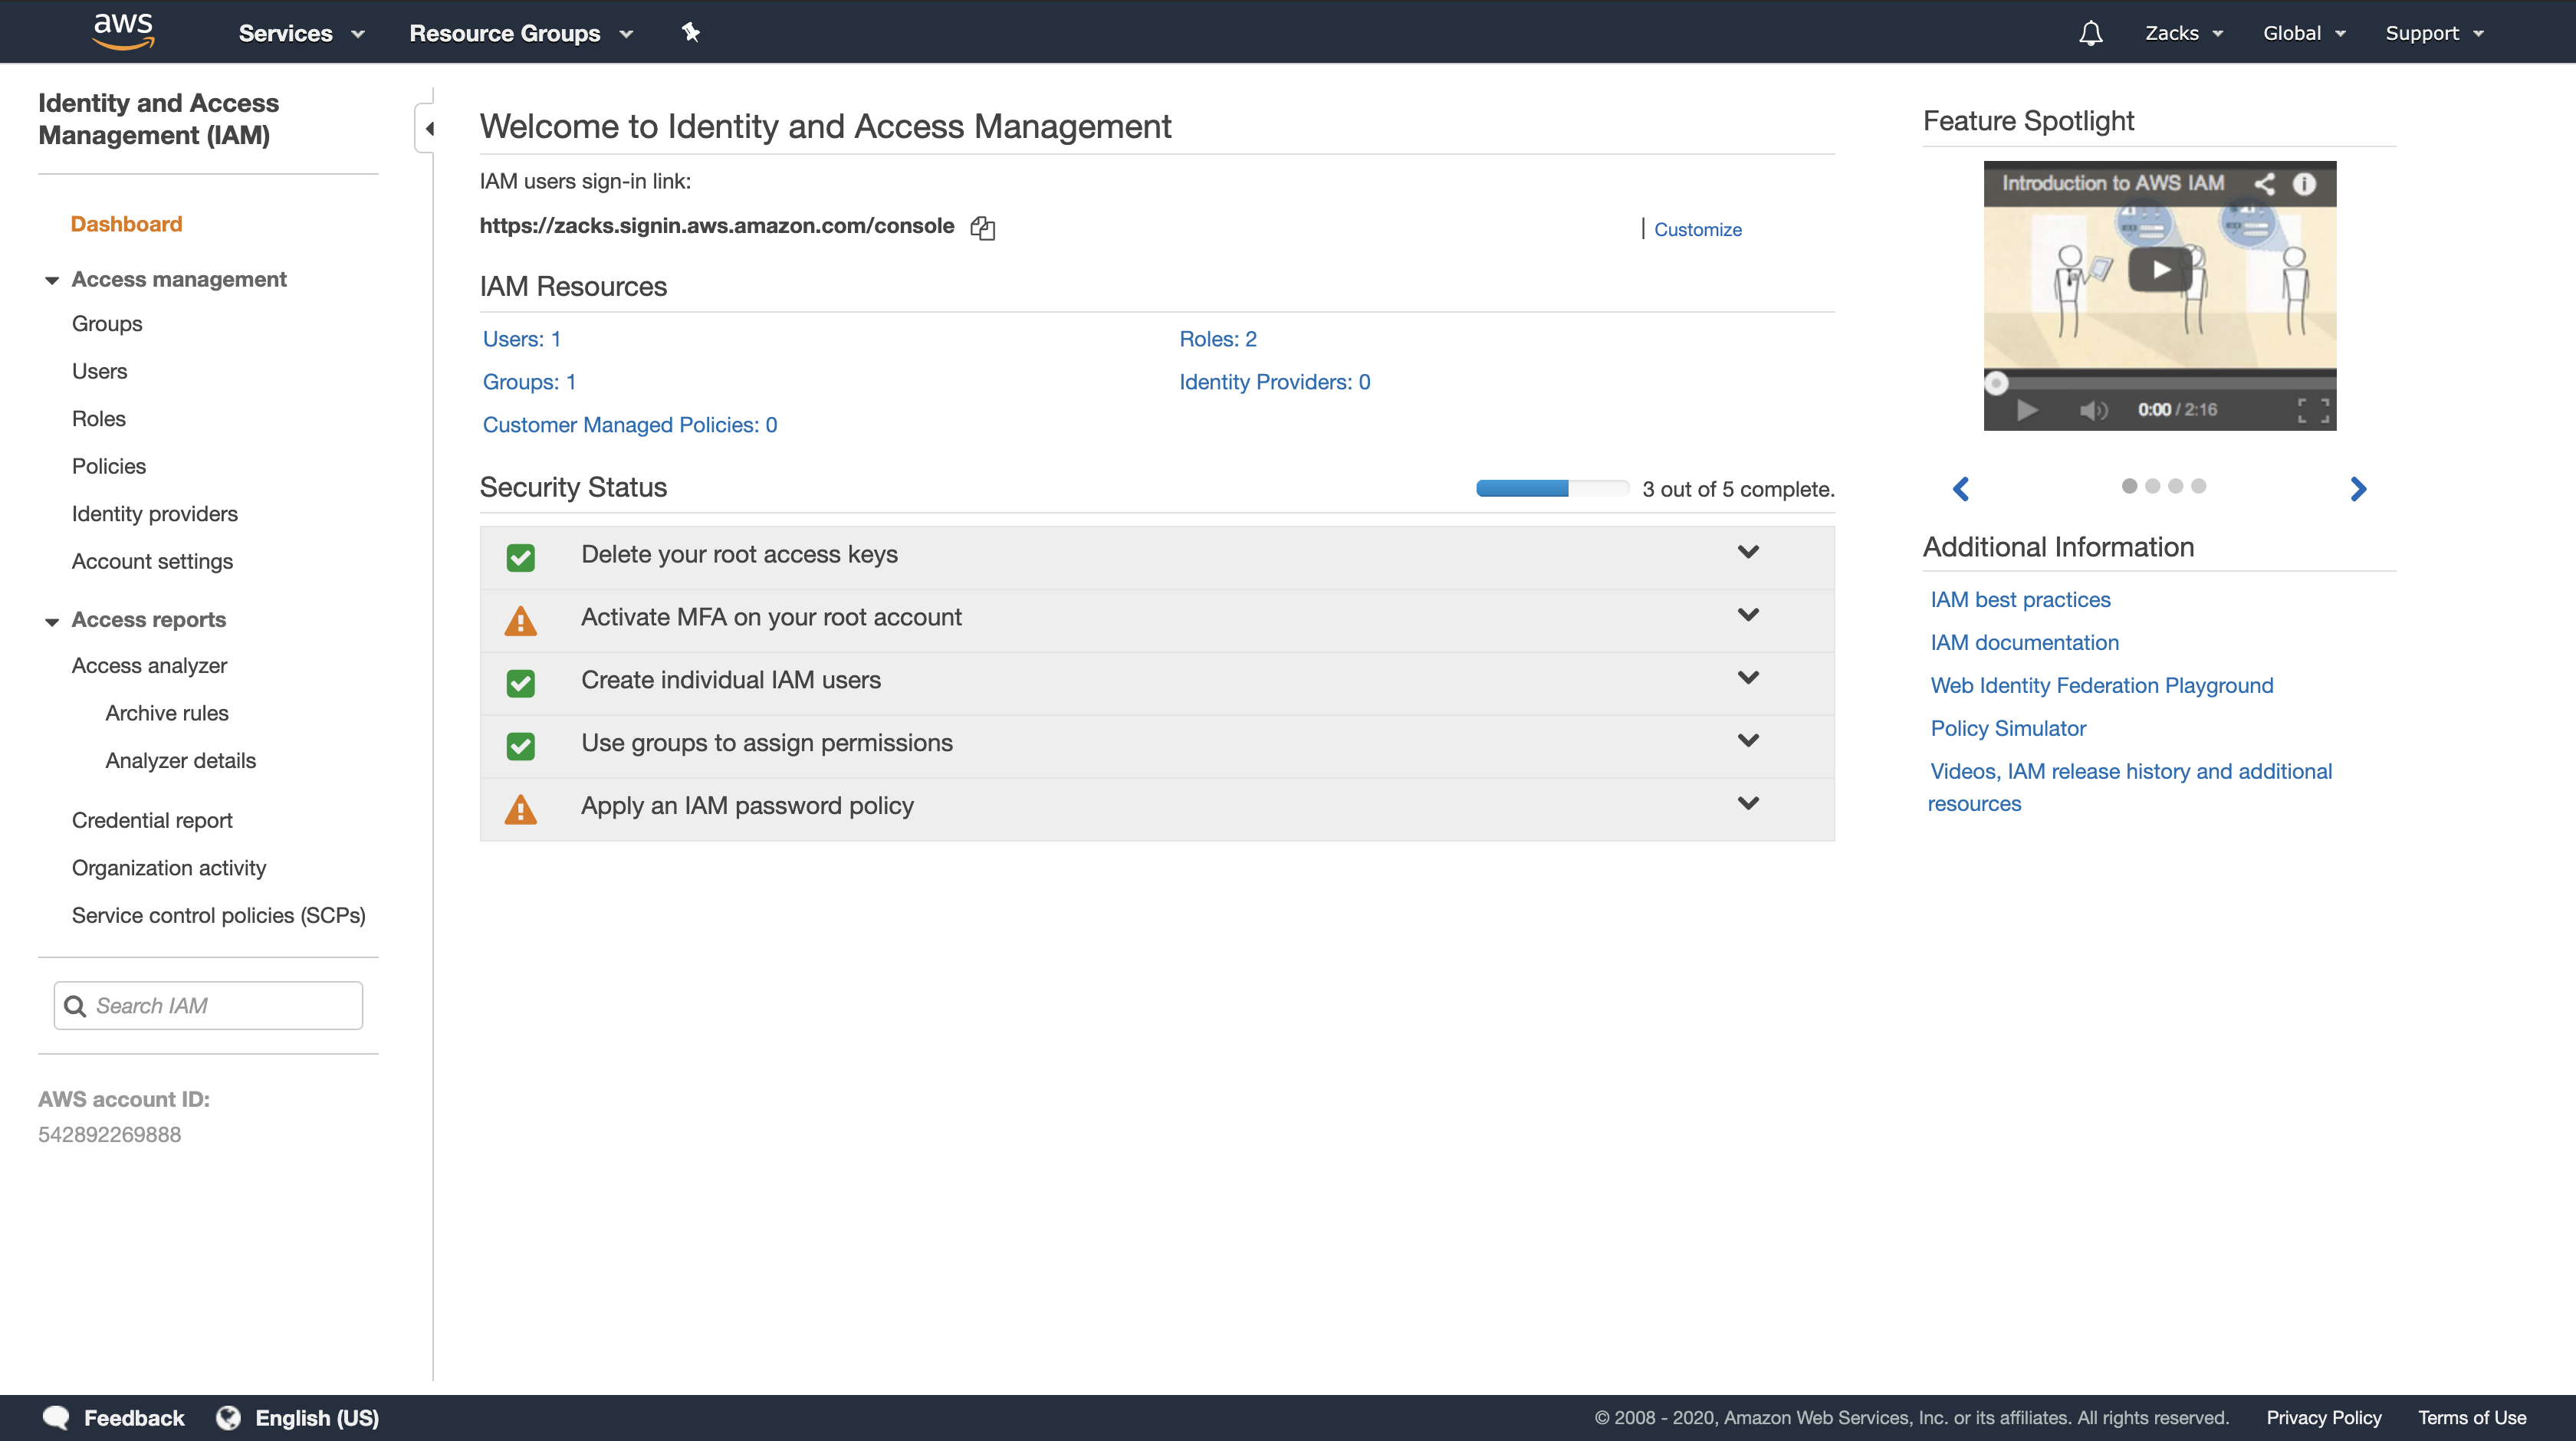
Navigation Pane
Click Groups > click your group
Managing Messages
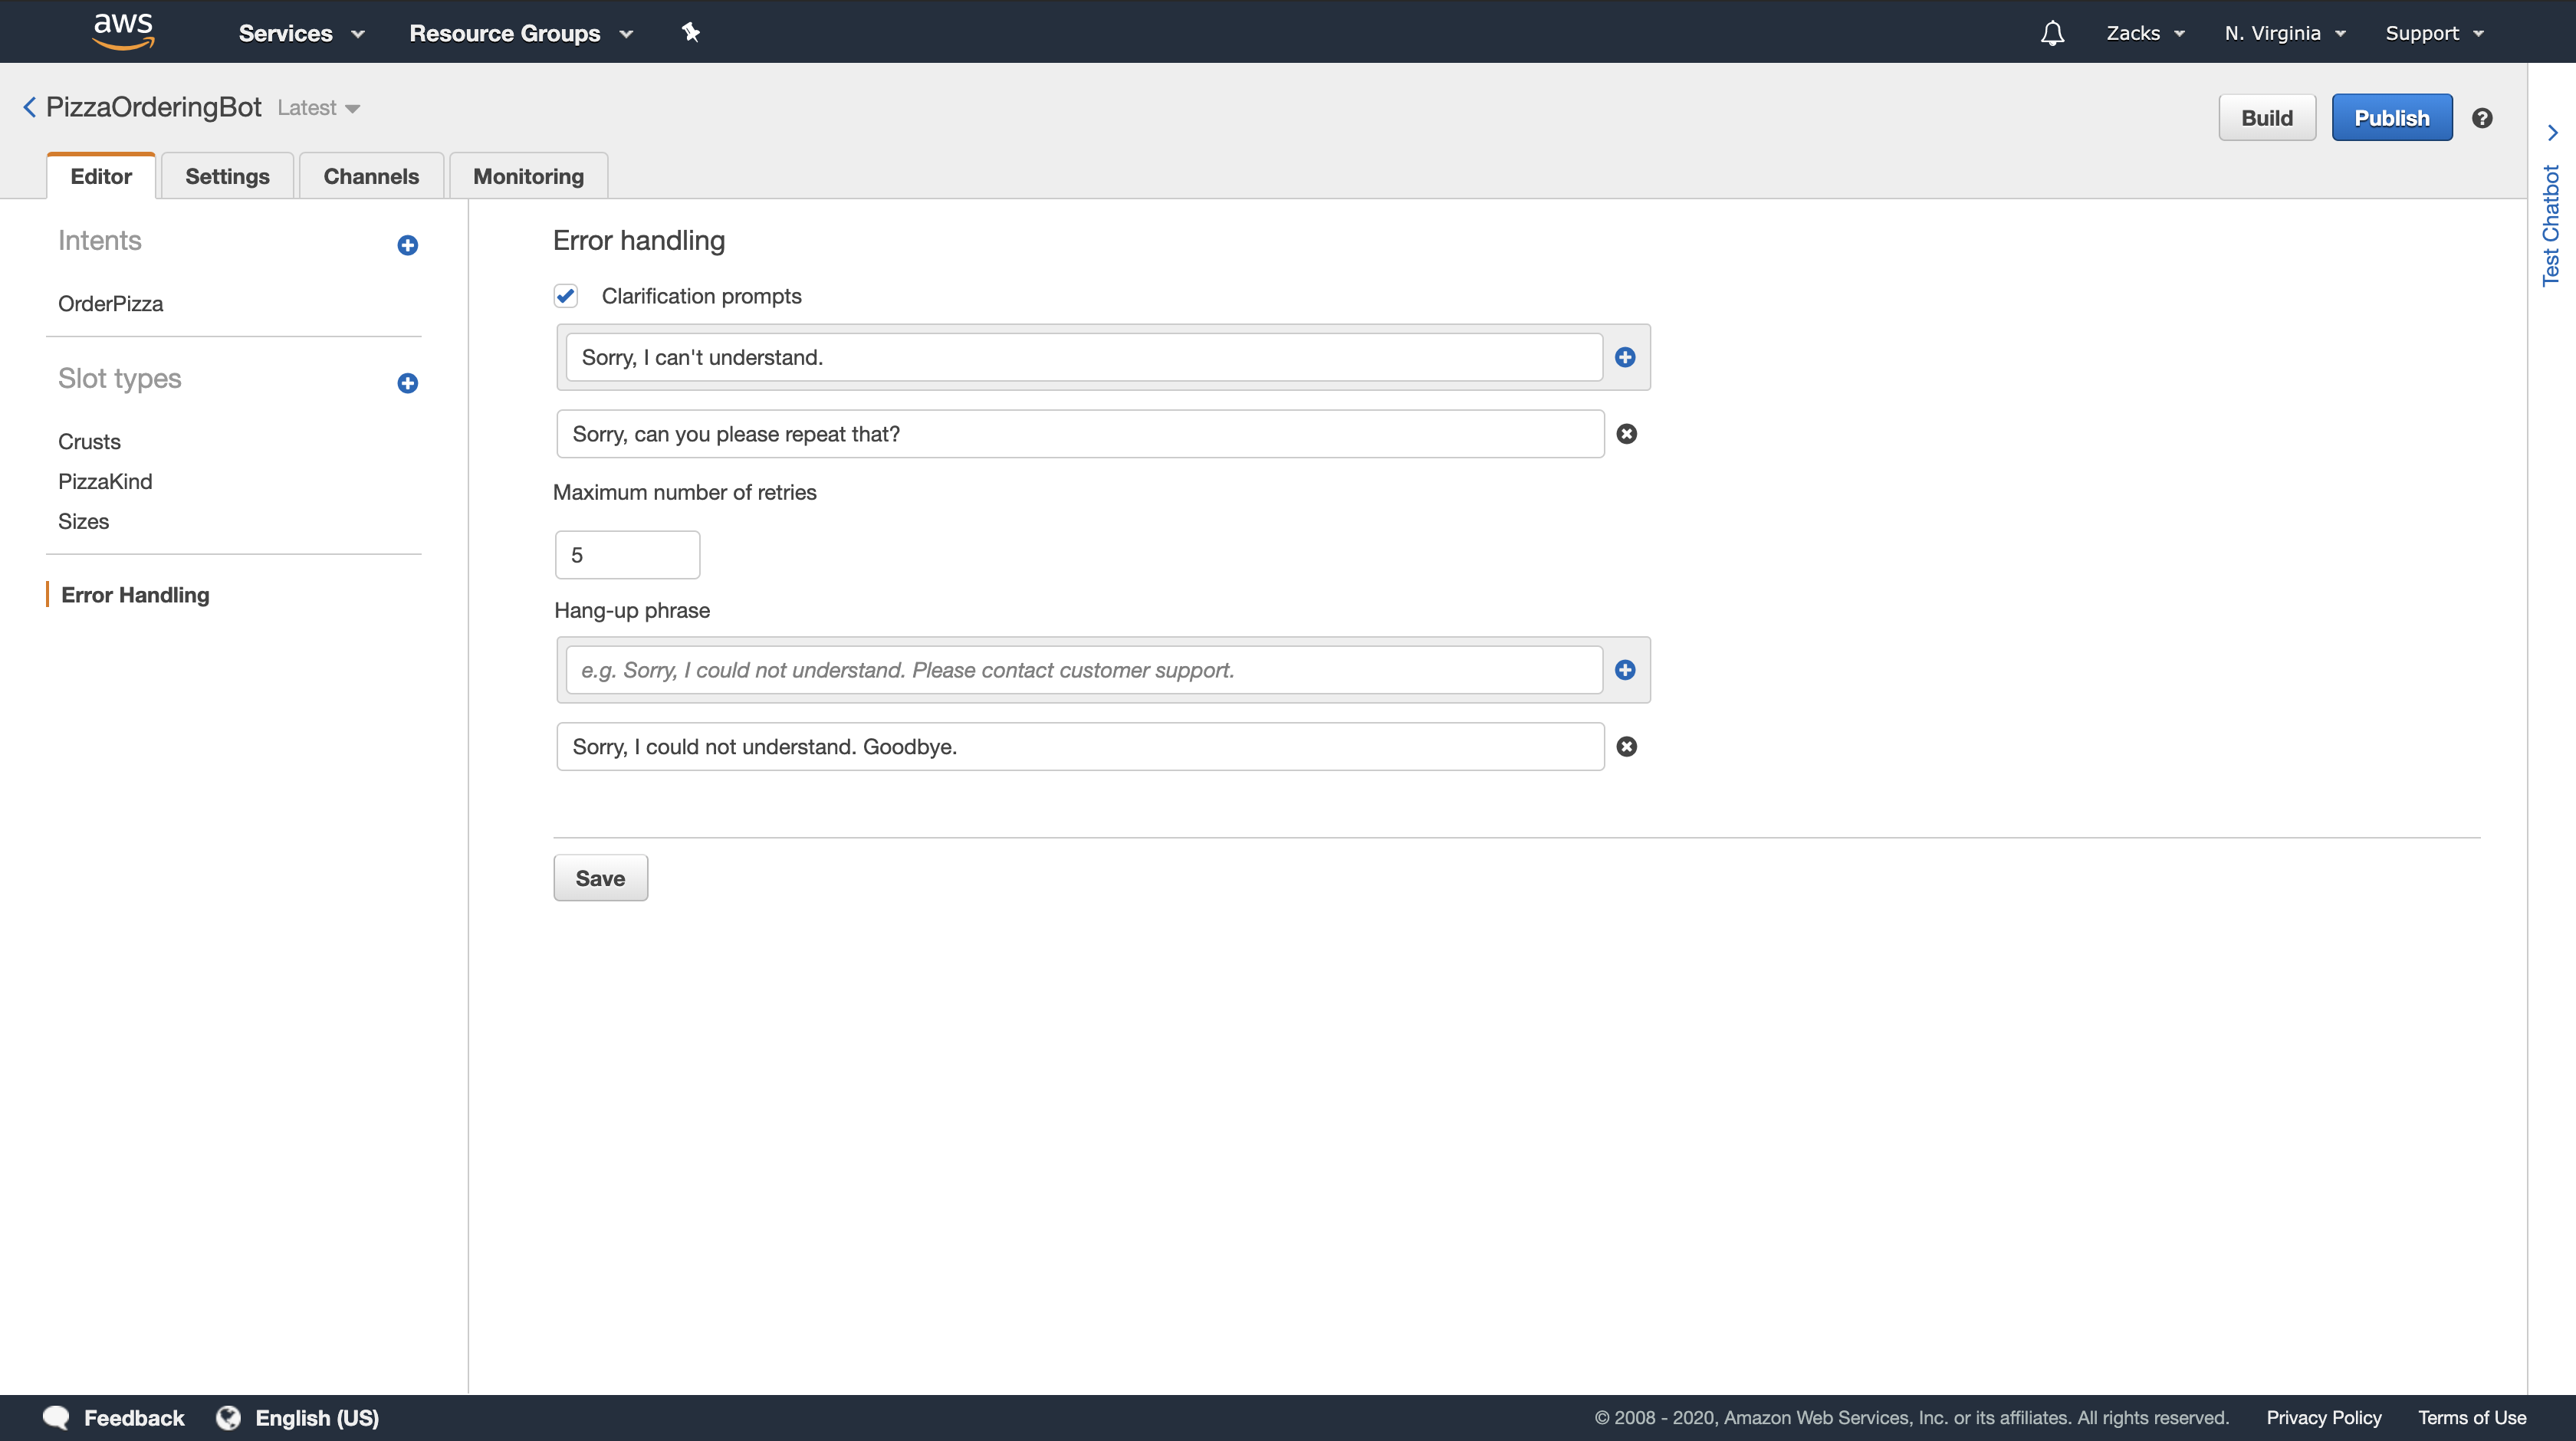
https://docs.aws.amazon.com/lex/latest/dg/howitworks-manage-prompts.html
Managing Conversation Context
Conversation Logs
https://docs.aws.amazon.com/lex/latest/dg/conversation-logs.html
Creating an IAM Role and Policies for Conversation Logs
https://docs.aws.amazon.com/lex/latest/dg/conversation-logs-role-and-policy.html
Configuring Conversation Logs
https://docs.aws.amazon.com/lex/latest/dg/conversation-logs-configure.html
Encrypting Conversation Logs
https://docs.aws.amazon.com/lex/latest/dg/conversation-logs-encrypting.html
Viewing Text Logs in Amazon CloudWatch Logs
https://docs.aws.amazon.com/lex/latest/dg/conversation-logs-cw.html
Accessing Audio Logs in Amazon S3
https://docs.aws.amazon.com/lex/latest/dg/conversation-logs-s3
Monitoring Conversation Log Status with CloudWatch Metrics
https://docs.aws.amazon.com/lex/latest/dg/conversation-logs-monitoring
Managing Sessions
https://docs.aws.amazon.com/lex/latest/dg/how-session-api.html
Deployment Options
https://docs.aws.amazon.com/lex/latest/dg/chatbot-service.html
Built-in Intents and Slot Types
https://docs.aws.amazon.com/lex/latest/dg/howitworks-builtins.html
Custom Slot Types
https://docs.aws.amazon.com/lex/latest/dg/howitworks-custom-slots
Slot Obfuscation
Sentiment Analysis
https://docs.aws.amazon.com/lex/latest/dg/sentiment-analysis
Getting Started with Amazon Lex
https://docs.aws.amazon.com/lex/latest/dg/getting-started.html
Amazon Lex provides API operations that you can integrate with your existing applications. For a list of supported operations, see the API Reference. You can use any of the following options:
- AWS SDK — When using the SDKs your requests to Amazon Lex are automatically signed and authenticated using the credentials that you provide. This is the recommended choice for building your applications.
- AWS CLI — You can use the AWS CLI to access any Amazon Lex feature without having to write any code.
- AWS Console — The console is the easiest way to get started testing and using Amazon Lex
If you are new to Amazon Lex, we recommend that you read Amazon Lex: How It Works. first.
Step 1: Set Up an AWS Account and Create an Administrator User
Step 2: Set Up the AWS Command Line Interface
https://docs.aws.amazon.com/lex/latest/dg/gs-set-up-cli.html
Step 3: Getting Started (Console)
The easiest way to learn how to use Amazon Lex is by using the console. To get you started, we created the following exercises, all of which use the console:
- Exercise 1 — Create an Amazon Lex bot using a blueprint, a predefined bot that provides all of the necessary bot configuration. You do only a minimum of work to test the end-to-end setup.
In addition, you use the Lambda function blueprint, provided by AWS Lambda, to create a Lambda function. The function is a code hook that uses predefined code that is compatible with your bot. - Exercise 2 — Create a custom bot by manually creating and configuring a bot. You also create a Lambda function as a code hook. Sample code is provided.
- Exercise 3 — Publish a bot, and then create a new version of it. As part of this exercise you create an alias that points to the bot version.
Exercise 1: Create an Amazon Lex Bot Using a Blueprint (Console)
In this exercise, you do the following:
- Create your first Amazon Lex bot, and test it in the Amazon Lex console.
For this exercise, you use the OrderFlowers blueprint. For information about blueprints, see Amazon Lex and AWS Lambda Blueprints. - Create an AWS Lambda function and test it in the Lambda console. While processing a request, your bot calls this Lambda function. For this exercise, you use a Lambda blueprint (lex-order-flowers-python) provided in the AWS Lambda console to create your Lambda function. The blueprint code illustrates how you can use the same Lambda function to perform initialization and validation, and to fulfill the
OrderFlowersintent. - Update the bot to add the Lambda function as the code hook to fulfill the intent. Test the end-to-end experience.
The following sections explain what the blueprints do.
Amazon Lex Bot: Blueprint Overview
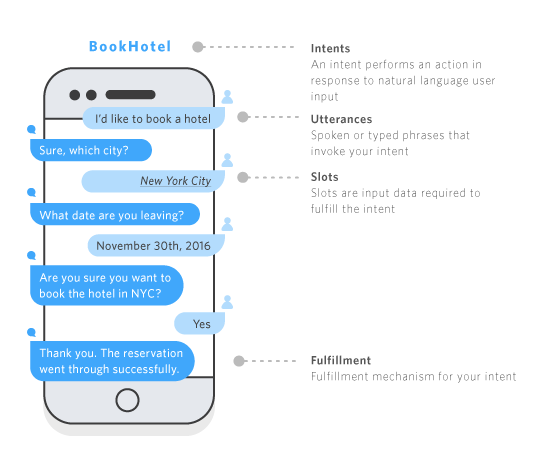
You use the OrderFlowers blueprint to create an Amazon Lex bot.For more information about the structure of a bot. The bot is preconfigured as follows:
- Intent – OrderFlowers
- Slot types – One custom slot type called
FlowerTypeswith enumeration values:roses,lilies, andtulips. - Slots – The intent requires the following information (that is, slots) before the bot can fulfill the intent.
PickupTime(AMAZON.TIME built-in type)FlowerType(FlowerTypes custom type)PickupDate(AMAZON.DATE built-in type)
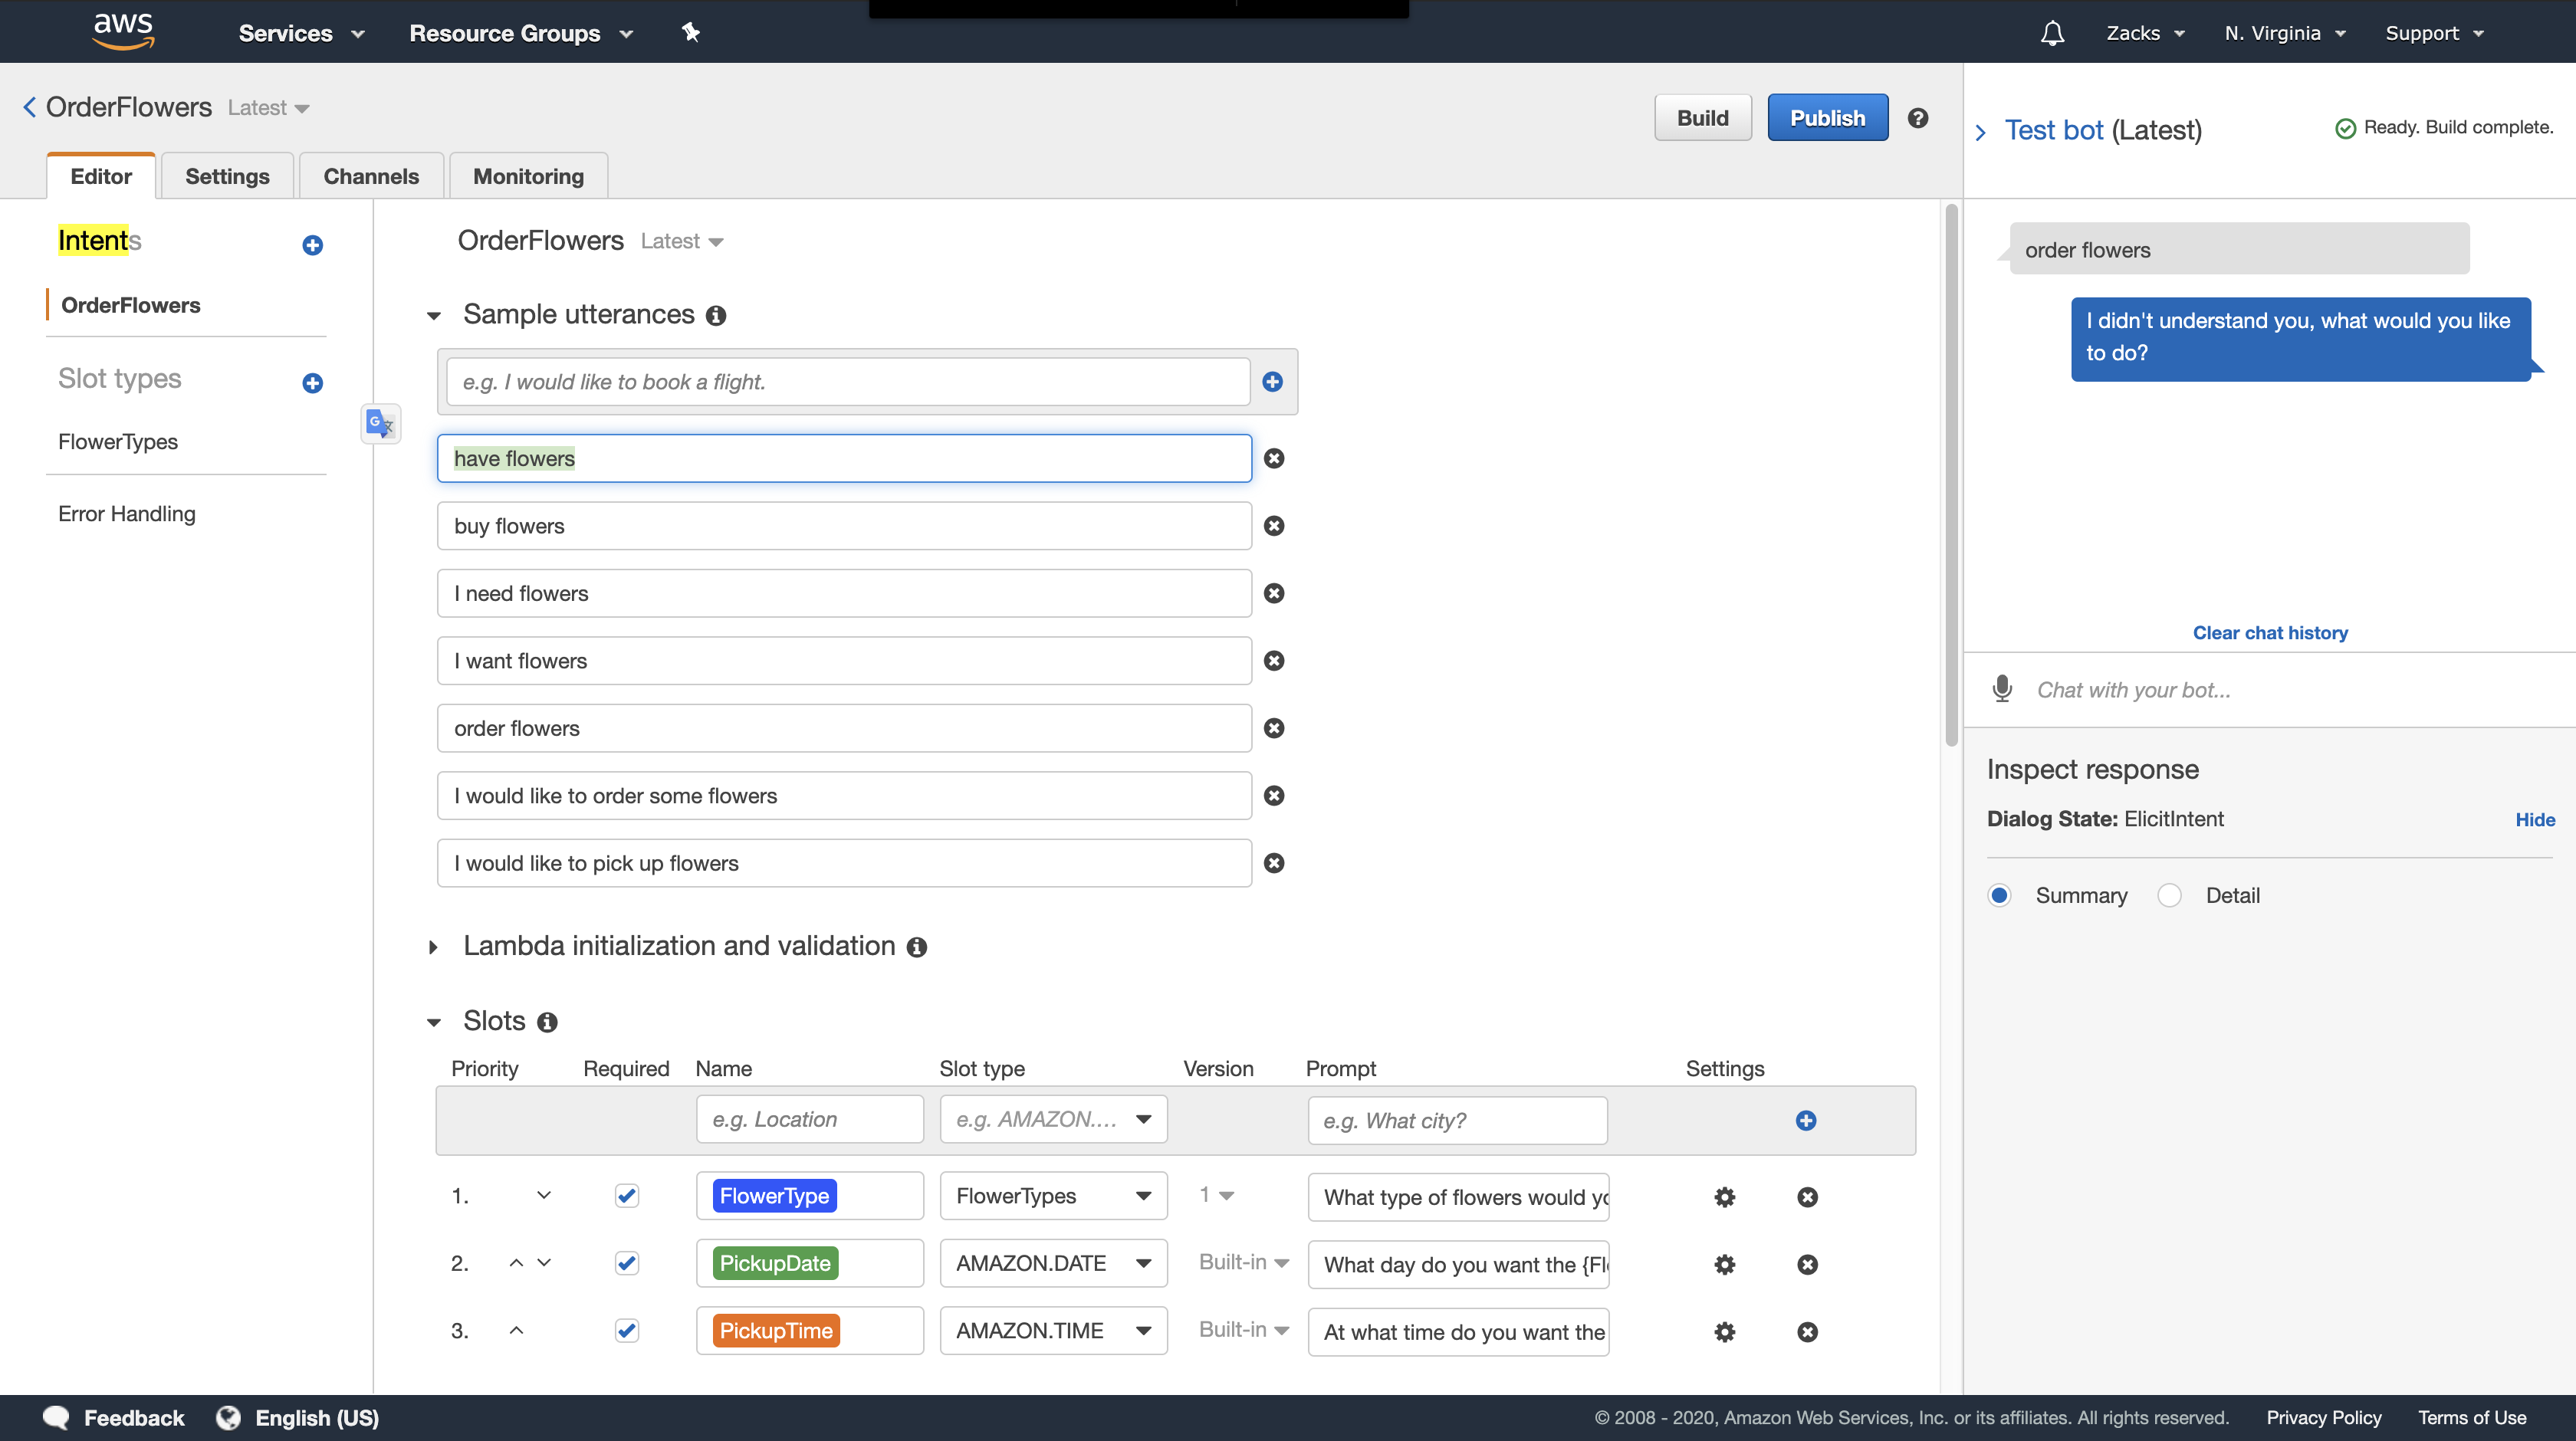
- Utterance – The following sample utterances indicate the user’s intent:
- “I would like to pick up flowers.”
- “I would like to order some flowers.”
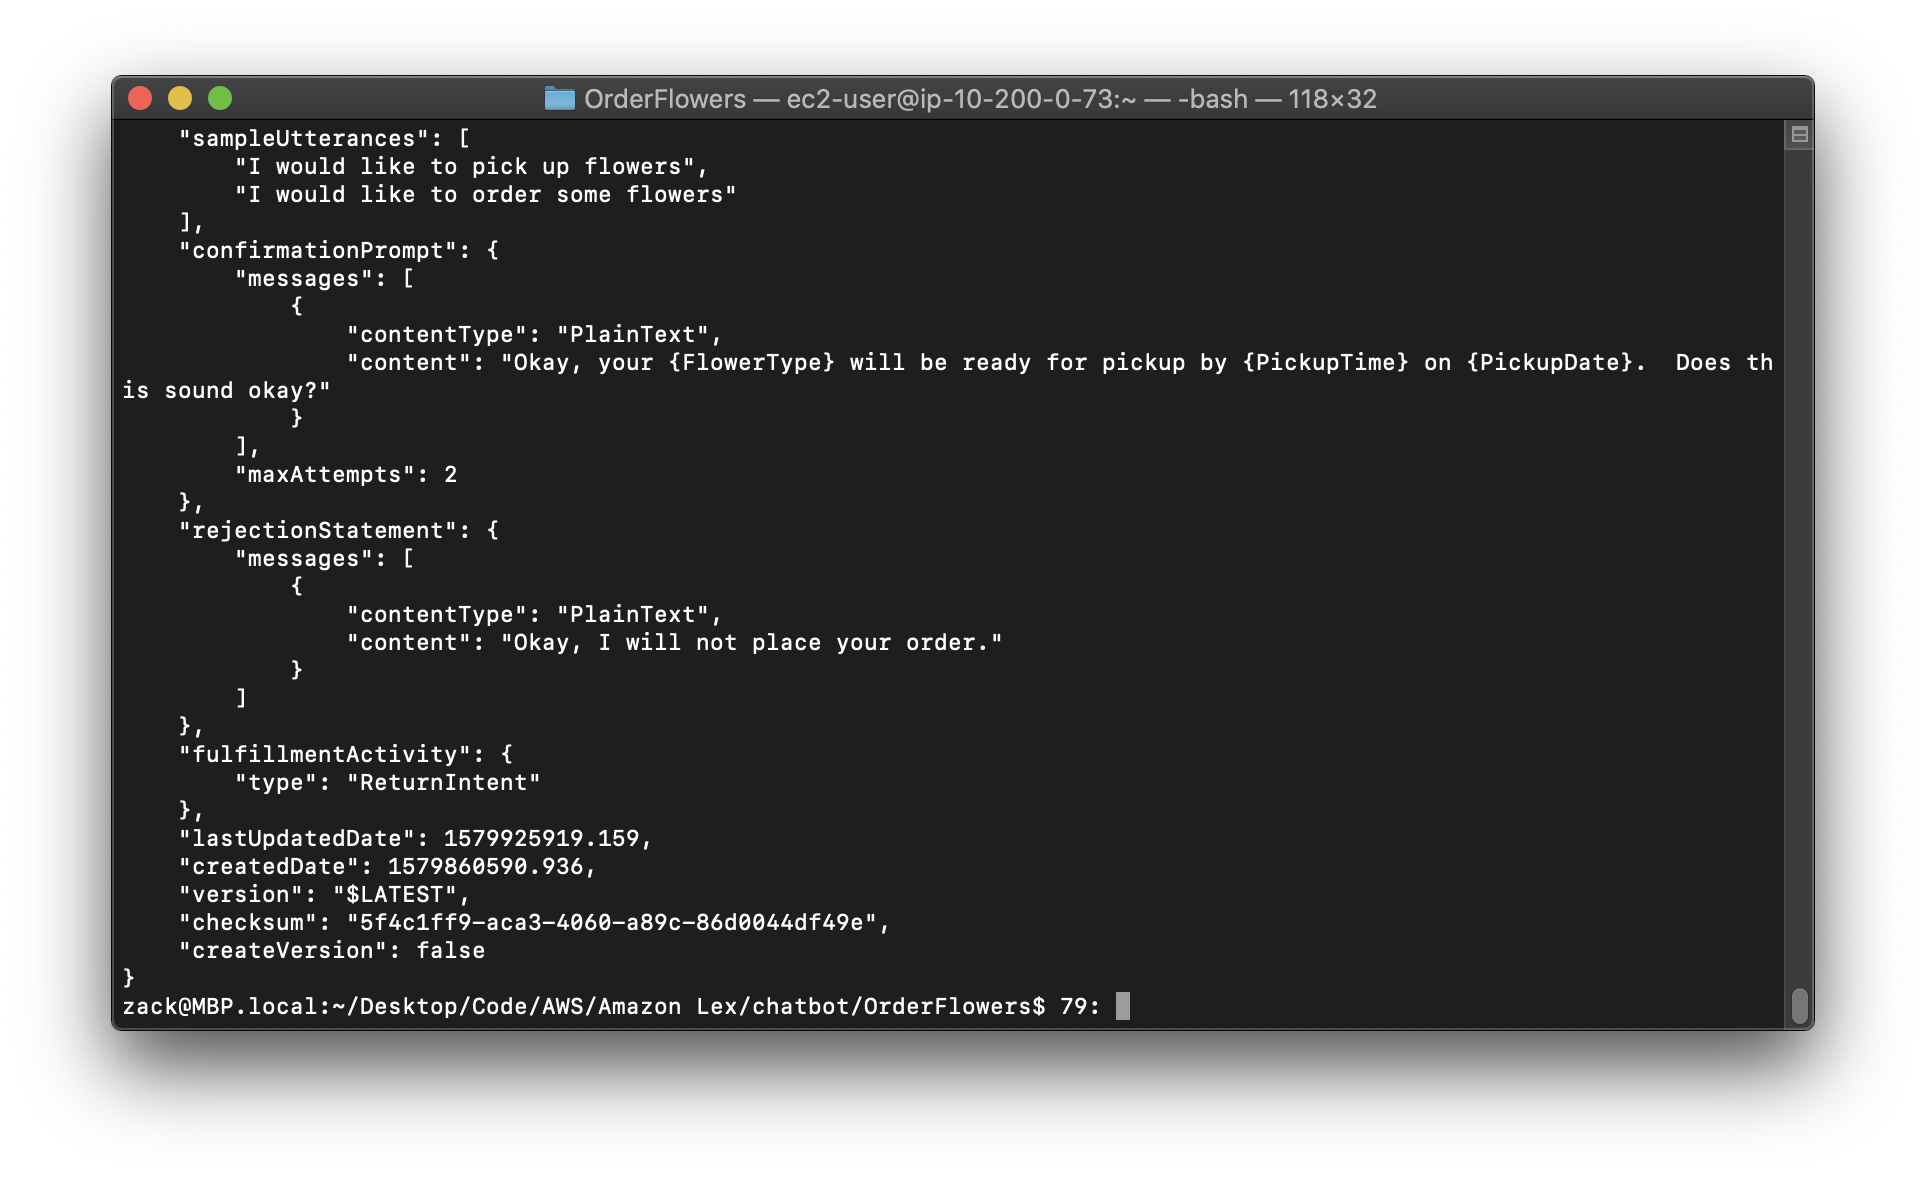
- Prompts – After the bot identifies the intent, it uses the following prompts to fill the slots:
- Prompt for the
FlowerTypeslot – “What type of flowers would you like to order?” - Prompt for the
PickupDateslot – “What day do you want the {FlowerType} to be picked up?” - Prompt for the
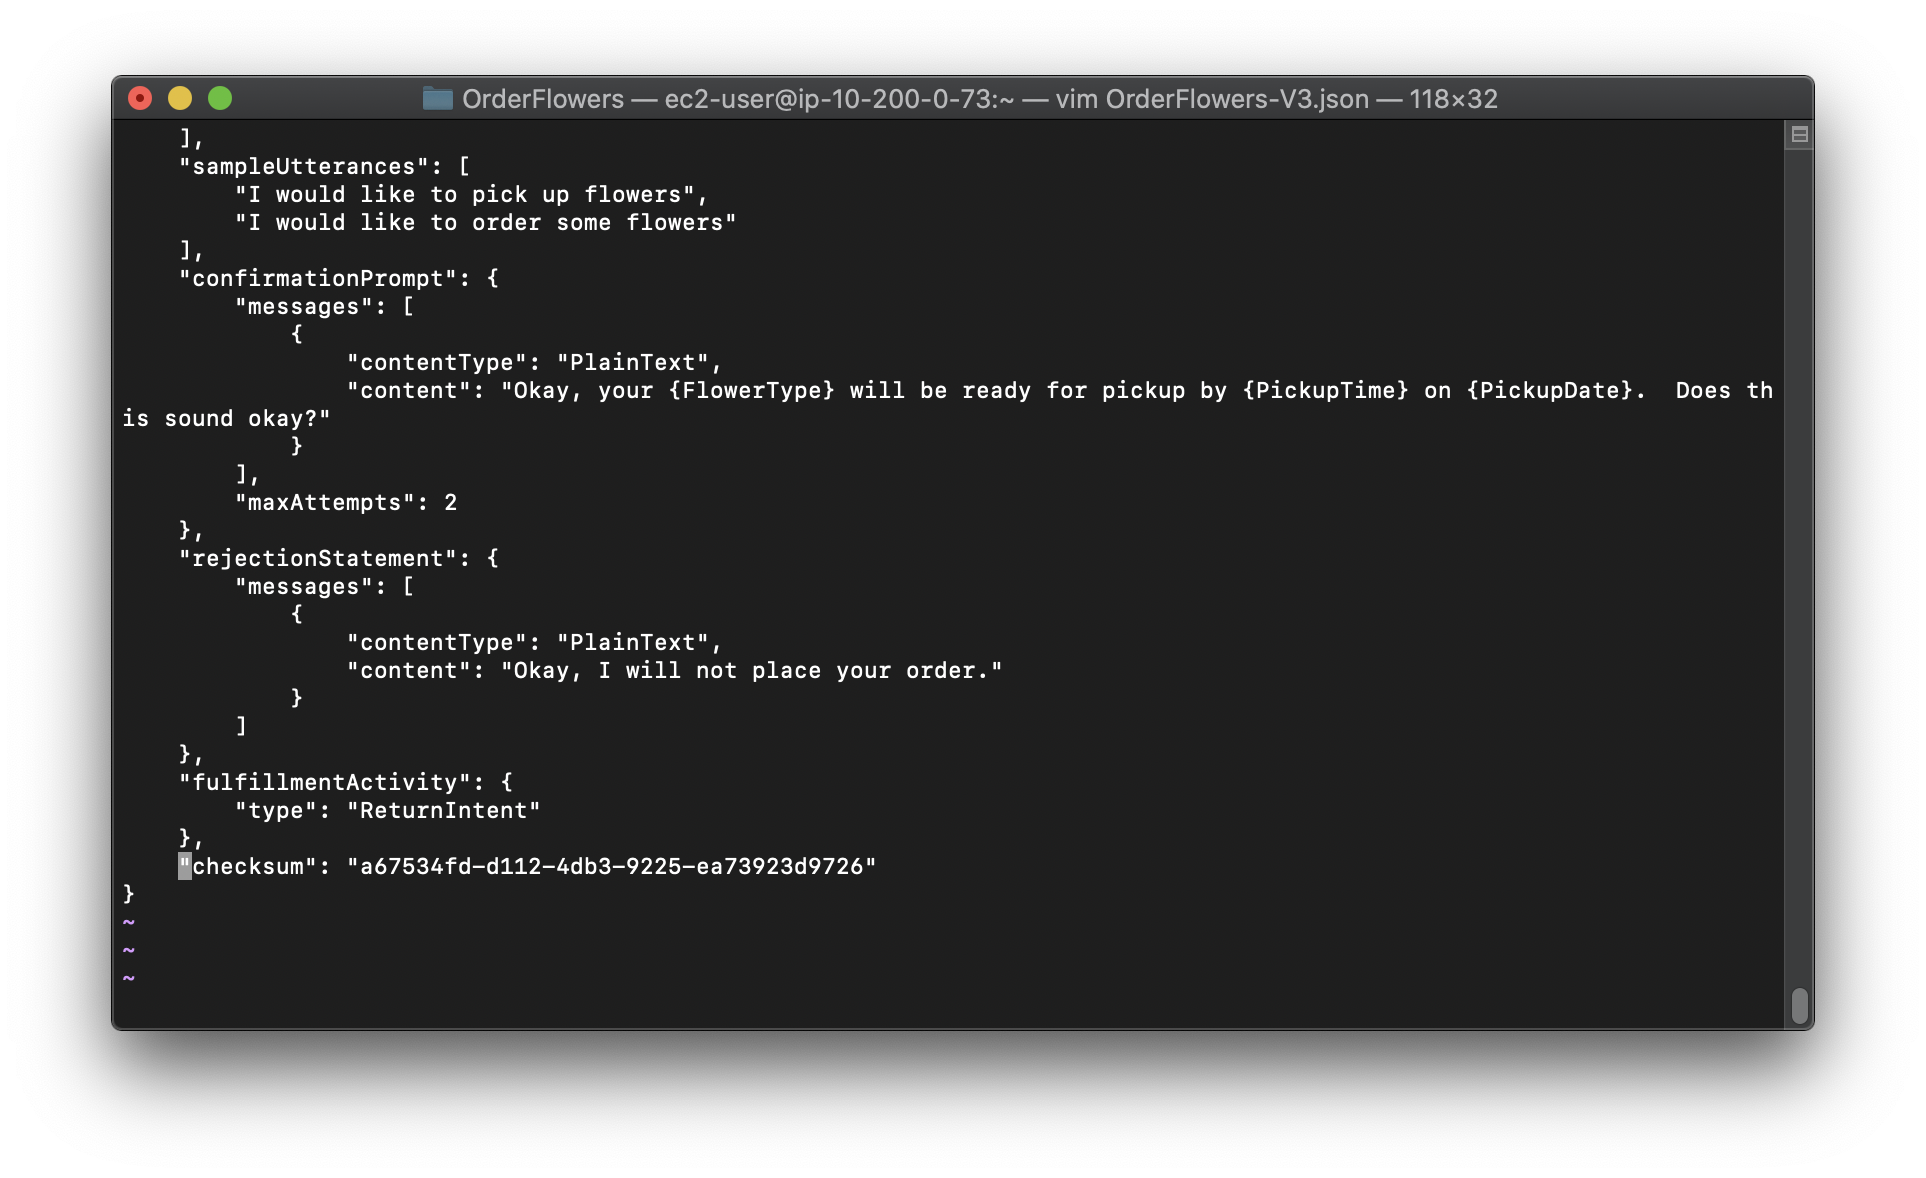
PickupTimeslot – “At what time do you want the {FlowerType} to be picked up?” - Confirmation statement – “Okay, your {FlowerType} will be ready for pickup by {PickupTime} on {PickupDate}. Does this sound okay?”
- Prompt for the
AWS Lambda Function: Blueprint Summary
The Lambda function in this exercise performs both initialization and validation and fulfillment tasks. Therefore, after creating the Lambda function, you update the intent configuration by specifying the same Lambda function as a code hook to handle both the initialization and validation and fulfillment tasks.
As an initialization and validation code hook, the Lambda function performs basic validation. For example, if the user provides a time for pickup that is outside of normal business hours, the Lambda function directs Amazon Lex to re-prompt the user for the time.
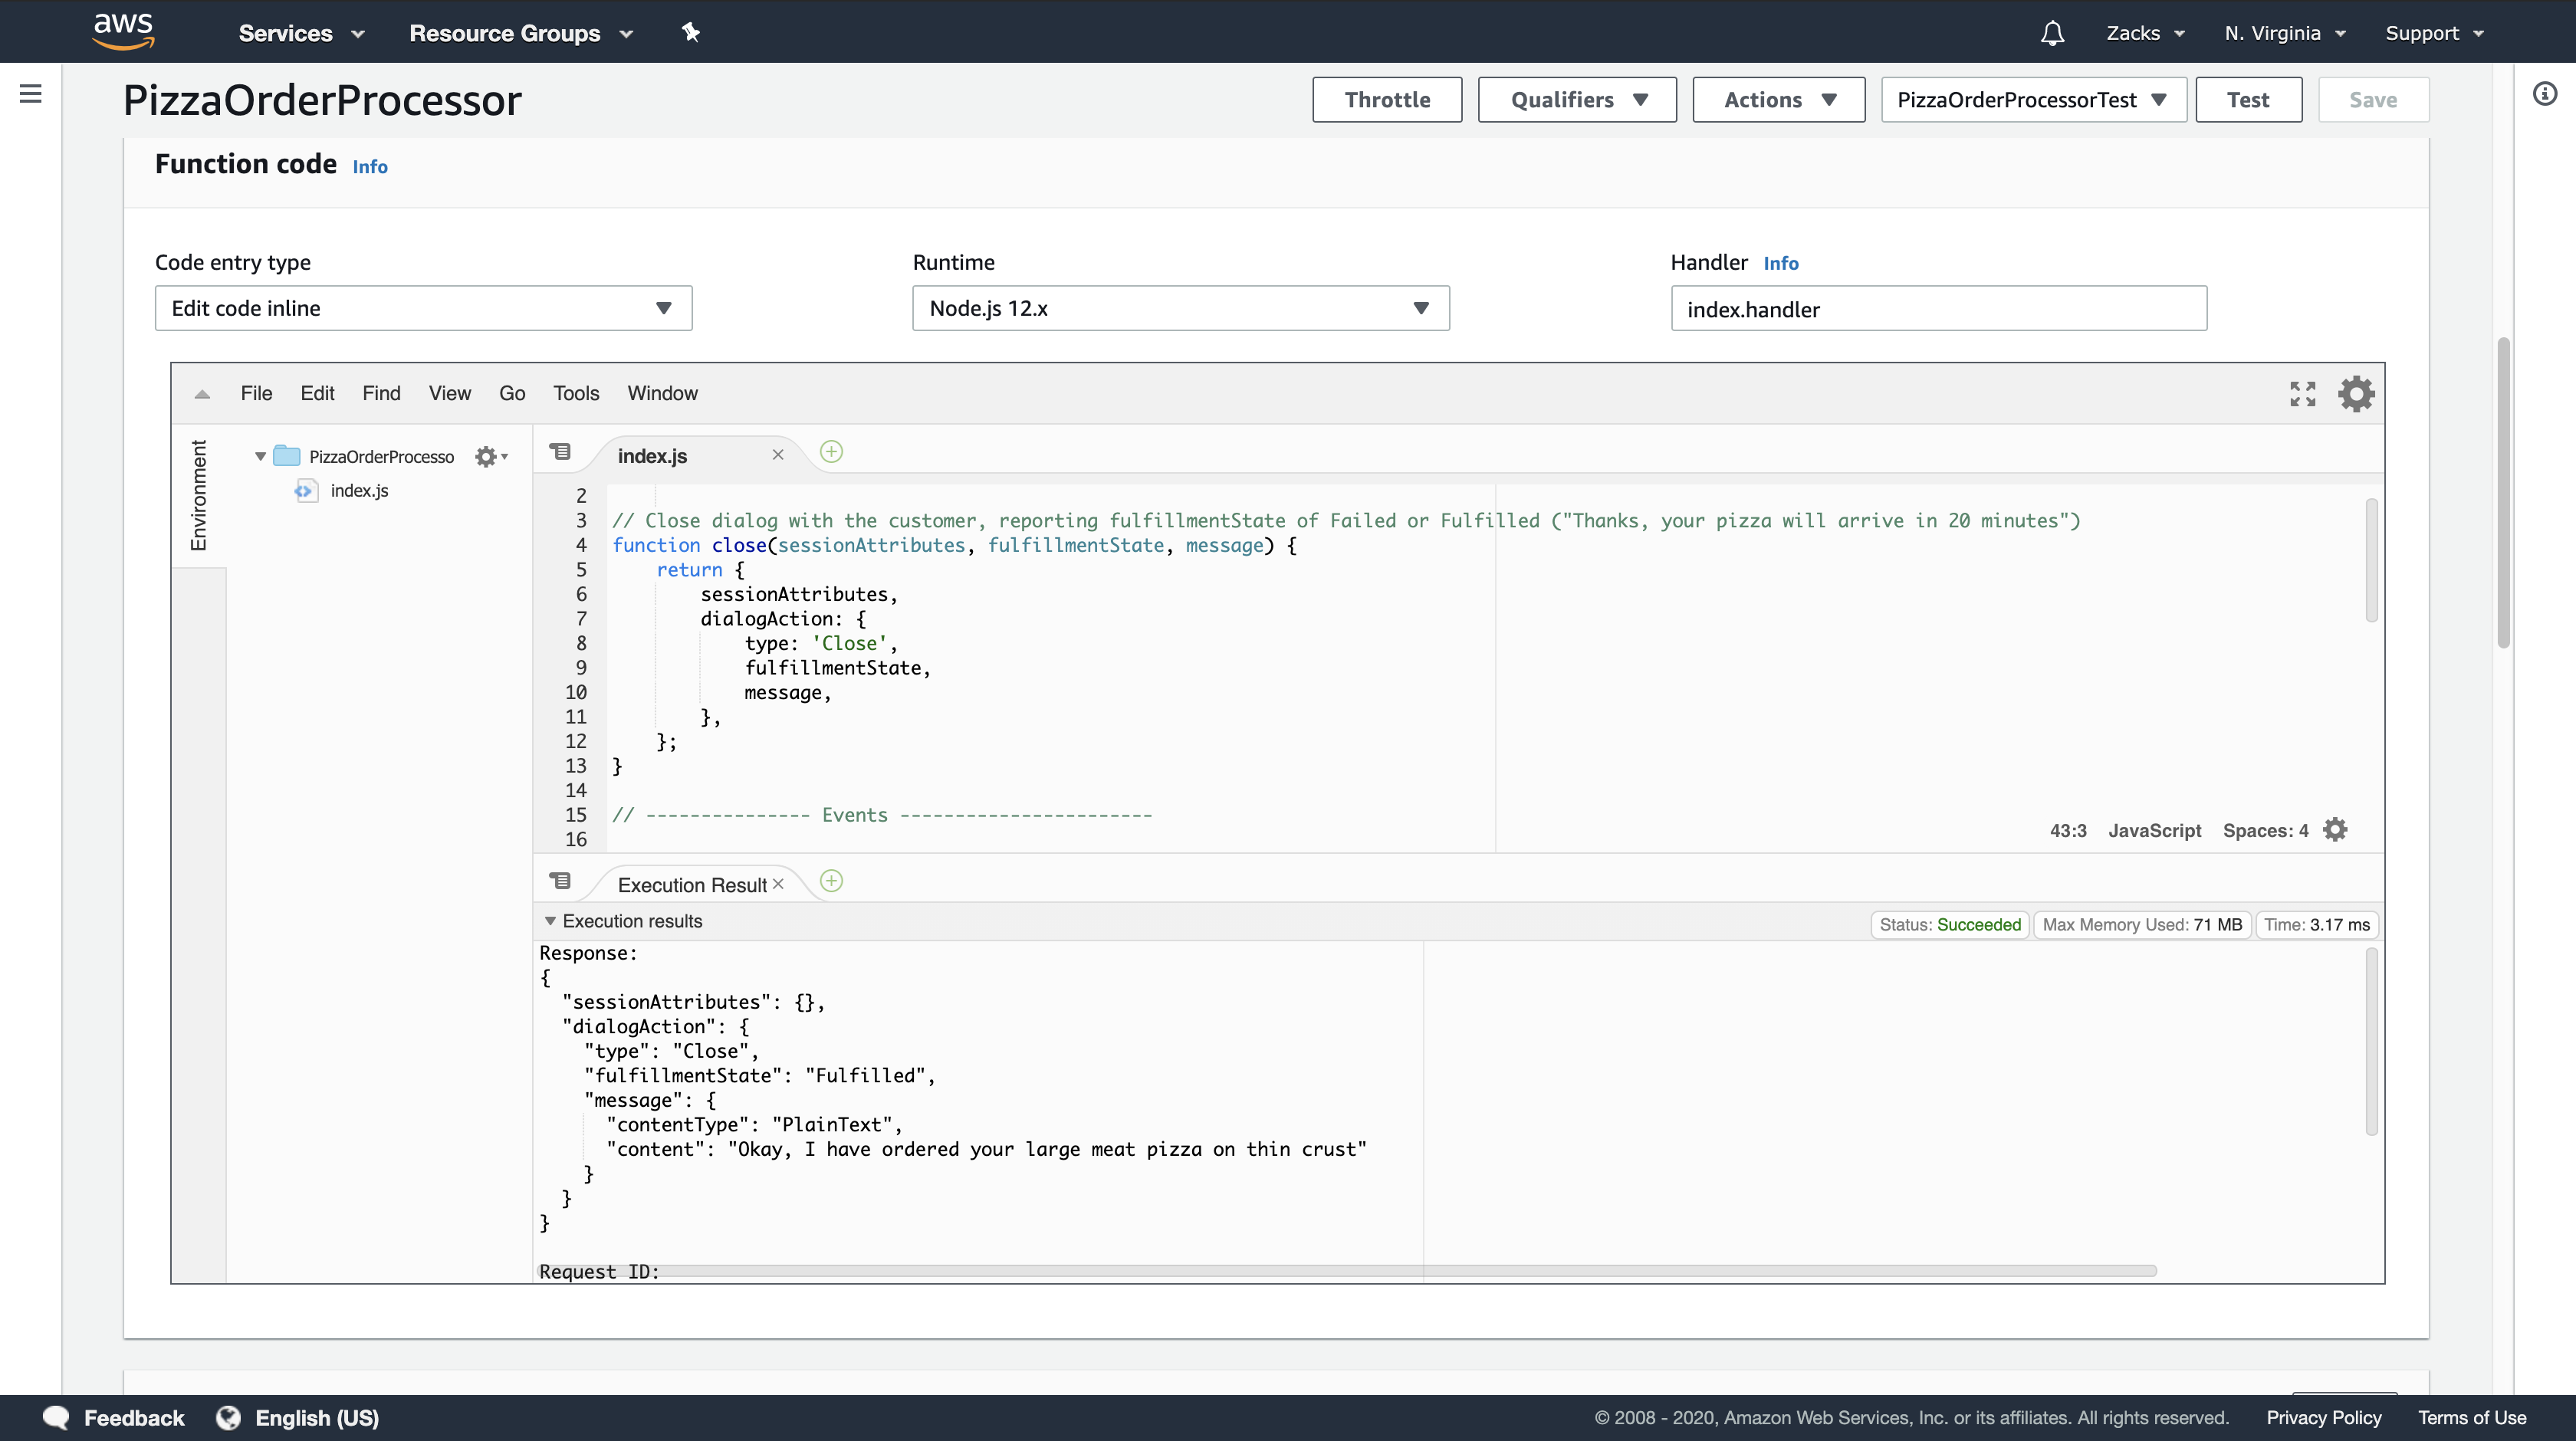
As part of the fulfillment code hook, the Lambda function returns a summary message indicating that the flower order has been placed (that is, the intent is fulfilled).
Step 1: Create an Amazon Lex Bot (Console)
For this exercise, create a bot for ordering flowers, called OrderFlowersBot.
To create an Amazon Lex bot (console)
- Sign in to the AWS Management Console and open the Amazon Lex console at https://console.aws.amazon.com/lex/.
- If this is your first bot, choose Get Started; otherwise, on the Bots page, choose Create.
- On the Create your Lex bot page, provide the following information, and then choose Create.
- Choose the OrderFlowers blueprint.
- Leave the default bot name (OrderFlowers).
- For COPPA, choose
No.
- Choose Create. The console makes the necessary requests to Amazon Lex to save the configuration. The console then displays the bot editor window.
- Wait for confirmation that your bot was built.
- Test the bot.
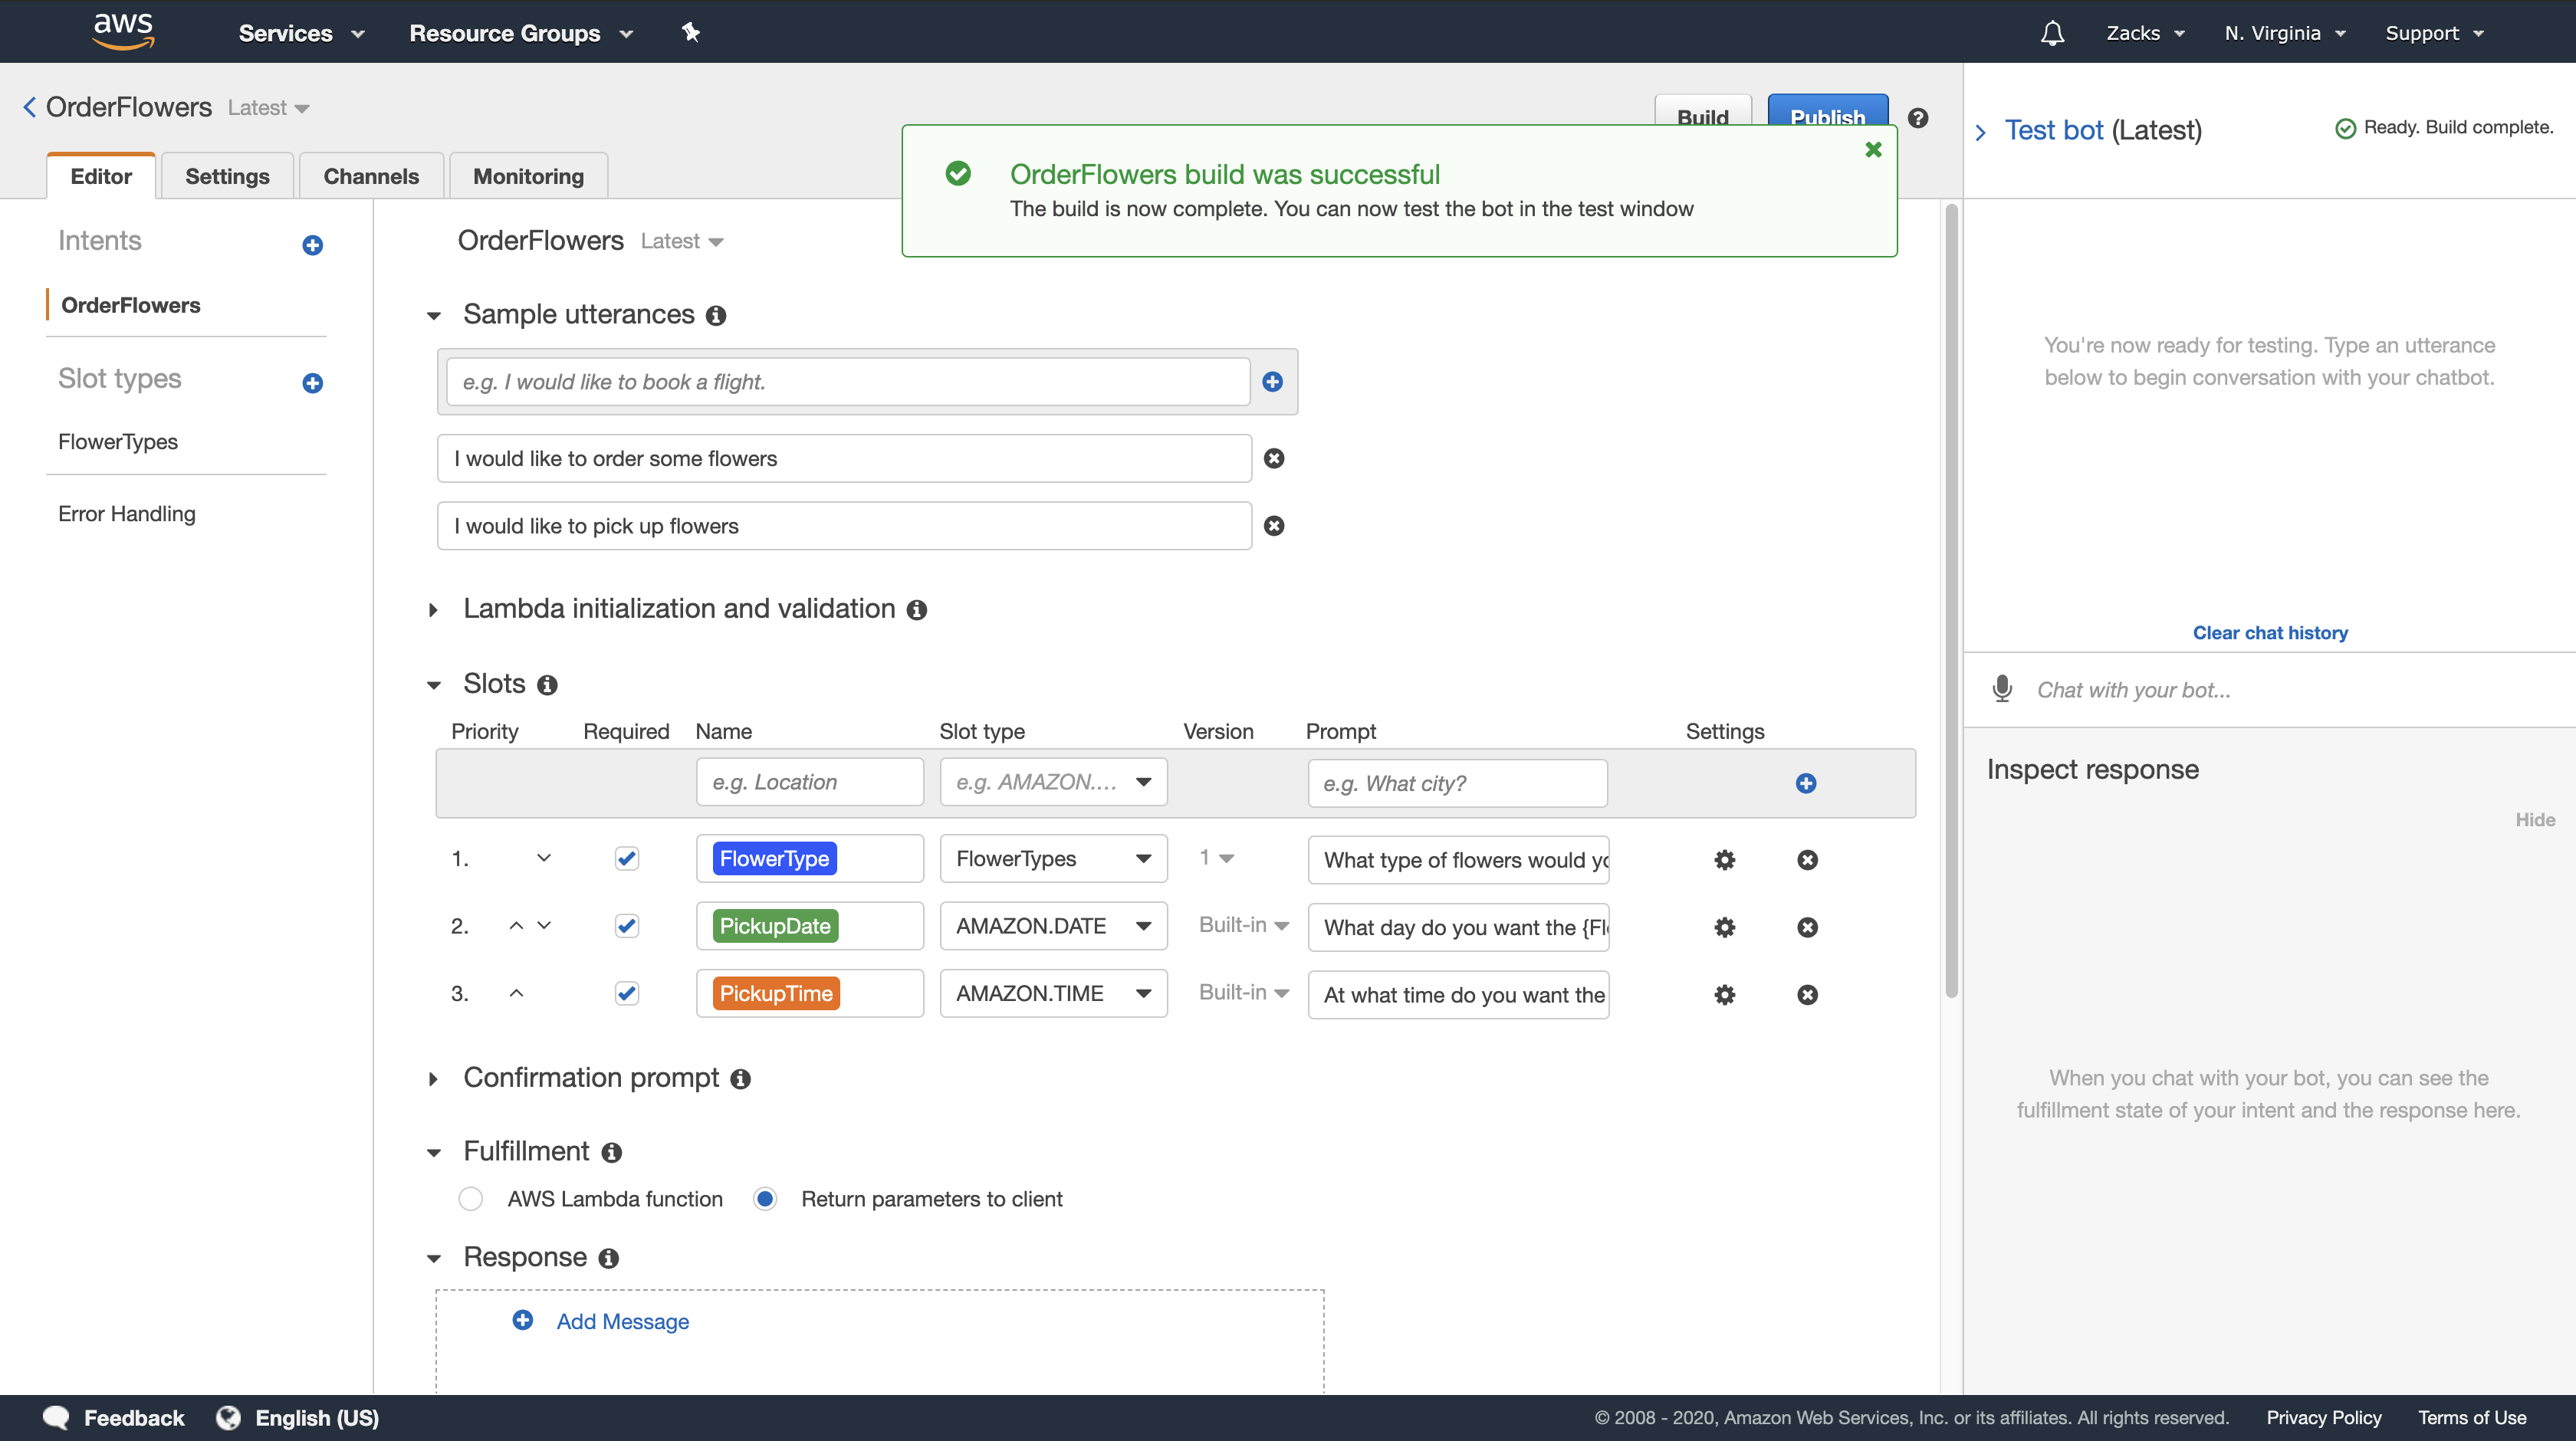
Note: You can test the bot by typing text into the test window, or, for compatible browsers, by choosing the microphone button in the test window and speaking.
Use the following example text to engage in conversation with the bot to order flowers:
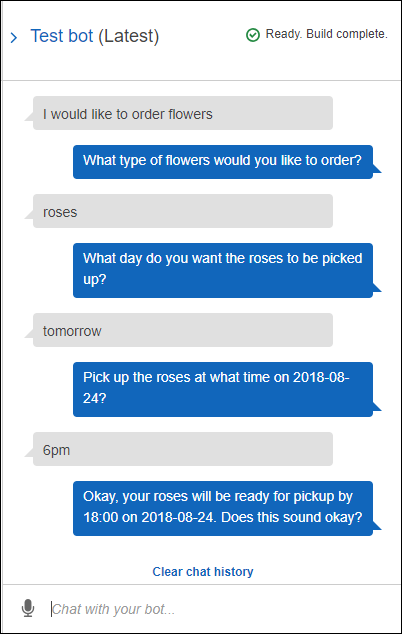
From this input, the bot infers the OrderFlowers intent and prompts for slot data. When you provide all of the required slot data, the bot fulfills the intent (OrderFlowers) by returning all of the information to the client application (in this case, the console). The console shows the information in the test window.
Specifically:
- In the statement “What day do you want the roses to be picked up?,”the term “roses” appears because the prompt for the
pickupDateslot is configured using substitutions,{FlowerType}. Verify this in the console. - The “Okay, your roses will be ready…” statement is the confirmation prompt that you configured.
- The last statement (“
FlowerType:roses...“) is just the slot data that is returned to the client, in this case, in the test window. In the next exercise, you use a Lambda function to fulfill the intent, in which case you get a message indicating that the order is fulfilled.
Step 2 (Optional): Review the Details of Information Flow (Console)
This section explains the flow of information between a client and Amazon Lex for each user input in our example conversation.
To see the flow of information for spoken or typed content, choose the appropriate topic.
- Step 2a (Optional): Review the Details of the Spoken Information Flow (Console)
- Step 2b (Optional): Review the Details of the Typed Information Flow (Console)
Step 3: Create a Lambda Function (Console)
https://docs.aws.amazon.com/lex/latest/dg/gs-bp-create-lambda-function.html
Create a Lambda function (using the lex-order-flowers-python blueprint) and perform test invocation using sample event data in the AWS Lambda console.
You return to the Amazon Lex console and add the Lambda function as the code hook to fulfill the OrderFlowers intent in the OrderFlowersBot that you created in the preceding section.
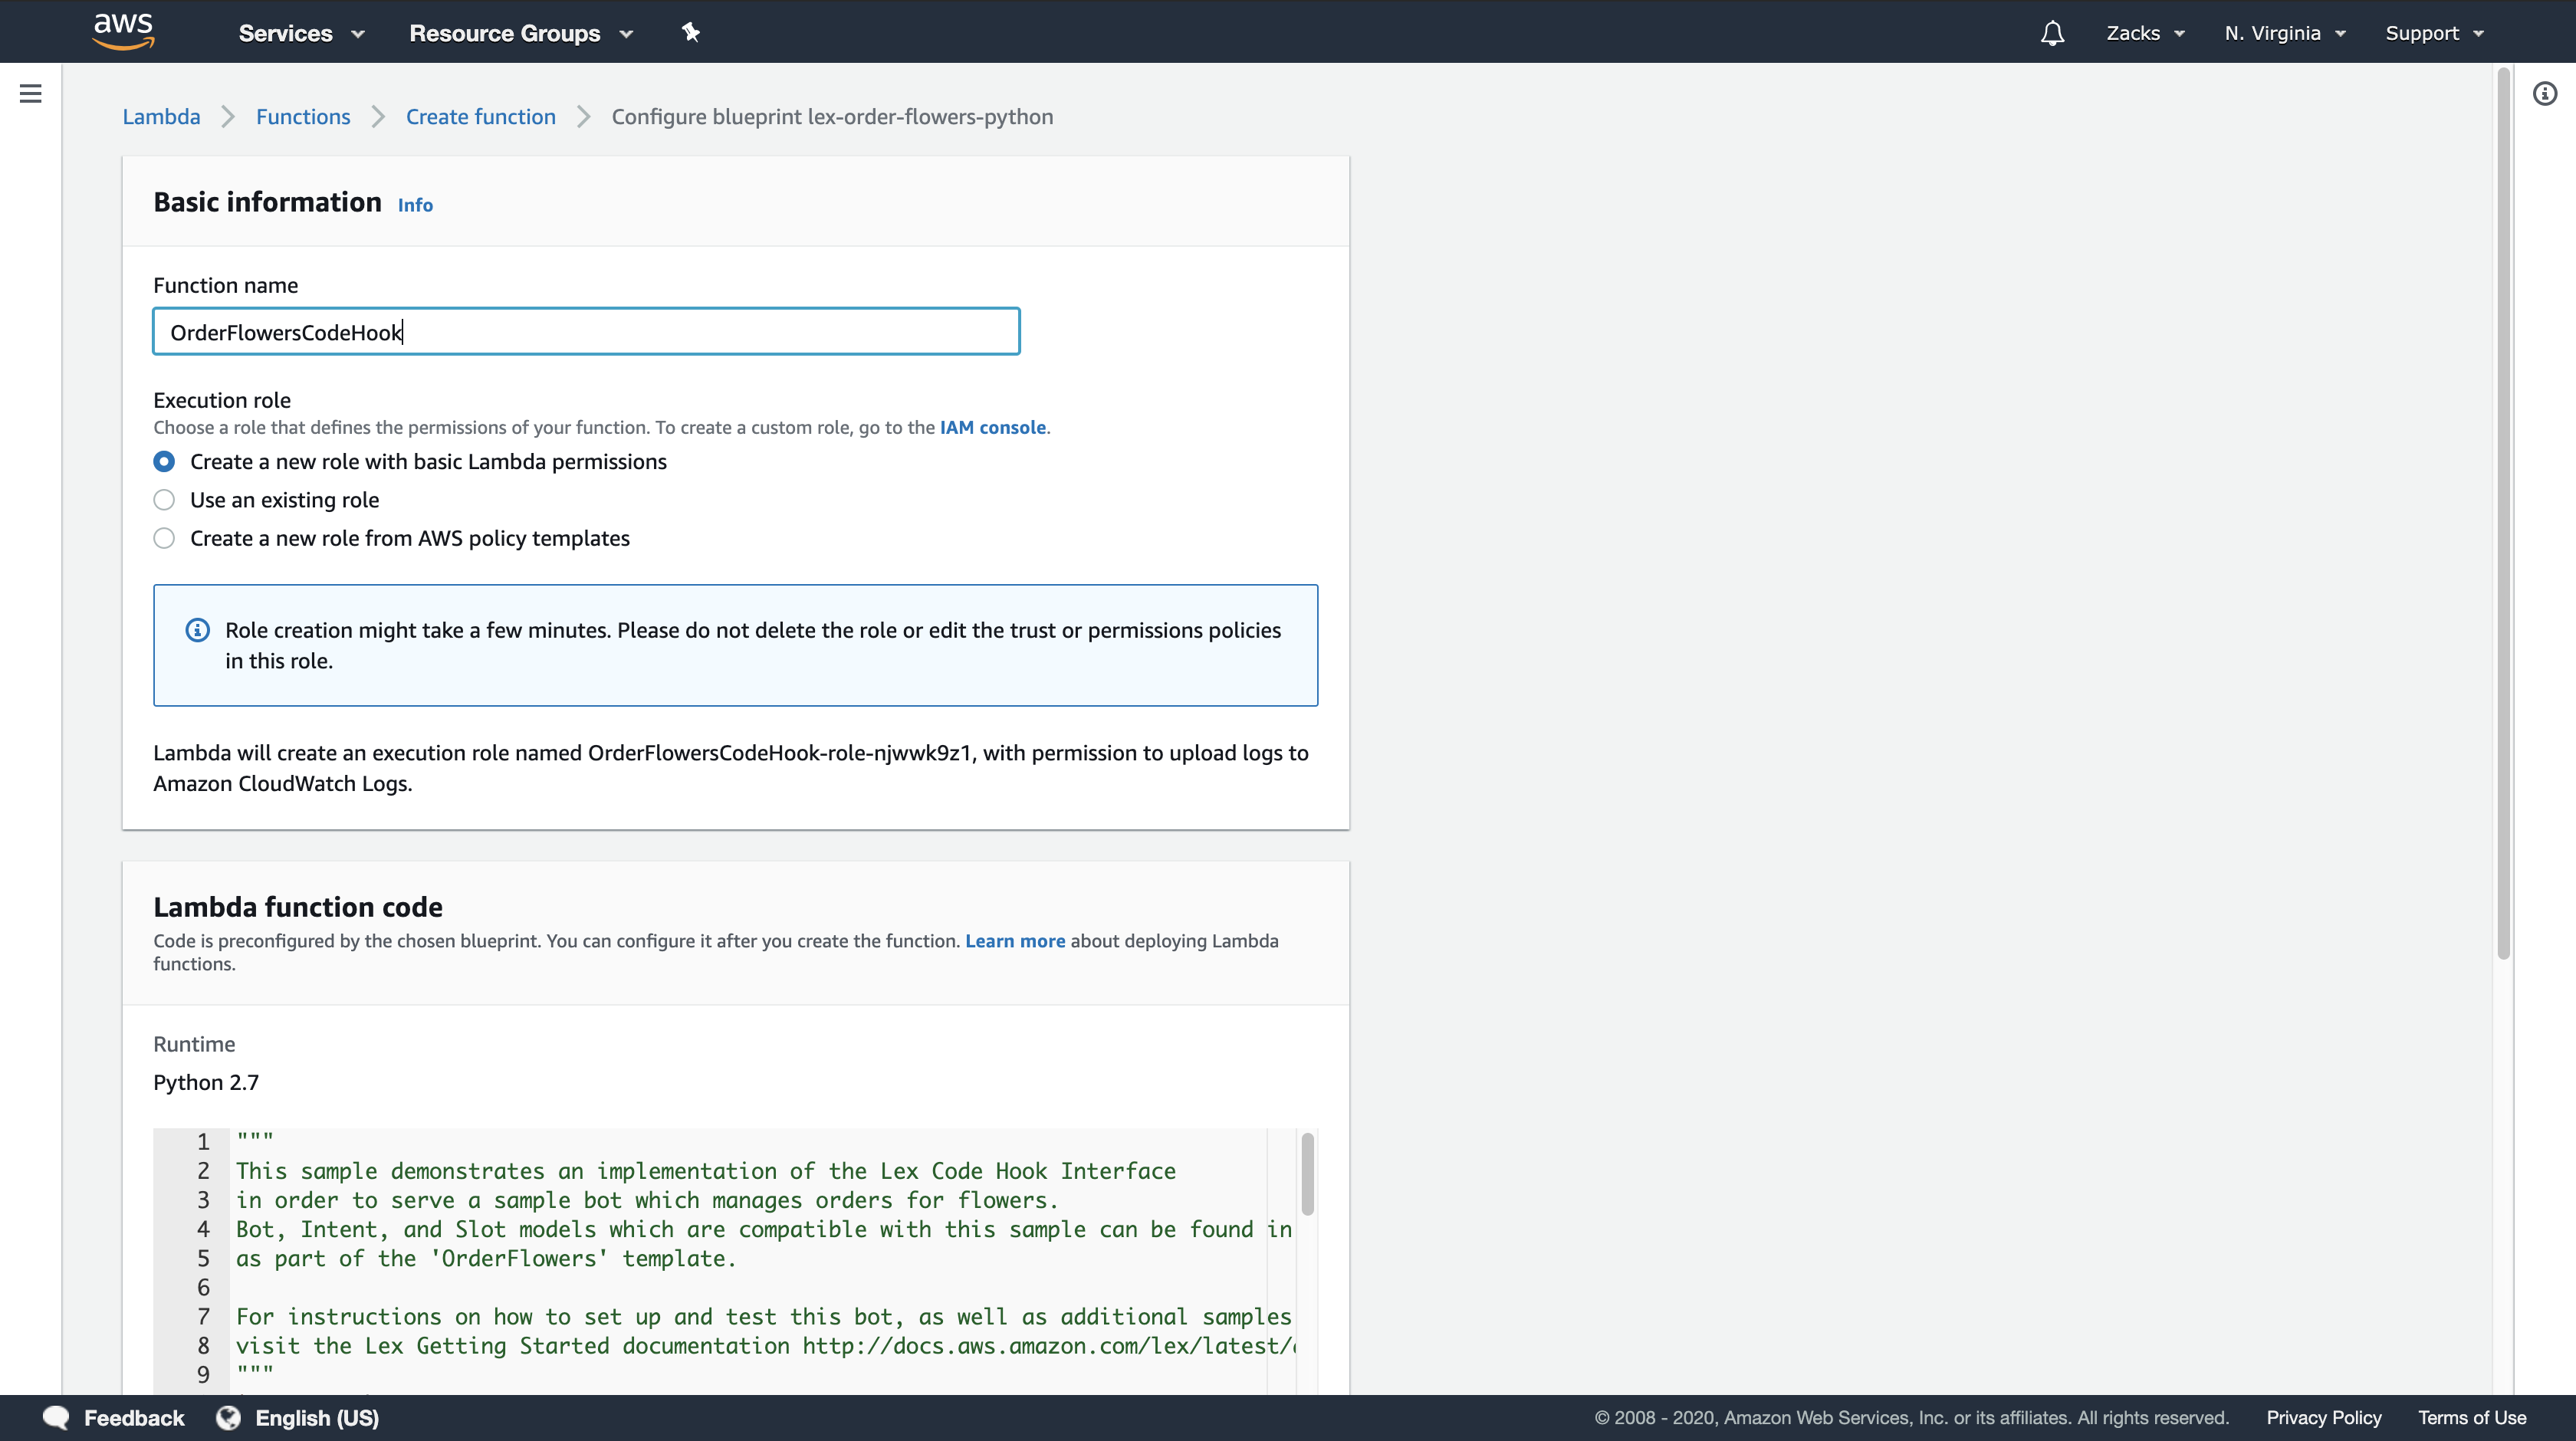
To create the Lambda function (console)
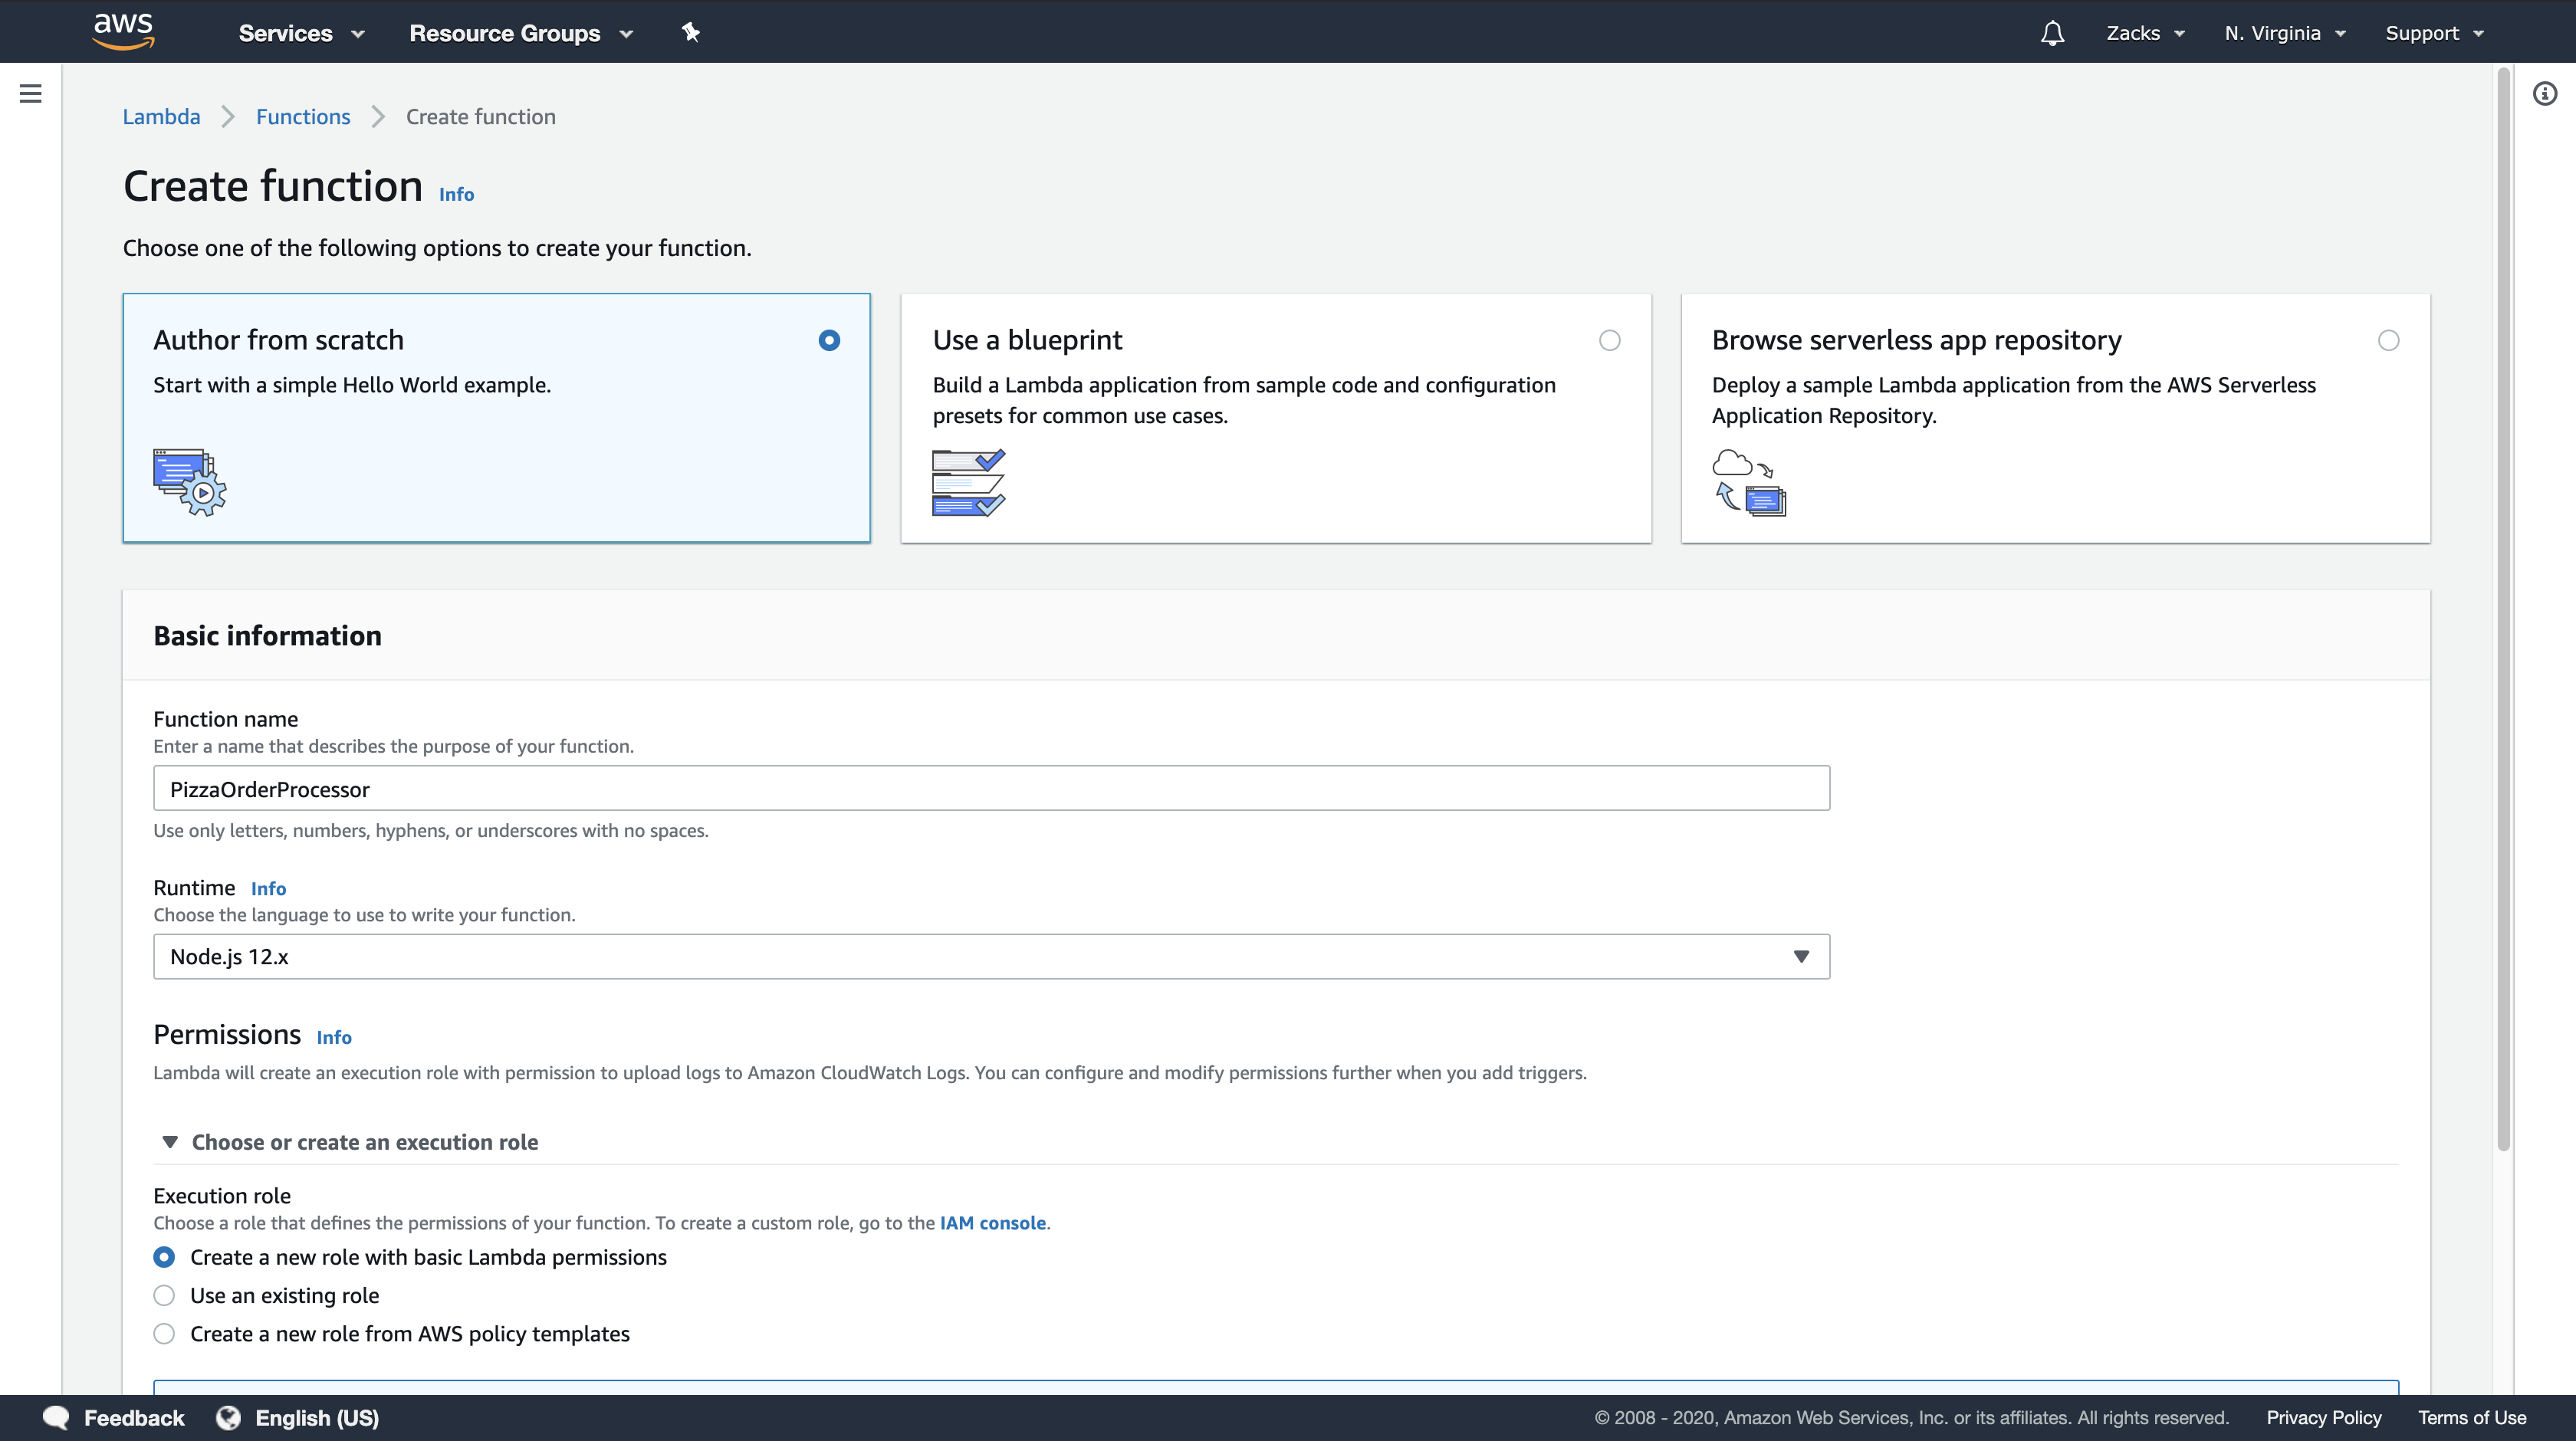
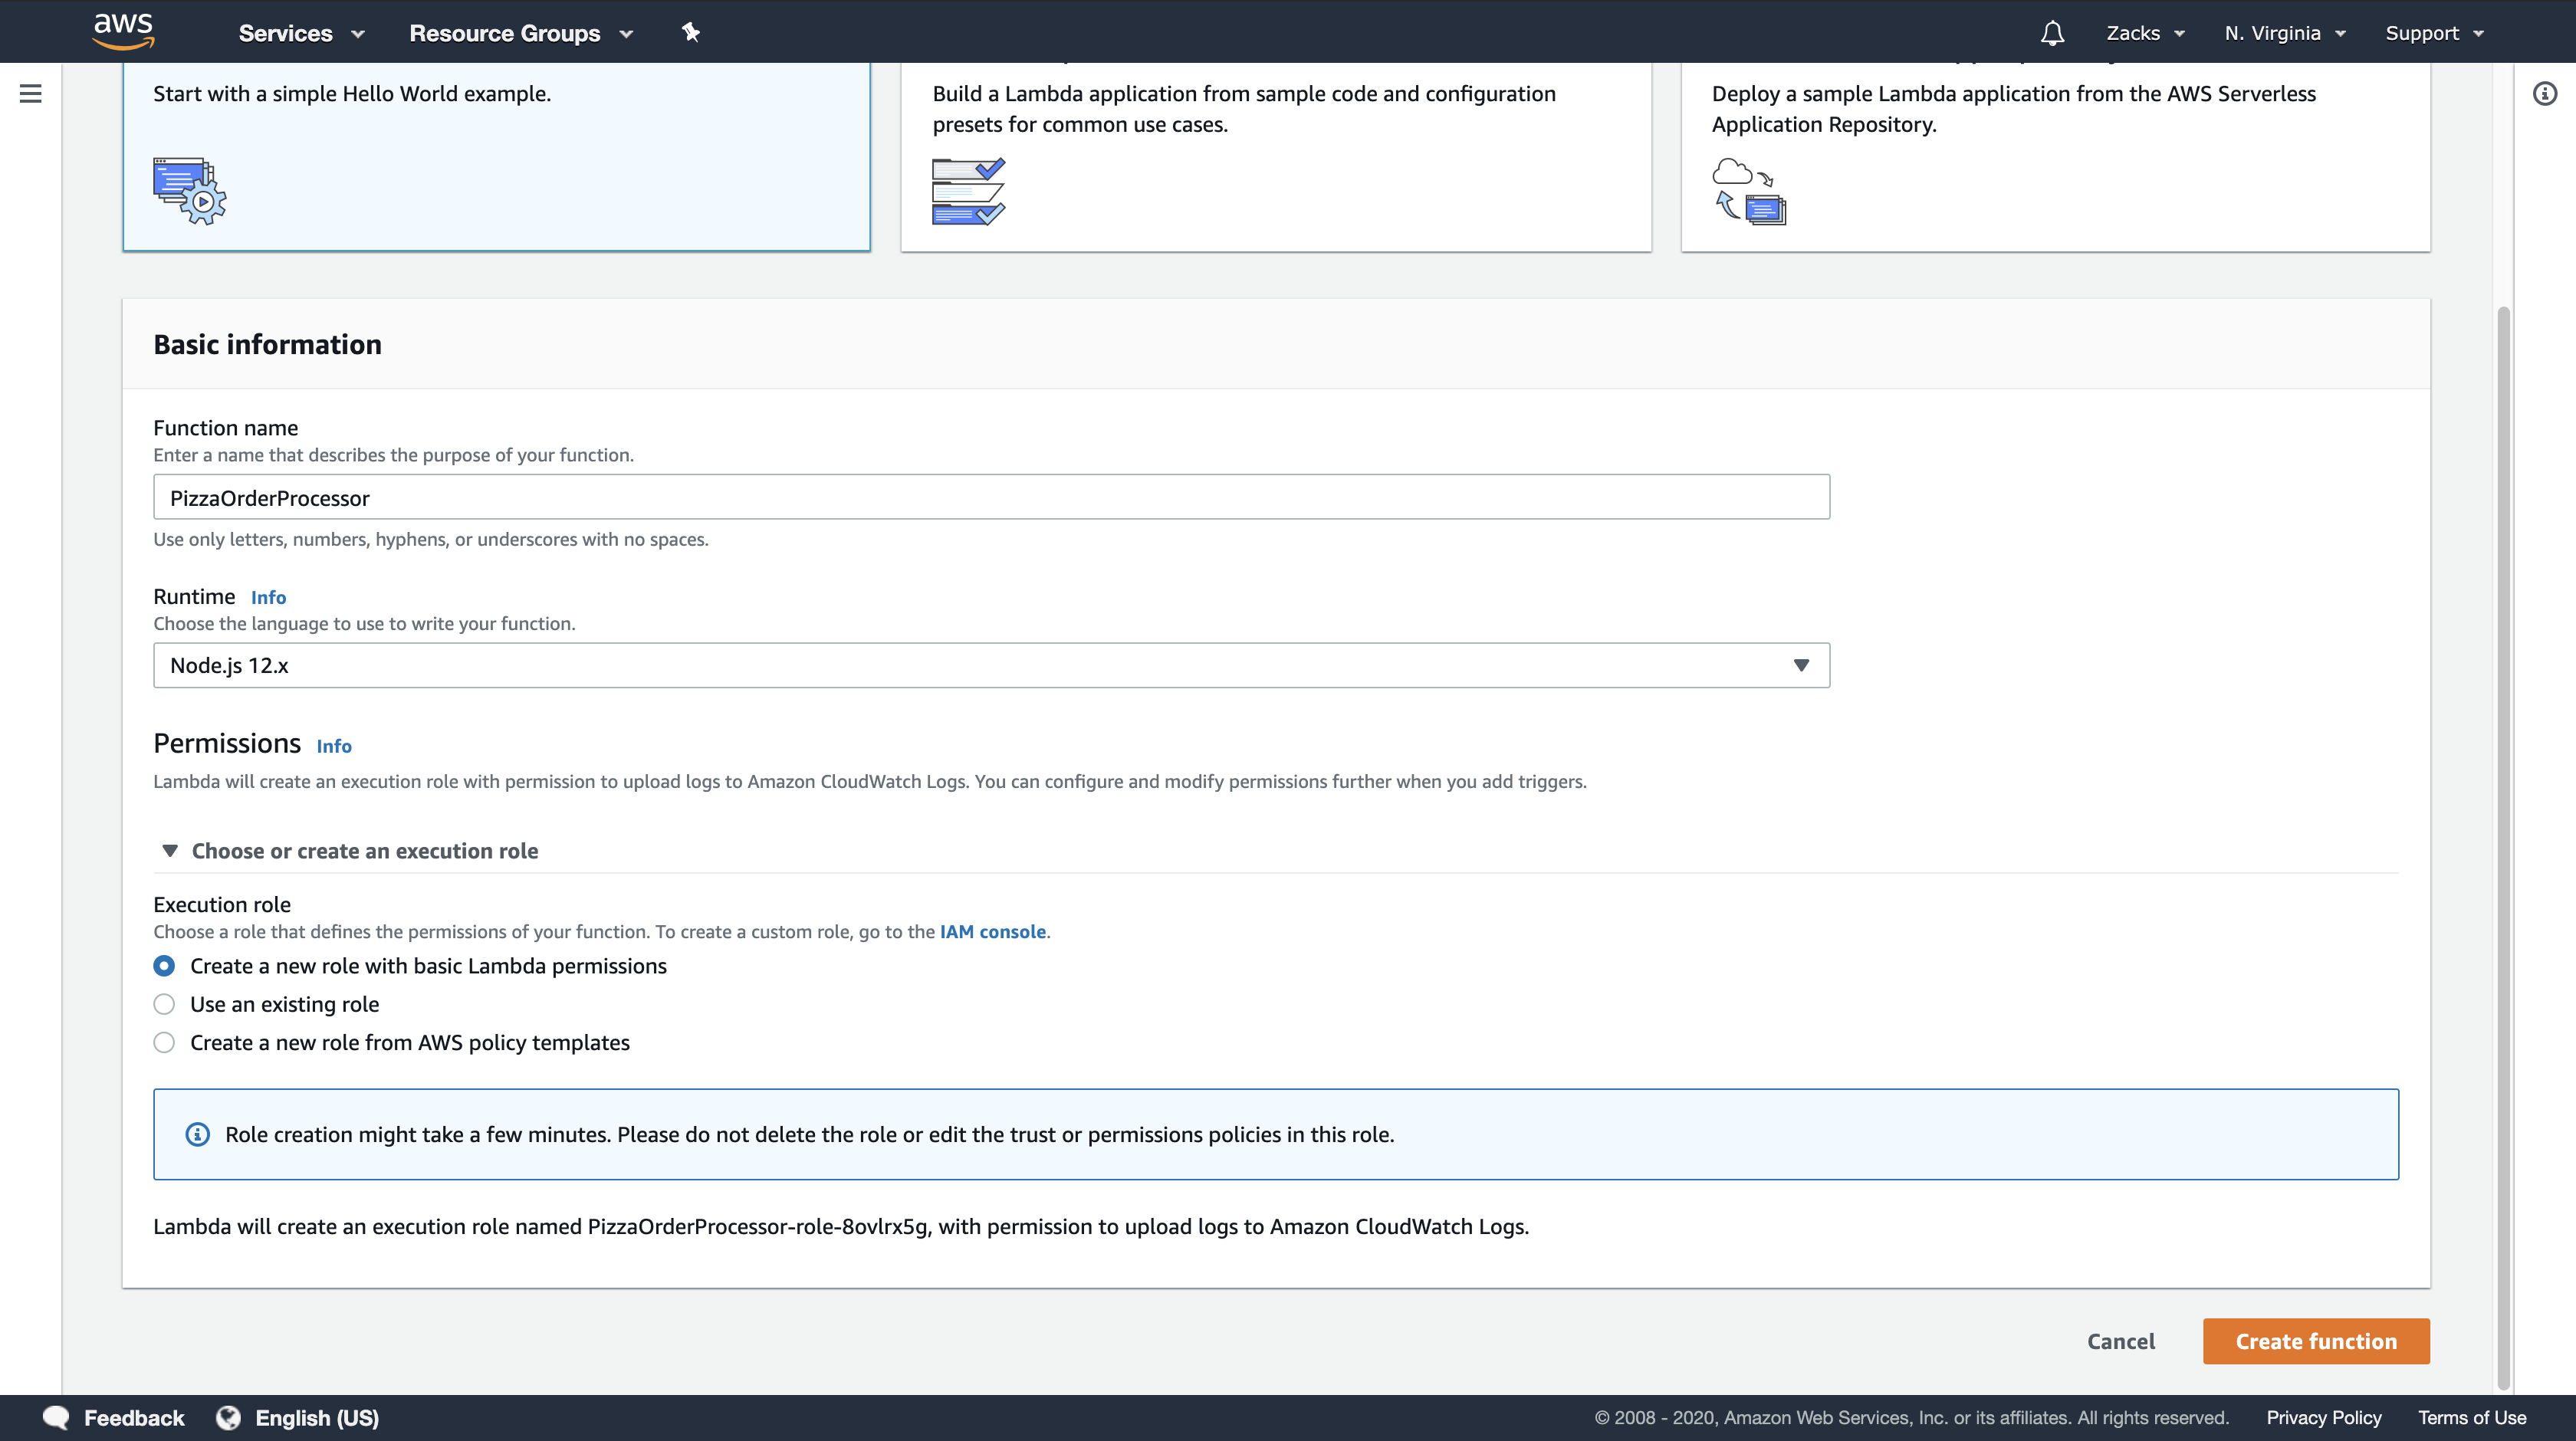
- Sign in to the AWS Management Console and open the AWS Lambda console at https://console.aws.amazon.com/lambda/.
- Choose Create function.
- On the Create function page, choose Use a blueprint. Type
lex-in the filter text box and then pressEnterto find the blueprint, choose thelex-order-flowers-pythonblueprint.
Lambda function blueprints are provided in both Node.js and Python. For this exercise, use the Python-based blueprint. - On the Basic information page, do the following.
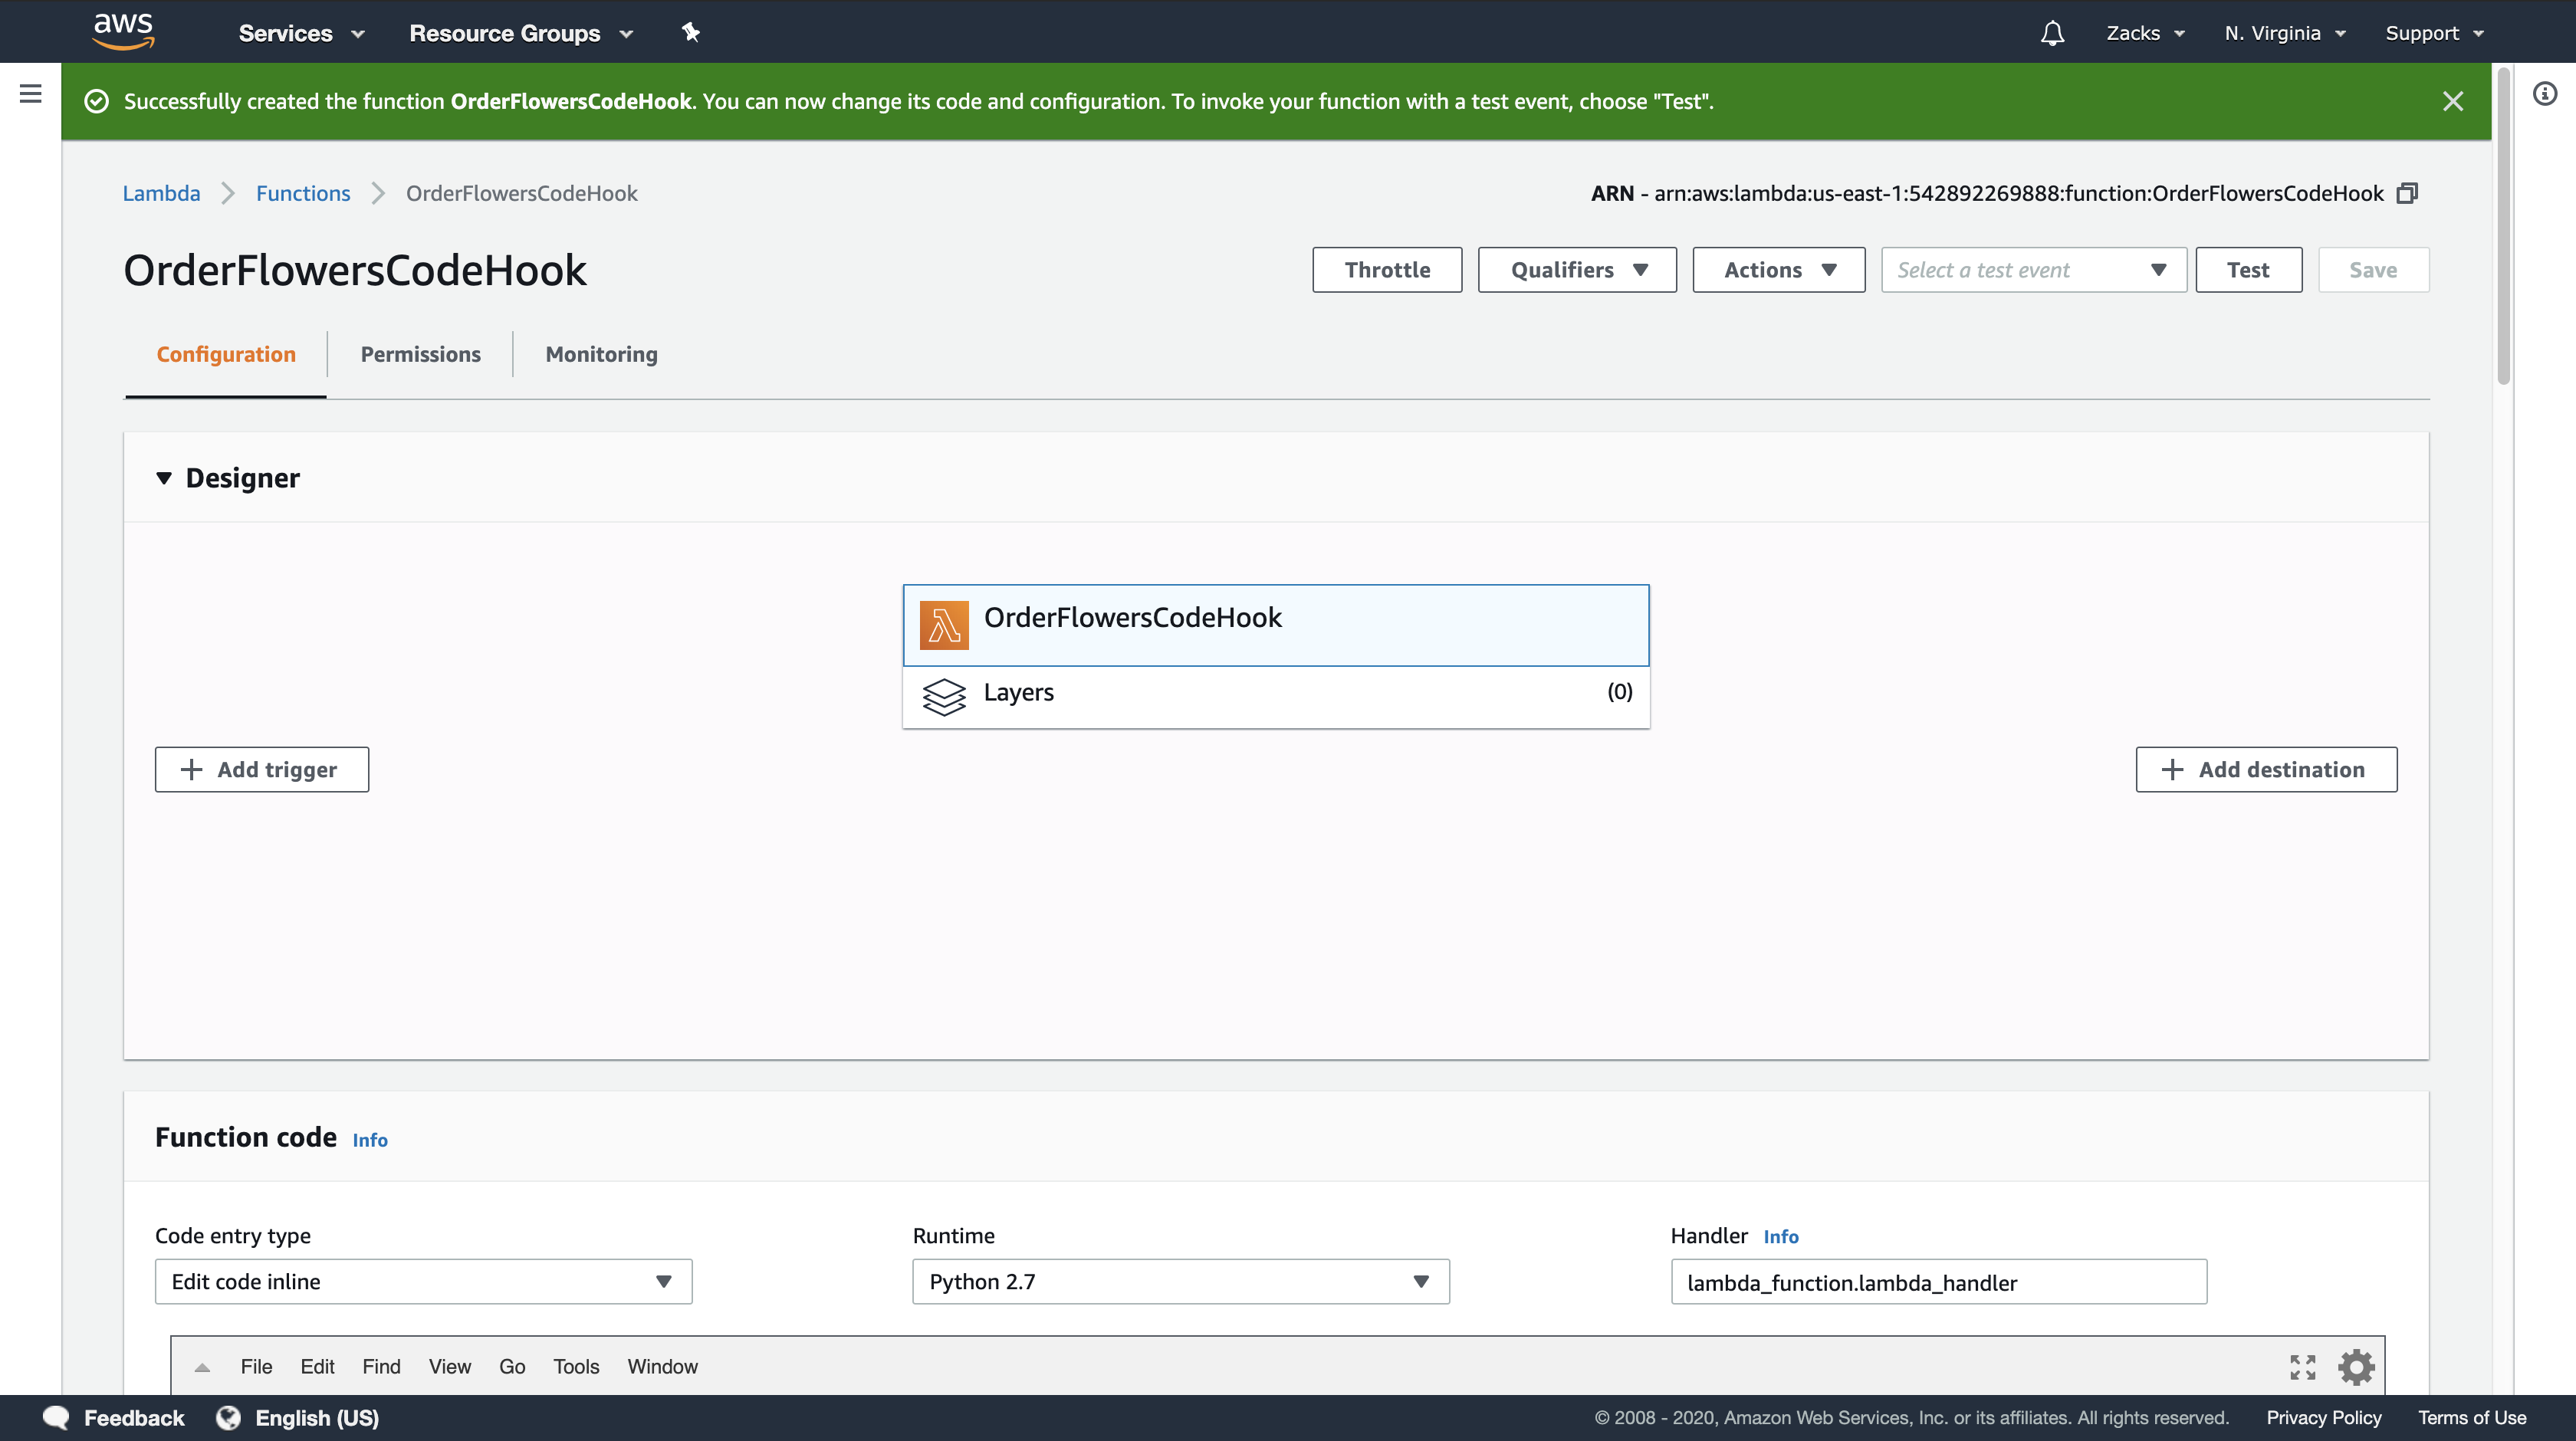
- Type a Lambda function name (
OrderFlowersCodeHook). - For the execution role, choose Create a new role with basic Lambda permissions.
- Leave the other default values.
- Choose Create function.
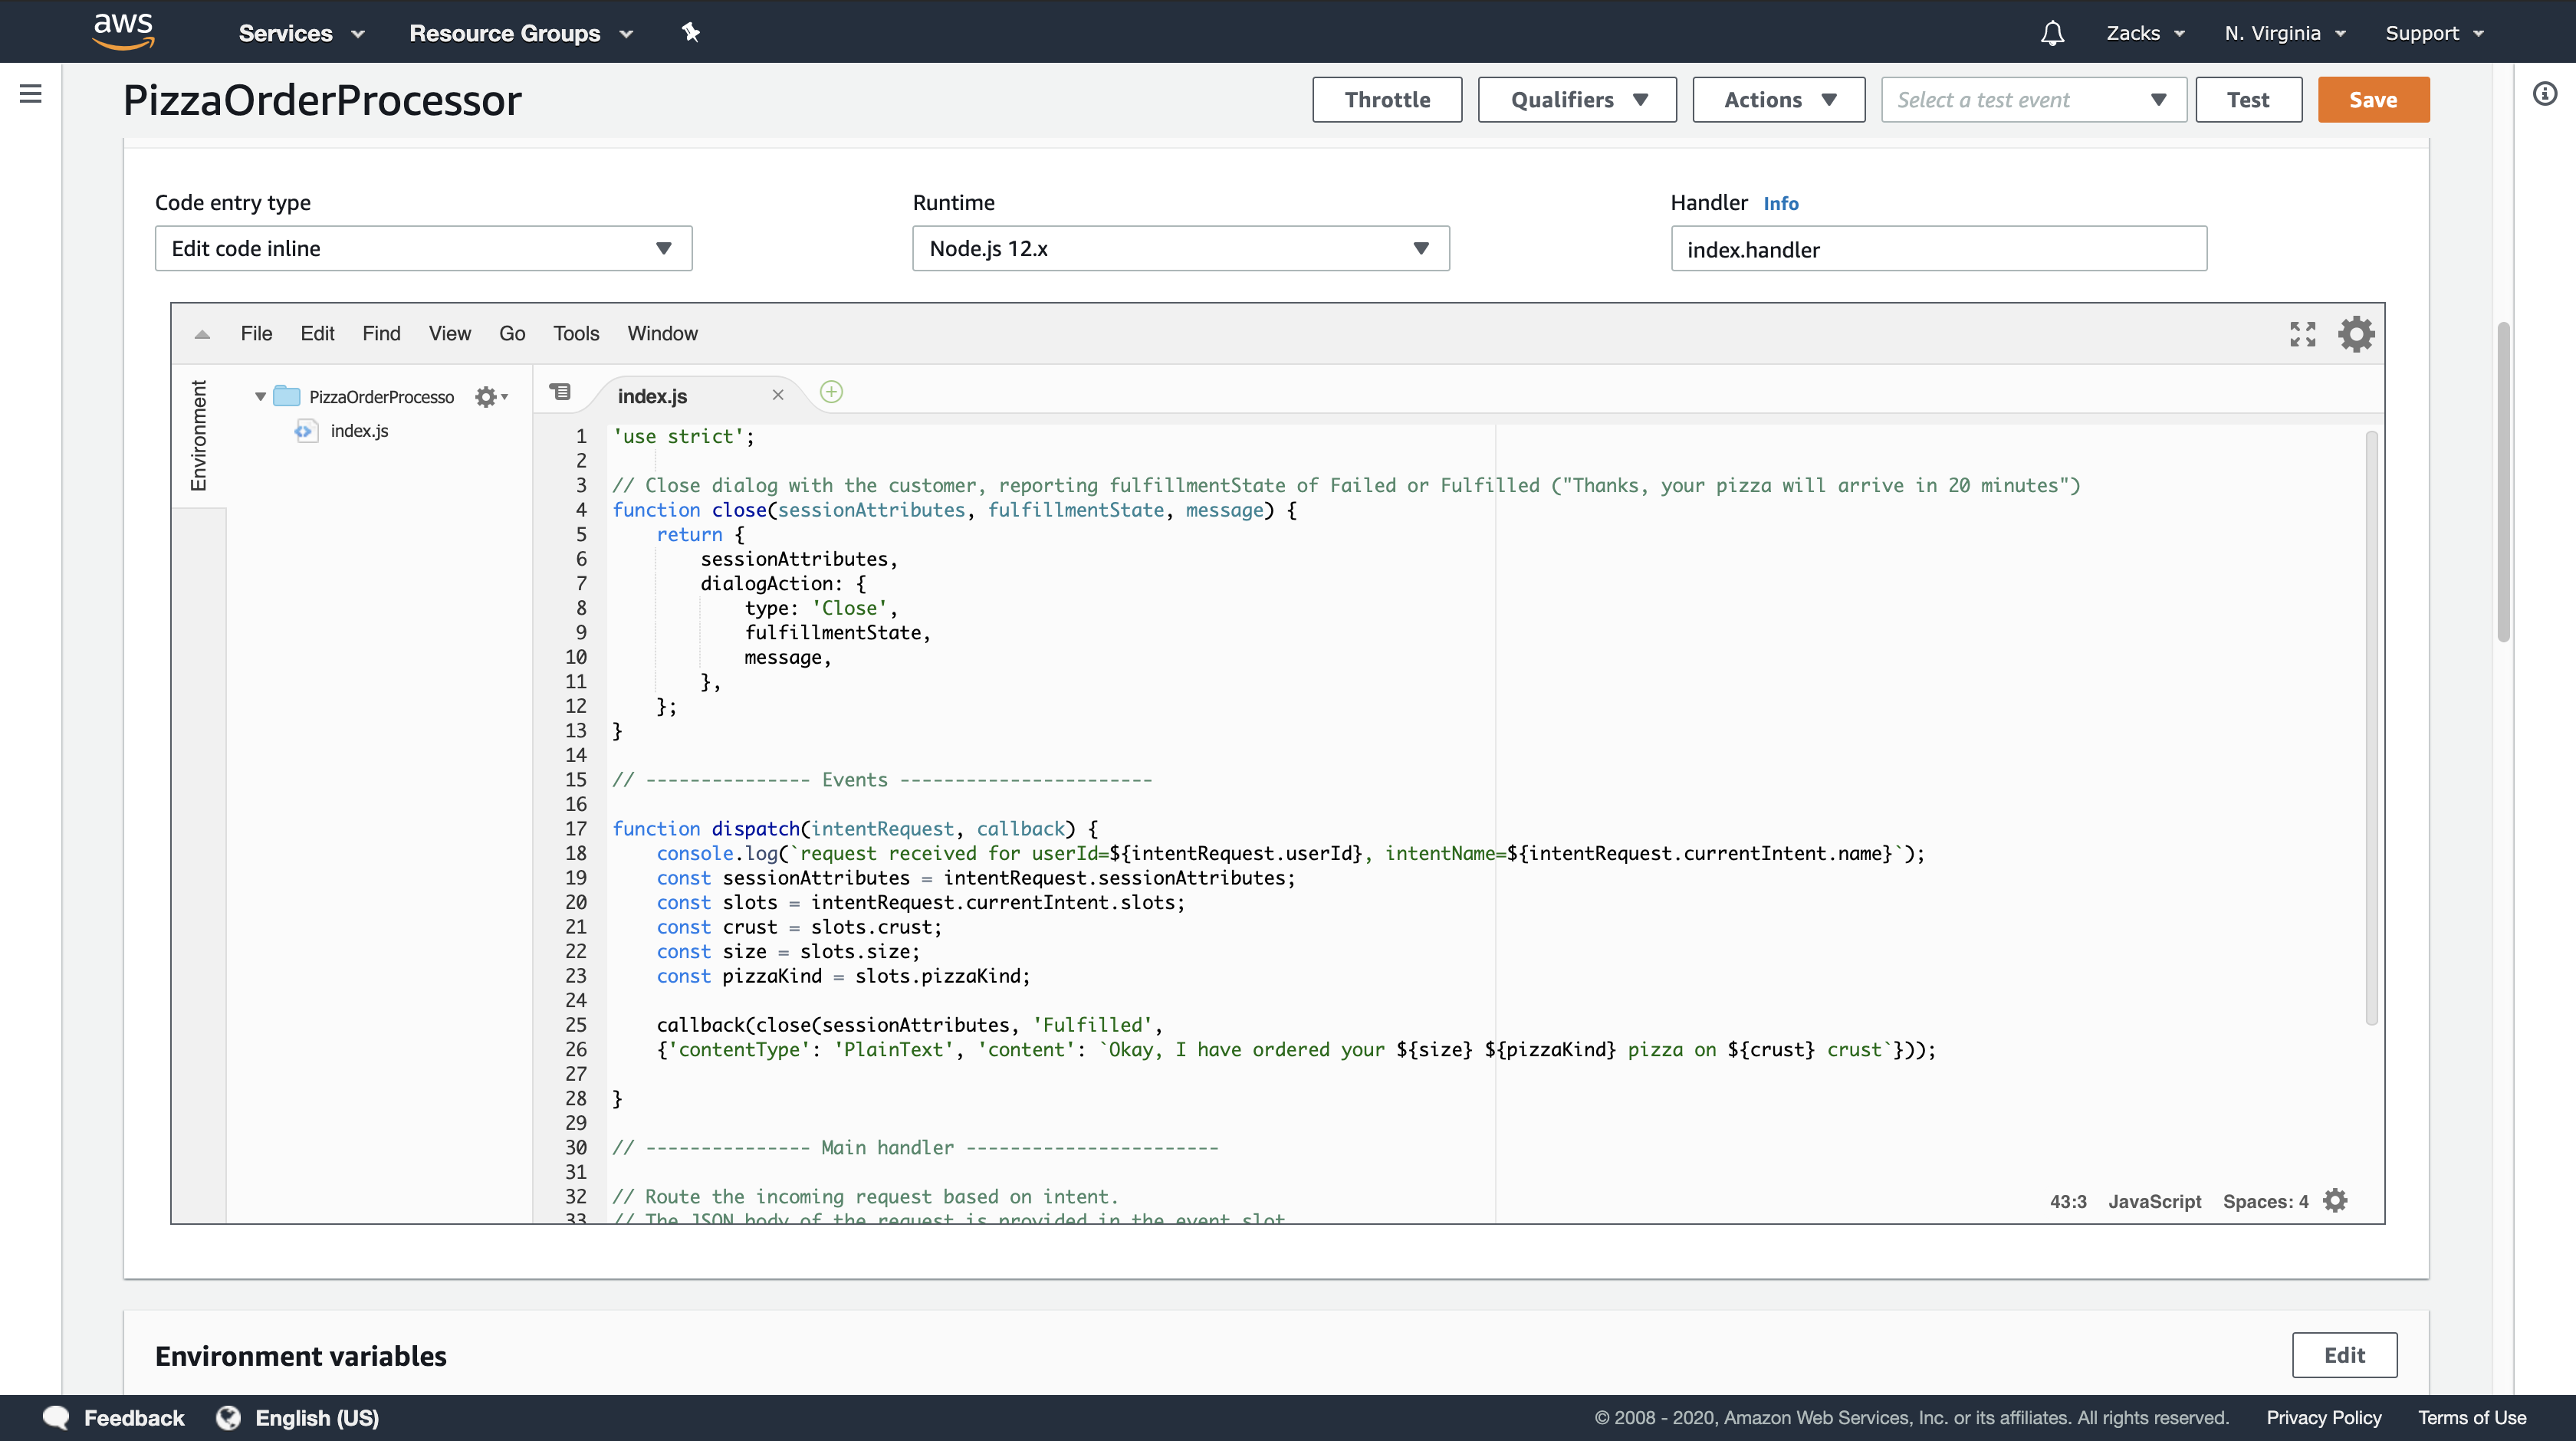
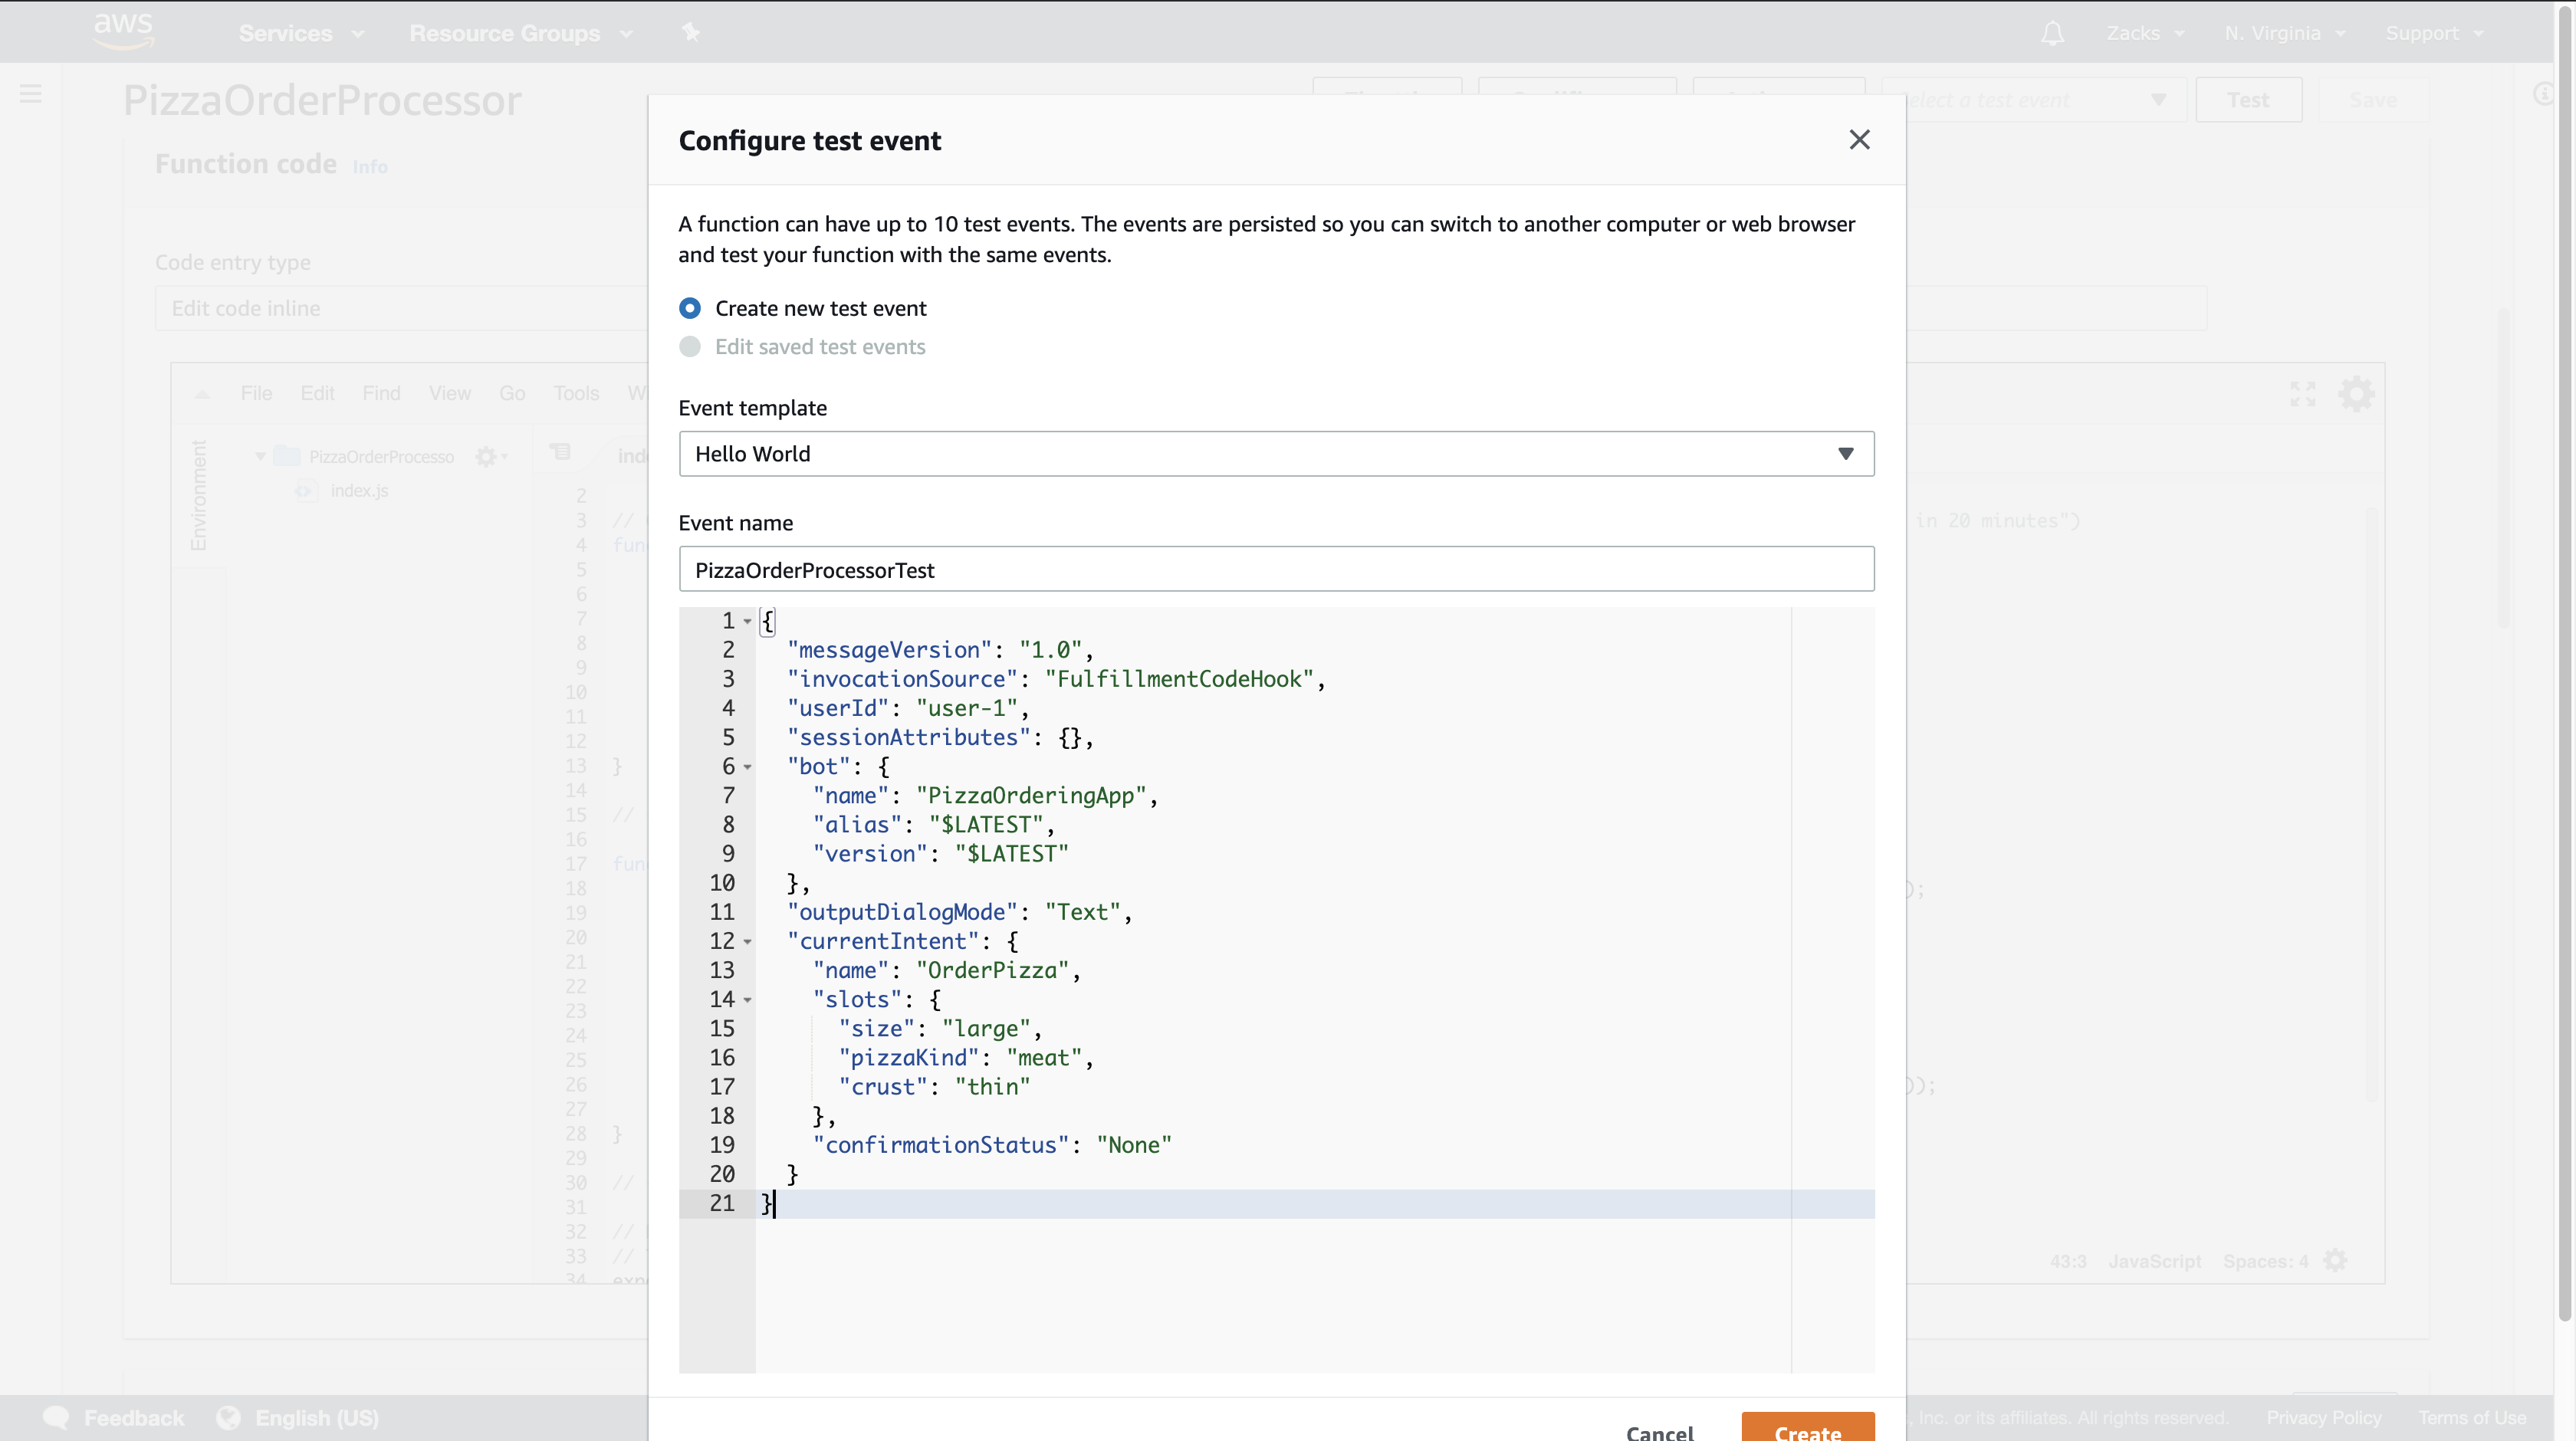
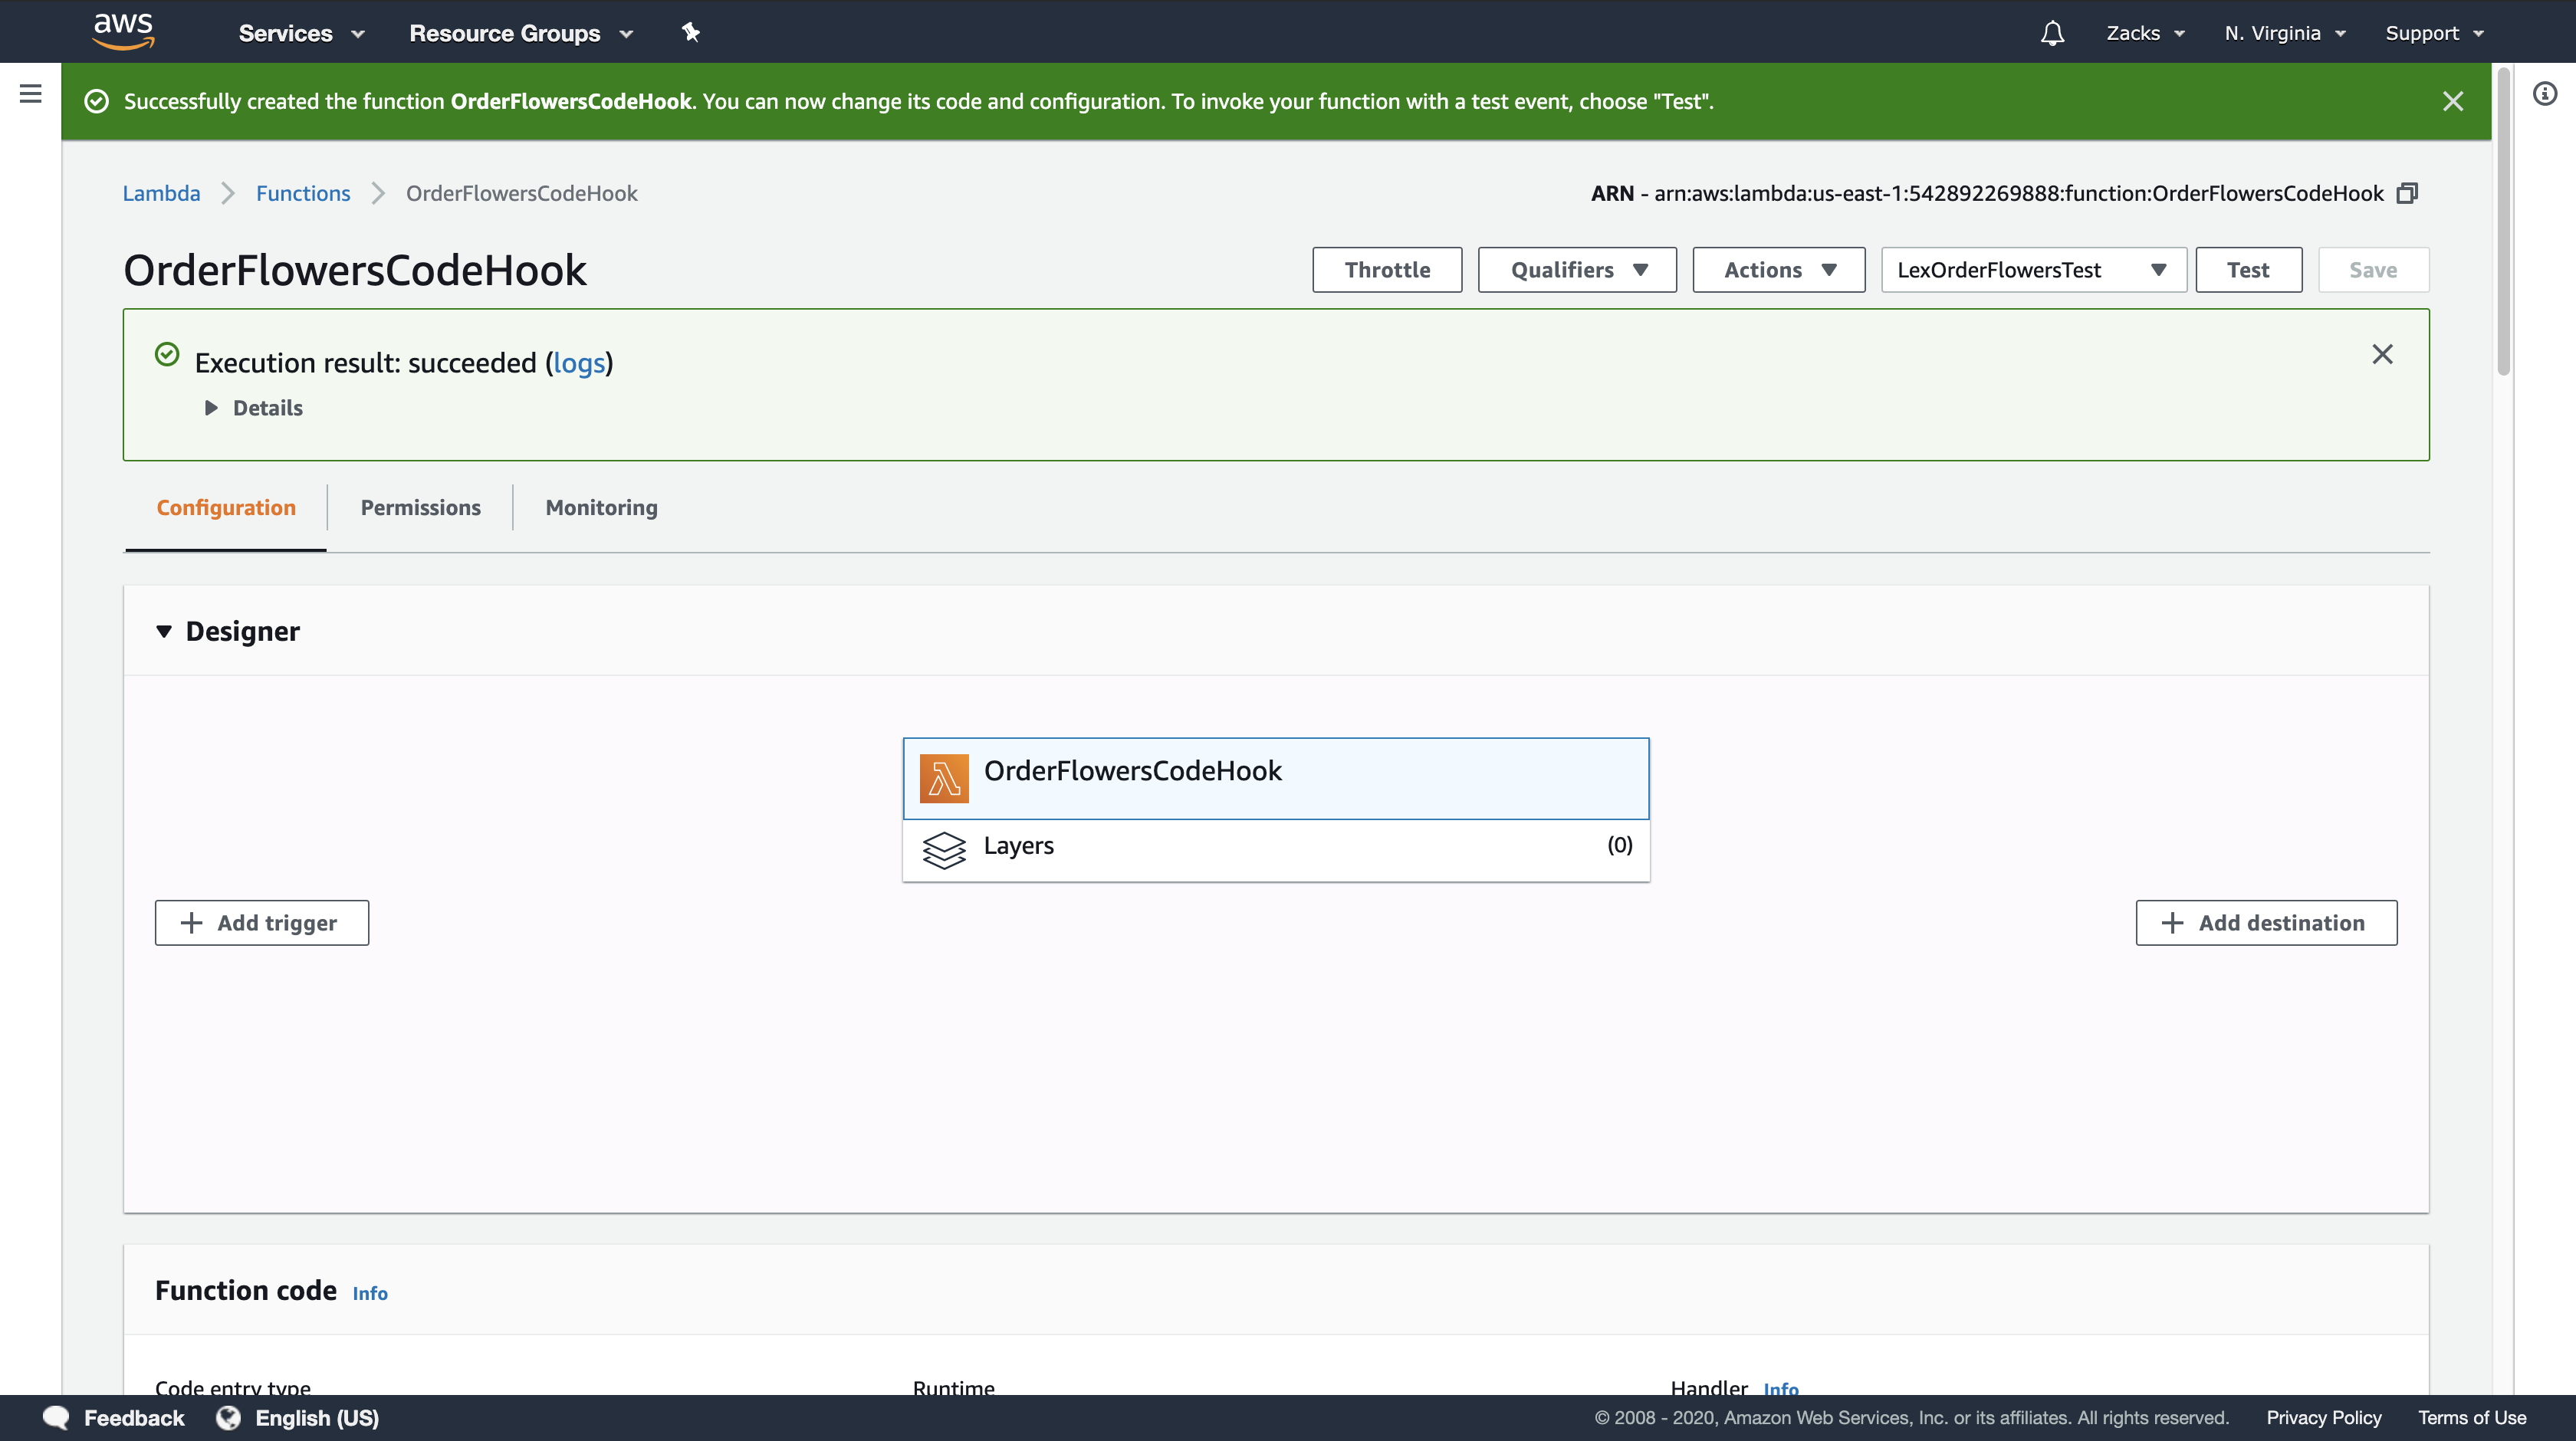
- Test the Lambda function.
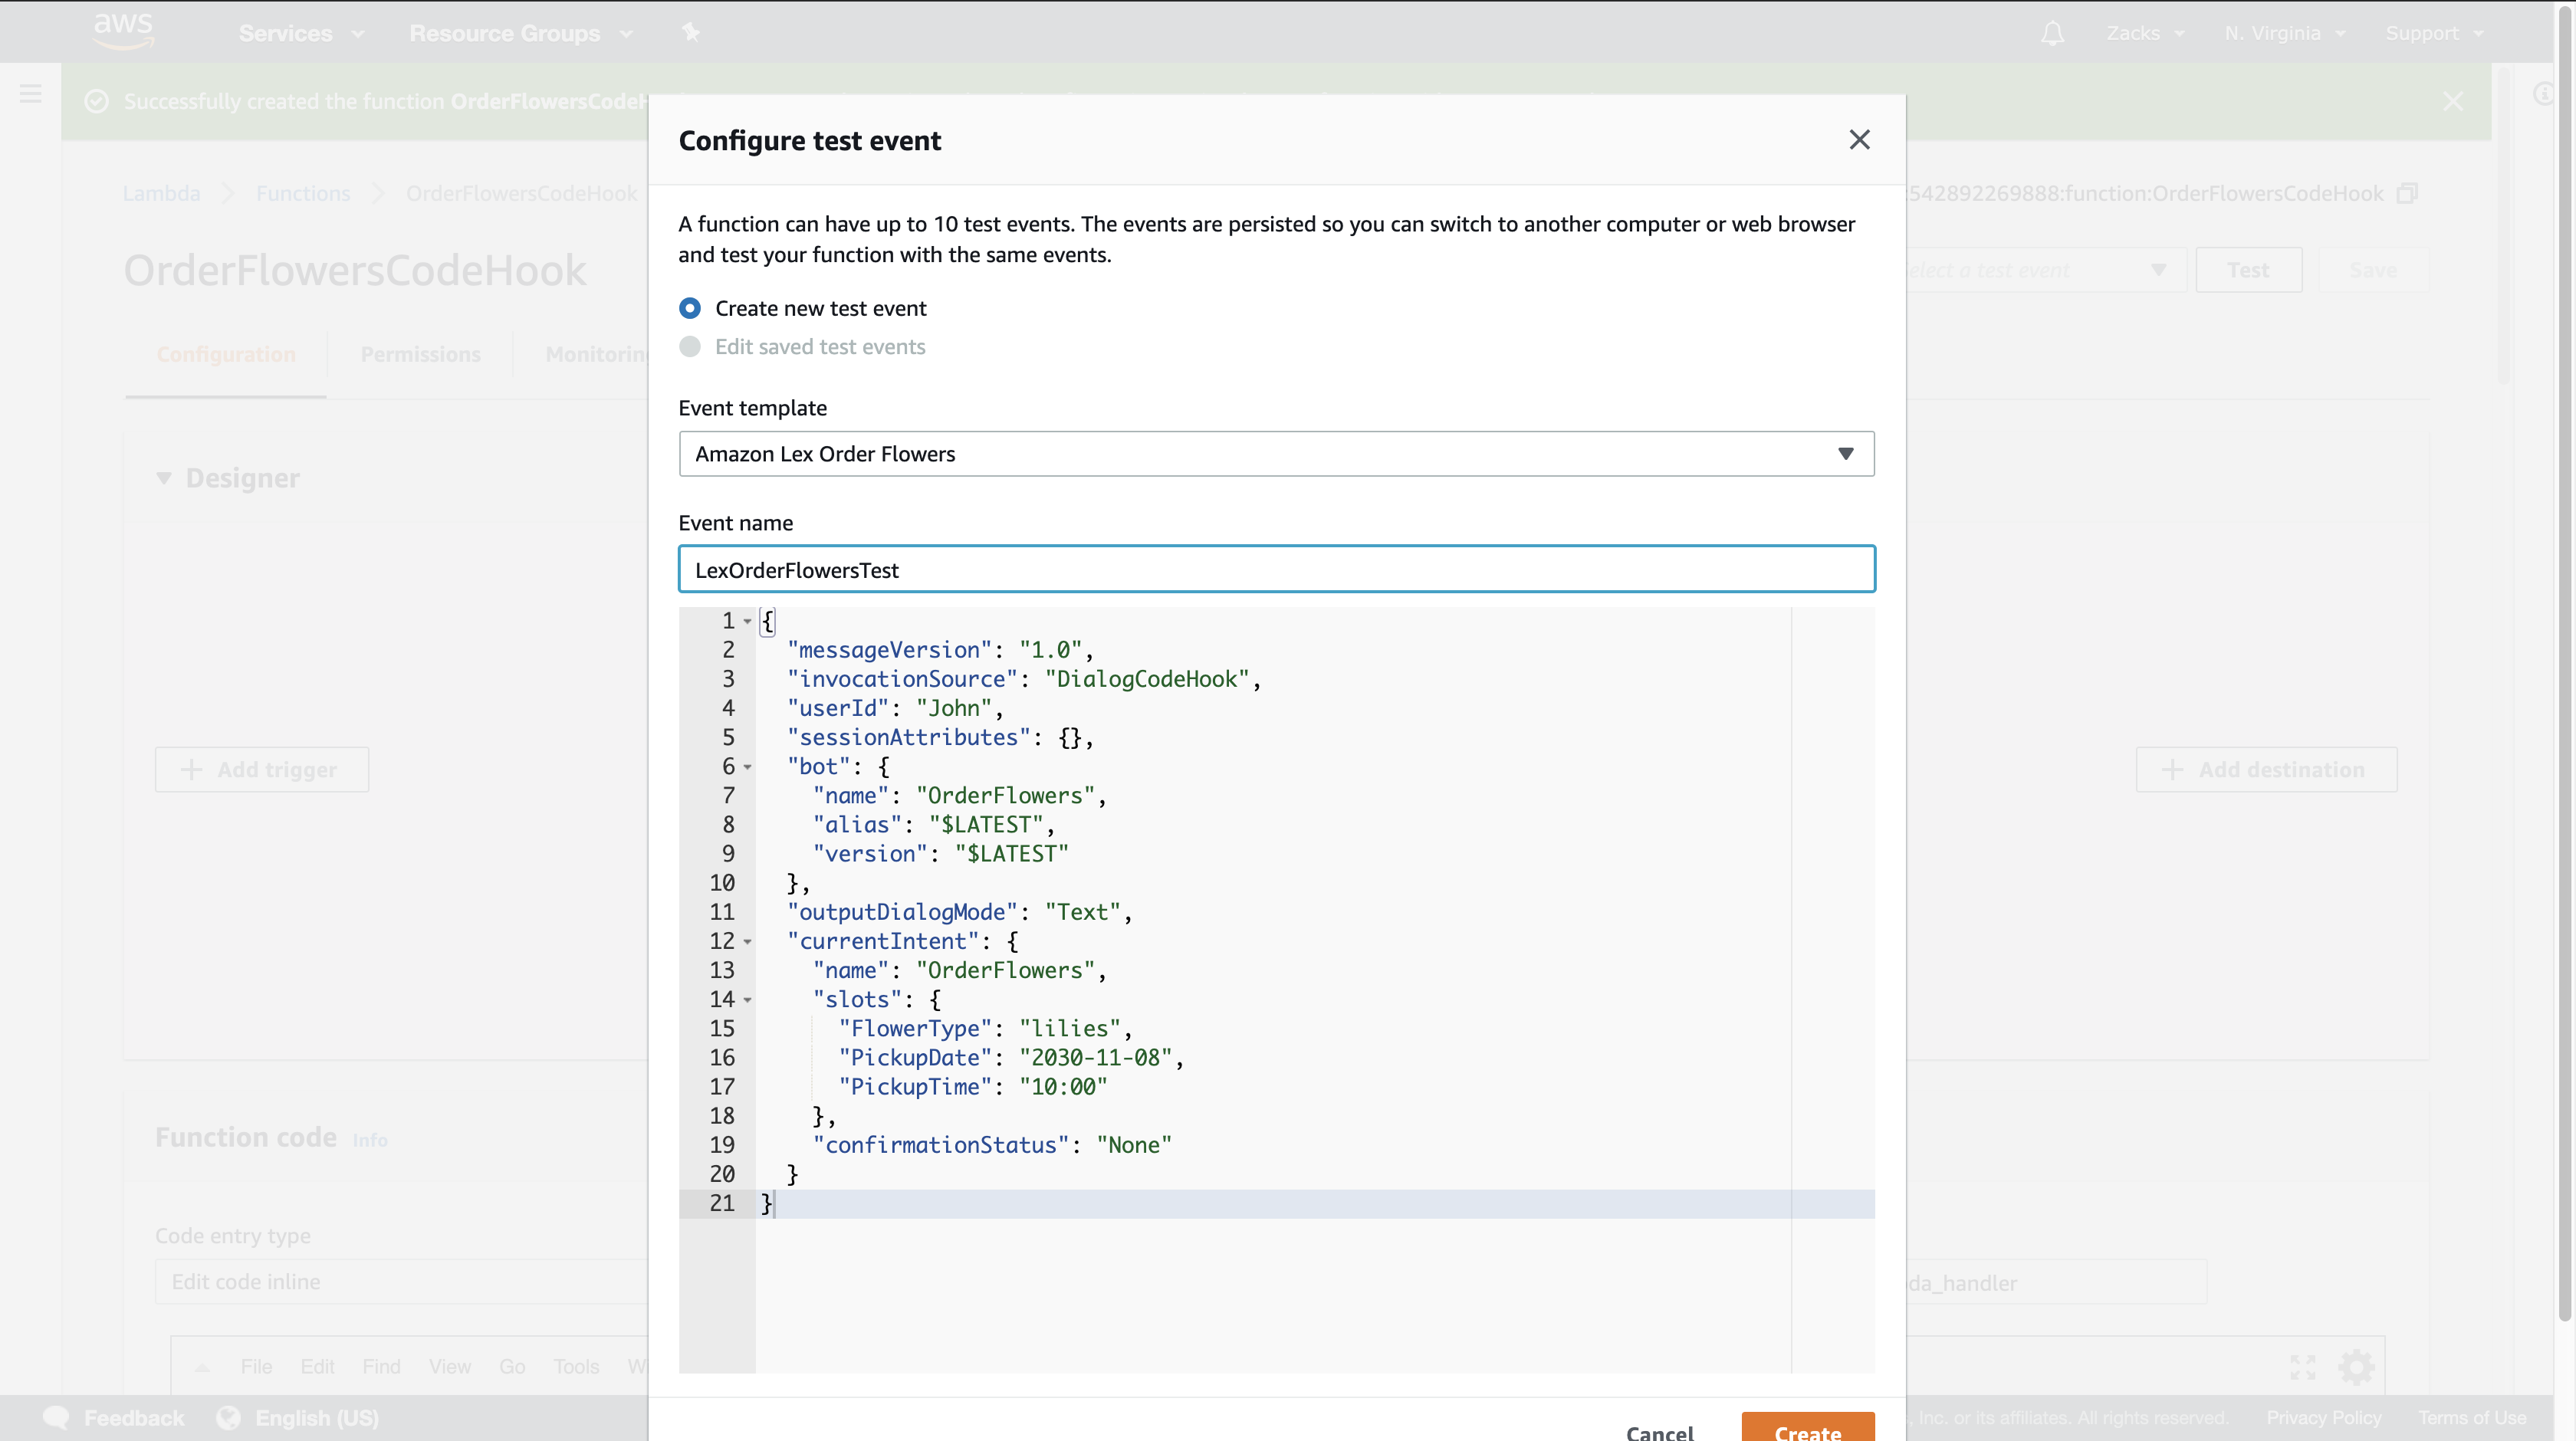
a. Choose Select a test event > Configure test events.
b. Choose Amazon Lex Order Flowers from the Event template list. This sample event matches the Amazon Lex request/response model (see Using Lambda Functions). Give the test event a name (LexOrderFlowersTest).
c. Choose Create.
d. Choose Test to test the code hook.
e. Verify that the Lambda function successfully executed. The response in this case matches the Amazon Lex response model.

Step 4: Add the Lambda Function as Code Hook (Console)
https://docs.aws.amazon.com/lex/latest/dg/gs-bp-create-integrate.html
Lambda Function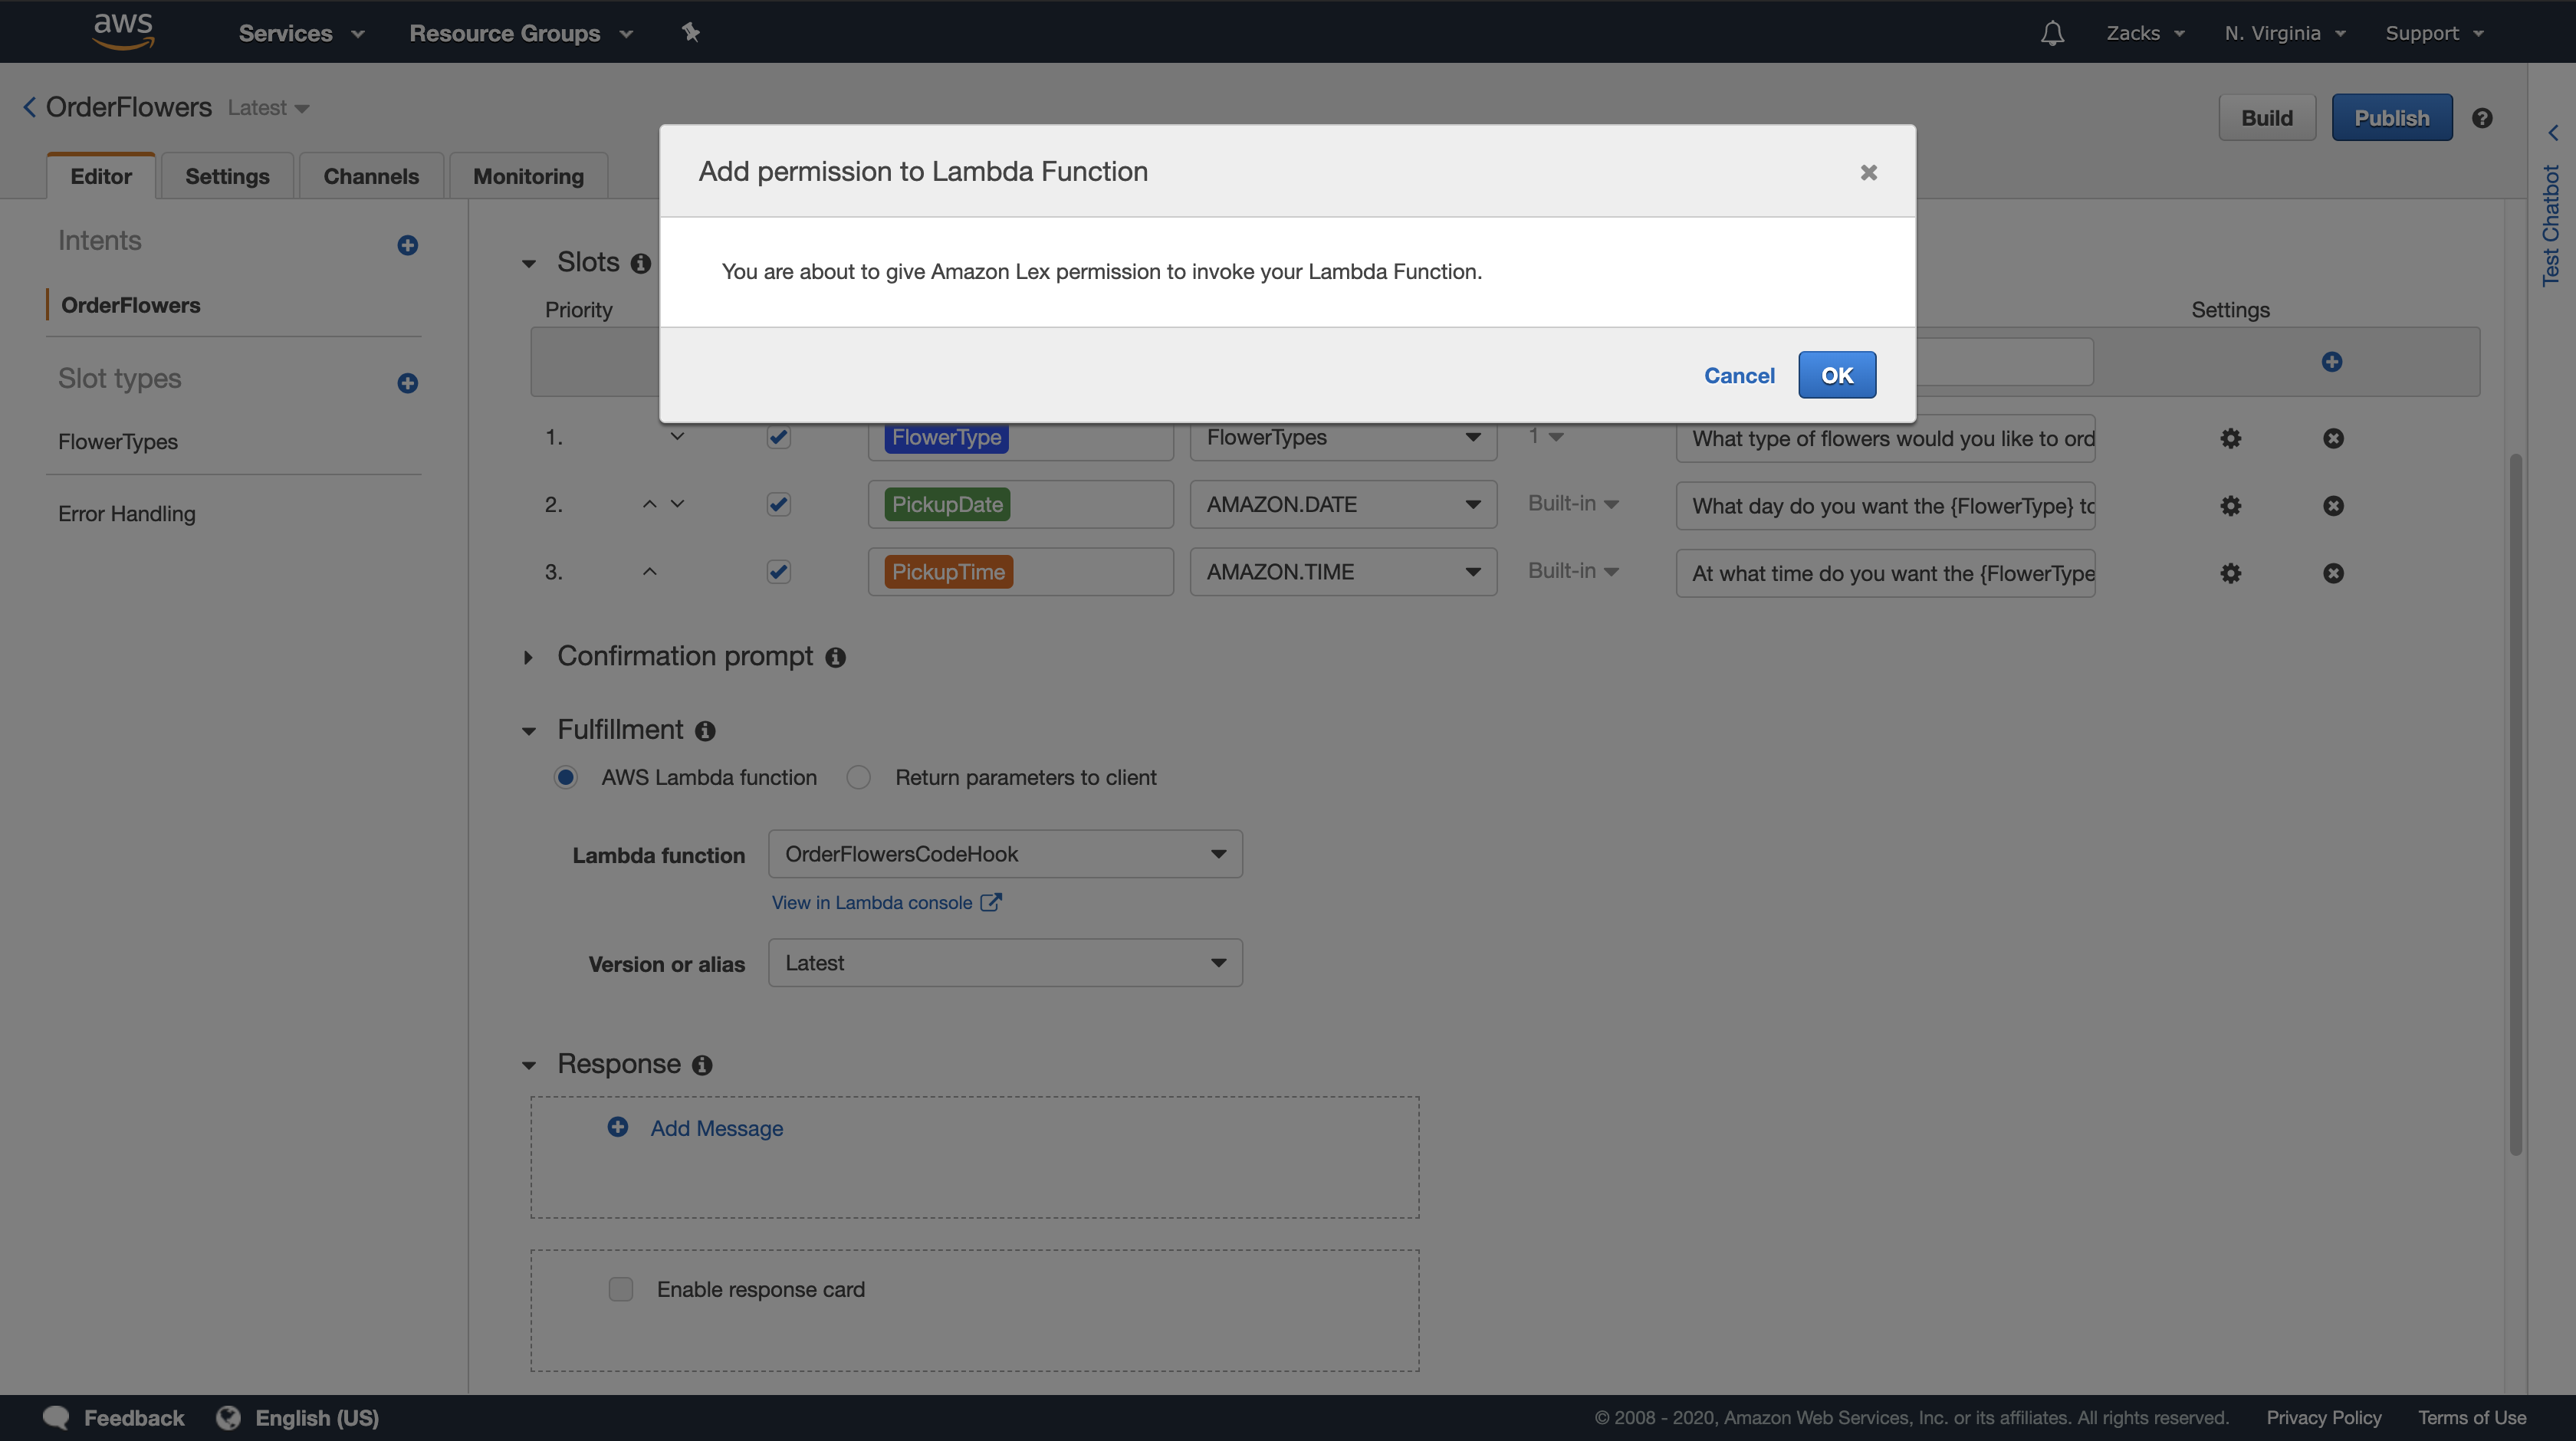
Type a goodbye message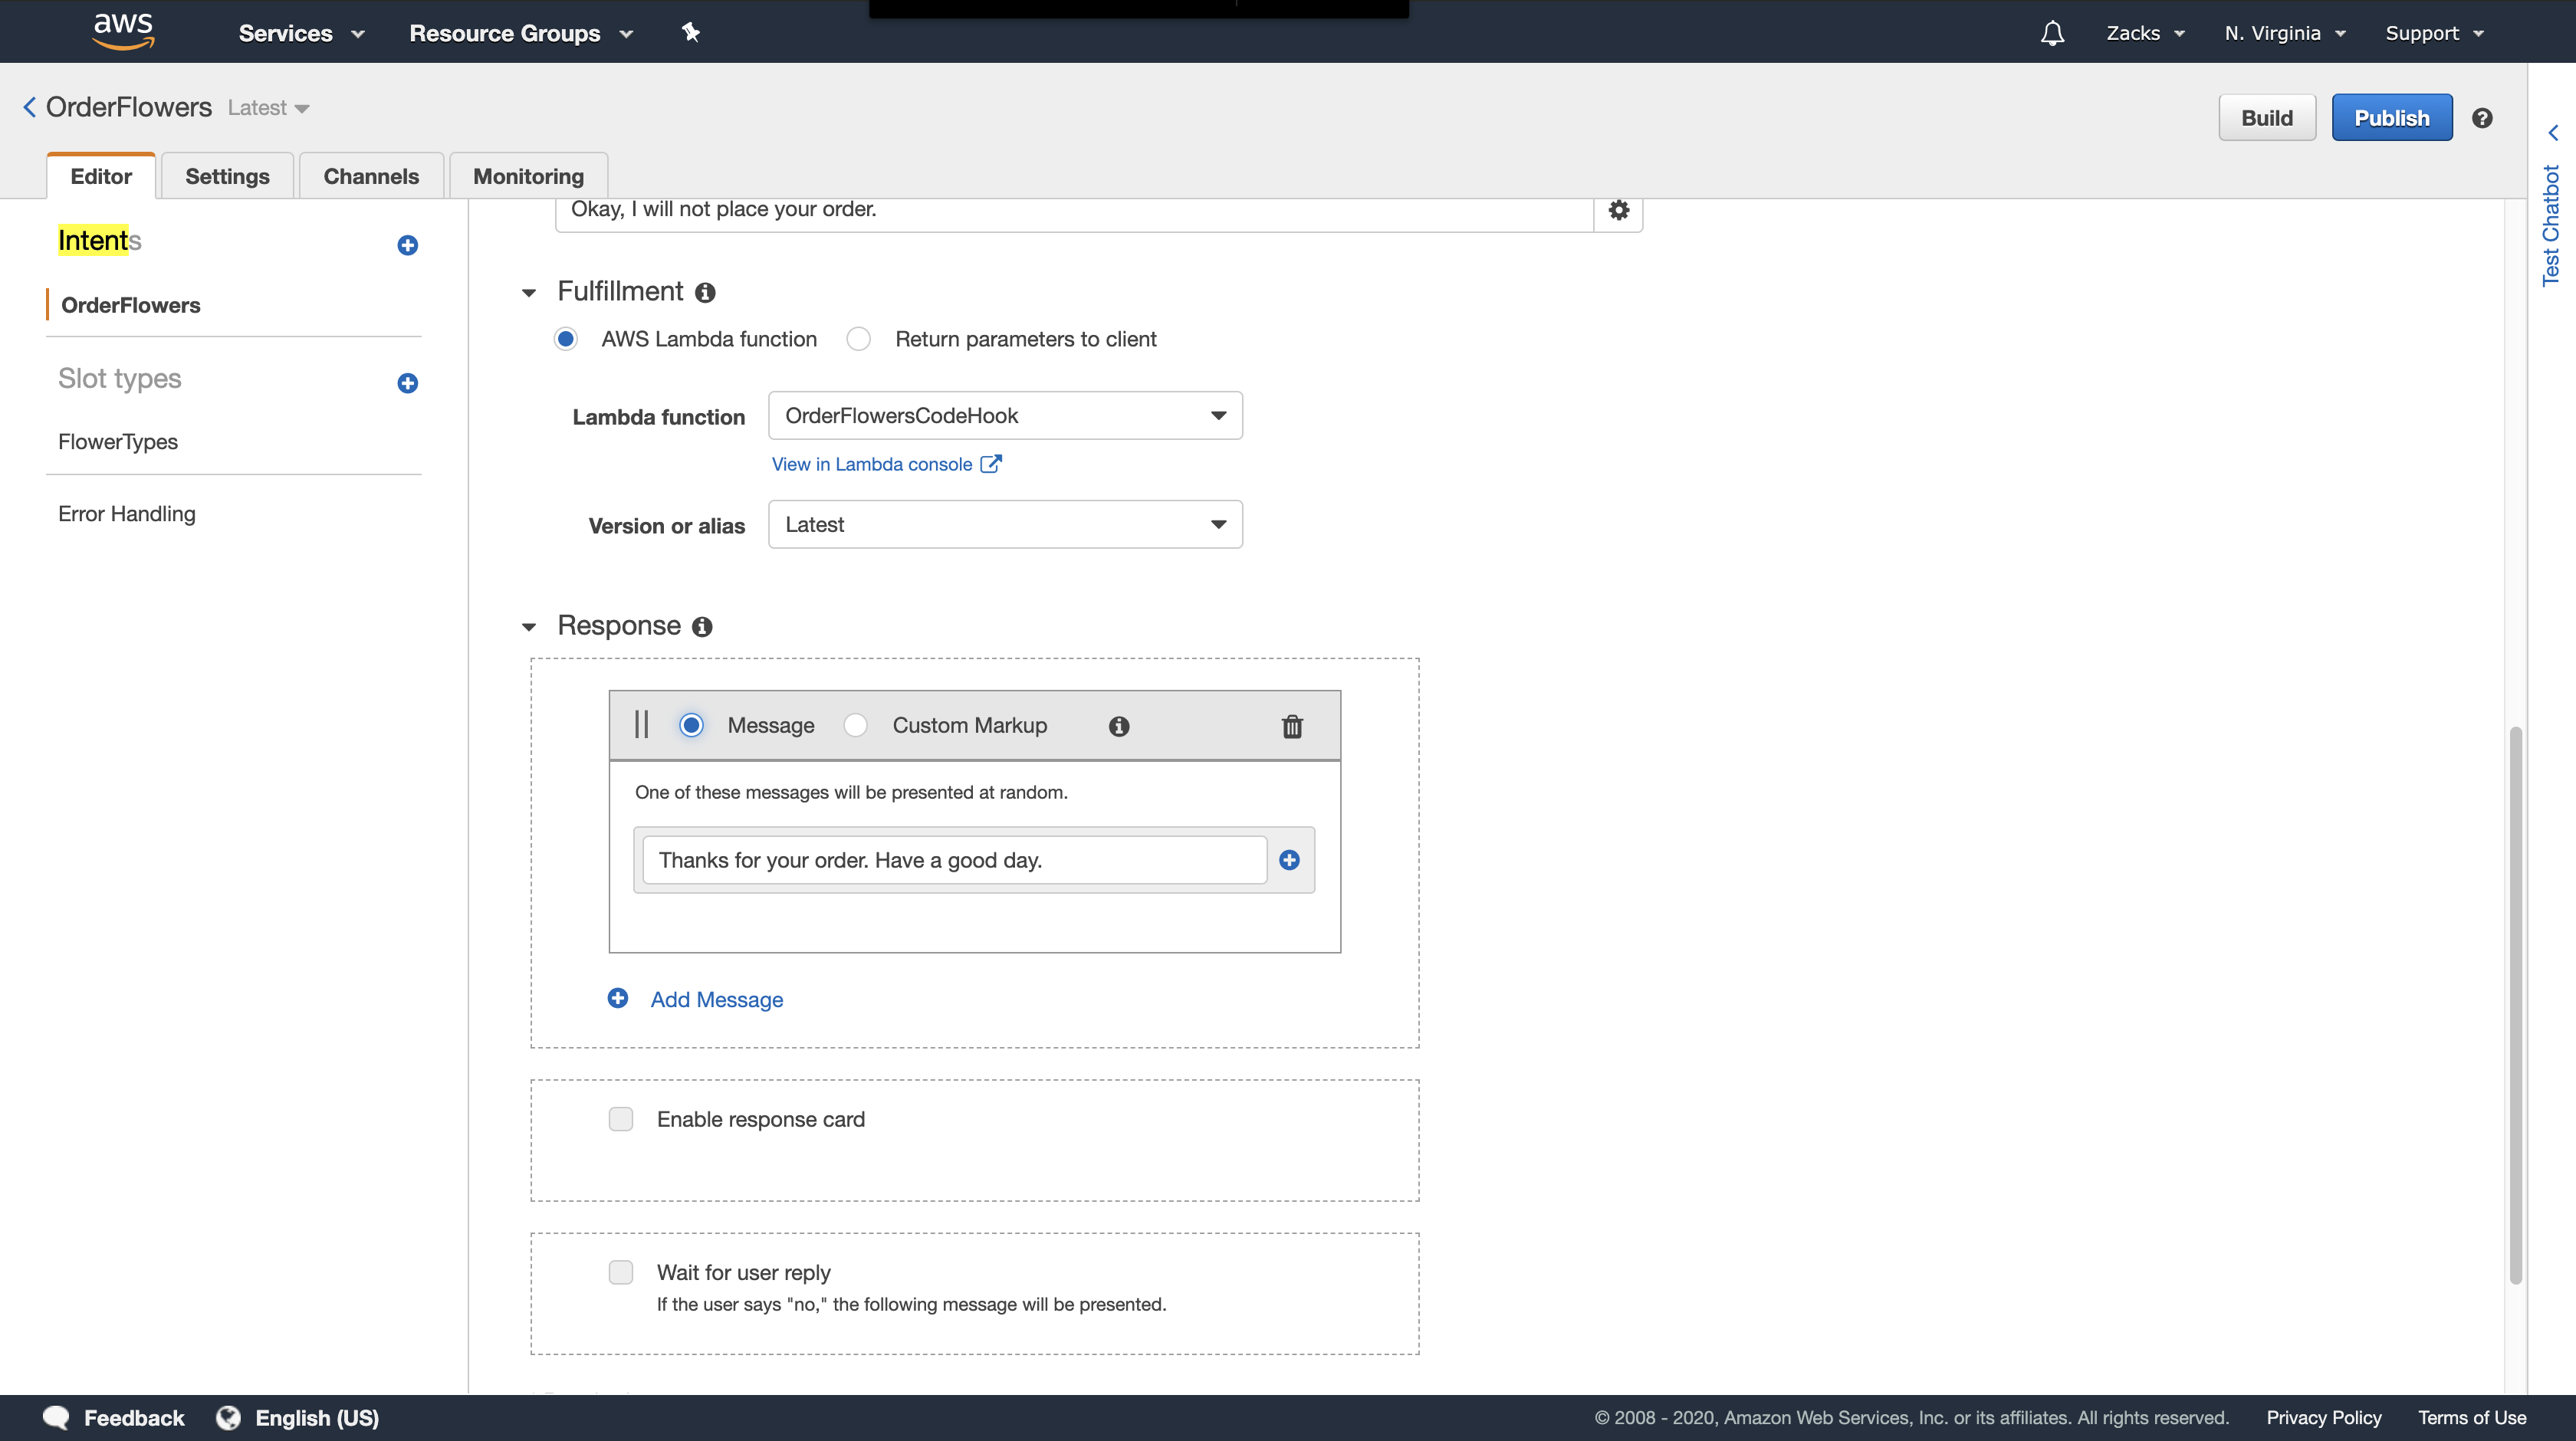
Click Build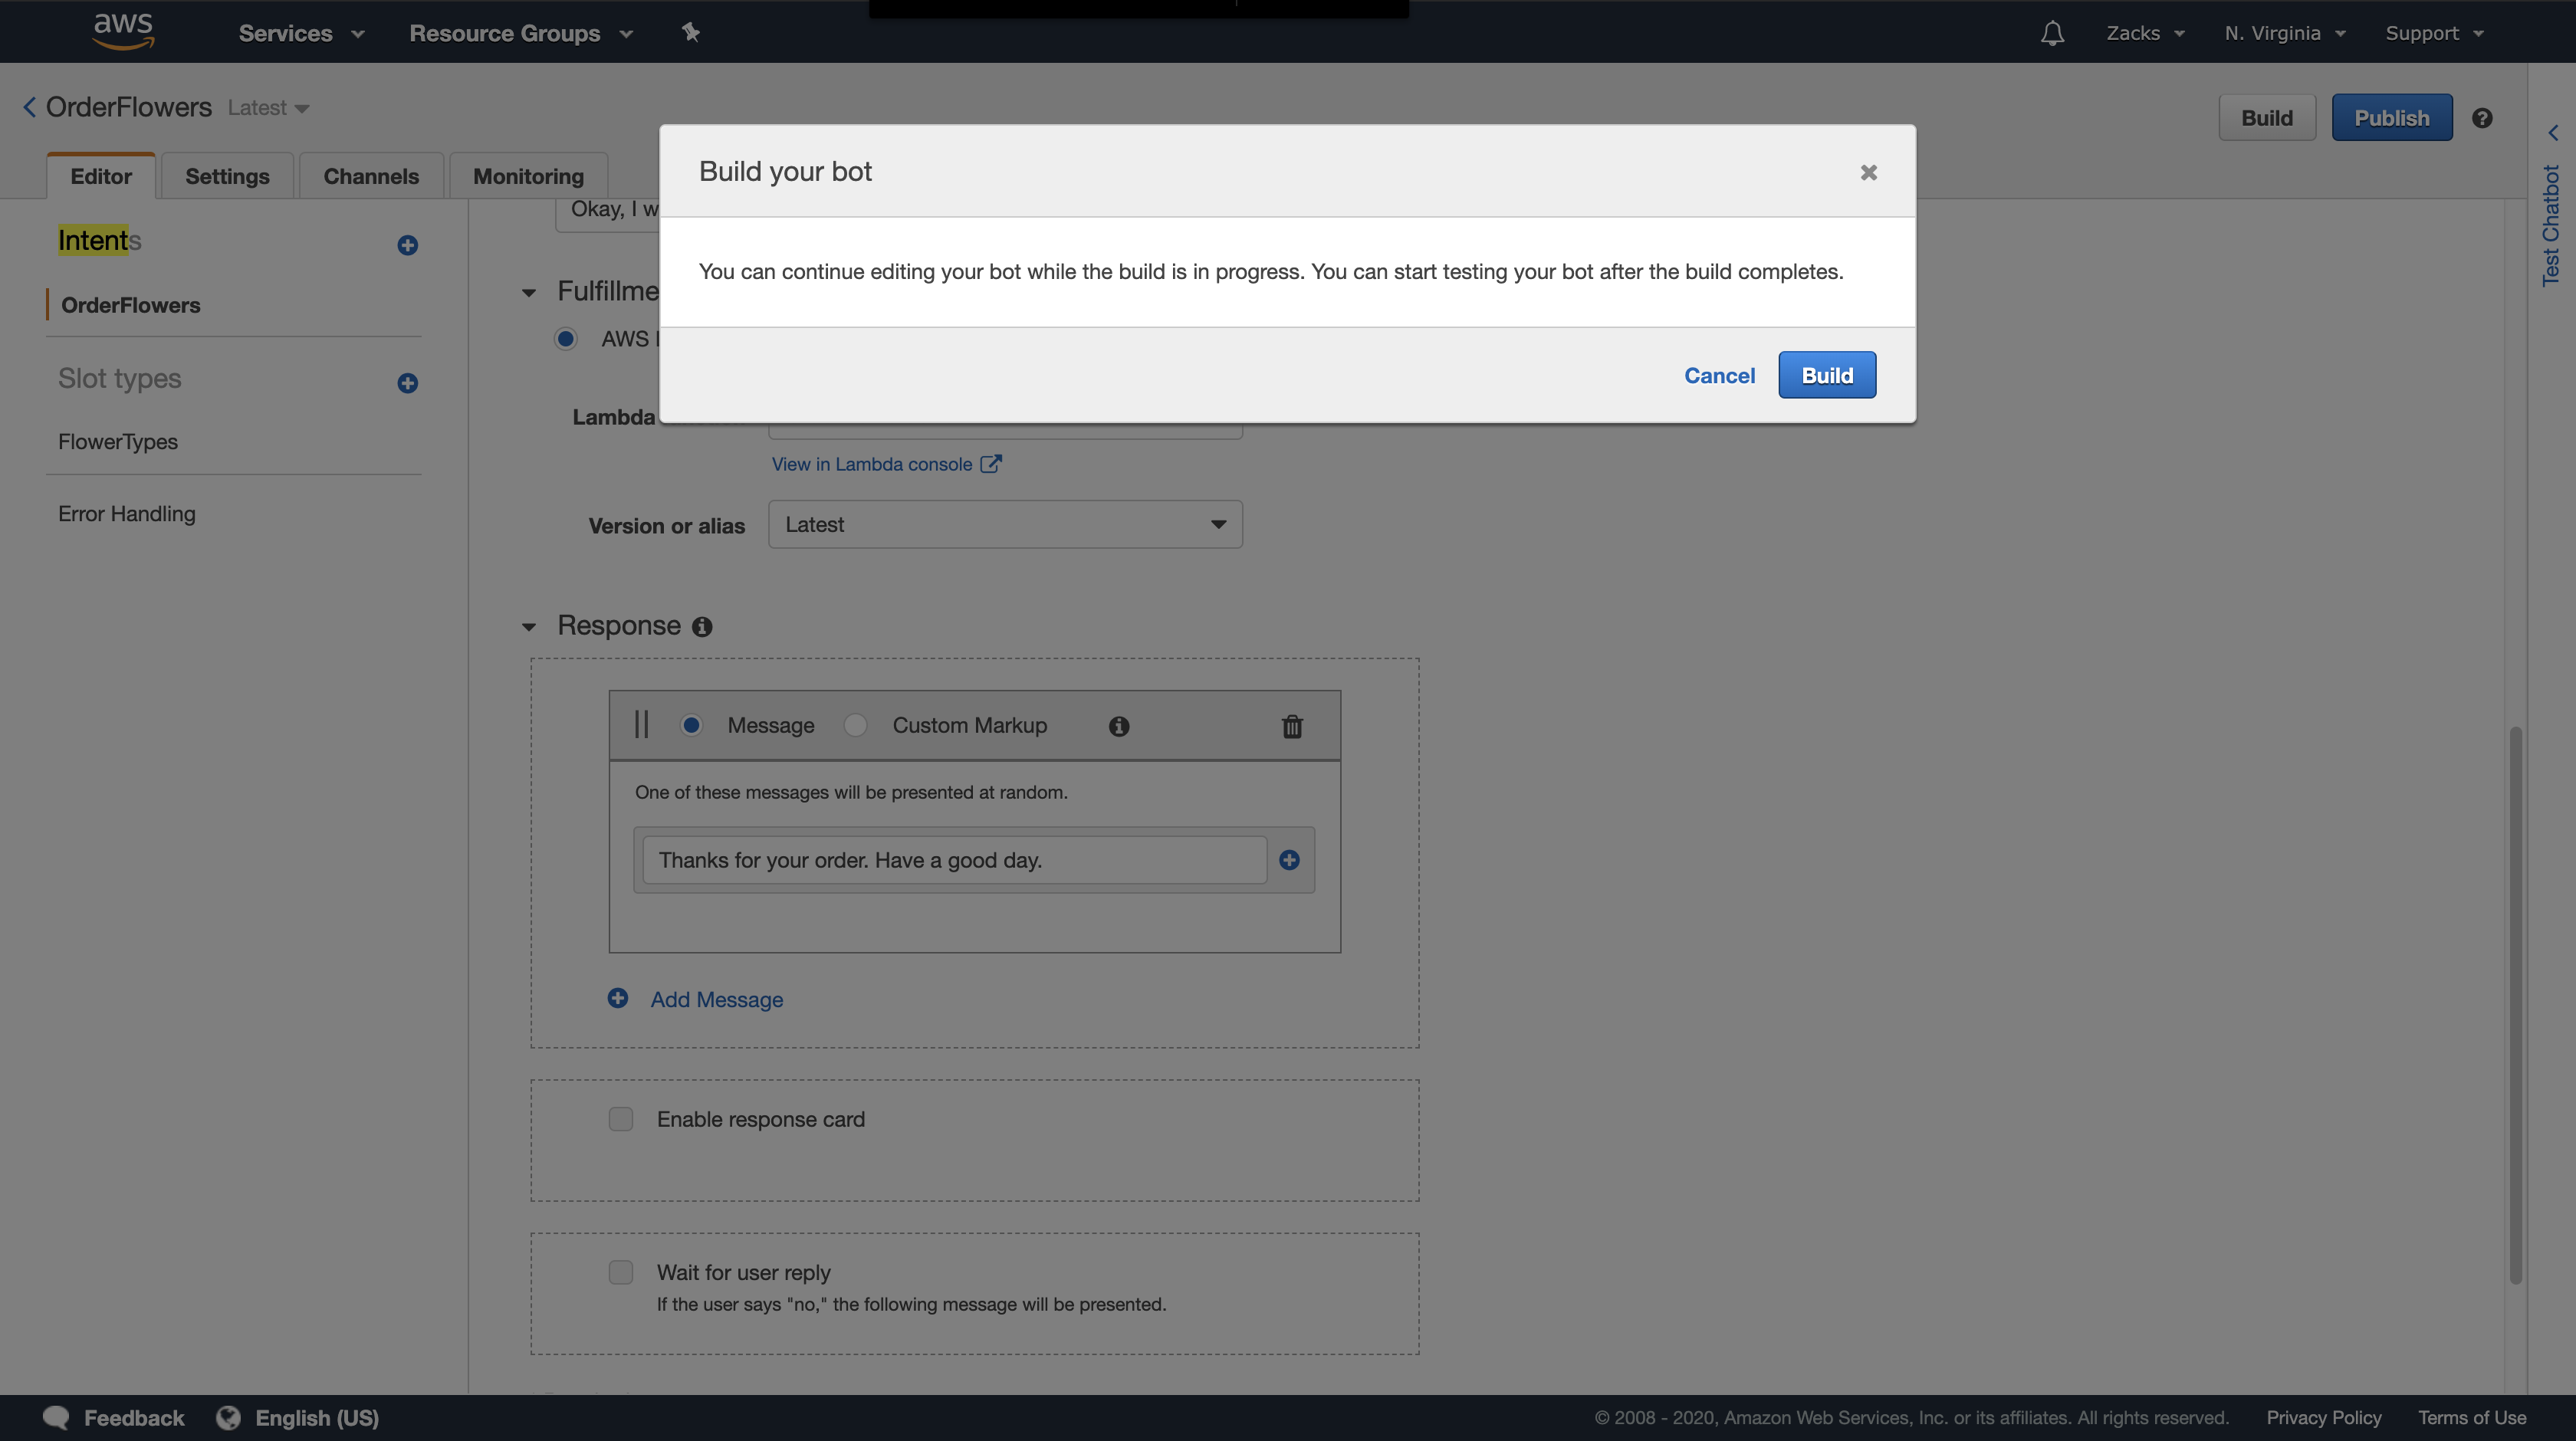
Test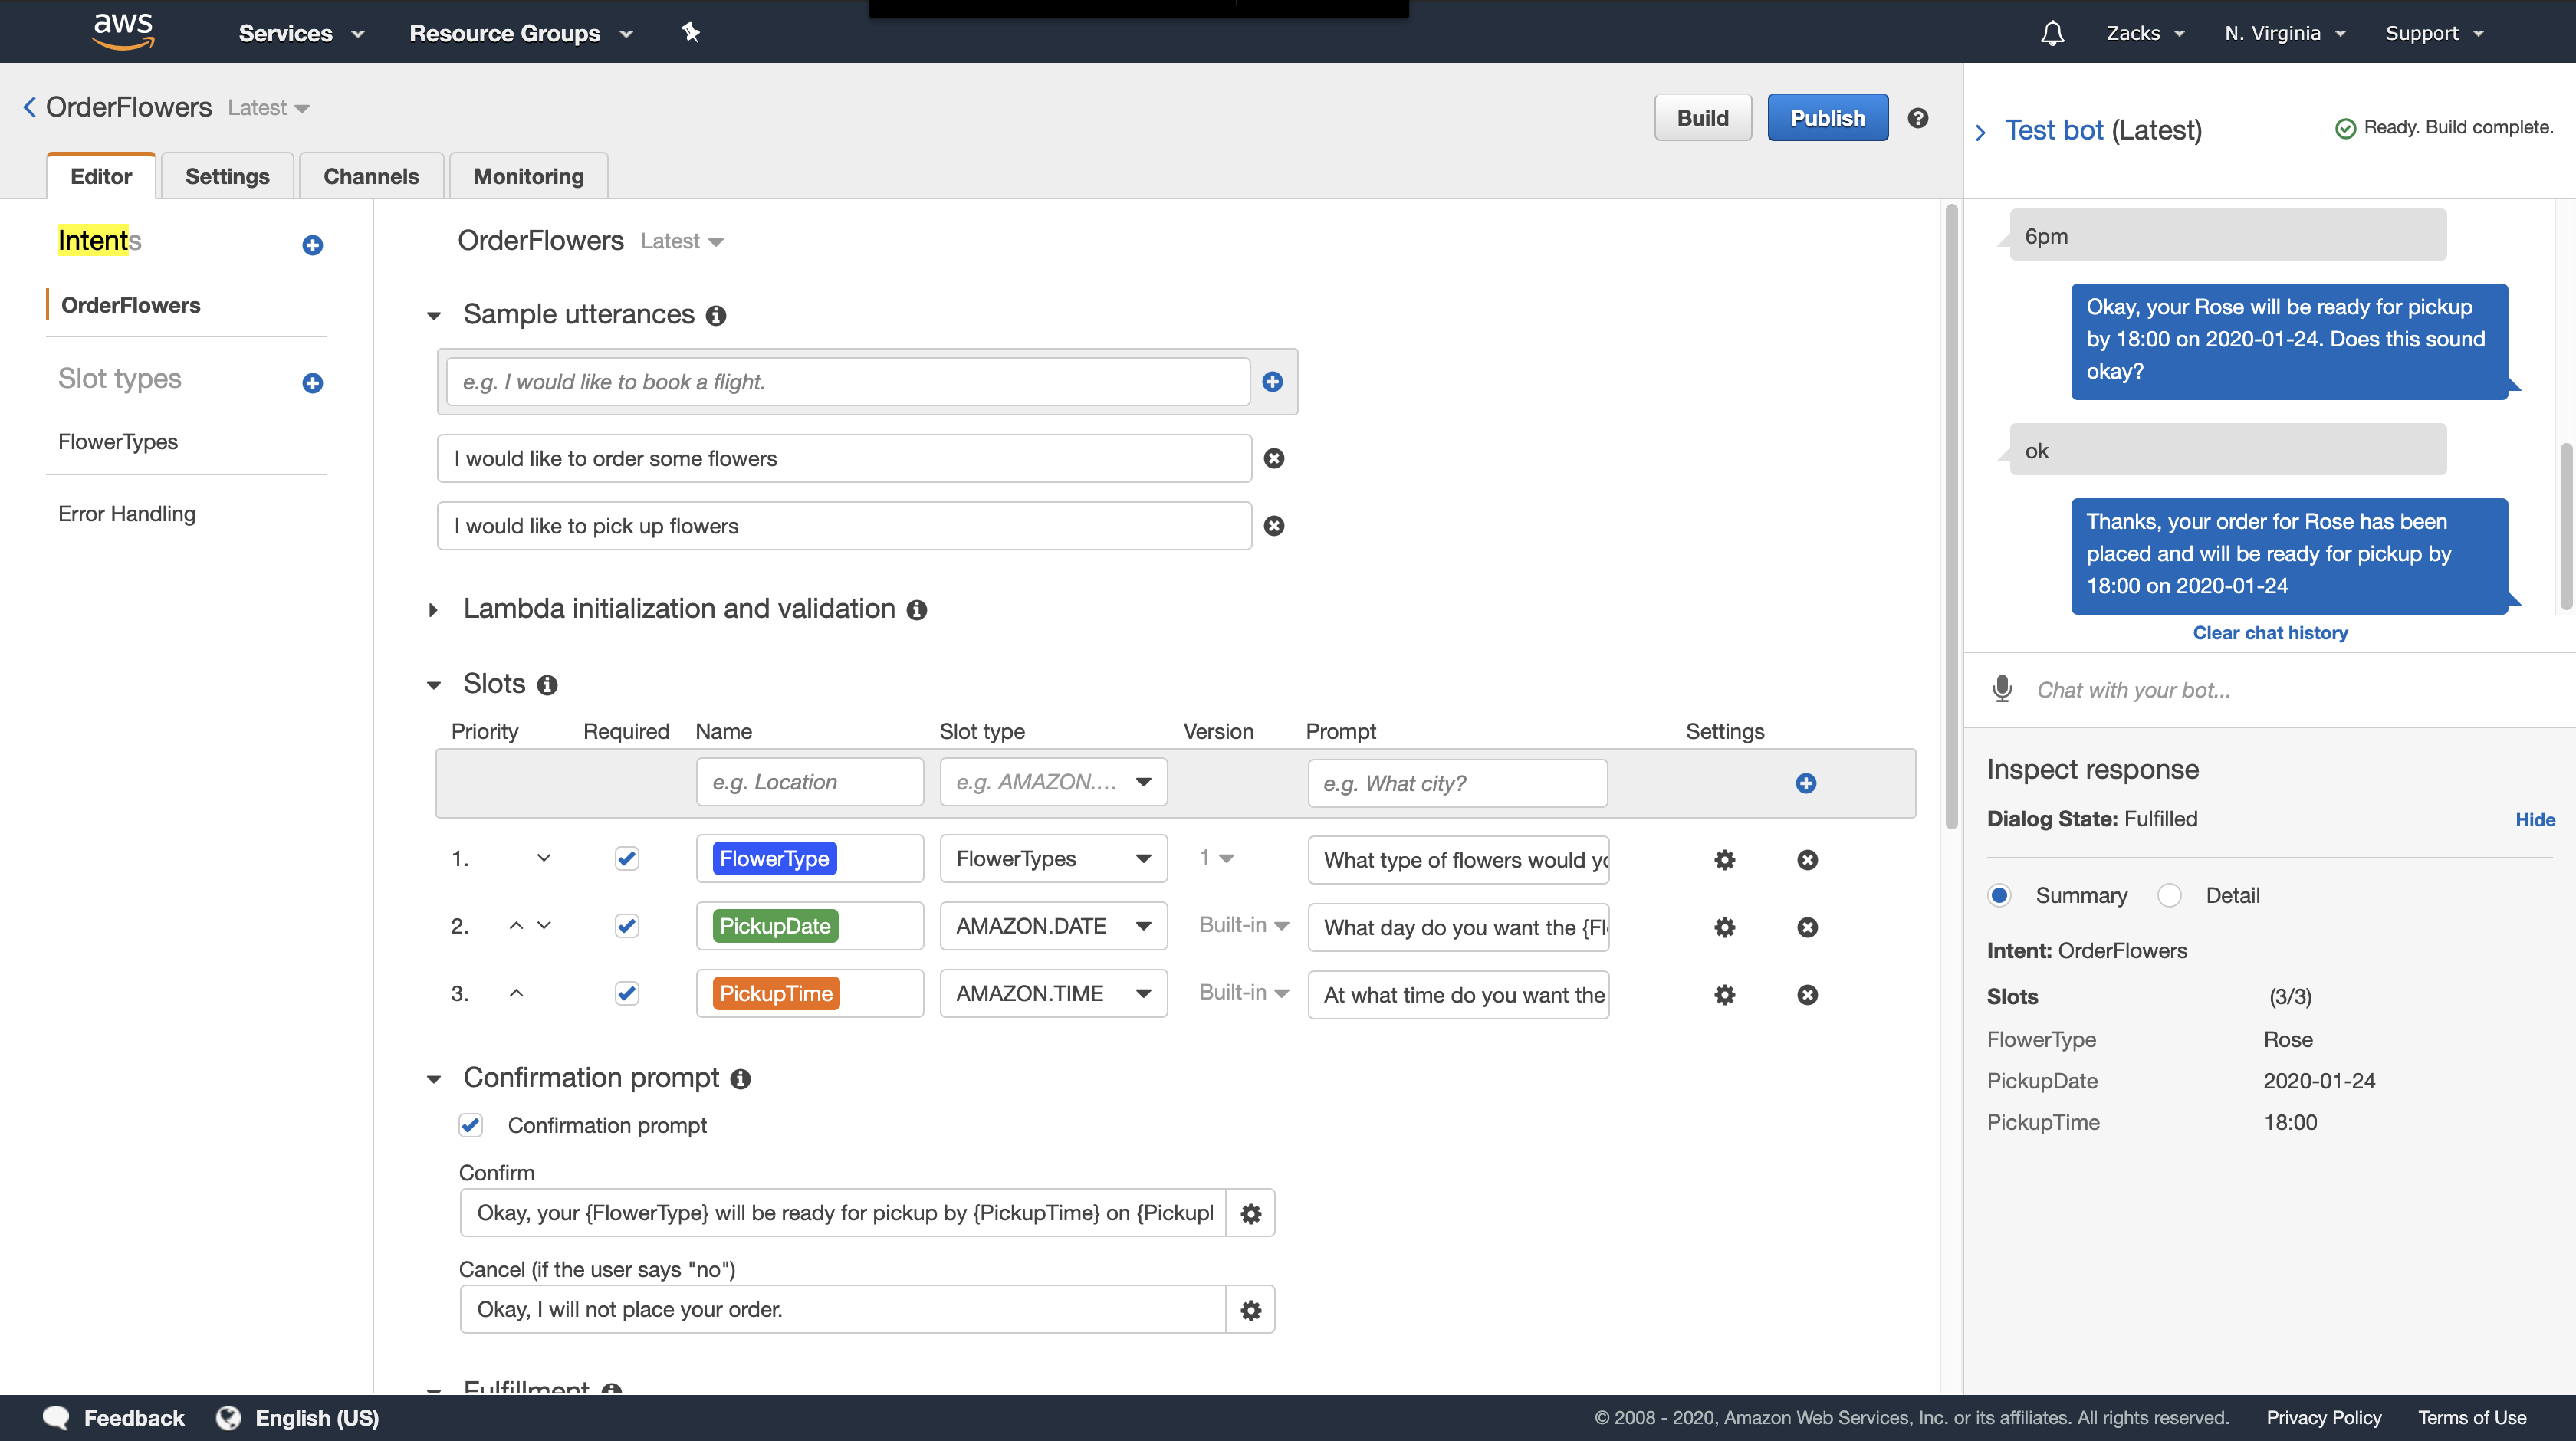
Step 5 (Optional): Review the Details of the Information Flow (Console)
https://docs.aws.amazon.com/lex/latest/dg/gs-bp-details-after-lambda.html
Step 6: Update the Intent Configuration to Add an Utterance (Console)
https://docs.aws.amazon.com/lex/latest/dg/gs-bp-utterance.html
Try to update the stupid model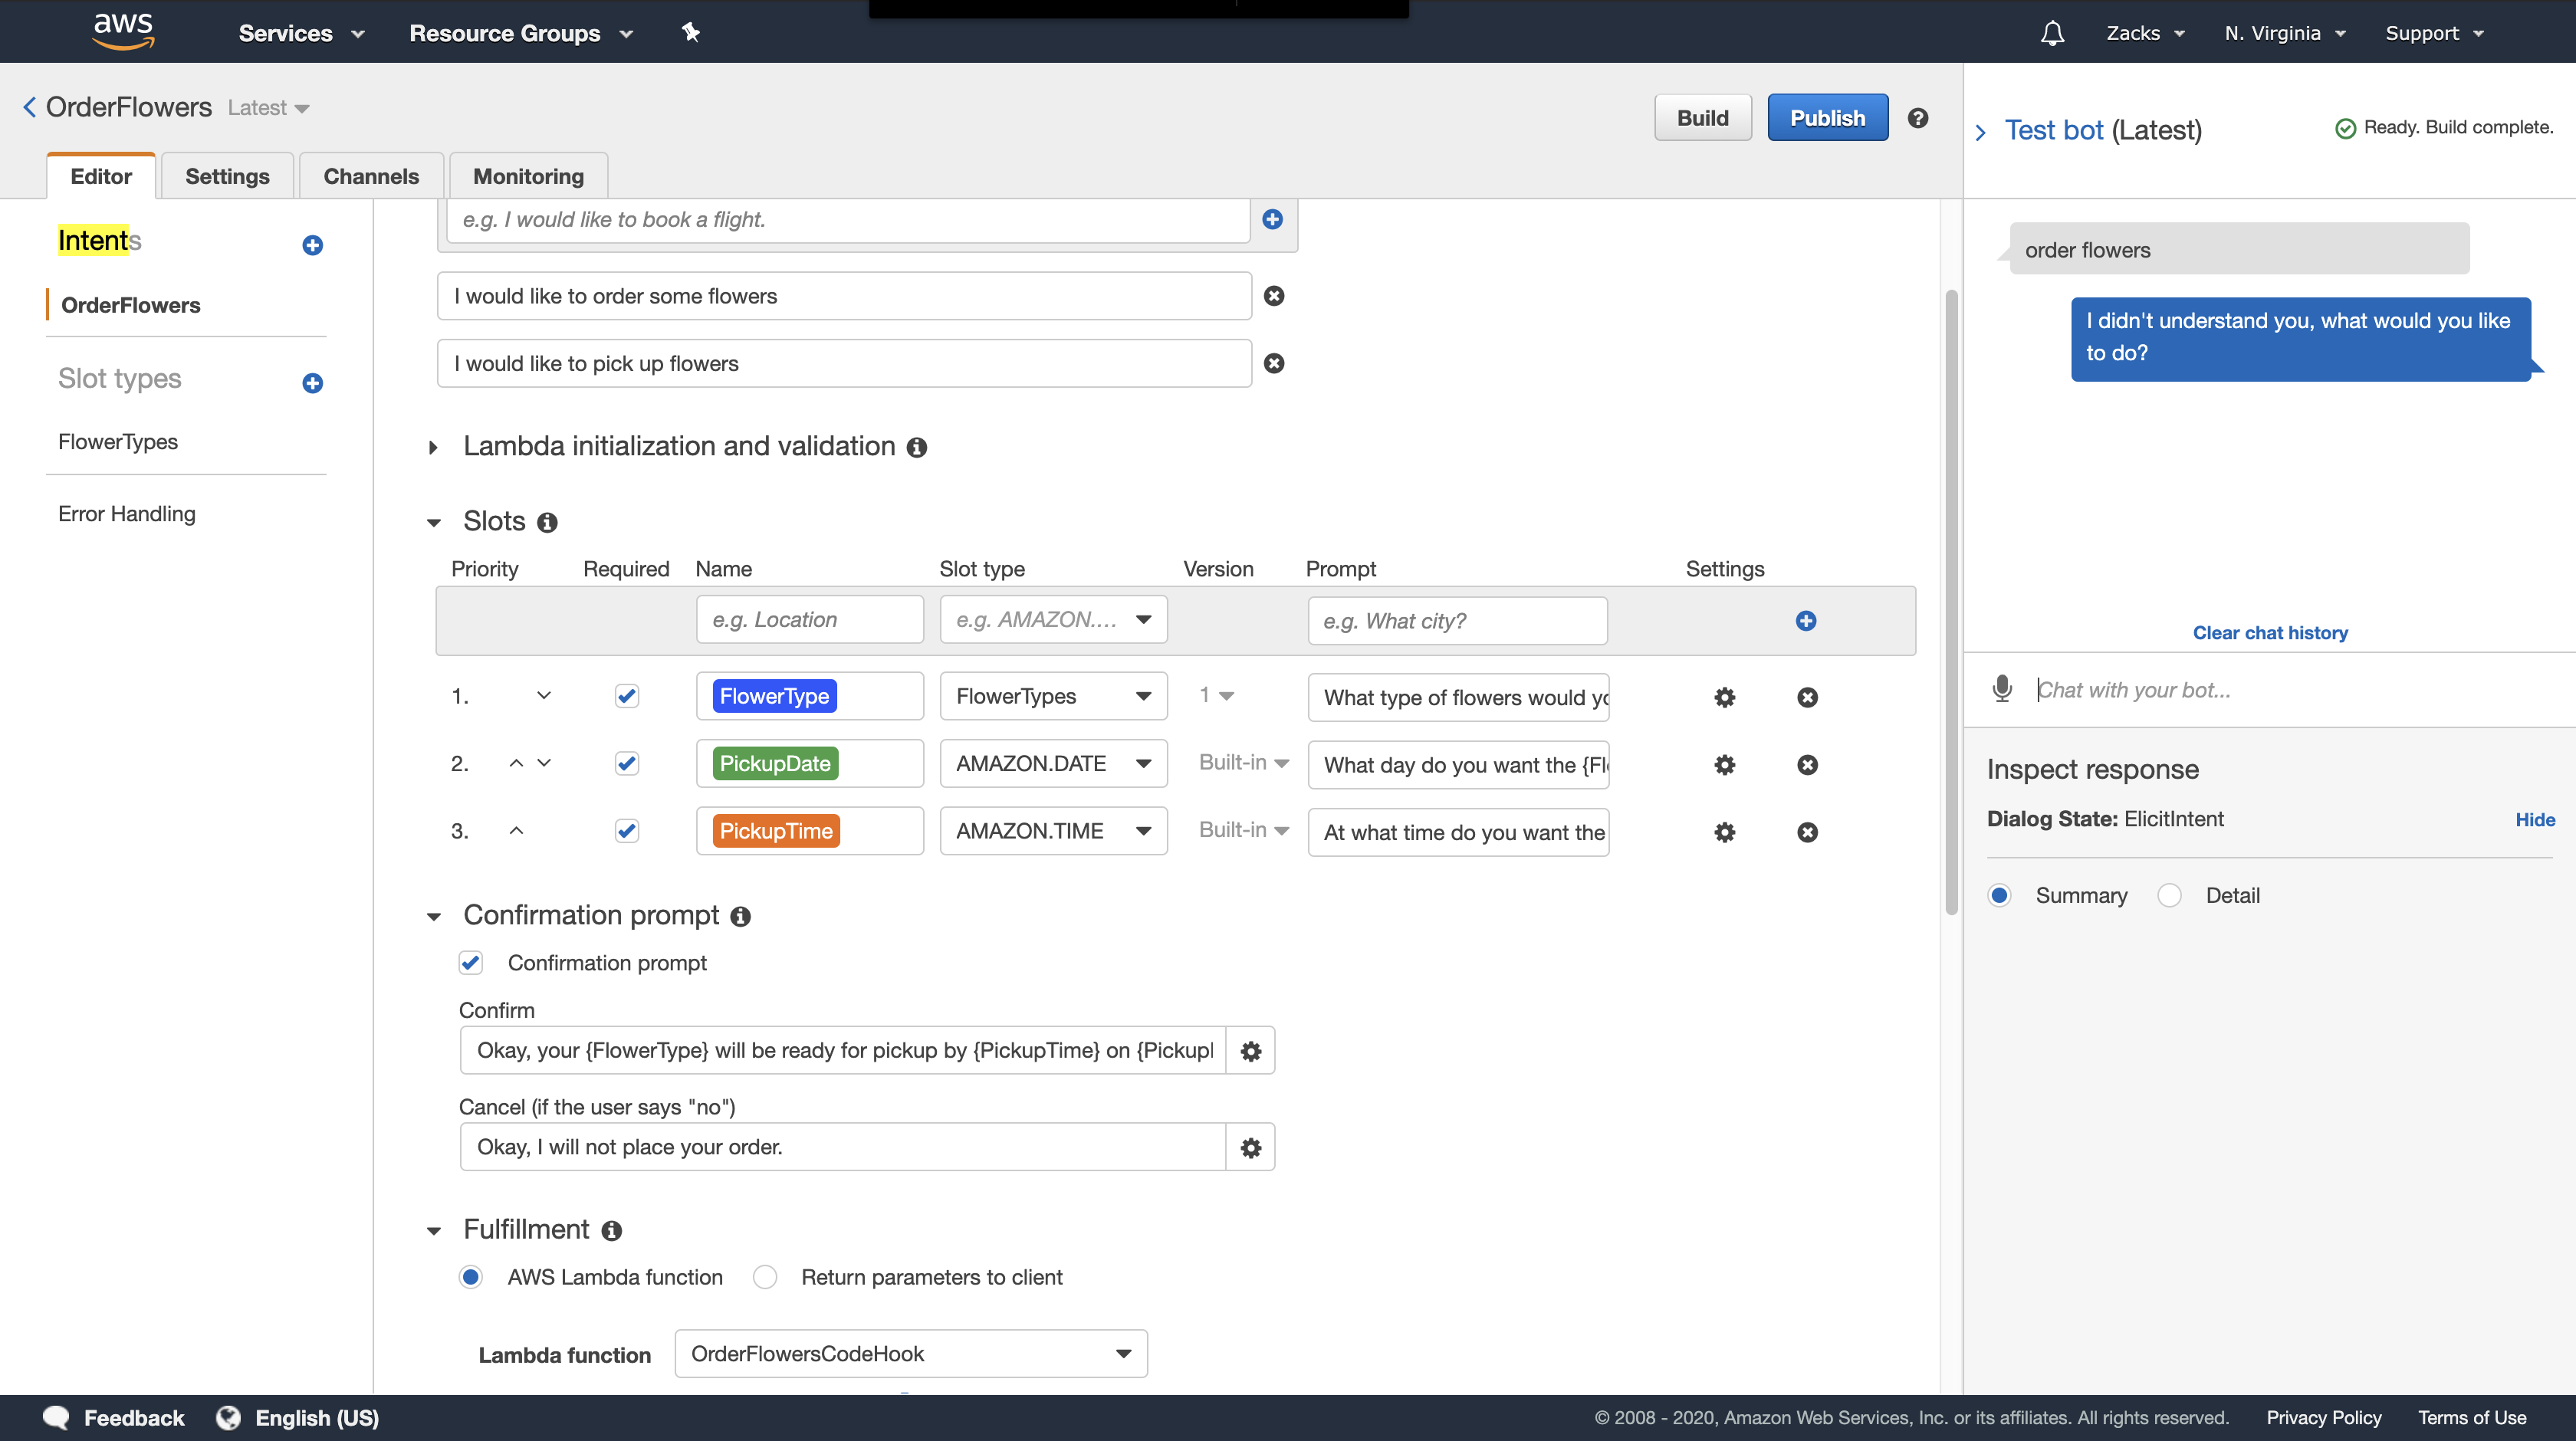
Successful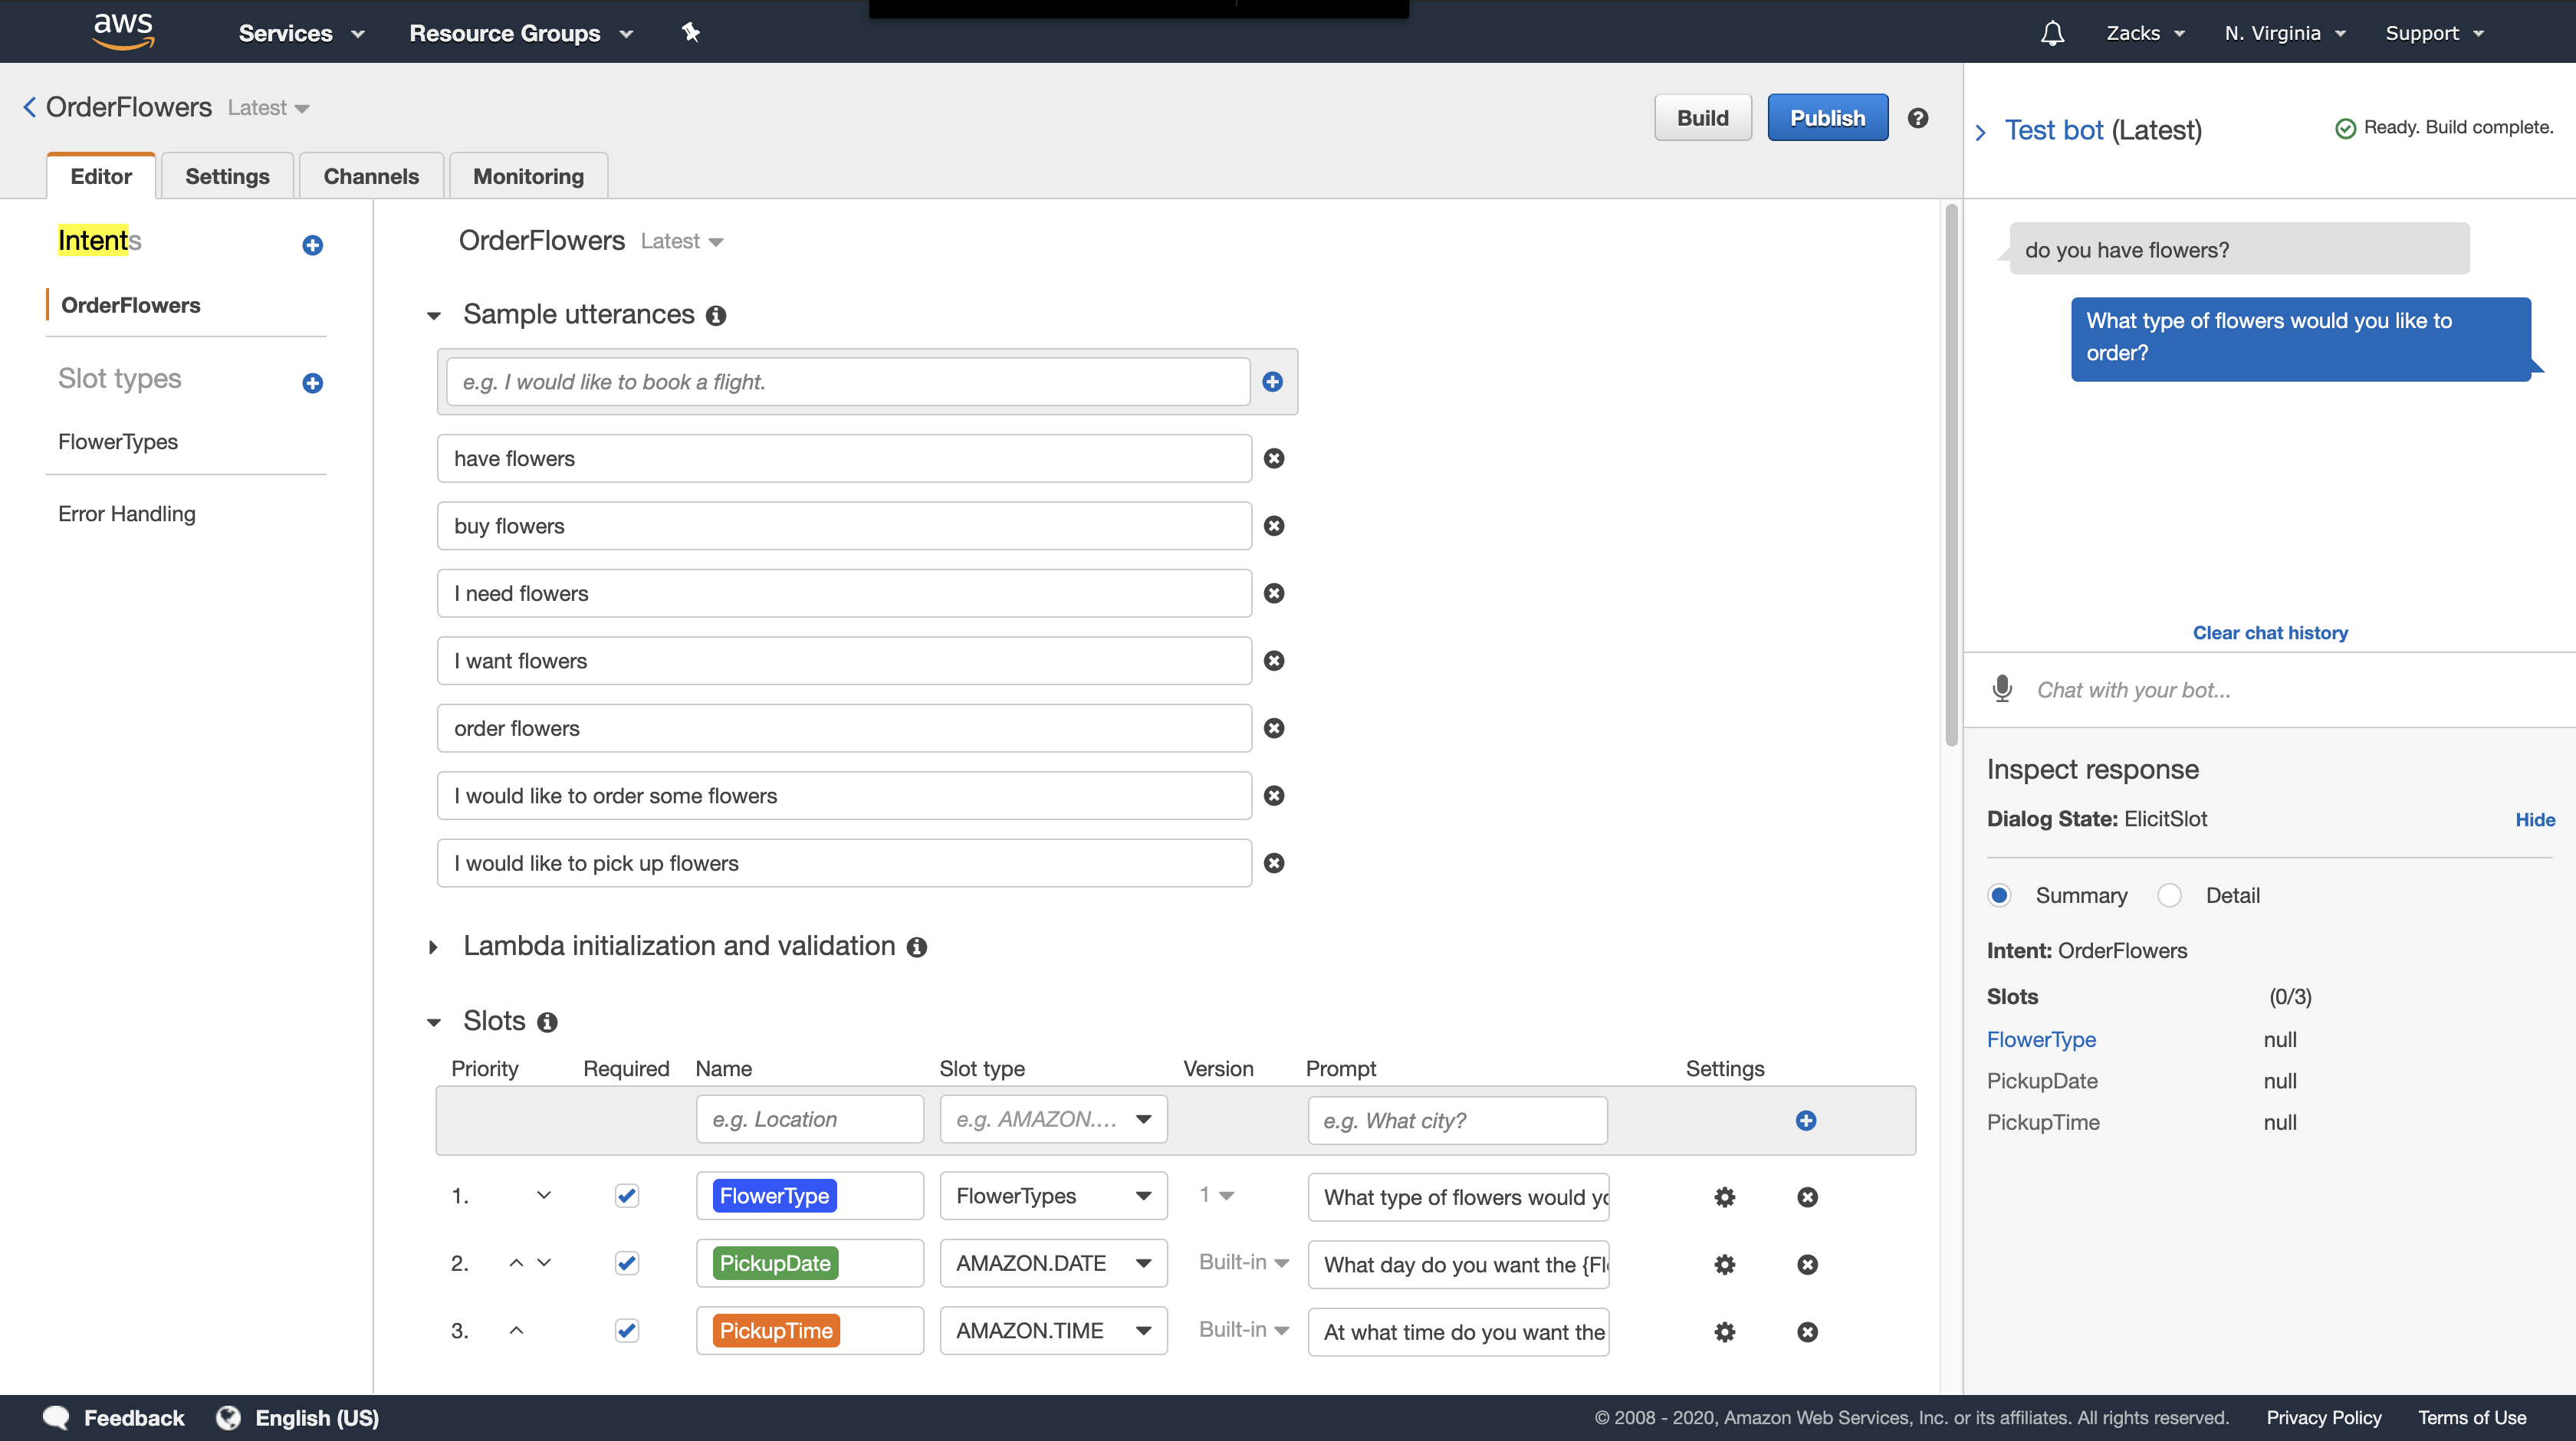
Step 7 (Optional): Clean Up (Console)
https://docs.aws.amazon.com/lex/latest/dg/gs-bp-cleaning-up.html
Exercise 2: Create a Custom Bot
https://docs.aws.amazon.com/lex/latest/dg/gs2-create-bot.html
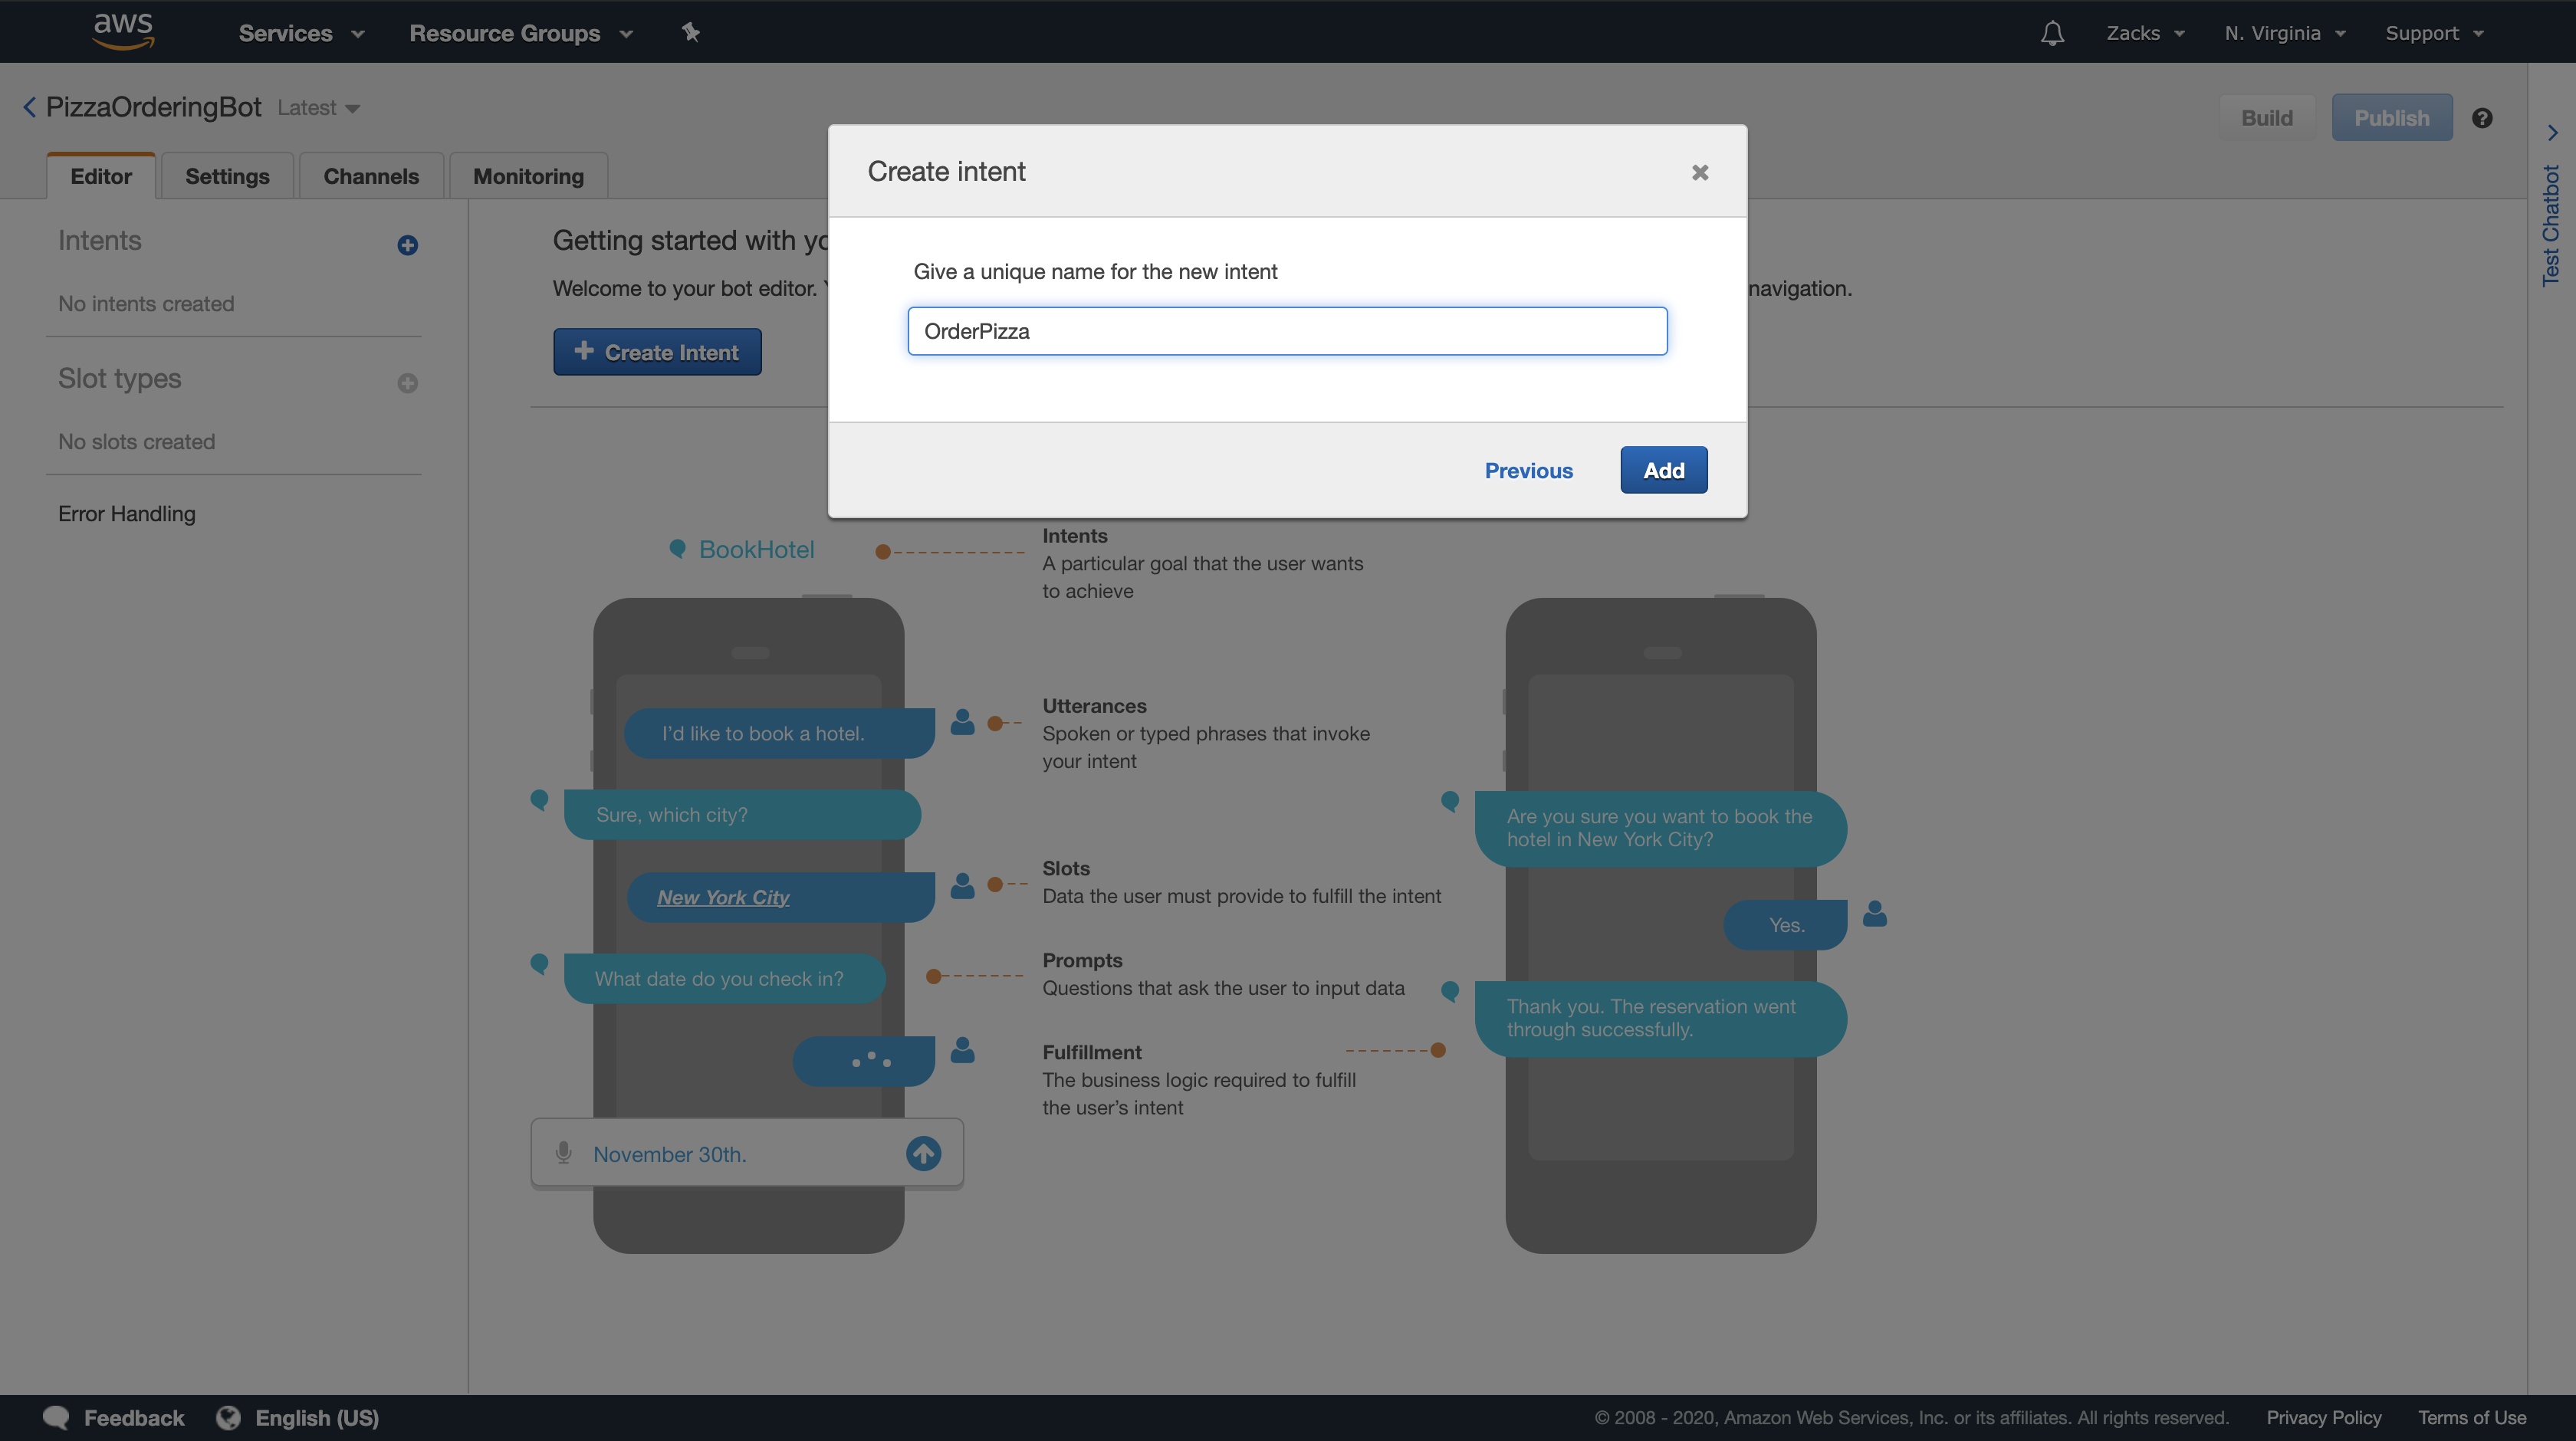
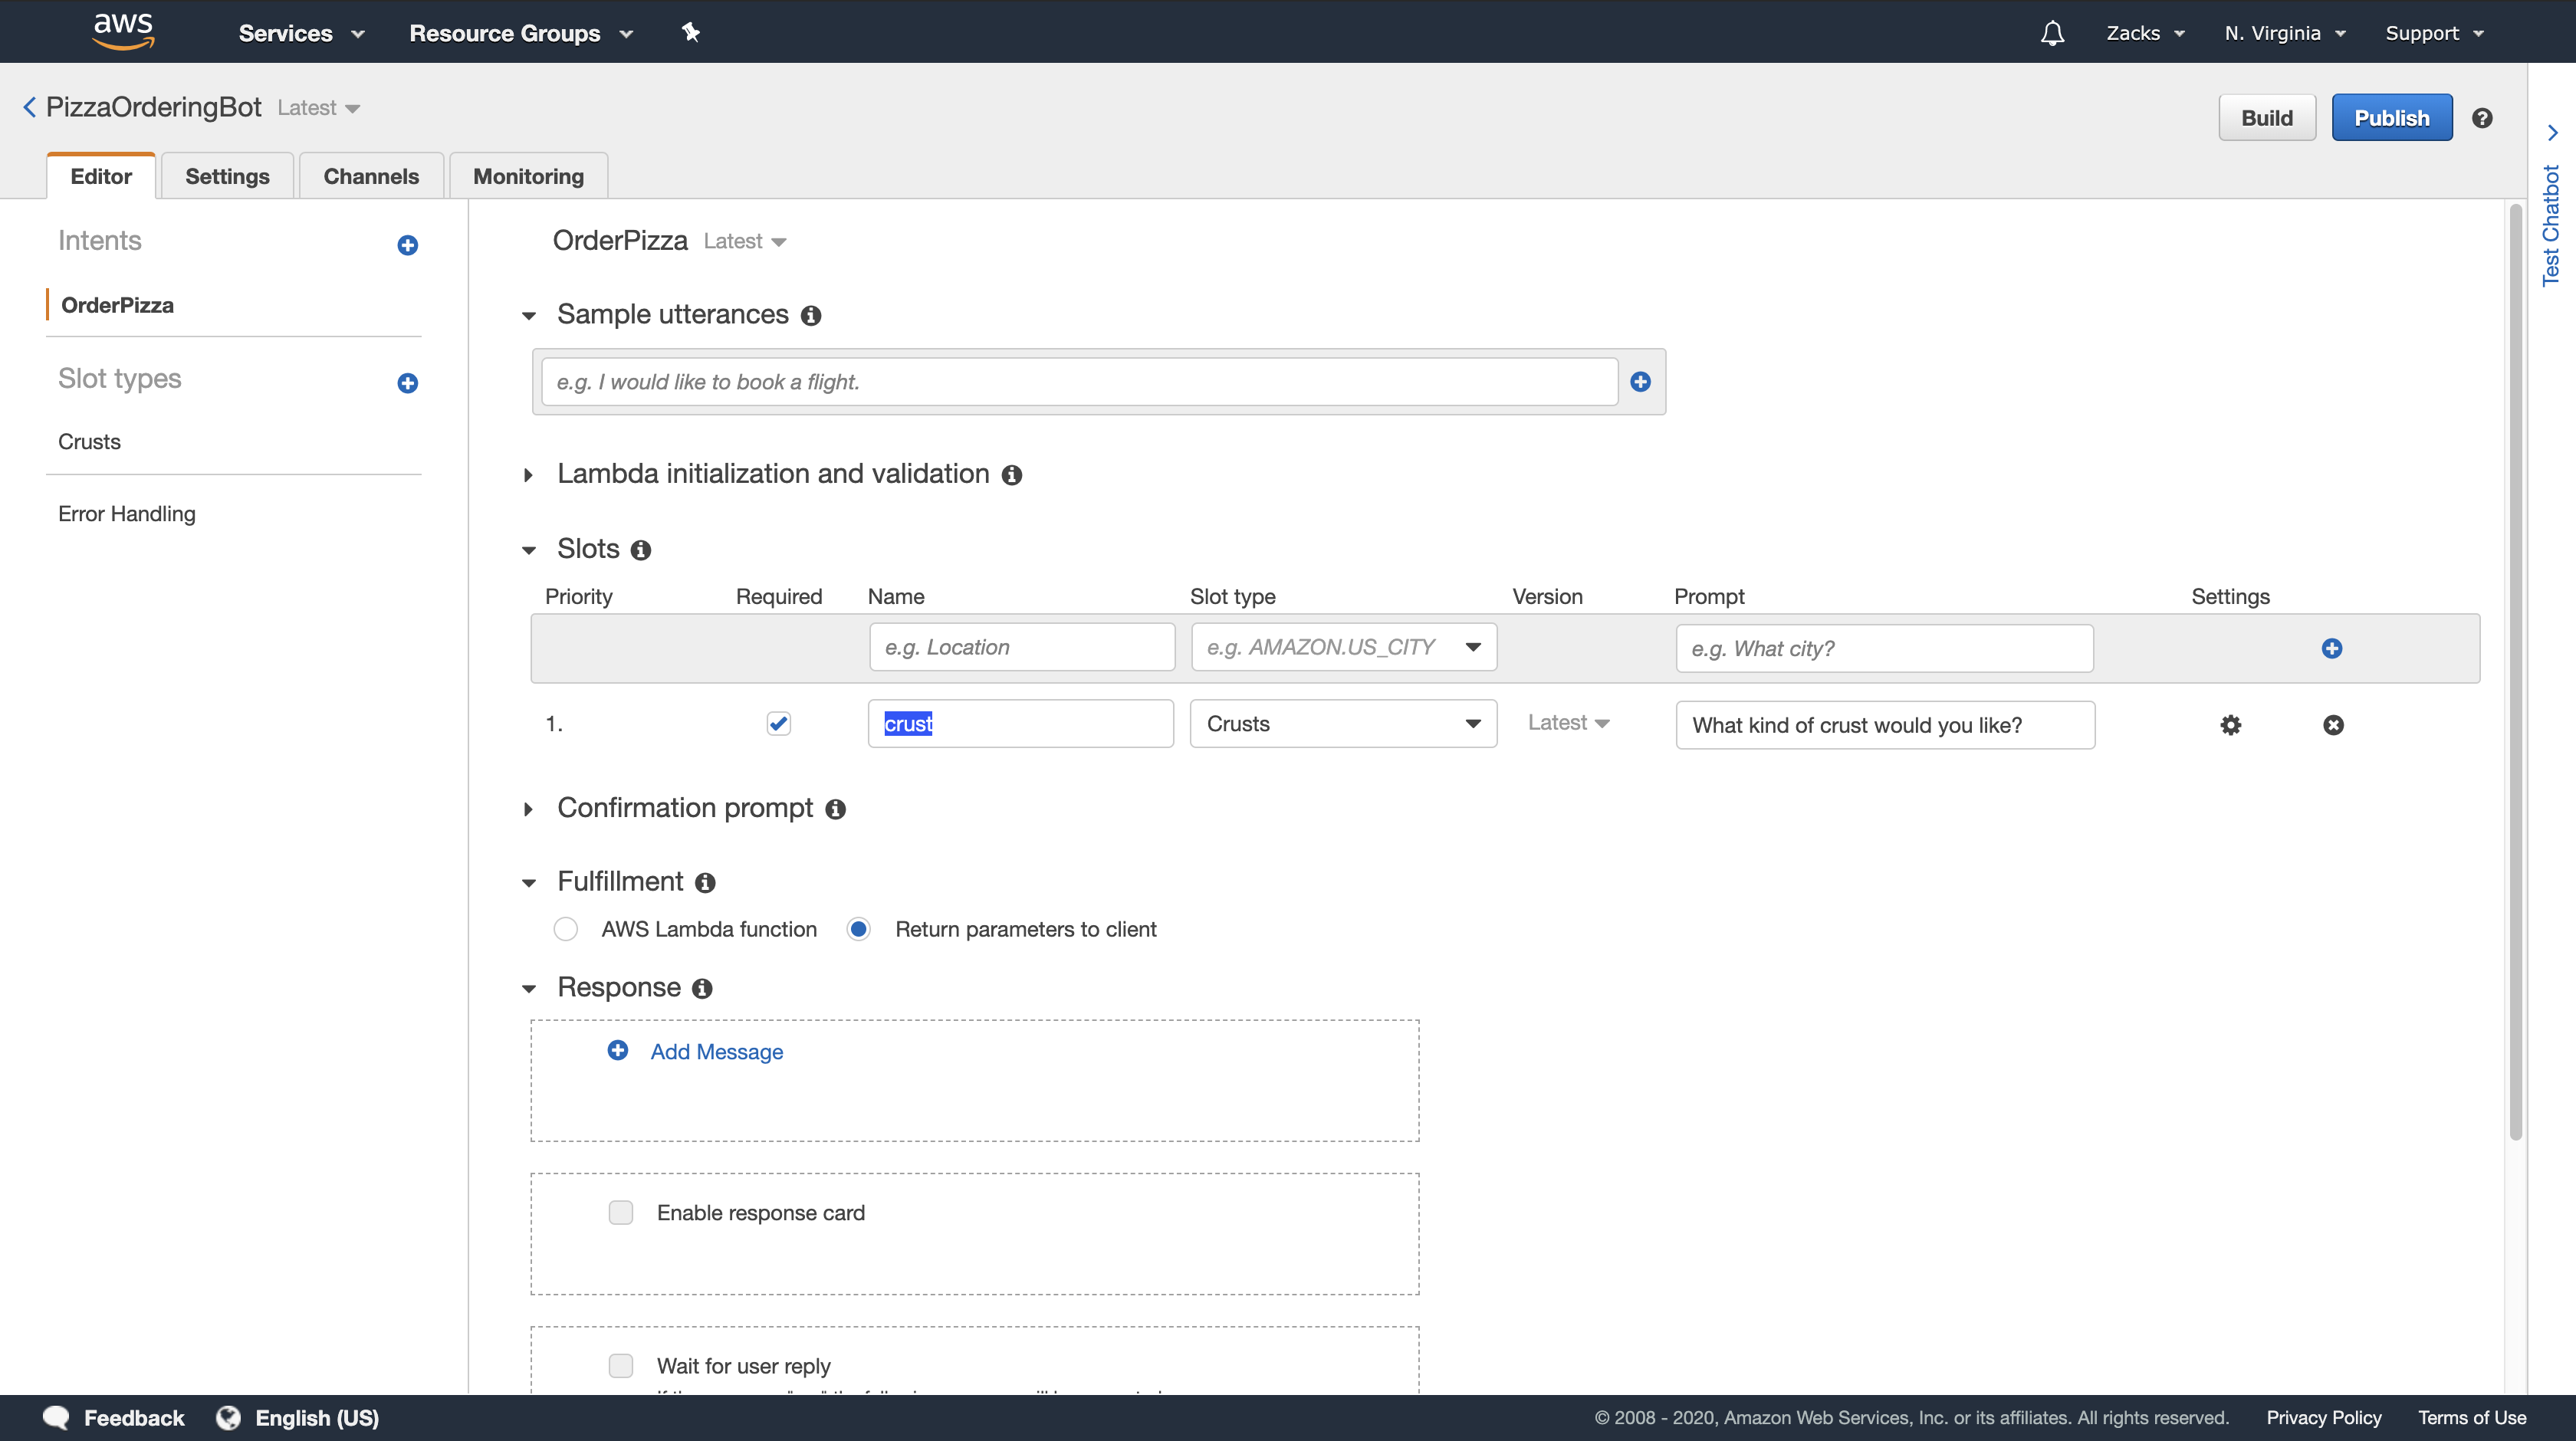
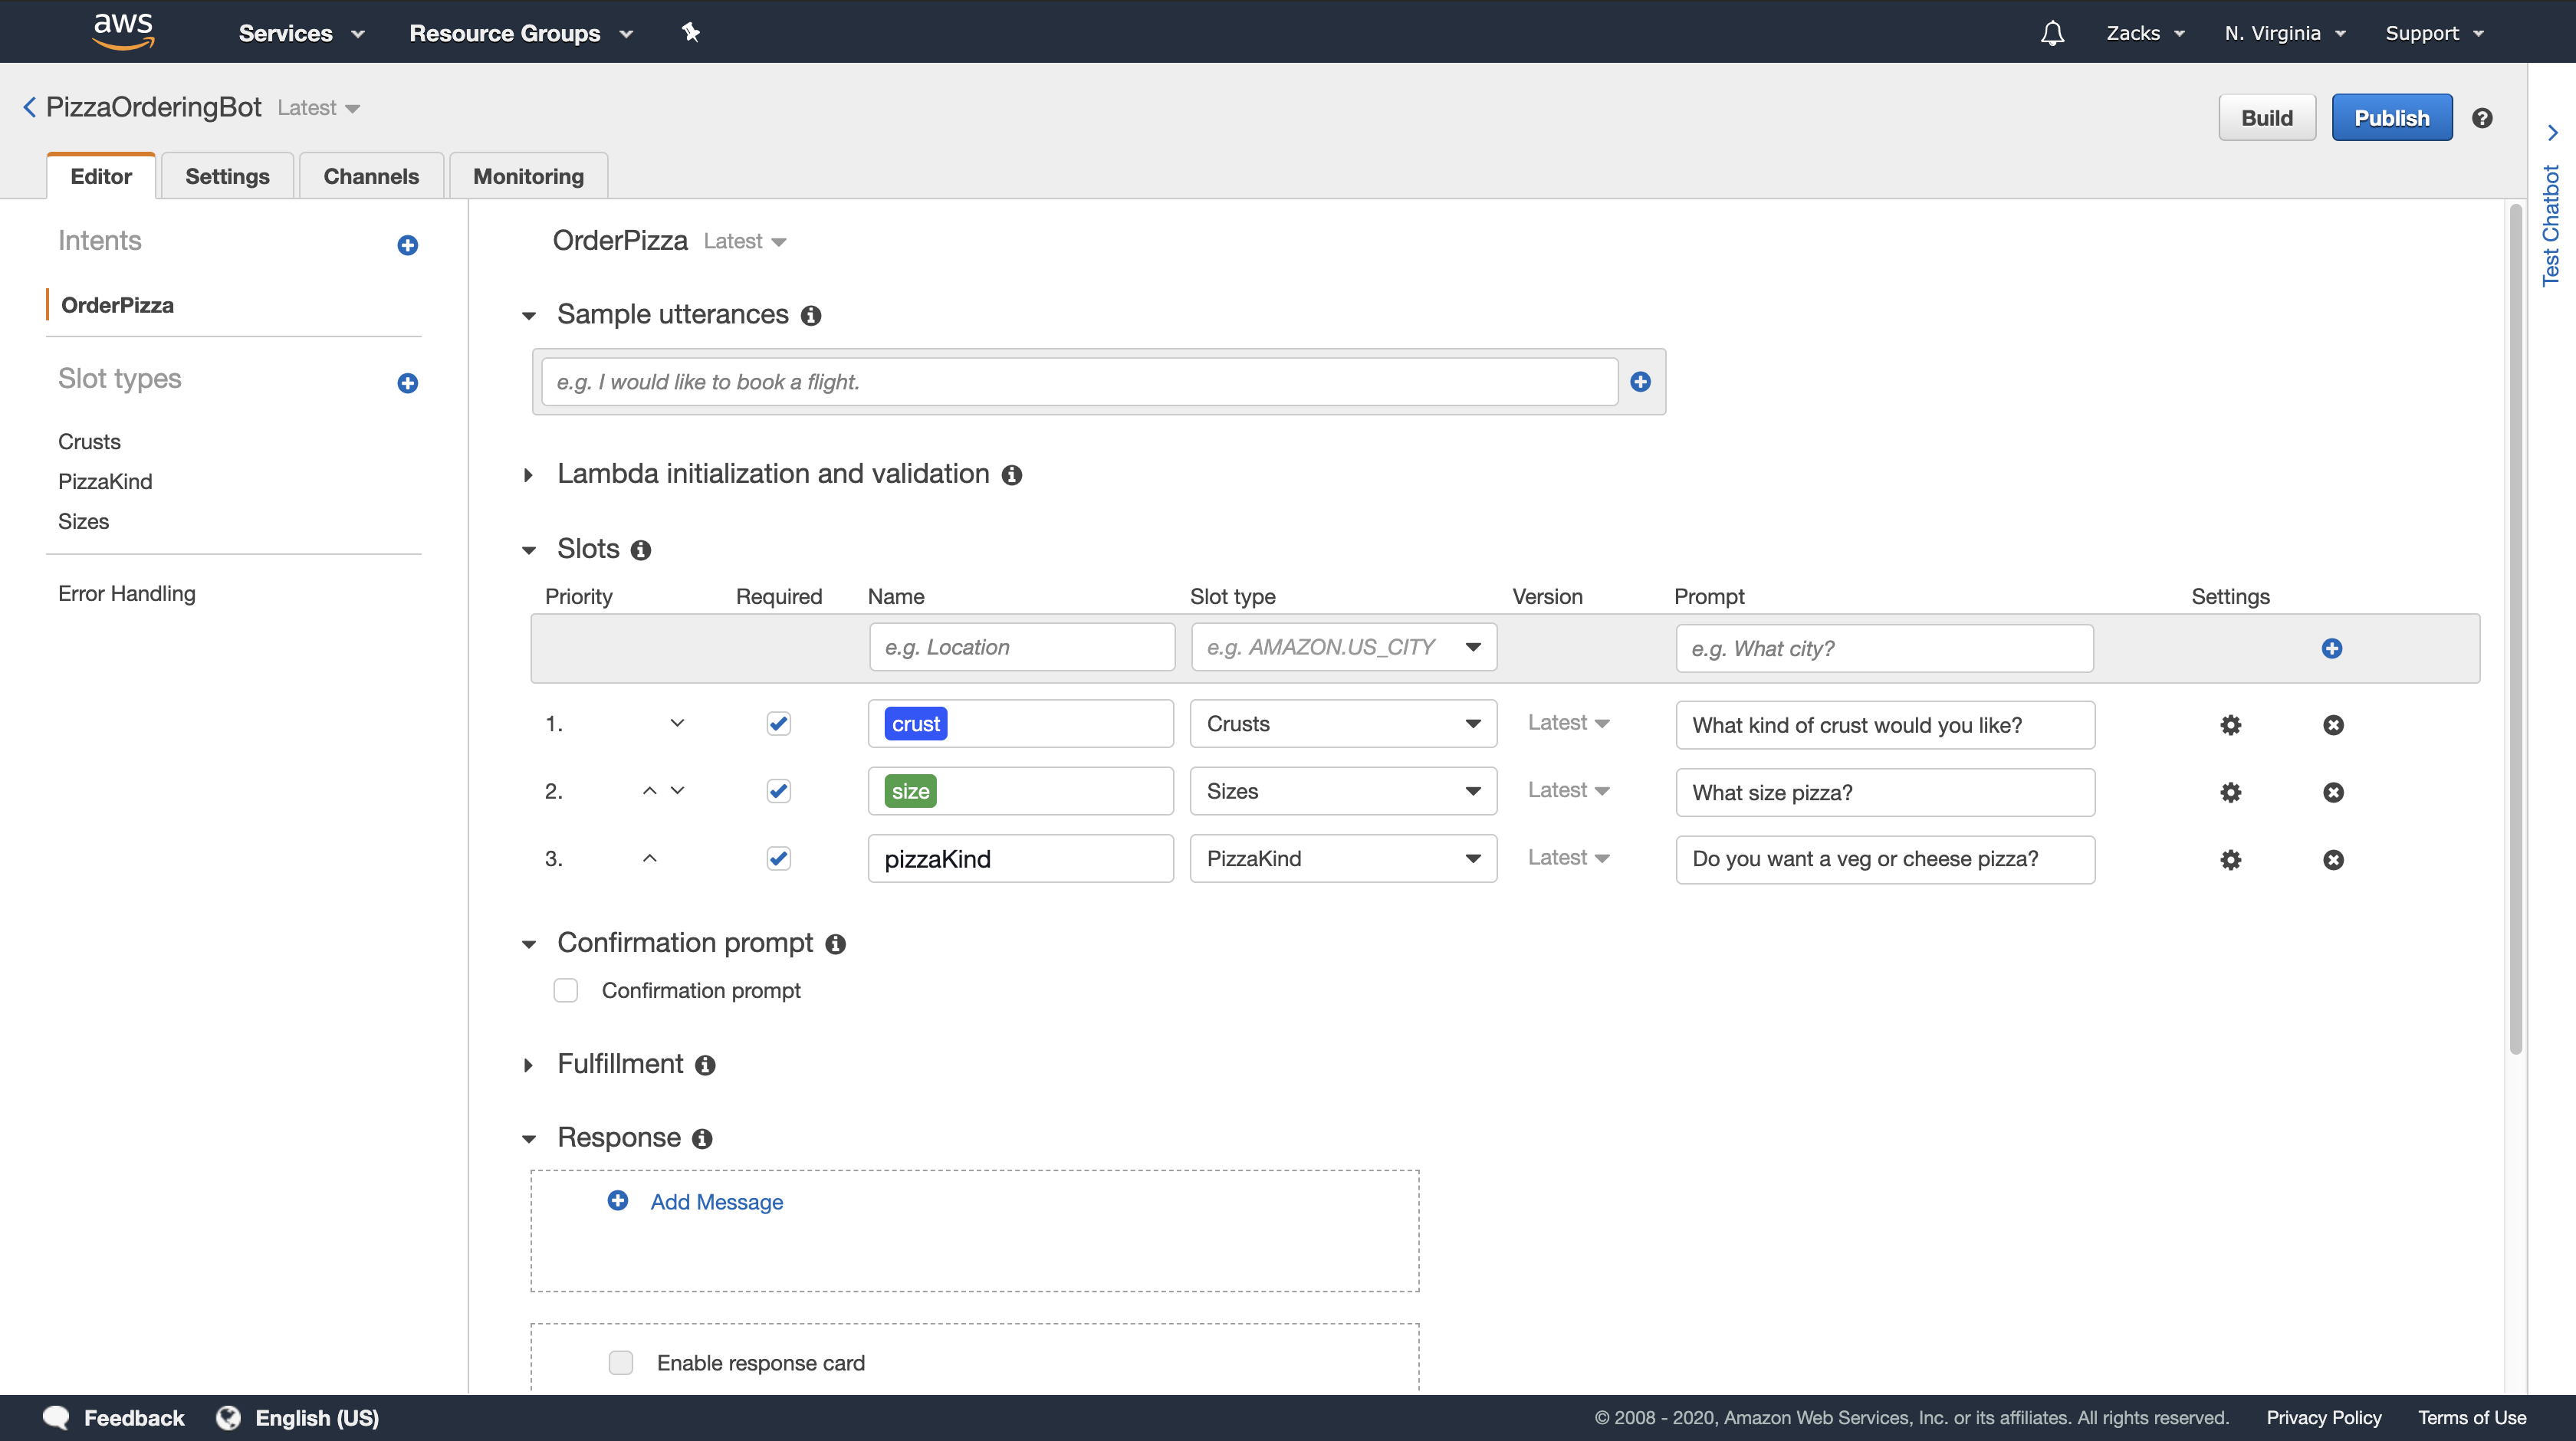
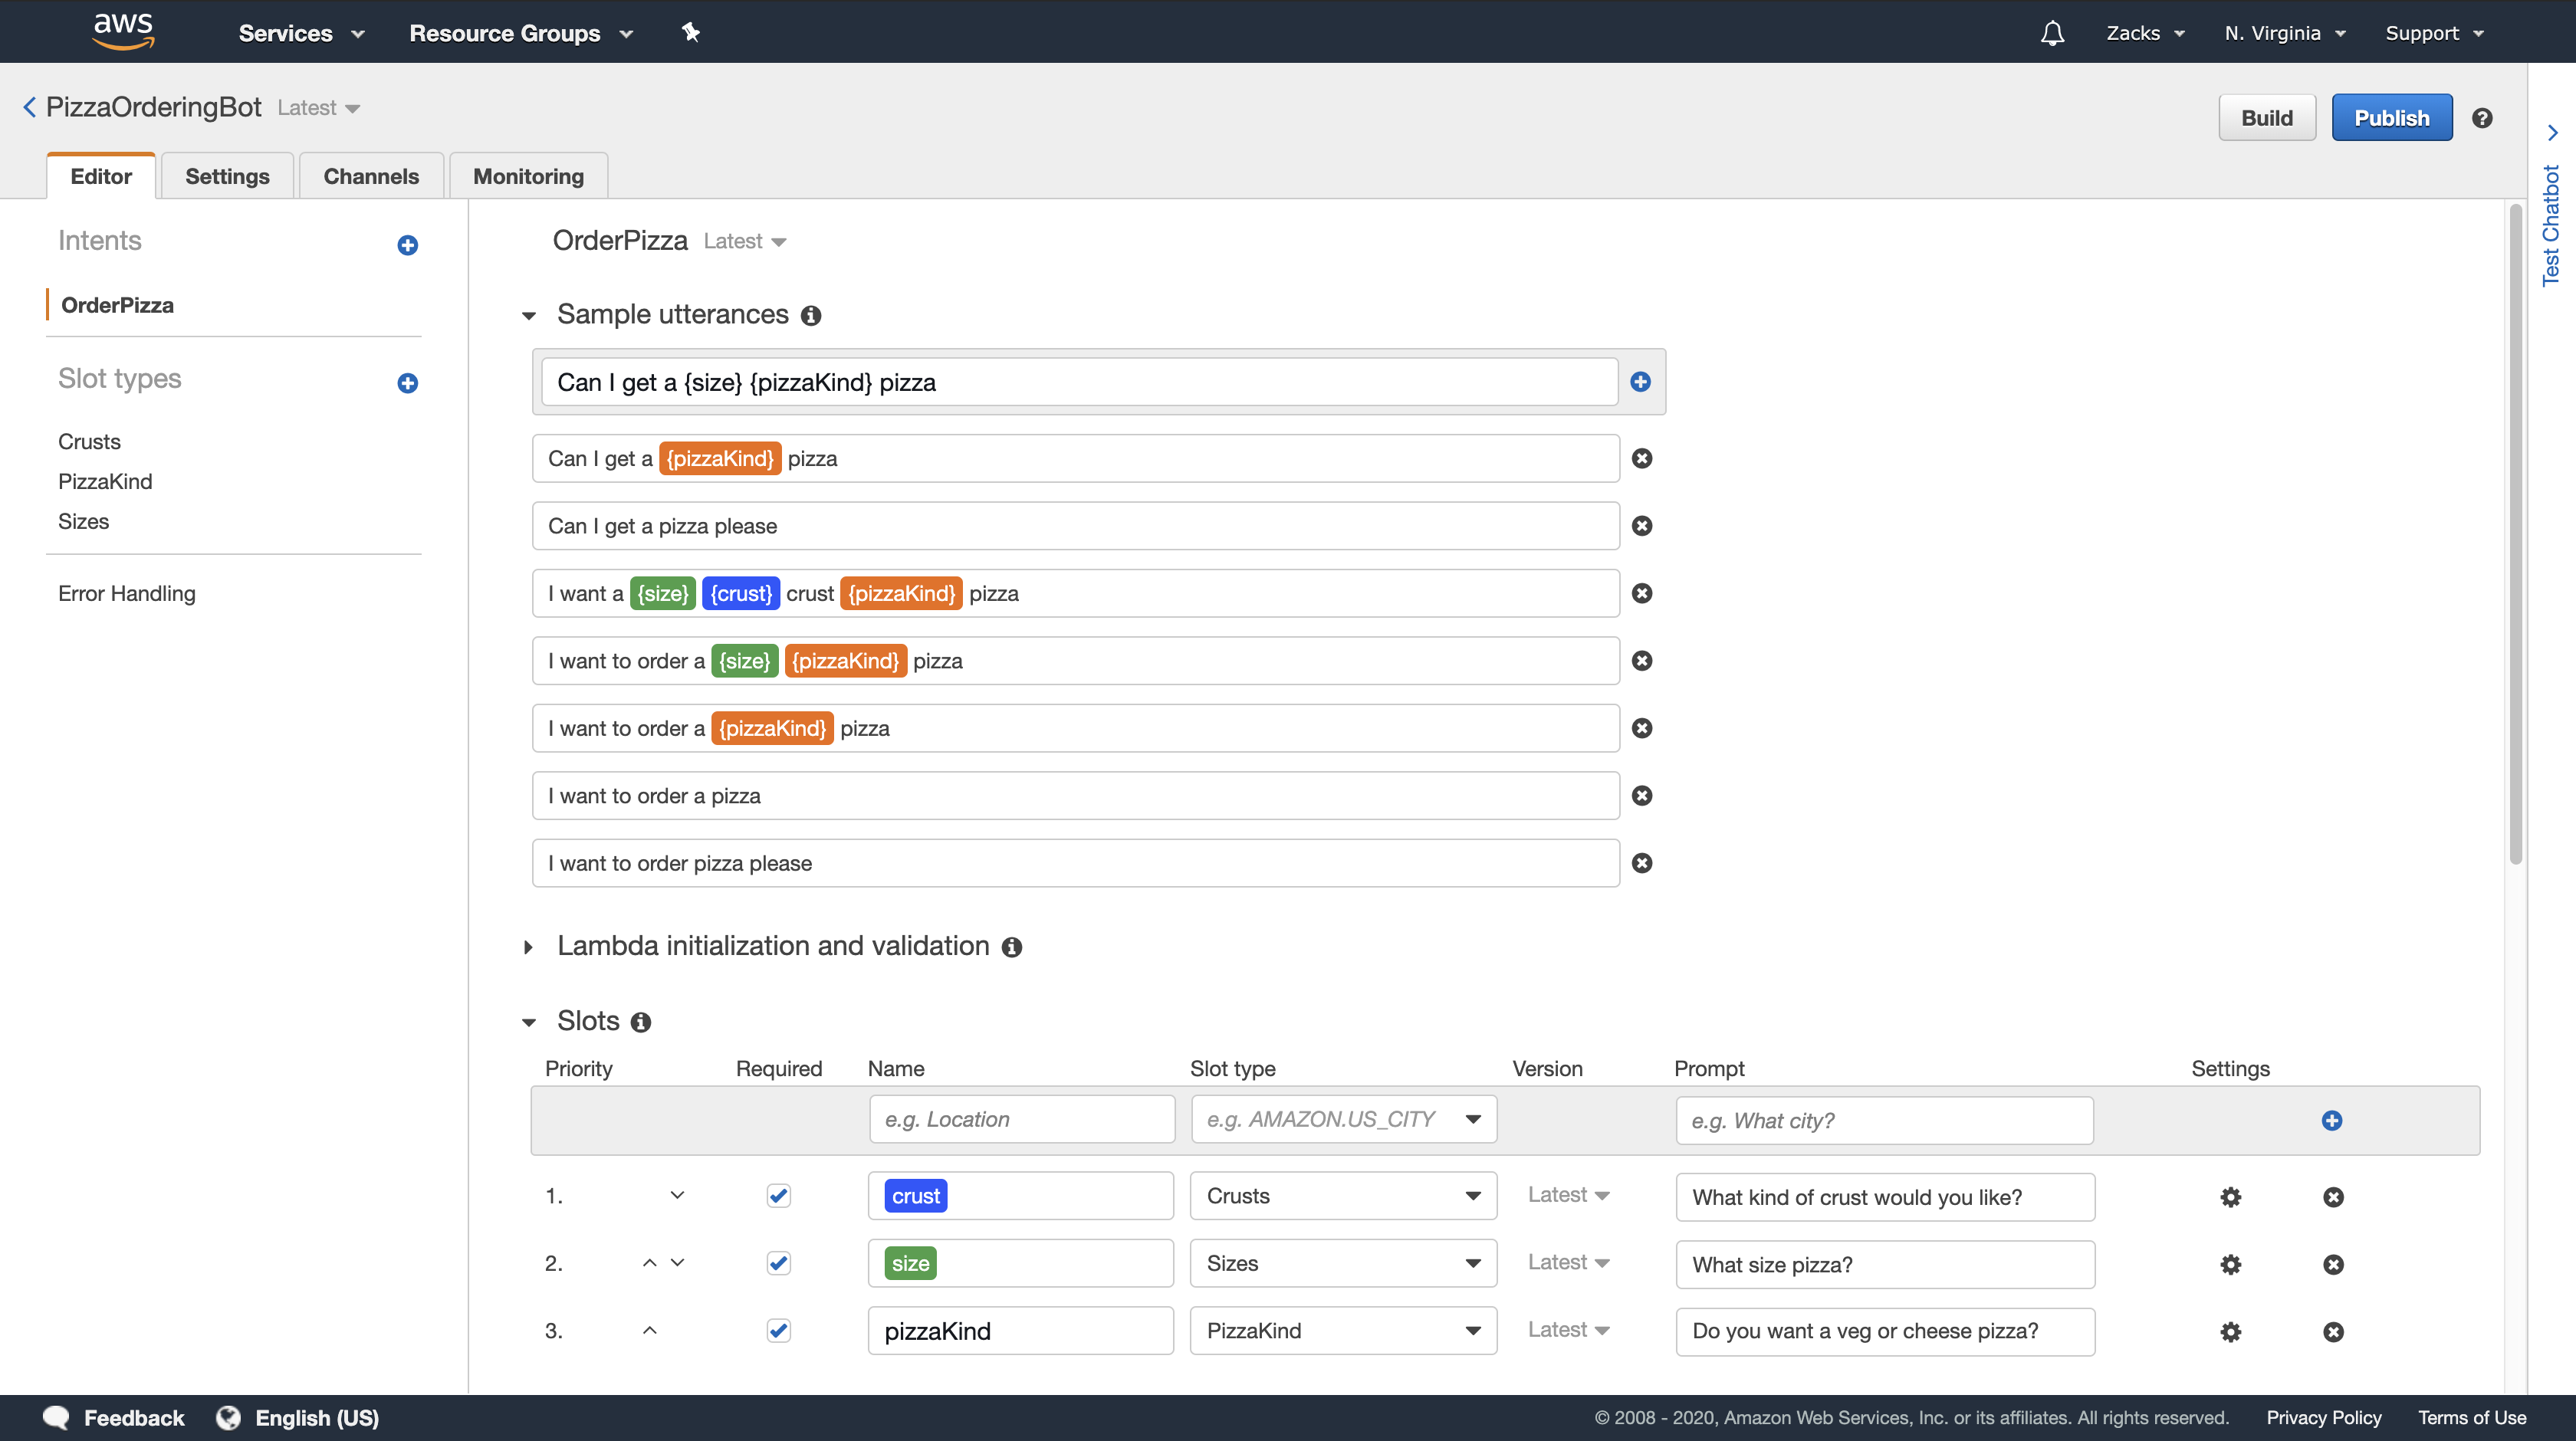
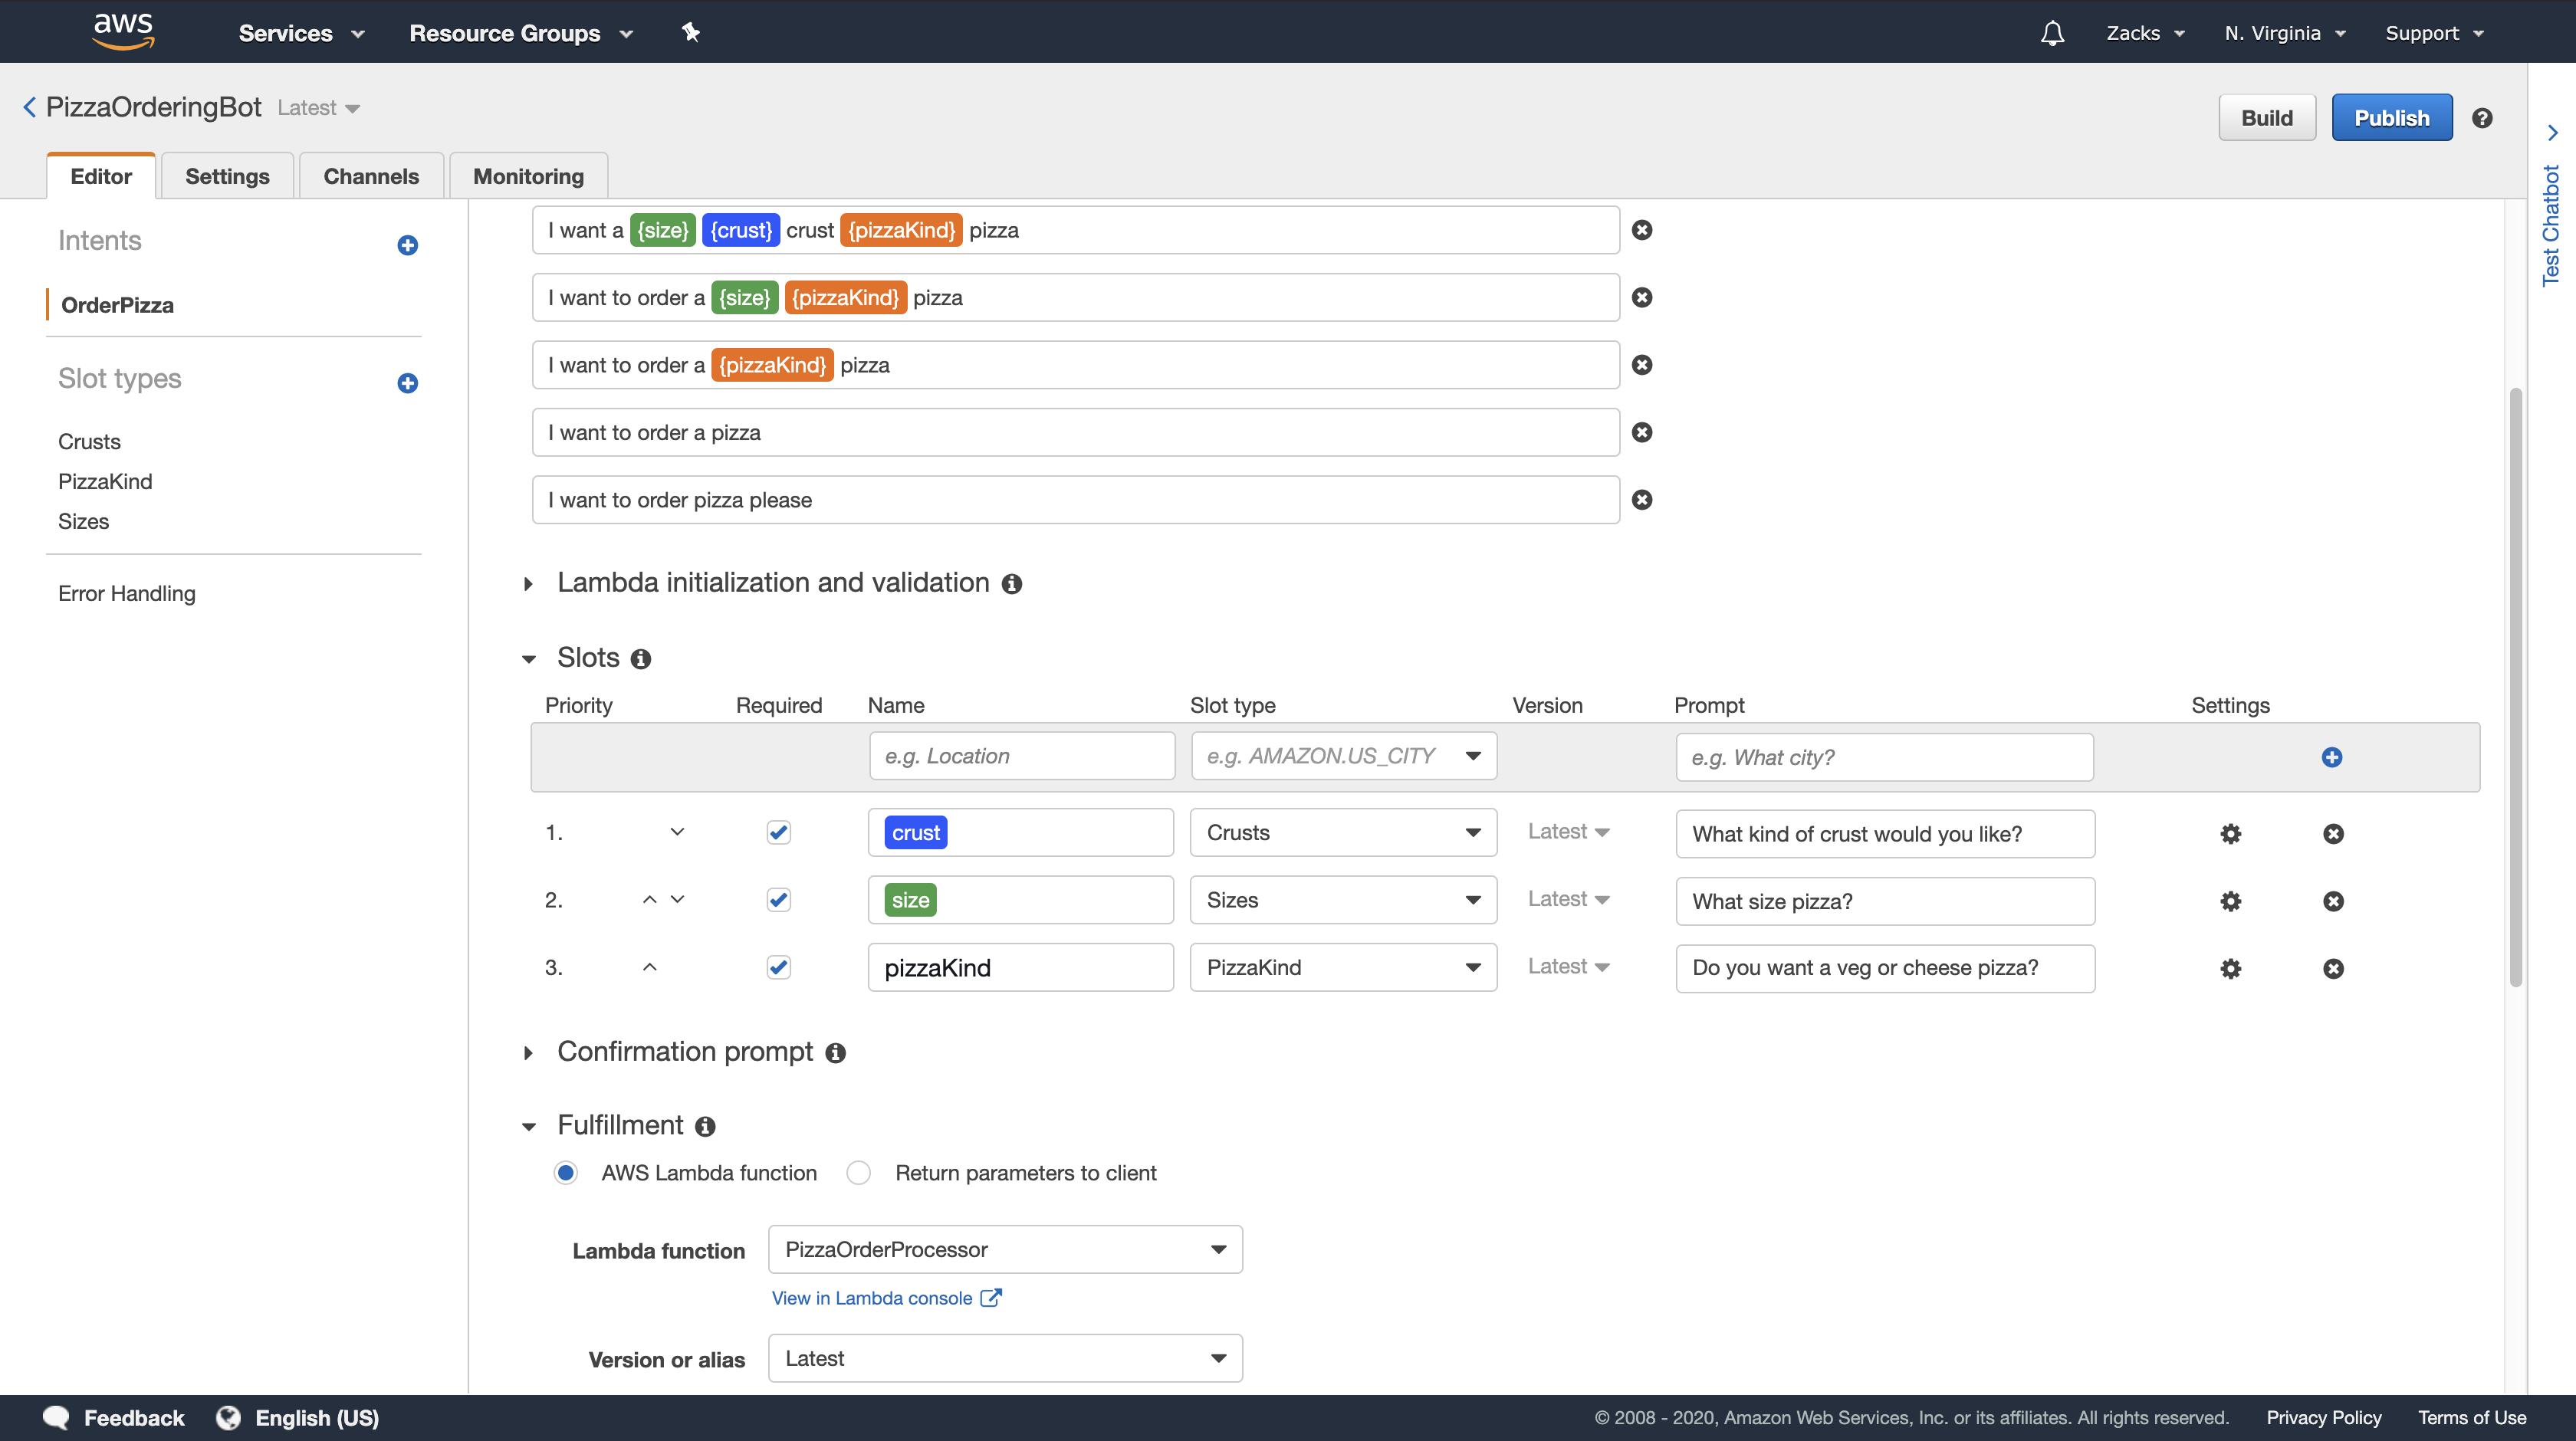
In this step, you create a bot to handle pizza orders.
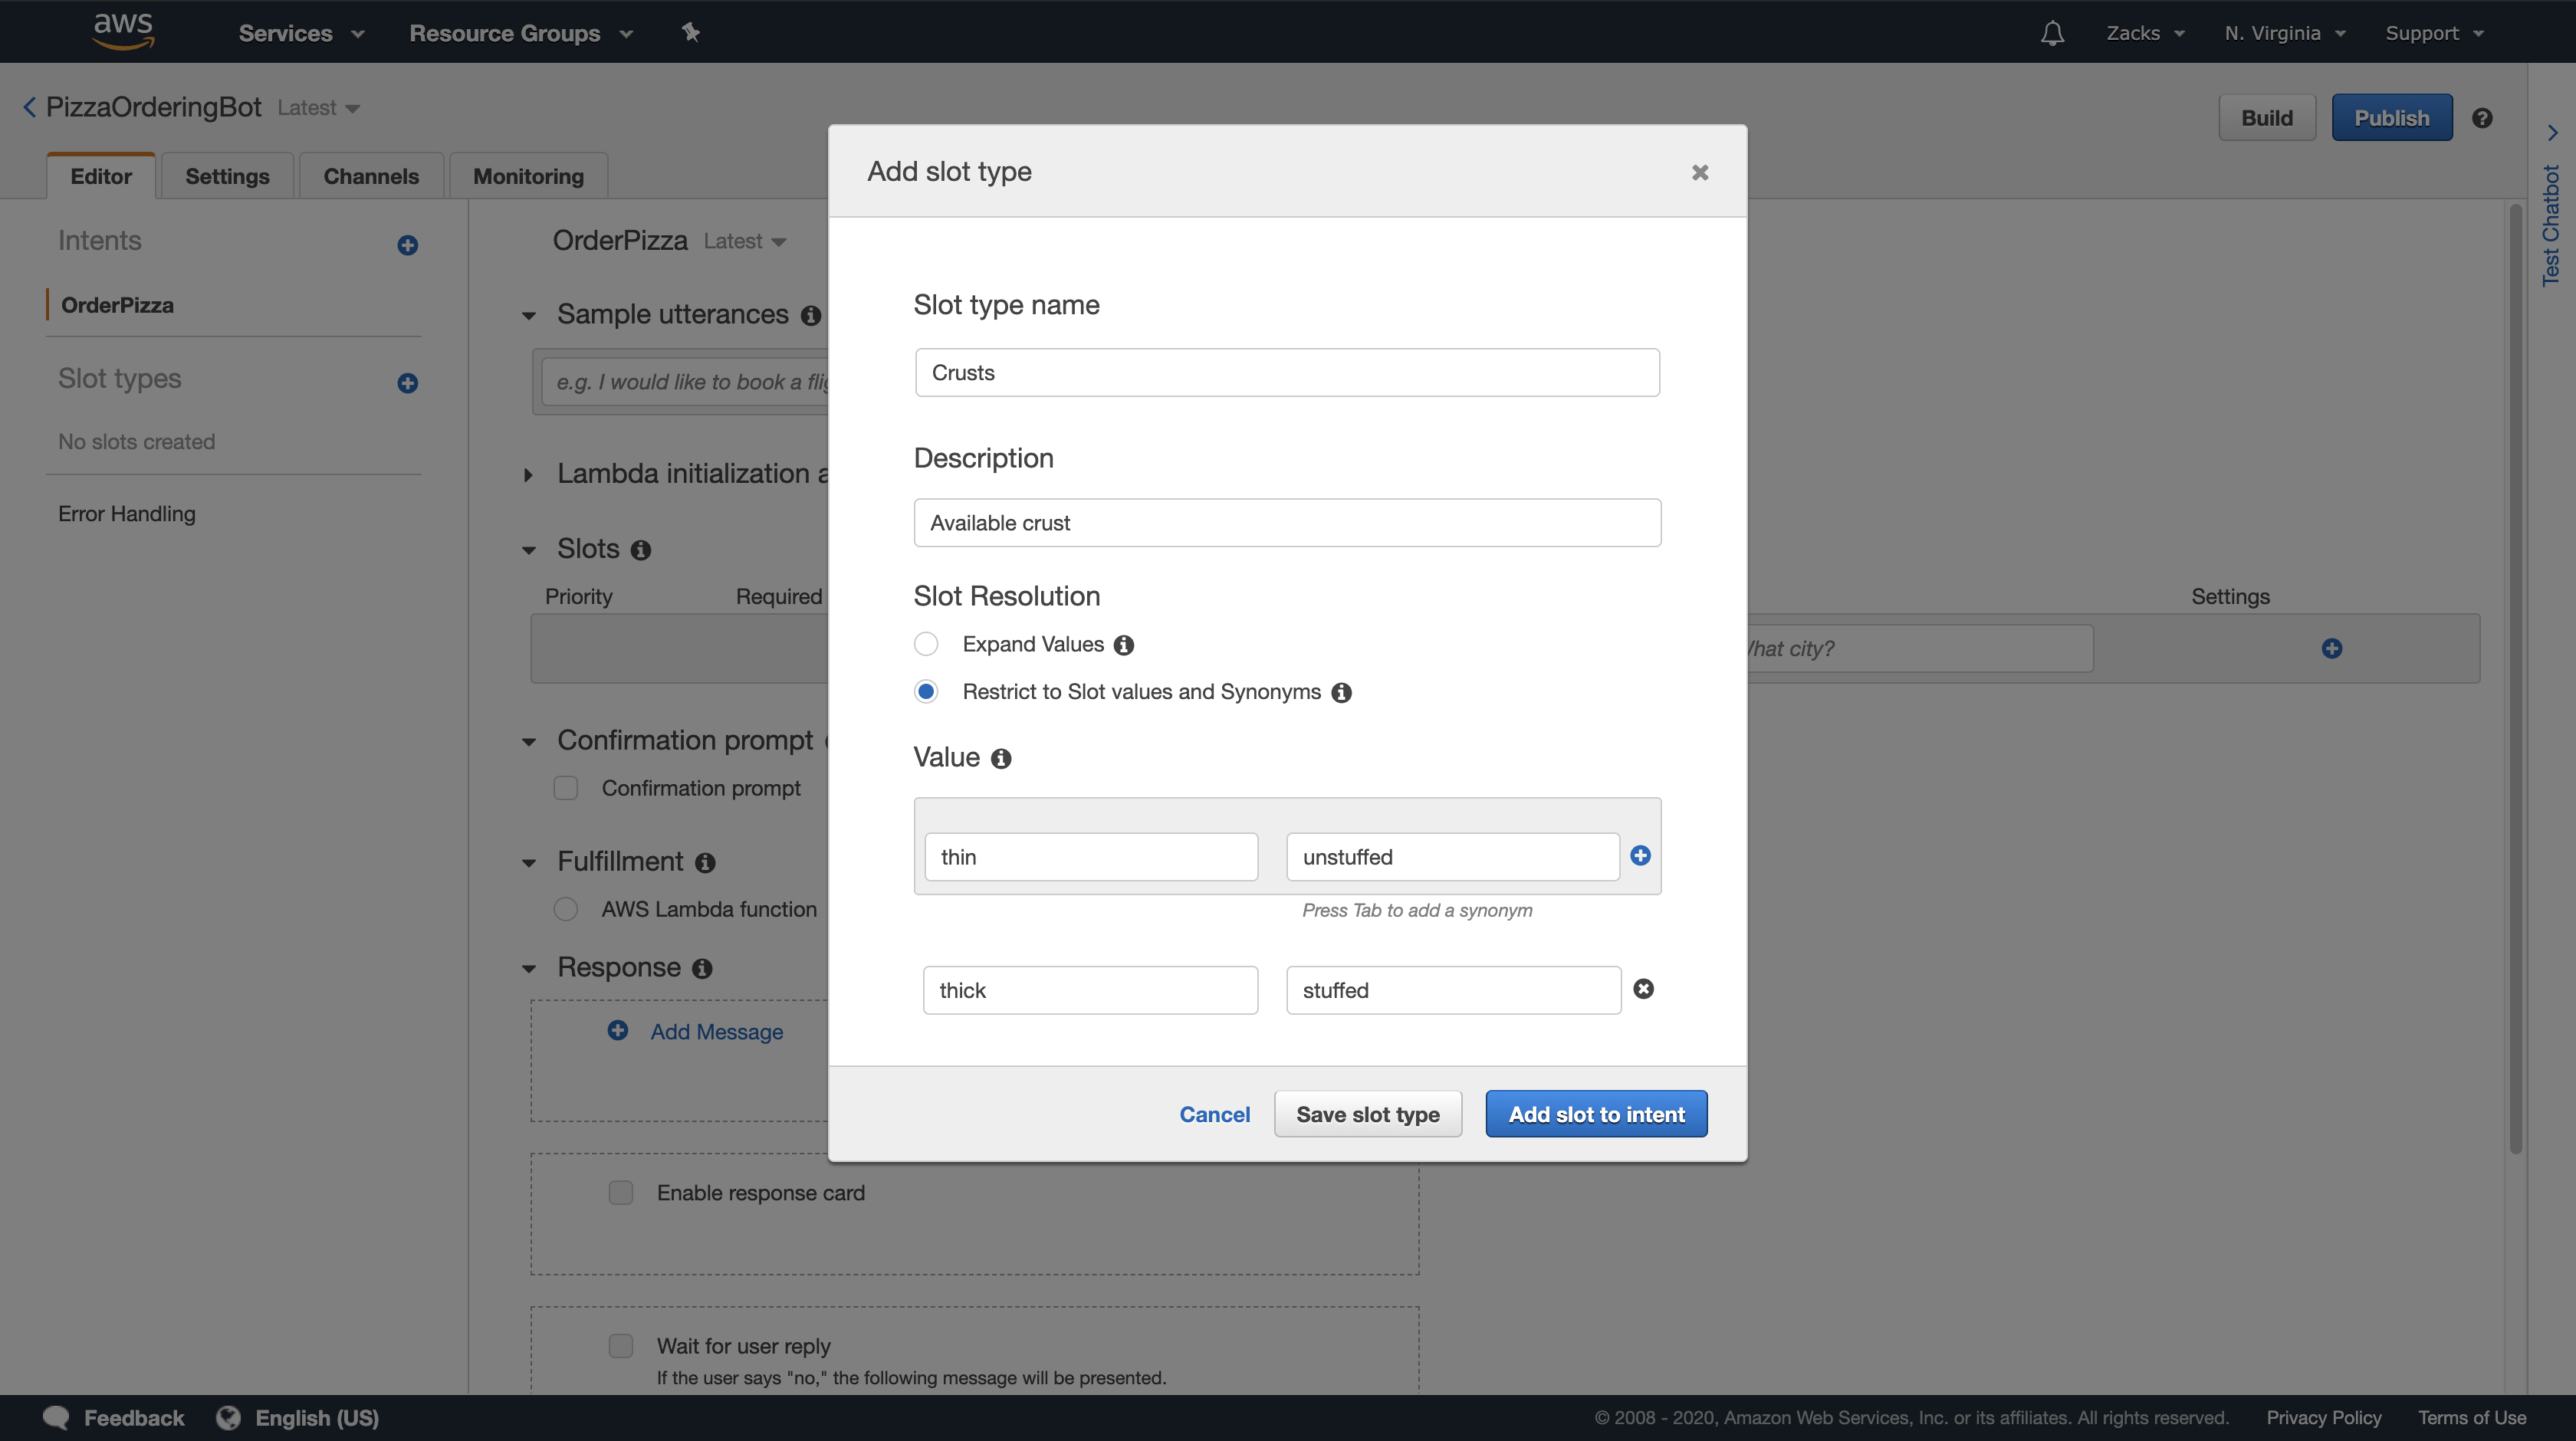
In this exercise, you use the Amazon Lex console to create a custom bot that orders pizza (OrderPizzaBot). You configure the bot by adding a custom intent (OrderPizza), defining custom slot types, and defining the slots required to fulfill a pizza order (pizza crust, size, and so on). For more information about slot types and slots, see Amazon Lex: How It Works.
Topics
- Step 1: Create a Lambda Function
- Step 2: Create a Bot
- Step 3: Build and Test the Bot
- Step 4 (Optional): Clean up
Step 1: Create a Lambda Function
Step 2: Create a Bot
https://docs.aws.amazon.com/lex/latest/dg/gs2-create-bot-create.html
Topics
- Create the Bot
- Create an Intent
- Create Slot Types
- Configure the Intent
- Configure the Bot
Create the Bot
https://docs.aws.amazon.com/lex/latest/dg/gs2-create-bot-create.html

Create an Intent
https://docs.aws.amazon.com/lex/latest/dg/gs2-create-bot-intent.html
Create Slot Types
https://docs.aws.amazon.com/lex/latest/dg/gs2-create-bot-slot-types.html
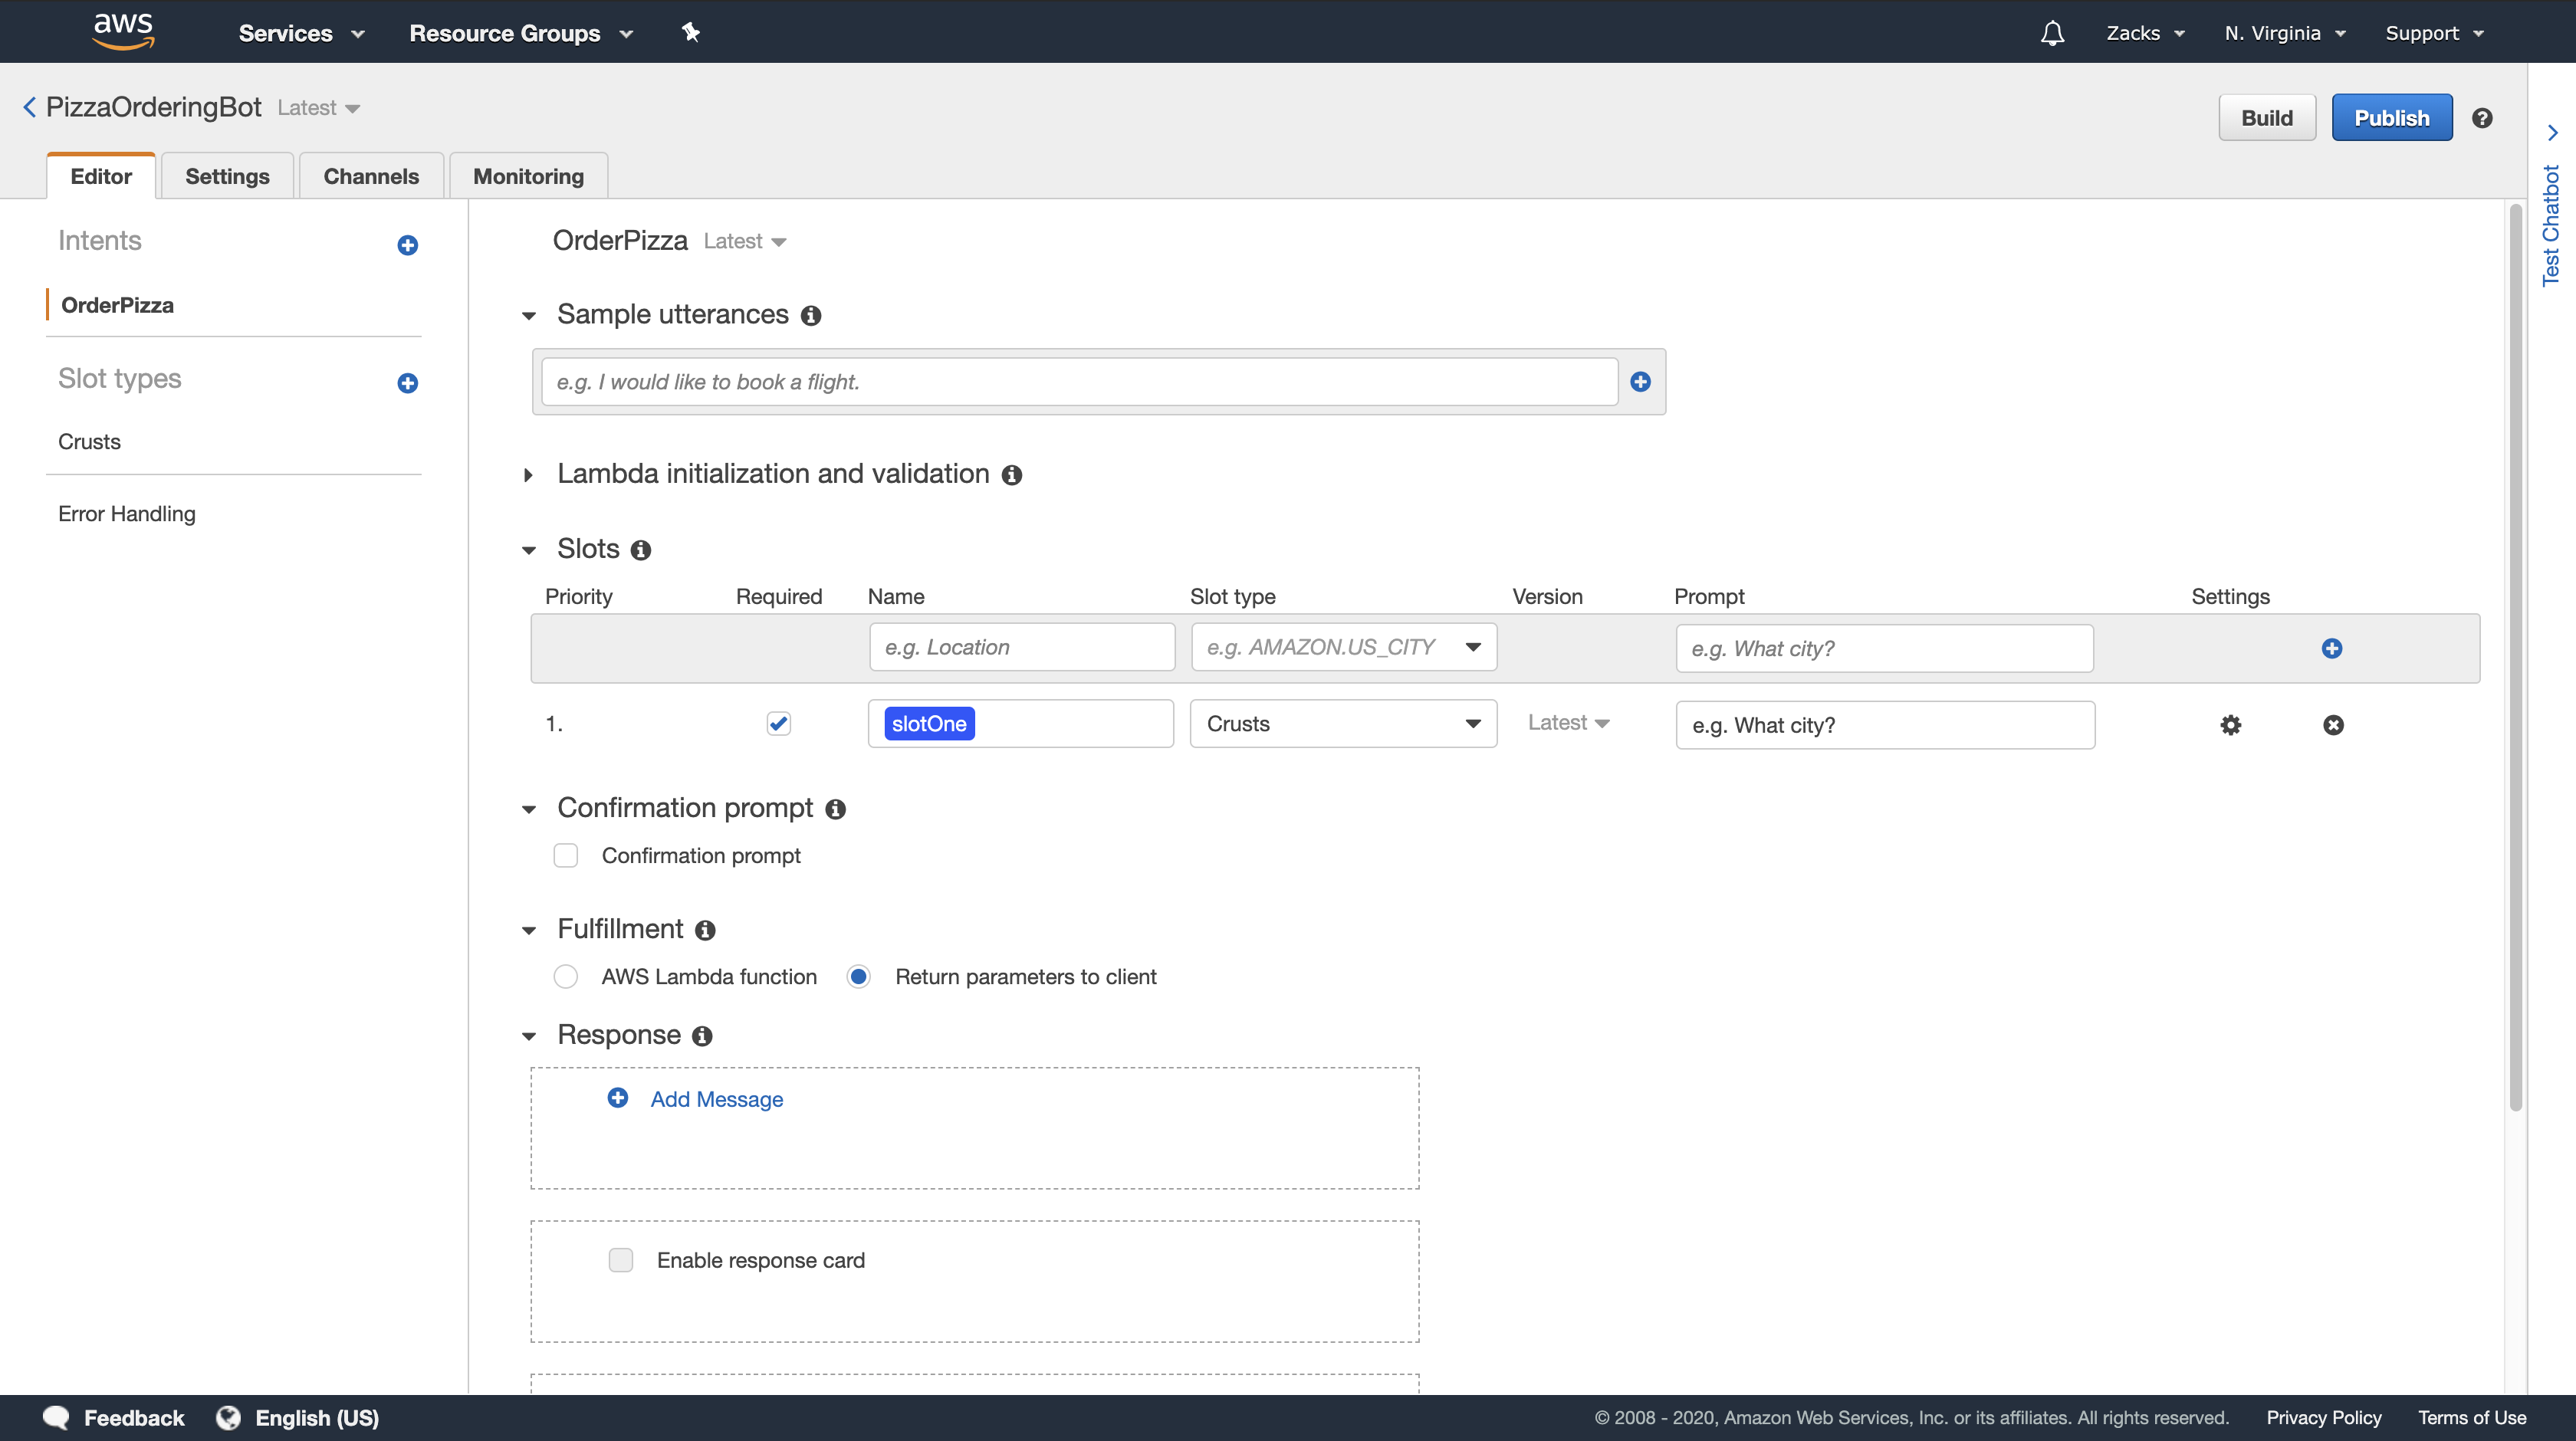
Configure the Intent
https://docs.aws.amazon.com/lex/latest/dg/gs2-create-bot-configure-intent.html
Configure the Bot
https://docs.aws.amazon.com/lex/latest/dg/gs2-create-bot-configure-bot.html
Step 3: Build and Test the Bot
https://docs.aws.amazon.com/lex/latest/dg/gs2-build-and-test.html
Successful
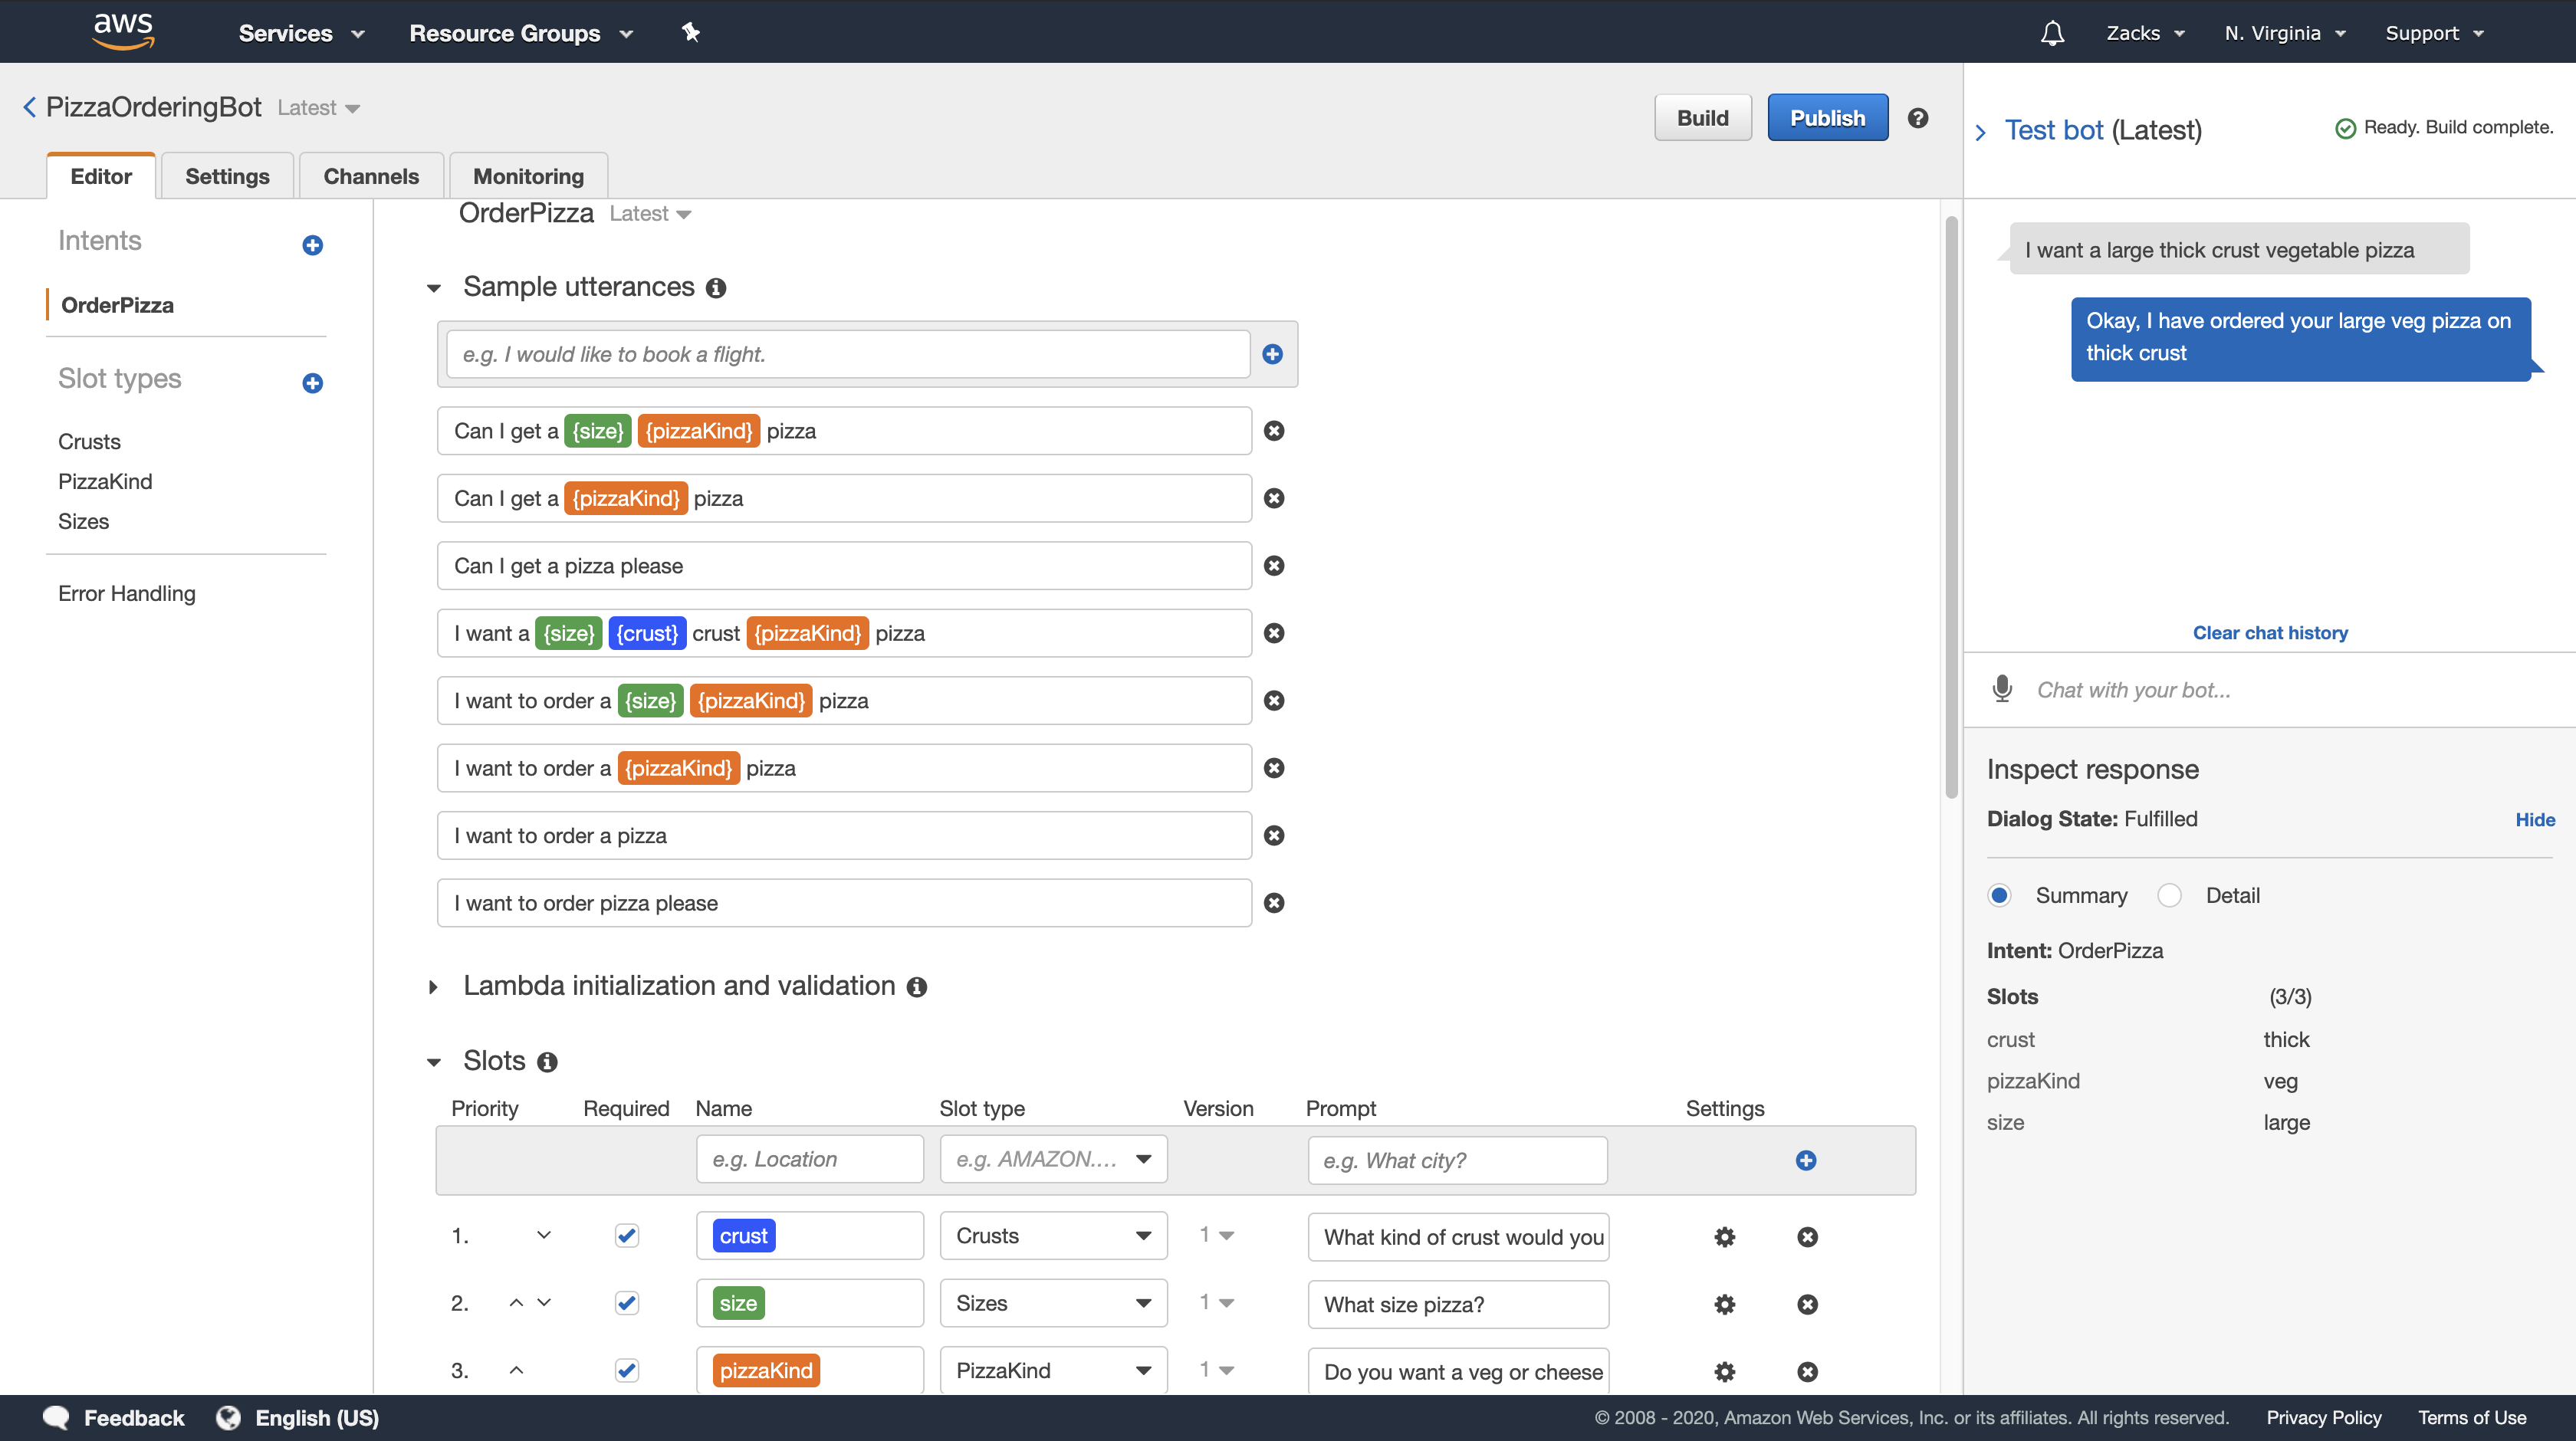
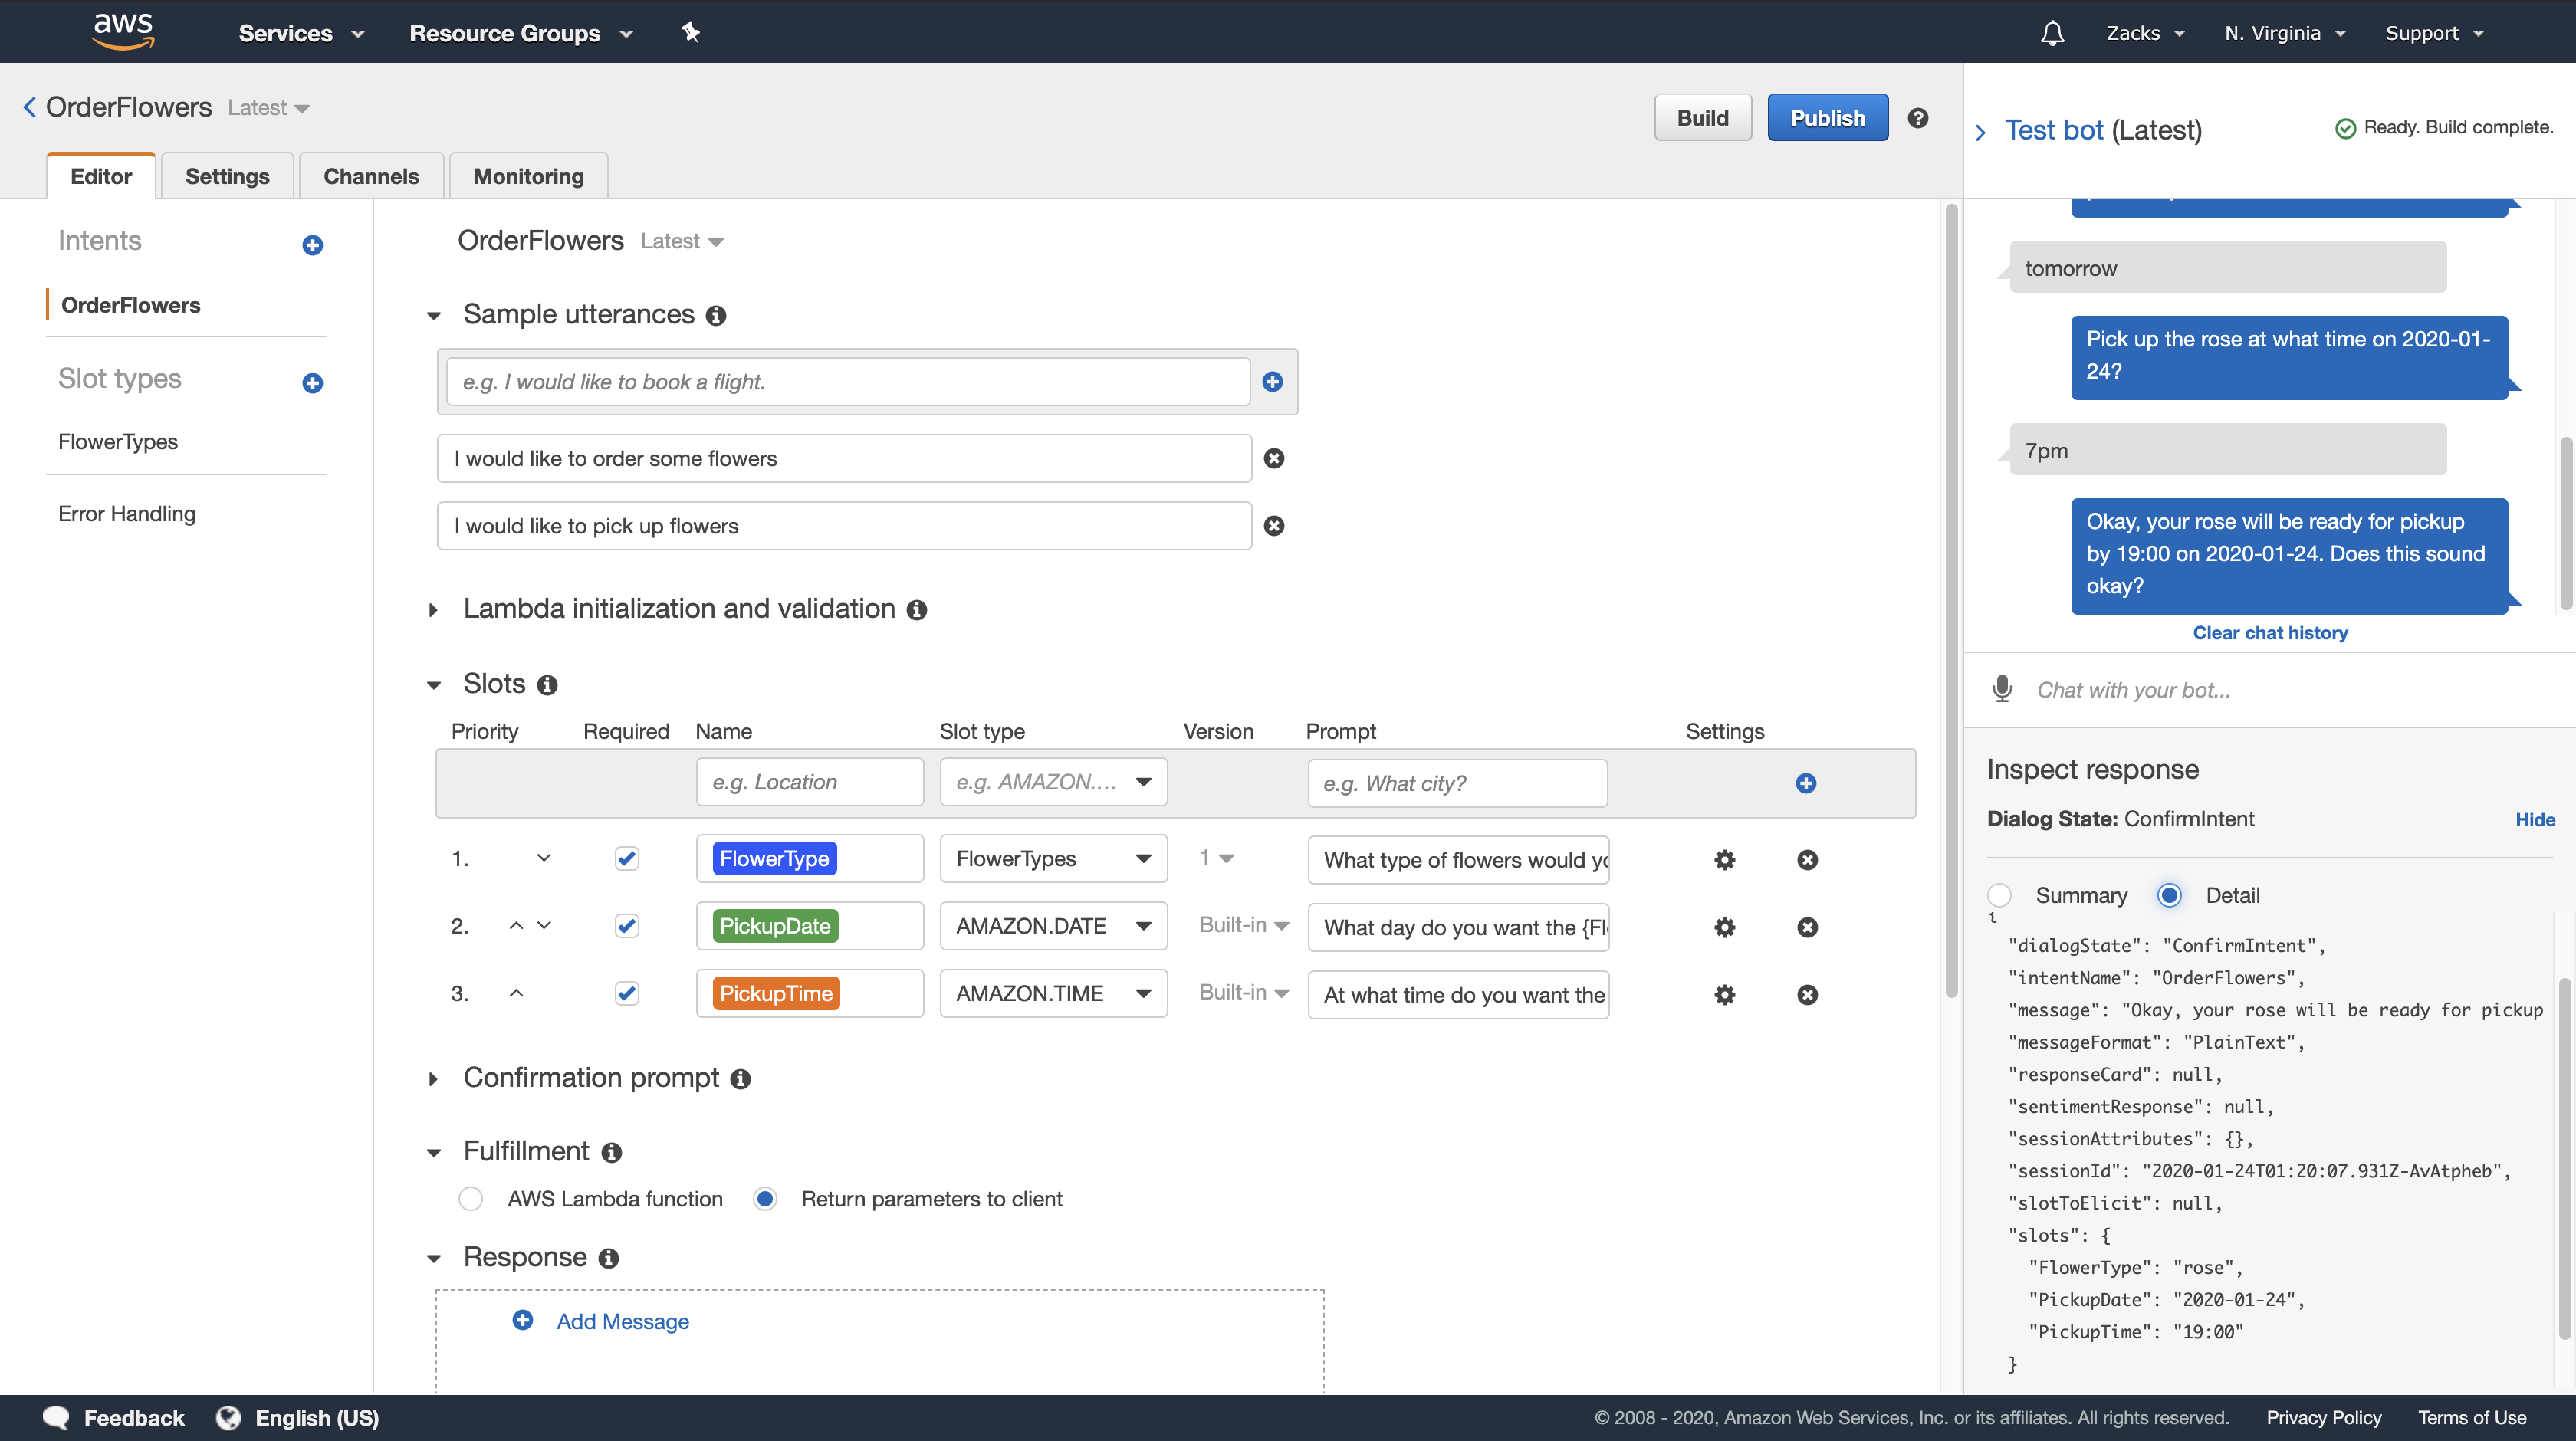
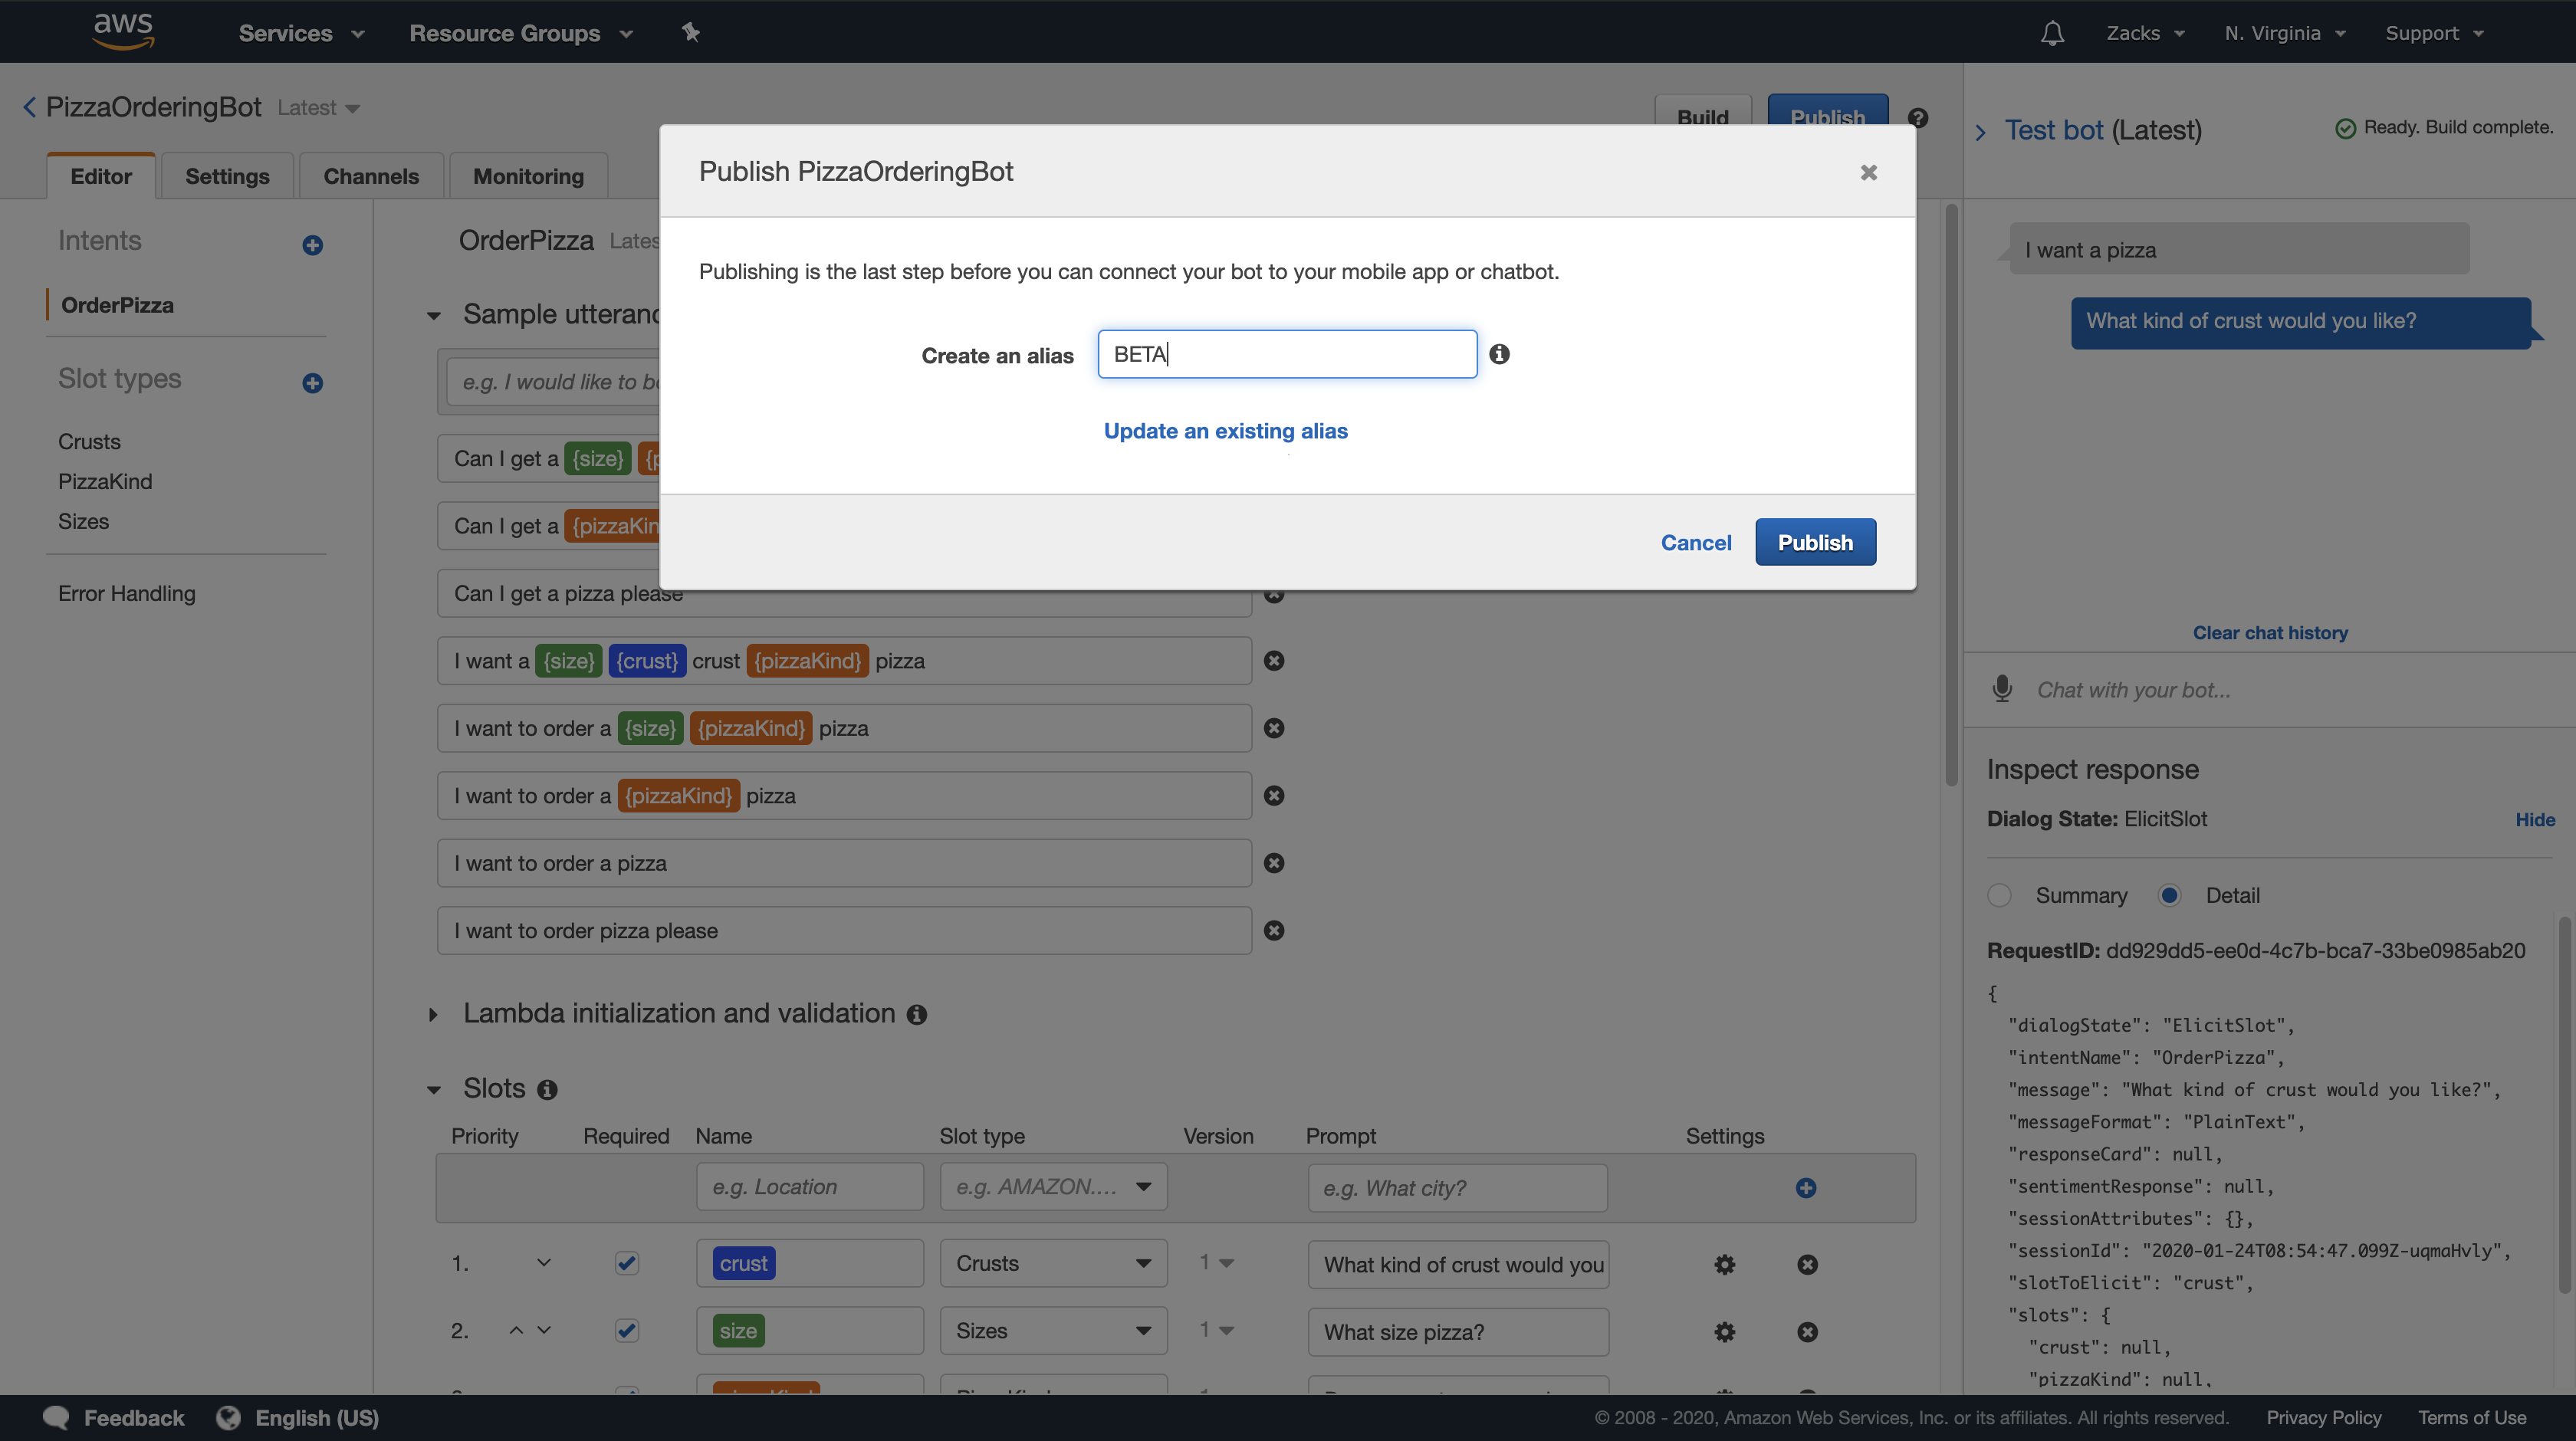
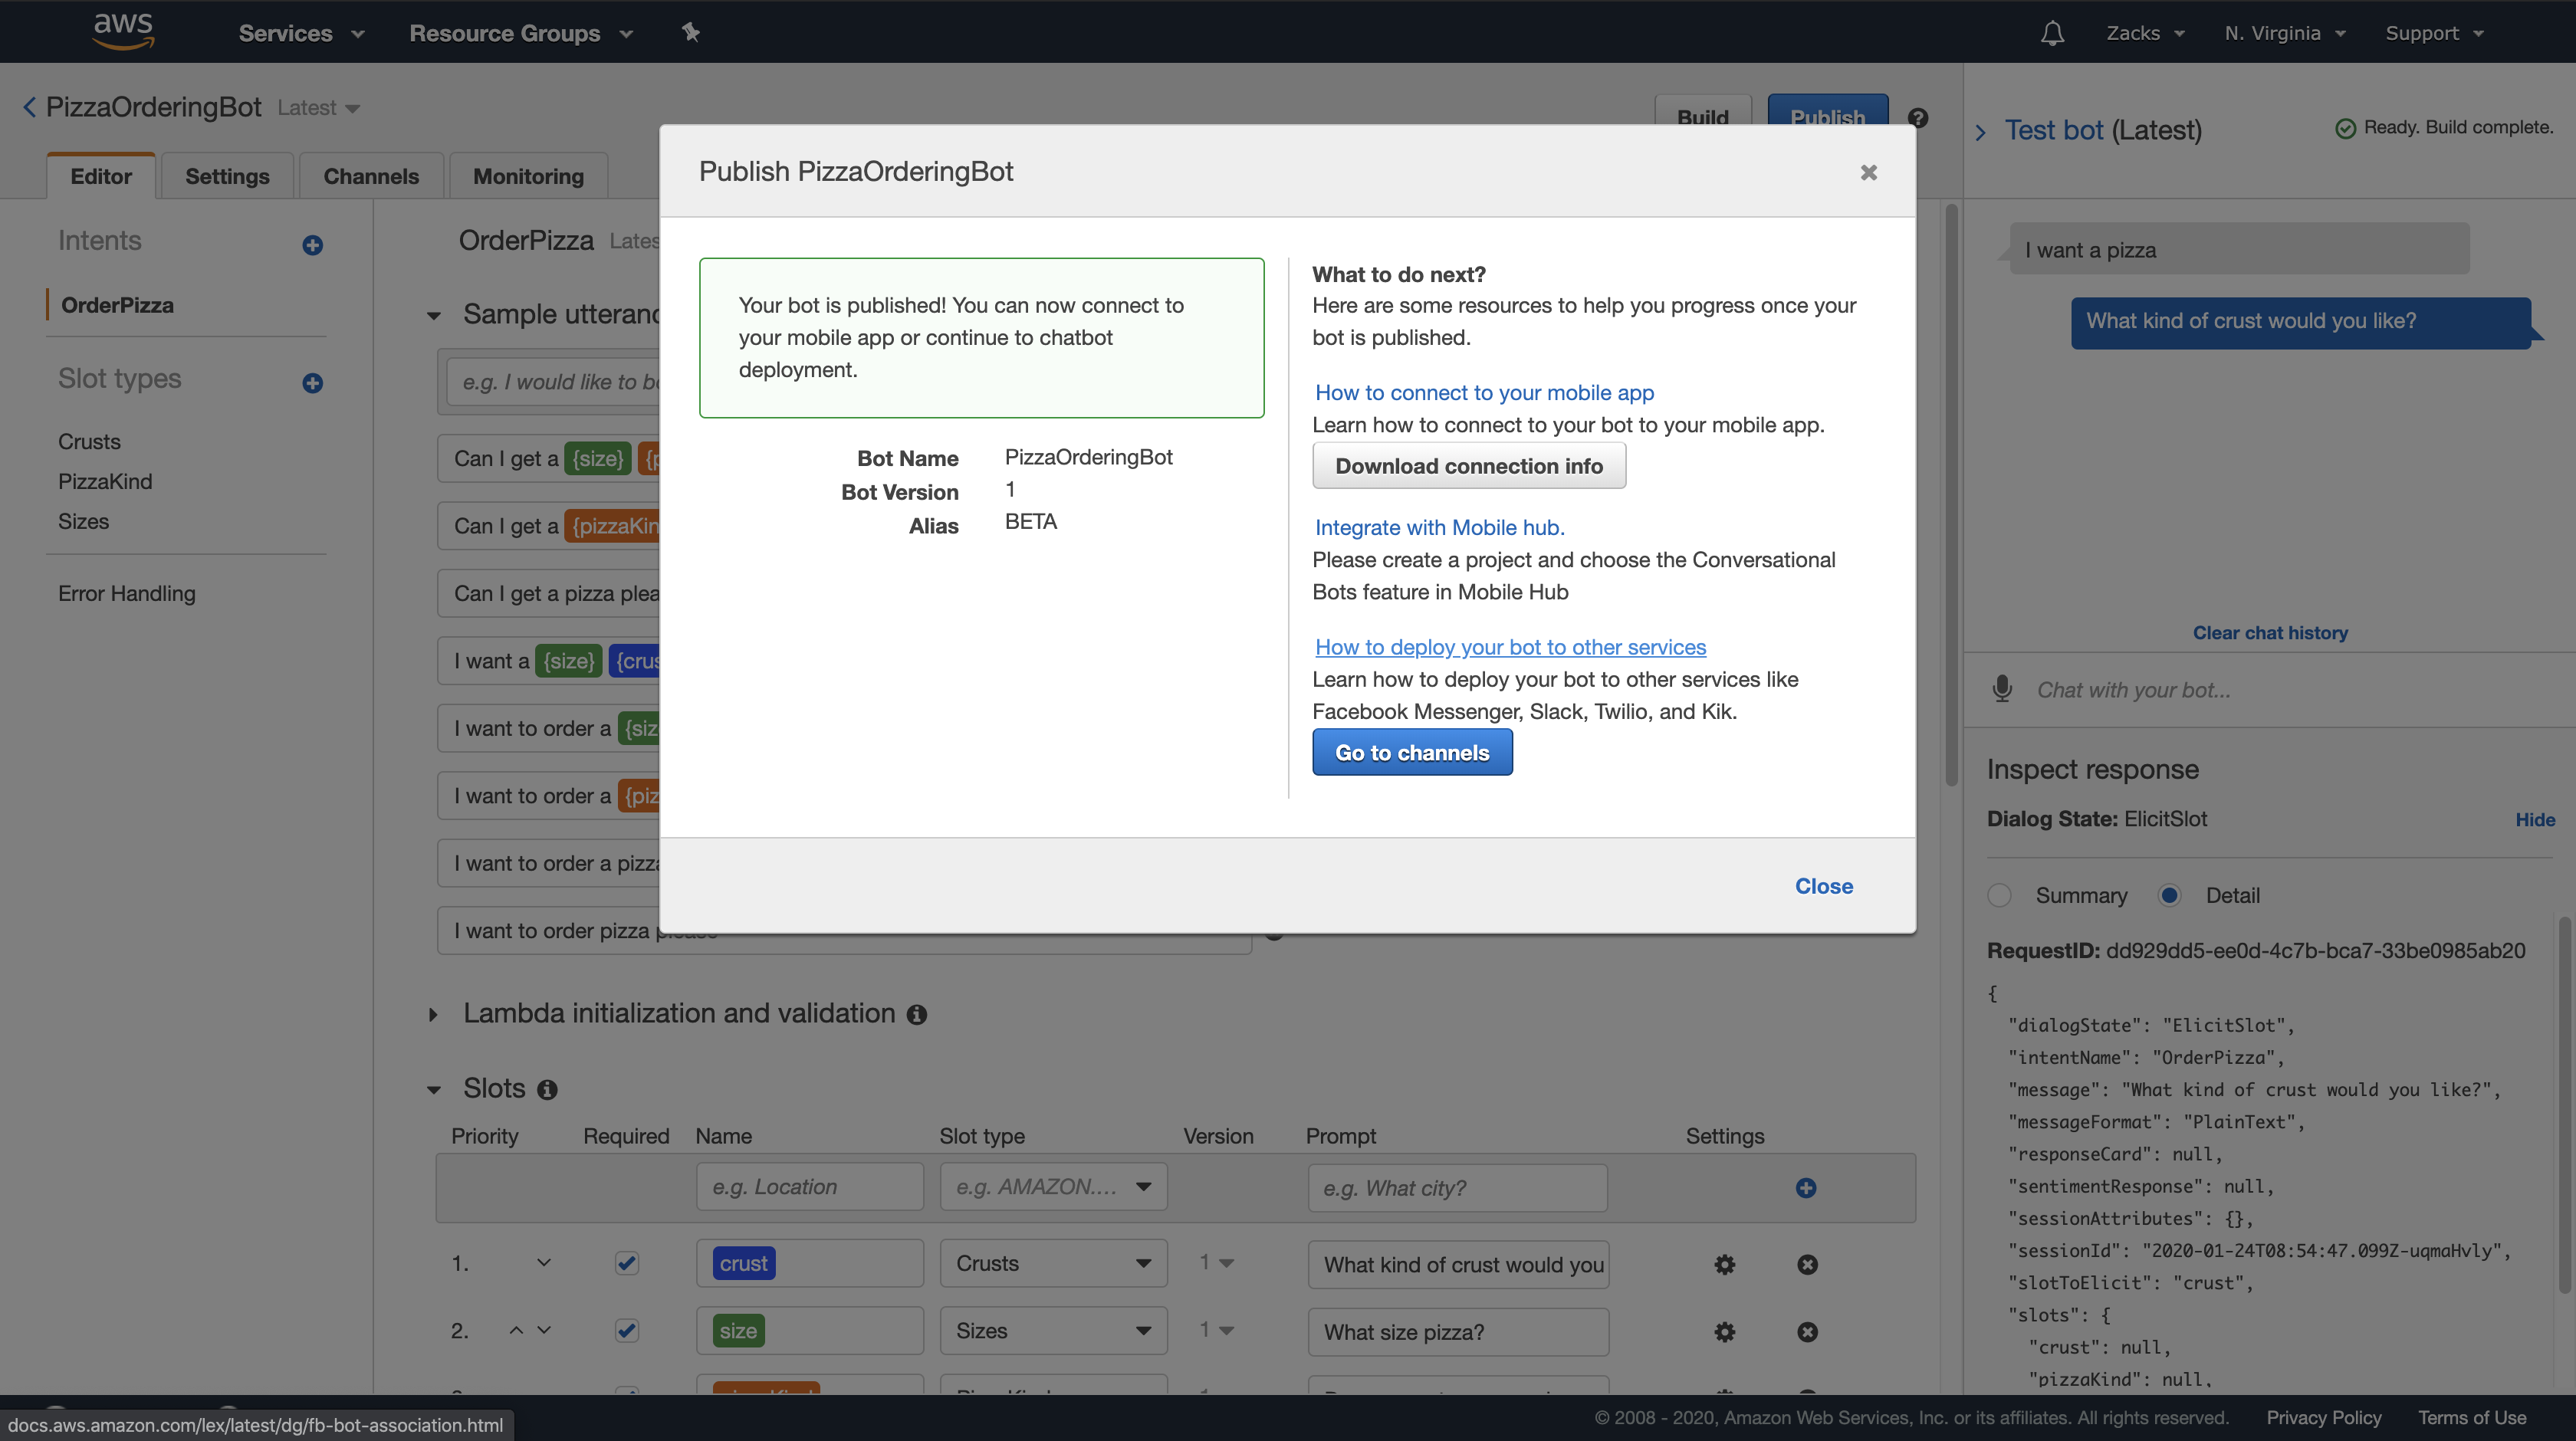
Inspecting the Response
Underneath the chat window is a pane that enables you to inspect the response from Amazon Lex. The pane provides comprehensive information about the state of your bot that changes as you interact with your bot.
The contents of the pane show you the current state of the operation.
- Dialog State – The current state of the conversation with the user. It can be ElicitIntent,
ElicitSlot,ConfirmIntentorFulfilled. - Summary – Shows a simplified view of the dialog that shows the slot values for the intent being fulfilled so that you can keep track of the information flow. It shows the intent name, the number of slots and the number of slots filled, and a list of all of the slots and their associated values.
- Detail – Shows the raw JSON response from the chatbot to give you a deeper view into the bot interaction and the current state of the dialog as you test and debug your chatbot. If you type in the chat window, the inspection pane shows the JSON response from the PostText operation. If you speak to the chat window, the inspection pane shows the response headers from the PostContent operation.
Step 4 (Optional): Clean up
Exercise 3: Publish a Version and Create an Alias
https://docs.aws.amazon.com/lex/latest/dg/gettingstarted-ex3.html
In Getting Started Exercises 1 and 2, you created a bot and tested it. In this exercise, you do the following:
- Publish a new version of the bot. Amazon Lex takes a snapshot copy of the
$LATESTversion to publish a new version. - Create an alias that points to the new version.
Step 4: Getting Started (AWS CLI)
In this step, you use the AWS CLI to create, test, and modify an Amazon Lex bot. To complete these exercises, you need to be familiar with using the CLI and have a text editor. For more information, see Step 2: Set Up the AWS Command Line Interface
- Exercise 1 — Create and test an Amazon Lex bot. The exercise provides all of the JSON objects that you need to create a custom slot type, an intent, and a bot. For more information, see Amazon Lex: How It Works
- Exercise 2 — Update the bot that you created in Exercise 1 to add an additional sample utterance. Amazon Lex uses sample utterances to build the machine learning model for your bot.
- Exercise 3 — Update the bot that you created in Exercise 1 to add a Lambda function to validate user input and to fulfill the intent.
- Exercise 4 — Publish a version of the slot type, intent, and bot resources that you created in Exercise 1.A version is a snapshot of a resource that can’t be changed.
- Exercise 5 — Create an alias for the bot that you created in Exercise 1.
- Exercise 6 — Clean up your account by deleting the slot type, intent, and bot that you created in Exercise 1, and the alias that you created in Exercise 5.
Exercise 1: Create an Amazon Lex Bot (AWS CLI)
https://docs.aws.amazon.com/lex/latest/dg/gs-cli-create.html
In general, when you create bots, you:
1.Create slot types to define the information that your bot will be working with.
2.Create intents that define the user actions that your bot supports. Use the custom slot types that you created earlier to define the slots, or parameters, that your intent requires.
3.Create a bot that uses the intents that you defined.
In this exercise you create and test a new Amazon Lex bot using the CLI. Use the JSON structures that we provide to create the bot. To run the commands in this exercise, you need to know the region where the commands will be run. For a list of regions, see Model Building Quotas .
Topics
- Step 1: Create a Service-Linked Role (AWS CLI)
- Step 2: Create a Custom Slot Type (AWS CLI)
- Step 3: Create an Intent (AWS CLI)
- Step 4: Create a Bot (AWS CLI)
- Step 5: Test a Bot (AWS CLI)
Step 1: Create a Service-Linked Role (AWS CLI)
https://docs.aws.amazon.com/lex/latest/dg/gs-create-role.html
Amazon Lex assumes AWS Identity and Access Management service-linked roles to call AWS services on behalf of your bots. The roles, which are in your account, are linked to Amazon Lex use cases and have predefined permissions. For more information, see Service Permissions.
If you’ve already created an Amazon Lex bot using the console, the service-linked role was created automatically. Skip to Step 2: Create a Custom Slot Type (AWS CLI).
To create a service-linked role (AWS CLI)
1.In the AWS CLI, type the following command:
1 | aws iam create-service-linked-role --aws-service-name lex.amazonaws.com |
That means I have already created it using the console.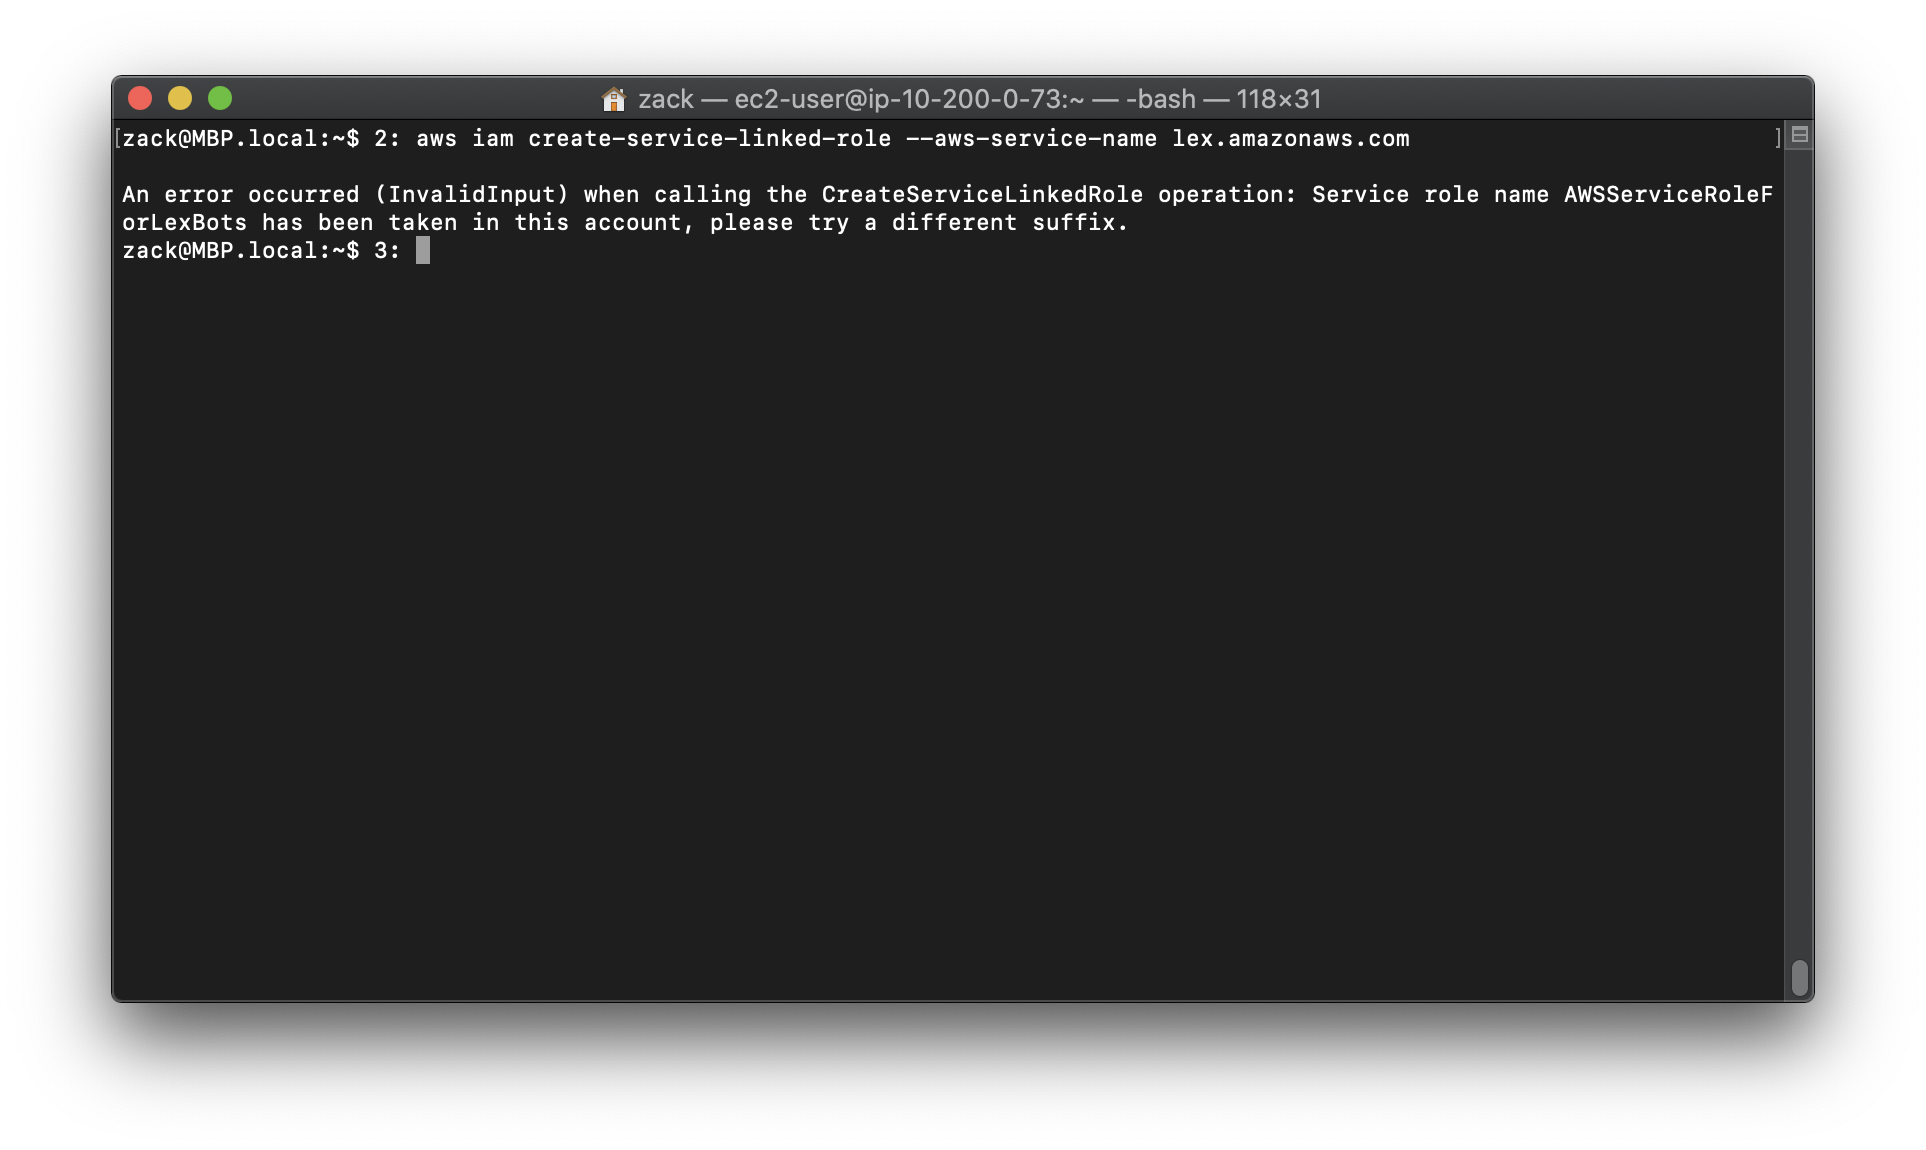
2.Check the policy using the following command:
1 | aws iam get-role --role-name AWSServiceRoleForLexBots |

Step 2: Create a Custom Slot Type (AWS CLI)
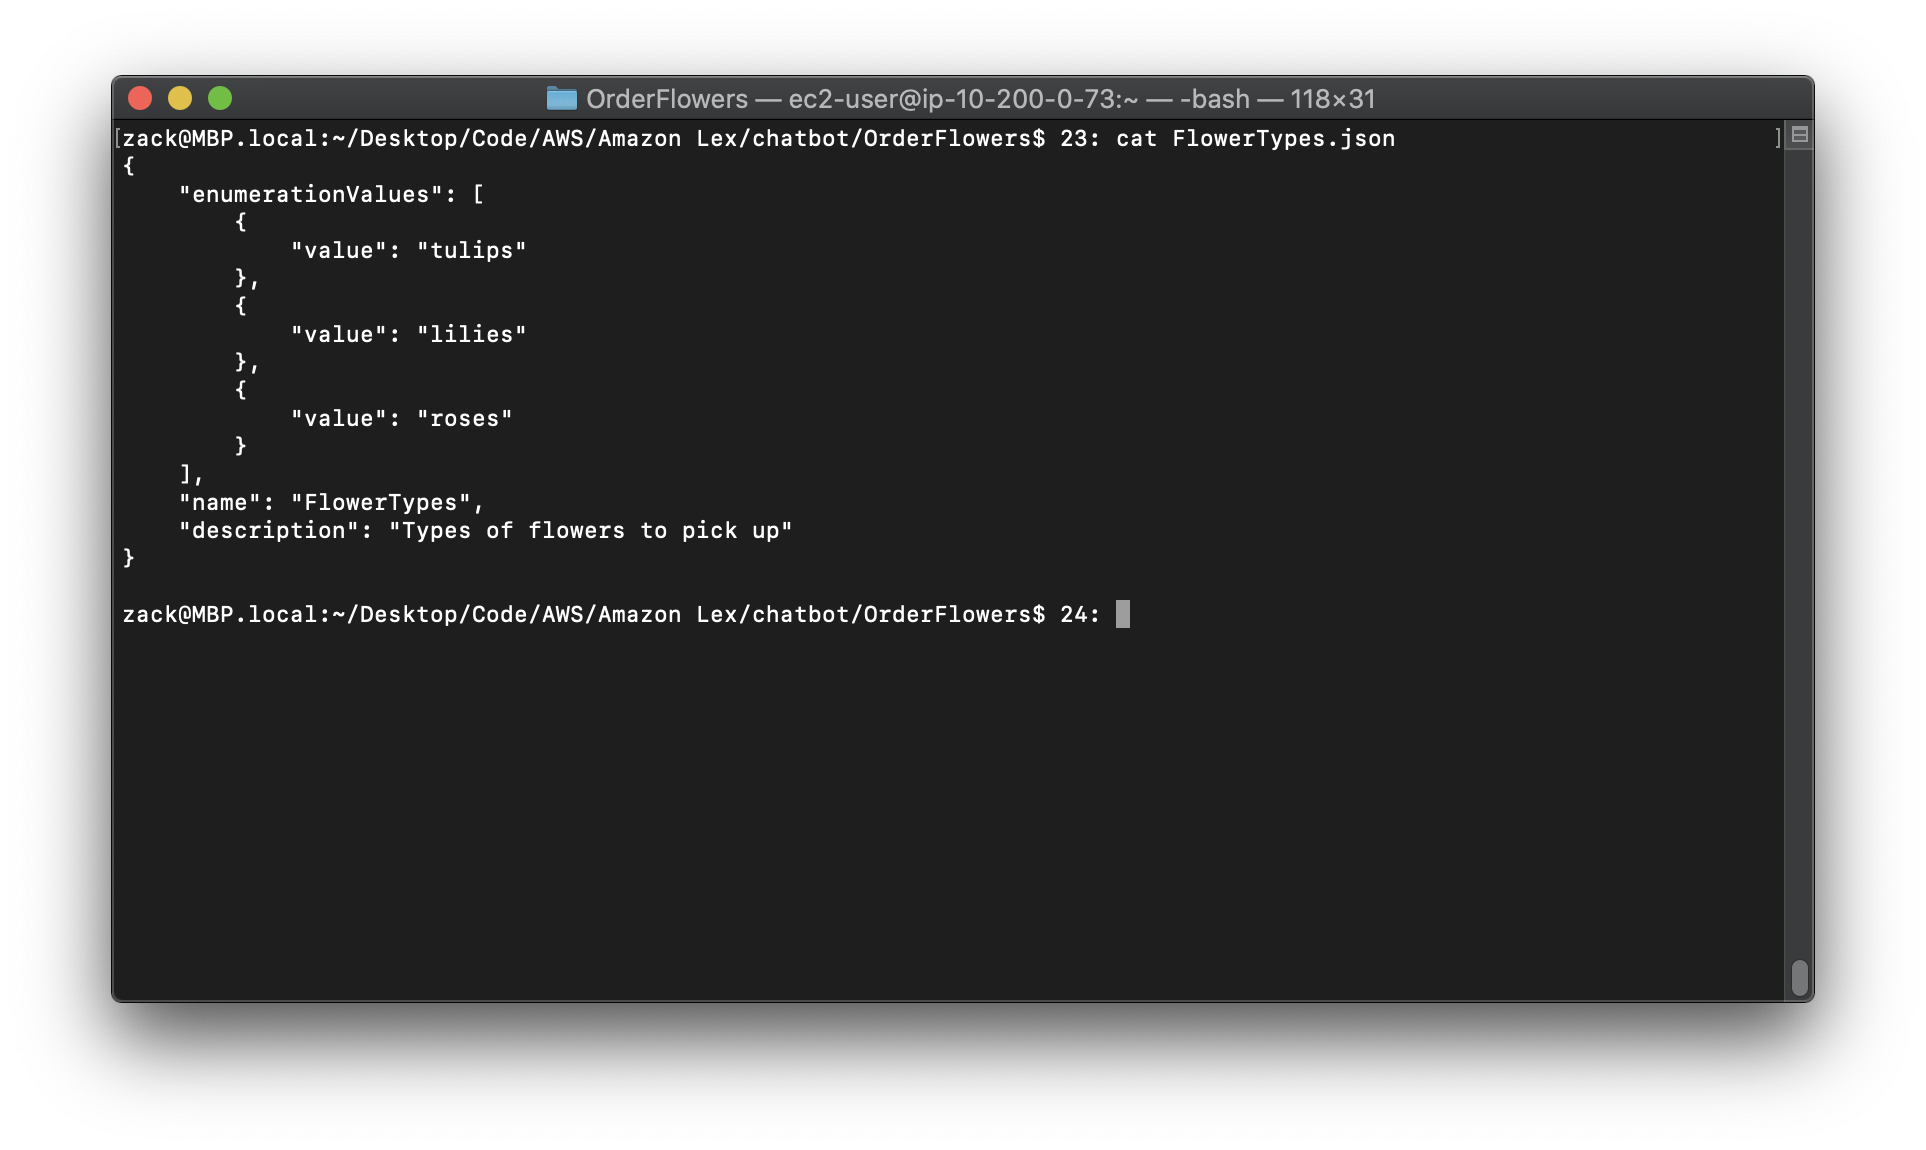
https://docs.aws.amazon.com/lex/latest/dg/gs-create-flower-types.html
Create a custom slot type with enumeration values for the flowers that can be ordered. You use this type in the next step when you create the OrderFlowers intent. A slot type defines the possible values for a slot, or parameter, of the intent.
To run the commands in this exercise, you need to know the region where the commands will be run. For a list of regions, see Model Building Quotas.
To create a custom slot type (AWS CLI)
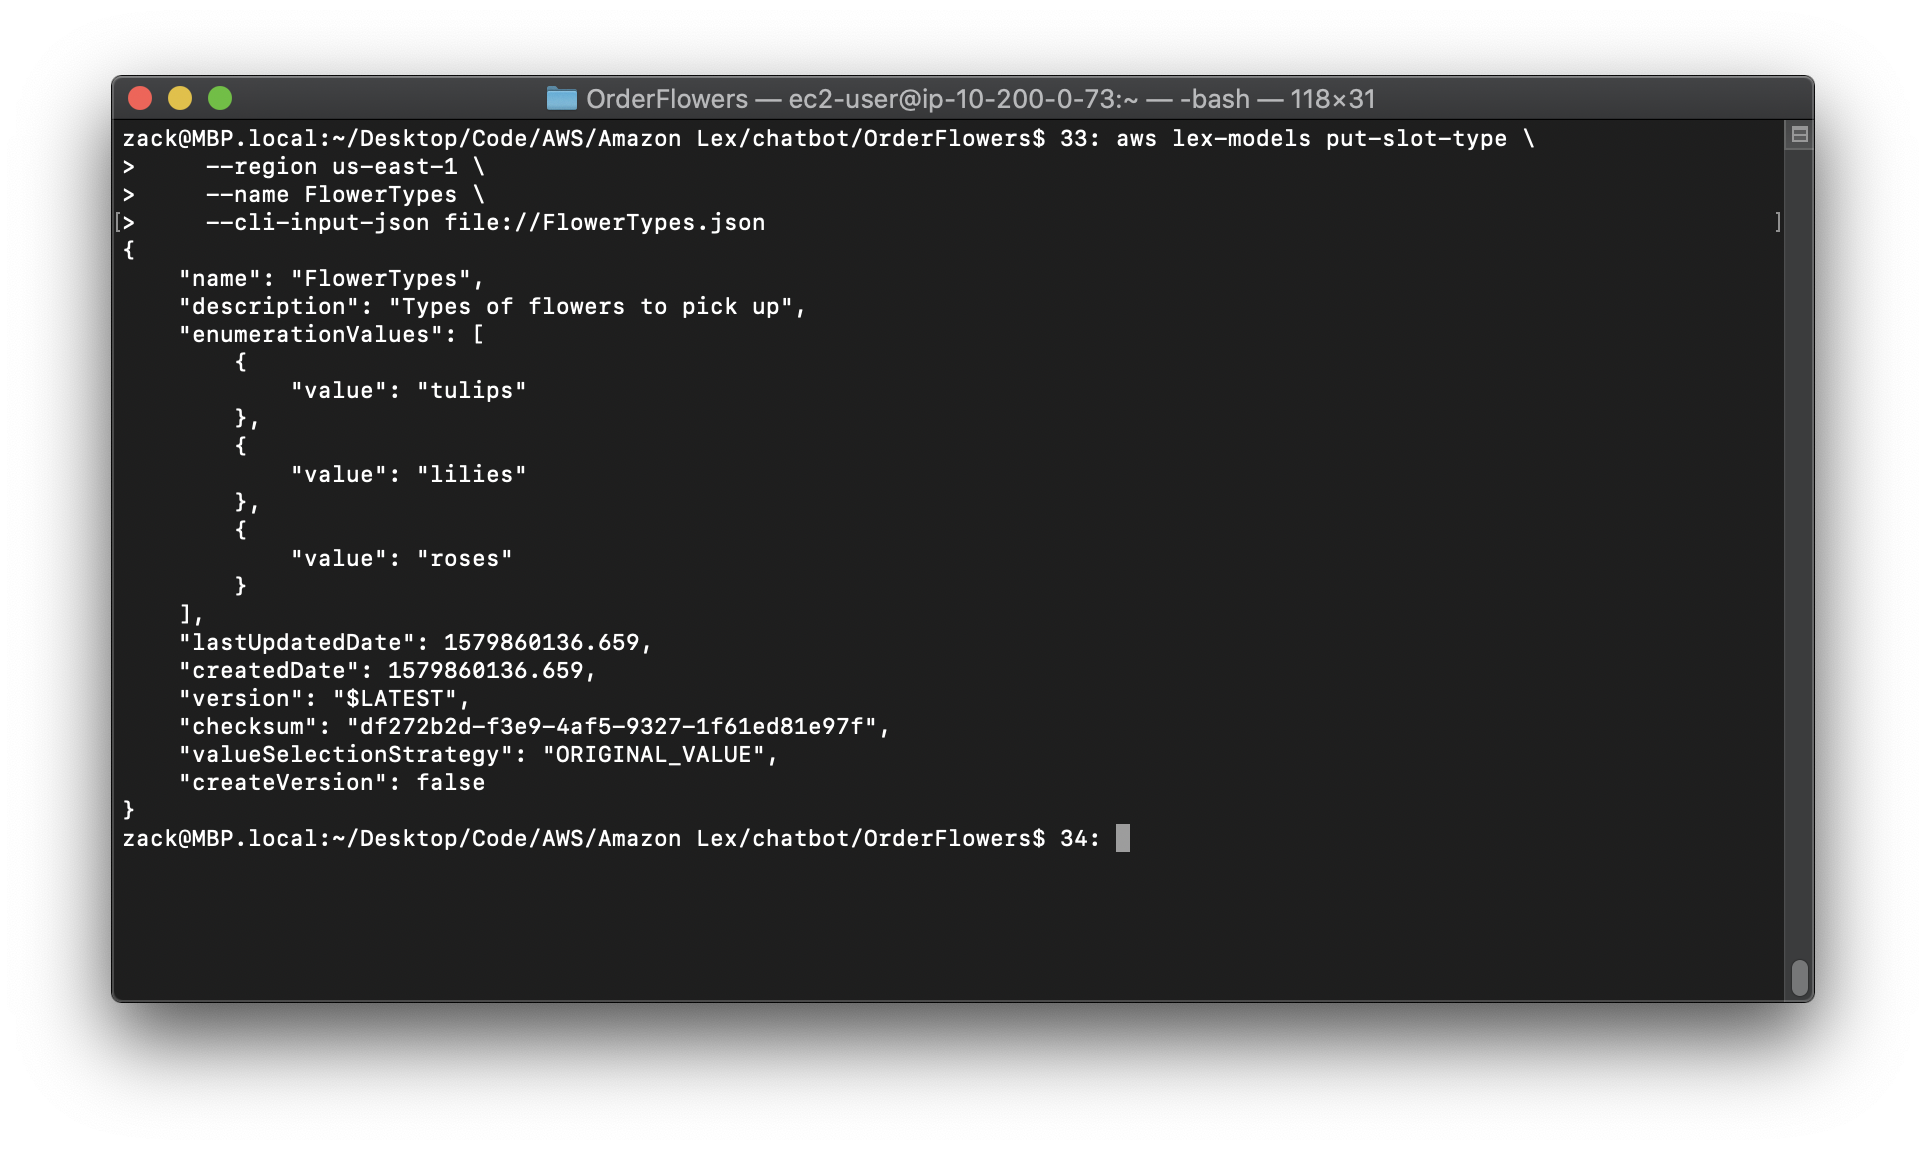
1.Create a text file named FlowerTypes.json. Copy the JSON code from FlowerTypes.json into the text file.
2.Call the PutSlotType operation using the AWS CLI to create the slot type. The example is formatted for Unix, Linux, and macOS. For Windows, replace the backslash () Unix continuation character at the end of each line with a caret (^).
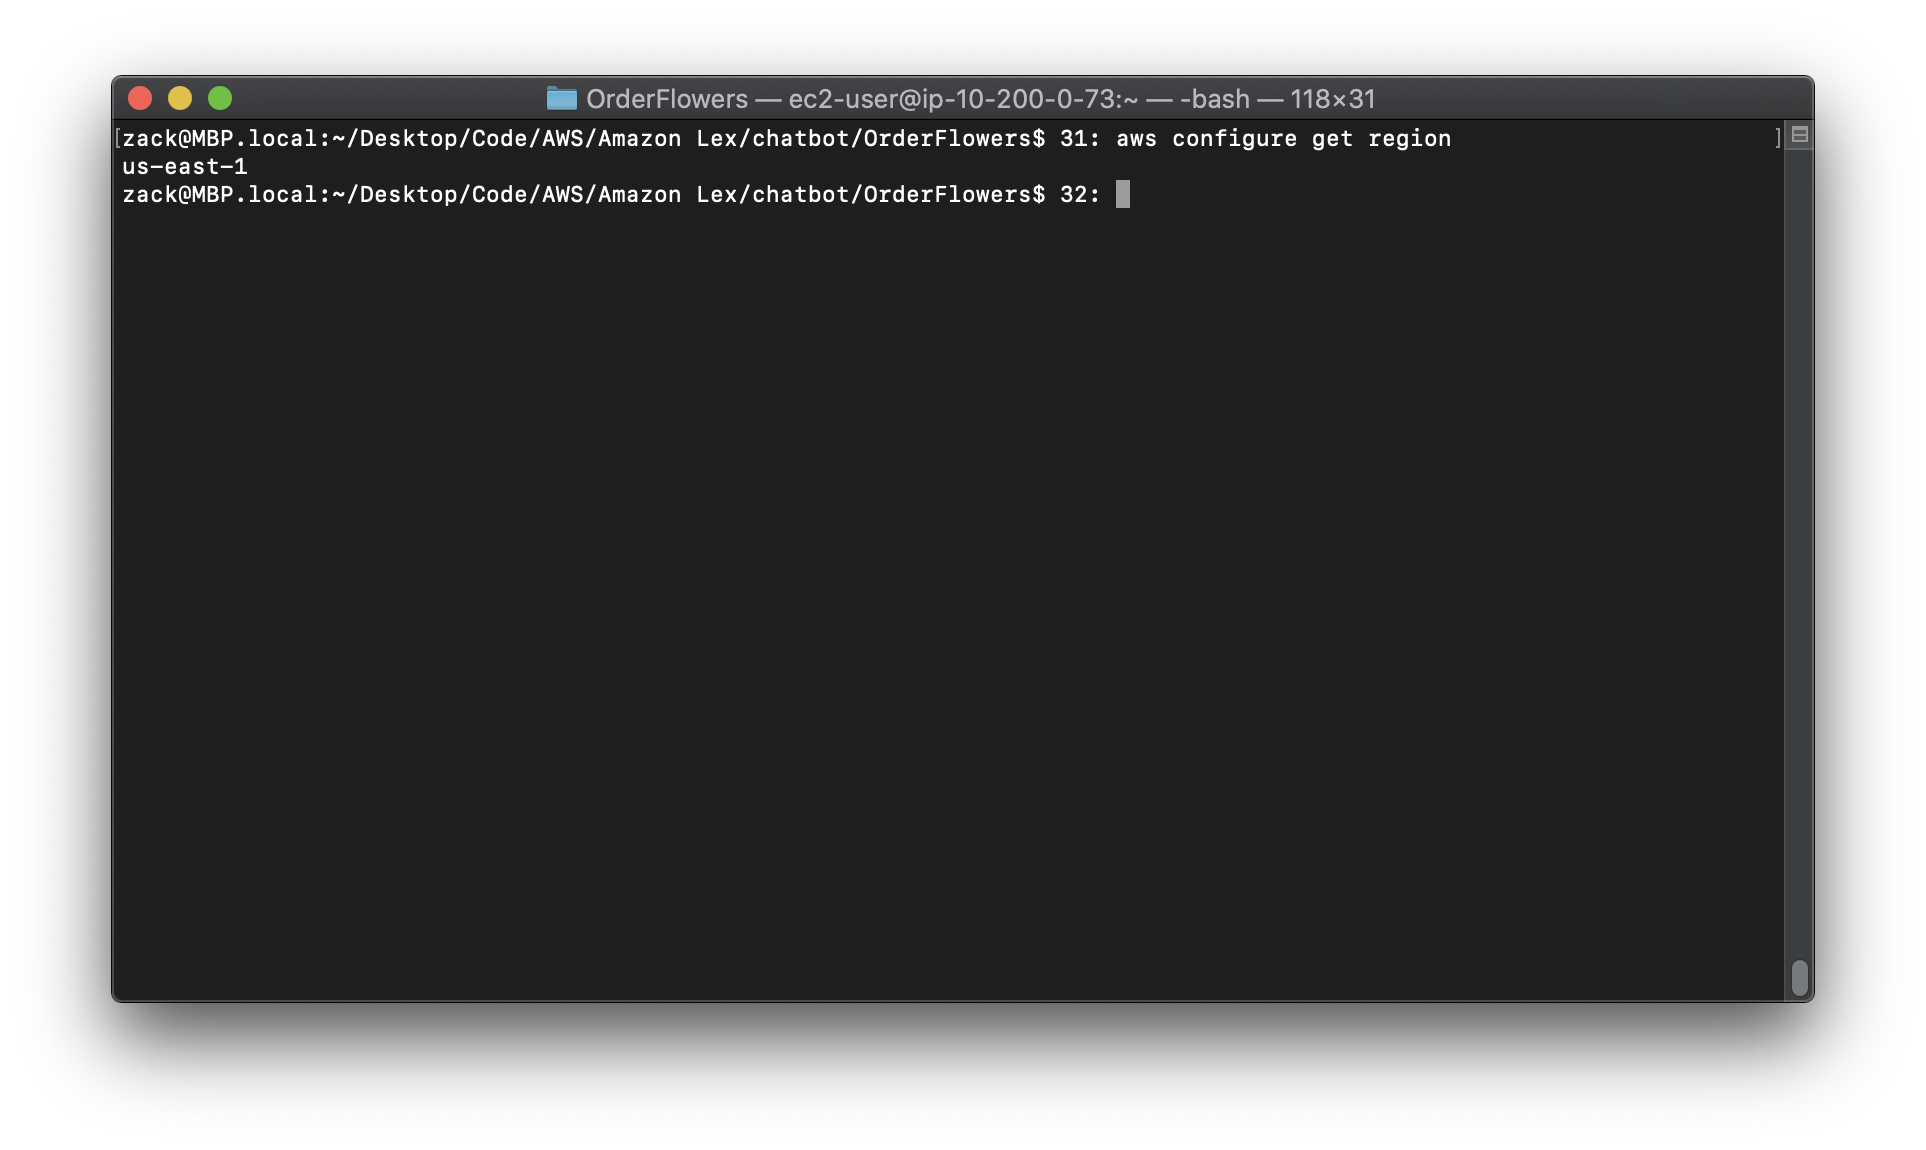
Get your region
1 | aws configure get region |

Change your region (optional)
1 | aws configure --region us-east-1 |
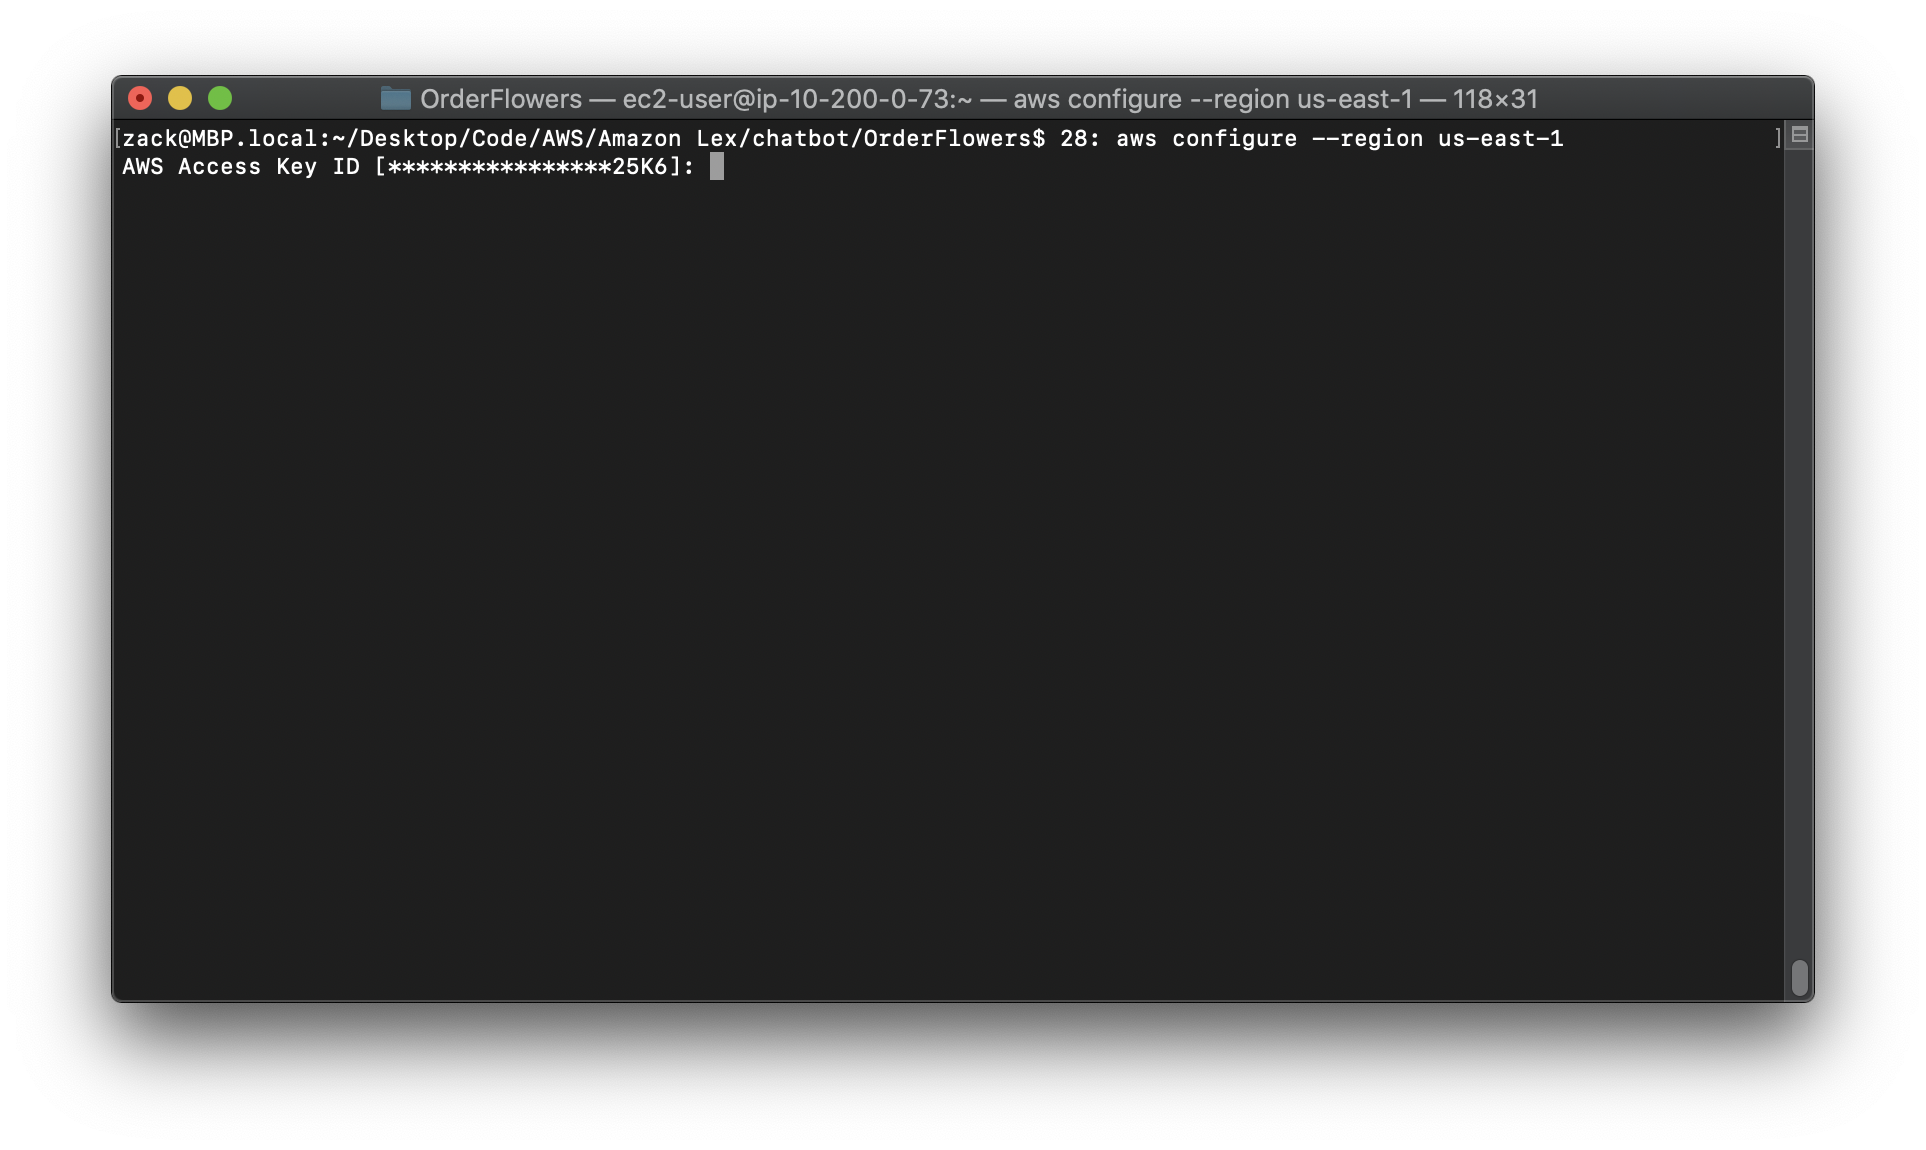
Replace the region to yours.
1 | aws lex-models put-slot-type \ |
Step 3: Create an Intent (AWS CLI)
https://docs.aws.amazon.com/lex/latest/dg/gs-cli-create-order-flowers.html
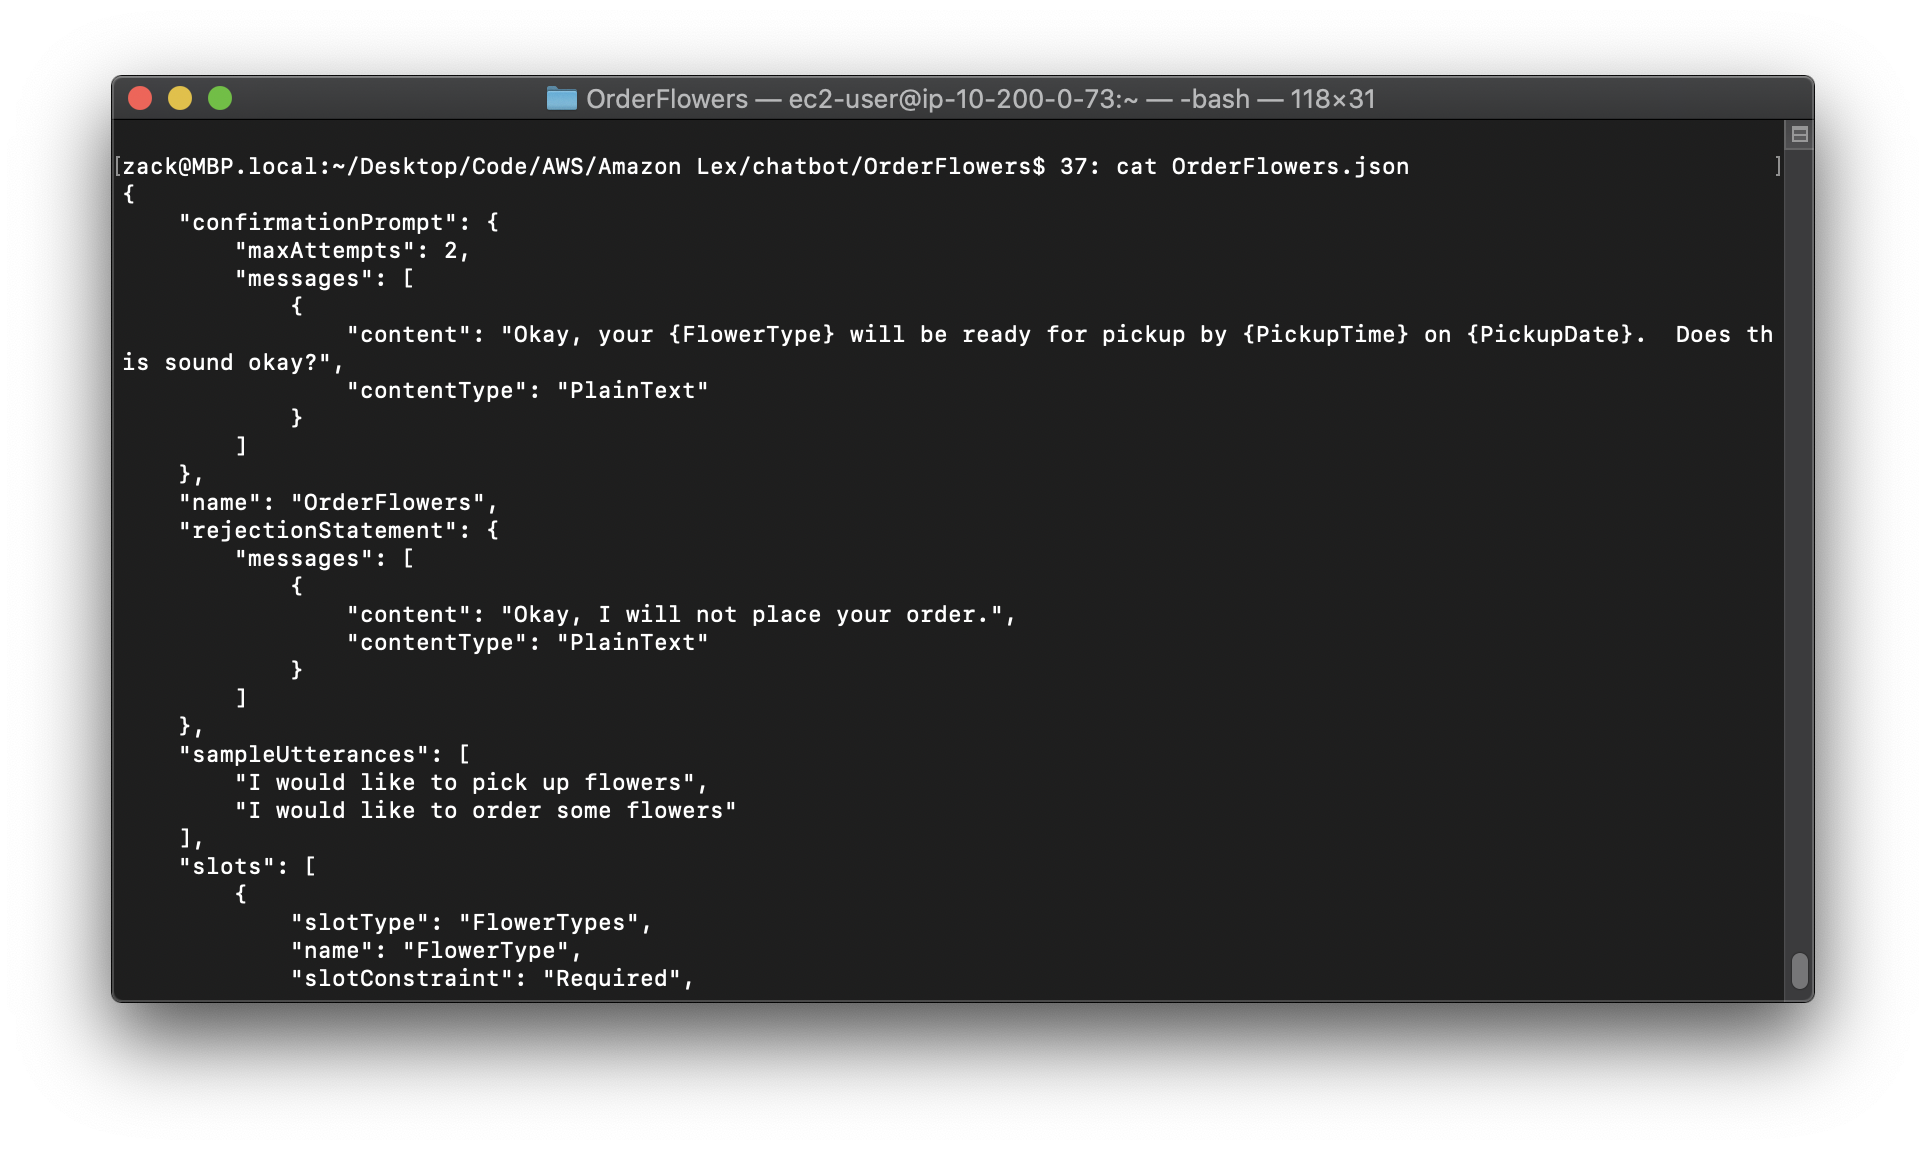
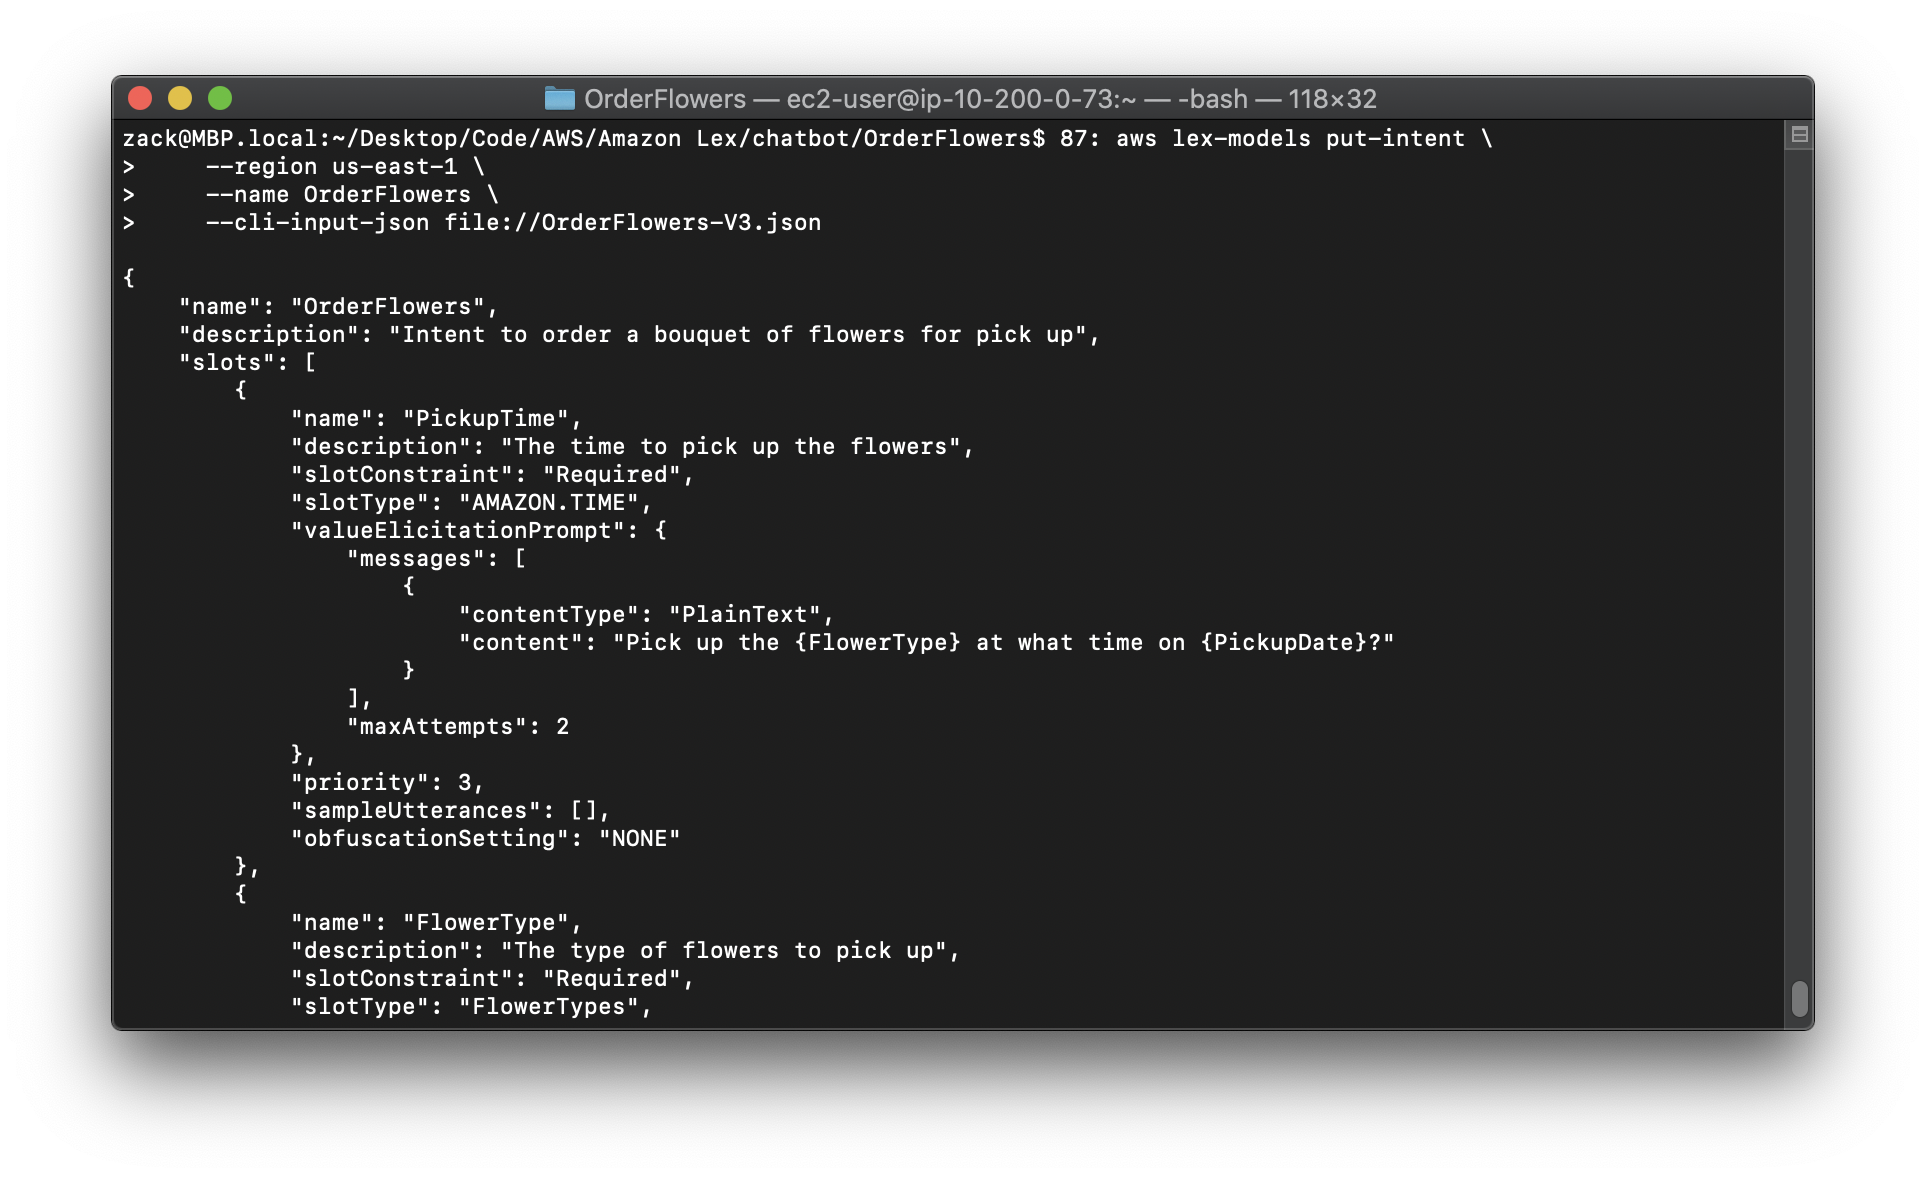
Create an intent for the OrderFlowersBot bot and provide three slots, or parameters. The slots allow the bot to fulfill the intent:
FlowerTypeis a custom slot type that specifies which types of flowers can be ordered.AMAZON.DATEandAMAZON.TIMEare built-in slot types used for getting the date and time to deliver the flowers from the user.
To create the OrderFlowers intent (AWS CLI)
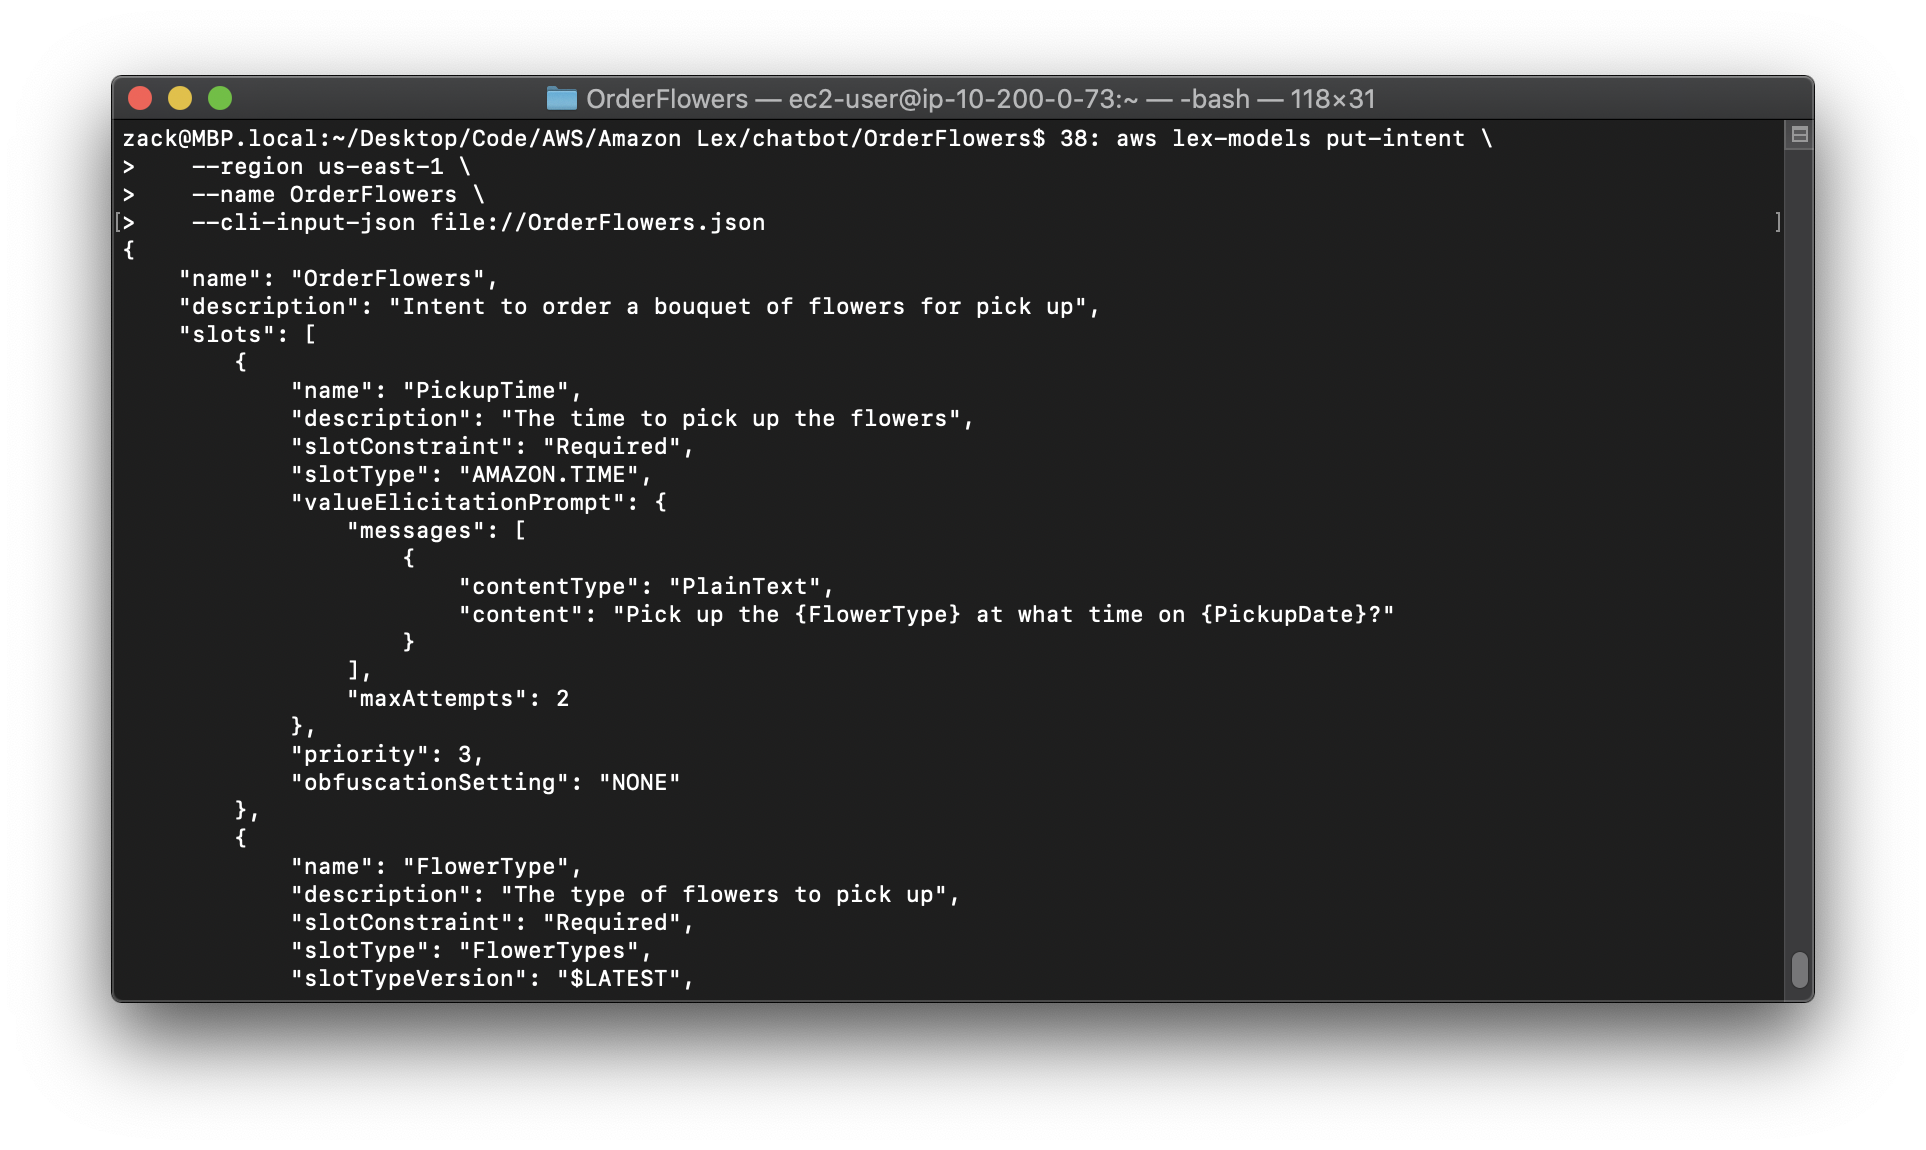
1.Create a text file named OrderFlowers.json. Copy the JSON code from OrderFlowers.json into the text file.
2.In the AWS CLI, call the PutIntent operation to create the intent. The example is formatted for Unix, Linux, and macOS. For Windows, replace the backslash () Unix continuation character at the end of each line with a caret (^).
Replace the region to yours.
1 | aws lex-models put-intent \ |
Step 4: Create a Bot (AWS CLI)
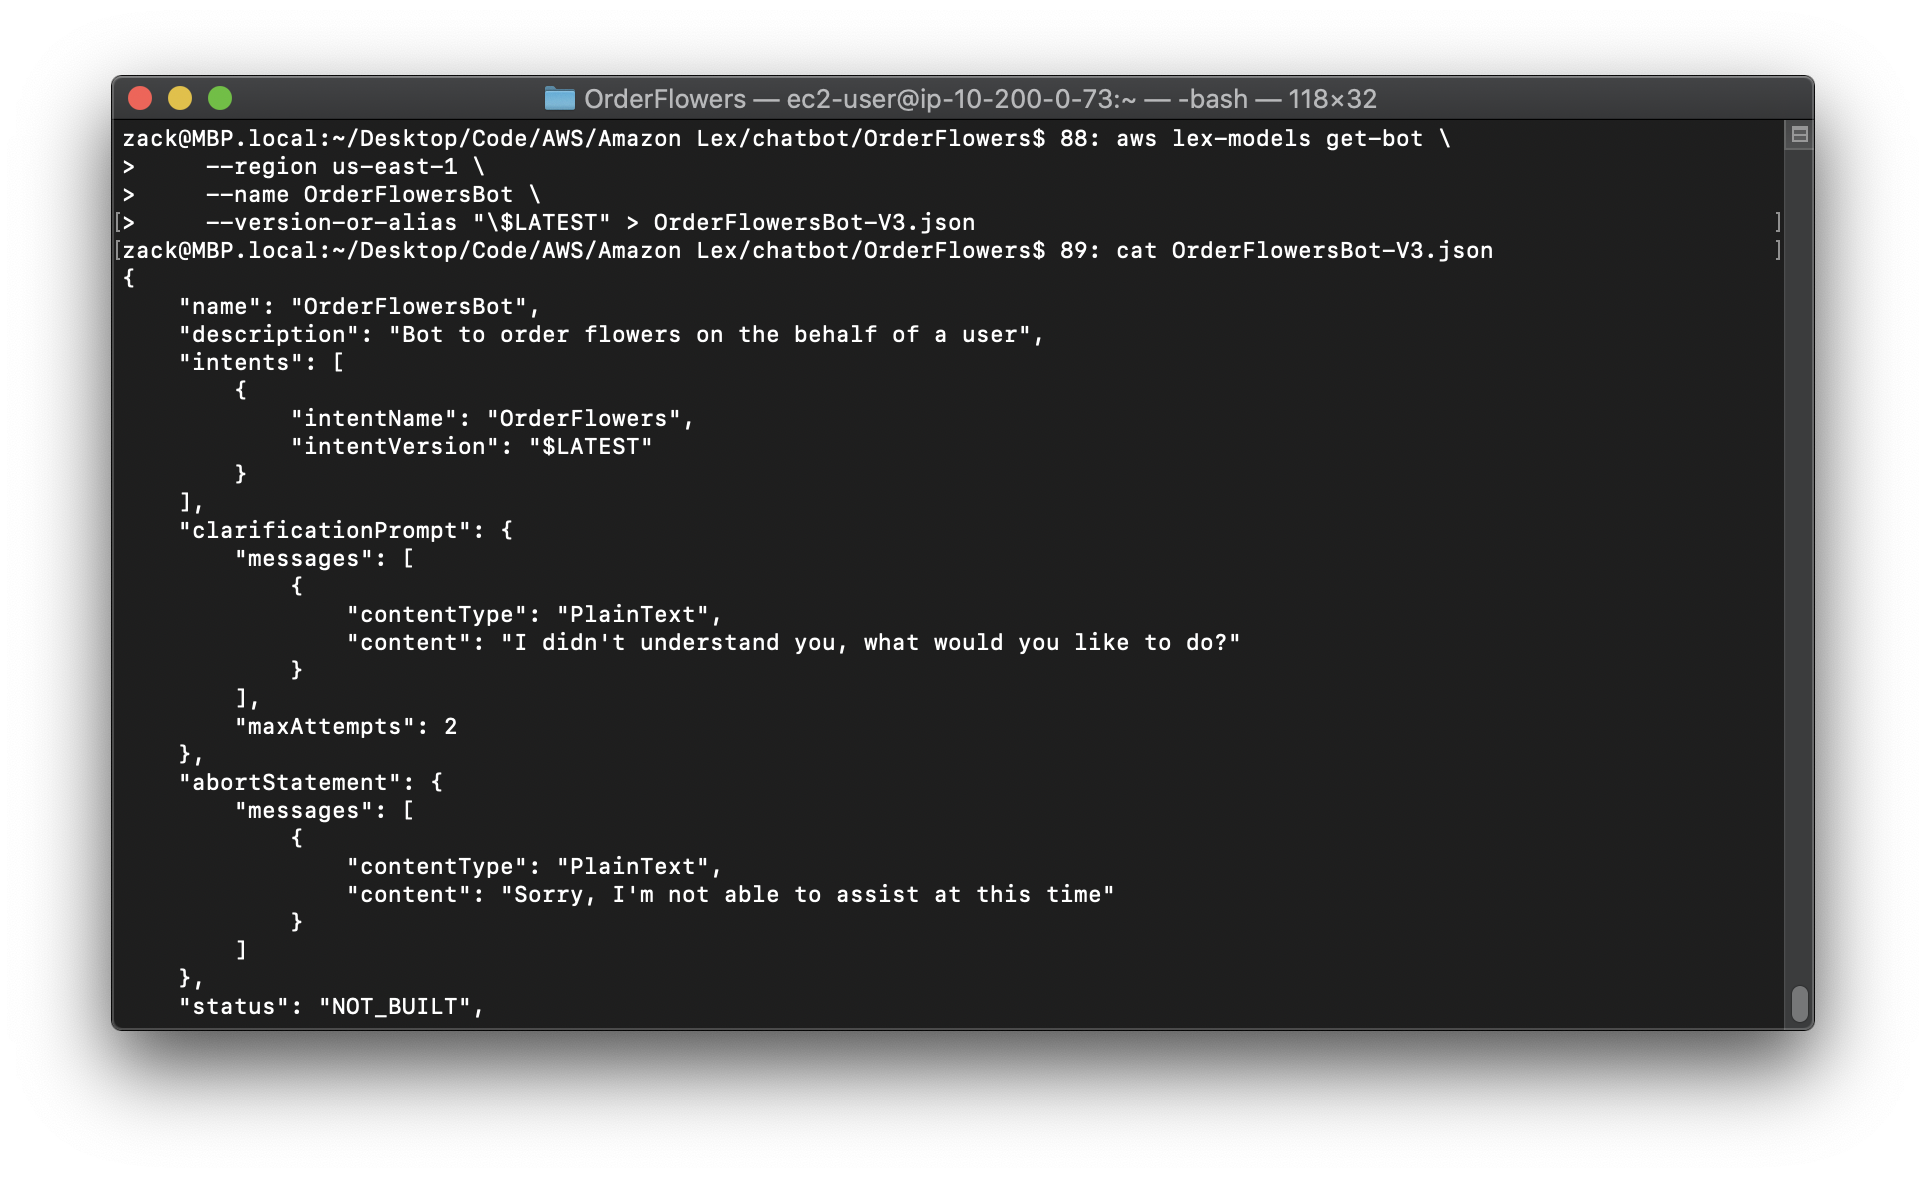
https://docs.aws.amazon.com/lex/latest/dg/gs-cli-create-order-flowers-bot.html
The OrderFlowersBot bot has one intent, the OrderFlowers intent that you created in the previous step. To run the commands in this exercise, you need to know the region where the commands will be run.
Note: The following AWS CLI example is formatted for Unix, Linux, and macOS. For Windows, change "\$LATEST" to $LATEST.
To create the OrderFlowersBot bot (AWS CLI)
1.Create a text file named OrderFlowersBot.json. Copy the JSON code from OrderFlowersBot.json into the text file.
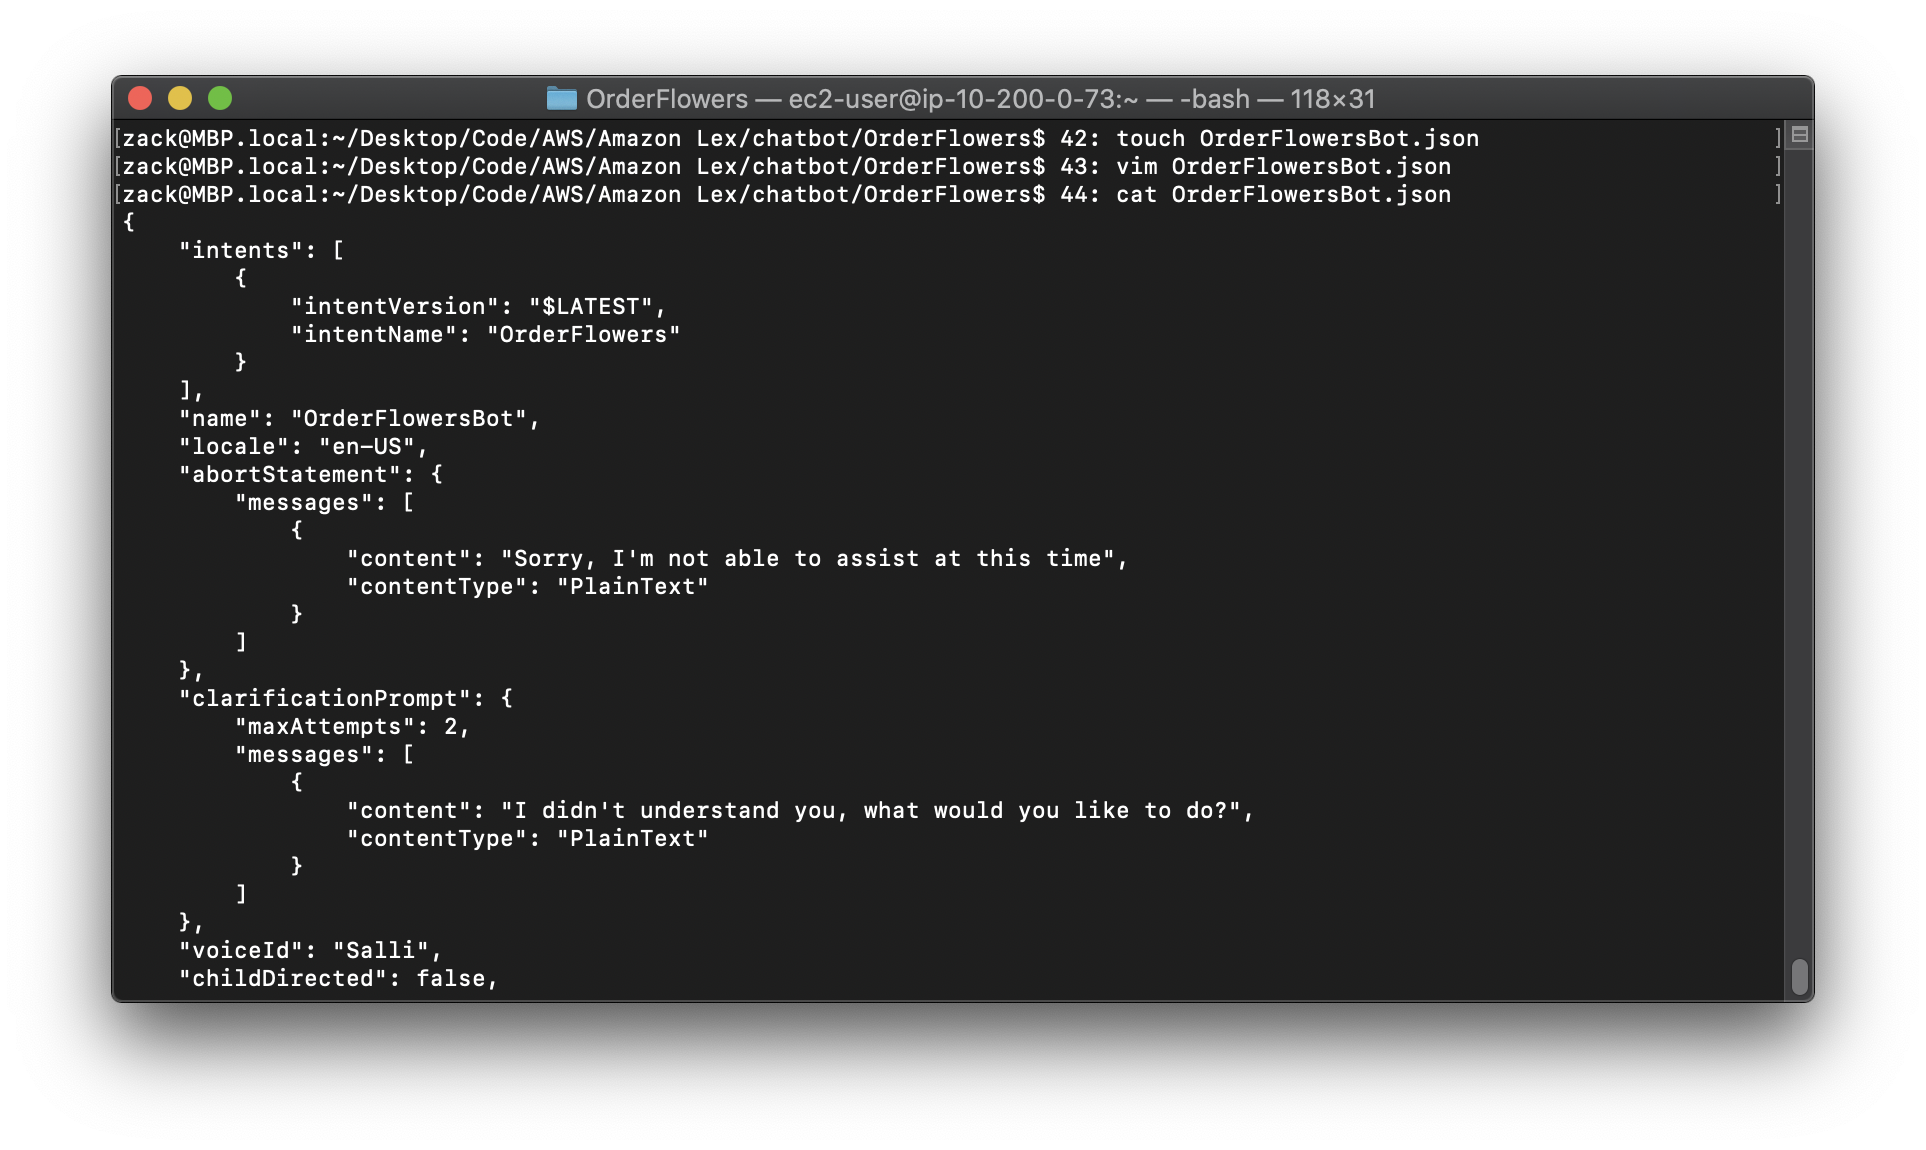
2.In the AWS CLI, call the PutBot operation to create the bot. The example is formatted for Unix, Linux, and macOS. For Windows, replace the backslash () Unix continuation character at the end of each line with a caret (^).
Replace the region to yours.
1 | aws lex-models put-bot \ |
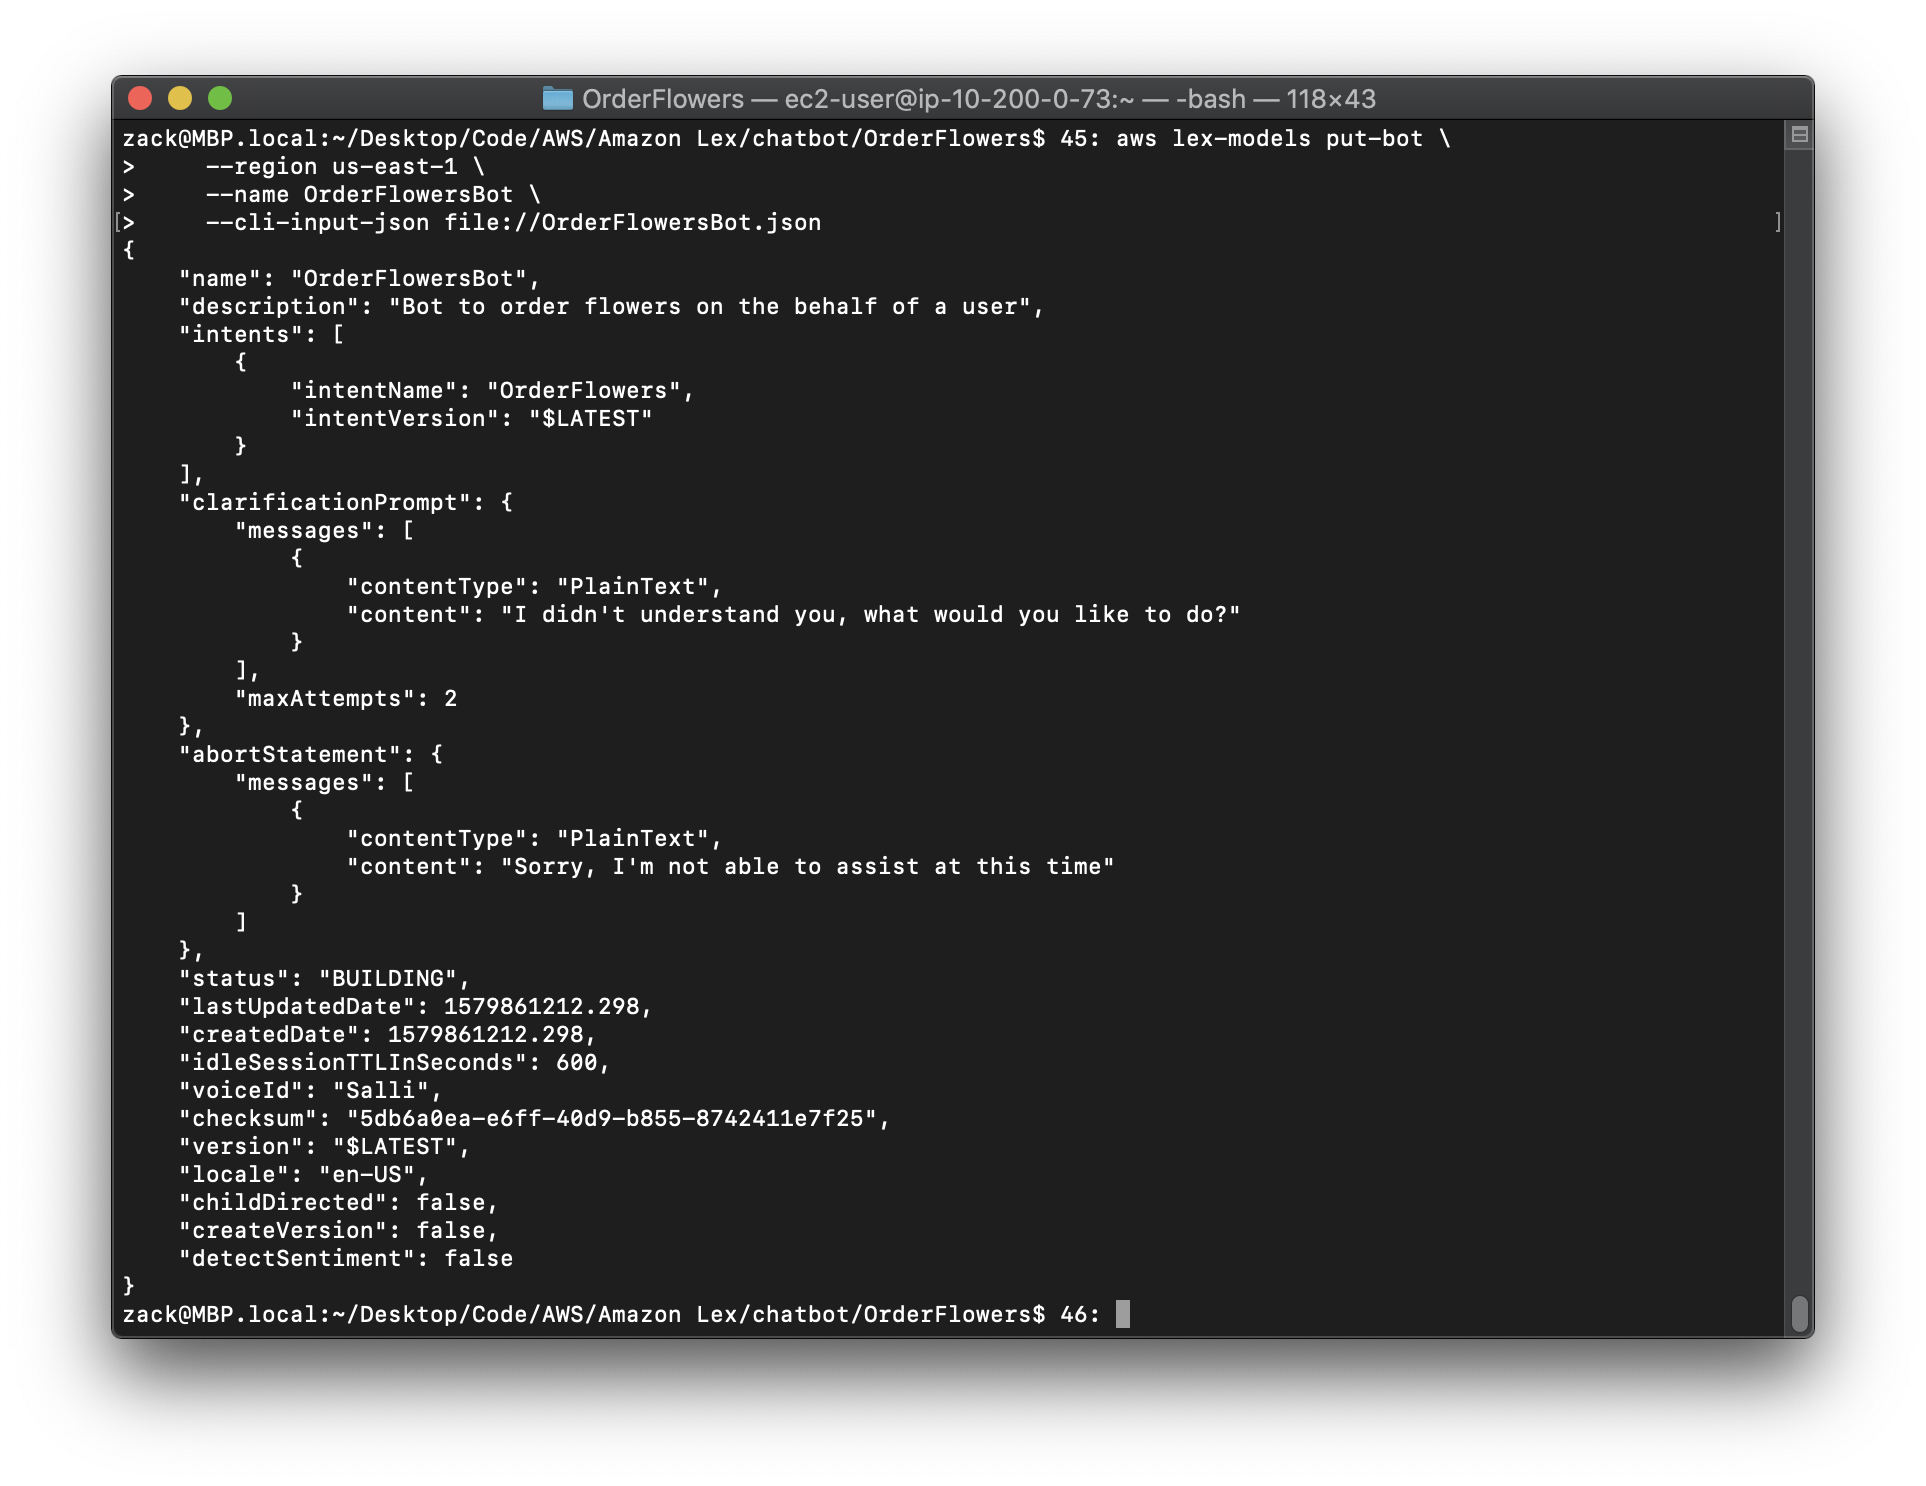
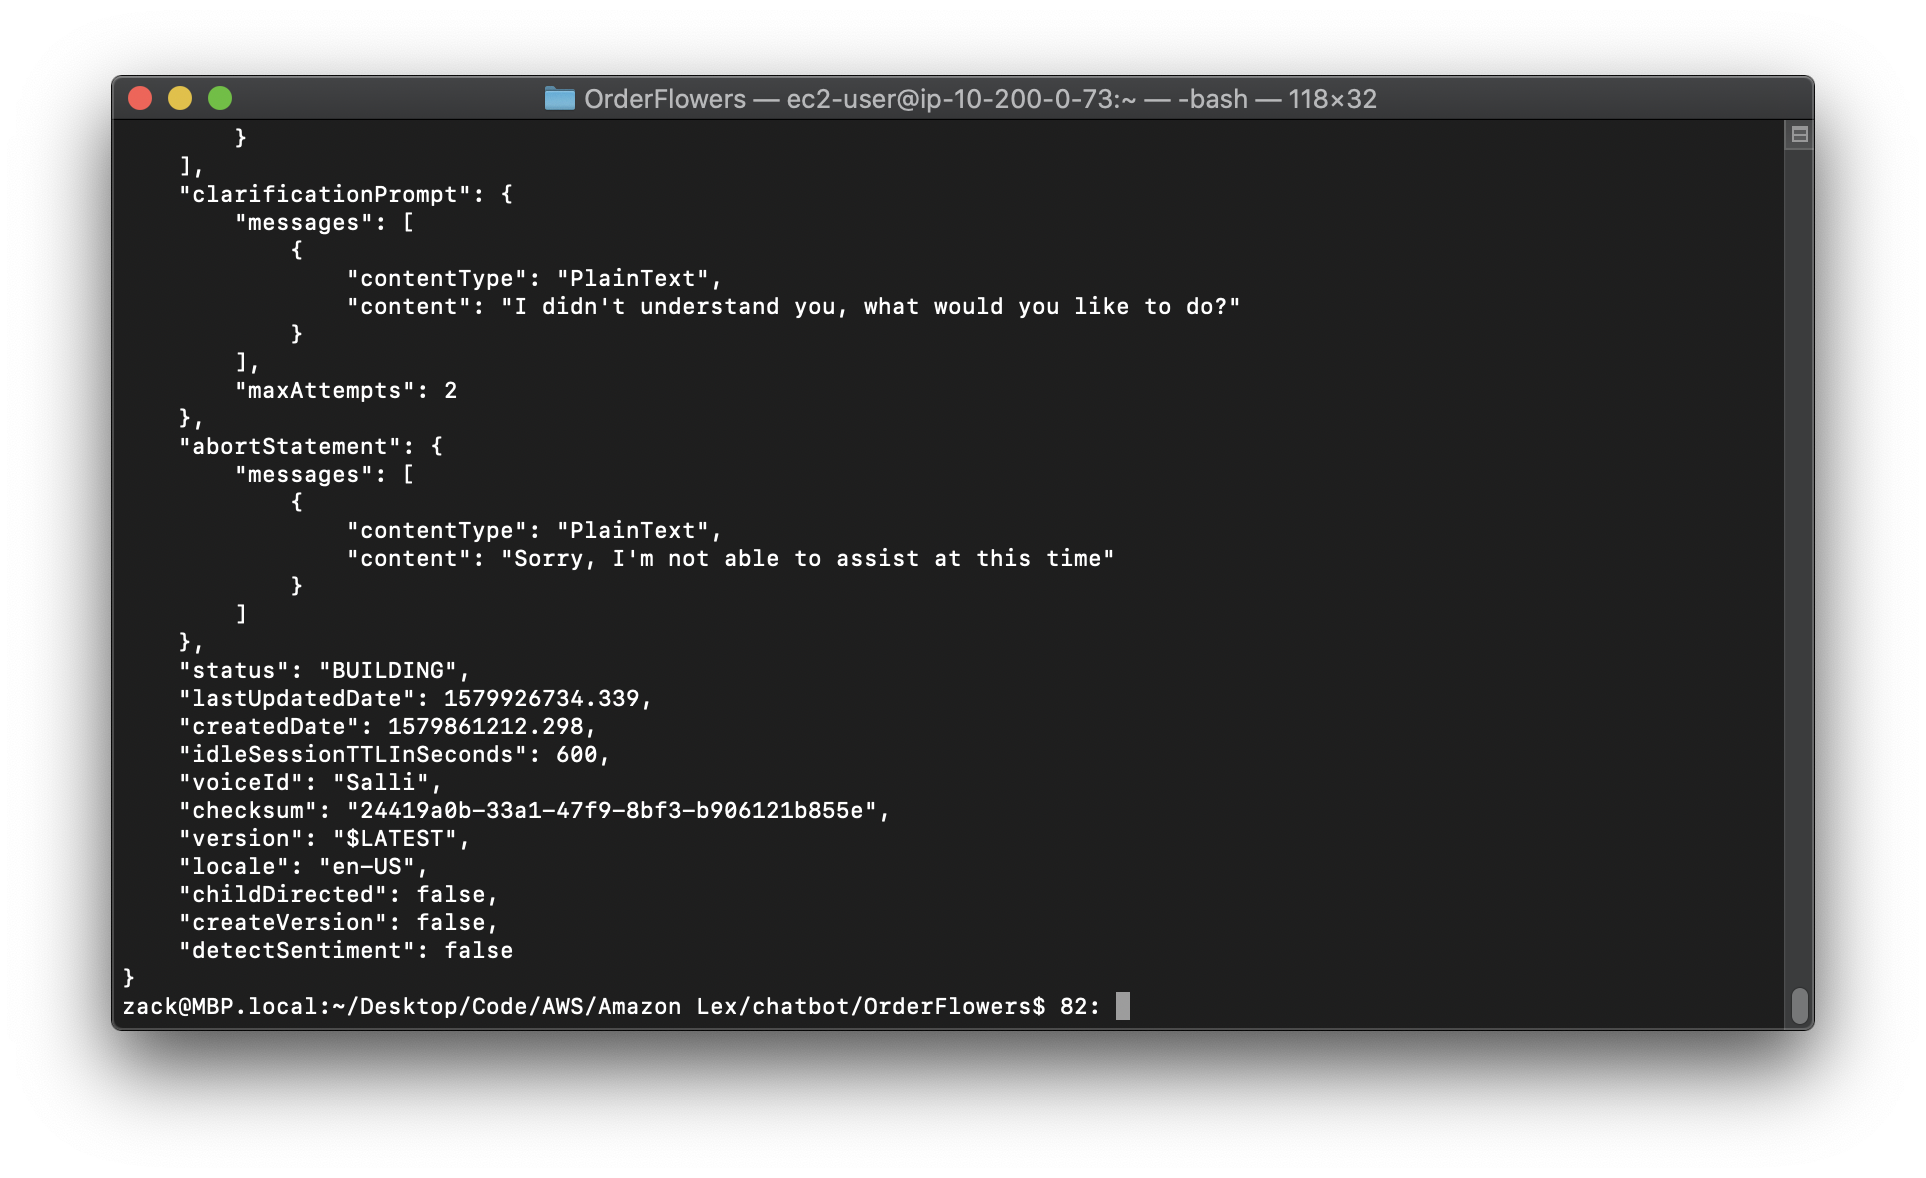
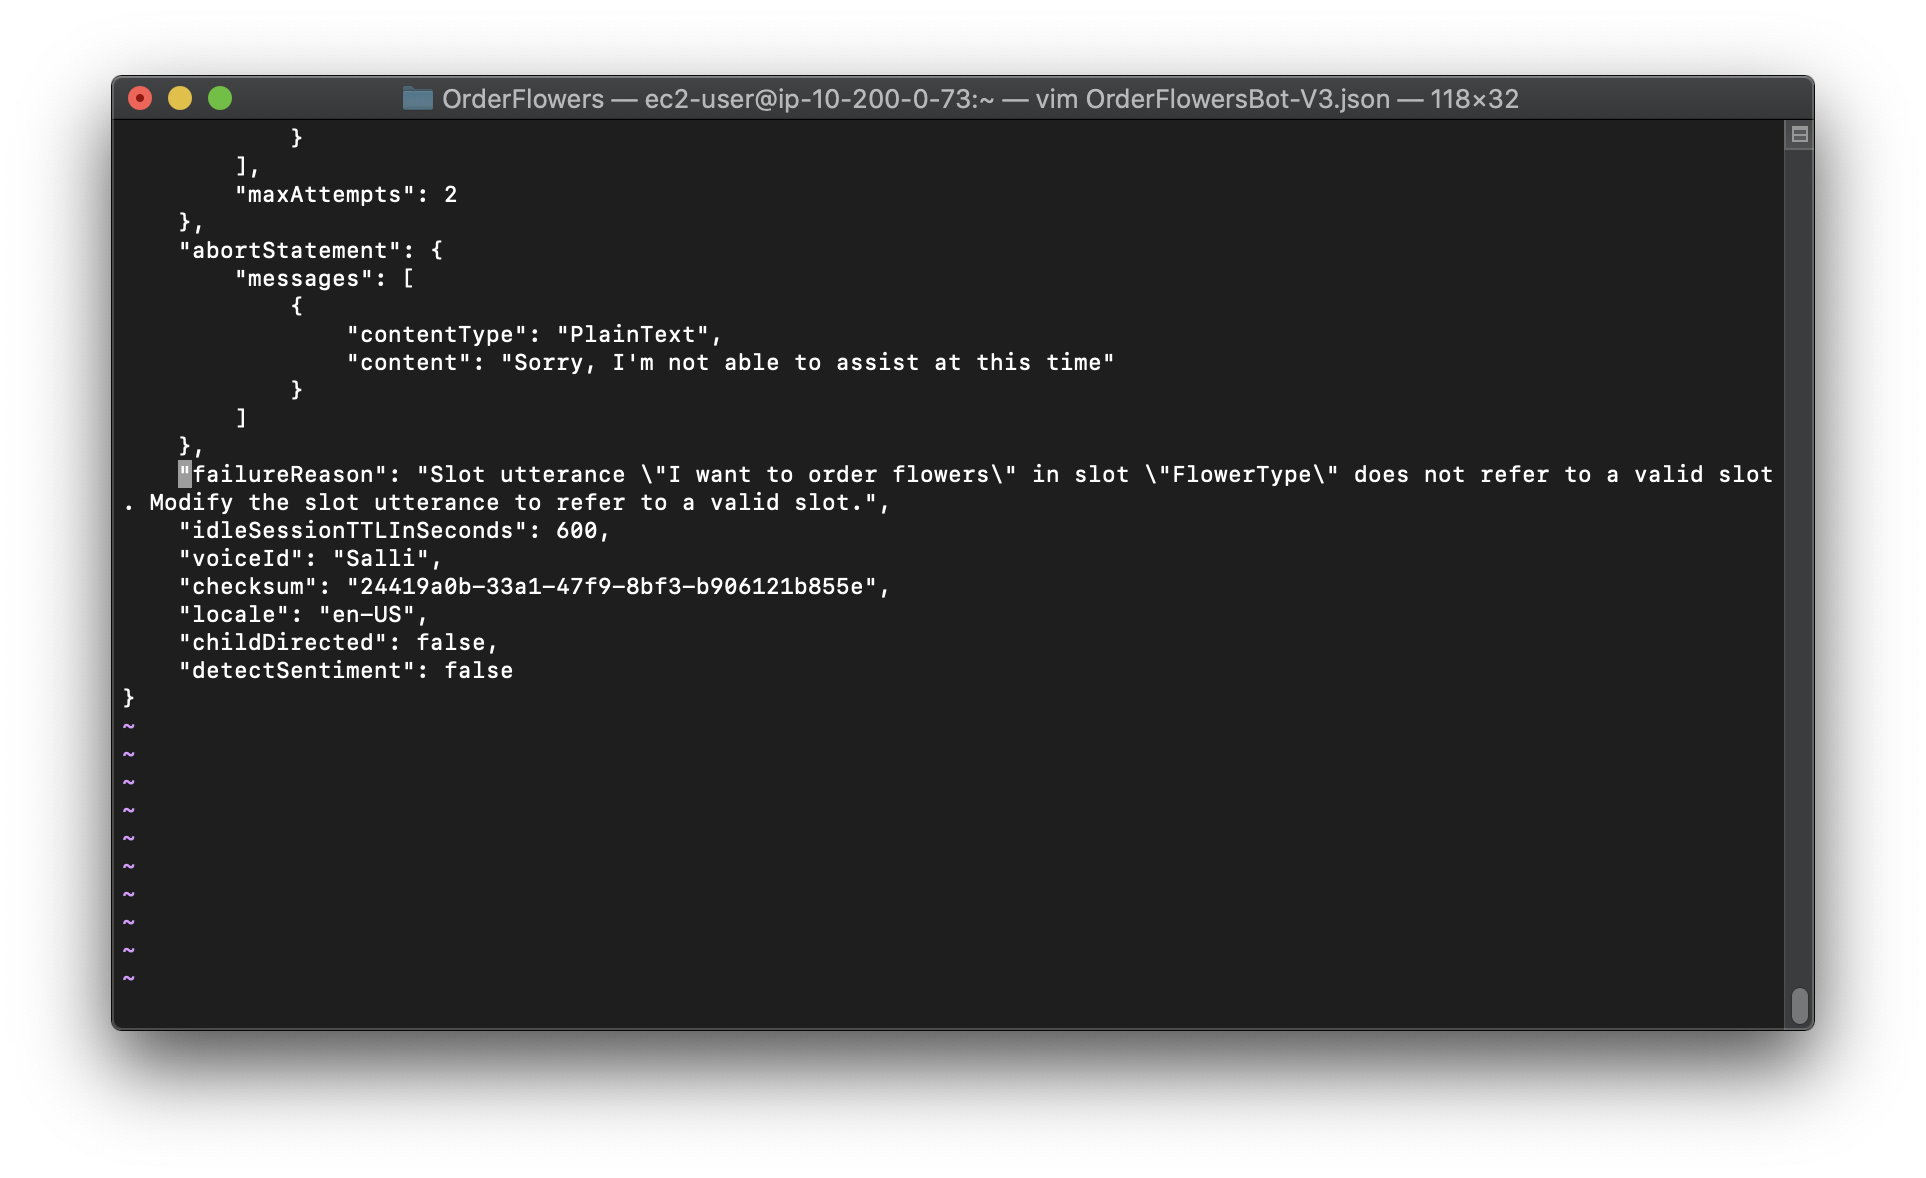
The response from the server follows. When you create or update bot, the status field is set to BUILDING. This indicates that the bot isn’t ready to use. To determine when the bot is ready for use, use the GetBot operation in the next step .
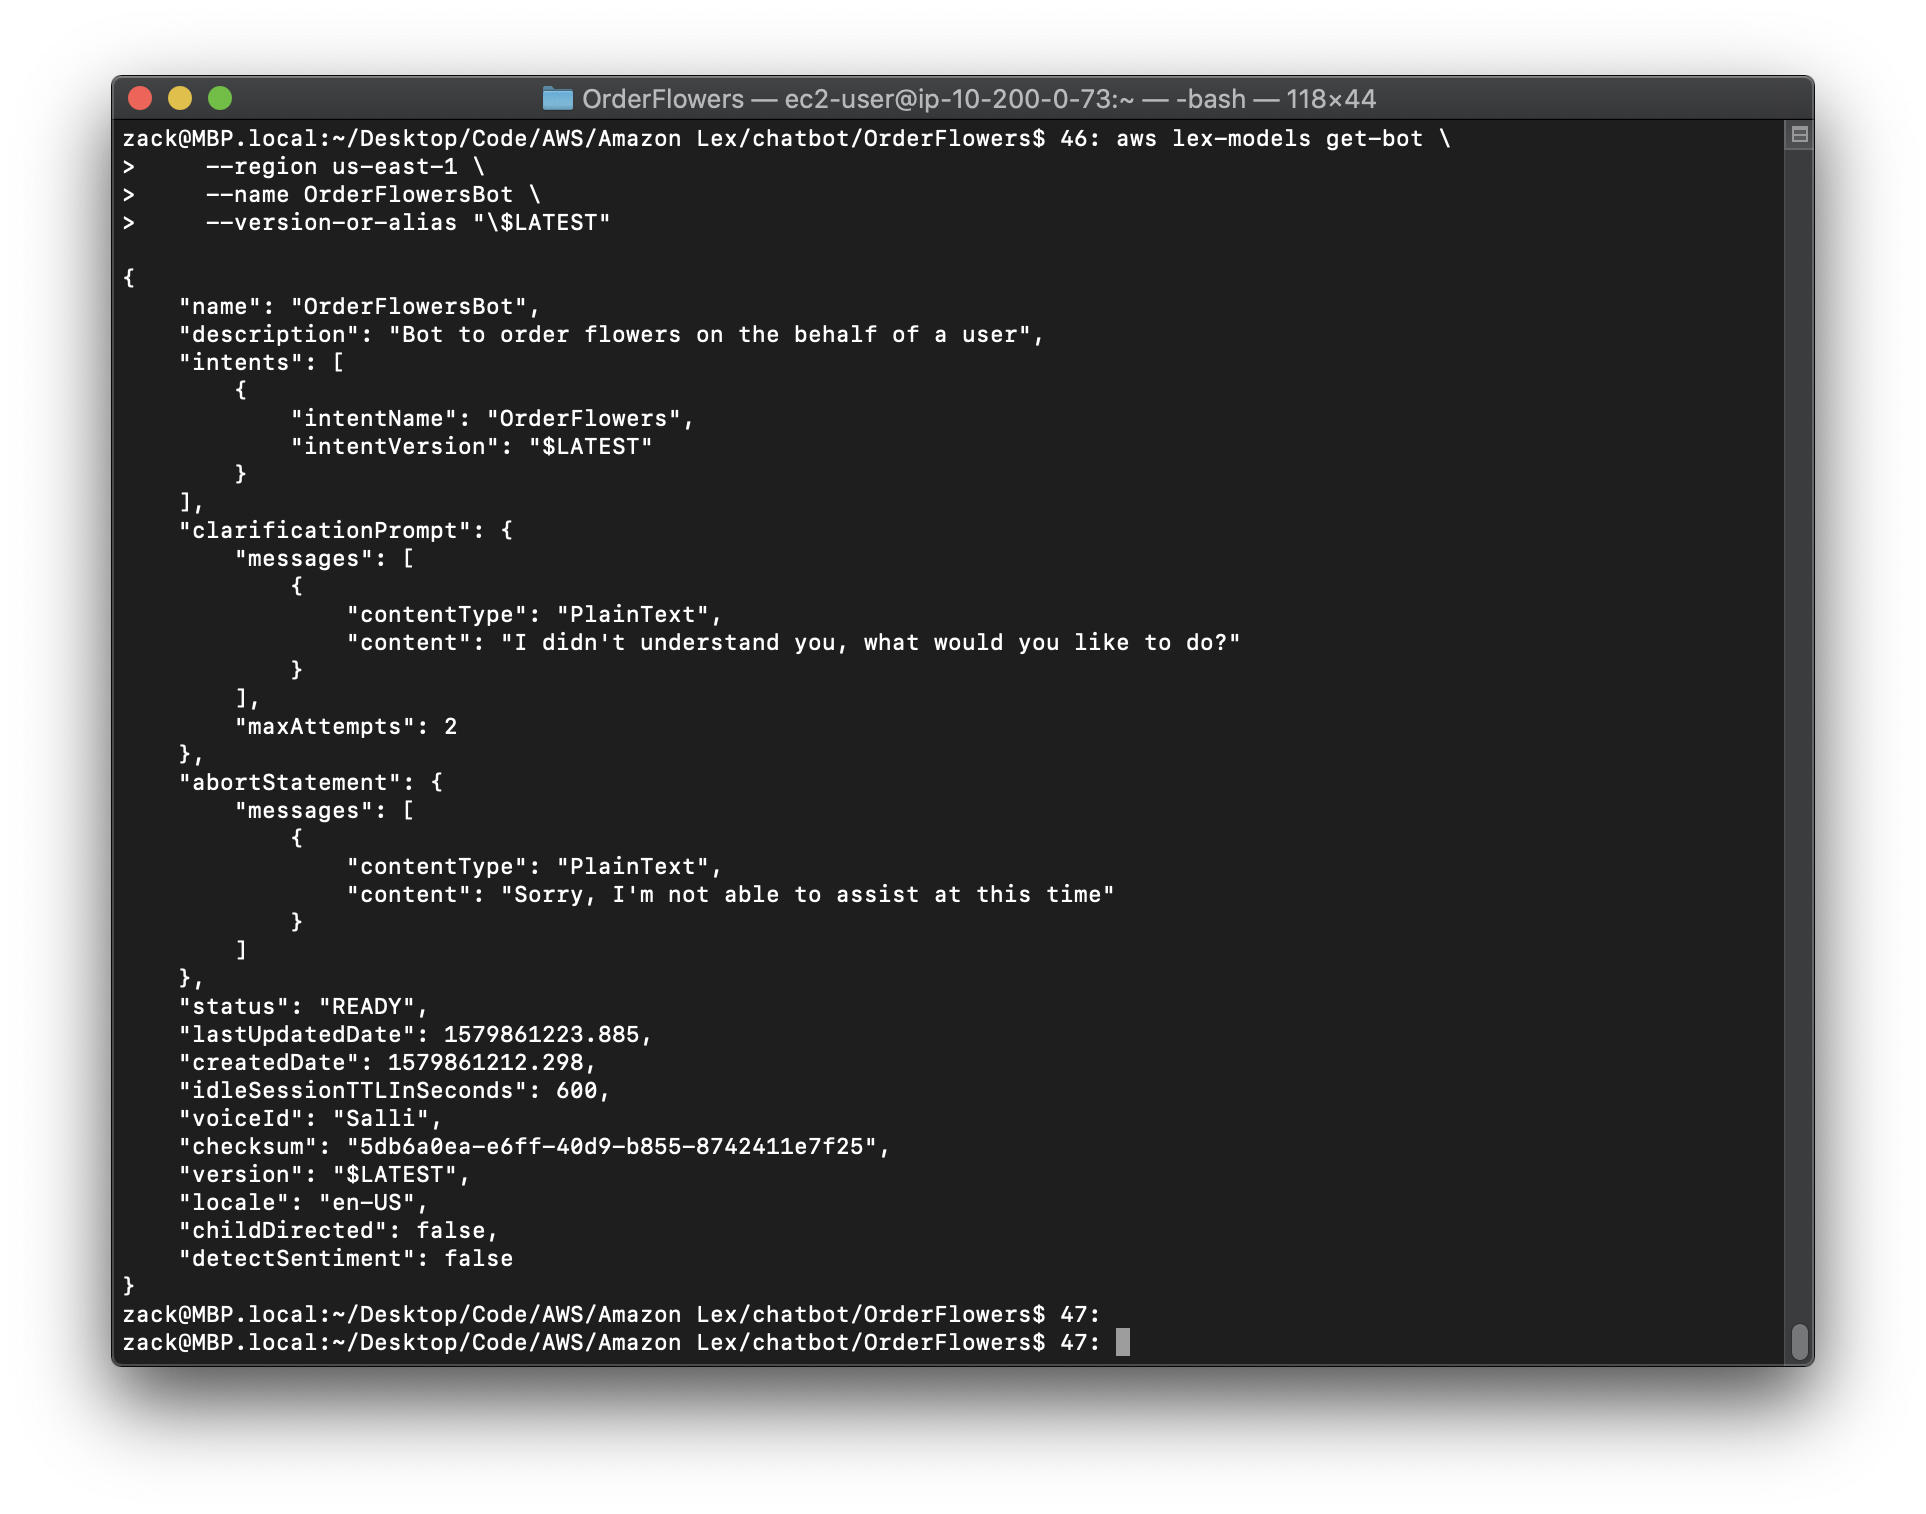
3.To determine if your new bot is ready for use, run the following command. Repeat this command until the status field returns READY. The example is formatted for Unix, Linux, and macOS. For Windows, replace the backslash () Unix continuation character at the end of each line with a caret (^).
Replace the region to yours.
1 | aws lex-models get-bot \ |
Step 5: Test a Bot (AWS CLI)
https://docs.aws.amazon.com/lex/latest/dg/gs-create-test.html
To test the bot,you can use either a text-based or a speech-based test.
Topics
- Test the Bot Using Text Input (AWS CLI)
- Test the Bot Using Speech Input (AWS CLI)
Test the Bot Using Text Input (AWS CLI)
https://docs.aws.amazon.com/lex/latest/dg/gs-create-test-text.html
To verify that the bot works correctly with text input, use the PostText operation. To run the commands in this exercise, you need to know the region where the commands will be run. For a list of regions, see Runtime Service Quotas.
Note: The following AWS CLI example is formatted for Unix, Linux, and macOS. For Windows, change "\$LATEST" to $LATEST and replace the backslash () continuation character at the end of each line with a caret (^).
To use text to test the bot (AWS CLI)
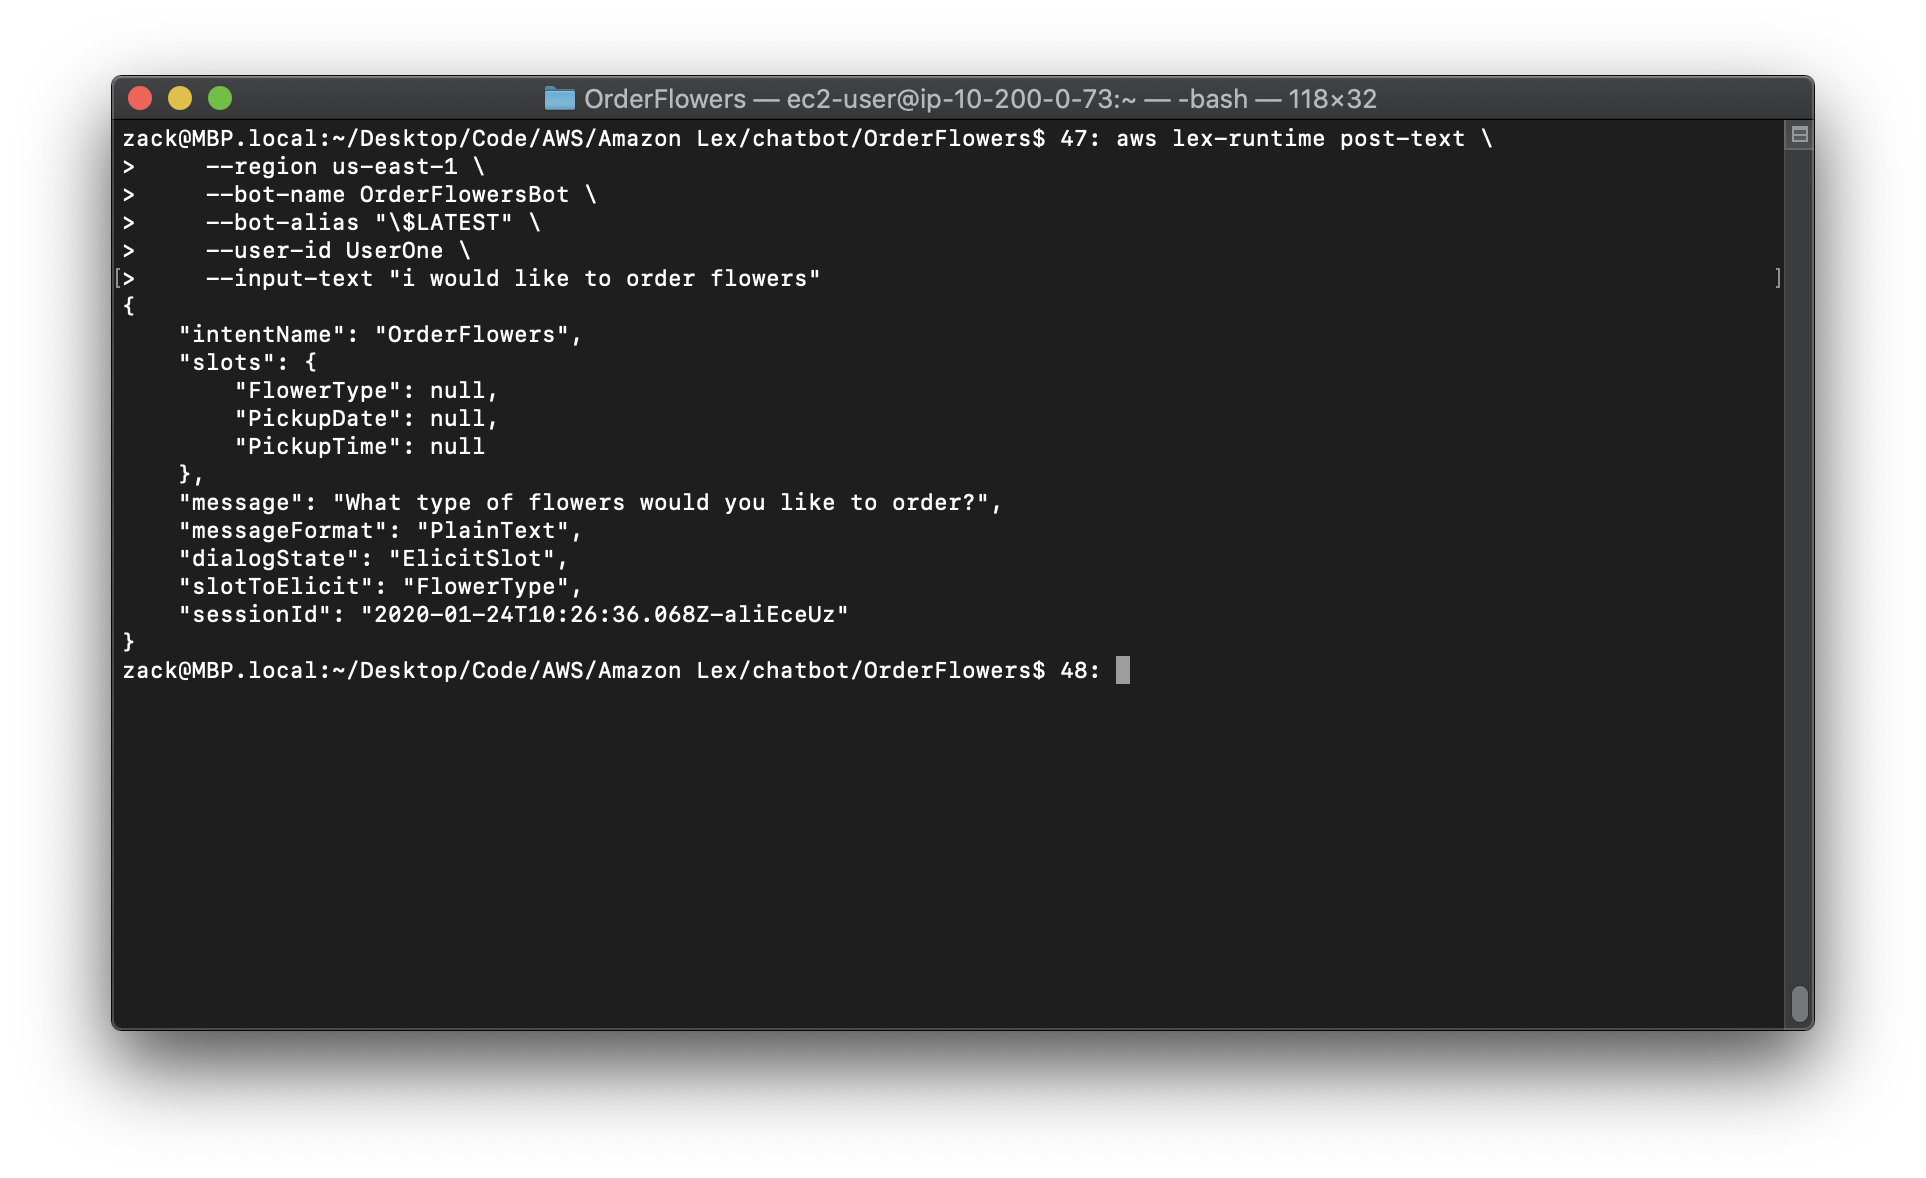
1.In the AWS CLI, start a conversation with the OrderFlowersBot bot. The example is formatted for Unix, Linux, and macOS. For Windows, replace the backslash () Unix continuation character at the end of each line with a caret (^).
Replace the region to yours.
1 | aws lex-runtime post-text \ |
2.Run the following commands to finish the conversation with the bot.
Replace the region to yours.
1 | aws lex-runtime post-text \ |
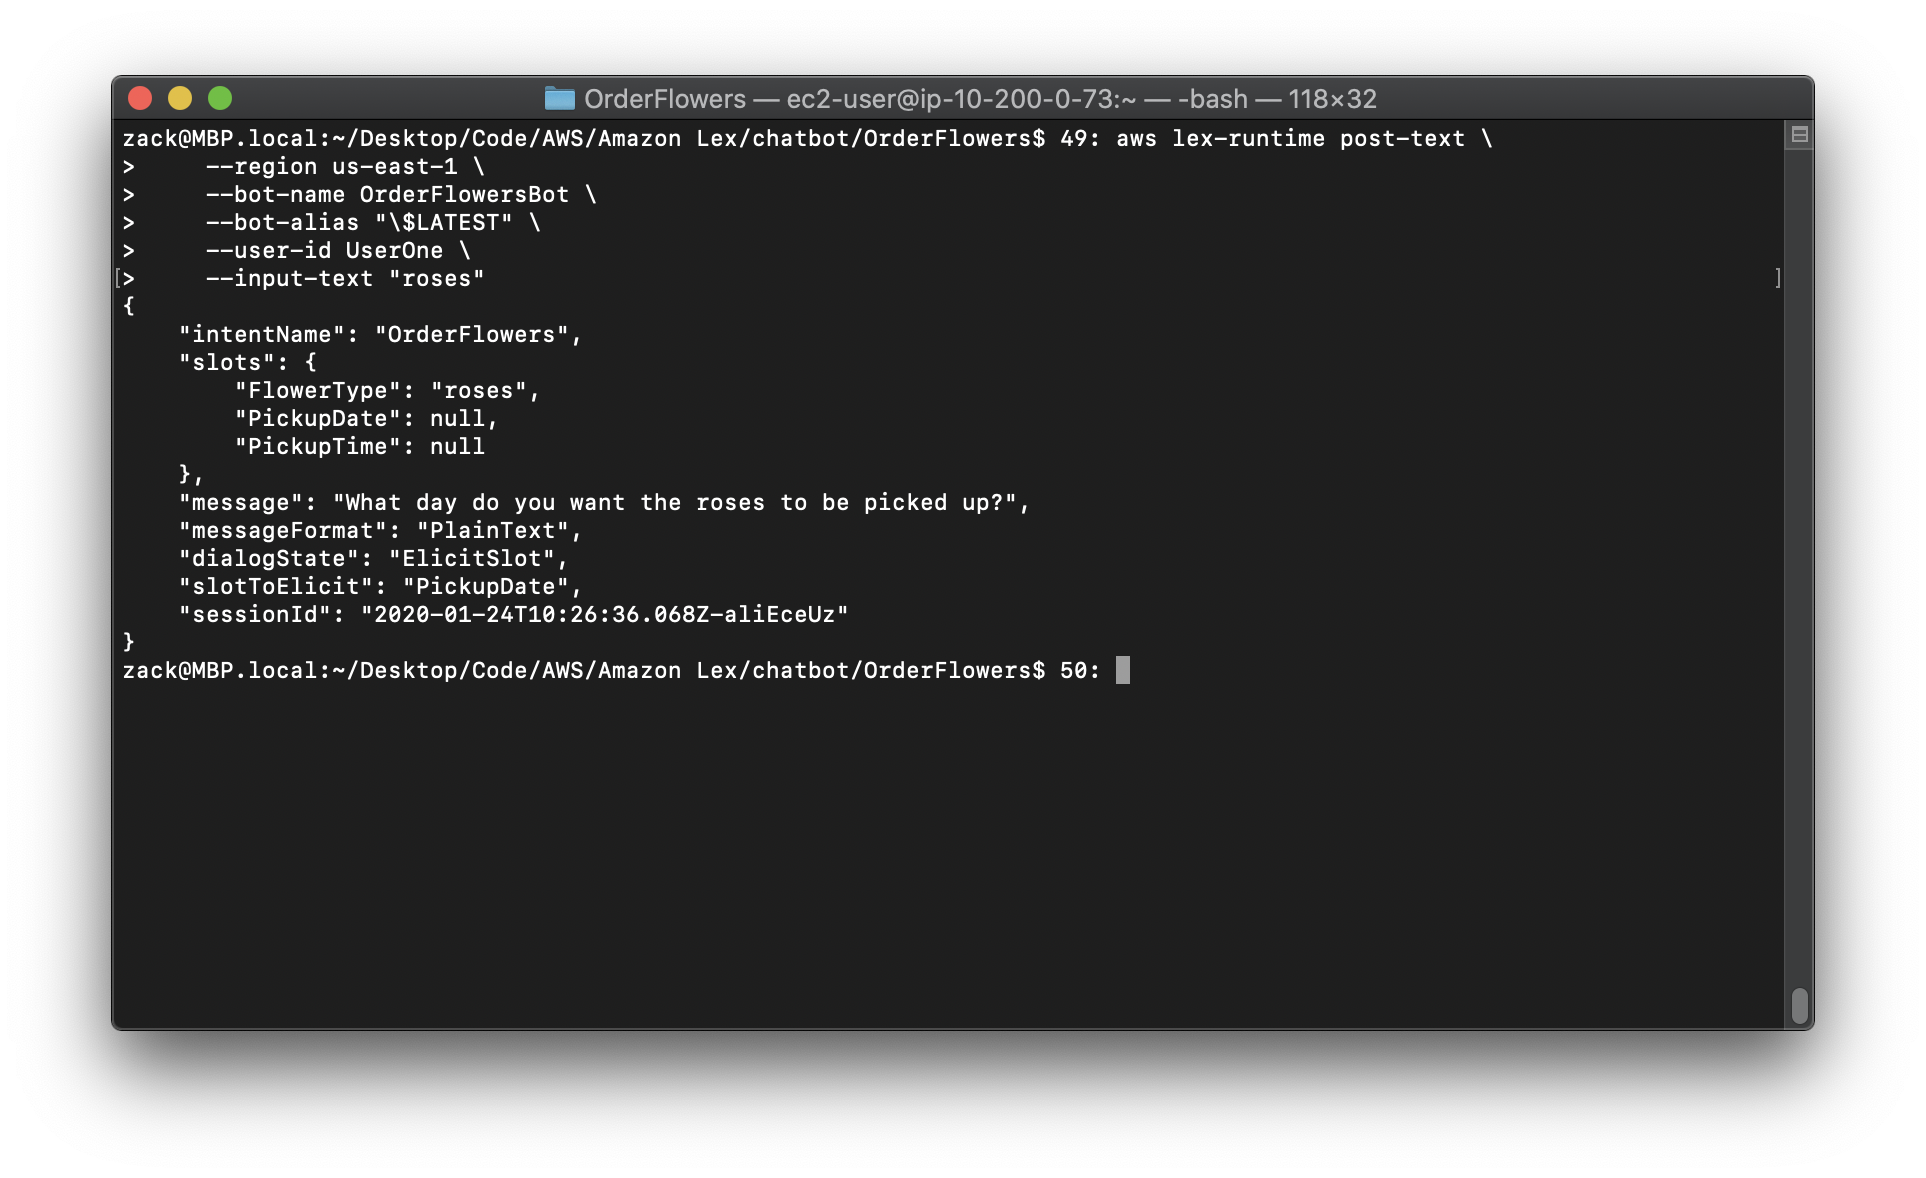
Replace the region to yours.
1 | aws lex-runtime post-text \ |

Replace the region to yours.
1 | aws lex-runtime post-text \ |
Replace the region to yours.
1 | aws lex-runtime post-text \ |
Test the Bot Using Speech Input (AWS CLI)
https://docs.aws.amazon.com/lex/latest/dg/gs-create-test-speech.html
To test the bot using audio files, use the PostContent operation. You generate the audio files using Amazon Polly text-to-speech operations.
To run the commands in this exercise, you need to know the region the Amazon Lex and Amazon Polly commands will be run. For a list of regions for Amazon Lex, see Runtime Service Quotas. For a list of regions for Amazon Polly see AWS Regions and Endpoints in the Amazon Web Services General Reference.
Note: The following AWS CLI example is formatted for Unix, Linux, and macOS. For Windows, change “$LATEST” to $LATEST and replace the backslash () continuation character at the end of each line with a caret (^).
To use a speech input to test the bot (AWS CLI)
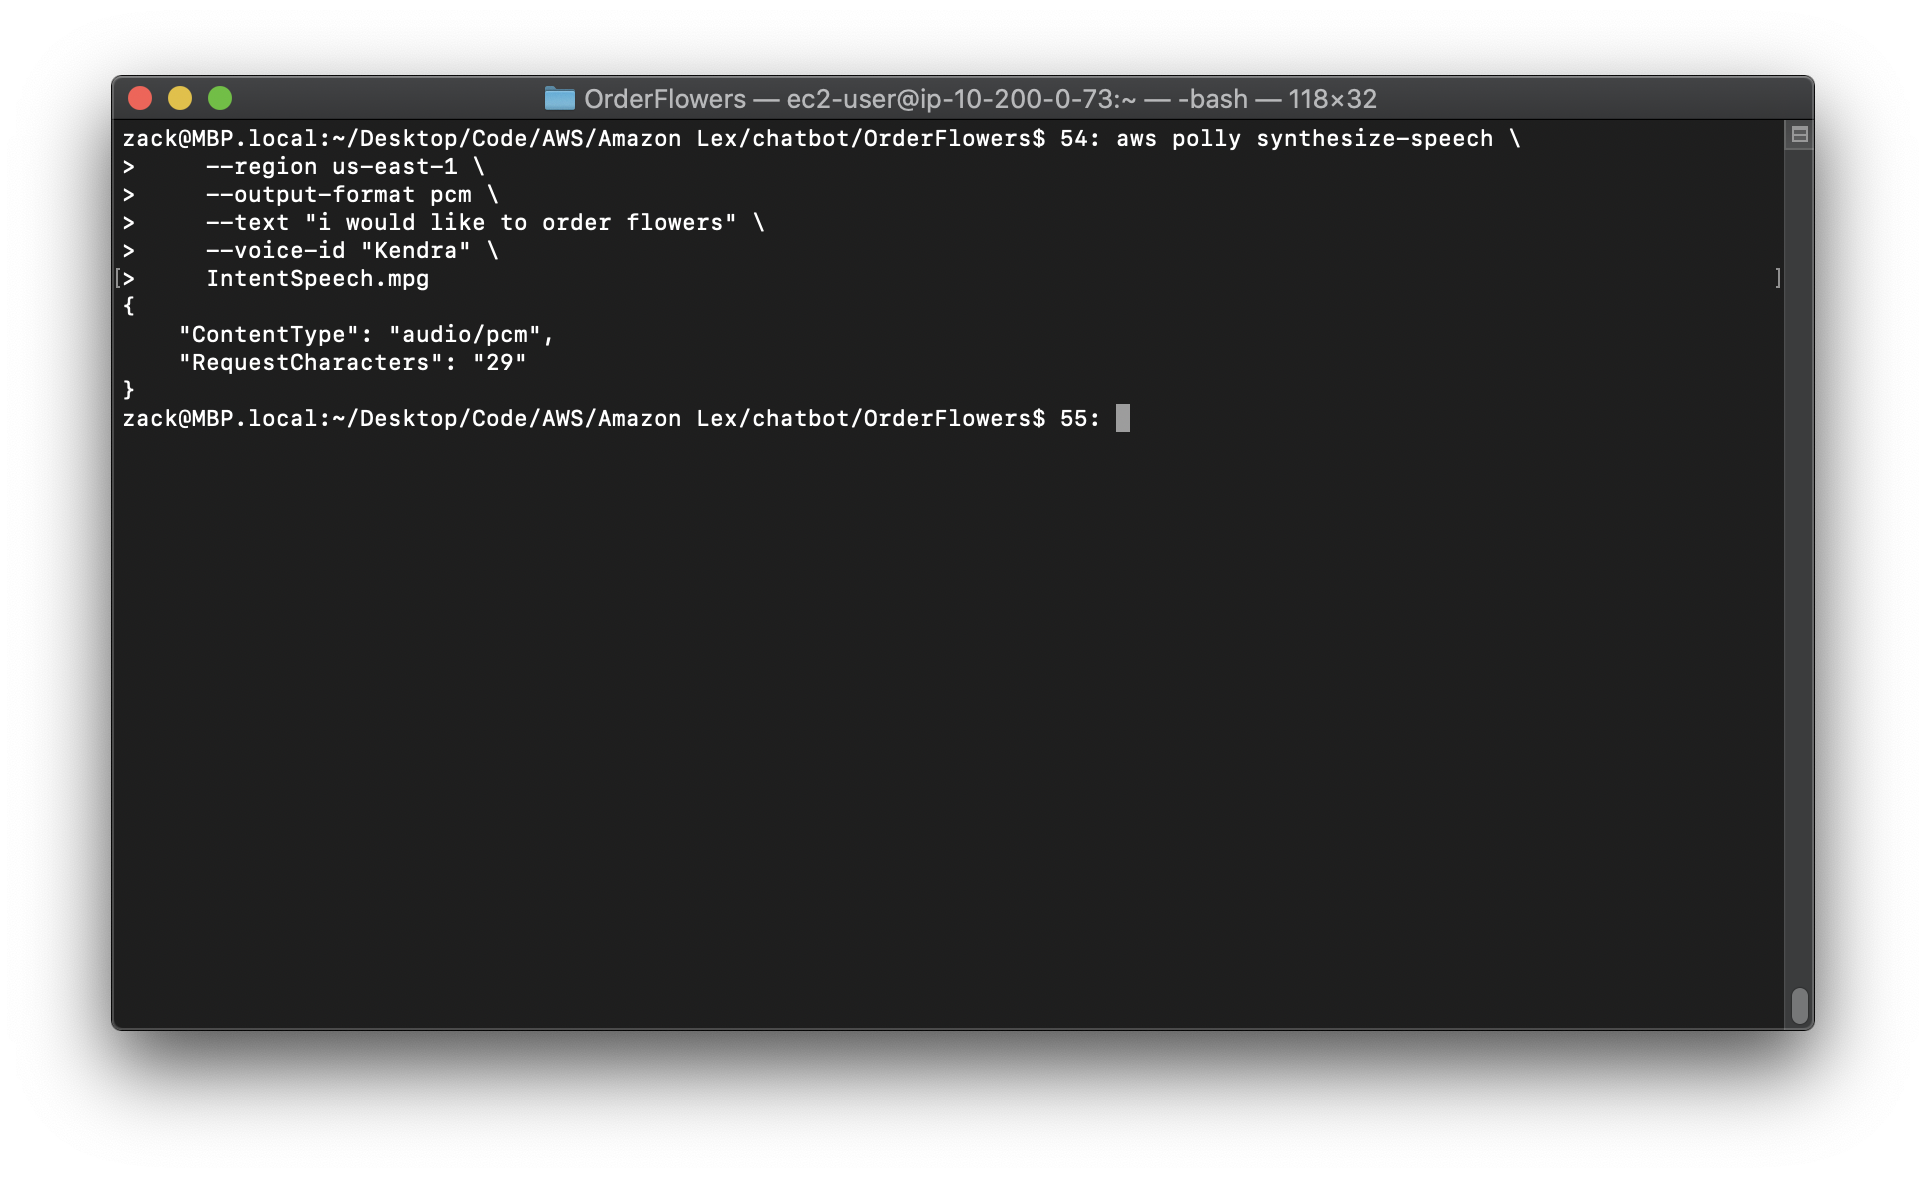
1.In the AWS CLI, create an audio file using Amazon Polly. The example is formatted for Unix, Linux, and macOS. For Windows, replace the backslash () Unix continuation character at the end of each line with a caret (^).
Replace the region to yours.
1 | aws polly synthesize-speech \ |
2.To send the audio file to Amazon Lex, run the following command. Amazon Lex saves the audio from the response in the specified output file.
Replace the region to yours.
1 | aws lex-runtime post-content \ |
Amazon Lex responds with a request for the first slot. It saves the audio response in the specified output file.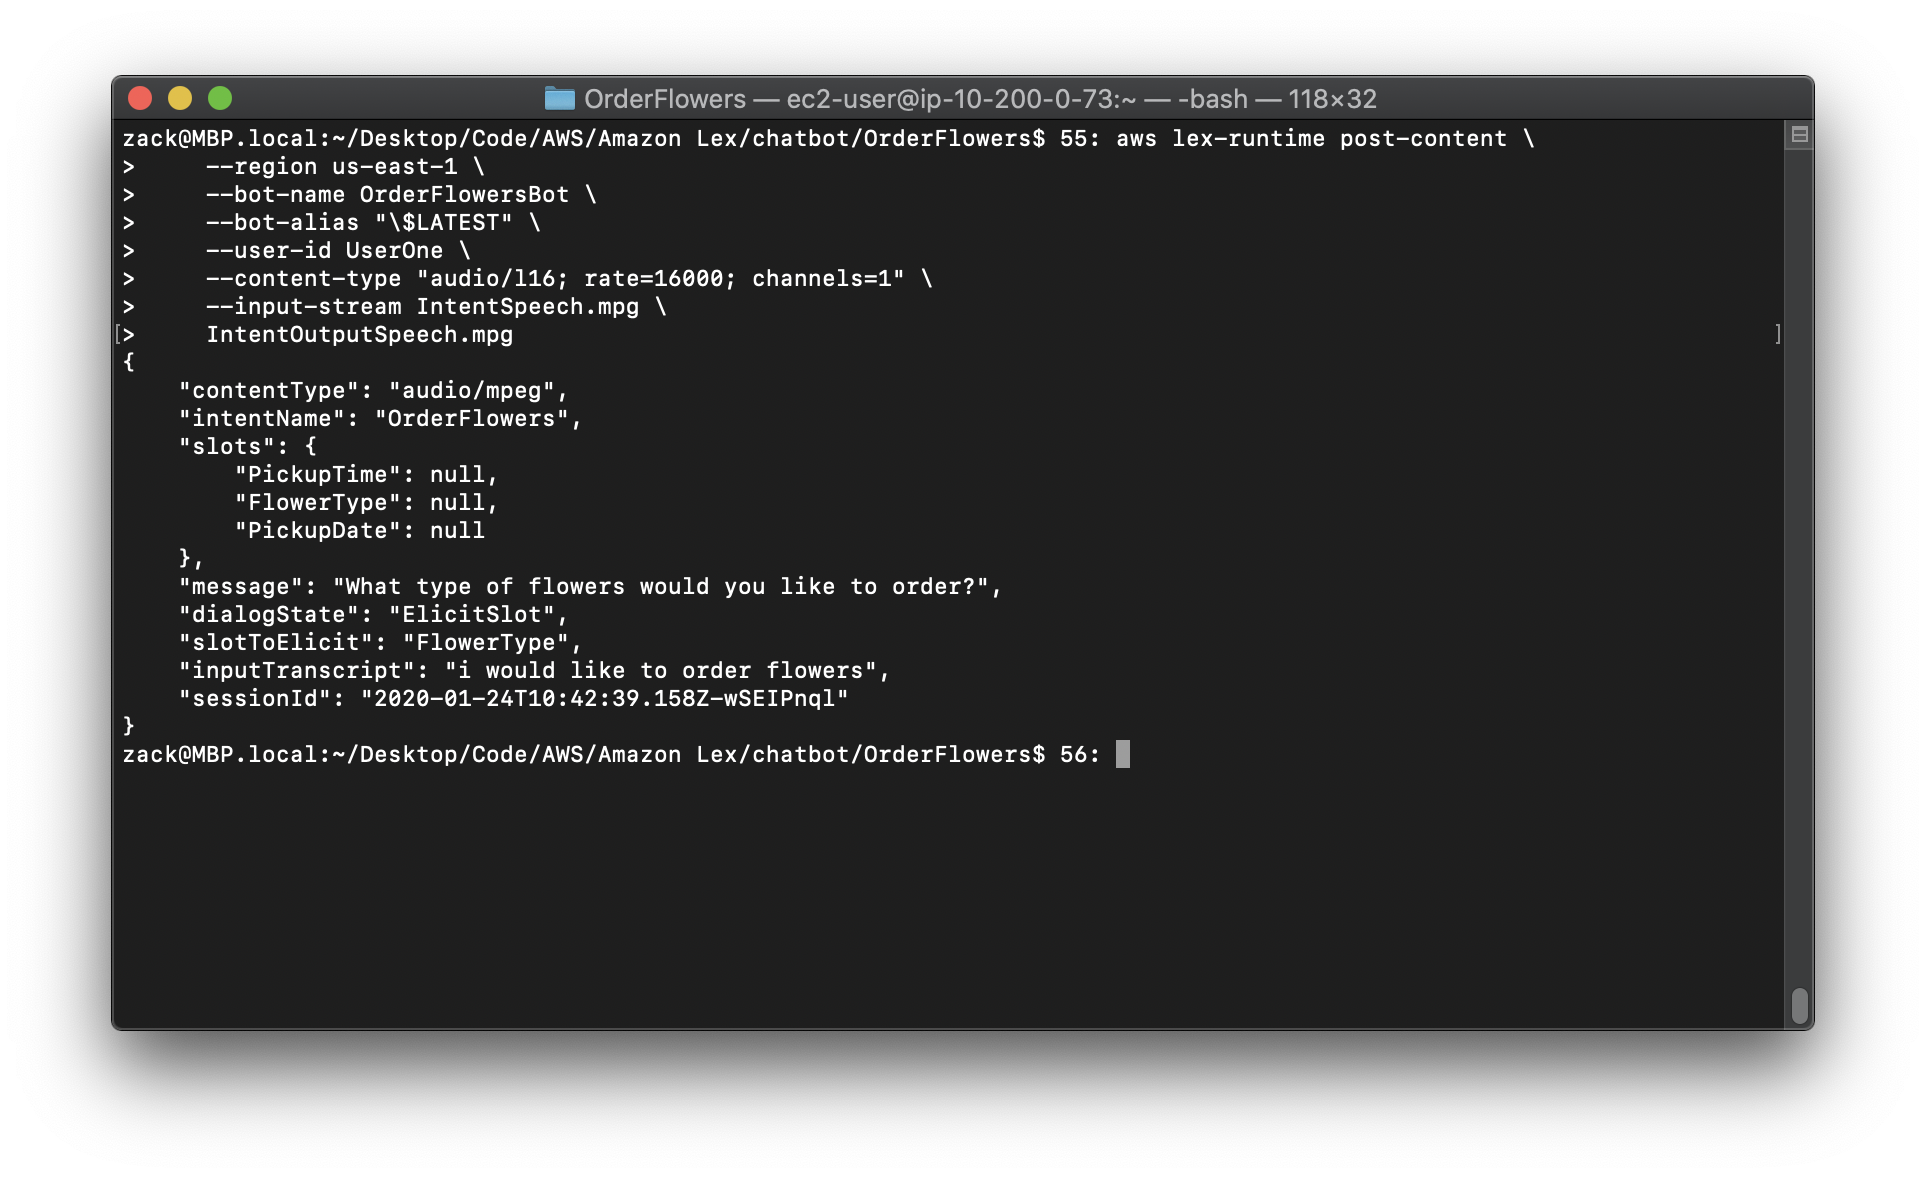
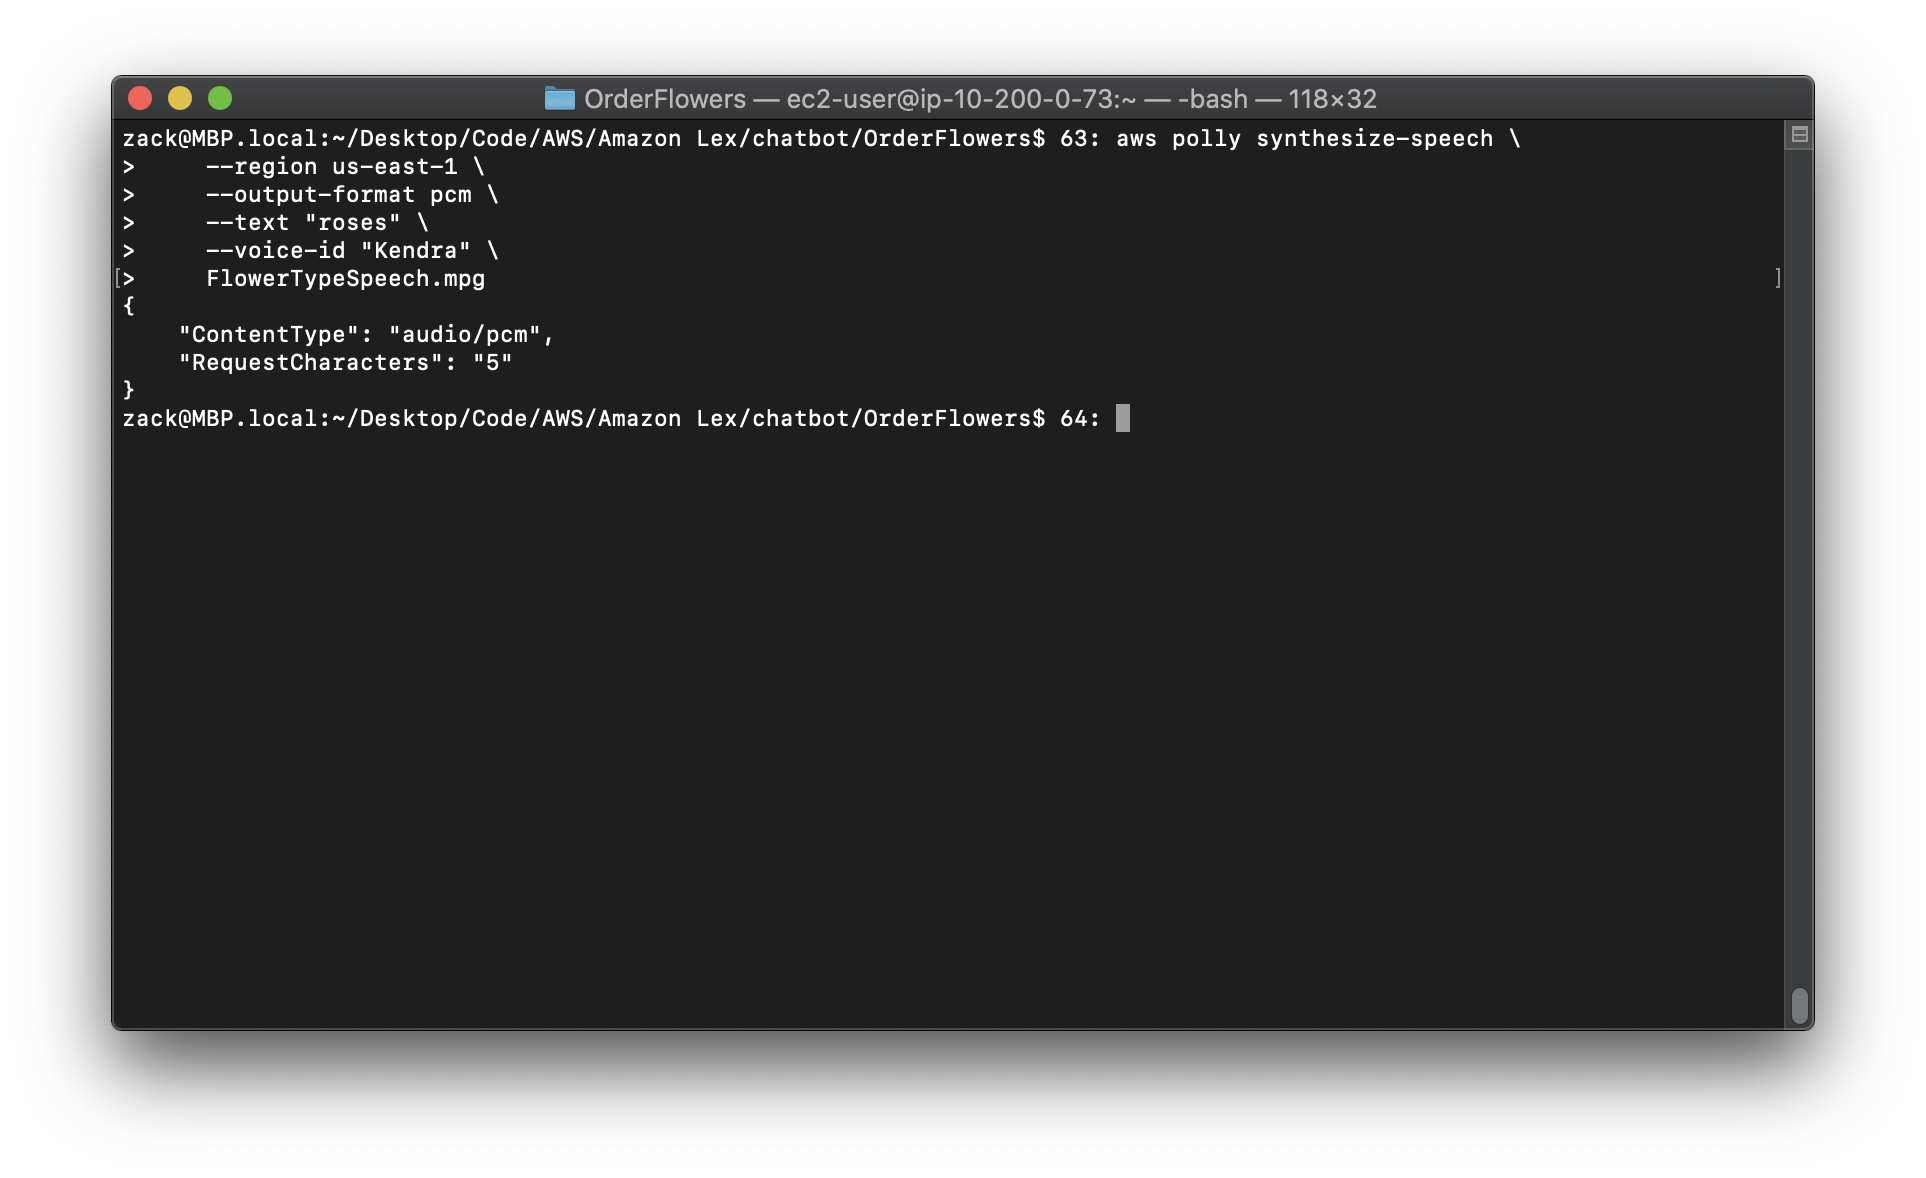
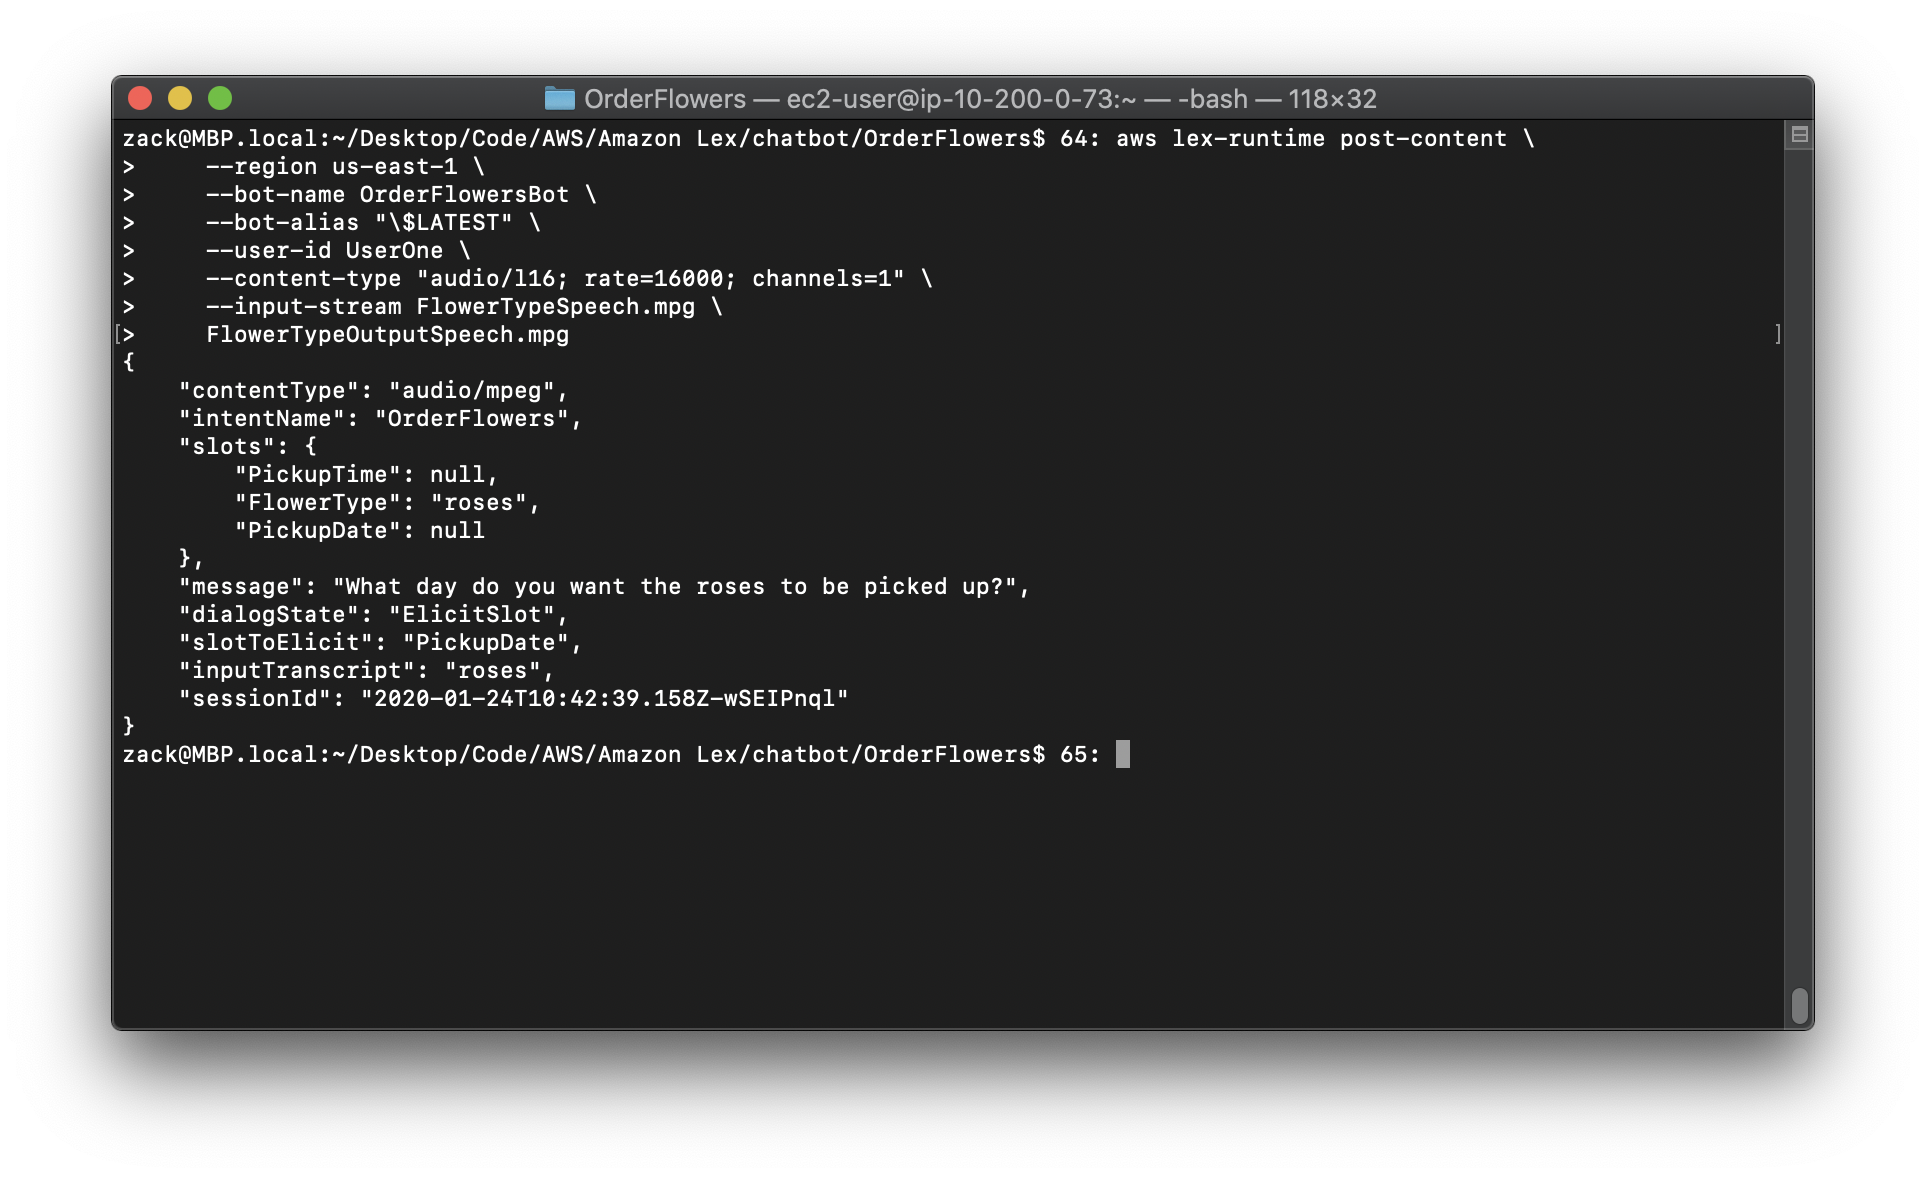
3.To order roses, create the following audio file and send it to Amazon Lex :
Replace the region to yours.
Note: the official developer guide miss an \ after “Kendra”.
1 | aws polly synthesize-speech \ |
Replace the region to yours.
1 | aws lex-runtime post-content \ |
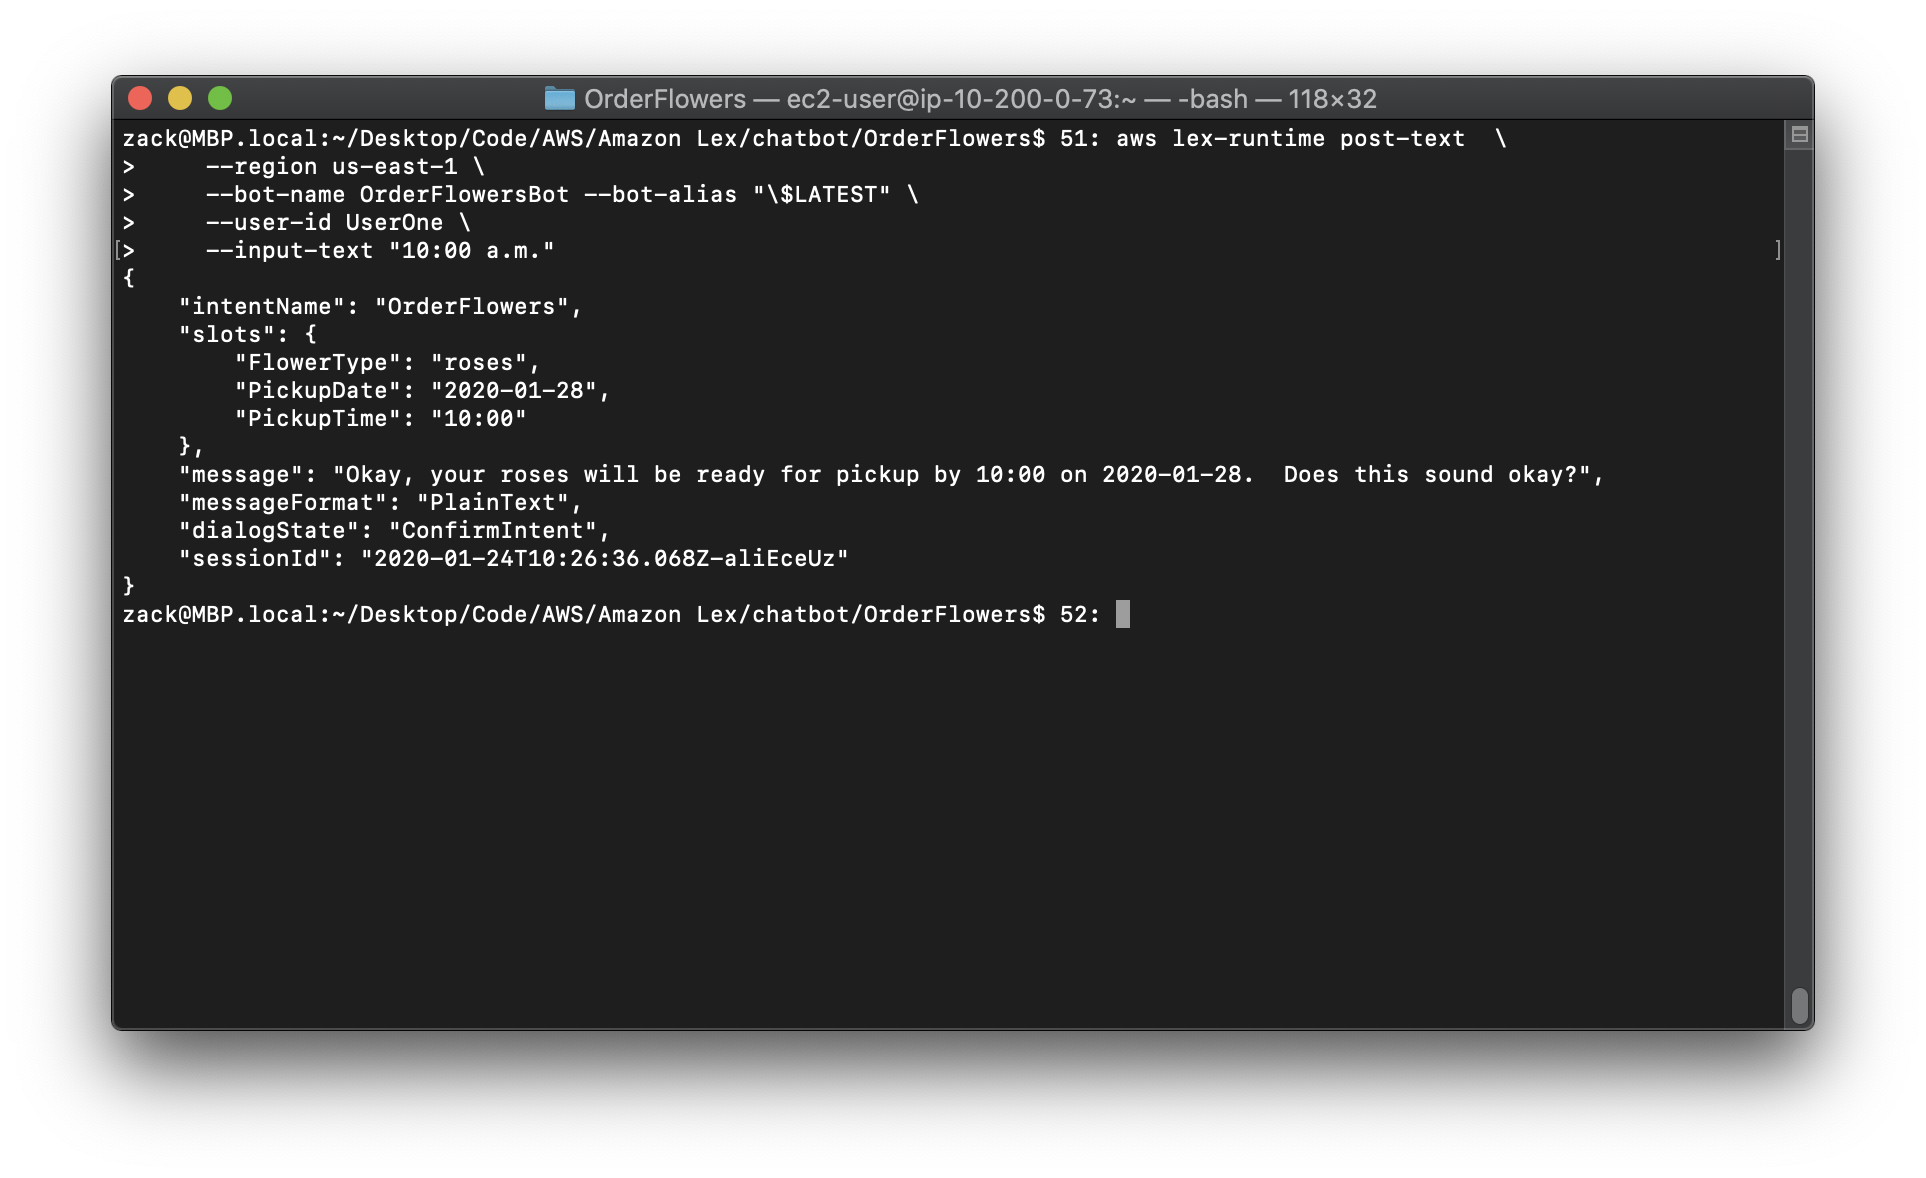
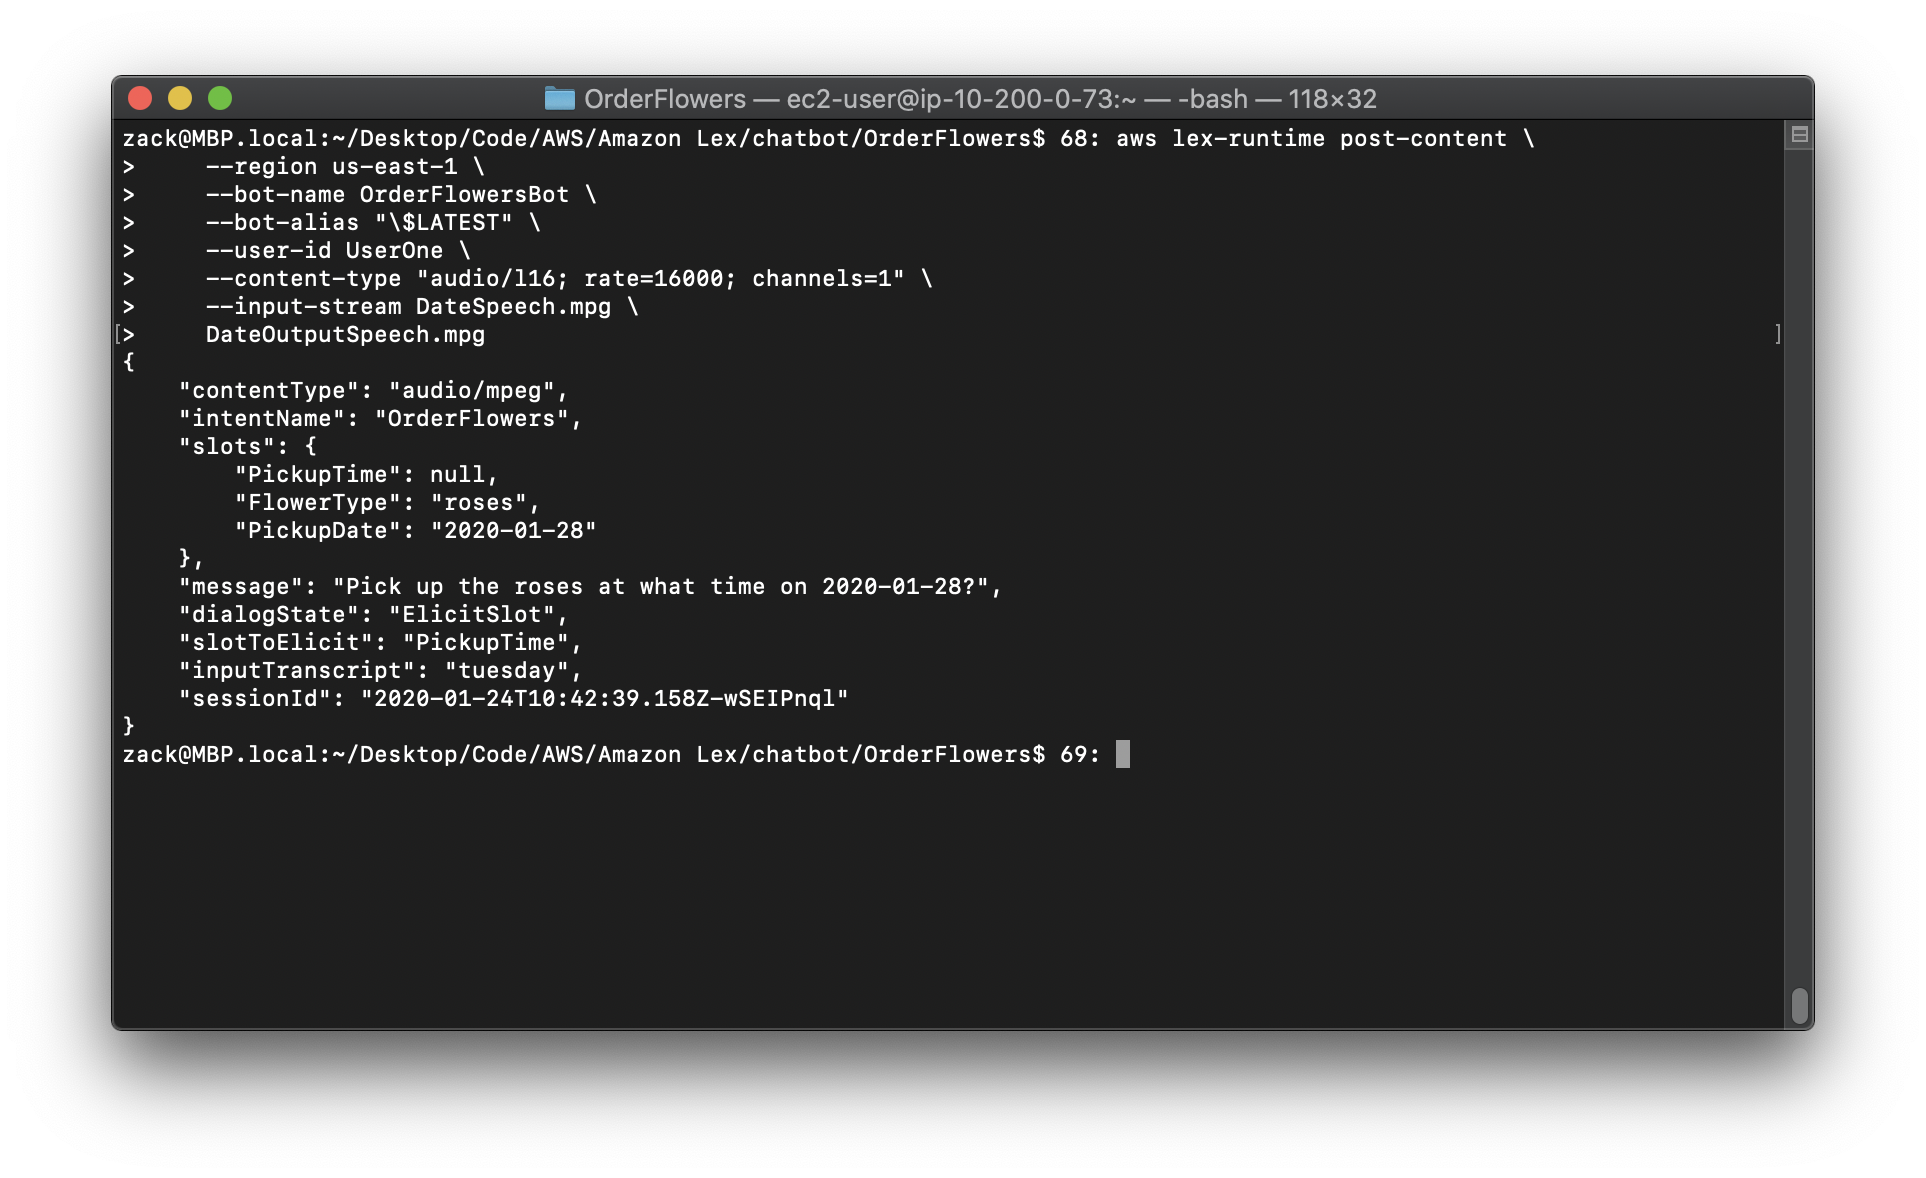
4.To set the delivery date, create the following audio file and send it to Amazon Lex:
Replace the region to yours.
Note: the official developer guide miss an \ after “Kendra”.
1 | aws polly synthesize-speech \ |

Replace the region to yours.
Note: the official developer guide miss an \ after DateSpeech.mpg.
1 | aws lex-runtime post-content \ |
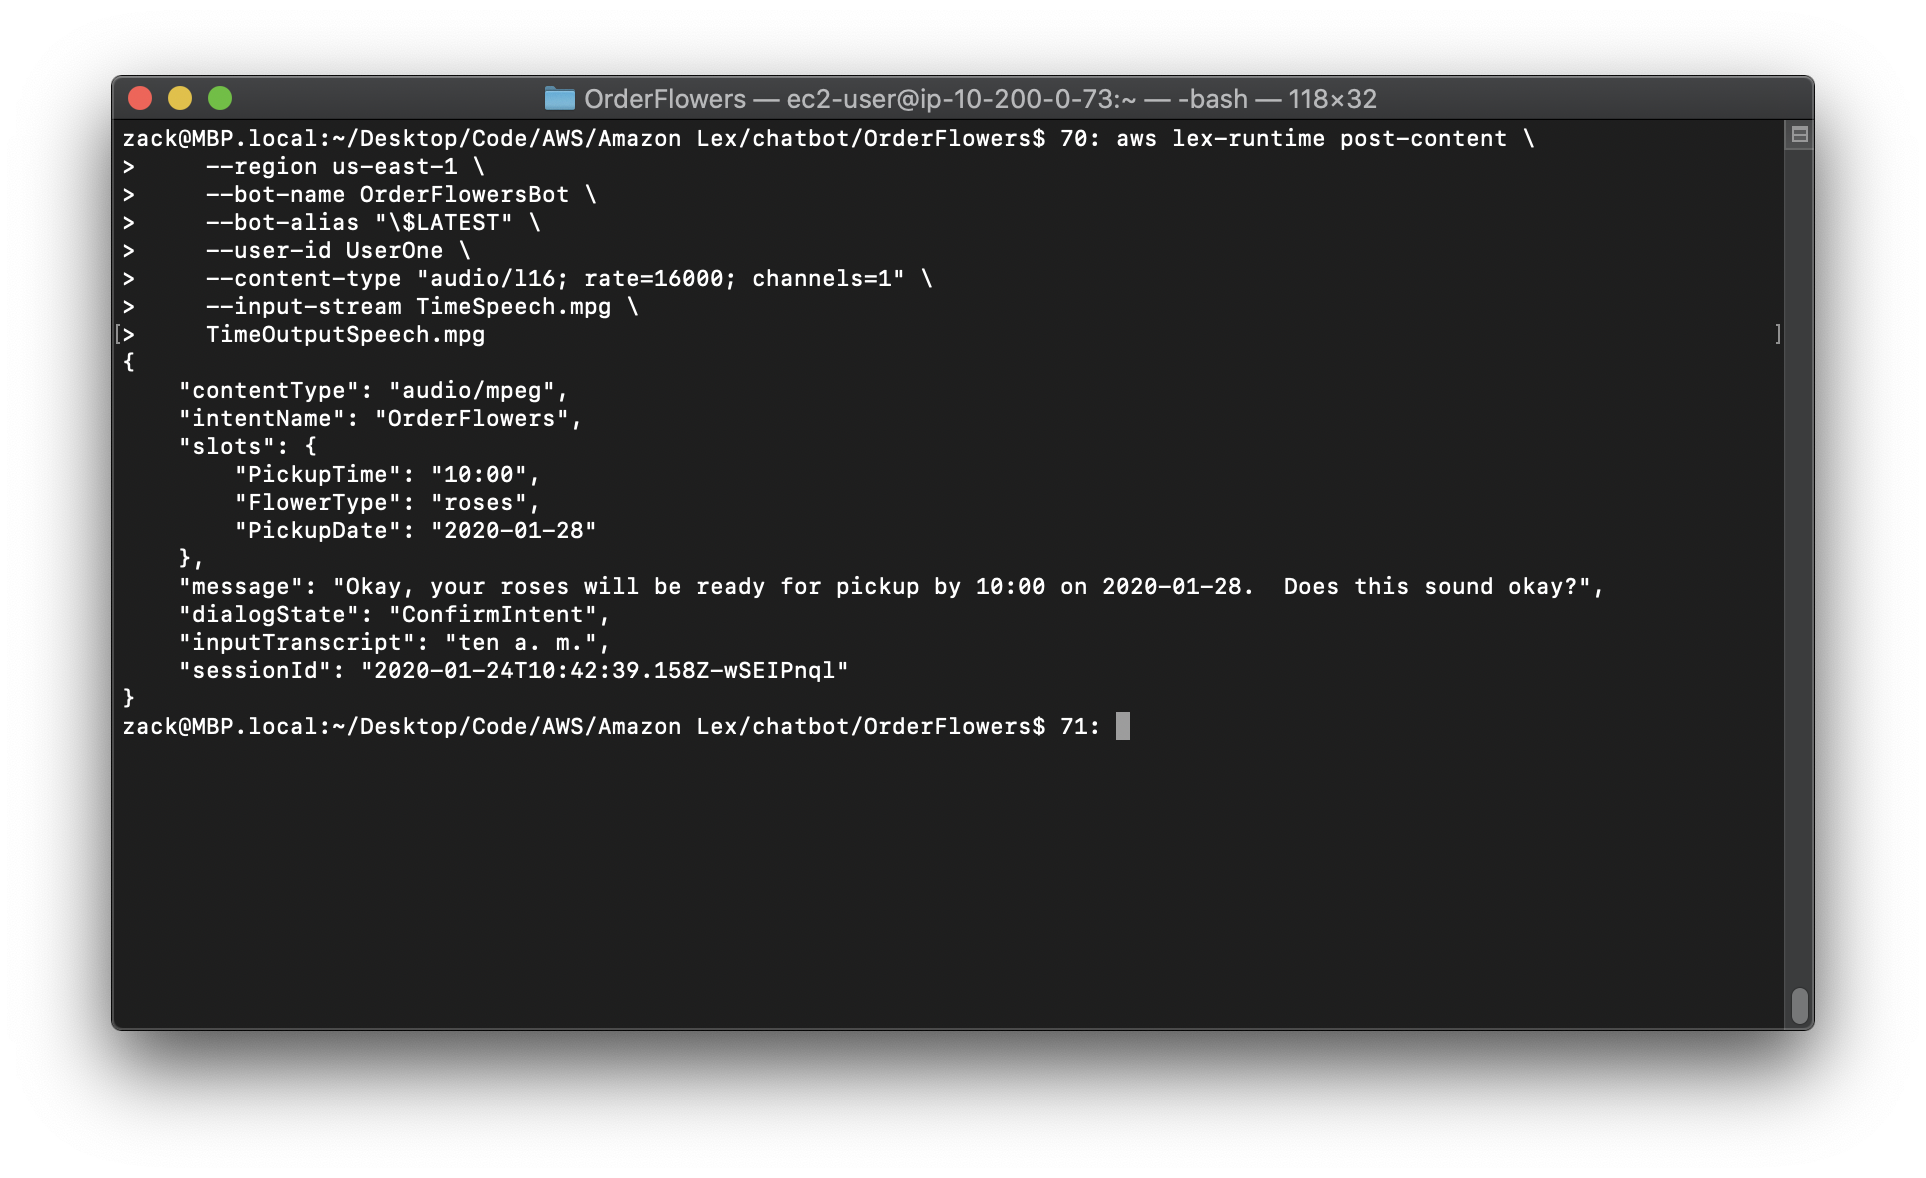
5.To set the delivery time, create the following audio file and send it to Amazon Lex:
Replace the region to yours.
Note: the official developer guide miss an \ after “Kendra”.
1 | aws polly synthesize-speech \ |

Replace the region to yours.
Note: the official developer guide miss an \ after TimeSpeech.mpg.
1 | aws lex-runtime post-content \ |
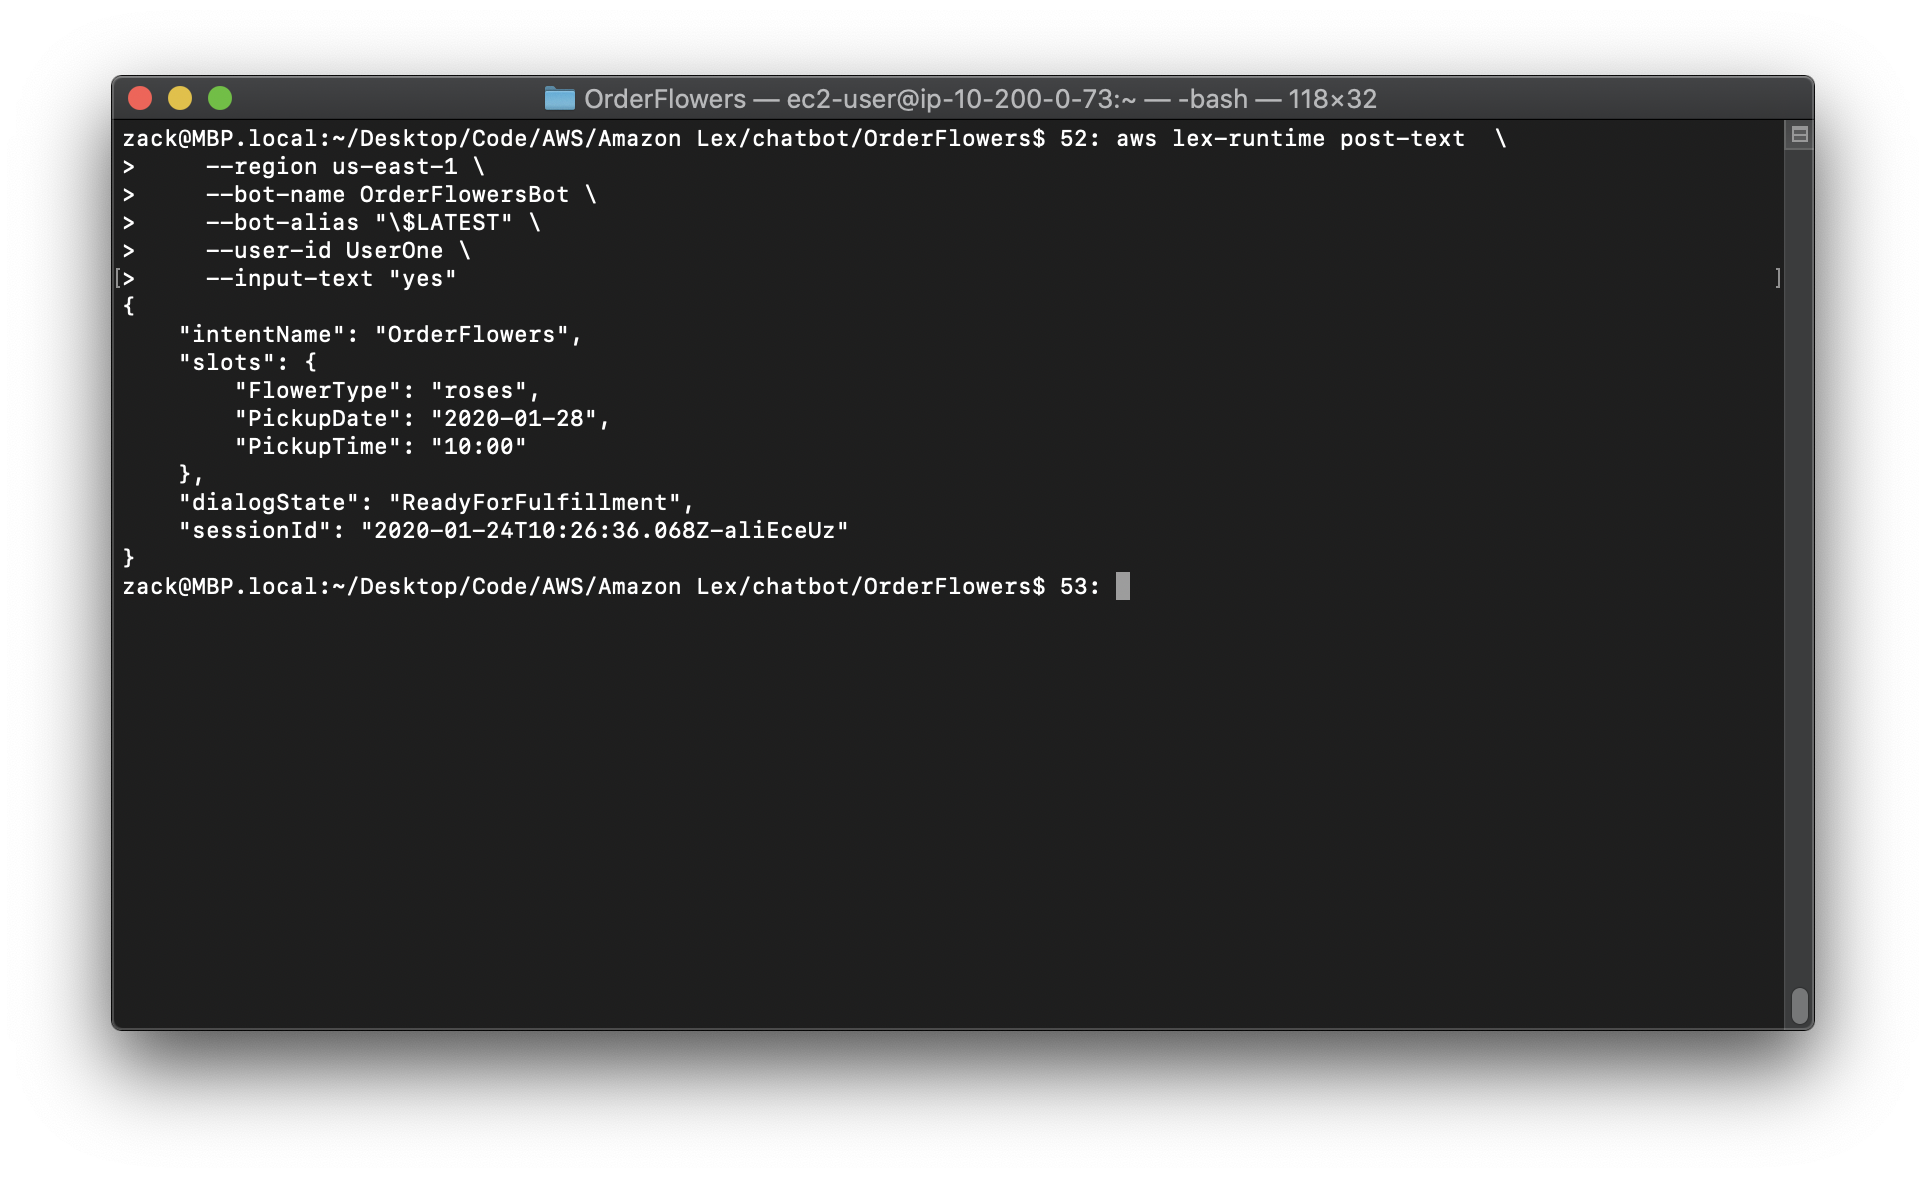
6.To confirm the delivery, create the following audio file and send it to Amazon Lex:
Replace the region to yours.
Note: the official developer guide miss an \ after “Kendra”.
1 | aws polly synthesize-speech \ |

Replace the region to yours.
1 | aws lex-runtime post-content \ |
After you confirm the delivery, Amazon Lex sends a response that confirms fulfillment of the intent: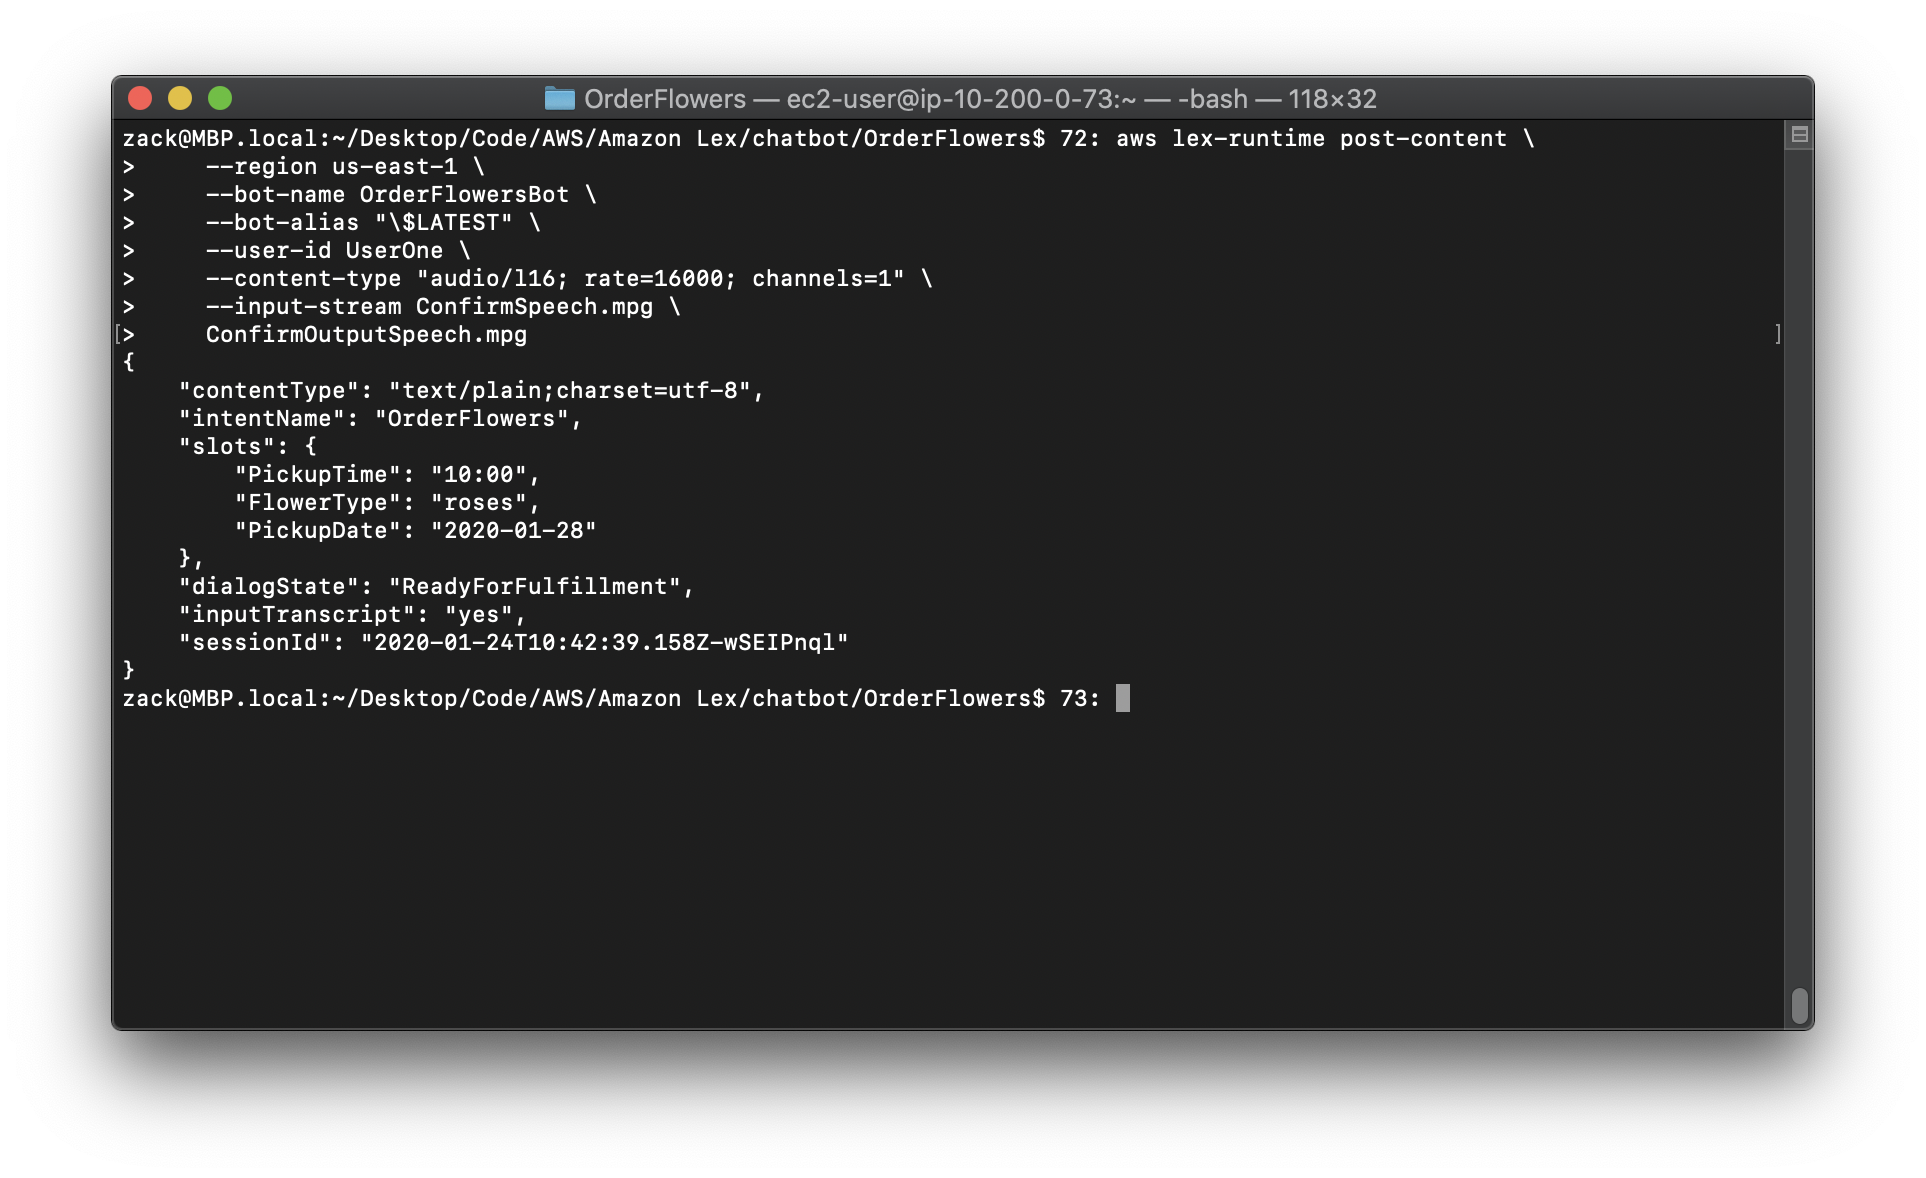
Exercise 2: Add a New Utterance
https://docs.aws.amazon.com/lex/latest/dg/gs-cli-update-utterance.html
To improve the machine learning model that Amazon Lex uses to recognize requests from your users, add another sample utterance to the bot.
Adding a new utterance is a four-step process.
1.Use the GetIntent operation to get an intent from Amazon Lex.
2.Update the intent.
3.Use the PutIntent operation to send the updated intent back to Amazon Lex.
4.Use the GetBot and PutBot operations to rebuild any bot that uses the intent.
To run the commands in this exercise, you need to know the region where the commands will be run. For a list of regions, see Model Building Quotas.
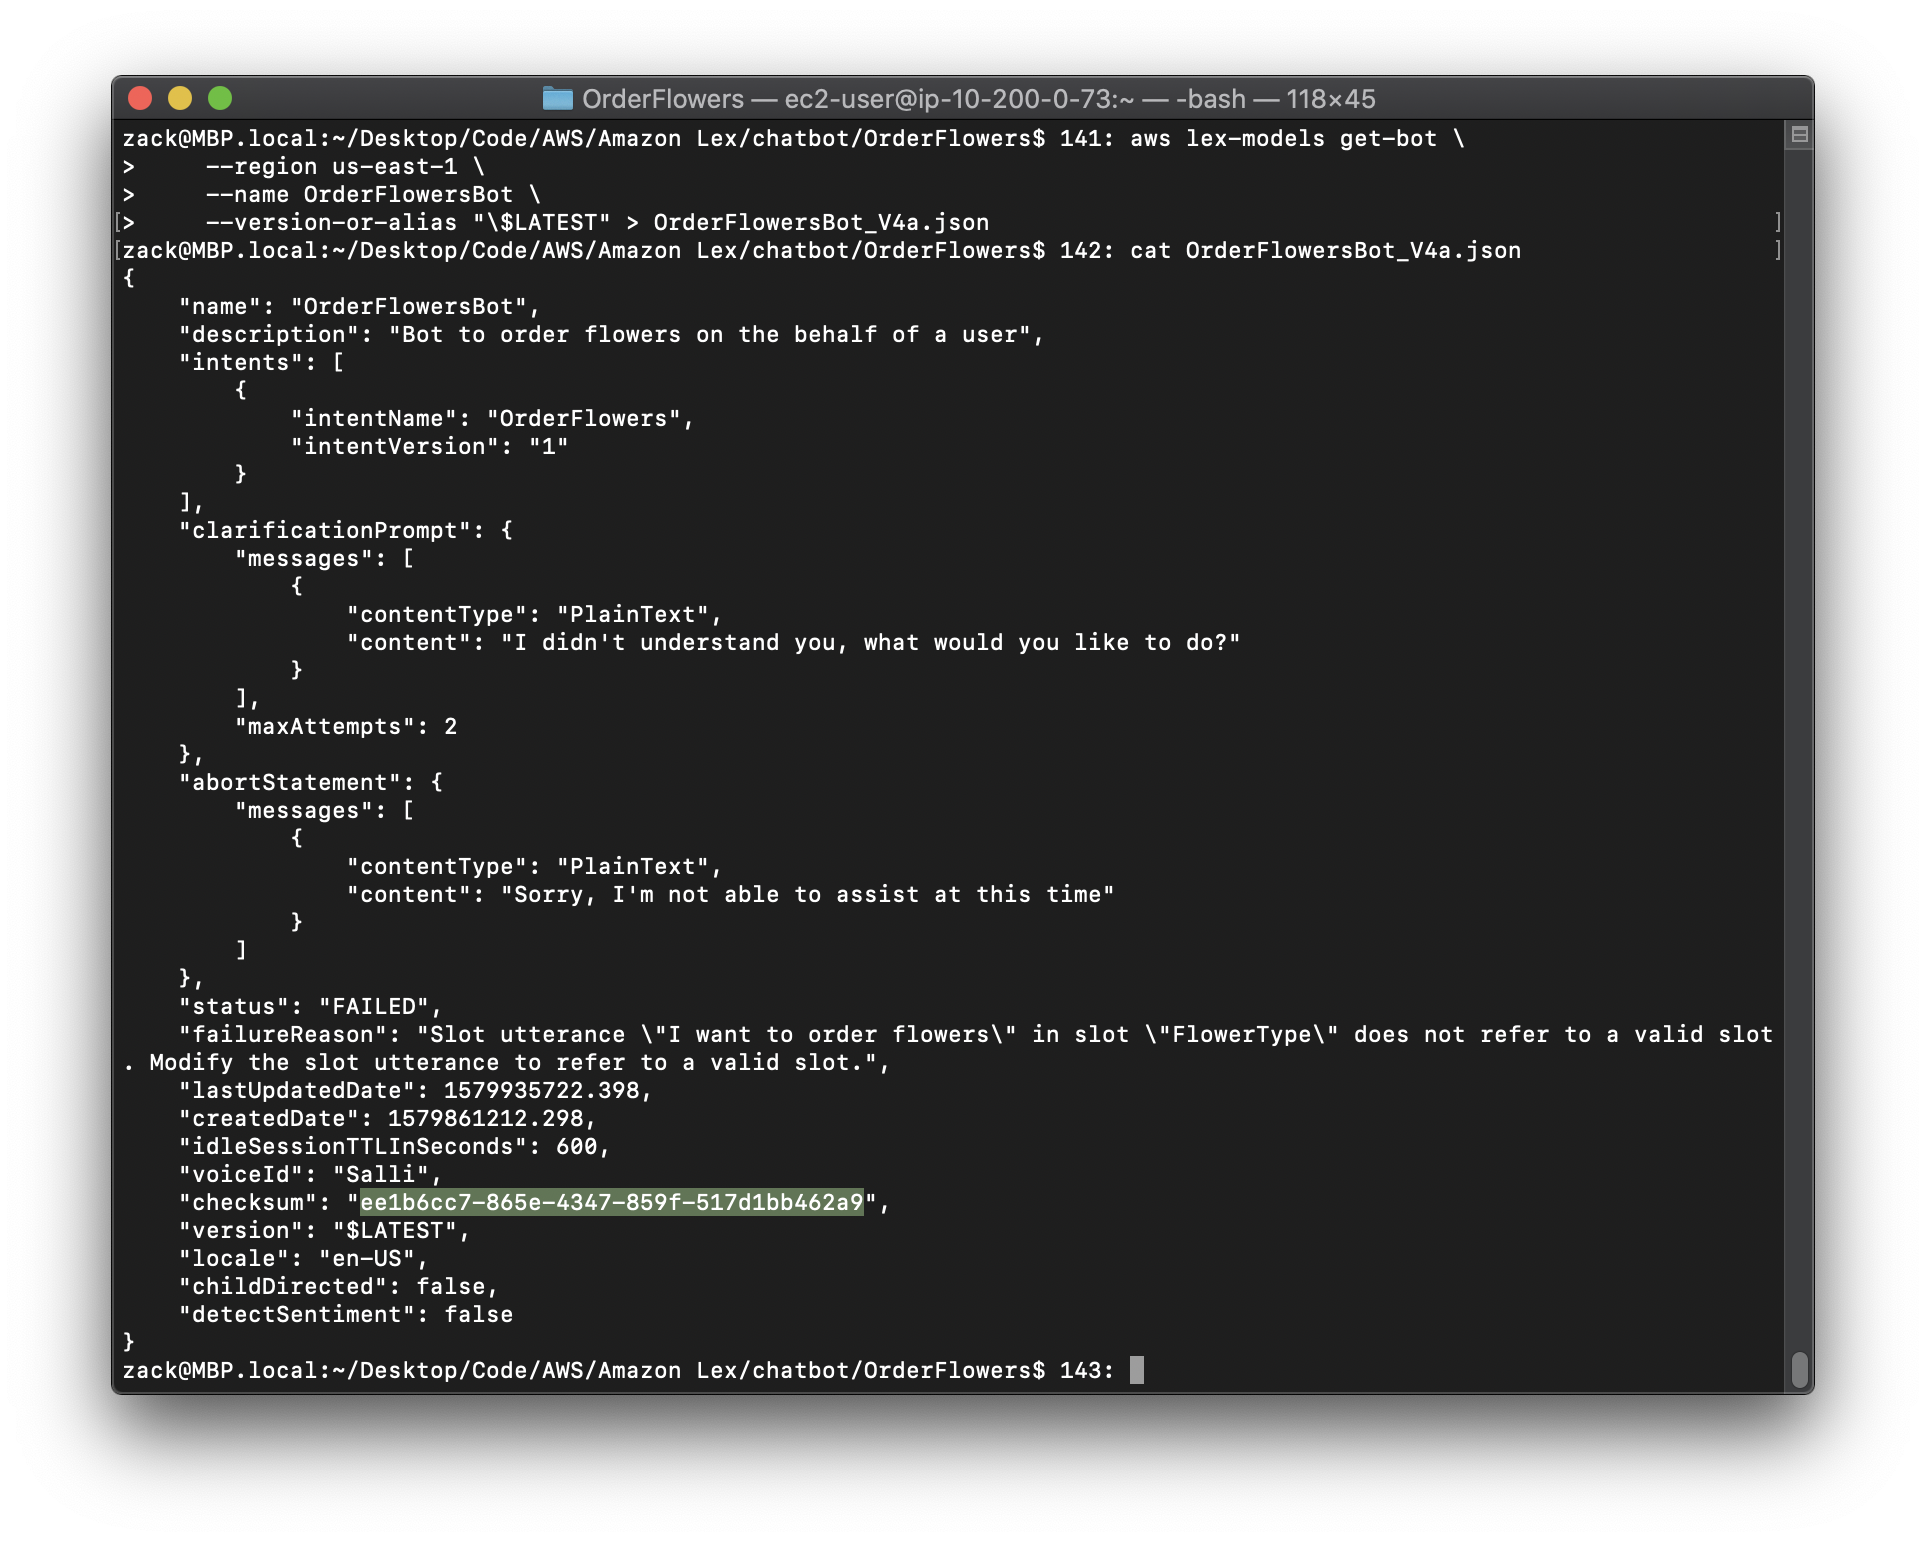
The response from the GetIntent operation contains a field called checksum that identifies a specific revision of the intent. You must provide the checksum value when you use the PutIntent operation to update an intent. If you don’t, you’ll get the following error message:
1 | An error occurred (PreconditionFailedException) when calling |
Note
The following AWS CLI example is formatted for Unix, Linux, and macOS. For Windows, change “$LATEST” to $LATEST and replace the backslash () continuation character at the end of each line with a caret (^).
To update the OrderFlowers intent (AWS CLI)
1.In the AWS CLI, get the intent from Amazon Lex. Amazon Lex sends the output to a file called OrderFlowers-V2.json.
Replace the region to yours.
1 | aws lex-models get-intent \ |
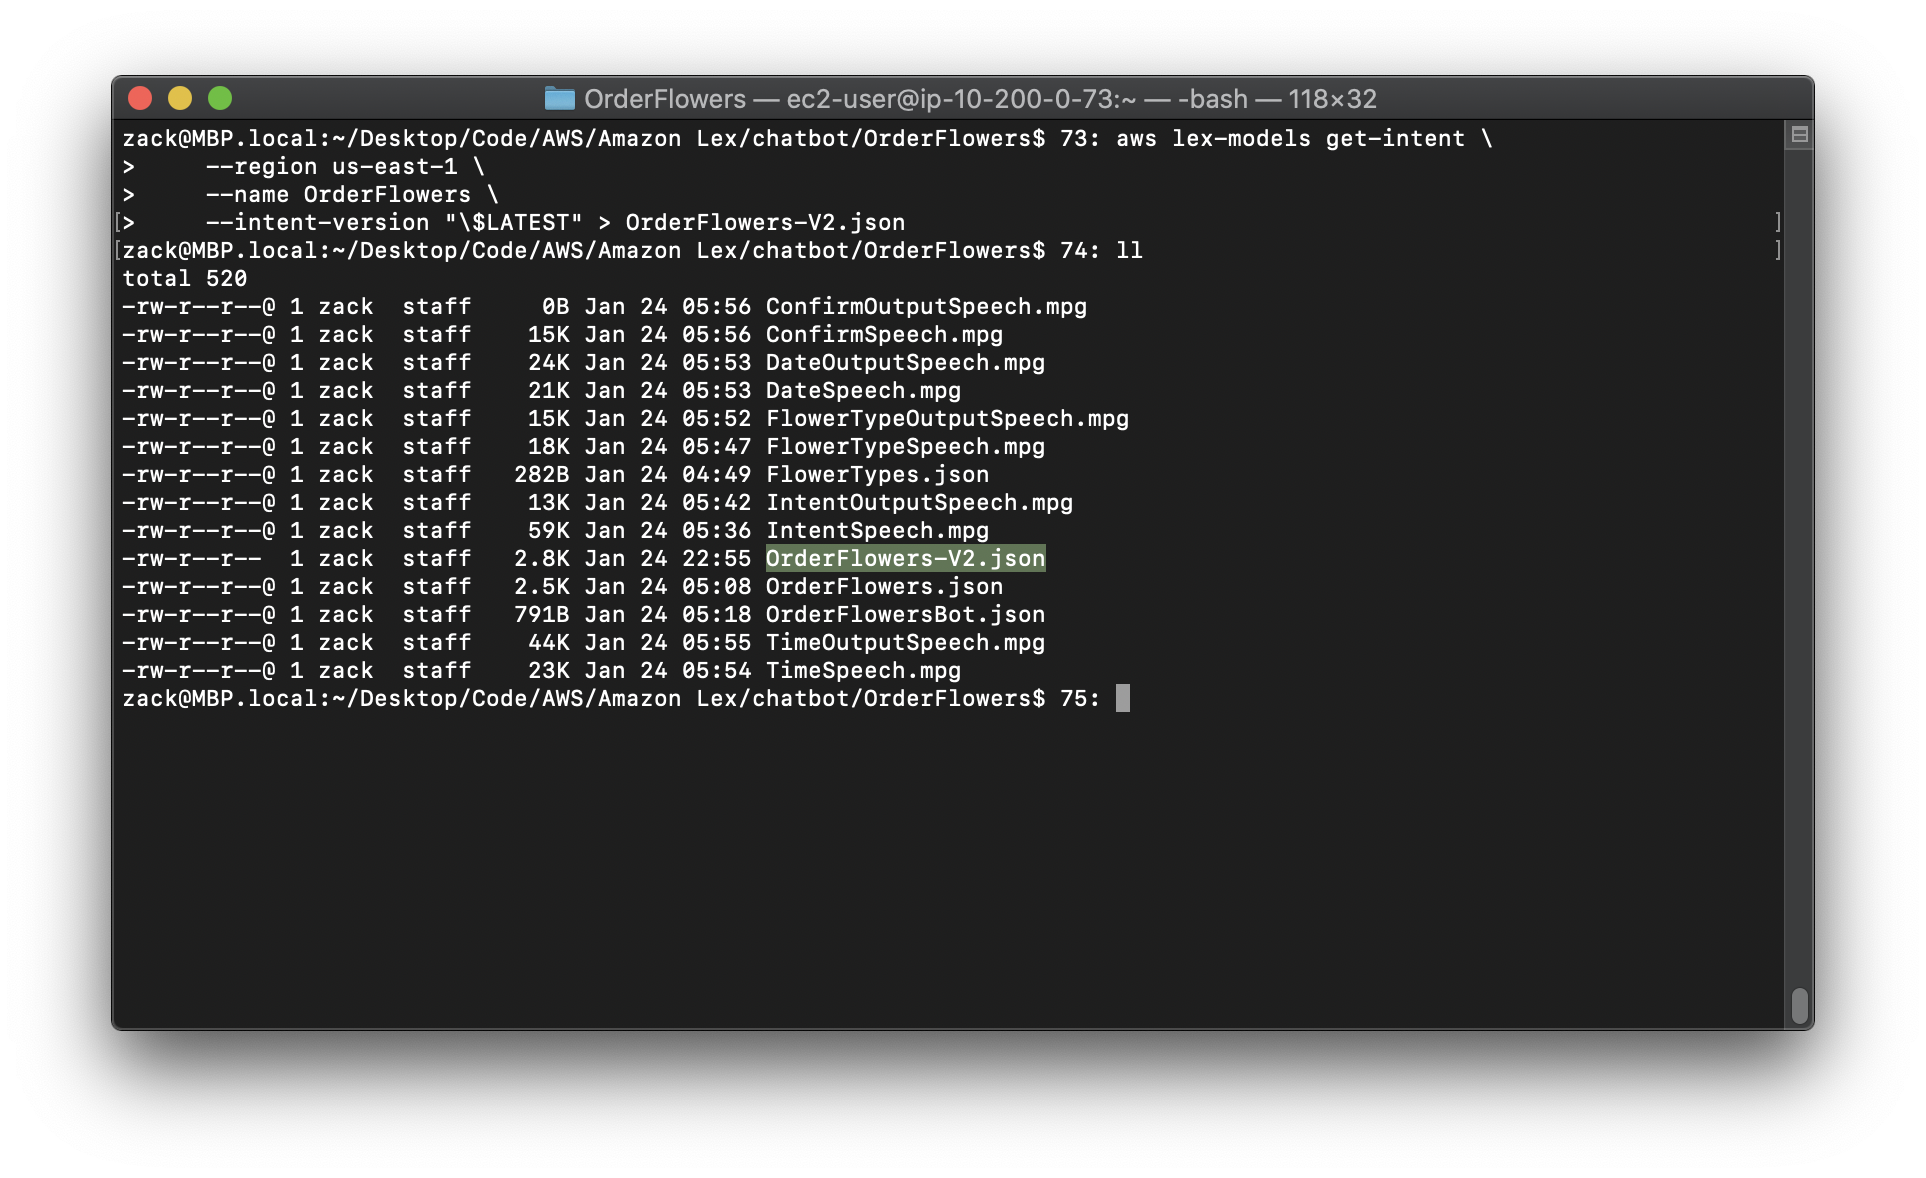
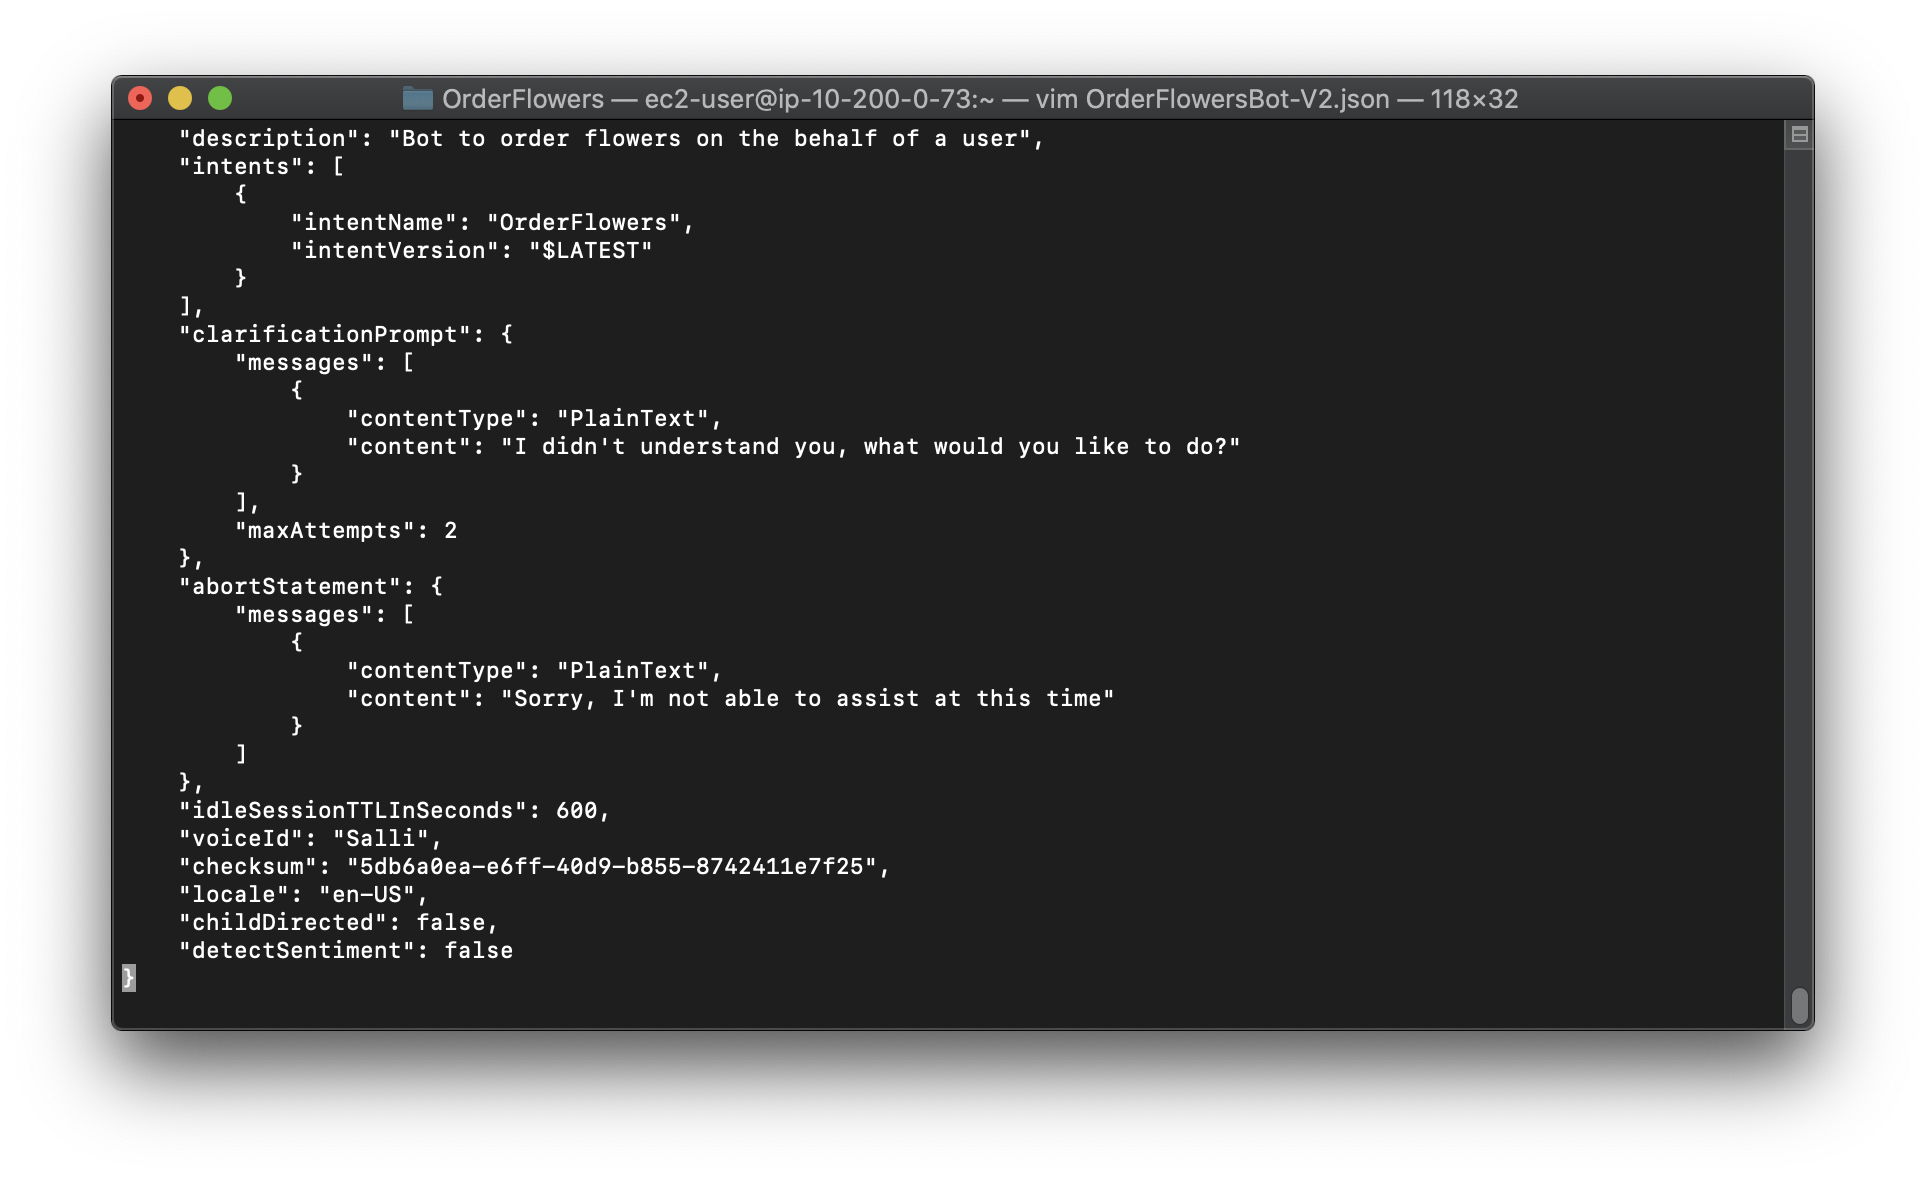
2.Open OrderFlowers-V2.json in a text editor.
a. Find and delete the createdDate, lastUpdatedDate, and version fields.

b. Add the following to the second sampleUtterances field:
1
I want to order flowers

c. Save the file.
3.Send the updated intent to Amazon Lex with the following command:
Replace the region to yours.
1 | aws lex-models put-intent \ |
Now that you have updated the intent, rebuild any bot that uses it.
To rebuild the OrderFlowersBot bot (AWS CLI)
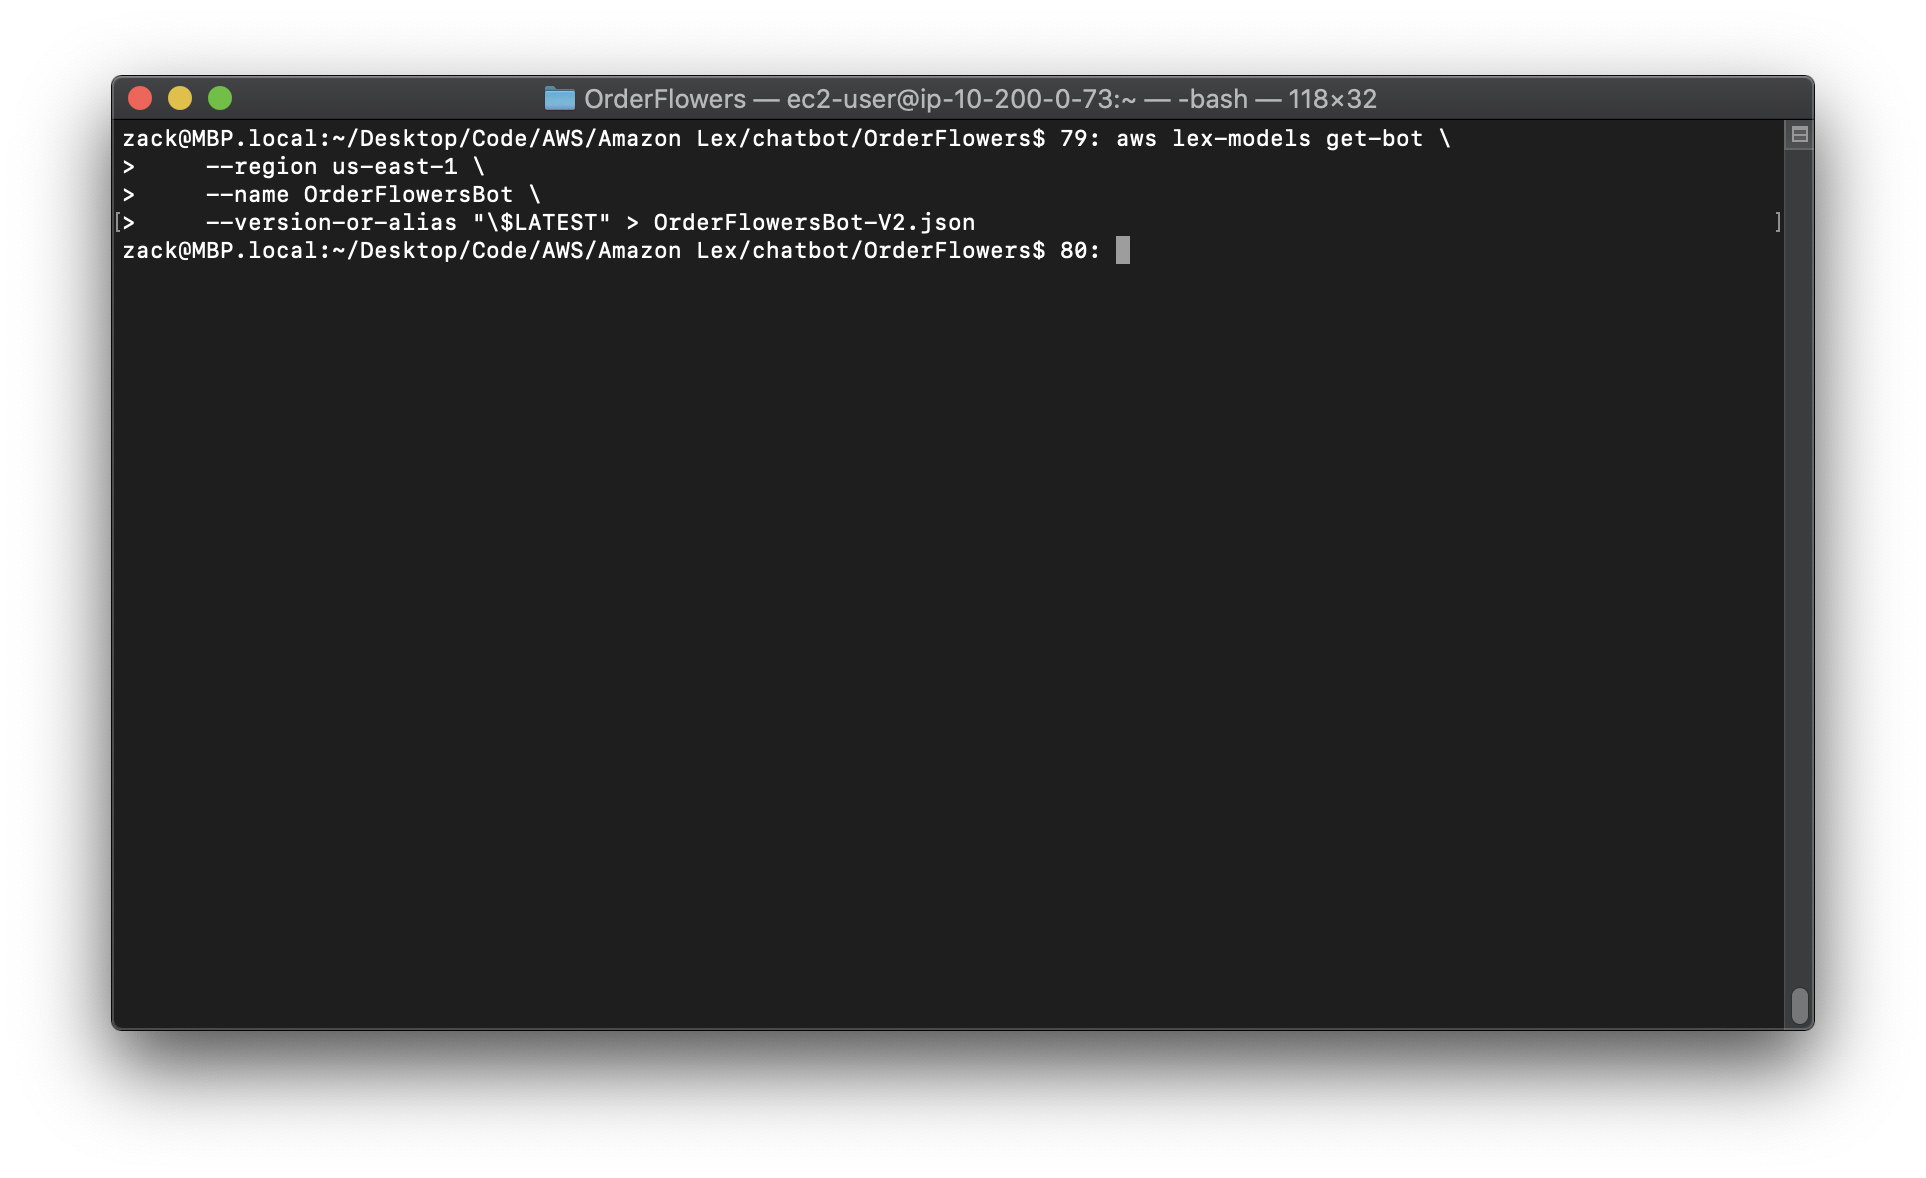
1.In the AWS CLI, get the definition of the OrderFlowersBot bot and save it to a file with the following command:
Replace the region to yours.
1 | aws lex-models get-bot \ |
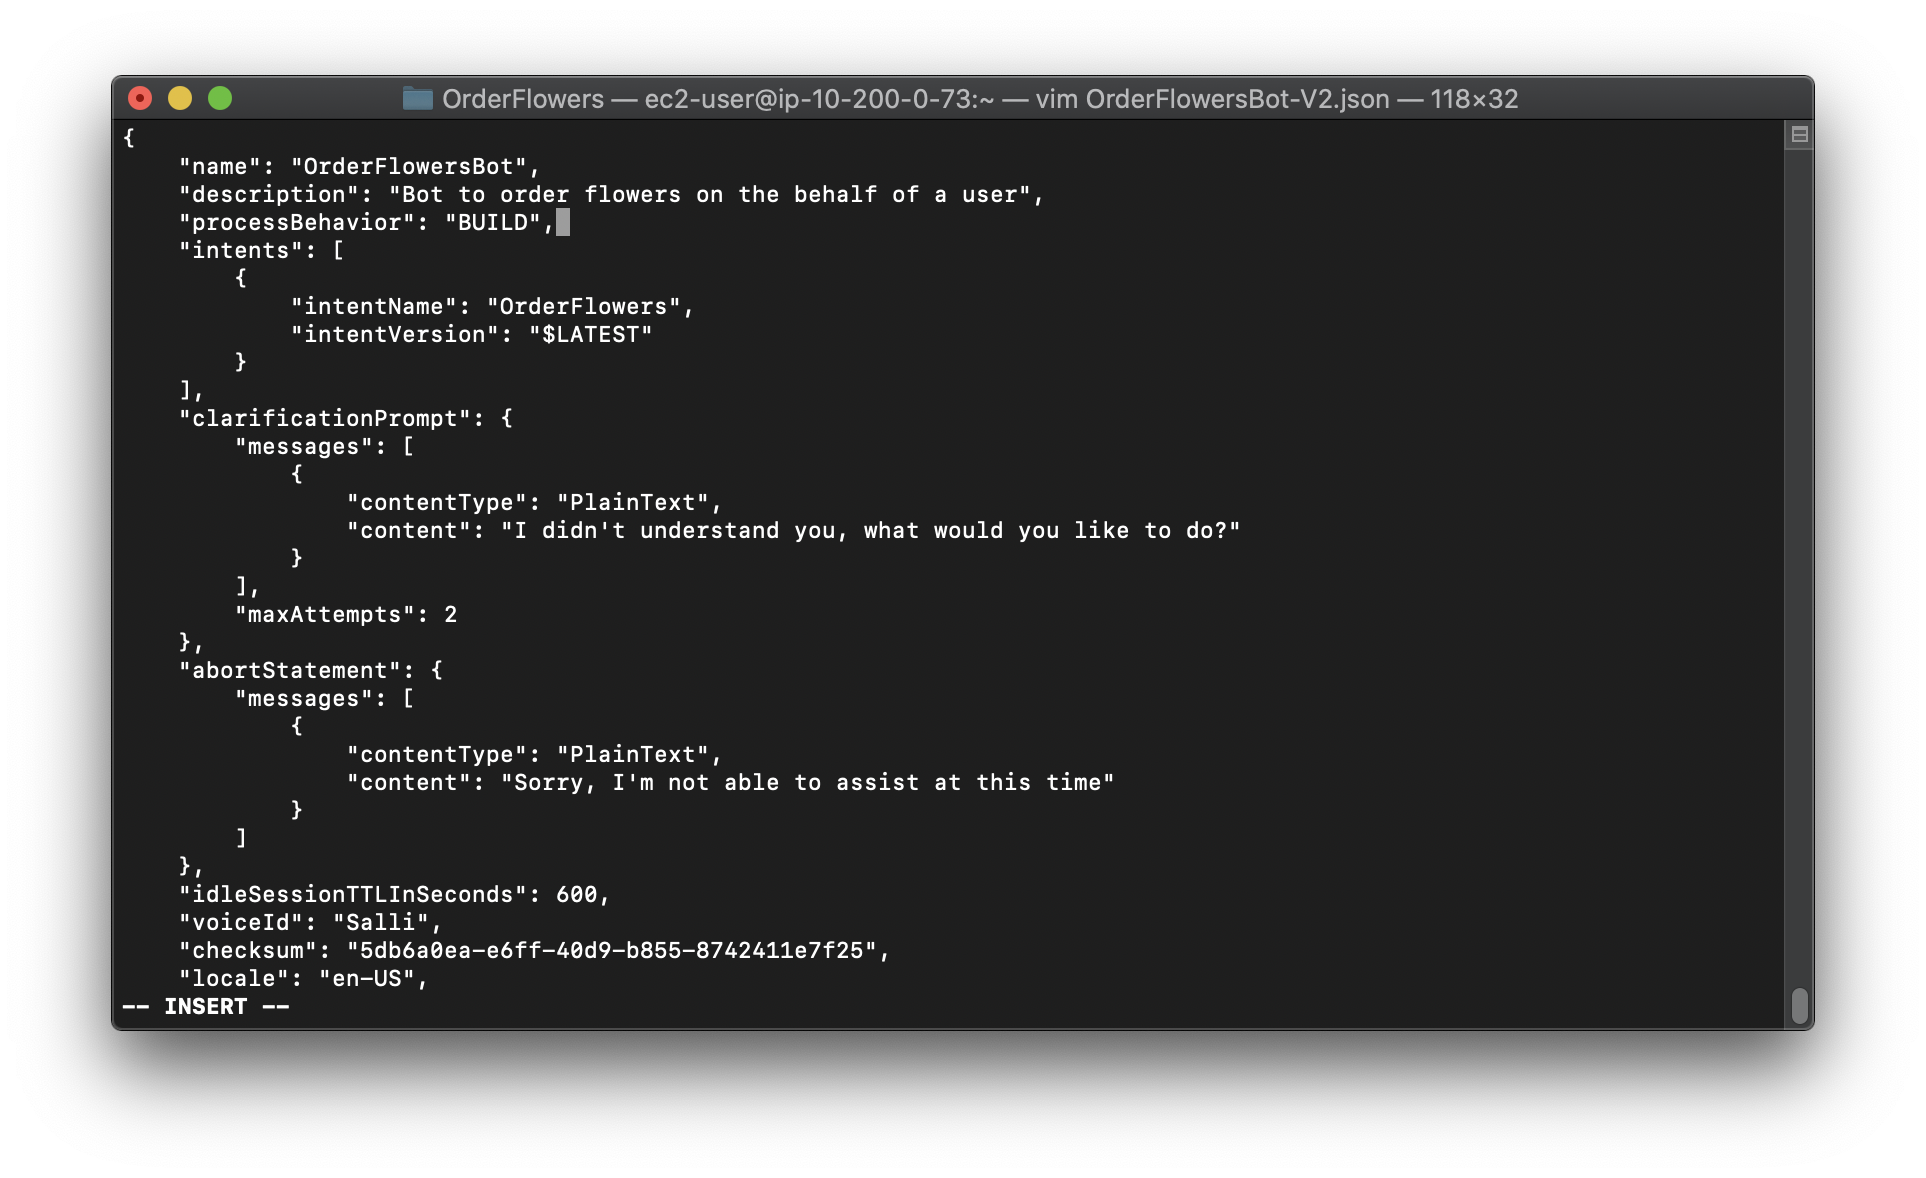
2.In a text editor, open OrderFlowersBot-V2.json. Remove the createdDate, lastUpdatedDate, status and version fields.
3.In a text editor, add the following line to the bot definition:
1 | "processBehavior": "BUILD", |
4.In the AWS CLI, build a new revision of the bot by running the following command to :
Replace the region to yours.
1 | aws lex-models put-bot \ |
Exercise 3: Add a Lambda Function
https://docs.aws.amazon.com/lex/latest/dg/gs-cli-update-lambda.html
Add a Lambda function that validates user input and fulfills the user’s intent to the bot.
Adding a Lambda expression is a five-step process.
1.Use the Lambda AddPermission function to enable the OrderFlowers intent to call the Lambda Invoke operation.
2.Use the GetIntent operation to get the intent from Amazon Lex.
3.Update the intent to add the Lambda function.
4.Use the PutIntent operation to send the updated intent back to Amazon Lex.
5.Use the GetBot and PutBot operations to rebuild any bot that uses the intent.
This exercise uses the Lambda function from Exercise 1: Create an Amazon Lex Bot Using a Blueprint (Console). For instructions to create the Lambda function, see Step 3: Create a Lambda Function (Console).
Prerequisite
To add a Lambda function to an intent
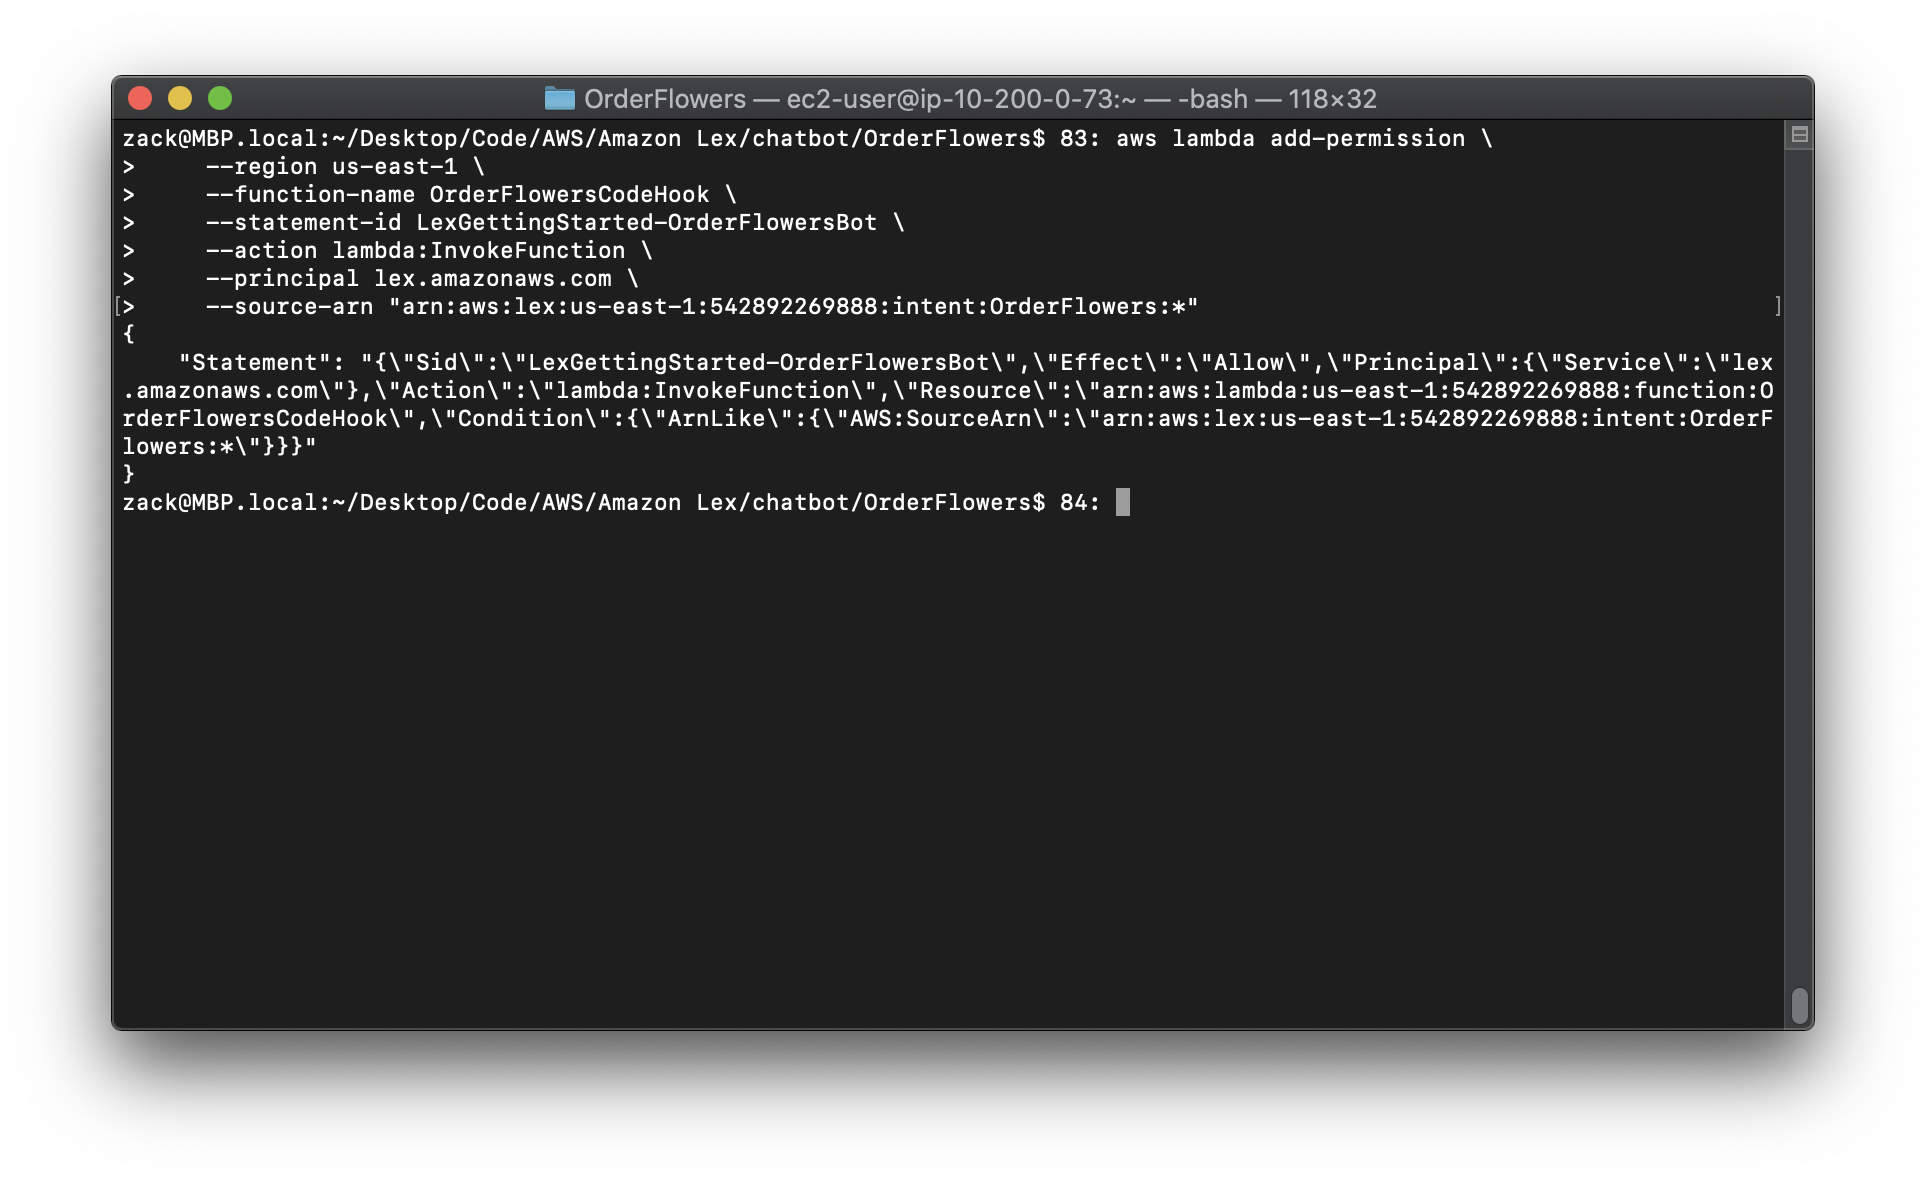
1.In the AWS CLI, add the InvokeFunction permission for the OrderFlowers intent:
Replace the region to yours.
Replace the region:account ID to yours.
1 | aws lambda add-permission \ |
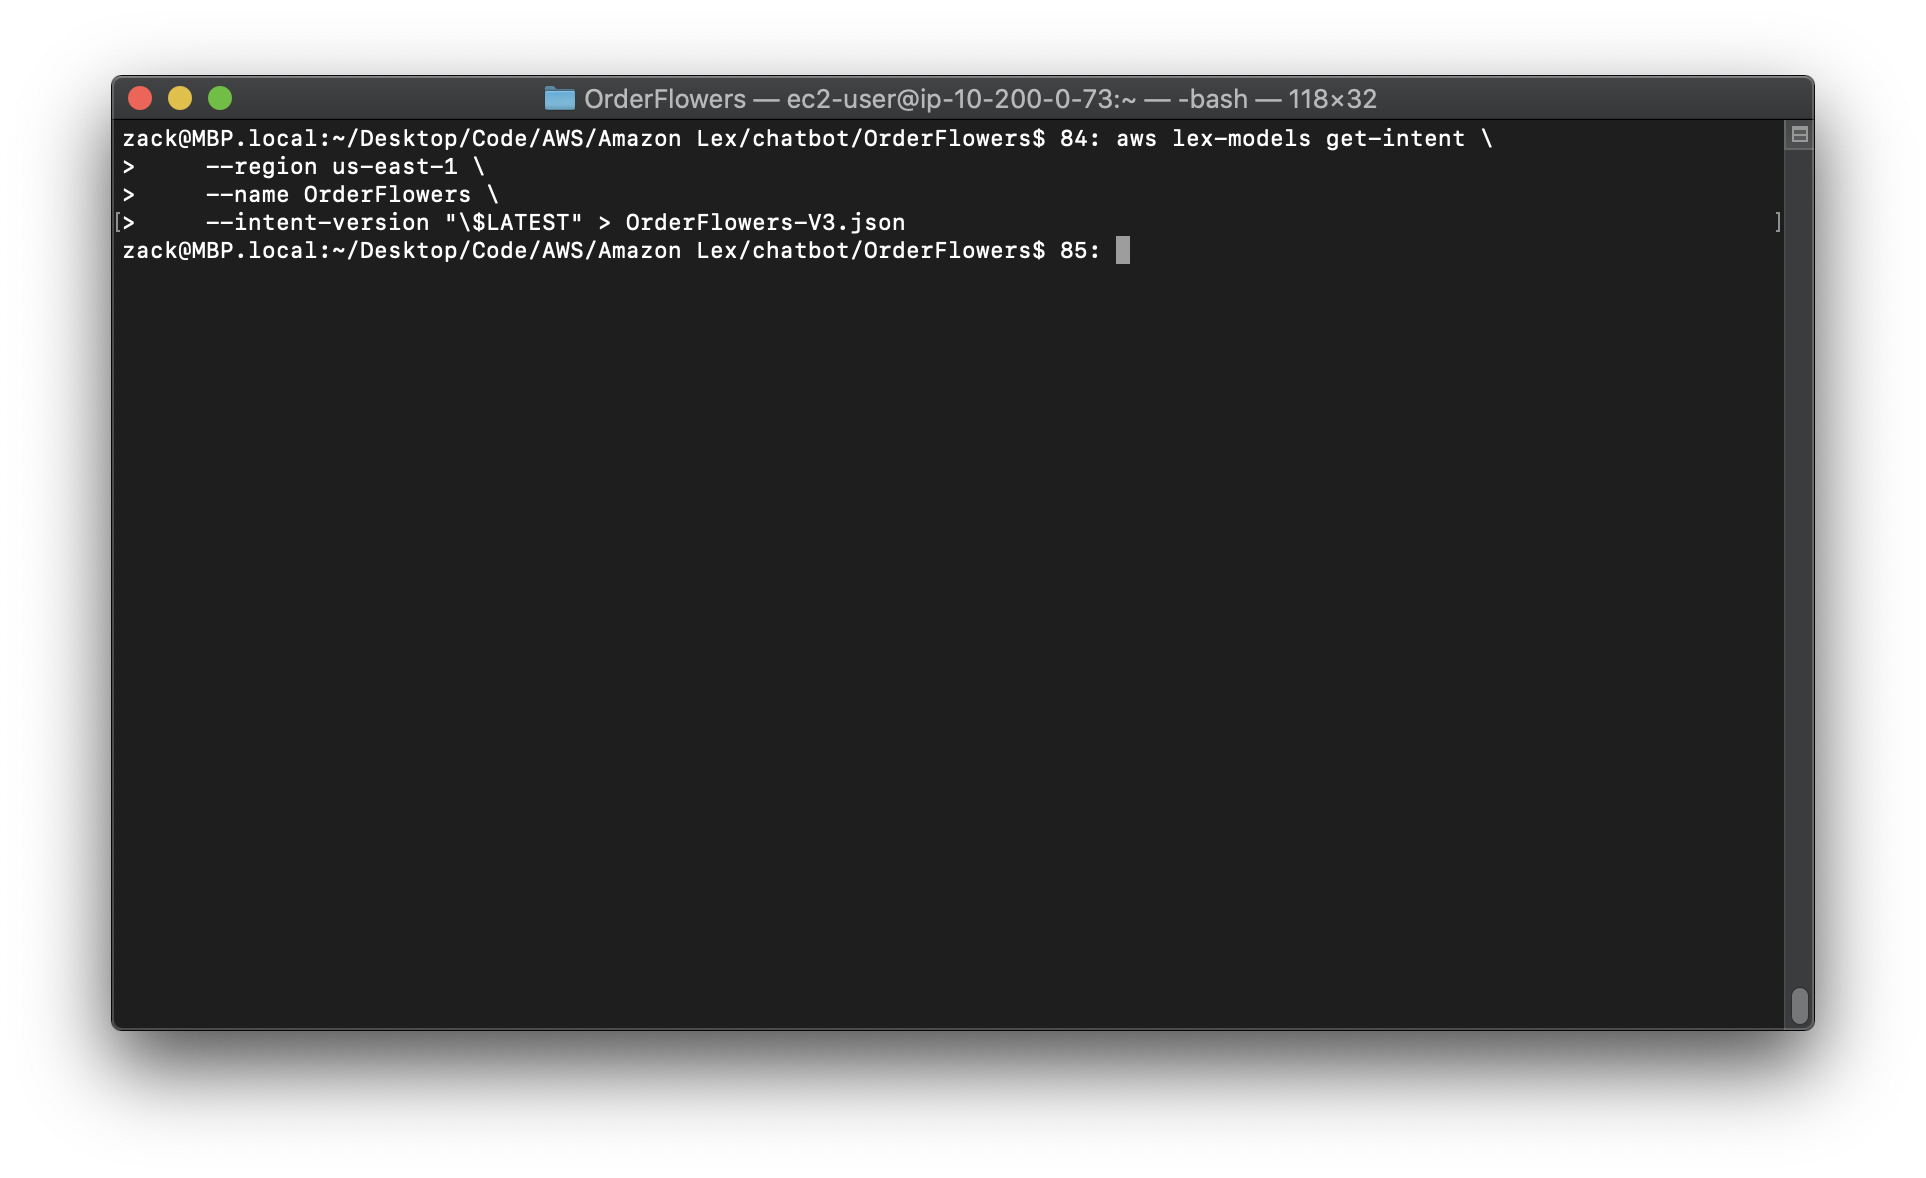
2.Get the intent from Amazon Lex. Amazon Lex sends the output to a file called OrderFlowers-V3.json.
Replace the region to yours.
1 | aws lex-models get-intent \ |
3.In a text editor, open the OrderFlowers-V3.json.
a. Find and delete the createdDate, lastUpdatedDate, and version fields.
b. Update the fulfillmentActivity field :
Replace the region:account ID to yours.
1 | "fulfillmentActivity": { |
c. Save the file.

4.In the AWS CLI, send the updated intent to Amazon Lex:
Replace the region to yours.
1 | aws lex-models put-intent \ |
Now that you have updated the intent, rebuild the bot.
To rebuild the OrderFlowersBot bot
1.In the AWS CLI, get the definition of the OrderFlowersBot bot and save it to a file:
Replace the region to yours.
1 | aws lex-models get-bot \ |
2.In a text editor,open OrderFlowersBot-V3.json. Remove the createdDate, lastUpdatedDate, status, and version fields.
3.In the text editor, add the following line to the definition of the bot:
1 | "processBehavior": "BUILD", |
4.In the AWS CLI, build a new revision of the bot:
Replace the region to yours.
1 | aws lex-models put-bot \ |

Exercise 4: Publish a Version
https://docs.aws.amazon.com/lex/latest/dg/gs-cli-publish.html
Now, create a version of the bot that you created in Exercise 1.A version is a snapshot of the bot. After you create a version, you can’t change it. The only version of a bot that you can update is the $LATEST version. For more information about versions, see Versioning and Aliases.
Before you can publish a version of a bot, you must publish the intents that is uses. Likewise, you must publish the slot types that those intents refer to. In general, to publish a version of a bot, you do the following:
1.Publish a version of a slot type with the CreateSlotTypeVersion operation.
2.Publish a version of an intent with the CreateIntentVersion operation.
3.Publish a version of a bot with the CreateBotVersion operation .
To run the commands in this exercise, you need to know the region where the commands will be run. For a list of regions, see Model Building Quotas .
Topics
- Step 1: Publish the Slot Type (AWS CLI)
- Step 2: Publish the Intent (AWS CLI)
- Step 3: Publish the Bot (AWS CLI)
Step 1: Publish the Slot Type (AWS CLI)
https://docs.aws.amazon.com/lex/latest/dg/gs-cli-publish-slot-type.html
Before you can publish a version of any intents that use a slot type, you must publish a version of that slot type. In this case, you publish the FlowerTypes slot type.
Note: The following AWS CLI example is formatted for Unix, Linux, and macOS. For Windows, change "\$LATEST" to $LATEST and replace the backslash () continuation character at the end of each line with a caret (^).
To publish a slot type (AWS CLI)
1.In the AWS CLI, get the latest version of the slot type:
Replace the region to yours.
1 | aws lex-models get-slot-type \ |
The response from Amazon Lex follows. Record the checksum for the current revision of the $LATEST version.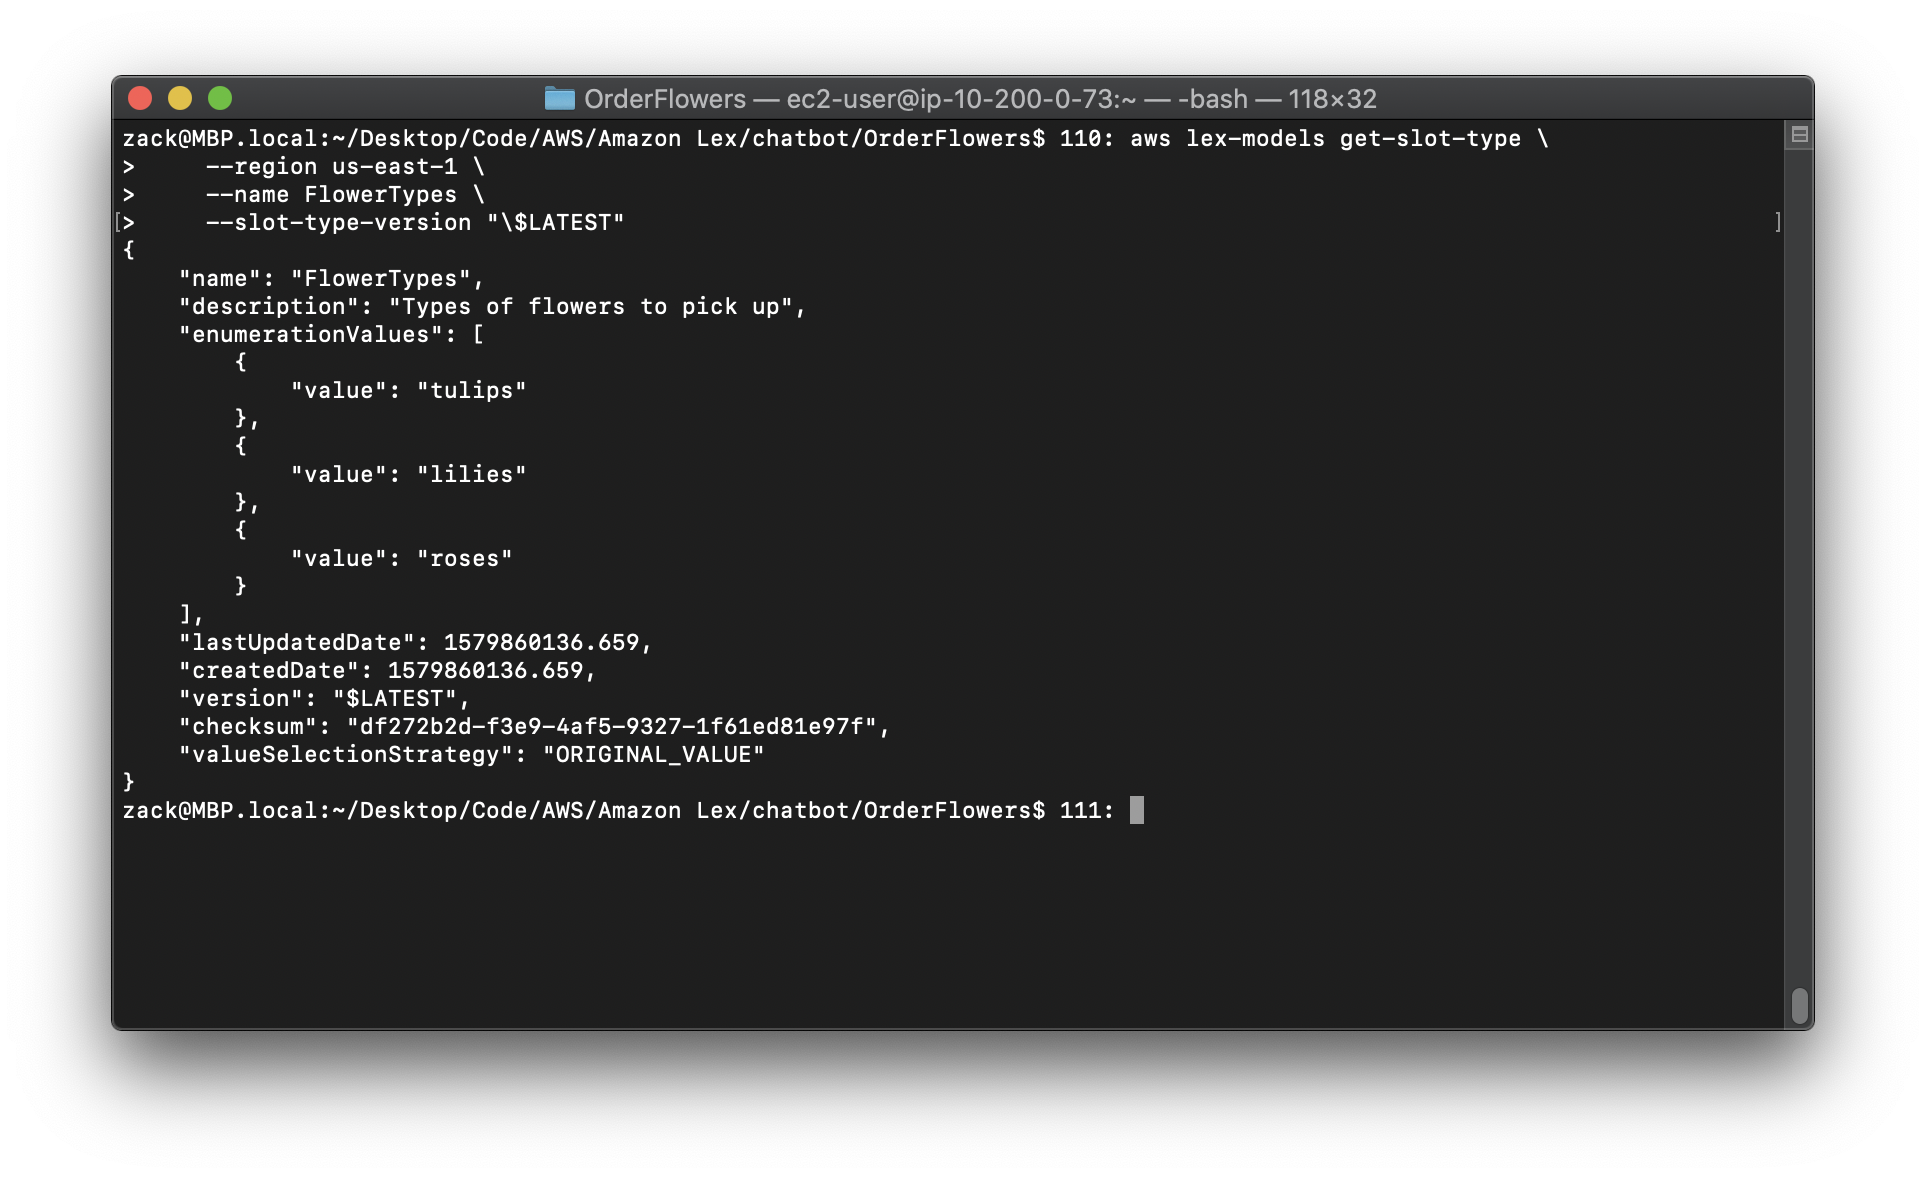
2.Publish a version of the slot type. Use the checksum that you recorded in the previous step.
Replace the region to yours.
Replace the "checksum" to yours.
1 | aws lex-models create-slot-type-version \ |
The response from Amazon Lex follows. Record the version number for the next step.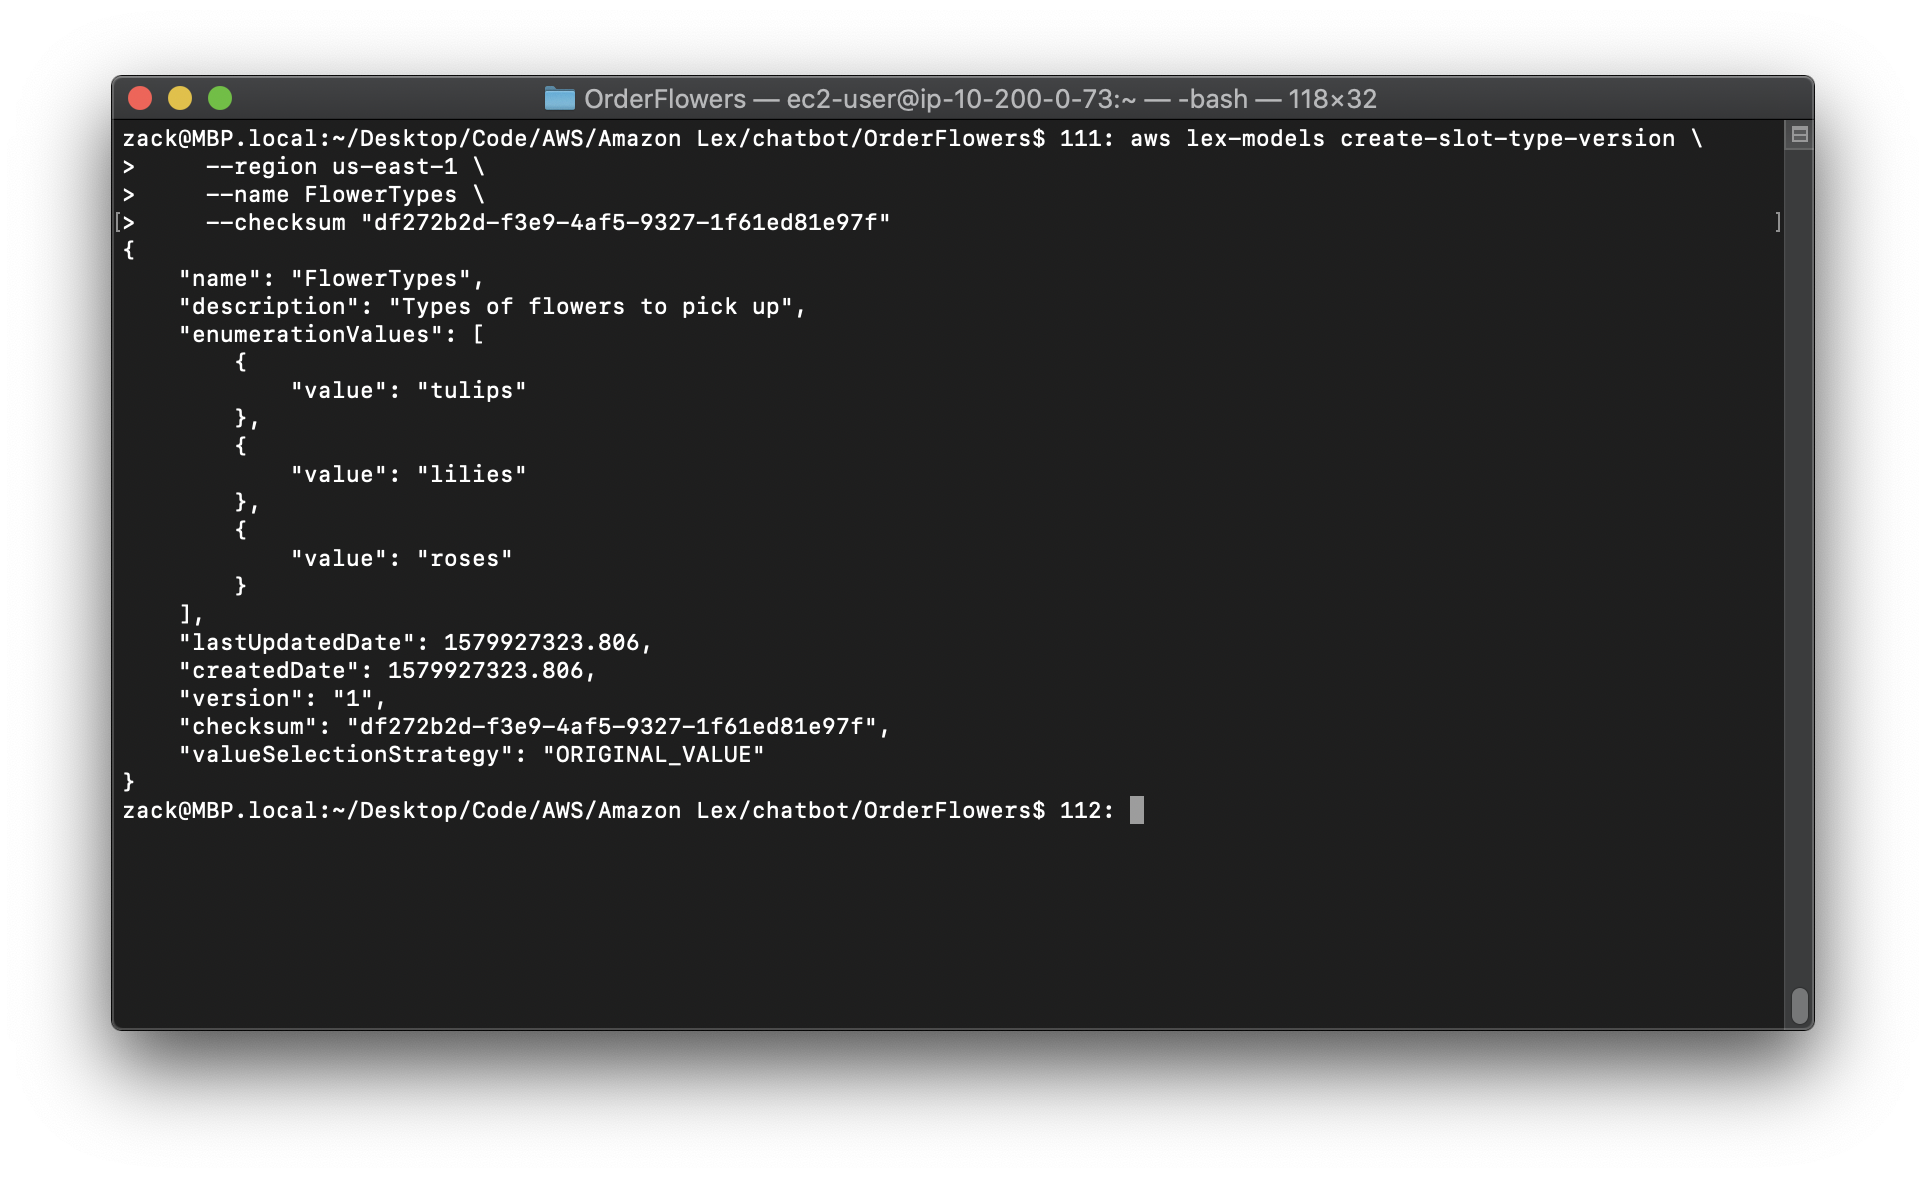
Step 2: Publish the Intent (AWS CLI)
https://docs.aws.amazon.com/lex/latest/dg/gs-cli-publish-intent.html
Before you can publish an intent, you have to publish all of the slot types referred to by the intent. The slot types must be numbered versions, not the $LATEST version.
First, update the OrderFlowers intent to use the version of the FlowerTypes slot type that you published in the previous step. Then publish a new version of the OrderFlowers intent.
Note: The following AWS CLI example is formatted for Unix, Linux, and macOS. For Windows, change "\$LATEST" to $LATEST and replace the backslash () continuation character at the end of each line with a caret (^).
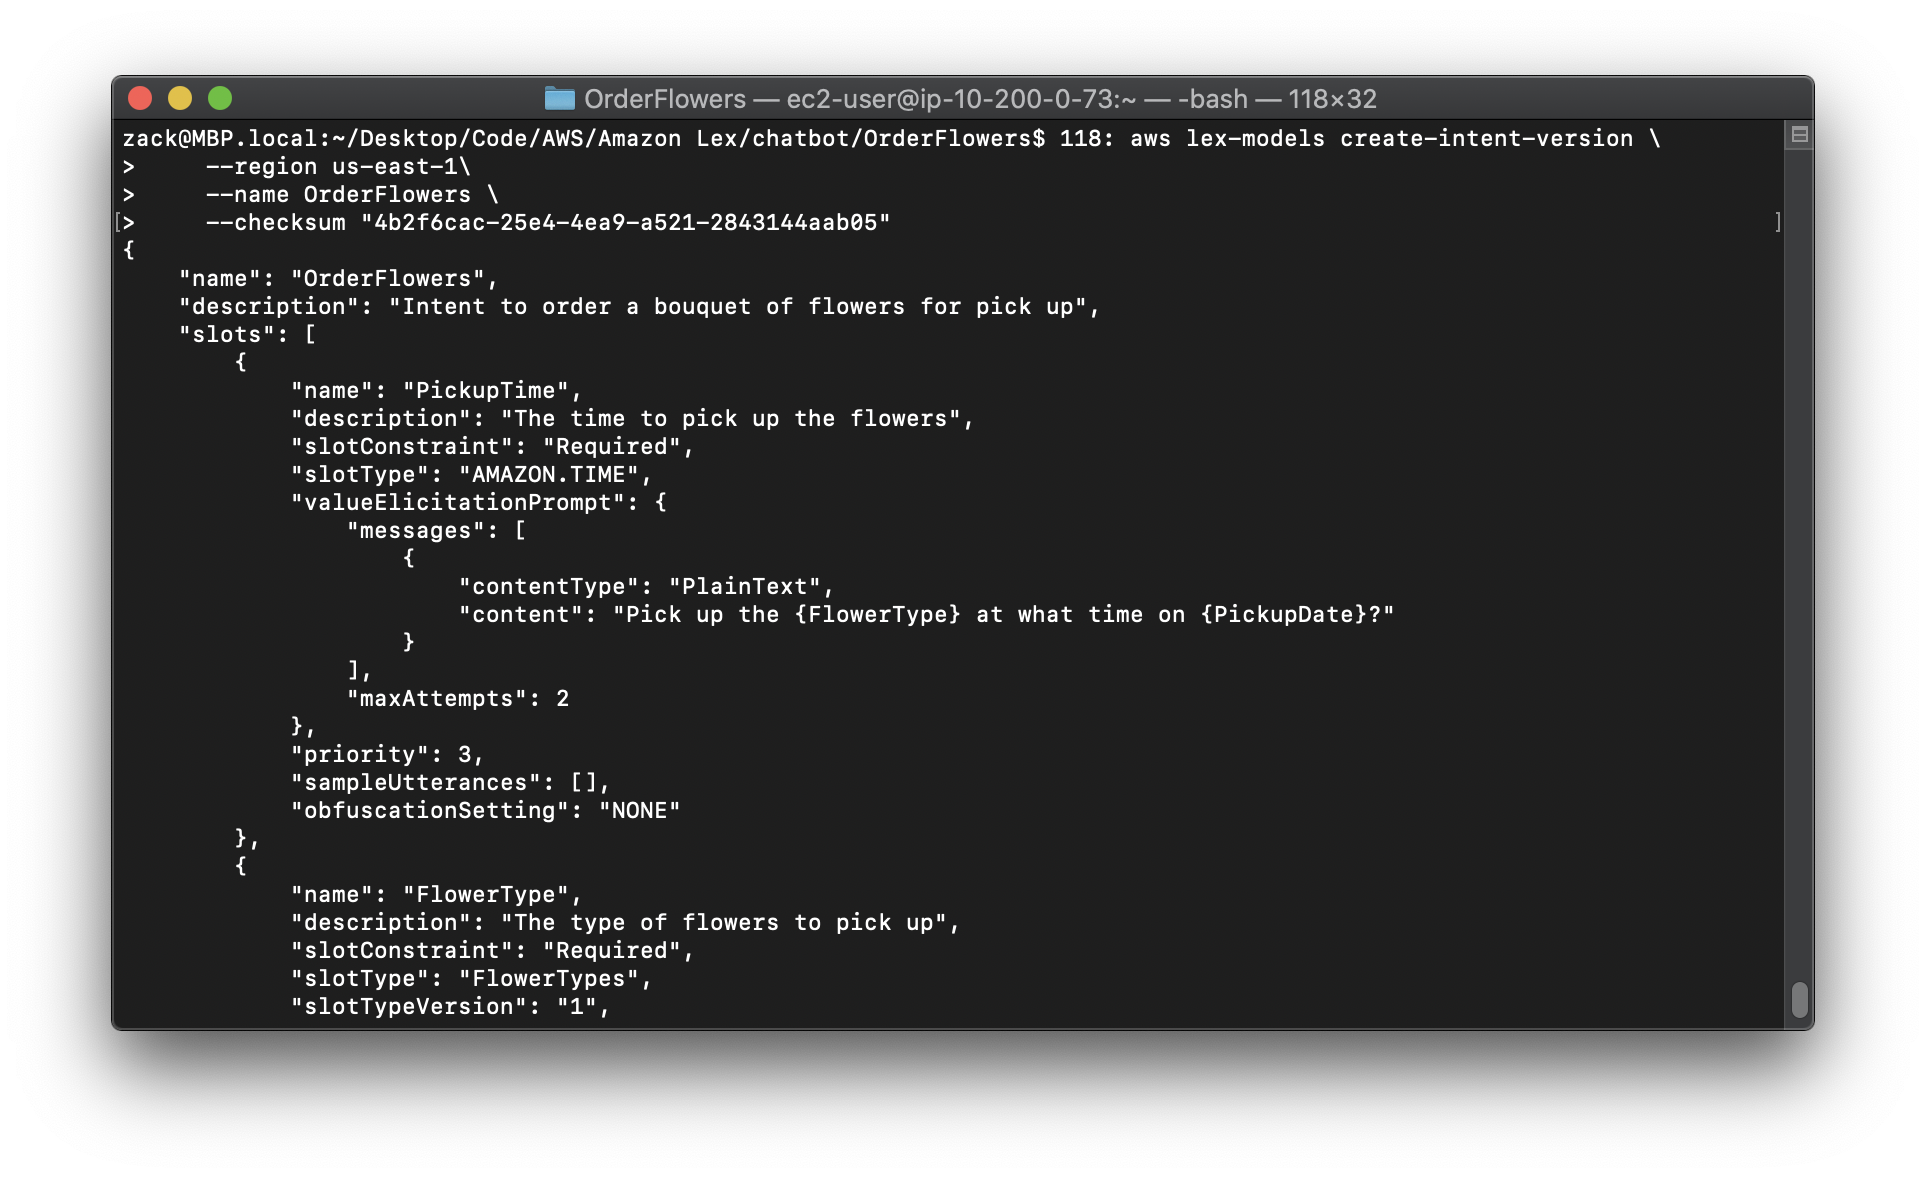
To publish a version of an intent (AWS CLI)
In the AWS CLI, get the $LATEST version of the OrderFlowers intent and save it to a file:
Replace the region to yours.
1 | aws lex-models get-intent \ |
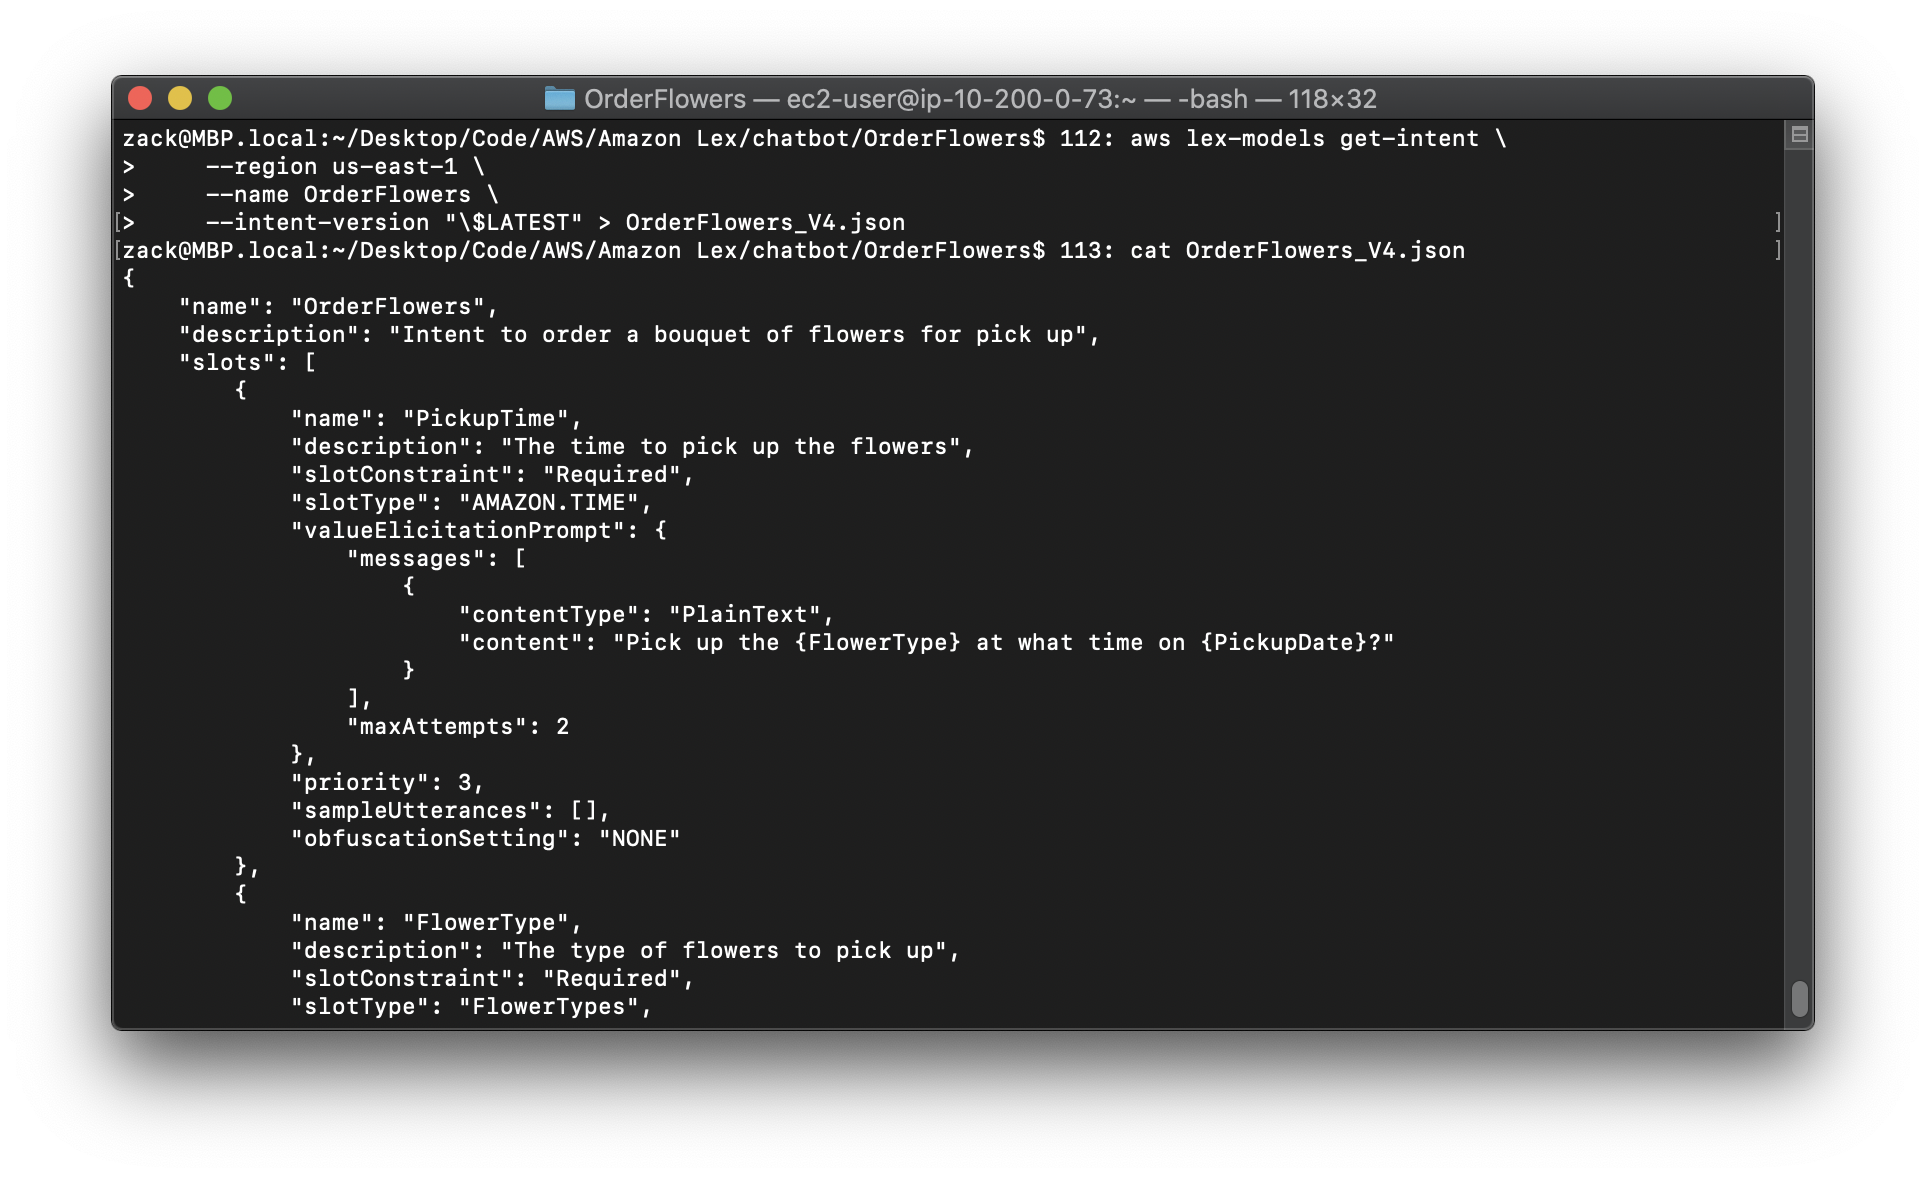
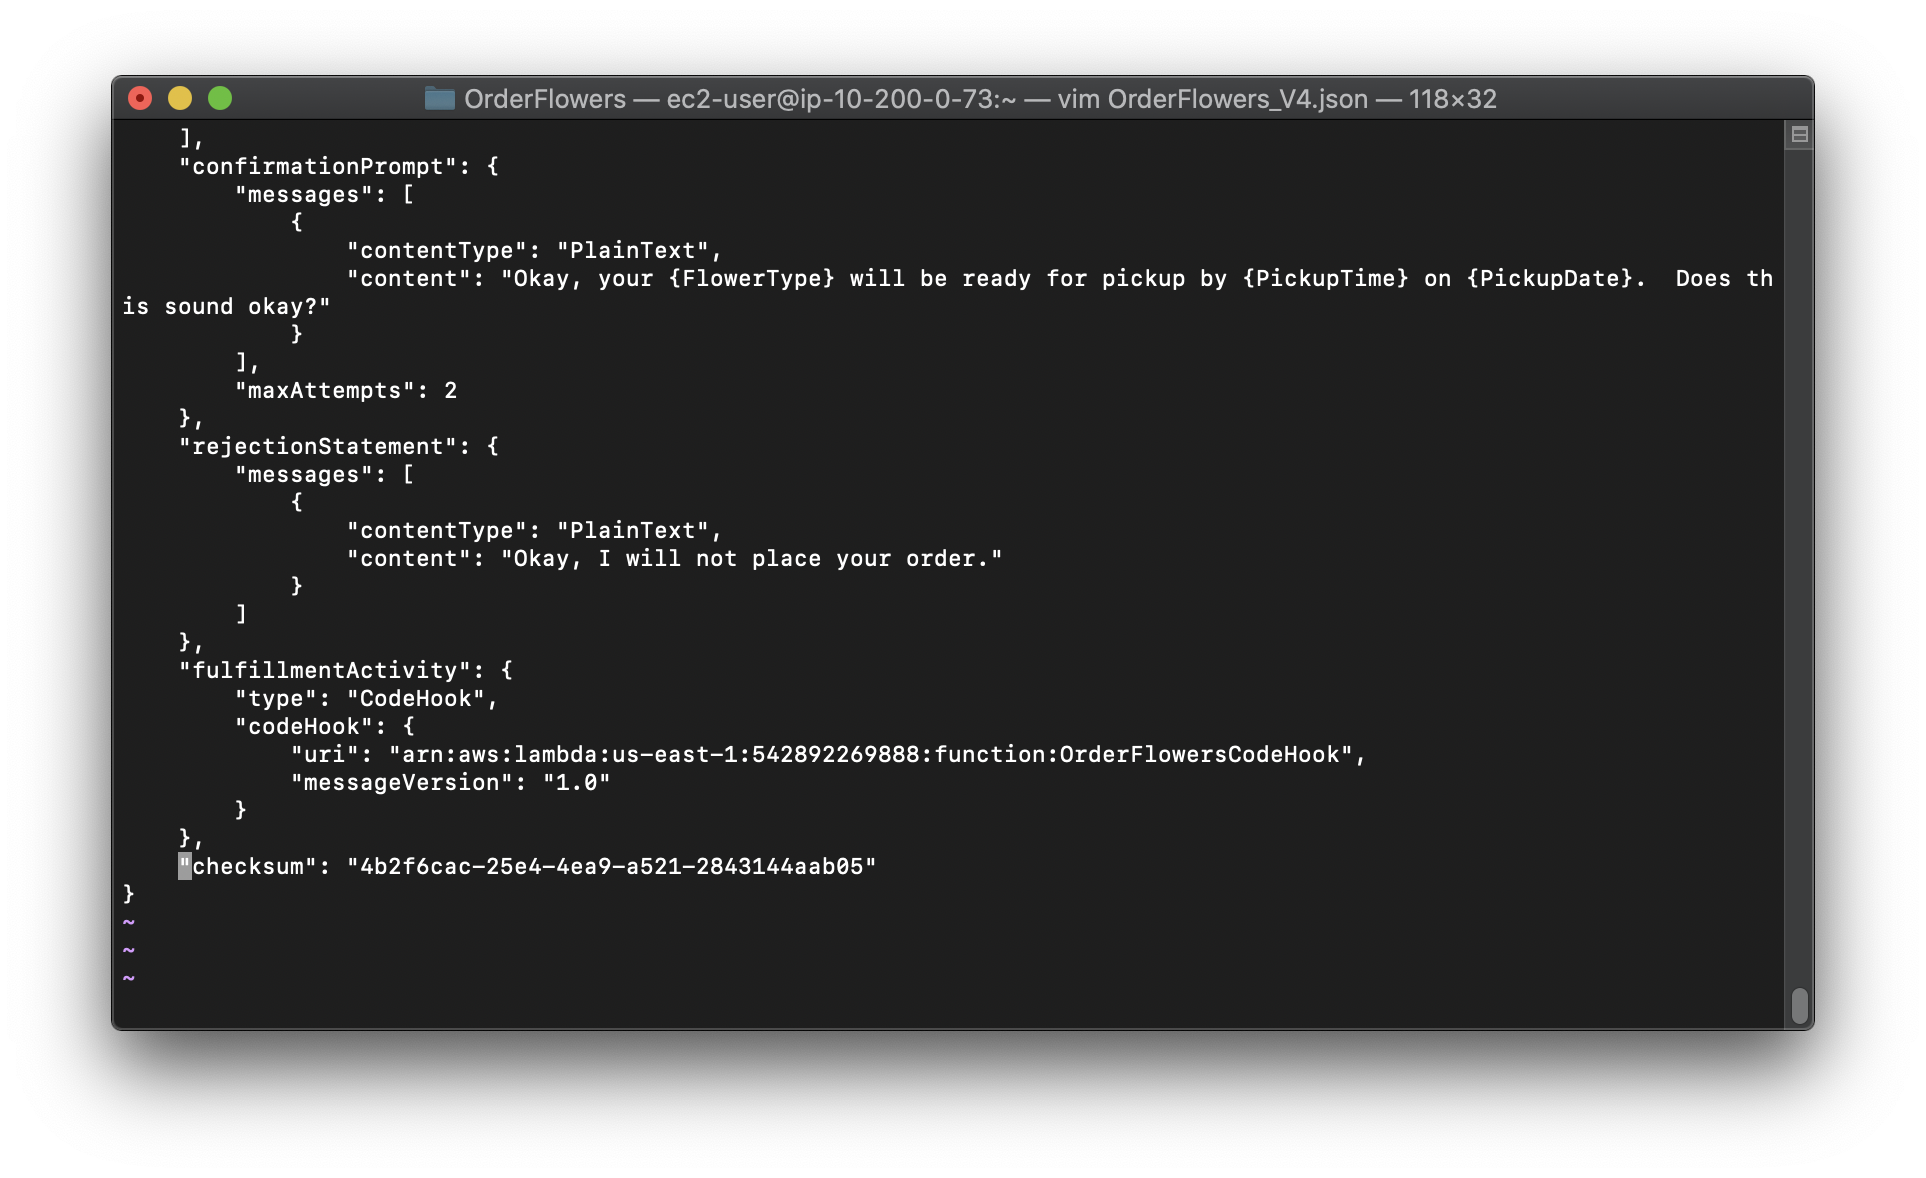
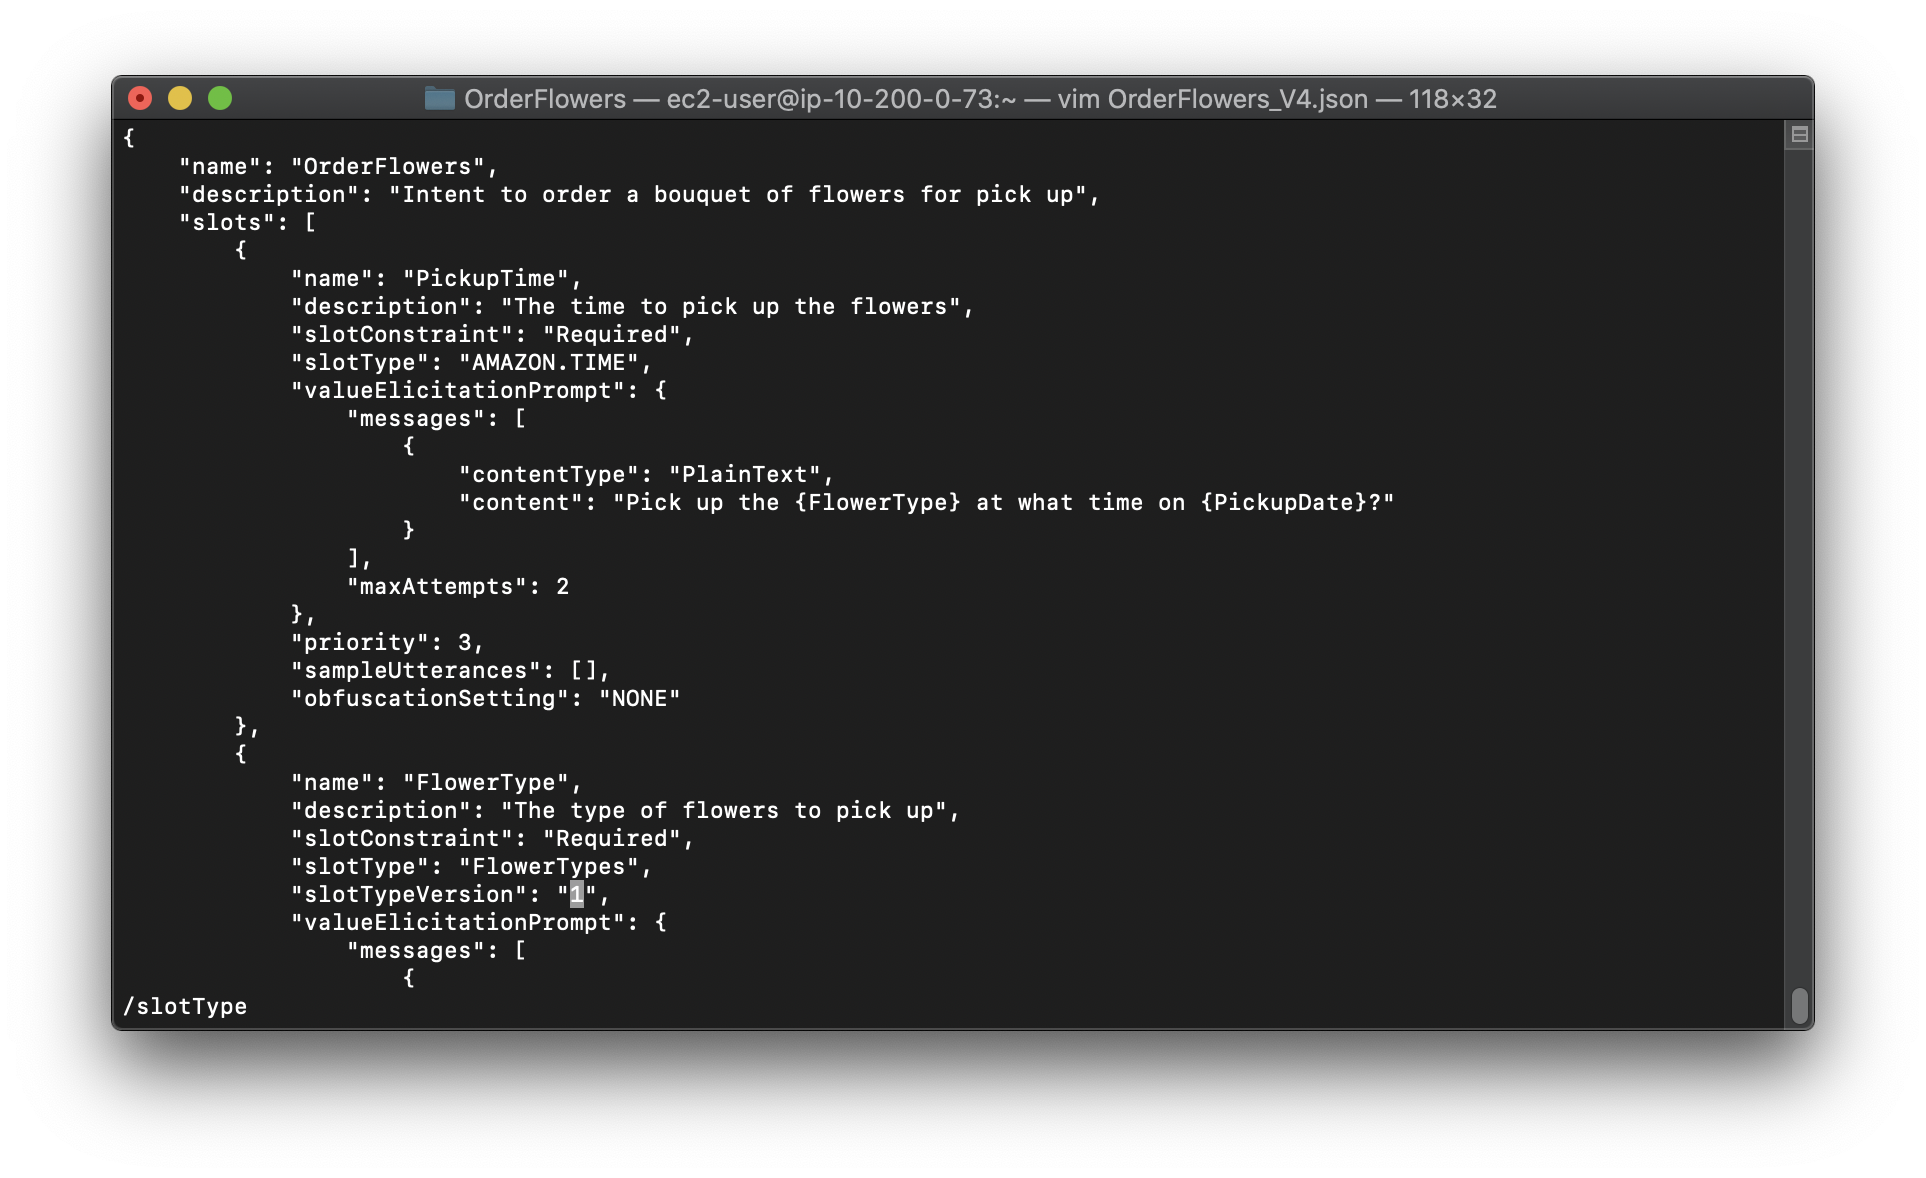
2.In a text editor, open the OrderFlowers_V4.json file. Delete the createdDate, lastUpdatedDate, and version fields. Find the FlowerTypes slot type and change the version to the version number that you recorded in the previous step. The following fragment of the OrderFlowers_V4.json file shows the location of the change:
3.In the AWS CLI, save the revision of the intent:
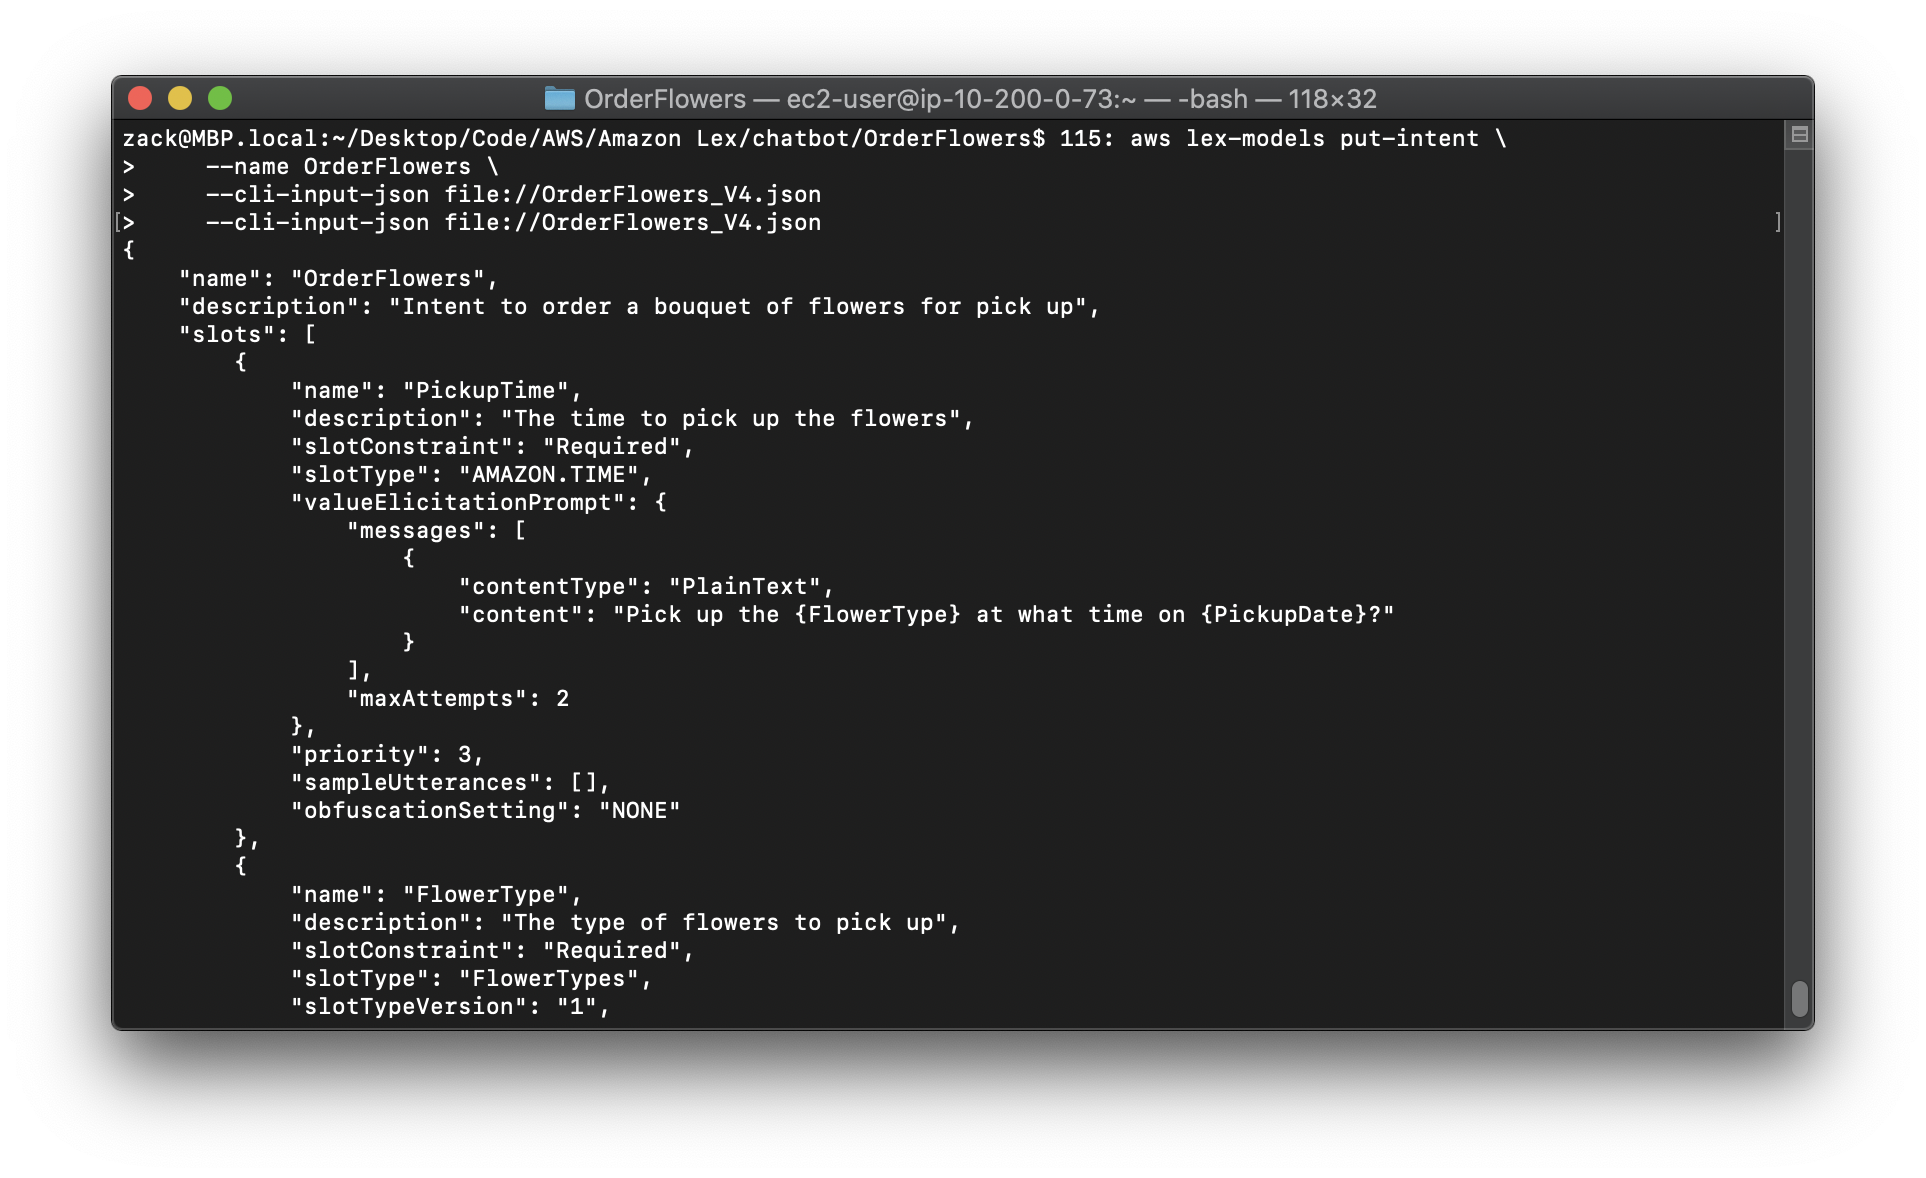
1 | aws lex-models put-intent \ |
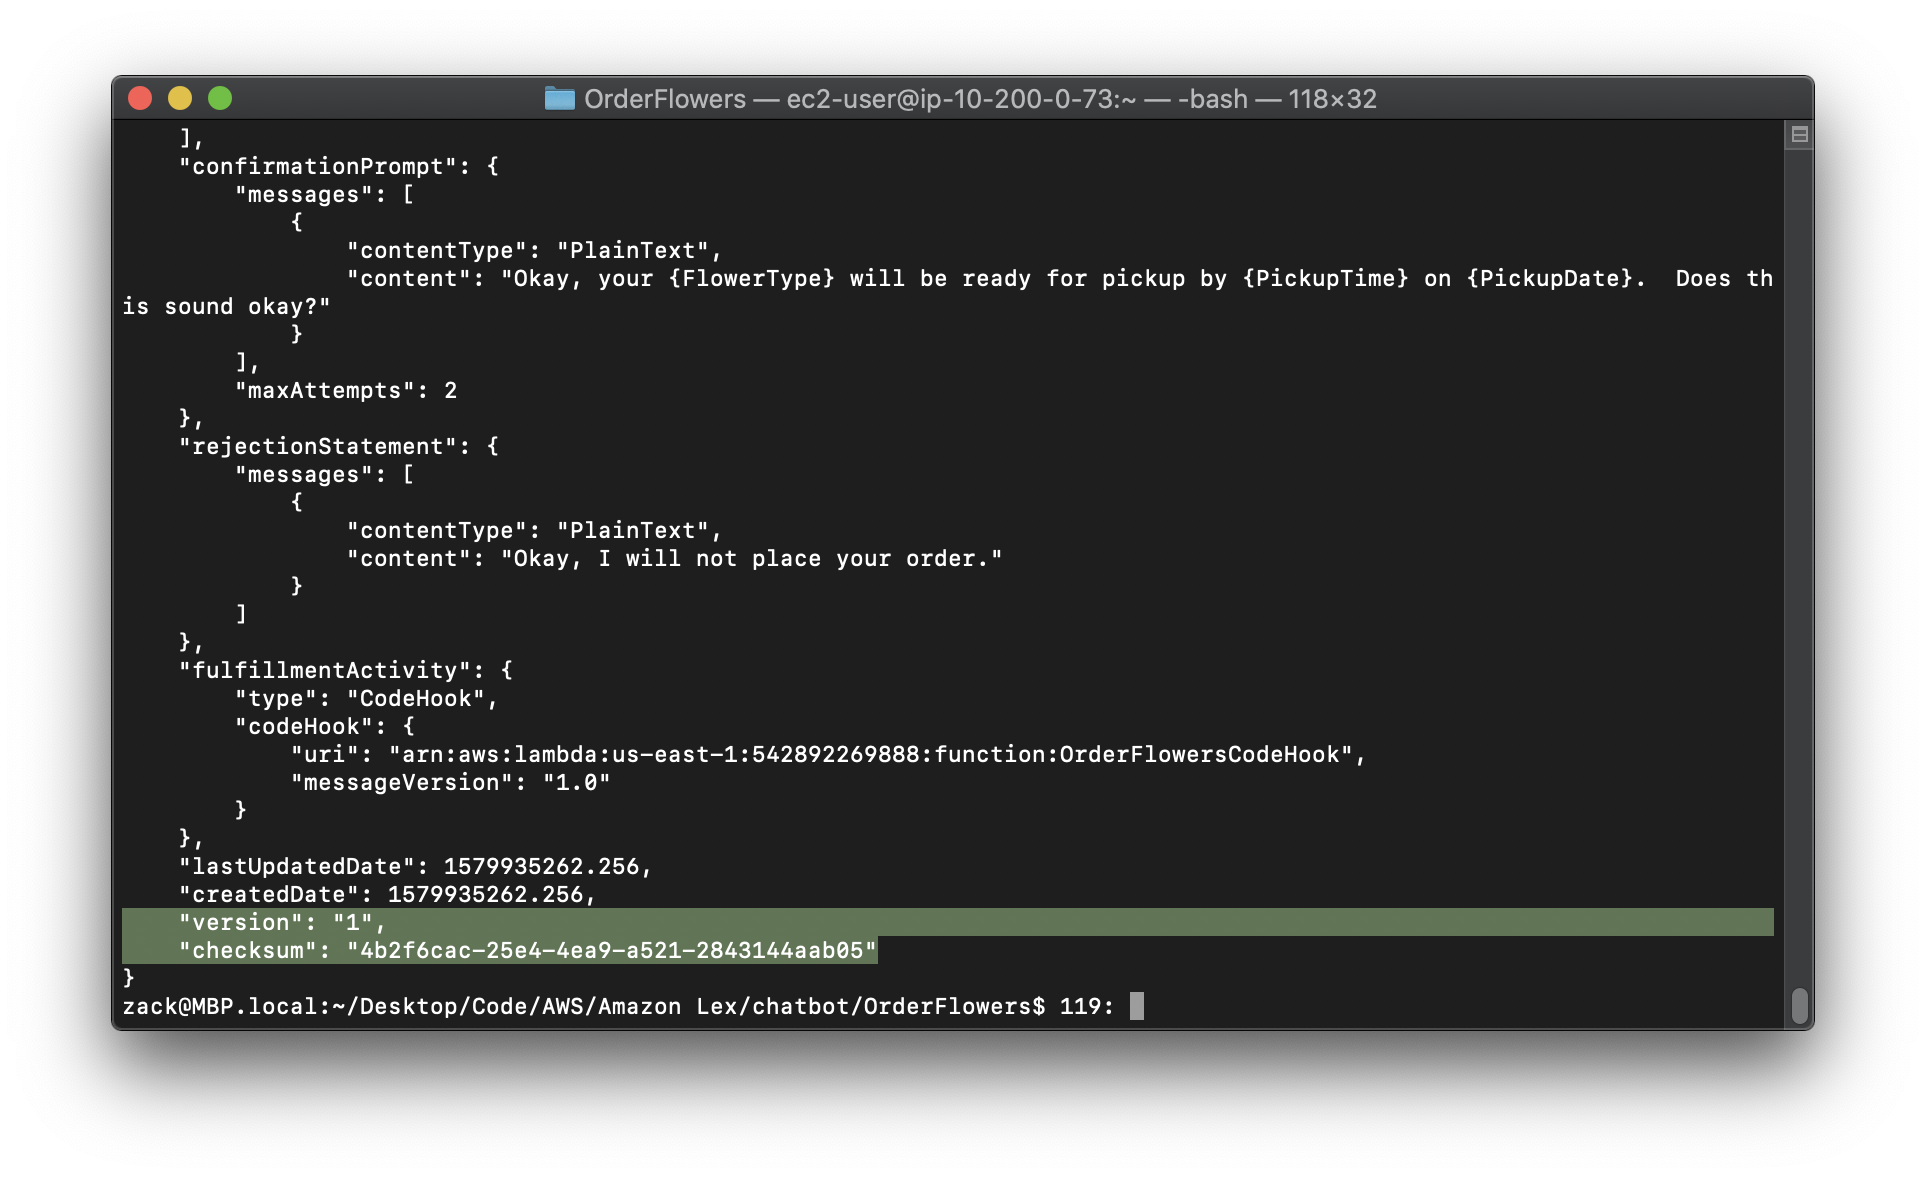
4.Get the checksum of the latest revision of the intent:
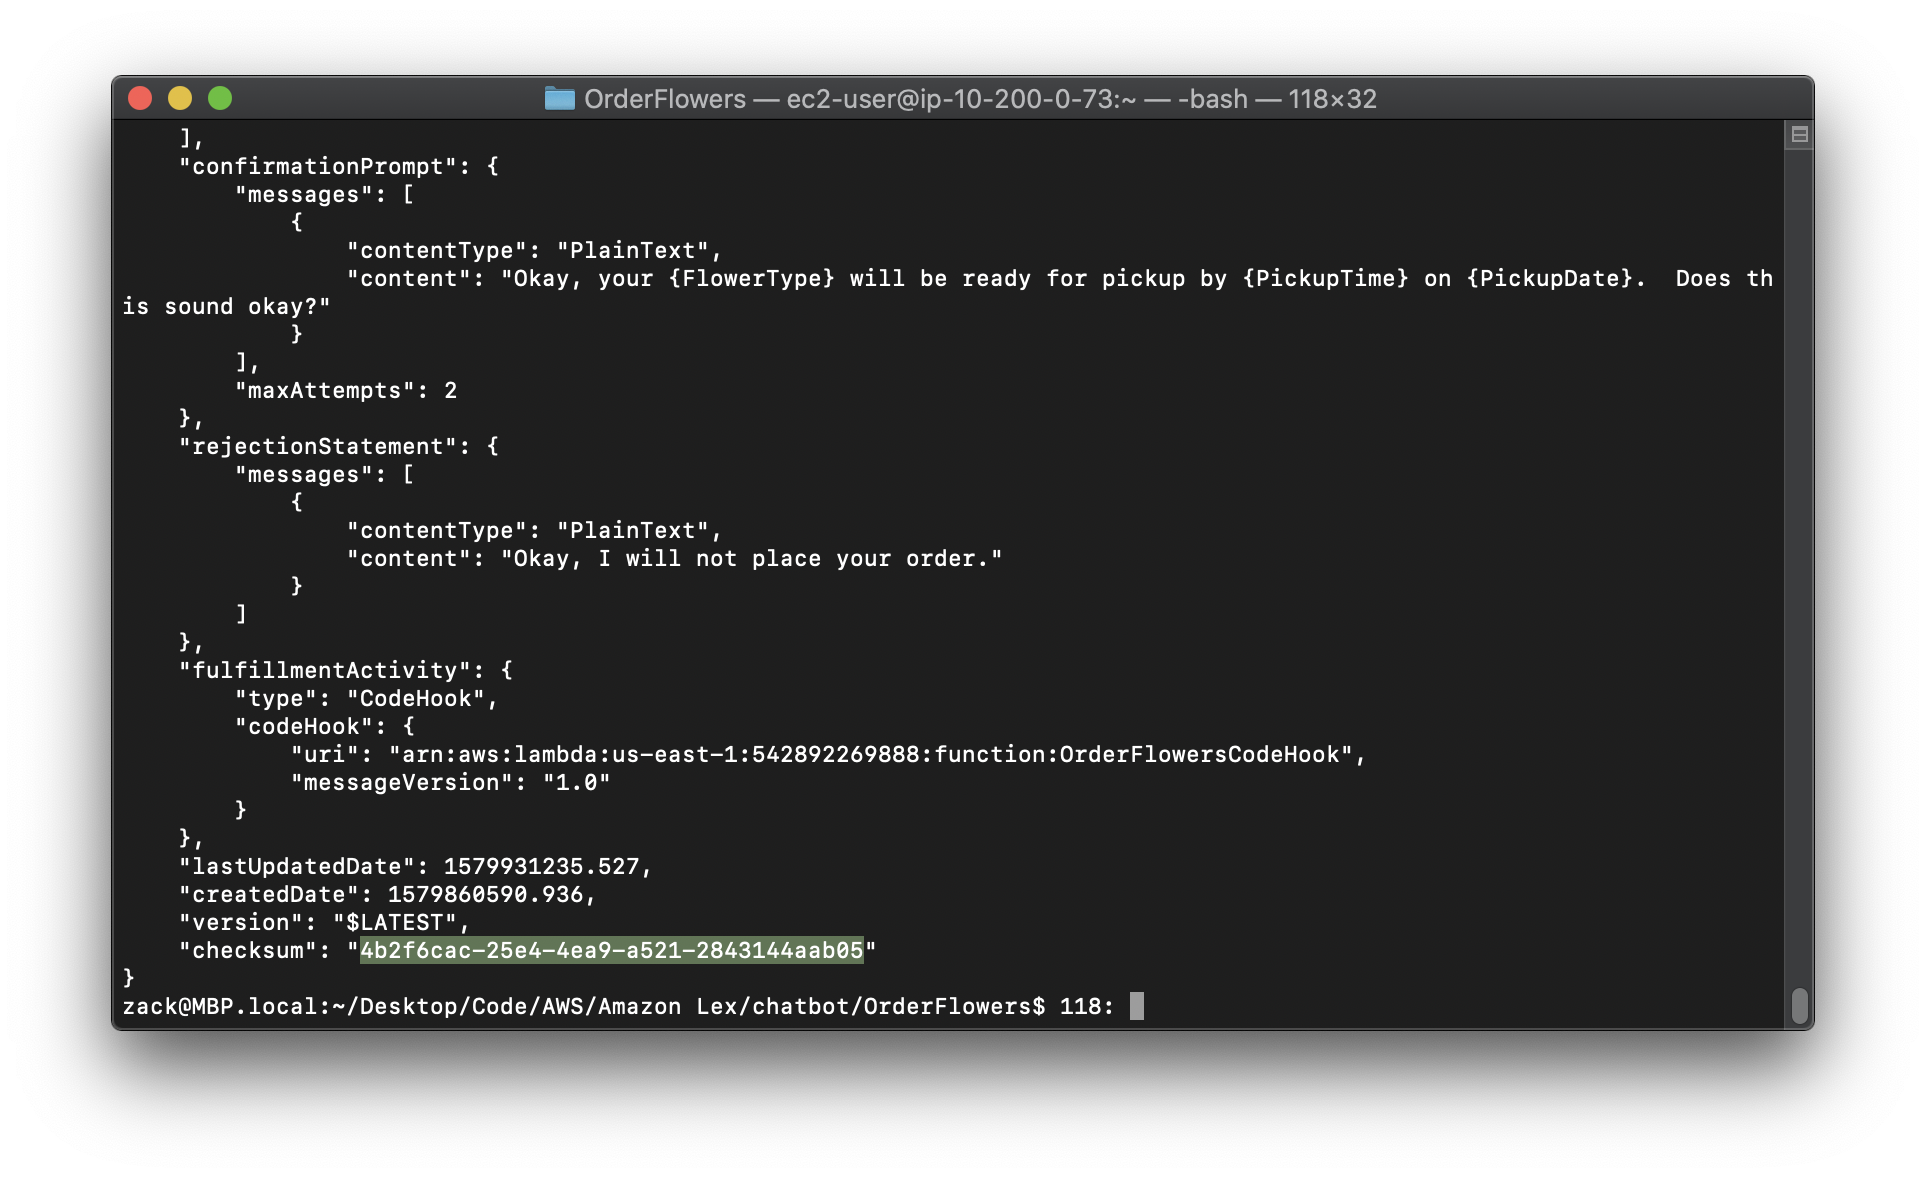
Replace the region to yours.
1 | aws lex-models get-intent \ |

The following fragment of the response shows the checksum of the intent. Record this for the next step.
5.Publish a new version of the intent:
Replace the region to yours.
Replace the "checksum" to yours.
1 | aws lex-models create-intent-version \ |
The following fragment of the response shows the new version of the intent. Record the version number for the next step.
Step 3: Publish the Bot (AWS CLI)
https://docs.aws.amazon.com/lex/latest/dg/gs-cli-publish-bot.html
After you have published all of the slot types and intents that are used by your bot, you can publish the bot.
Update the OrderFlowersBot bot to use the OrderFlowers intent that you updated in the previous step. Then, publish a new version of the OrderFlowersBot bot.
Note
The following AWS CLI example is formatted for Unix, Linux, and macOS. For Windows, change "\$LATEST" to $LATEST and replace the backslash () continuation character at the end of each line with a caret (^).
To publish a version of a bot (AWS CLI)
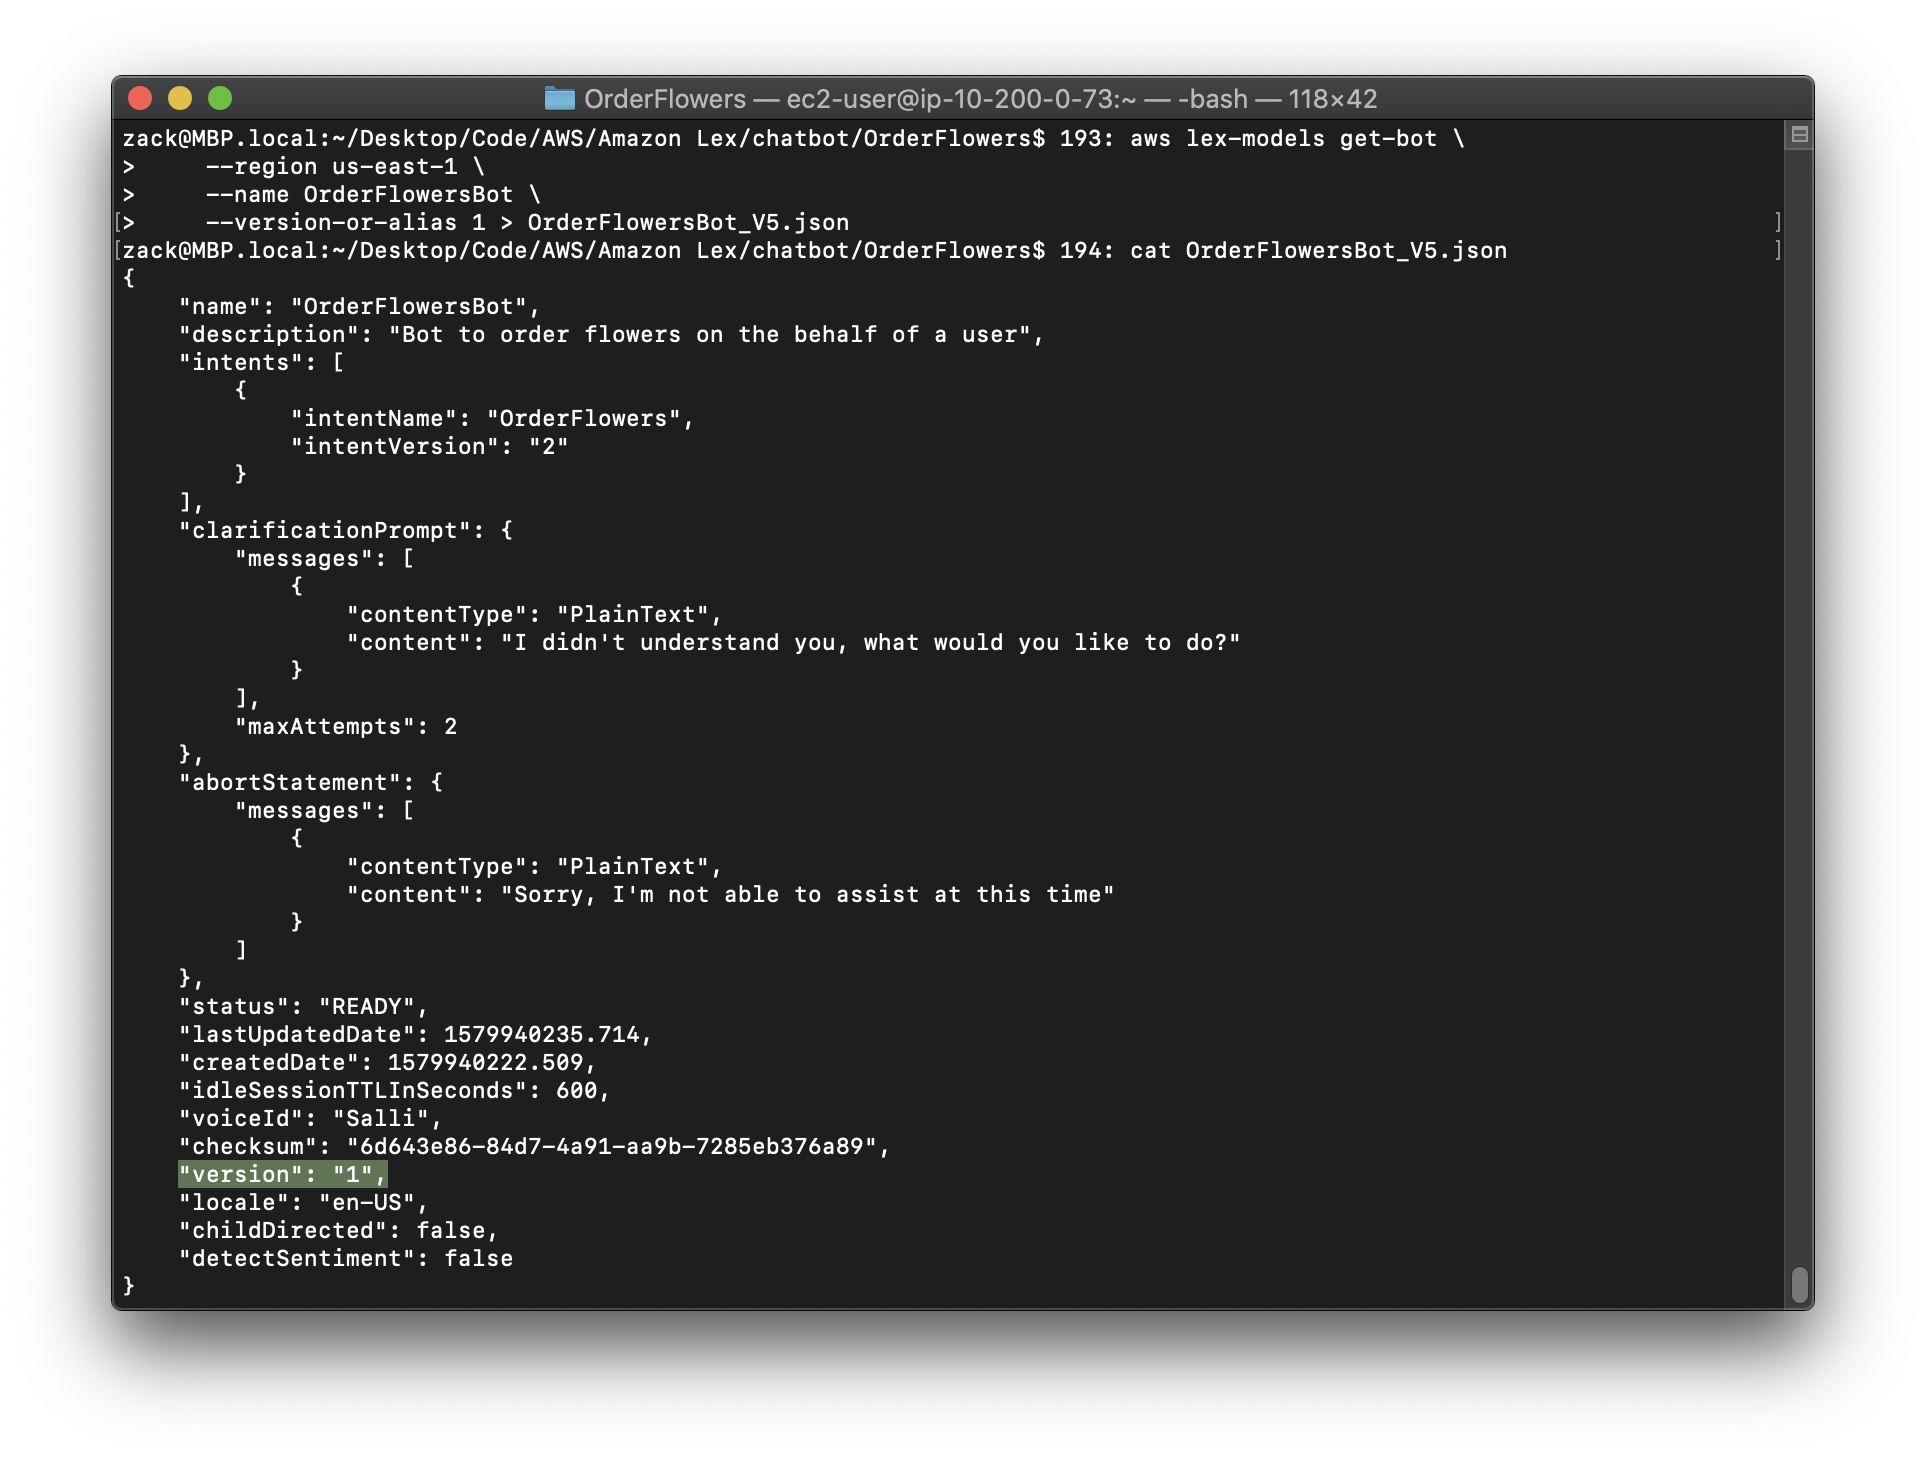
1.In the AWS CLI, get the $LATEST version of the OrderFlowersBot bot and save it to a file:
Replace the region to yours.
1 | aws lex-models get-bot \ |

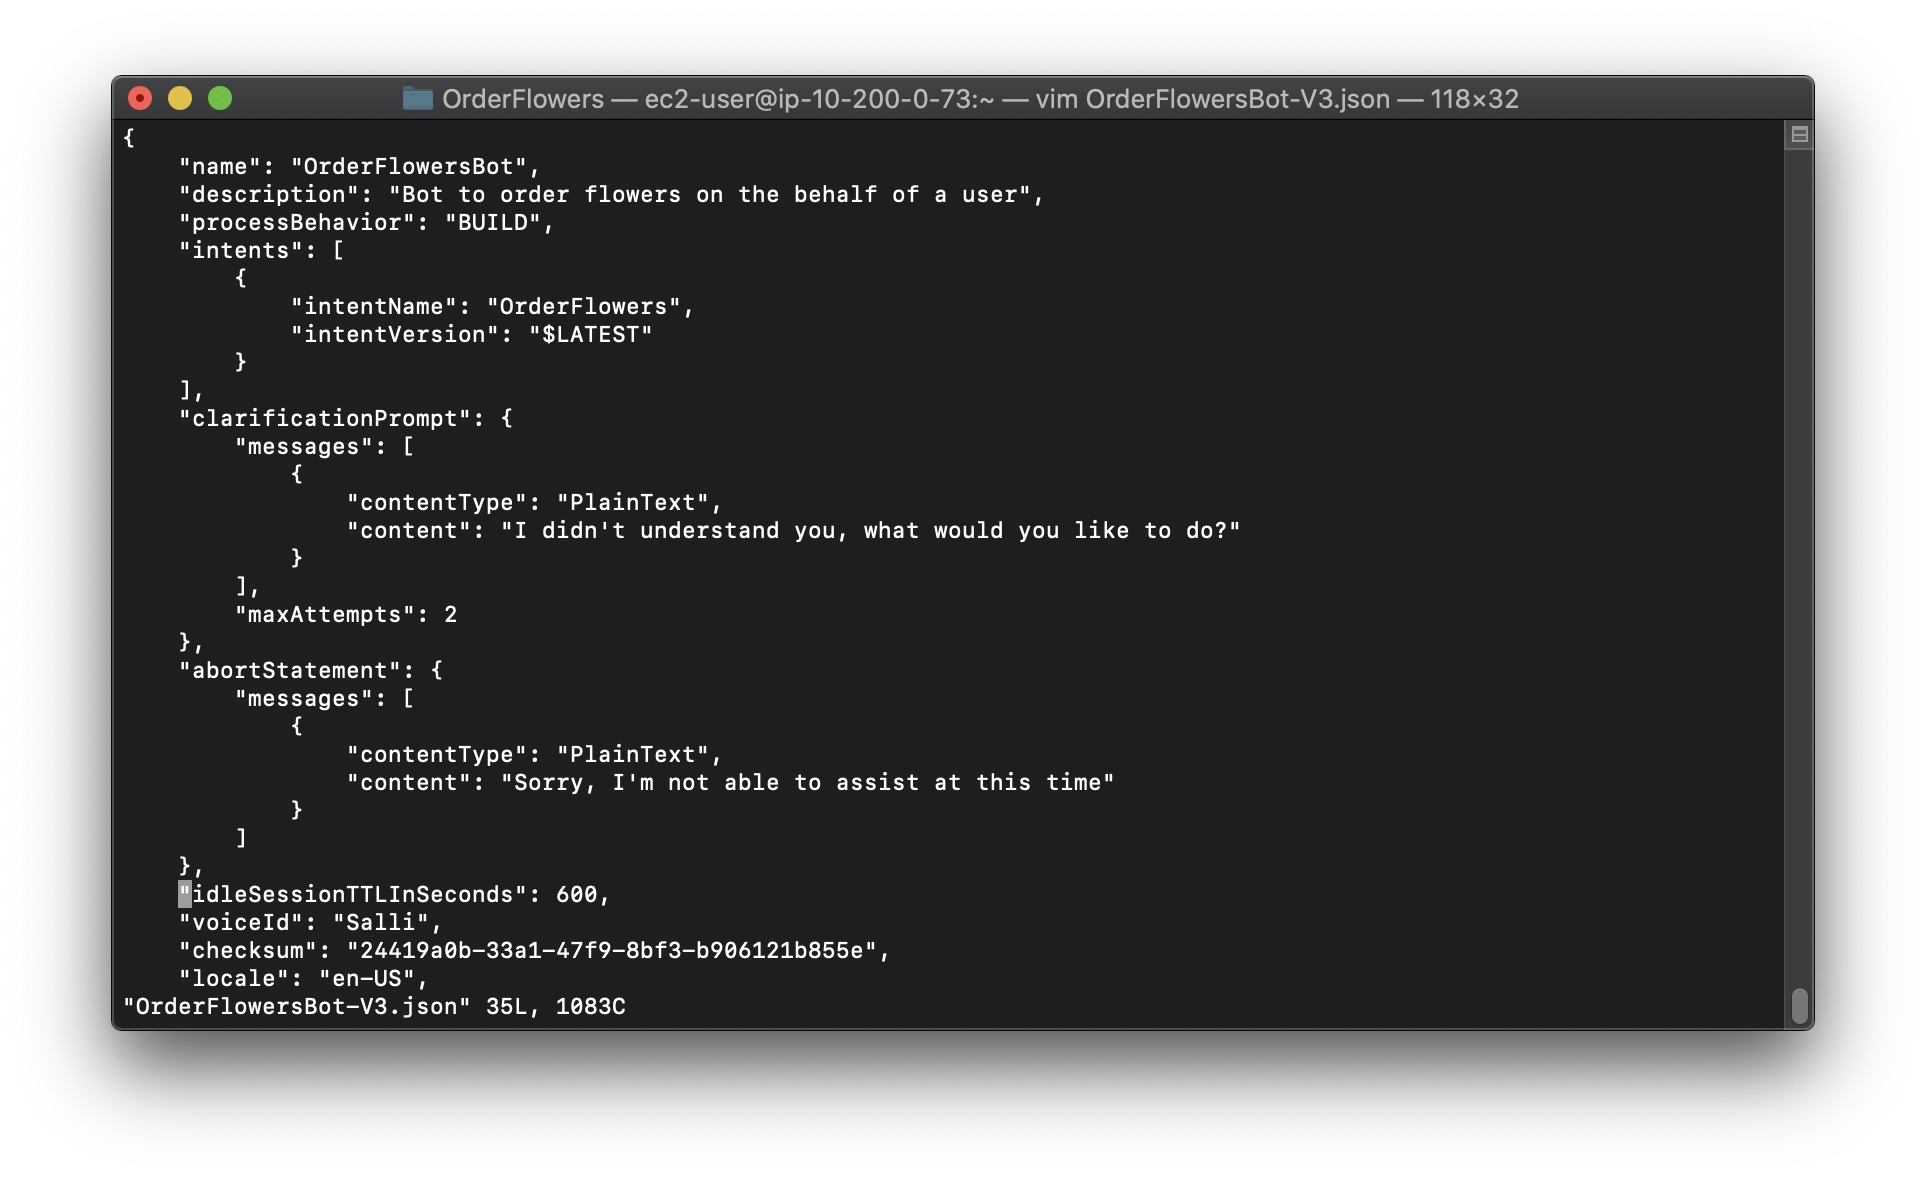
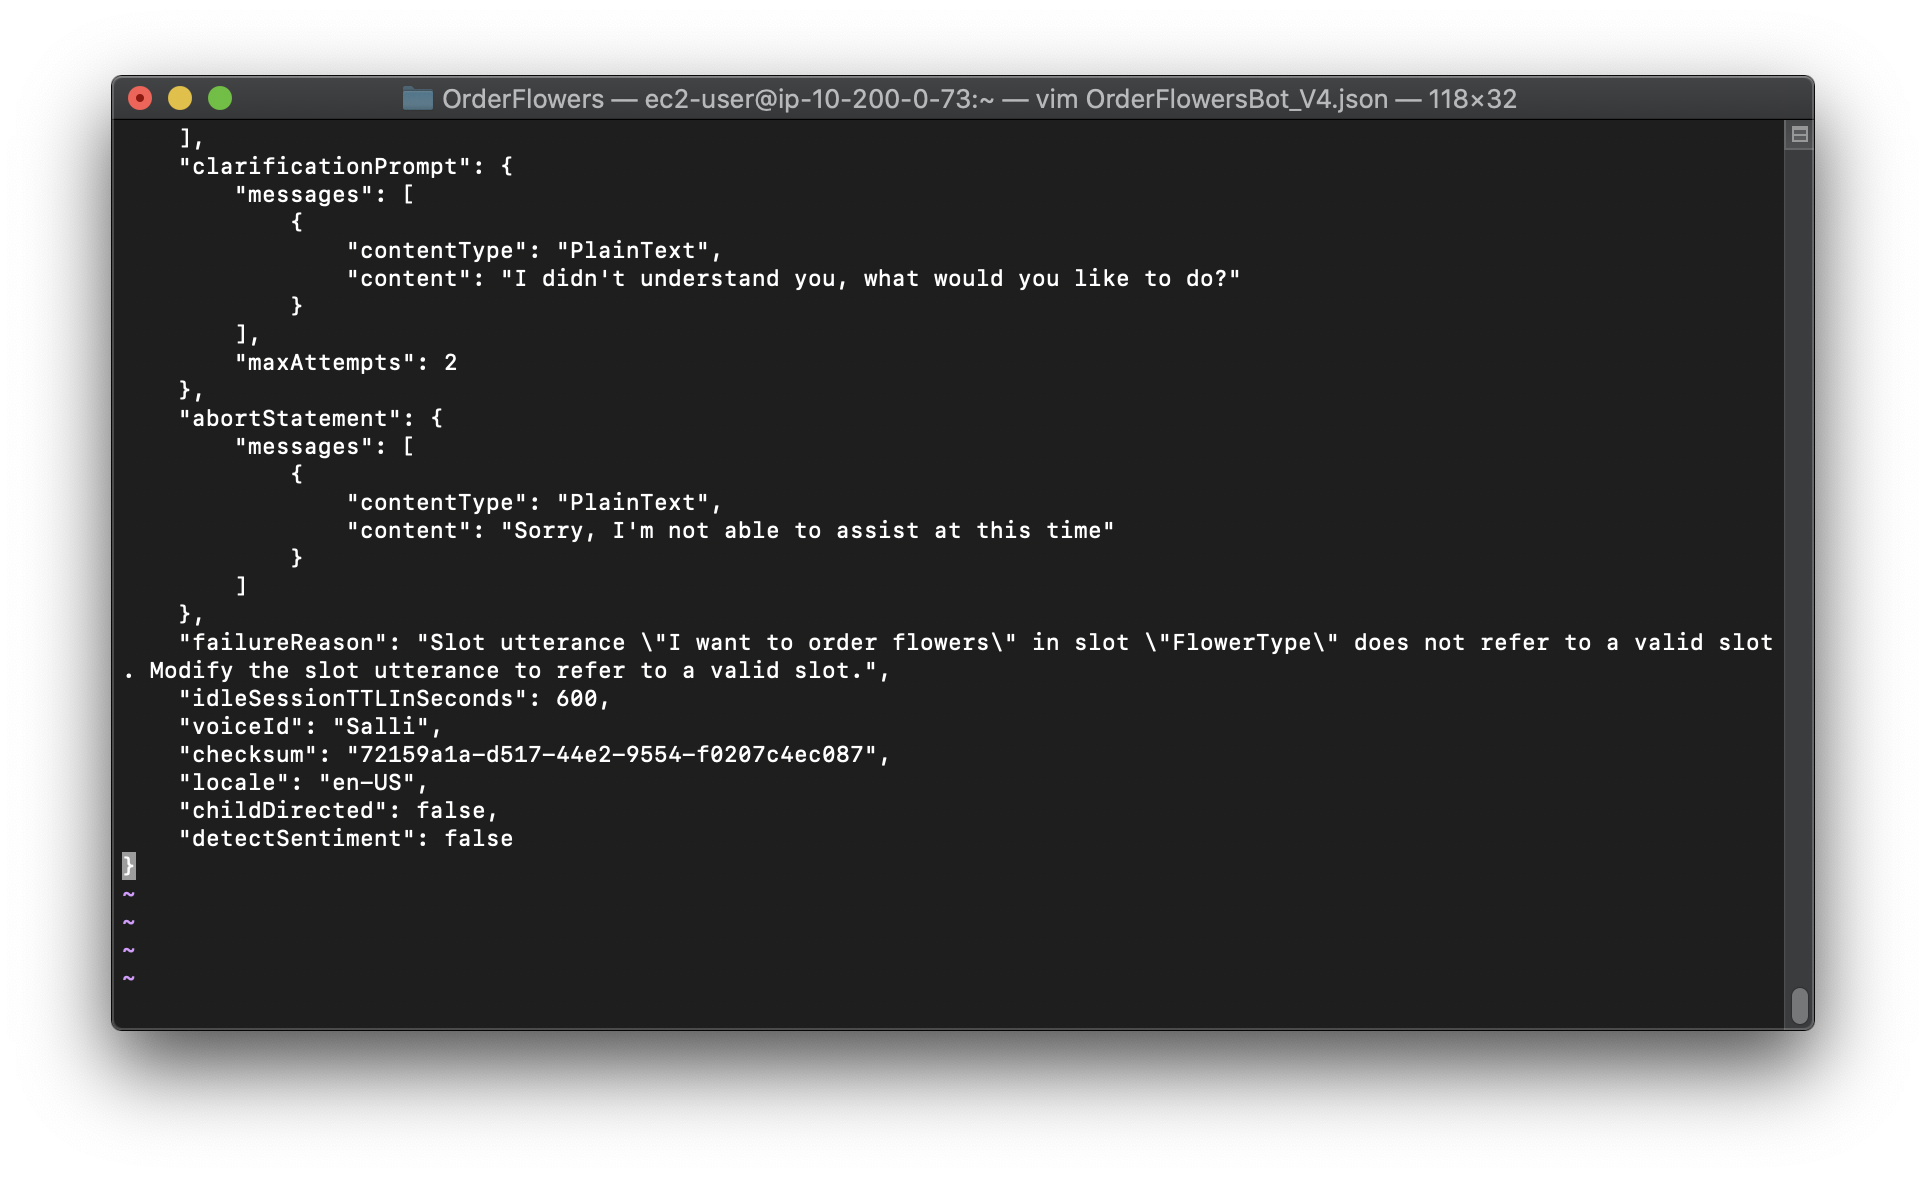
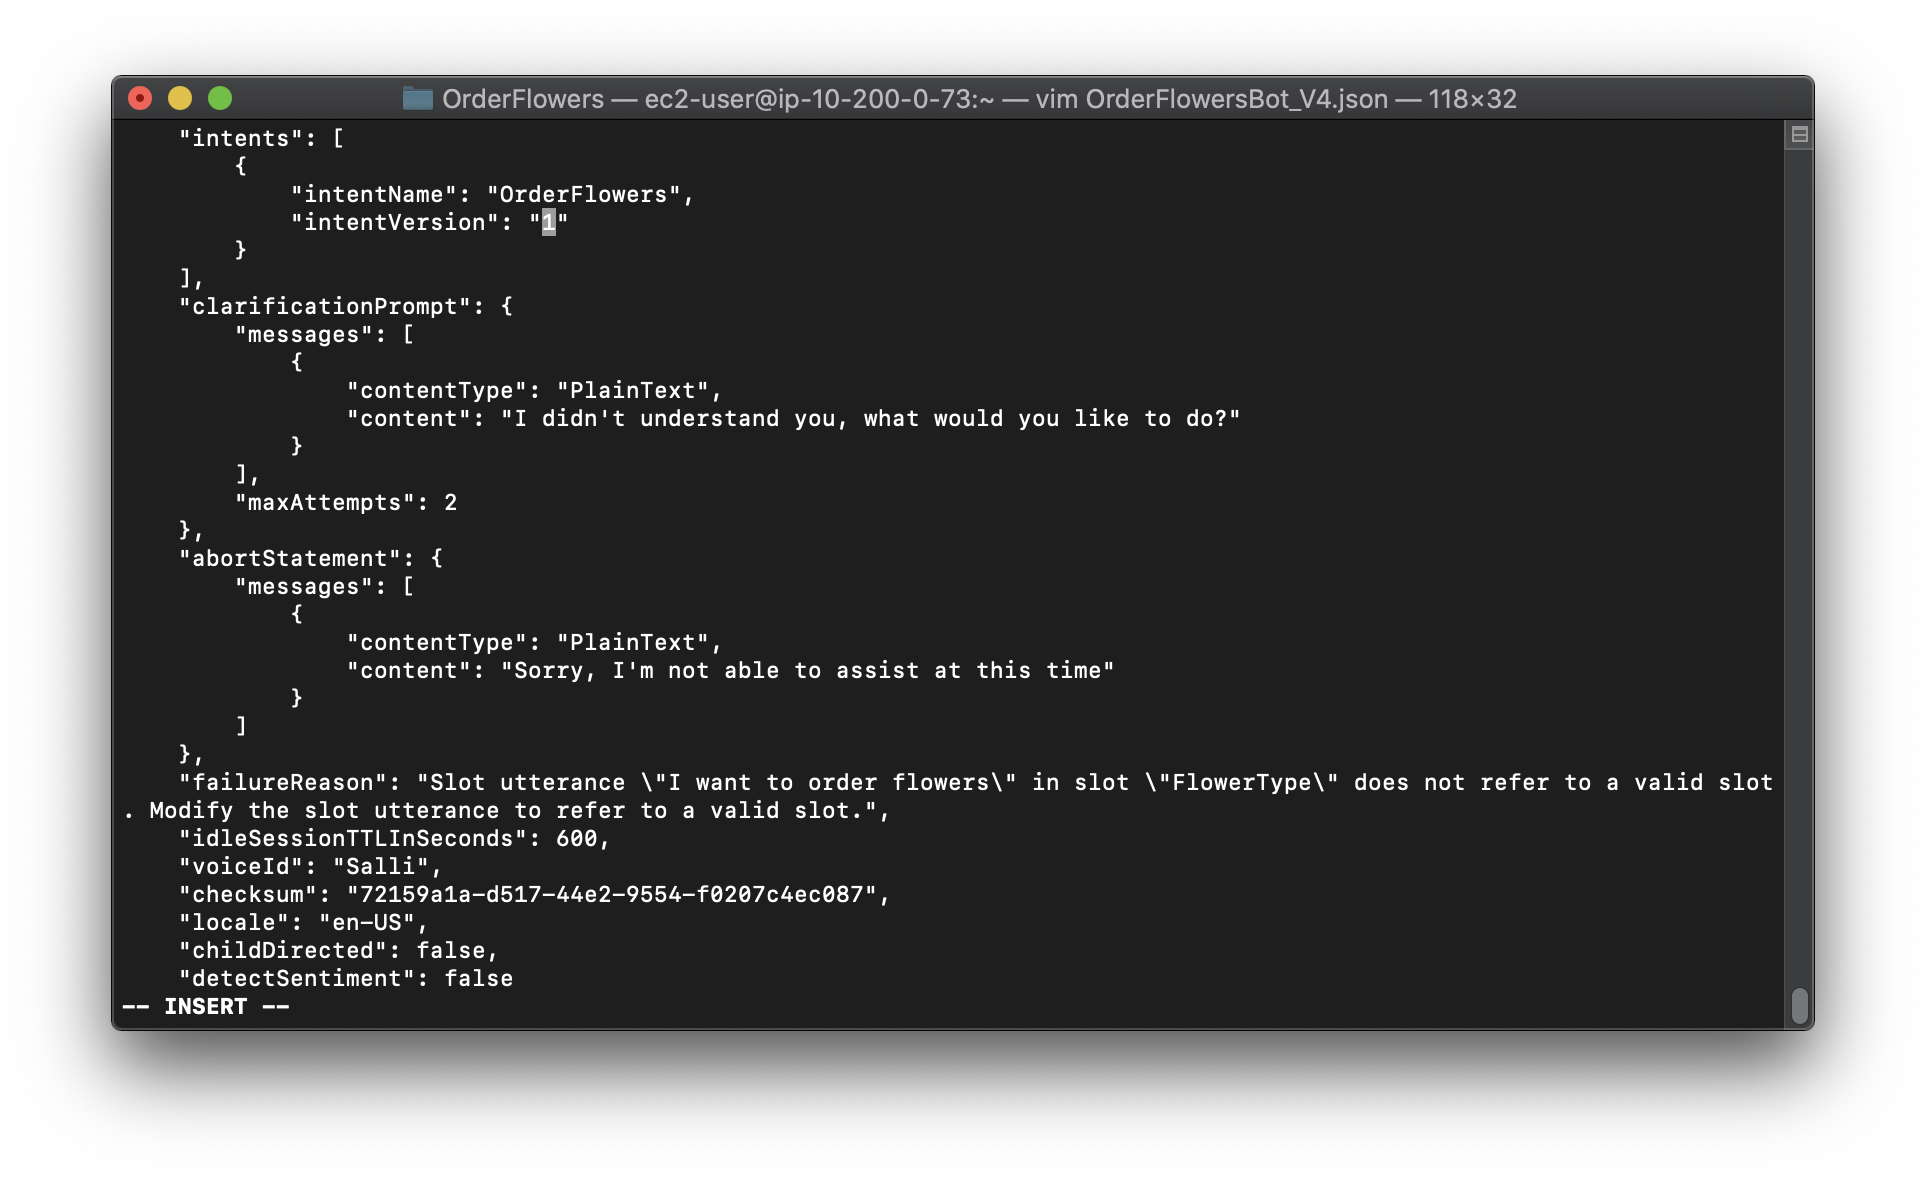
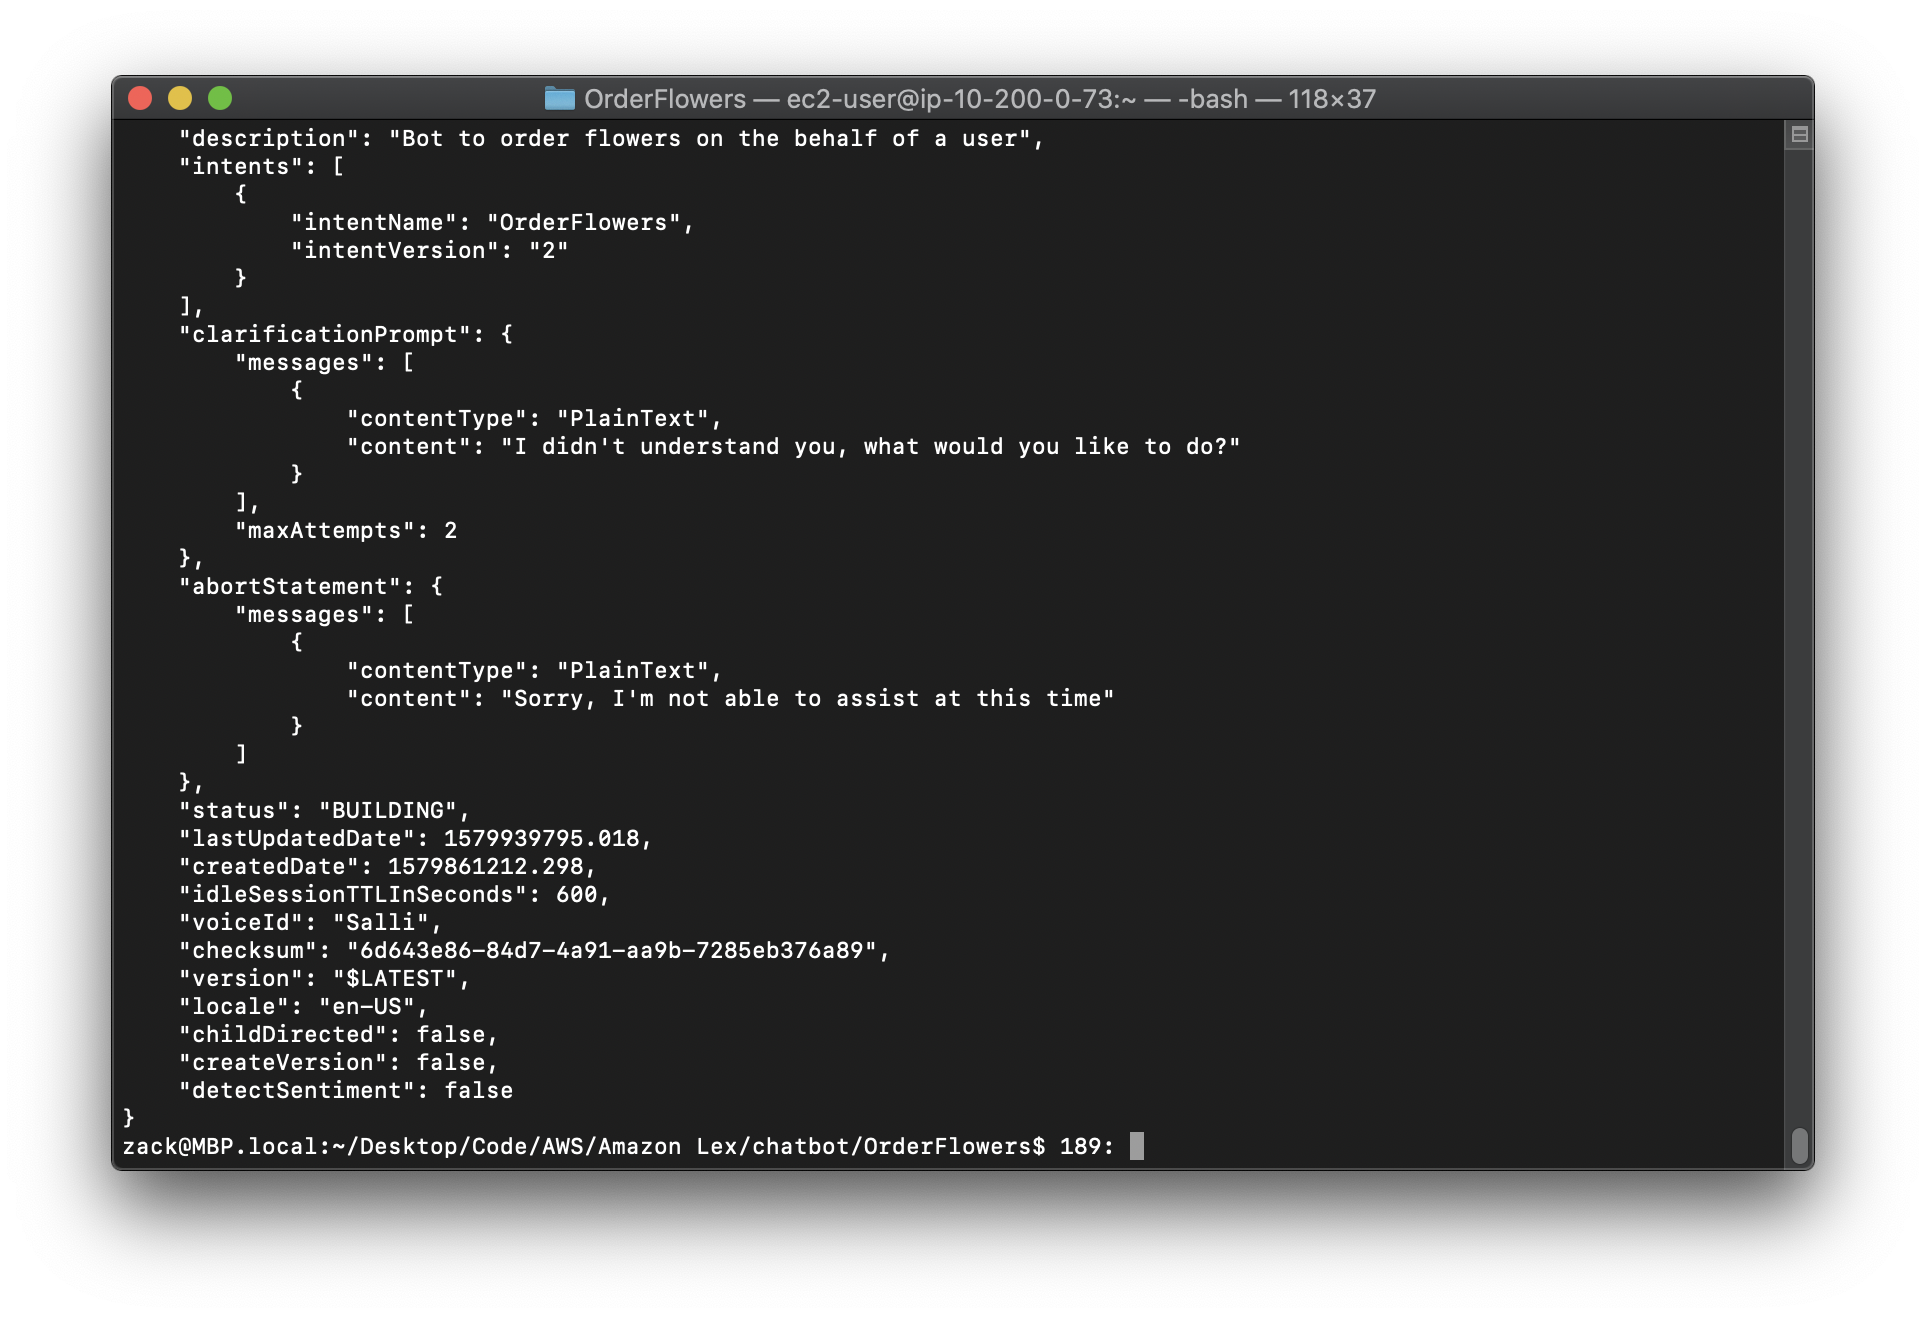
2.In a text editor, open the OrderFlowersBot_V4.json file. Delete the createdDate, lastUpdatedDate, status and version fields. Find the OrderFlowers intent and change the version to the version number that you recorded in the previous step. The following fragment of OrderFlowersBot_V4.json shows the location of the change.
3.In the AWS CLI, save the new revision of the bot:
1 | aws lex-models put-bot \ |
4.Get the checksum of the latest revision of the bot:
Replace the region to yours.
1 | aws lex-models get-bot \ |
Note: there is a bug in official developer guide that it missed –version line
The following fragment of the response shows the checksum of the bot. Record this for the next step.
5.Publish a new version of the bot:
Replace the region to yours.
Replace the "checksum" to yours.
1 | aws lex-models create-bot-version \ |

Exercise 5: Create an Alias
https://docs.aws.amazon.com/lex/latest/dg/gs-cli-create-alias.html
An alias is a pointer to a specific version of a bot. With an alias you can easily update the version that your client applications are using. For more information, see Versioning and Aliases.To run the commands in this exercise, you need to know the region where the commands will be run. For a list of regions, see Model Building Quotas.
To create an alias (AWS CLI)
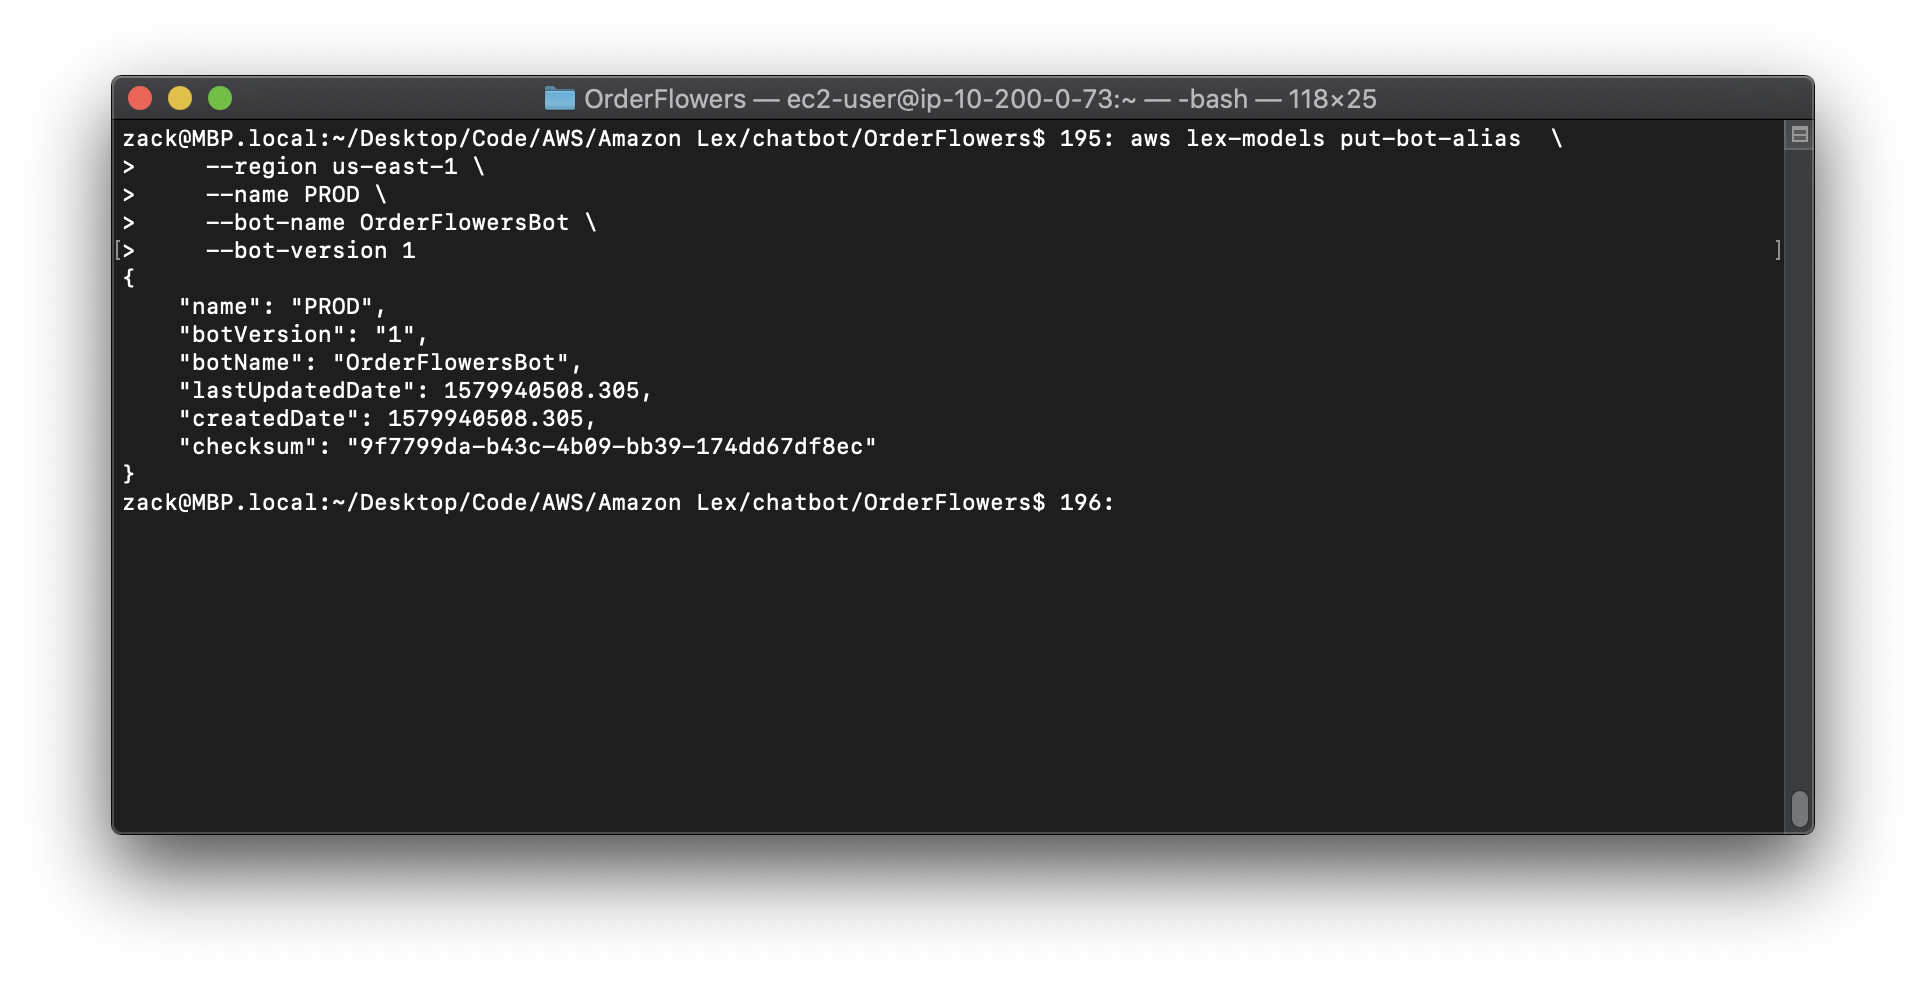
1.In the AWS CLI, get the version of the OrderFlowersBot bot that you created in Exercise 4: Publish a Version (AWS CLI).
Replace the region to yours.
Replace the version to yours.
1 | aws lex-models get-bot \ |
2.In a text editor, open OrderFlowersBot_v5.json. Find and record the version number.
3.In the AWS CLI, create the bot alias:
Replace the region to yours.
Replace the version to yours.
1 | aws lex-models put-bot-alias \ |
Exercise 6: Clean Up
https://docs.aws.amazon.com/lex/latest/dg/gs-cli-clean-up.html
Delete the resources that you created and clean up your account.
You can delete only resources that are not in use. In general, you should delete resources in the following order.
- Delete aliases to free up bot resources.
- Delete bots to free up intent resources.
- Delete intents to free up slot type resources.
- Delete slot types.
To clean up your account (AWS CLI)
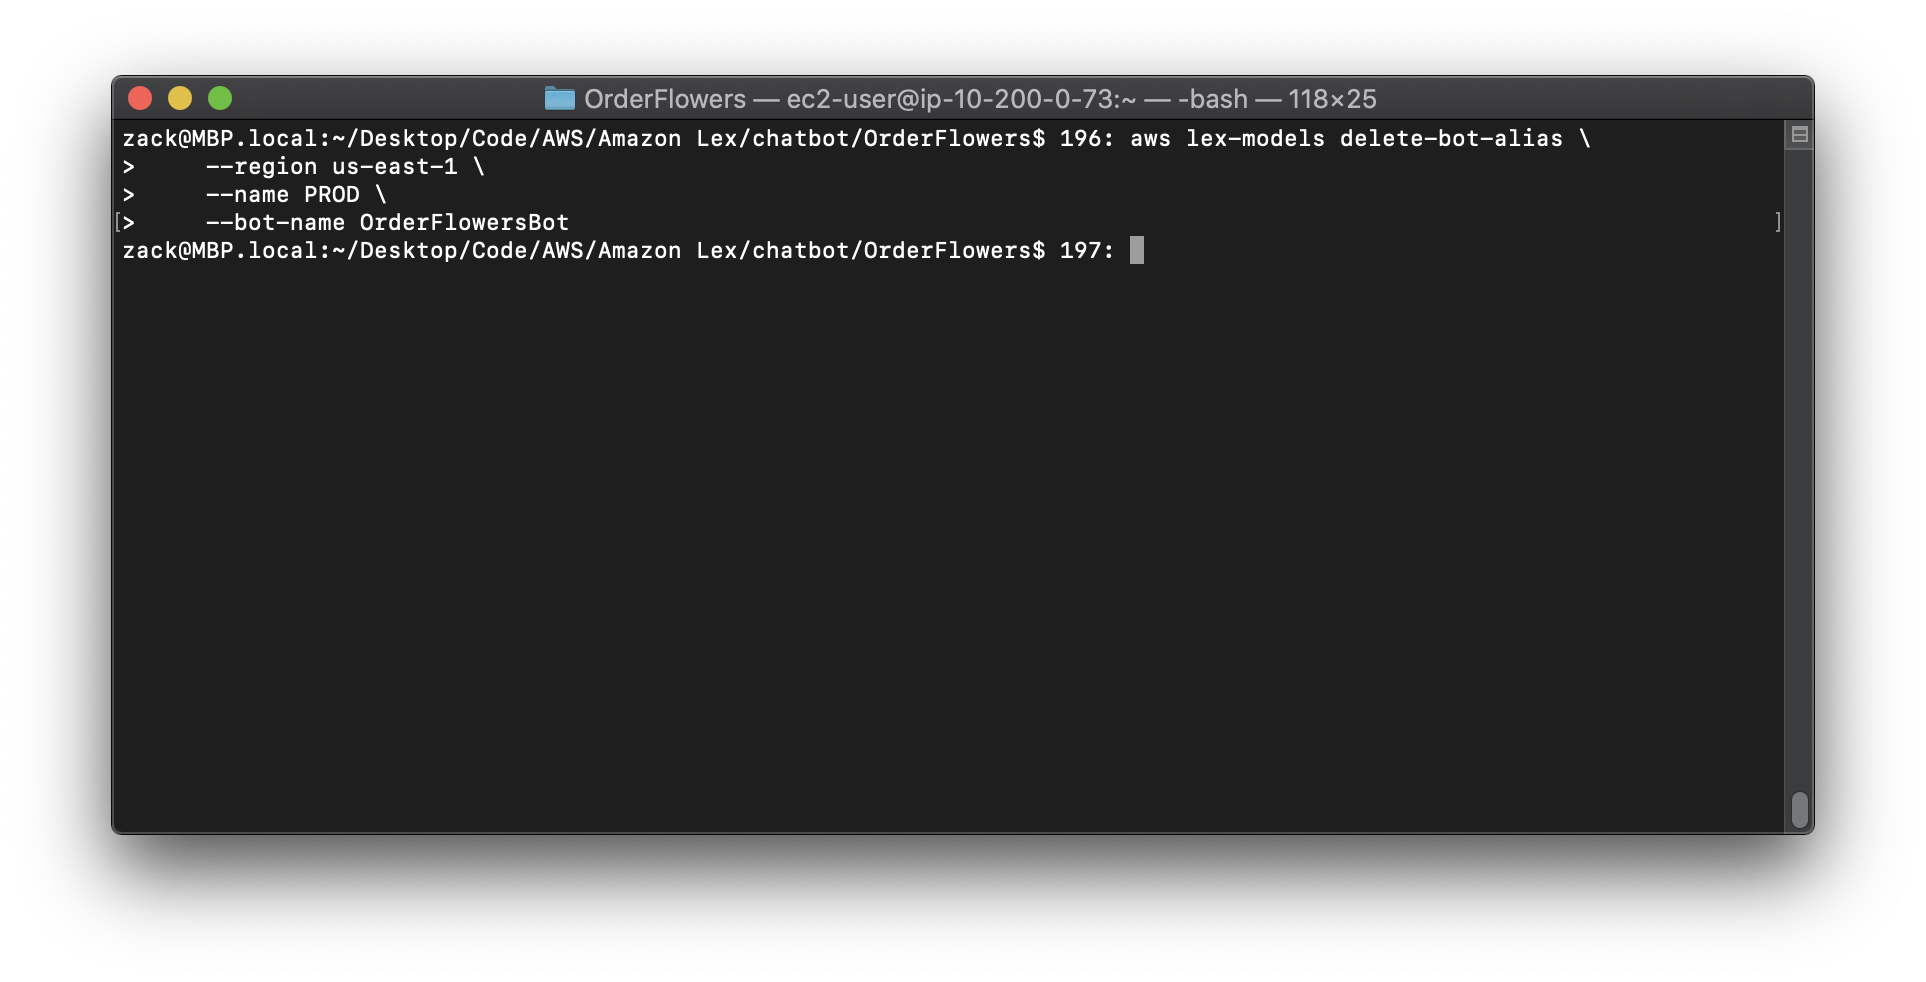
1.In the AWS CLI command line, delete the alias:
Replace the region to yours.
1 | aws lex-models delete-bot-alias \ |
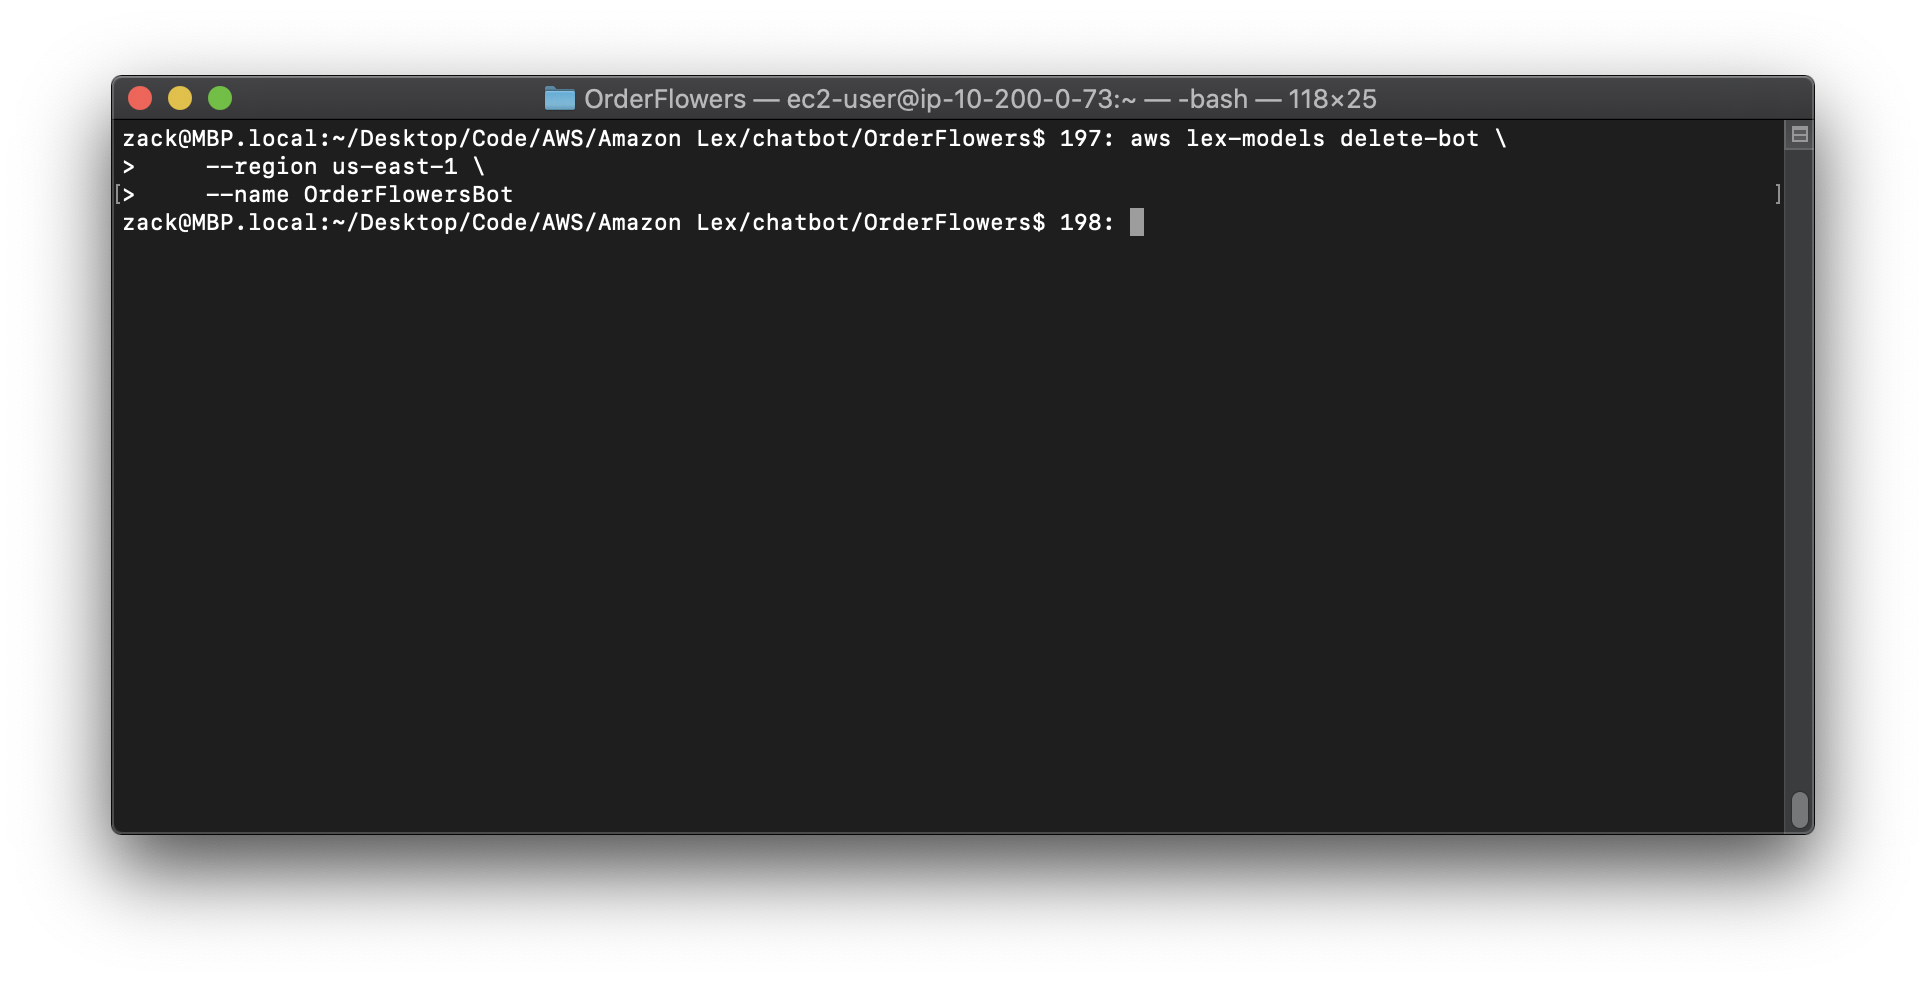
2.In the AWS CLI command line, delete the bot:
Replace the region to yours.
1 | aws lex-models delete-bot \ |
3.In the AWS CLI command line, delete the intent:
Replace the region to yours.
1 | aws lex-models delete-intent \ |

4.From the AWS CLI command line, delete the slot type:
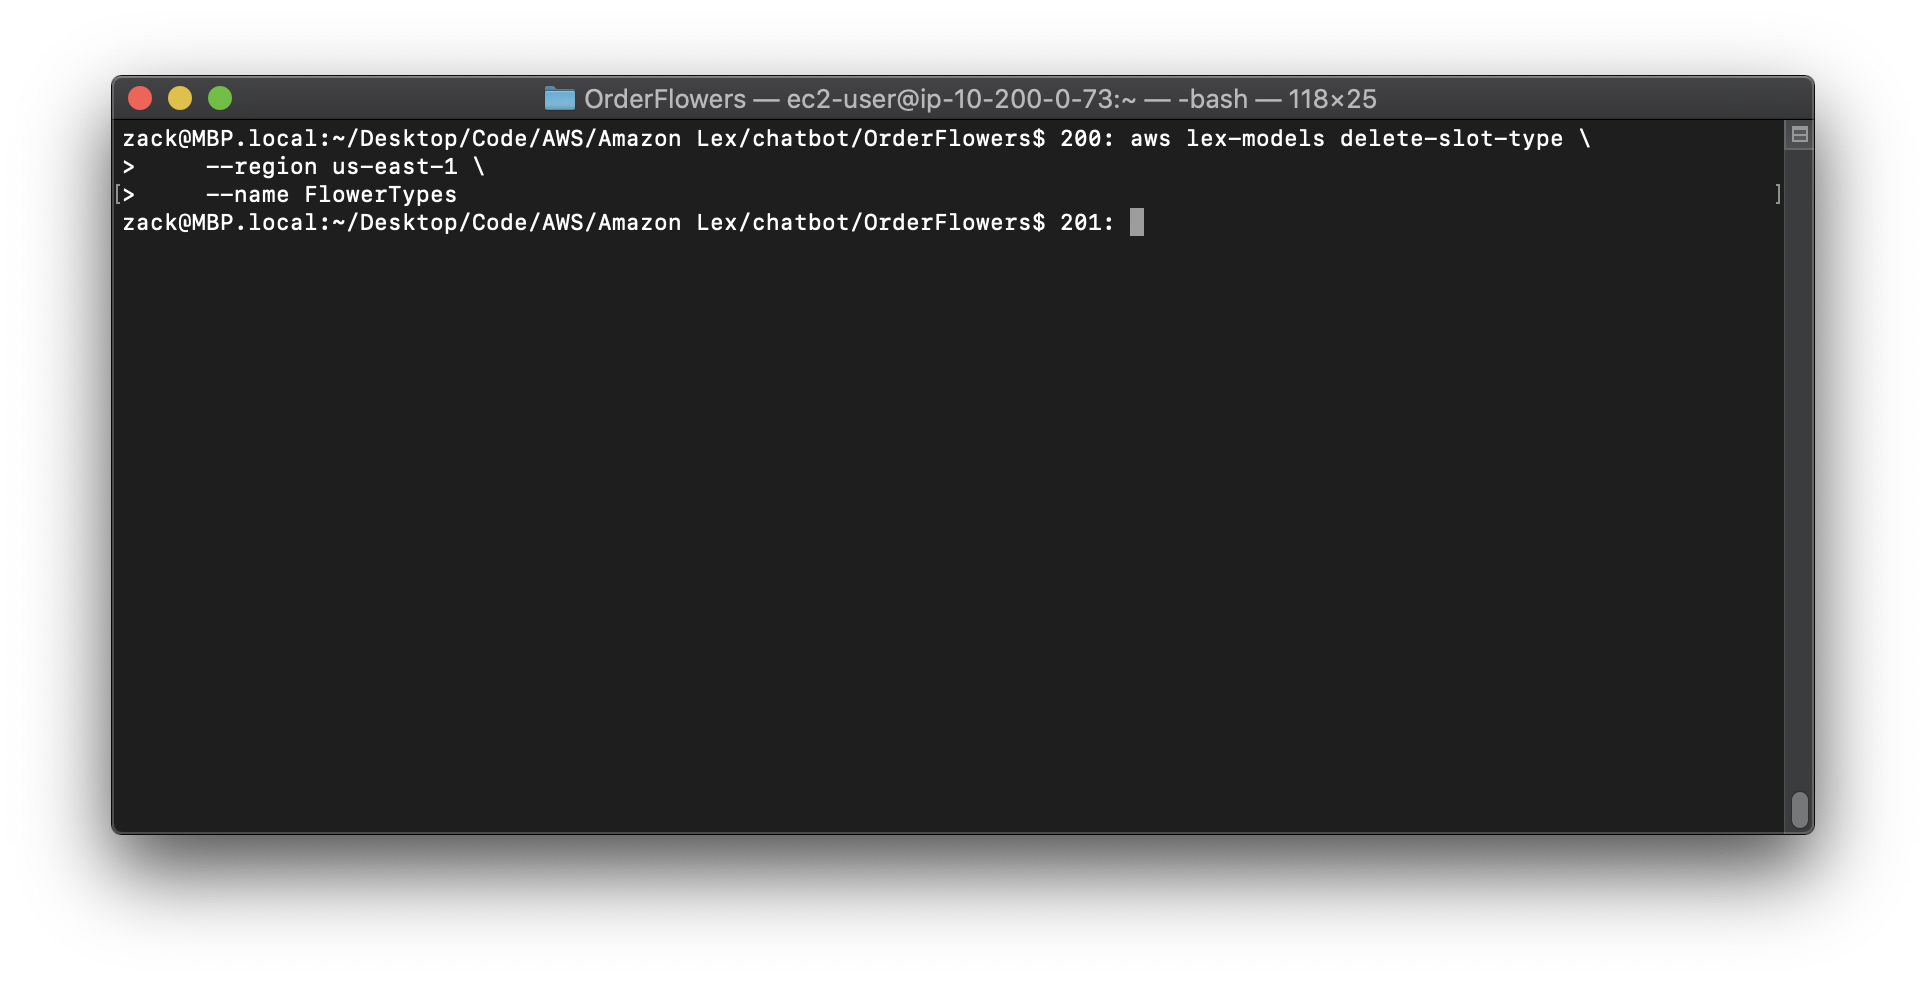
Replace the region to yours.
1 | aws lex-models delete-slot-type \ |