Firearms Safety Certificate
Hunter Education
Unit 1: Introduction to Hunter Education
Topic 1: Firearm Safety Rules
The Four Primary Rules of Firearm Safety (During shooting)
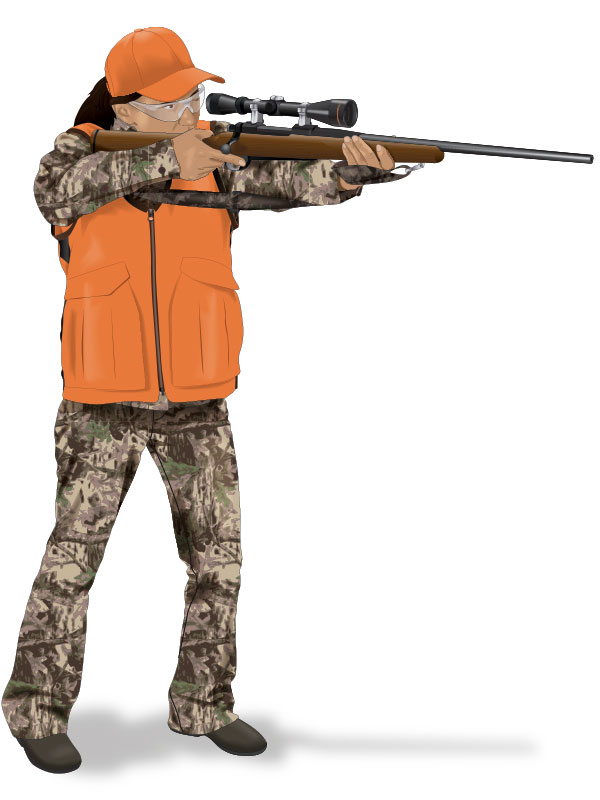
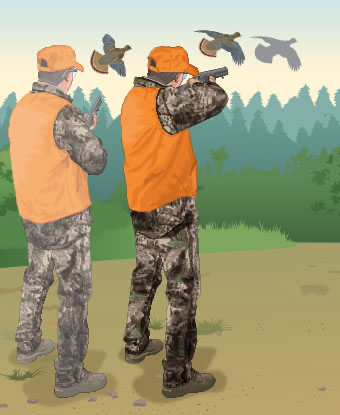
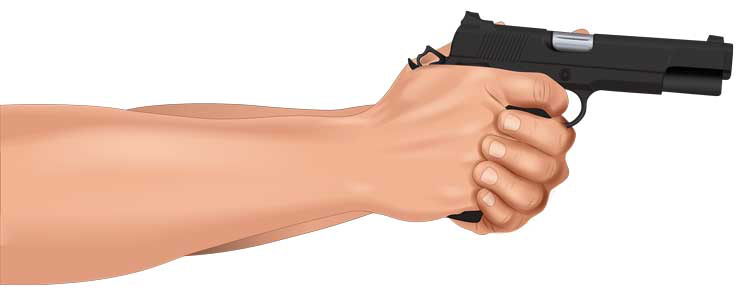
Watch that muzzle!
Keep it pointed in a safe direction at all times.Treat every firearm with the respect due a loaded gun.
It might be, even if you think it isn’t.Be sure of the target and what is in front of it and beyond it.
Know the identifying features of the game you hunt. Make sure you have an adequate backstop—don’t shoot at a flat, hard surface or water.Keep your finger outside the trigger guard until ready to shoot.
This is the best way to prevent an accidental discharge.
Additional Rules About Firearm Safety
Check your barrel and ammunition.
Make sure the barrel and action are clear of obstructions, and carry only the proper ammunition for your gun.Unload firearms when not in use.
Leave actions open, and carry firearms in cases and unloaded to and from the shooting area.Point a firearm only at something you intend to shoot.
Avoid all horseplay with a gun.Don’t run, jump, or climb with a loaded firearm.
Unload a firearm before you climb a fence or tree, or jump a ditch. Pull a firearm toward you by the butt, not the muzzle.Store firearms and ammunition separately and safely.
Store each in secured locations beyond the reach of children and careless adults.Avoid alcoholic beverages before and during shooting.
Also avoid mind- or behavior-altering medicines or drugs.
Topic 2: The Importance of Hunter Education
Pittman–Robertson Act
The Federal Aid in Wildlife Restoration Act, popularly known as the Pittman–Robertson Act, was approved by Congress in 1937.
The act provides funding for the selection, restoration, and improvement of wildlife habitat and for wildlife management research. The act was amended in 1970 to include funding for hunter education programs and for the development and operation of public target ranges.
Funds for the act come from an 11% federal excise tax on sporting arms, ammunition, and archery equipment, as well as a 10% tax on handguns. One-half of the excise tax on handguns and archery equipment is used for hunter education and target ranges. These funds are collected from the manufacturers and are distributed each year to the states and territorial areas by the Department of the Interior.
Each state’s proportion of the federal funds is based on the area of the state and the number of licensed hunters in the state. The state covers the full amount of an approved project and then applies for reimbursement through federal aid for up to 75% of the project’s expenses; the state is responsible for the other 25% of the project’s cost.
Non-hunting nature lovers equally benefit from this funding since it supports the management of wildlife areas and wetlands as well as game and non-game wildlife.
“Robertson’s 29 words” are a clause in the act’s language to prevent states from diverting license fees paid by hunters away from their intended purpose: “… And which shall include a prohibition against the diversion of license fees paid by hunters for any other purpose than the administration of said State fish and game department….”
Responsibility, Safety Skills, Knowledge, and Involvement
Hunter education strives to instill responsibility, improve skills and knowledge, and encourage the involvement of beginner and veteran hunters. Responsible, ethical behavior and personal involvement are both essential to the survival of hunting.
Responsibility
A knowledgeable and skillful student of hunting will never be a true hunter unless he or she also behaves responsibly. Responsible behavior includes courtesy, respect of others and of wildlife, and involvement. Responsible hunters do not poach or act carelessly. Responsible hunters obey hunting laws, hunt fairly, practice safety rules, and wait for a clean kill before shooting. How you behave and how other people see you will determine hunting’s future.
Safety Skills
Hunting-related safety skills are gained through hands-on training and practice. It is most valuable to learn these skills from an experienced hunter.
Knowledge
Knowledge is learning and understanding the basics of safe gun handling and hunting. Before being trained in the skill of firearm shooting, you should know how the firearm operates and how to handle it safely.
Involvement
Part of the process of becoming a true, responsible sportsman is becoming involved in efforts to keep hunting a respected sport. That includes teaching others, working with landowners, and cooperating with game wardens. It also includes joining conservation organizations, which will help preserve habitat and promote wildlife management.
Unit 2: Know Your Firearm Equipment
Topic 1: What is a Firearm?
Defining a Firearm
A firearm is a mechanical device that uses pressure from a burning powder to force a projectile through and out of a metal tube. To appreciate fully the importance of firearm safety, you first must understand how firearms work. This includes knowing the parts of the firearm, the types of ammunition, how ammunition is fired, and the ranges of the various firearms used for hunting.
Basic Parts of a Firearm
Although firearms have changed a great deal since they were first invented, the terms used for their parts have changed very little. All modern firearms have three basic groups of parts: action, stock, and barrel.
Action: The action is the heart of the firearm—the moving parts that load and fire the ammunition and eject the shells or cartridges. Several types of actions are used in modern firearms. Muzzleloaders have locks instead of actions.
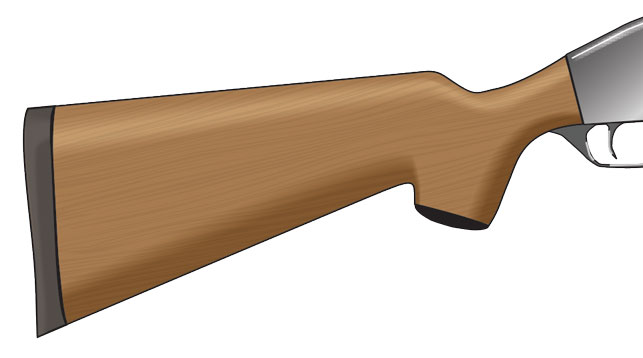
Stock: The stock is the part of the firearm that is held by the shooter. The stock also serves as the platform for supporting the action and the barrel.
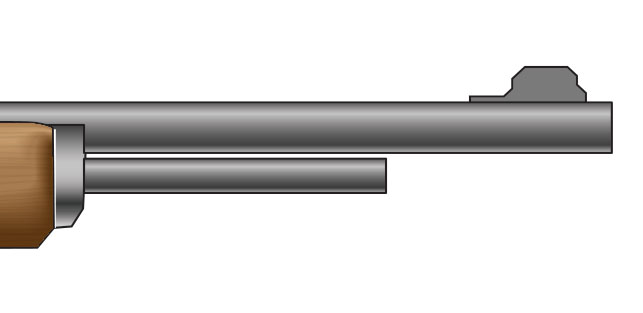
Barrel: The barrel is the metal tube that the projectile travels through as a result of pressure from burning gunpowder, compressed air, or other like means. The barrel also guides the projectile in the intended direction.
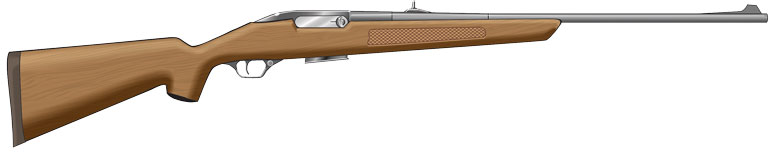
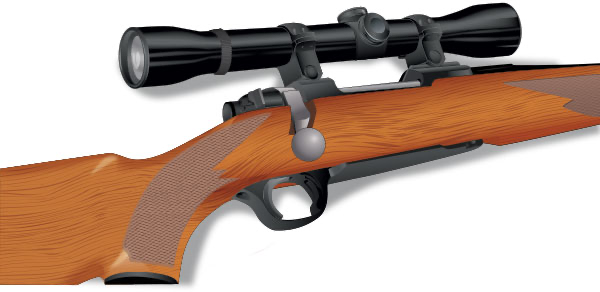
Parts of a Bolt-Action Rifle
Rifles, shotguns, and handguns have many similar parts. Shown here are the parts of a commonly used rifle—a bolt-action rifle.
- Butt: The part of the stock that you hold against your shoulder when shooting
- Stock: The part of a gun which is held, or braced, against the shooter’s body
- Trigger Guard: Piece that surrounds the trigger to protect it from being squeezed or bumped accidentally
- Trigger: Small lever that is squeezed to start the firing process
- Safety: Mechanical device that blocks the trigger or hammer to help prevent accidental firing
- Bolt Handle: Handle used to open a bolt action
- Bolt: Movable metal block that seals a cartridge into the chamber on some actions
- Magazine: Container on a repeating firearm that holds ammunition before it’s loaded into the chamber; usually tubes or boxes attached to the receiver
- Chamber: Base of the barrel used to hold the cartridge or shotshell ready for shooting
- Forestock: Front portion of the stock extending under the barrel in front of the receiver; usually held by the non-trigger hand to help support the firearm
- Barrel: Metal tube through which the projectile travels
- Sight: Device used for aiming by aligning a front and rear sight
- Muzzle: The end of the barrel through which the projectile (bullet or shot) exits
Other Firearm Parts
- bore: Inside of the firearm barrel through which the projectile travels when fired
- breech: Rear end of the barrel
- firing pin: A pin that strikes the primer of the cartridge, causing ignition
- receiver: Metal housing for the working parts of the action
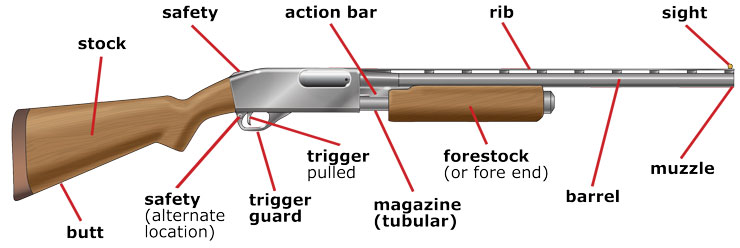
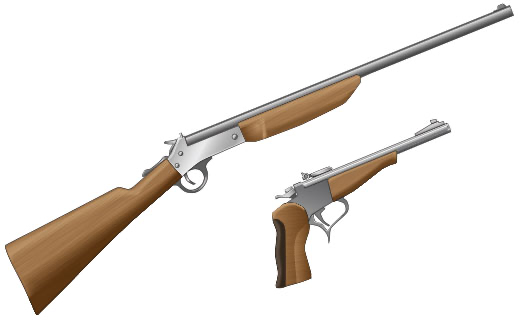
Parts of a Pump-Action Shotgun
Shotguns are another long-barreled firearm used by hunters. Below are the parts of a commonly used shotgun—the pump-action shotgun.
- Butt: The part of the stock that you hold against your shoulder when shooting
- Stock: The part of a gun which is held, or braced, against the shooter’s body
- Trigger Guard: Piece that surrounds the trigger to protect it from being squeezed or bumped accidentally
- Trigger: Small lever that is squeezed to start the firing process
- Safety: Mechanical device that blocks the trigger or hammer to help prevent accidental firing
- Safety (Alternate Position): Mechanical device that blocks the trigger or hammer to help prevent accidental firing
- Action Bar: Attaches the moveable forestock to the cocking/loading mechanism
- Magazine (tubular): Container on a repeating firearm that holds ammunition before it’s loaded into the chamber; usually tubes or boxes attached to the receiver
- Forestock (or fore end): On a pump (or slide) action, sliding the forestock back ejects the shotshell and cocks the action. Sliding it forward loads a fresh shell into the chamber.
- Rib: A raised surface along the top of the barrel which serves as a sighting plane
- Barrel: Metal tube through which the projectile travels
- Bead: A visual indicator for pointing the shotgun
- Muzzle: The end of the barrel through which the projectile (bullet or shot) exits
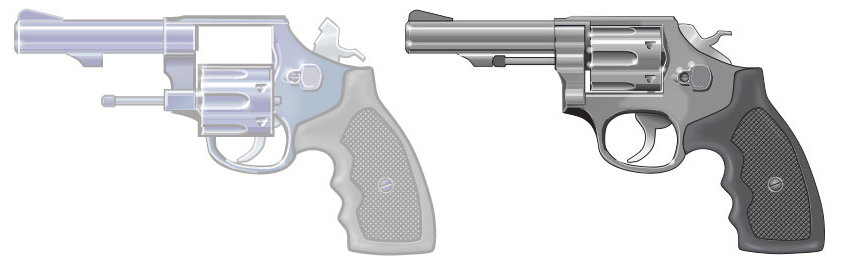
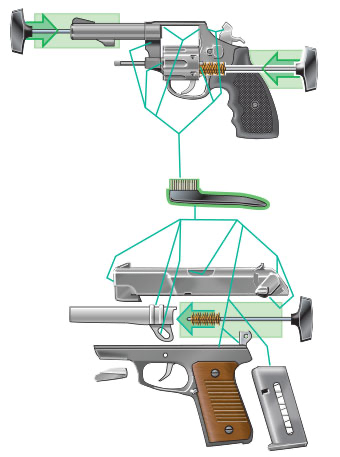
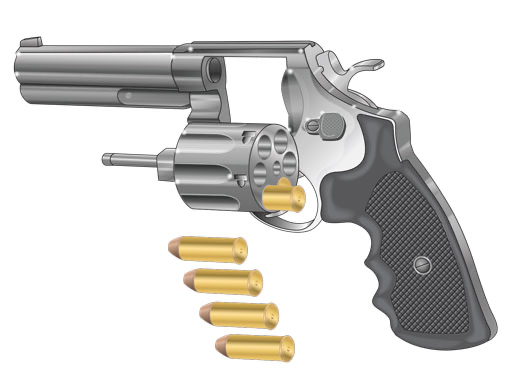
Parts of a Double-Action Revolver
Handguns (revolvers and pistols) are short-barreled firearms sometimes used for hunting. Below are the parts of a double-action revolver.
- Sight: Device used for aiming by aligning a front and rear sight
- Muzzle: The end of the barrel through which the projectile (bullet or shot) exits
- Ejector Rod: Metal rod used to help with removal of cartridges
- Cylinder: Storage for ammunition in a revolver; the cylinder rotates as the action is cocked
- Trigger Guard: Piece that surrounds the trigger to protect it from being squeezed or bumped accidentally
- Trigger: Small lever that is squeezed to start the firing process
- Hammer: Part that strikes the primer to cause ignition
- Grip: Handle of the handgun
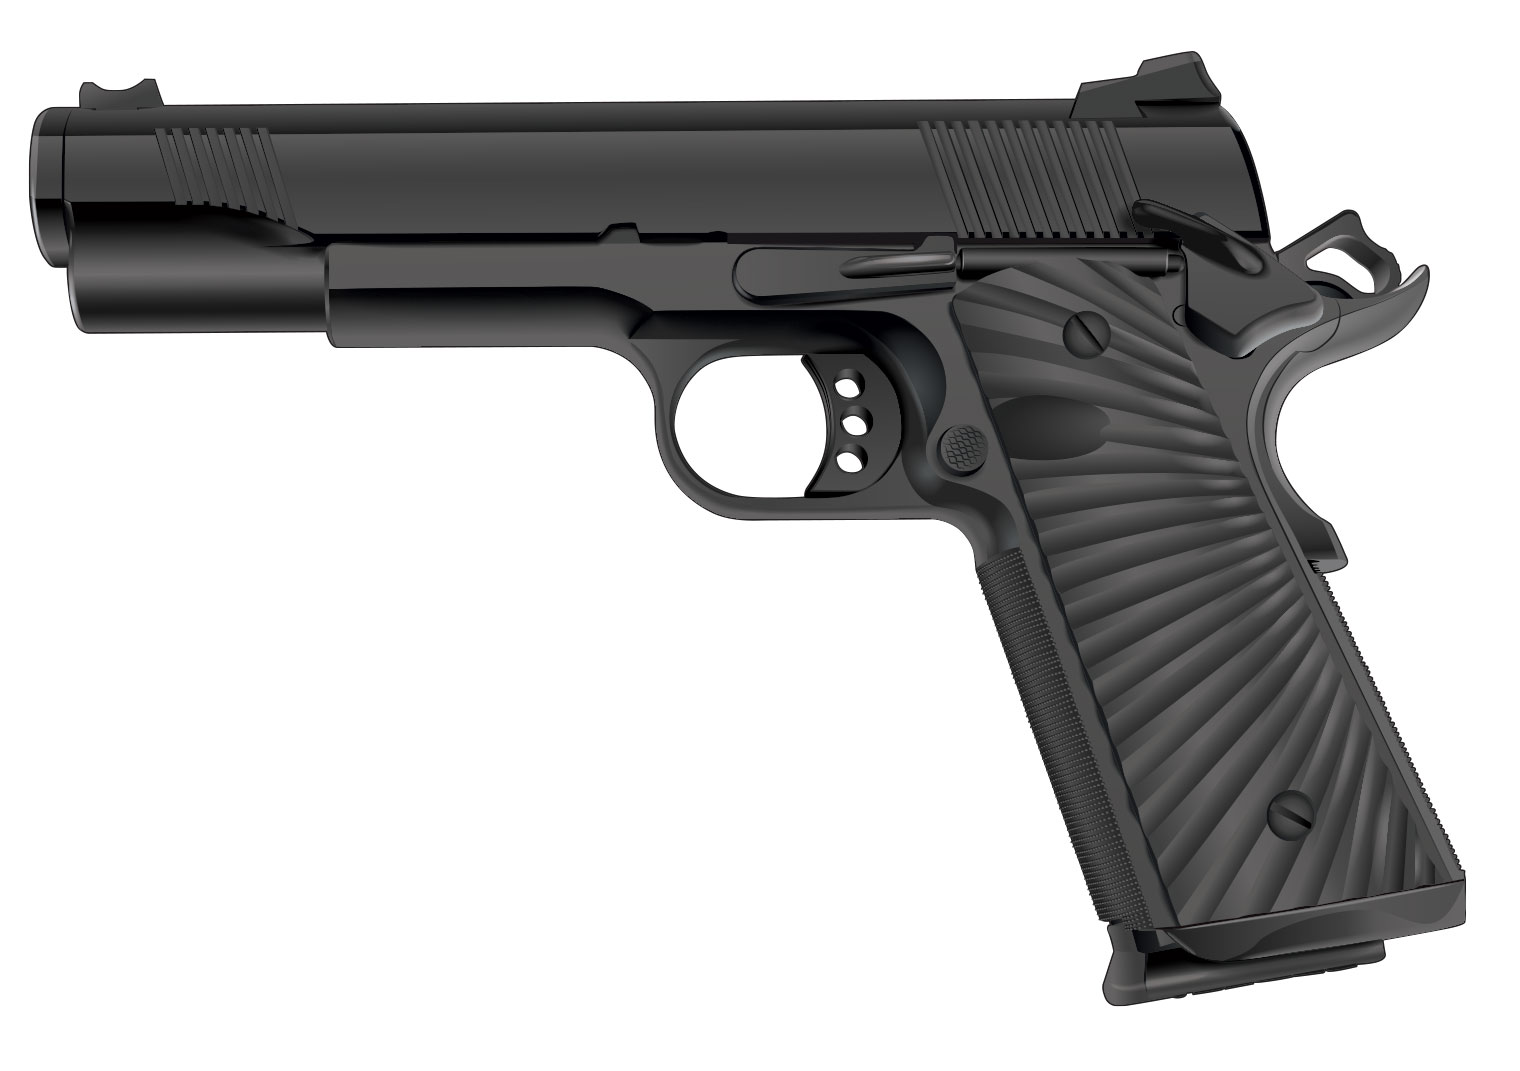
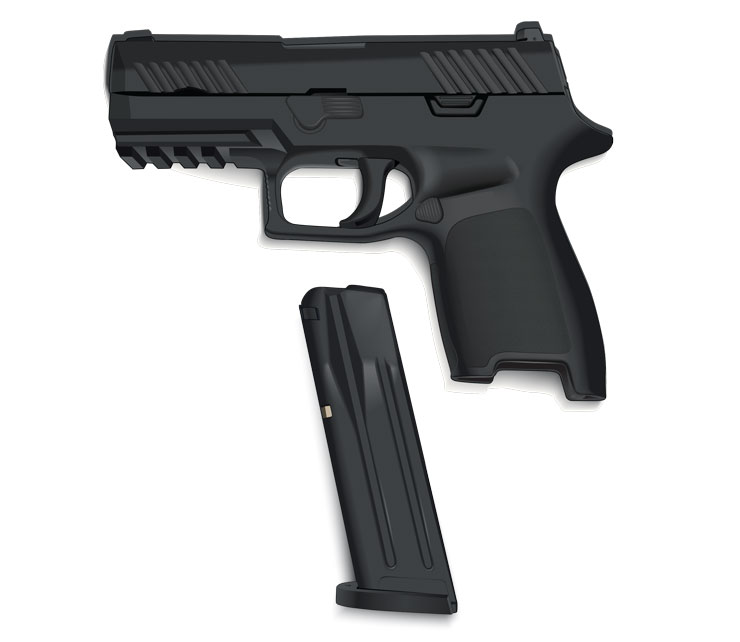
Parts of a Semi-Automatic Pistol
Handguns (revolvers and pistols) are short-barreled firearms sometimes used for hunting. Below are the parts of a semi-automatic pistol.
- Muzzle: The end of the barrel through which the projectile (bullet or shot) exits
- Slide: Part that moves back to load cartridges
- Trigger Guard: Piece that surrounds the trigger to protect it from being squeezed or bumped accidentally
- Trigger: Small lever that is squeezed to start the firing process
- Barrel: Metal tube inside the slide through which the projectile travels
- Sight: Device used for aiming by aligning a front and rear sight
- Hammer: Part that strikes the primer to cause ignition
- Grip: Handle of the handgun
- Magazine: Detachable container on a repeating firearm that holds ammunition before it is loaded into the chamber.
Topic 2: What is Ammunition?
Defining Ammunition
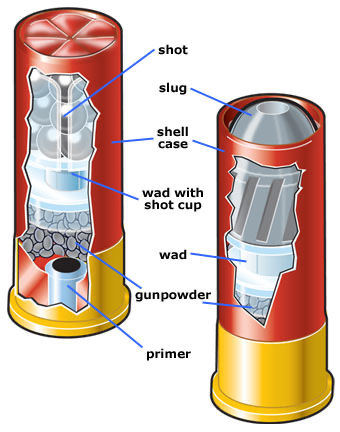
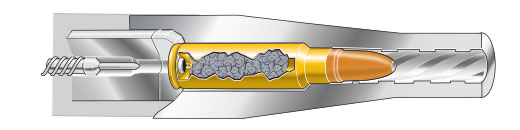
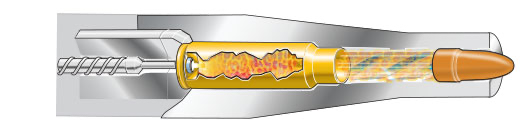
Modern ammunition varies depending on the type of firearm. Rifles and handguns use a cartridge containing a single projectile (bullet). Shotguns use a shotshell containing either a single slug or a large number of small projectiles (shot or pellets). However, the basic components of cartridges and shotshells are similar.
- cartridge: Ammunition used in modern rifles and handguns; a case containing primer, gunpowder, and a bullet
- shotshell: Ammunition used in modern shotguns; a case containing primer, gunpowder, wad, and a slug or shot
Basic Components of Ammunition
The basic components of ammunition are the case, primer, powder, and projectile(s). Shotshells have an additional component called wad.
- case: The container that holds all the other ammunition components together. It’s usually made of brass, steel, copper, paper, or plastic.
- gunpowder: A chemical mixture that burns rapidly and converts to an expanding gas when ignited. Modern smokeless powder will burn slowly when ignited in the open (outside of the case). Black powder is less stable and can be explosive when impacted or ignited in the open.
- primer: An explosive chemical compound that ignites the gunpowder when struck by a firing pin. Primer may be placed either in the rim of the case (rimfire) or in the center of the base of the case (centerfire).
- projectile: The object(s) expelled from the barrel. A bullet is a projectile, usually containing lead, fired through a rifle or handgun barrel. A slug is a solid projectile, usually of lead, fired through a shotgun barrel. Shot is a group of lead, steel, tungsten alloy, or bismuth pellets fired through a shotgun barrel.
- wad: A seal and/or shot container made of paper or plastic separating the powder from the slug or shot in a shotshell. The wad prevents gas from escaping through the shot and holds the shot together as it passes through the barrel.
Selecting the Correct Ammunition
The way a projectile performs when shot from a firearm depends on the bullet weight or shot size, the design of the projectile, the materials used to manufacture the projectile, and the type and amount of gunpowder. When selecting the ammunition for your firearm, remember the following.
It is critical that you use the correct cartridge or shotshell for your rifle, handgun, or shotgun.
You should also consider the species being hunted, the hunting environment, and the hunting regulations.
Rifle and Handgun Cartridges

Bullets used in rifle and handgun cartridges come in various designs, sizes, and weights.
- It’s critical to select the correct cartridge for your rifle or handgun. Carefully compare the barrel stamp on the firearm against the description on the ammunition box and the stamp on each cartridge.
- The bullet usually is made of lead and may have a jacket made of copper, brass, or another metal.
- Bullets used for hunting game may have soft or hollow points designed to expand (mushroom) upon impact.
- Bullets used for target shooting usually have solid points that make smaller holes.
Common Types of Rifle Bullets
- Pointed Soft Point: High velocity, accurate bullets with a flat travel path (trajectory); excellent mushrooming
- Rounded Soft Point: Popular for low-velocity calibers; recommended for tubular magazines
- Protected Tip: Highly accurate with excellent expansion
- Full Metal Jacket: Maximum penetration without mushrooming; these bullets are illegal for big game hunting in most states
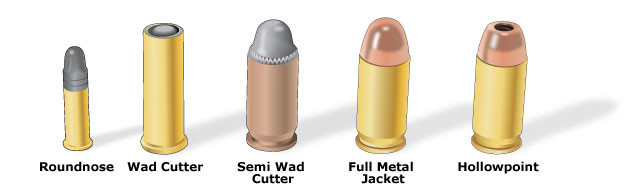
Common Types of Handgun Bullets
- Roundnose Lead: Good penetration, little expansion
- Full Metal Jacket: High penetration, no expansion
- Semi-Wad Cutter: Balances penetration and expansion
- Hollowpoint: Designed for high expansion on impact
- Wad Cutter: Flat-ended, used for target shooting; creates clean hole in paper
Hunter’s Tip
In tubular magazines, the bullet tip of one cartridge rests directly on the primer of the cartridge immediately ahead. For this reason, use only rounded or blunt tips in tubular magazines.
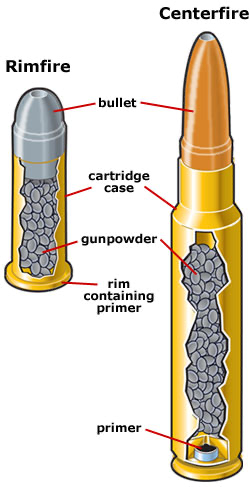
Centerfire and Rimfire Ammunition
Ammunition can be centerfire or rimfire.
- Centerfire ammunition is used for rifles, shotguns, and handguns. In this type of ammunition, the primer is located in the center of the casing base. Most centerfire ammunition is reloadable.
- Rimfire ammunition has the primer contained in the rim of the ammunition casing. Rimfire ammunition is limited to low-pressure loads. Rimfire cartridges are not reloadable.
Shotshells
Shotgun shells (shotshells) use different projectiles and come in different sizes.
- Shotshells use a slug or shot as the projectile(s).
- A slug is a solid projectile, usually of lead, used for hunting big game with a shotgun.
- Shot are multiple pellets fired through a shotgun barrel. Shot size is adaptable to the game being hunted. This type of projectile is used typically to hunt game birds and small game animals.
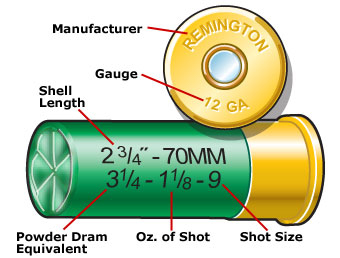
- The shotshells must match exactly the gauge and shell length specified by the manufacturer. This information usually is found on the barrel of the shotgun. Shotguns may be chambered for 2½-inch, 2¾-inch, 3-inch, or 3½-inch shells. This refers to the length of the shell after it has been fired. Never load a shotshell that exceeds the approved shell length stamped on the barrel of your shotgun.
gauge: Diameter of the bore of a shotgun and the designation for the size of ammunition for different bores
Choosing the Correct Type and Size of Shot

You also must choose the correct type and size of shot for the shotshell. In general, as the size of your target decreases, you should decrease the diameter of the shot you use.
- As pellet diameter decreases, more shot can be placed in a standard shotshell.
- The smaller the shot “number,” the larger the pellet diameter.
- Shotshell marked as magnum means the shell has more shot or more gunpowder than a regular shell. Magnum and regular shotshells are interchangeable if the correct gauge and shell length are used.
Steel Shot
Steel shot pellets react differently than lead when shot. Because steel shot pellets are not as dense, they weigh about one-third less than lead shot pellets of the same size. Also, steel is harder, does not deform, and is not as unstable in flight as lead. It will produce a tighter pattern than lead shot. If using steel shot for hunting, choose a steel shot size one to two sizes larger than the lead shot you would select and choose a less constrictive choke.
Shot Sizes
Shot size is adaptable to the game being hunted. As pellet diameter decreases, more shot can be placed in a standard shotshell load. The smaller the shot number, the larger the shot size.

Non-Toxic Shot
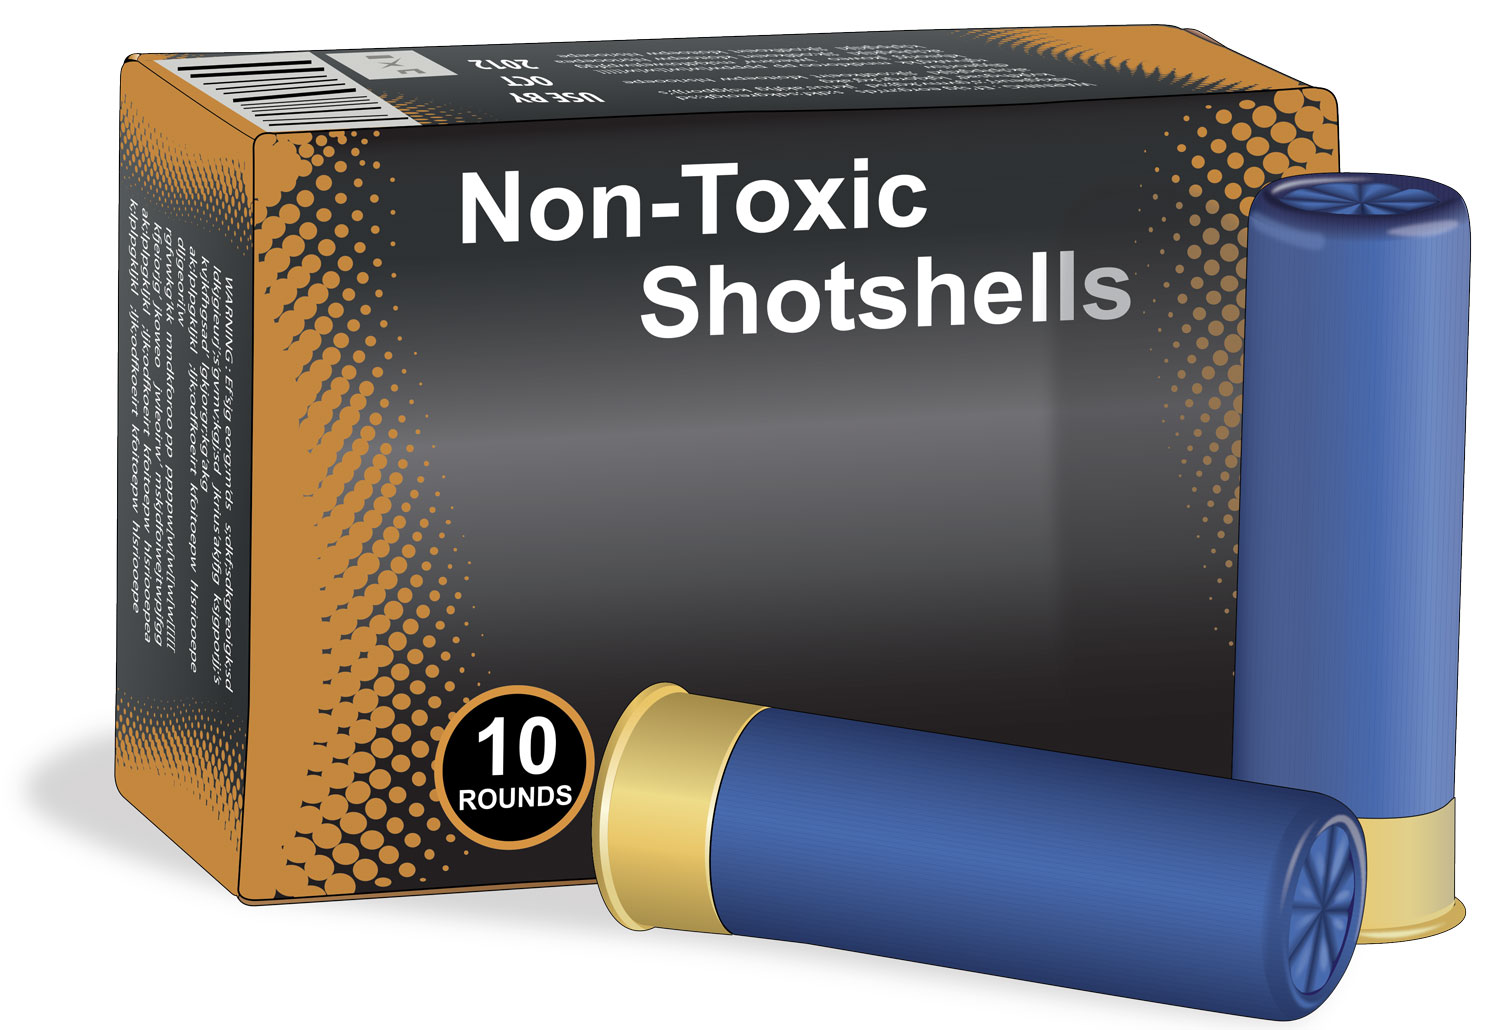
Non-toxic shot is required throughout the U.S. for waterfowl hunting. Studies showed that many waterfowl died each year because of lead poisoning. Lead pellets from traditional shotshells were picked up and digested by waterfowl. The toxic effect spread to other birds, such as the bald eagle, which consumed the poisoned waterfowl. To reduce this problem, conservationists worked with shotshell manufacturers to produce effective alternatives to lead shot—steel, tungsten alloy, or bismuth shot.
Topic 3: How a Firearm Works?
The Basic Firing Process
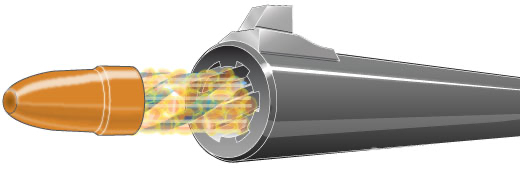
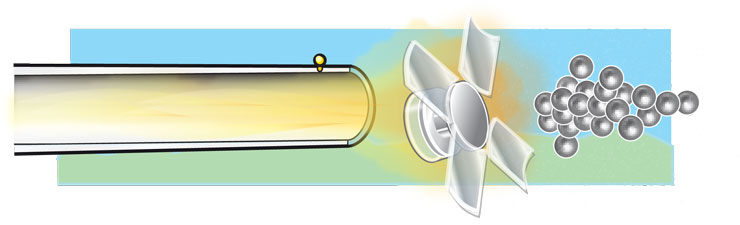
The same physical process is used to shoot shotshells from shotguns or cartridges from rifles or handguns. Pulling the trigger causes the firing pin to strike and explode the primer in the base of the cartridge or shotshell. The spark from the primer ignites the gunpowder, which burns rapidly and converts to a gas. The gas rapidly expands and drives the projectile(s) through the barrel with great force.
How the Rifle and Handgun Fire
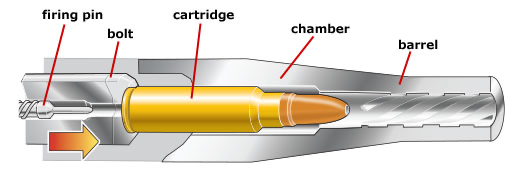
A cartridge is inserted into the chamber.
The action is closed, and the firing pin is pushed back and held back under spring tension.

The trigger is squeezed, releasing the firing pin, which moves forward with great force. The firing pin strikes the primer, causing it to explode.
The spark from the primer ignites the gunpowder. Gas converted from the burning powder rapidly expands in the cartridge. The expanding gas forces the bullet out of the cartridge and down the barrel with great speed. The rifling in the barrel causes the bullet to spin as it travels out of the barrel. The bullet’s speed and escaping gases produce a “bang.”
How the Shotgun Shoots
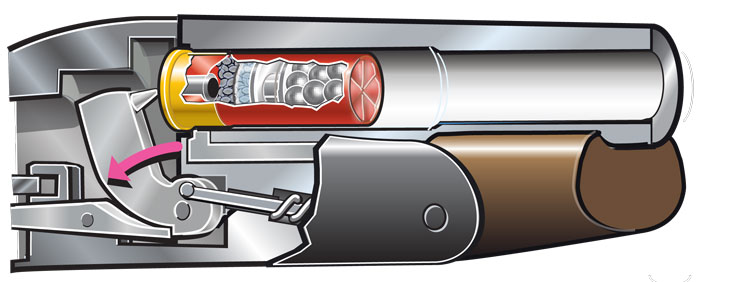
A shotshell is inserted into the chamber. Closing the action pushes the firing pin back and holds it under spring tension.

Pulling the trigger releases the firing pin. The firing pin strikes the primer producing sparks.
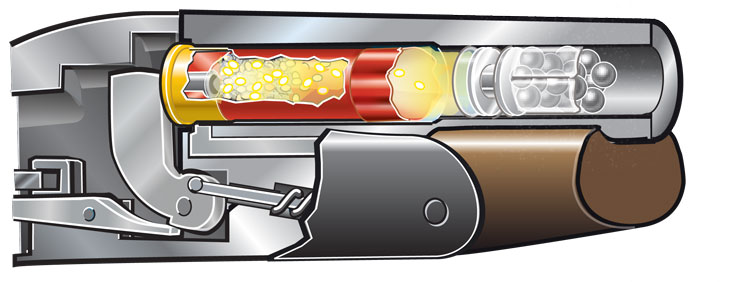
Heat and sparks from the primer ignite the gunpowder. Gas converted from the burning powder expands in the shell. The expanding gas forces the wad and shot out of the plastic body of the shell.
The escaping gases produce a “bang” as the wad and shot leave the barrel. The wad quickly opens and falls away. The shot cluster spreads. This spread is called the shot string.
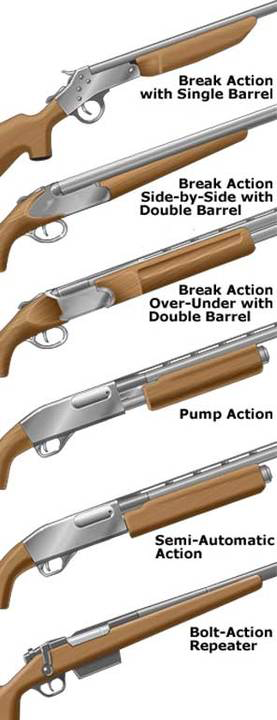
Topic 4: Common Features of Firearms: Firearm Actions
Introduction to Firearm Actions
All types of firearms have actions and sights, and they may have safeties or magazines.
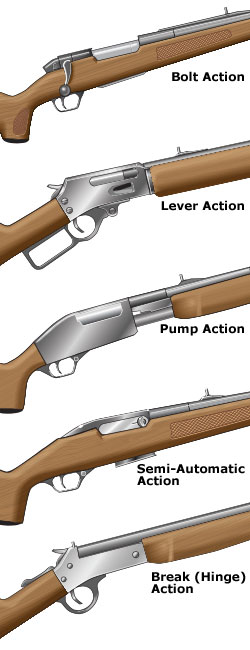
Types of Actions
Firearms can be classified by their action type. The action of a firearm is made up of parts that load, unload, fire, and eject the shotshell or cartridge. Actions are either single-shot or repeating styles. Single-shot firearms must be reloaded each time the firearm is fired. Repeating firearms have extra cartridges or shotshells ready in a magazine, cylinder, or extra barrel.
Bolt Action

A bolt-action firearm operates like opening and closing a door bolt. The bolt solidly locks into the breech, making it accurate and dependable.
- To open the action, lift the handle up and pull it to the rear.
- If the firearm is loaded, the cartridge or shotshell will be ejected as you pull the bolt to the rear. To make sure it’s unloaded, open the action, and check both the chamber and the magazine for cartridges or shotshells.
- You can store a bolt-action firearm safely by storing the bolt separately from the firearm.
Lever Action
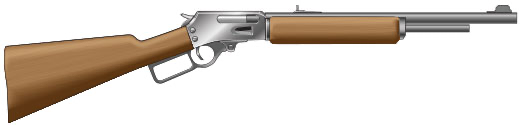
The lever-action firearm has a large metal lever located behind the trigger. This handle usually forms the trigger guard as well.
- To open the action, push the lever downward and forward, which extracts the cartridge case from the chamber and ejects it. If a magazine holds extra cartridges, another is immediately ready to be loaded into the chamber.
- It’s often difficult to tell whether a lever-action firearm is loaded. To unload, push the lever downward and forward repeatedly until no more cartridges are ejected. To make sure it’s unloaded, open the action, and check both the chamber and the magazine for cartridges.
- Most models also have an exposed hammer, which can be dangerous.
- Always use extra caution to keep your hands away from the trigger while working the lever action.
Pump Action
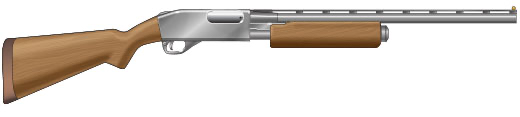
The pump-action firearm is fast and smooth. It allows the shooter to re-cock the firearm without taking his or her eye off the target. The pump action also is referred to as “slide action” or “trombone action.”
- To open the action, slide the forestock to the rear, which extracts the cartridge or shotshell from the chamber and ejects it. Sliding the forestock toward the muzzle closes the action and readies another cartridge or shell for loading. A pump-action firearm will open only after it’s fired or if a release lever is pressed and the forestock is pulled to the rear.
- To make sure it’s unloaded, open the action, and check both the chamber and the magazine for cartridges or shotshells.
Semi-Automatic (or Autoloading) Action
As each shot is fired manually, the case of the cartridge or shotshell is ejected automatically and the chamber is reloaded automatically.
- To open the action, you must pull back the bolt’s operating handle (on a rifle or shotgun) or the slide (on a pistol). Most semi-automatics, when the bolt or slide is pulled back, will lock in the open position if the magazine is empty. If the firearm does not lock open, it means that a cartridge or shotshell from the magazine has gone into the chamber, making the firearm ready to fire. A few semi-automatics do not lock open and must be held open to check the chamber.
- To unload, first remove the magazine, and lock the action open. Then make sure it’s unloaded—check both the chamber and the magazine for extra cartridges or shells.
- When closing the action for loading, pull back to unlock the bolt or slide and then let go, allowing it to travel forward on its own. Do not guide it forward with your hand because it may not seat properly.
- On a semi-automatic, the trigger must be pulled each time a shot is fired. This makes the semi-automatic different from the fully automatic firearm, which fires continuously as long as the trigger is held down. The fully automatic firearm may not be used for hunting or sport shooting.
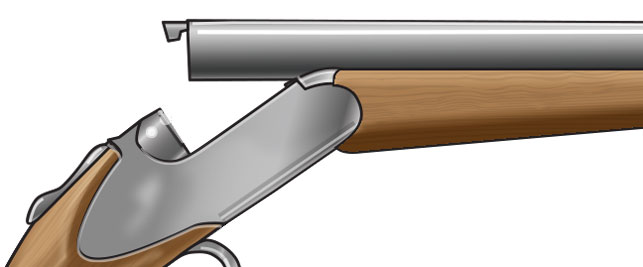
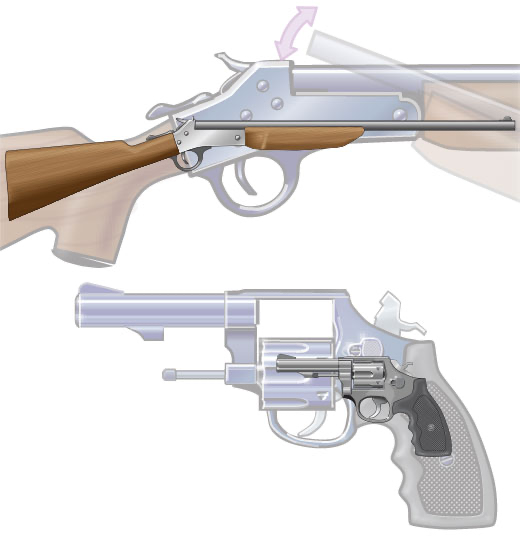
Break (or Hinge) Action
The break-action firearm operates on the same principle as a door hinge. Simple to load and unload, a hinge action is often chosen as a hunter’s first firearm.
- To open the action, point the barrel(s) at the ground. A release is pressed, and the stock drops downward. This allows the cartridges or shotshells to eject or to be removed manually if the firearm is loaded.
- Hinge-action firearms have a separate barrel for each shot rather than a magazine. Most models have one or two barrels, but some have up to four.
- Some models also have an exposed hammer(s), which can be dangerous.
Revolving Action
The revolving action takes its name from a revolving cylinder containing a number of cartridge chambers. One chamber at a time lines up with the barrel as the firearm is fired. Revolving cylinders may rotate either clockwise or counterclockwise, depending on the manufacturer. This type of action is usually found on handguns but may be found on some older rifles. Revolving actions are referred to as either “single action” or “double action.”
- double action: Pulling the trigger both cocks and releases the hammer. A double-action revolver typically also can be hammer-cocked like a single-action revolver.
- single action: Will fire only after the hammer has been cocked manually.
Common Actions on Rifles and Shotguns
Common Actions on Rifles
Single-shot rifles are usually break- or bolt-actions. Repeating rifles include the bolt-action, lever-action, pump-action, and semi-automatic types. Operating the lever, bolt, or forestock ejects the empty cartridge case, chambers a new round of ammunition, and cocks the gun.
Common Actions on Shotguns
Shotguns use many of the same actions as rifles—the pump action, semi-automatic action, and bolt action. They also use a break action as either a single barrel or double barrels. The double barrels can be arranged horizontally (side-by-side) or vertically (over-under).
Common Actions on Handguns
Handguns fall into two basic types: revolvers (that fire from a revolving cylinder) and pistols (all other types, including auto-loading and single-shot handguns). There are two common types of actions used in sport shooting.
Single-Action Handguns
- Single-action means that the gun must be manually cocked for each shot (revolvers) or for the first shot (autoloaders), usually by pulling back the hammer or cycling the slide.
- A single-action handgun’s manual cocking allows a shorter, lighter trigger pull that is an aid to accuracy; but an accidental light touch of the trigger will usually fire a cocked single-action gun if the safety is off.
Double-Action Handguns
- Double-action means that trigger movement cocks the action as the trigger is pulled during firing, but the gun can also be manually cocked like a single-action. A gun which can be cocked only by trigger action (no manual cocking) is known by the term double-action-only.
- A double-action handgun’s trigger-cocking allows a faster shot, since no separate manual cocking is needed. A double-action gun’s longer, heavier trigger pull is also considered safer. In fact, many double-action guns, especially revolvers, have no mechanical safety at all, since only a long, deliberate pull will fire the handgun.
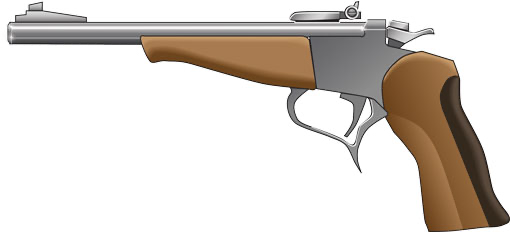
Single-Shot Pistol (Break-Action)
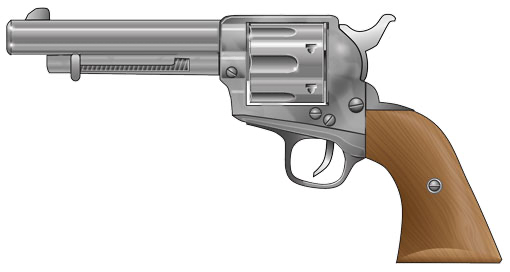
Single-Action Revolver
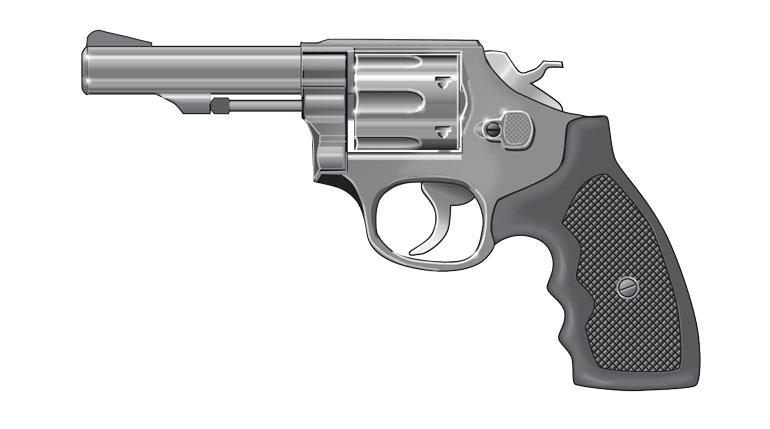
Double-Action Revolver
Semi-Automatic Pistol
Topic 4: Common Features of Firearms: Firearm Safeties
Safety Mechanisms
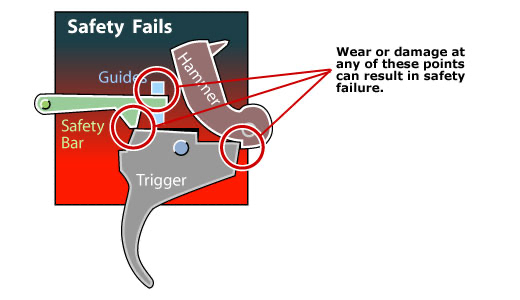
A safety is a device that blocks the action to prevent the firearm from shooting until the safety is released or pushed to the off position. The safety is intended to prevent the firearm from being fired accidentally. However, safeties should never be relied on totally to protect against accidental shooting. Safeties are mechanical devices subject to mechanical failure from wear and other factors, and they can fail when least expected. Also, safeties can be unknowingly bumped from the safe position as your firearm is being handled or as it catches on clothing or tree branches.

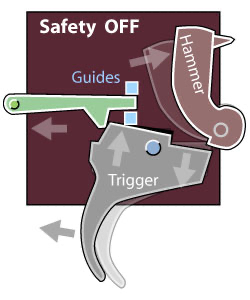
How Safeties Can Fail
A safety is only a backup to safe gunhandling habits.
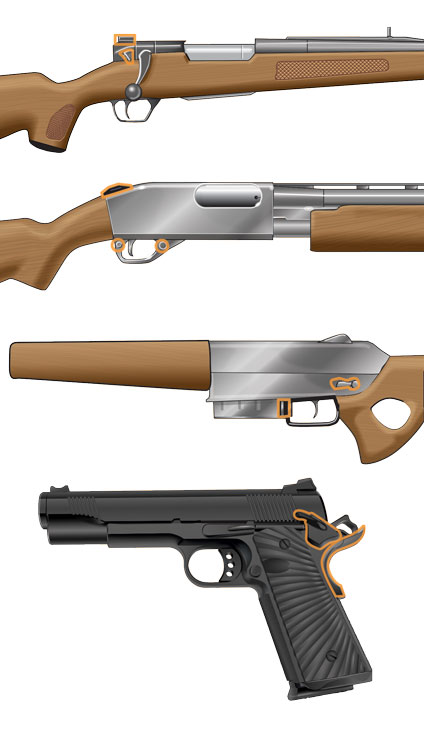
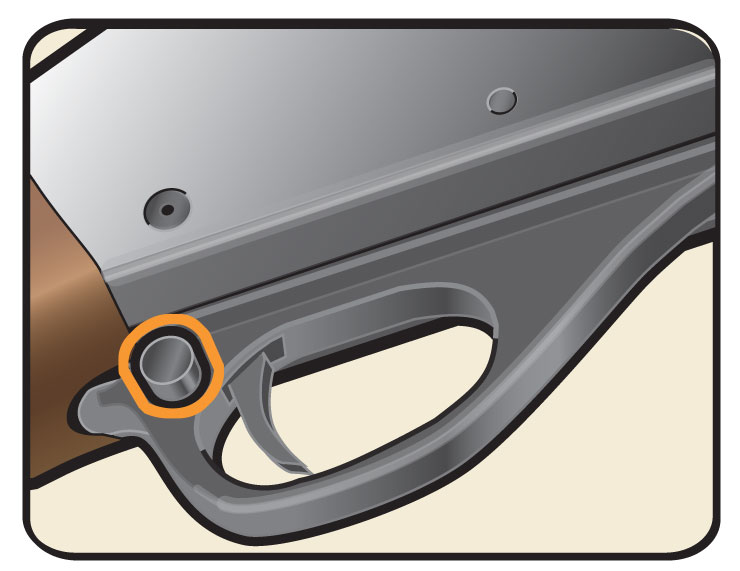
Typical Locations of Safeties
All safeties are located around the receiver of the firearm and are usually easy to spot. The orange outlines indicate where safeties typically are located on rifles, shotguns, and handguns.
Types of Safeties
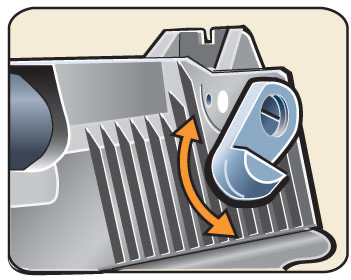
Cross-Bolt Safety
- Common on pump and semi-automatic firearms
- A simple, push-button action that blocks the trigger or hammer
- Usually located at the trigger guard or ahead of the hammer
Cross-Bolt Trigger Safety on the Trigger Guard of a Pump-Action Shotgun
Pivot Safety
- Common on bolt-action rifles and found on some semi-automatic pistols
- A pivoting lever or tab that blocks the trigger or firing pin
- Located on the frame (blocks trigger) or on the bolt or slide (blocks firing pin)
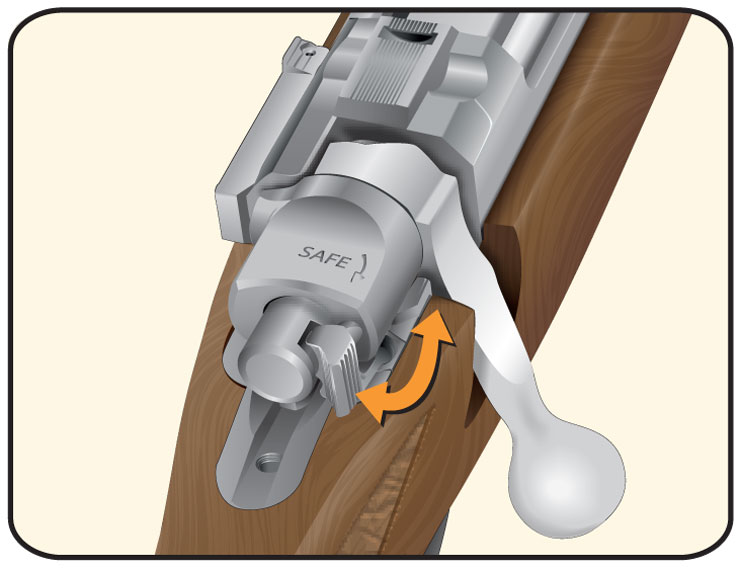
Pivot Safety on the Bolt of a Bolt-Action Rifle
Pivot Safety on the Slide of a Semi-Automatic Handgun
Slide or Tang Safety
- Common on some rifles and break-action shotguns
- A sliding bar or button that blocks the firing action
- Located on the tang (a metal strip behind the receiver) of break-action firearms or on the side of the receiver on some rifles
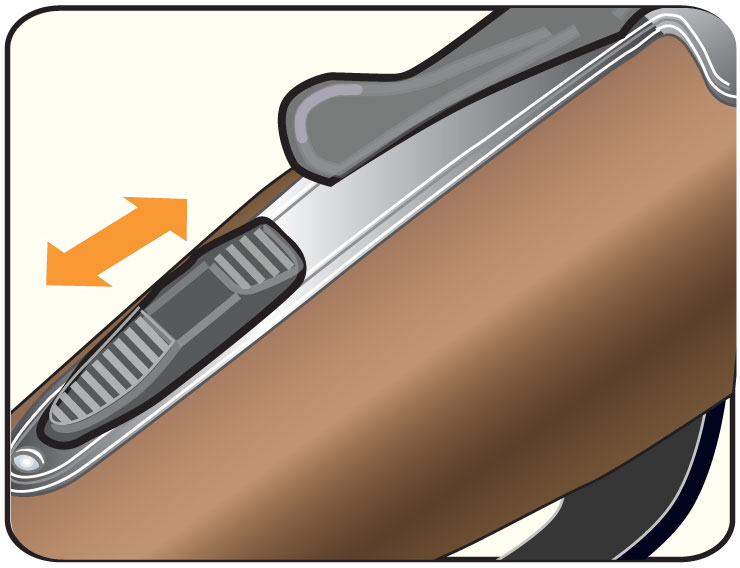
Slide Safety on the Tang of a Break-Action Shotgun
Half-Cock or Hammer Safety
- Common on single-action revolvers and other firearms with exposed hammers
- Positions the hammer at half-cock, away from the firing pin
- Engaged by placing the hammer at half-cock
- While not a true safety, it is sometimes described as a mechanical safety device by firearm manufacturers
Safeties Don’t Replace Safe Handling
- You should never replace safe firearm handling with trusting the safety on a firearm. A safety is a mechanical device that could fail. Don’t release the safety until just before you shoot.
- Knowing where the safety is and how it works is not always as simple as it might seem. There are many types of safeties. Sometimes people alter or modify their guns to disable the safety. This is very dangerous, especially if the gun gets into the hands of an inexperienced shooter. Be sure you know how the safety works on your own gun or any others you handle. Never alter or modify your firearm yourself. Have an experienced gunsmith look at your gun if the safety does not work or if anything else is wrong with it.
Topic 6: Common Features of Firearms: Magazines and Sights
Magazines
In repeating firearms, the magazine is the place that stores the ammunition that has not been fired. It is a removable, spring-powered ammunition storage and feeding device that is inserted into a semi-automatic firearm. When you work the action, a cartridge is picked up from the magazine and placed in the chamber ready to be fired.

- Magazines are designed with a spring and follower, which push against the cartridges to move them into the action. When checking a magazine to make sure it’s empty, you must be able to either see or feel the follower; if you cannot see or feel the follower, there may be a cartridge jammed in the magazine, which can be dangerous. Tubular magazines require close attention to make sure a cartridge is not jammed in the magazine.
- Magazines may be detachable or fixed.
- Detachable magazines allow you to remove extra ammunition from the firearm by simply removing the magazine.
- Fixed magazines require the ammunition to be removed manually from the gun itself. These include tubular, hinged-floor-plate, and revolving magazines.
Introduction to Sights
A sight is a device used to line up the muzzle with the shooter’s eye so that he or she can hit the target. Sights are more critical on a firearm that fires a single projectile (rifle and handgun) than on a firearm that shoots a pattern of shot (shotgun). Shotguns usually have a simple pointing bead. Rifles typically have an open, aperture (peep), or telescopic sight. Most handguns have an iron (open) sight, although some specialized handguns have a dot, a laser, or a telescopic sight.
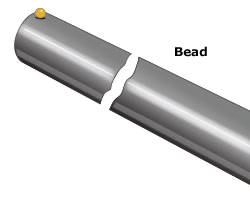
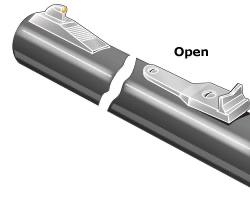
Sights: Bead and Open
Bead Sight: Simple round bead set into the top of the barrel near the muzzle of a shotgun. Some shotguns have a second, smaller bead about halfway back on the barrel. The shooter uses the shotgun to “point” at and follow a moving object. The bead is used only for a reference as the shotgun is pointed and moved to follow flying or running targets.
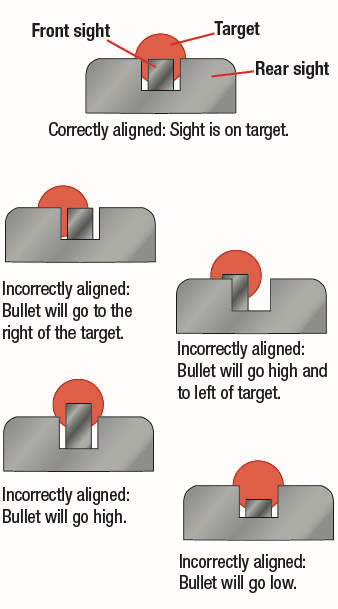
Open (Iron) Sight: Combination of a bead or post front sight and a notched rear sight. These sights are simple and inexpensive. Open sights allow quick sighting. To aim, you center the top of the bead or post within the notch of the rear sight, and line up on the target. Open sights can be fixed or adjustable.
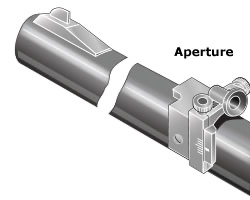
Sights: Aperture (Peep)
Aperture (Peep) Sight: Combination of a bead or post front sight and a round hole set on the rifle’s receiver close to the shooter’s eye. To aim, you center the target in the rear peep or aperture sight, and then bring the front sight into the center of the hole. An aperture sight lets you aim more accurately and is adjusted more easily than an open sight.
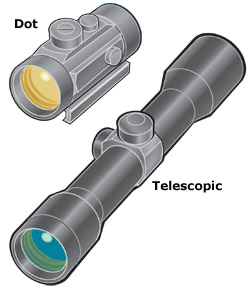
Sights: Telescopic (Scope) and Dot
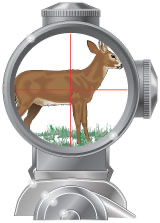
Telescopic Sight (Scope): Small telescope mounted on your firearm. A scope gathers light to brighten the image, uses mirrors and lenses to magnify the target, and does away with aligning rear and front sights. The aiming device inside the scope is called the “reticle.” To aim, you simply look through the scope, and line up the crosshairs, post, or dot with your target. Telescopic sights provide the most accurate aiming, which makes them popular for hunting.
Dot Sight: Small device mounted on your firearm. A dot sight uses electronics or optical fibers to project a glowing dot or other mark on a lens in front of the shooter’s eye. Some dot sights also magnify like telescopic sights.
Topic 7: Difference Between Firearms
Differences Between Rifles, Shotguns, and Handguns
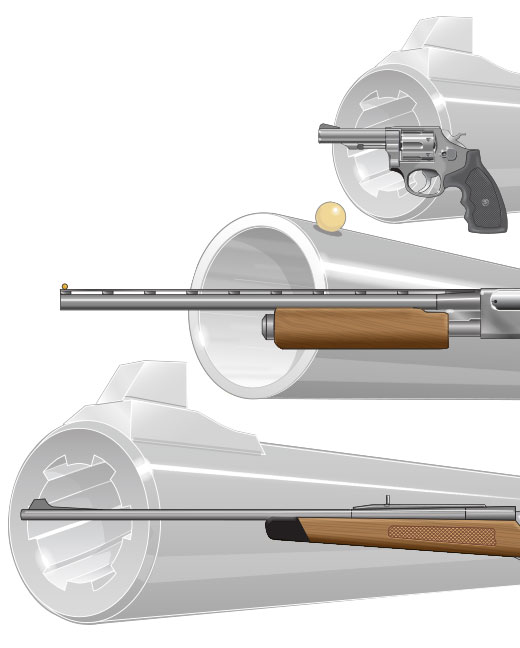
The main differences between rifles, shotguns, and handguns are their barrels, their intended targets, and the type of ammunition used.
- Rifle
- The rifle has a long barrel with rifling and thick walls to withstand high pressures. Rifling puts a spiral spin on a bullet fired from a rifle, increasing accuracy and distance.
- Rifles are typically used for firing at stationary targets.
- The bore of a rifle barrel is made for only one specific caliber of ammunition.
- Shotgun
- The shotgun has a long barrel and usually has a smooth bore to reduce friction. The barrel’s walls are thinner due to reduced pressures. If a shotgun is designed to fire slugs, it might have a rifled barrel.
- Shotguns are typically used for shooting at moving targets in the air.
- The bore of a shotgun barrel is made for only one specific gauge of ammunition.
- Handgun
- The handgun has a short barrel with rifling and thick walls to withstand high pressures. Because of the short barrel, extra care must be taken to control the muzzle of a handgun. Like the rifle, rifling in the handgun puts a spiral spin on a bullet when fired, increasing accuracy and distance.
- Handguns are typically used for firing at stationary targets.
- The bore of a handgun barrel is usually made for only one specific caliber of ammunition.
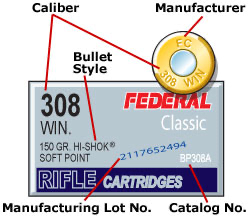
- caliber: Diameter of the bore of a rifle or handgun as measured from land to opposite land on rifled barrels and the designation for the size of ammunition for different bores
- rifling: Spiral grooves cut into the bore of a firearm barrel together with the lands—the ridges of metal between the grooves; rifling makes a bullet spin in flight, increasing accuracy and distance
Rifling in the Rifle or Handgun Bore
The bore of a rifle or handgun is grooved, which puts a spiral spin on the bullet for greater accuracy. The bore of the shotgun barrel is smooth because rifling would spread the shot pattern too soon.
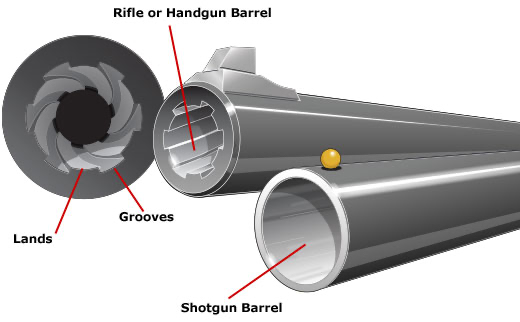
- grooves: The spiral cuts in a rifled bore
- lands: The ridges of metal between the grooves in a rifled bore
A Rifle’s or Handgun’s Caliber
Caliber is used to describe the size of a rifle or handgun bore and the size of cartridges designed for different bores.
- Caliber usually is measured as the diameter of the bore from land to opposite land and is expressed in hundredths of an inch, thousandths of an inch, or millimeters. For example, a .270-caliber rifle bore measures 270/1000ths of an inch in diameter between the lands and has a larger bore diameter than a .223-caliber rifle. However, there is no standard established for designating caliber. In some cases, the caliber is given as the diameter of the bullet, which is the distance between the grooves.
- Caliber designations sometimes have a second number that has nothing to do with the diameter. For example, the popular .30-30 is a .30-caliber cartridge, but the second number is a holdover from the days when the cartridge took 30 grains of powder. The “06” in .30-06 refers to the year (1906) it became the official ammunition of the U.S. military.
- Every rifle or handgun is designed for a specific cartridge. The ammunition must match the barrel stamp on the firearm.
- Having the same bore size does not mean different cartridges are interchangeable. For example, there are several .30-caliber firearms that use the same bullet size but are designed for different cartridges (the .30-30, .30-06, .308, and the .300 Savage). If you cannot find the caliber stamped on the firearm, take it to a qualified gunsmith.
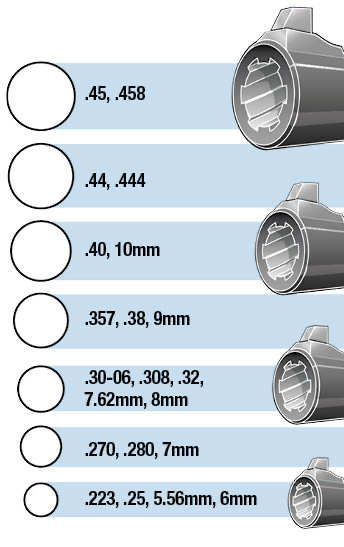
The circles show bore sizes of common calibers.
A Shotgun’s Gauge
Shotguns are classified by gauge, which is a measure related to the diameter of the smooth shotgun bore and the size of the shotshell designed for that bore.
- Common shotgun gauges are 10-gauge, 12-gauge, 16-gauge, 20-gauge, and 28-gauge. The smaller the gauge number, the larger the shotgun bore. Gauge is determined by the number of lead balls of size equal to the approximate diameter of the bore that it takes to weigh one pound. For example, it would take 12 lead balls with the same diameter as a 12-gauge shotgun bore to weigh one pound. Today, however, gauge can be measured much the same way as caliber, by measuring the inside bore diameter.
- The .410-bore shotgun is the only exception to the gauge designation for shotguns. It has an actual bore diameter of 410/1000ths of an inch, which is approximately equivalent to a 67½ gauge.
- Each gauge of shotgun shoots only shells of the same gauge. For example, 12-gauge guns use only 12-gauge shells.
- The gauge of a shotgun is usually marked on the rear of the barrel, and the gauge of a shell is marked on the shell as well as on the factory box.

Sizes shown are the minimum inside bore diameter with a tolerance of +0.020”. Data is presented courtesy of SAAMI.
Shotgun Choke and Shot String
When a shotshell is fired from a shotgun, the pellets leave the barrel and begin to spread or scatter. The farther the pellets travel, the greater the spread of the group of pellets (shot) both in length and diameter. This spread is called the shot string. To control the shot string, shotgun barrels have a choke that will affect the shot pattern when the shot string hits the target.
- choke: The degree of narrowing at the muzzle end of the shotgun barrel
- shot pattern: The spread of shot pellets after they hit a non-moving target
- shot string: The three-dimensional spread of shot pellets after they leave the barrel
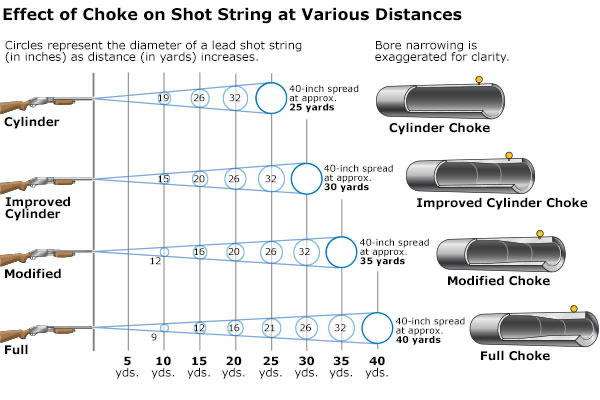
Types of Chokes
Your distance from the target determines the choke you need. The choke of a shotgun determines shot string only. It has no bearing on shot speed (velocity) or distance (range). That is, the choke does not alter the shotgun’s power—it just controls how tight or spread out the pellets will be at a specific distance.
Cylinder choke is an unconstricted barrel. The shot string spreads quickly.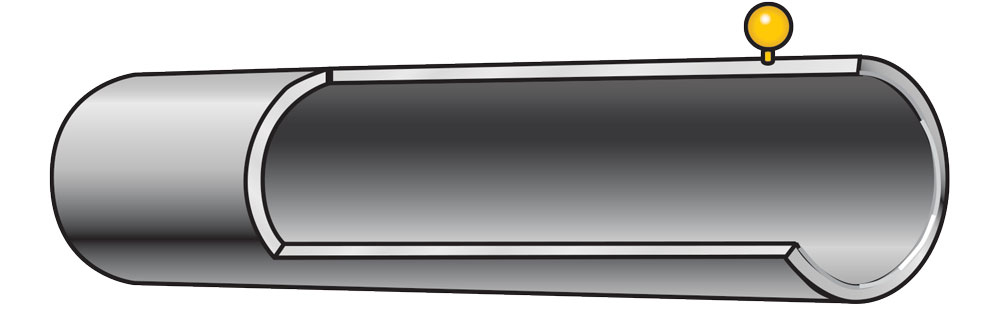
Cylinder Choke
Improved Cylinder choke has a slight constriction. It allows the shot string to spread fairly quickly. This is a good choice for quail, rabbits, and other upland game at relatively close ranges.
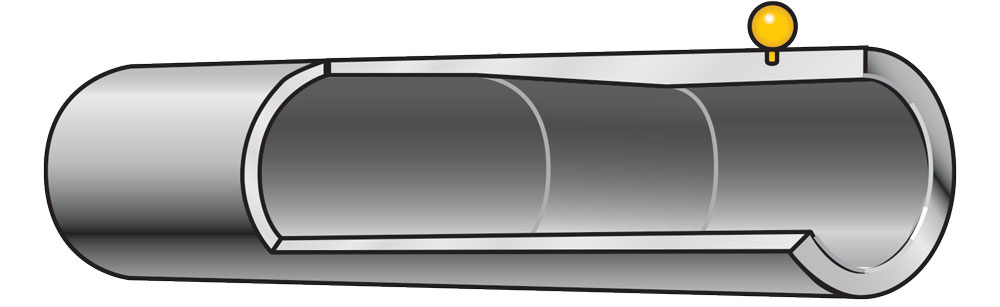
Improved Cylinder Choke
Modified choke has moderate constriction. The pellets stay together longer, making the shot string denser and more useful at longer ranges. This choke is used often when dove hunting and when using steel shot to hunt for ducks or geese. There is also an Improved Modified choke that is slightly tighter than Modified.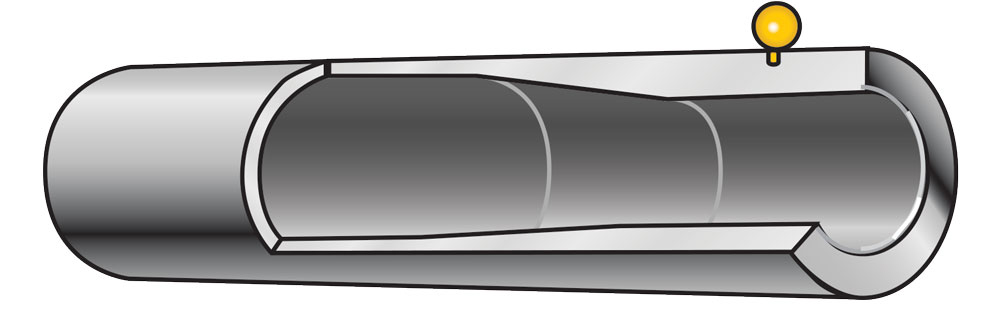
Modified Choke
Full choke has tight constriction. The shot holds together even longer, making this choke good for squirrels, turkey, and other game shot at 40-yard and longer ranges. Turkey hunters sometimes use Extra Full or Turkey choke for even denser patterns at long range.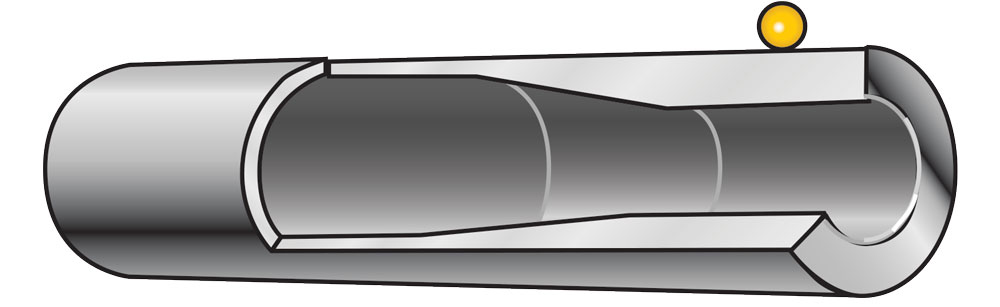
Full Choke
Shot String at Various Distances
Shot String at Various Distances
Steel Shot

Steel shot is slightly lighter than lead shot of the same size—reducing its velocity and distance (range). Also, steel shot is harder than lead, so the individual pellets stay round, keeping the pattern tighter.
- Some hunters use steel shot one or two sizes larger to make up for the difference in weight from lead shot. Others use the same size steel shot, or even smaller steel shot, to get more shot into their patterns. You should pattern your shotgun with various loads of steel shot before hunting waterfowl with it.
- Effective pattern density is the key. Maximum pellet counts spread evenly across a 30-inch circle are best. Full chokes generally produce poor patterns with steel shot.
Topic 8: Using the Correct Ammunition
Match Firearms and Ammunition Correctly
With so many kinds of firearms and types of ammunition, it’s not always easy to match the proper ammunition to your firearm correctly—but getting it right is critical. If you match the wrong ammunition to your gun, you can cause an explosion, injuring or possibly killing yourself and any bystanders.
To match the proper ammunition to your rifle, shotgun, or handgun correctly:
- Read the specific caliber or gauge designations on the side of the barrel. Match that barrel stamp designation exactly. For example, if it says “.270 Winchester,” you cannot use “.270 Weatherby.” Shotgun barrels will give the gauge and the length of the chamber (for example, “12-gauge for 2¾-inch shells” or “20-gauge Magnum for 3-inch shells”).
- Carefully read the information on the lid of the ammunition box and on the head stamp on the ammunition. With shotgun ammunition, always check both the gauge and the shell length, and whether it’s a magnum load, to ensure it matches the data on the barrel.
- Finally, match the proper caliber of cartridge, or gauge and length of shotshell, on the ammunition box and the ammunition head stamp to the barrel stamp before you shoot.
The rear of the shotgun barrel should be marked with the gauge and the length of the chamber.
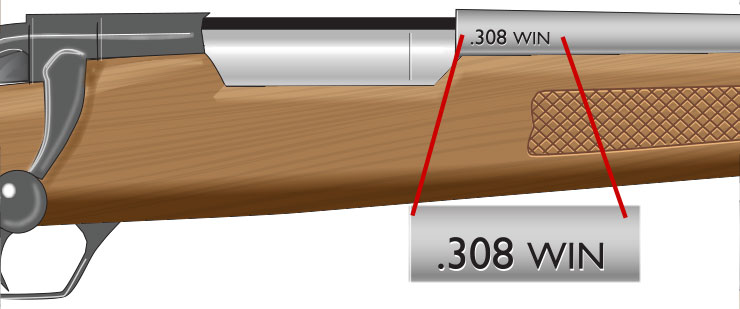
The barrel stamp of a rifle is usually stamped toward the rear of the barrel.
load: The amount of gunpowder in the cartridge or shotshell together with the weight of the bullet or shot charge
Safety Practices to Help You Avoid Using Wrong Ammunition
Safety practices that will help you avoid using the wrong ammunition are:
- Purchase only the correct ammunition for your firearm. Buy the exact caliber or gauge and length of ammunition for which your rifle, handgun, or shotgun was designed. For example, shotshells must be the correct length for the shotgun. The data stamp on the barrel of the shotgun will identify what length shell can be used. Never use a shell that is longer than this length.
- Carry only the correct ammunition for the firearm you’re using. Never mix ammunition, such as carrying a caliber or gauge your companion uses. A common mistake involves putting a 20-gauge shotshell into a 12-gauge shotgun. The smaller gauge shell will slide through the 12-gauge chamber and partly down the barrel, causing an obstruction. The shooter, especially when excited by the presence of game, then might insert a 12-gauge shotgun shell behind the 20-gauge shell.
- Never use old ammunition. Contact your local law enforcement agency for advice on destroying it.
Important
Reloaded shells may have wrong information or have been improperly reloaded. It’s important to mark reloaded shells clearly. Use only shells or cartridges that you have reloaded yourself or that have been reloaded by a person whom you know is competent.
The Danger of Using Wrong Ammunition
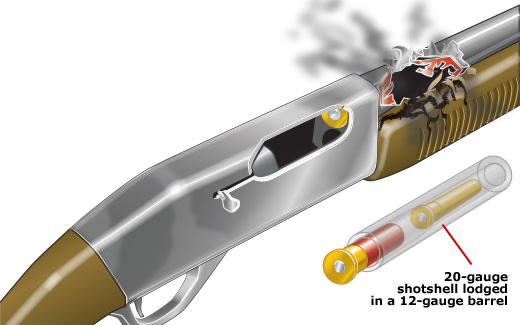
Smaller shotshells (such as 20-gauge shells), if mistakenly fed into a 12-gauge gun, will slip past the chamber and lodge in the barrel, causing serious personal injury or gun damage if a 12-gauge shell is loaded and fired. Some rifle and handgun ammunition also may fit into the wrong gun, creating a dangerous obstruction. The caliber or gauge stamped on the end of the shell must match that which is stamped on the gun barrel. Some barrels are not stamped. Be sure the right ammunition is used in your gun.
Topic 9: A Firearm’s Range
Know Your Firearm’s Range
Knowing your firearm’s “maximum projectile range” is critical to being a safe and responsible hunter. The maximum projectile range tells you at what distances your firearm’s projectile could cause injury or damage to persons, animals, or objects. When hunting, knowing the “effective killing range” lets you immediately assess when a shot will give a clean kill. The effective killing range will always be less than the maximum projectile range. Learning to estimate distances and knowing your firearm’s projectile range and your effective killing range are important parts of hunting.
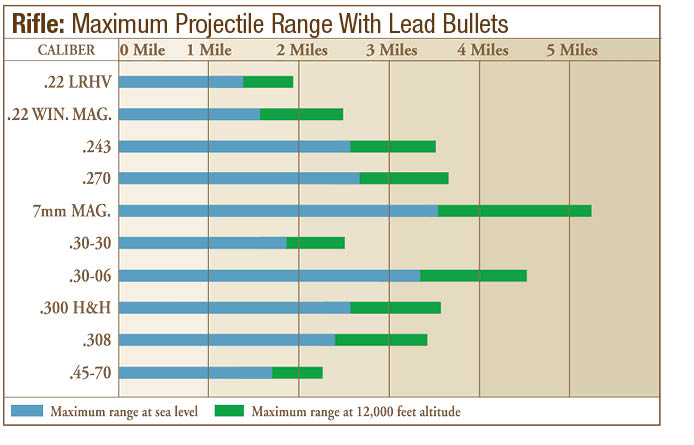
Maximum Projectile Range: Rifle
The following chart shows the maximum projectile range when you use lead bullets in your rifle. Notice how altitude affects this range.
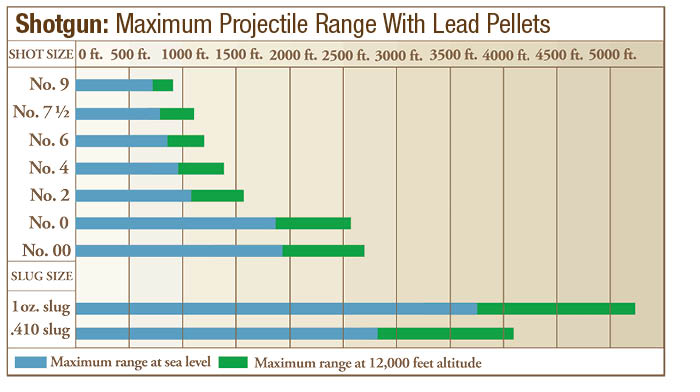
Maximum Projectile Range: Shotgun
The following chart shows the maximum projectile range when you use lead pellets in your shotgun. Notice how altitude affects this range.
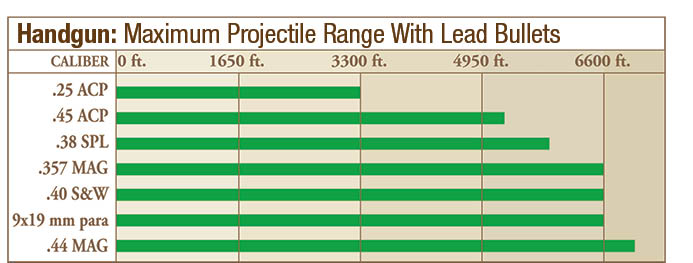
Maximum Projectile Range: Handgun
The following chart shows the maximum projectile range when you use lead bullets in your handgun.
Topic 10: Cleaning and Storing Firearms
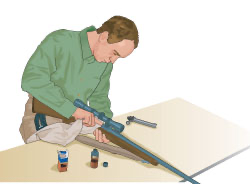
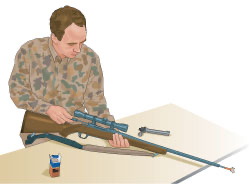
Firearm Cleaning Basics
Clean your firearms after every use to keep them in top condition. This will help ensure that the action functions safely and properly and the ammunition performs as it should.
- Work on a cleared table or bench. Always give cleaning your full attention. Never clean a firearm while doing something else.
- Follow these basic steps to clean your firearm.
- Point the muzzle in a safe direction, and make sure the gun is unloaded.
- Remove all ammunition from the cleaning bench.
- For the most thorough cleaning, field strip the firearm as directed in the firearm owner’s manual. Then clean each part separately.
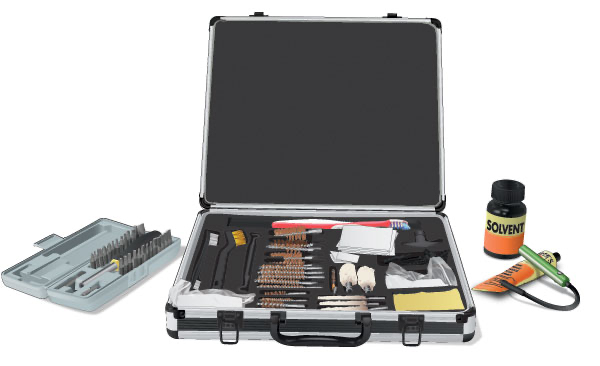
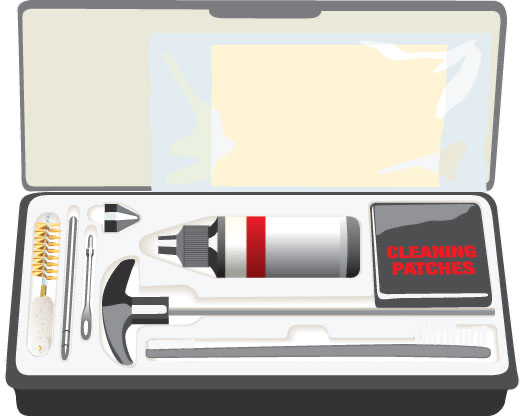
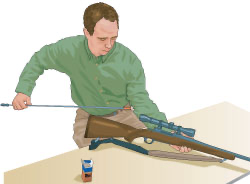
A Cleaning Kit
Every hunter should own a complete cleaning kit. A cleaning kit should include:
- Assorted rod tips—brushes, mop tips, slotted tips, jag tips
- Bore light
- Clean cloths
- Cleaning rods
- Cotton swabs
- Dental mirror
- Gun grease
- Gun oil
- Gunsmith screwdrivers
- Patches appropriate for the caliber or gauge of the firearm
- Pipe cleaners
- Solvent
- Stand to hold the firearm securely in a horizontal position
- Toothbrush
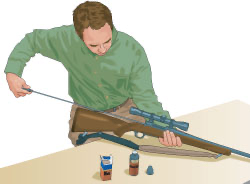
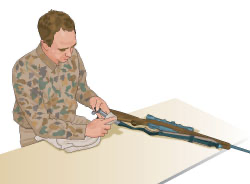
General Cleaning Instructions
Follow the instructions in your cleaning kit.
- Use a cloth and cleaning solvent to remove dirt, gunpowder residue, skin oils, and moisture from the action and all other metal parts of the firearm.
- If possible, clean the barrel from the breech end, using a bore guide and a cleaning rod holding a bore brush or patch wetted with solvent. Pass the brush/patch all the way through the barrel. Repeat several times with fresh patches. You may need a larger brush for the chamber.
- Use a hand brush to clean the crevices where powder residue accumulates.
- Follow with a dry patch, and finish with a lightly oiled patch for the barrel. Use cloth for other parts.
- Apply a coating of gun oil to protect the firearm from rust.
Use a flexible “pull-through” cleaning cable when cleaning firearms with lever or semi-automatic actions to prevent dirt, grime, or debris from being pushed into the action area.
Clean your ammunition by wiping it with a cleaning cloth. If the ammunition is not clean, particles of sand or dirt can scratch the bore.
Use cleaning solvents in a well-ventilated area and only as directed.
If cleaning from the muzzle end, use a muzzle protector so that you don’t damage the rifling near the muzzle.
Steps for Cleaning a Firearm
Step 1: Clean barrel and metal parts with good commercial solvent.
Step 2: Bore should be cleaned through breech end where possible.
Step 3: Clean bore until dry patch comes through as clean as possible.
Step 4: Run oily patch through barrel.
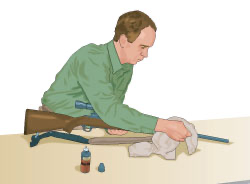
Step 5: All metal parts should get light coat of oil.
Step 6: Store in horizontal position, or with muzzle pointing down.
Step 7: After storage, run a clean patch through bore before firing.
Step 8: Remove all excess grease and oil.
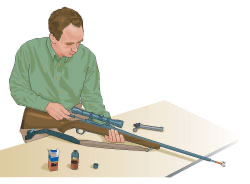
Where to Use a Brush, Cleaning Rod, and Cleaning Cable
These illustrations show where to use a brush and a cleaning rod to clean a gun.
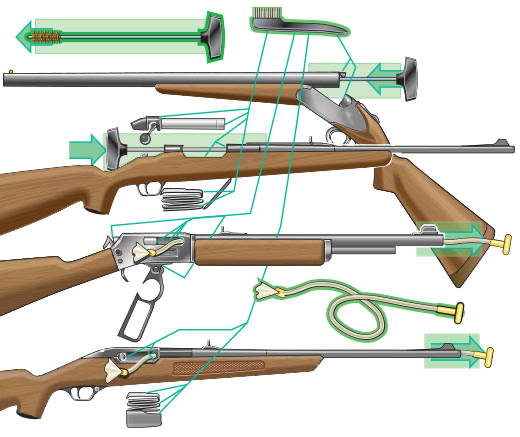
Cleaning of a Rifle
Cleaning of a Handgun
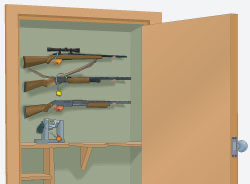
Storing Your Firearm
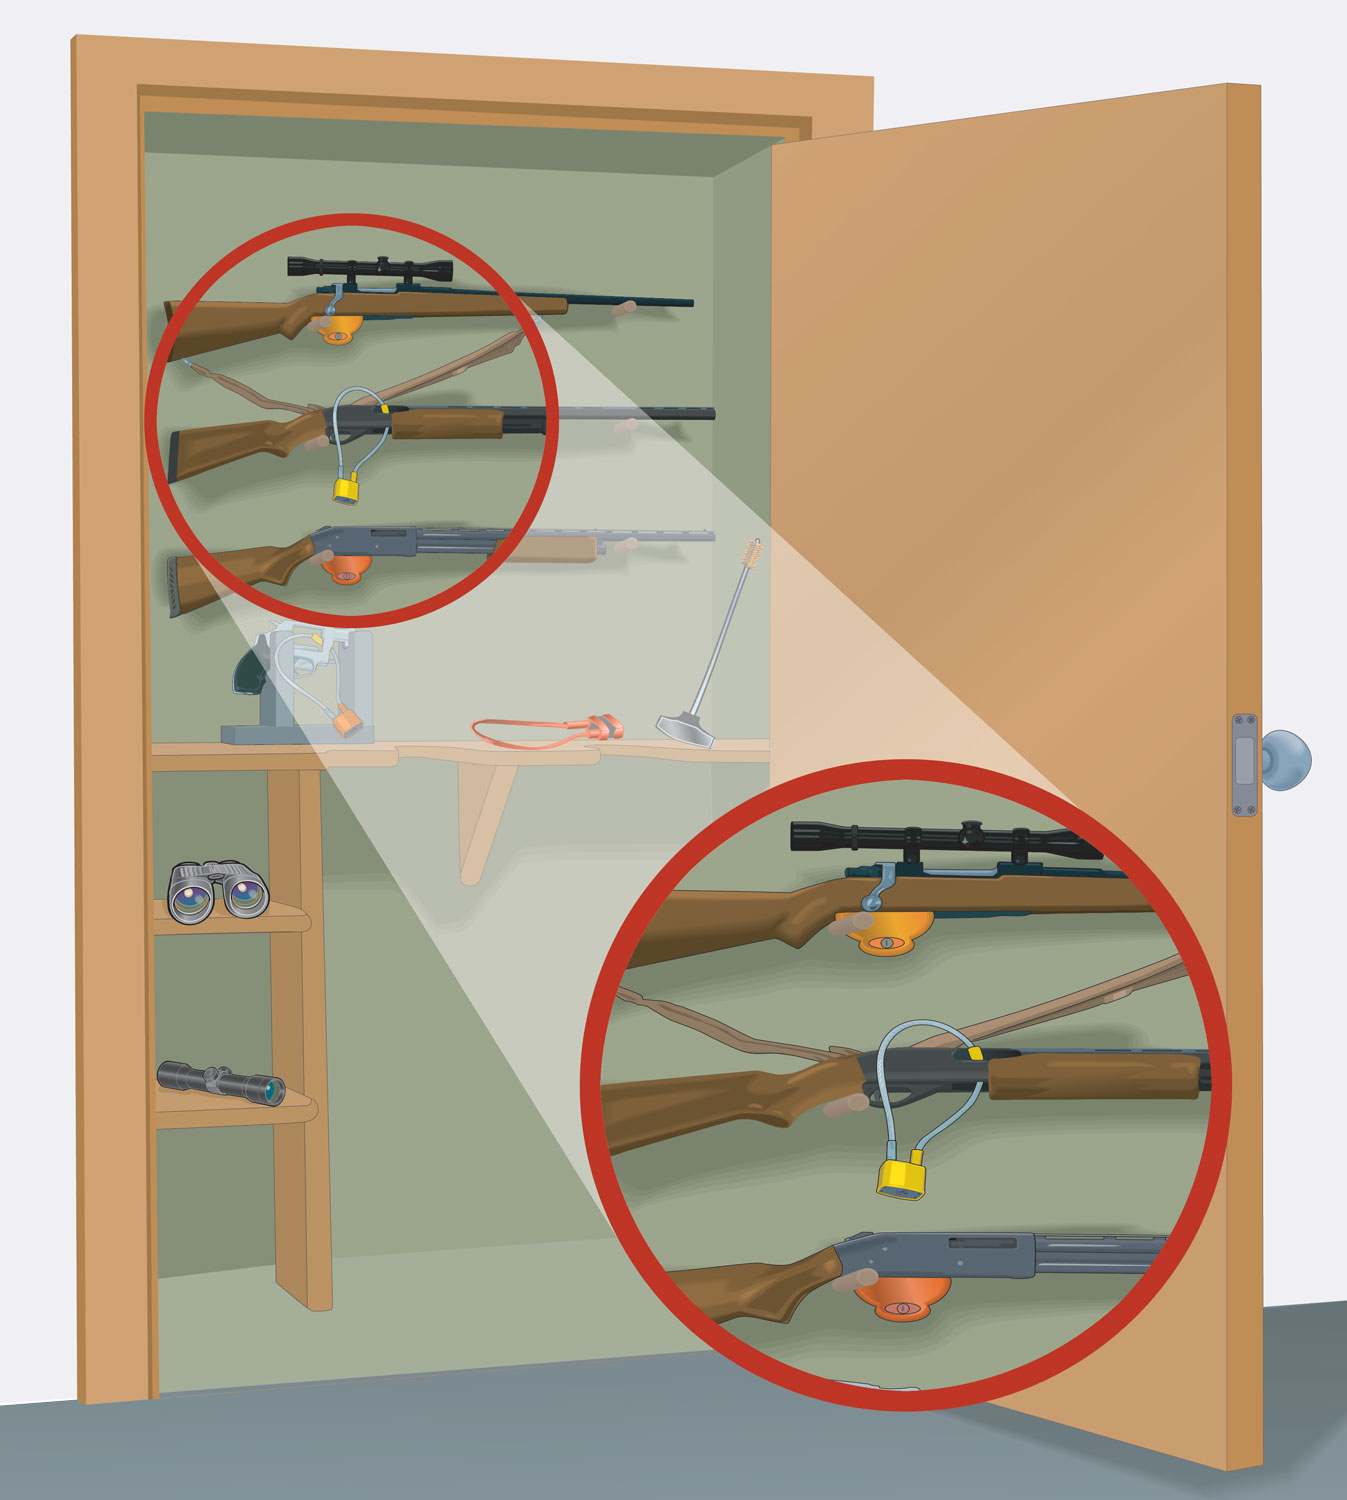
Firearms must be stored unloaded and in a locked location, separate from ammunition.
- The storage area should be cool, clean, and dry. Storing firearms in closed gun cases or scabbards isn’t recommended because moisture can accumulate.
- Store guns horizontally, or with the muzzle pointing down. When guns are stored upright, gravity pulls gun oil downward into the action, which forms a sticky film. Oil also can drain onto the stock, softening the wood.
- Displaying guns in glass cabinets or wall racks is an invitation to thieves and curious children.
- If guns are stored in an accessible area, such as a closet, put a locking device on each one.
- Ideally, guns should be hidden from view and locked. Storage devices with hidden compartments are available. For the best protection against theft and fire damage, purchase a safe.
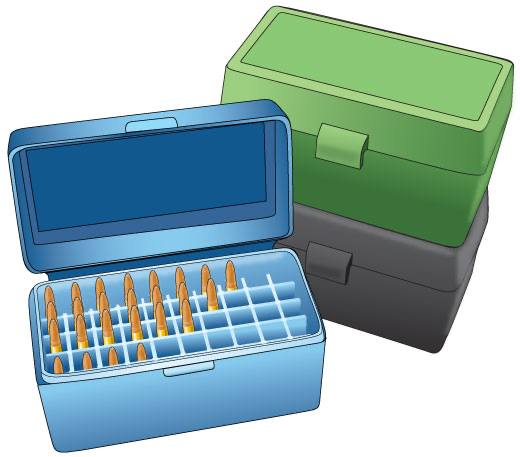
Storing Ammunition
Follow these guidelines for storing ammunition.
- Store ammunition, reloading supplies, and firearms in separate locked compartments.
- Keep all ammunition away from flammables.
- Store ammunition in a cool, dry place to prevent corrosion. Corroded ammunition can cause jamming, misfires, and other safety problems.
Unit 3: Basic Shooting Skills
Topic 1: Good Marksmanship and Accuracy
Fundamentals of Good Marksmanship
A fair amount of knowledge, skill, and experience is required to become a successful hunter. One of the essential skills is good marksmanship, which is accurately and consistently hitting the target where planned. When hunting, accuracy is critical for a clean kill. Good marksmanship is built on three fundamentals:
- Proper sight adjustment or patterning
- Proper shooting technique
- Practice
Selecting the Proper Firearm and Ammunition
- When choosing a firearm for hunting, make sure you meet any minimum legal requirements for caliber, gauge, or the amount of energy produced by the projectile. When hunting, your firearm should:
- Be powerful enough to kill the game quickly and effectively and…
- Fit you properly and…
- Have the correct amount of recoil, usually moderate, so that you will practice more often and shoot more proficiently.
- The ammunition you select for hunting depends on the type of game you plan to hunt. Most manufacturers recommend specific ammunition for each species.
- When hunting with a shotgun, also be sure to select the proper choke and ammunition combination.
Determining Accuracy Limits
After selecting your firearm, you should practice with it before you go hunting. Ethical hunters know their personal accuracy and limit their shots accordingly.
- Rifles: Use an 8-inch paper plate as the standard target to establish deer hunting accuracy. An 8-inch target is about the same size as the vital area of a deer. Before hunting, practice until you are confident you can hit the required target at the distances and from the shooting positions you expect to use in the field. When hunting, limit your shots to your most accurate range.
- Shotguns: Pattern your shotgun, and then practice hitting targets at the distances you expect to be from game you shoot. This will develop proficiency with the chosen firearm and help to ensure an ethical, clean, quick kill.
Protecting Your Vision and Hearing

Shooting a firearm can cause immediate and permanent hearing loss and can damage your vision.
- Shooting a firearm creates a loud noise. To protect your hearing, always wear properly fitting ear protection.
- For target practice, use an earplug or earmuff (or both) with a high Noise Reduction Rating (NRR).
- When hunting, use electronic or non-linear devices that allow normal or even enhanced hearing but block damaging levels of sound.
- For more information, visit the National Hearing Conservation Association website.
- Not only does shooting a firearm send the projectile(s) downrange, but it also discharges small particles from the projectile, burning gas, and other residue. Also a shell could rupture or your firearm could malfunction.
- When shooting, always wear suitable eye protection, such as shooting glasses with high-impact lenses, to protect your eyes.
- Wear eye protection also whenever disassembling or cleaning a firearm.
Topic 2: Rifle Firing
Sight Alignment
Sight alignment is the process of lining up rear and front sights. The sight picture is the image you see when the sights are aligned correctly with the target. To ensure that the bullet will travel to the target in your sight, it’s necessary to sight-in your rifle or handgun.
With an open sight, you line up the target with the blade or bead of the front sight within the notch of the rear sight.
With an aperture sight, you line up the target so that the front sight is within the rear peephole.
With a telescopic sight with a crosshair reticle, you line up the target with the crosshairs of the sight.
With a telescopic sight with a dot reticle, you line up the target with the dot of the sight. The dot must be centered.
Aligning an Open Sight
Determining Your Dominant or Master Eye
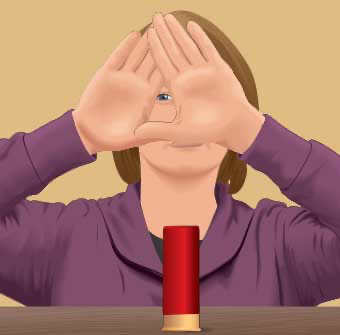
Just as you have a dominant hand, you also have a dominant eye.
- You need to aim with the dominant—or master—eye for the most accurate shooting. Usually your dominant eye is the same as your dominant hand, but not always. You should determine which is your dominant eye before you sight-in your rifle or handgun.
- To determine your dominant eye:
- Form a triangular opening with your thumbs and forefingers.
- Stretch your arms out in front of you.
- Focus on a distant object while looking through the triangular opening and keeping both eyes open.
- Bring your hands slowly to your face, keeping sight of the object through the opening; the opening will come to your dominant eye naturally.
- If you’re not sure, close one eye at a time. The weak eye will see the back of your hand; the strong one will be focused on the object in the triangle.
Important
Good vision is the foundation for good shooting and hunting safety. Have your eyes examined on a regular basis.
Sighting-In a Rifle
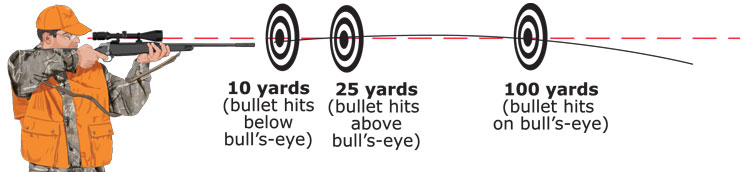
Rifle bullets don’t travel in a straight line. They travel in an arc, formed by the pull of gravity.
- “Sighting-in” is a process of adjusting the sights to hit a target at a specific range. Deer hunters, for example, often sight-in their rifles to hit the bull’s-eye at 100 yards.
- All rifles should be sighted-in before every hunt using the ammunition you plan to use, especially rifles with peep or telescopic sights. Guns you sighted-in prior to your last outing could have been knocked out of alignment by a single jolt. That misalignment could mean the difference between a successful hunt and a disappointing experience.
- Other than ensuring accurate shots, sighting-in a rifle has other advantages:
- Forces you to practice
- Makes accurate shooting possible
- Helps identify problems with your firing technique
- Helps determine the farthest range at which you can hit your target
- Improves safety by helping you know where your rifle will fire
- Builds confidence in your shooting ability
Optional Sighting-In Techniques
Use bore or collimator sighting-in initially to line up the rifle on the paper target. However, these techniques alone are not sufficient to sight-in a rifle. You must make final adjustments by firing the rifle with the same ammunition you plan to use in the field.
- Bore sighting-in with bolt-action rifles: Remove the bolt, brace the firearm on sandbags, and look directly through the bore. Correct the rifle’s position until you see the bull’s-eye in the center of the bore. Adjust the sights to give you a good sight picture.
- Collimator sighting-in for rifles without bolt actions: A collimator slips into the muzzle end of the barrel and allows you to adjust the sights, much like bore sighting-in.
Important
You must sight-in your rifle with the ammunition you plan to use. Be sure you sight-in and practice firing your rifle before you go hunting.
Sighting-In Procedure
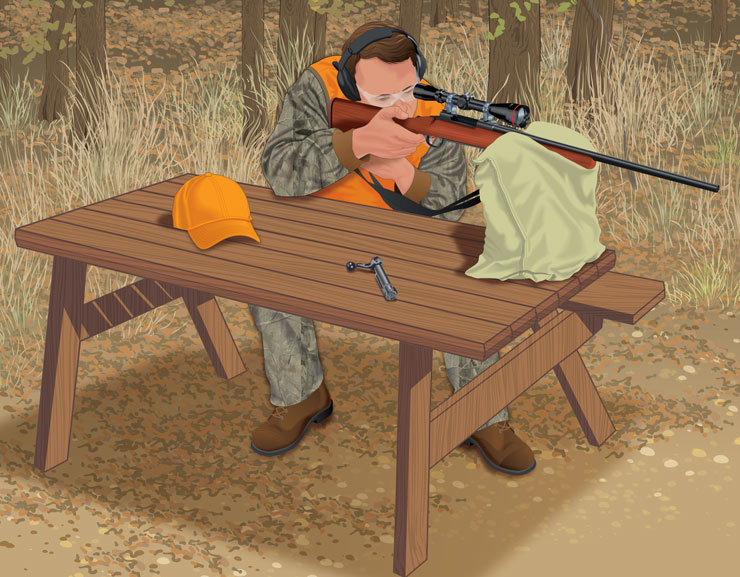
Fire your rifle from a solid bench rest with the forestock resting on a pad or a sandbag. Don’t rest the gun on its barrel—it will shoot higher than normal. Ideally, use an adjustable shooting tripod with sandbags. A spotting scope is also useful.
Sight-in instructions are printed on some targets available from retail outlets or manufacturers. The sighting-in process for most centerfire rifles begins at 25 yards and then should be repeated at 100 yards. The basic steps involve firing at least three shots carefully and consistently at a target. If the bullets form a relatively small group of holes on the target, but not where you were aiming, the sights will have to be adjusted.
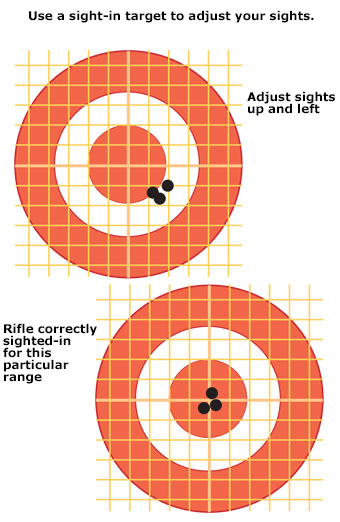
Adjusting Your Sight
When adjusting peep or telescopic sights, the rear sights or dials are adjusted by a certain number of minutes-of-angle, or “clicks,” in a certain direction. Read the sight’s instruction manual to see how much each click changes the sight at 100 yards.
The rear sight is moved in the same direction you want your shot to move on the target. Moving shots from side to side is “adjusting for windage.” Moving shots up or down is “adjusting for elevation.”
Specific instructions about trajectory and what fractions or inches you should be above the bull’s-eye at 25, 50, or 100 yards are usually included on sight-in targets. You also might consult a ballistics chart or get help from an experienced shooter.
MOA
The standard measurement unit of shooting accuracy; one minute-of-angle (MOA) is 1/60 of one degree, or approximately one inch, at 100 yards
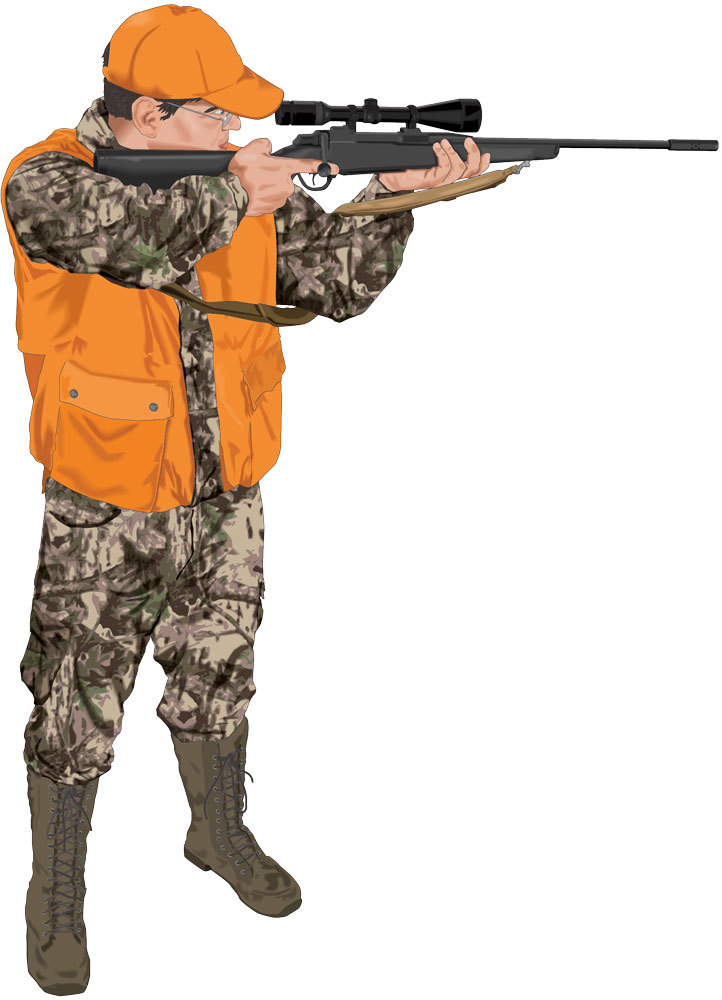
Rifle-Firing Techniques
Using correct firing techniques will help you steady the rifle for the most accurate shooting. Bear in mind that these are only the basics. Further study will help you understand other factors that can affect your accuracy, such as wind, heat, and parallax.
- Shooting From a Rest: When shooting in the field, the safest and most accurate shots are taken from a rest—a log, large rock, or other stable object. Don’t rest the barrel directly on a hard surface, or the rifle will fire higher than normal—put some padding, such as a hat or a jacket, under the rifle.
- Breathing: Your breathing can move the rifle just enough to throw off your shot.
- When you’re ready to fire, draw a deep breath, and exhale about half of it.
- Then hold your breath as you squeeze the trigger.
- Bear in mind that if you hold your breath too long, your heart beats faster, which increases your pulse and causes the rifle to move. If you notice this happening, take another breath and start over.
- At times the excitement of spotting game will make it more difficult to control your breathing. Try to relax and follow the correct procedure.
- Trigger Squeeze: Jerking the trigger or abruptly clenching the trigger hand can move the gun enough to cause a miss.
- To squeeze the trigger without jarring the gun, simply apply slow, steady pressure until the gun fires.
- Practice makes breath control and proper trigger squeeze habitual.
- Follow Through: After the bullet fires, it’s important to continue the squeeze or follow through. That prevents you from jerking the gun before the bullet has left the barrel.
Four Fundamentals for an Accurate Rifle Shot
- Aim carefully, aligning your sights.
- Take a deep breath, and then release about half of it.
- Squeeze the trigger slowly.
- Follow through.
parallax: Optical bending of telescopic crosshairs in relation to the target
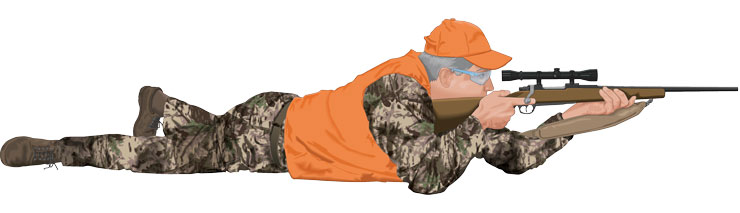
Firing Positions: Prone
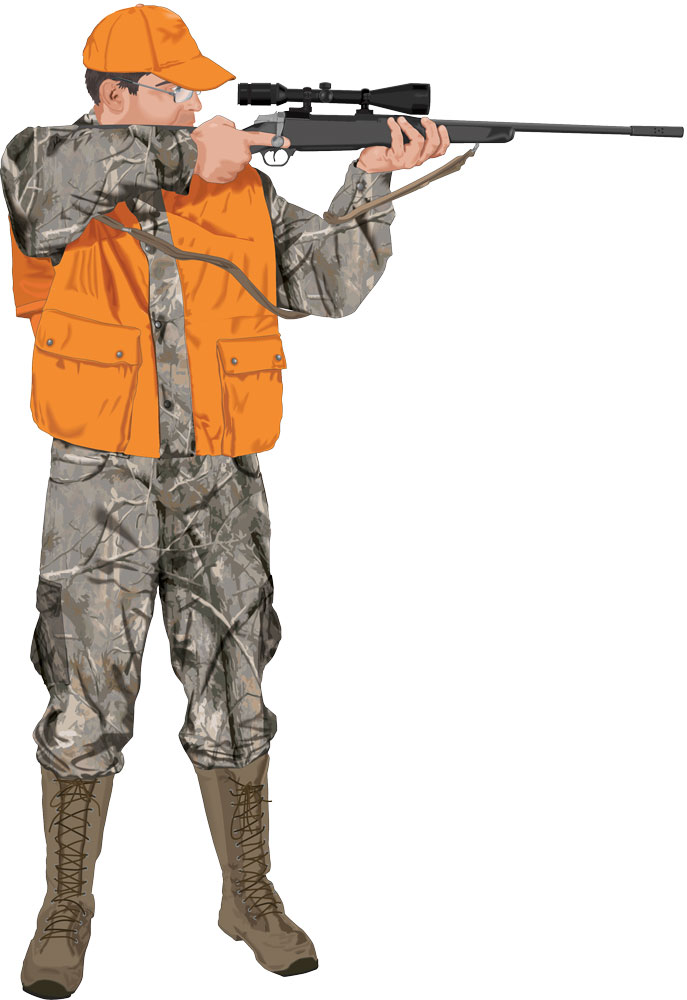
There are four standard rifle-firing positions: prone, standing, sitting, and kneeling.
Prone
The prone position is the steadiest of the four positions. Because it’s the easiest to hold, it’s the best position for mastering the fundamentals of firing—aiming, breath control, trigger squeeze, and follow through.
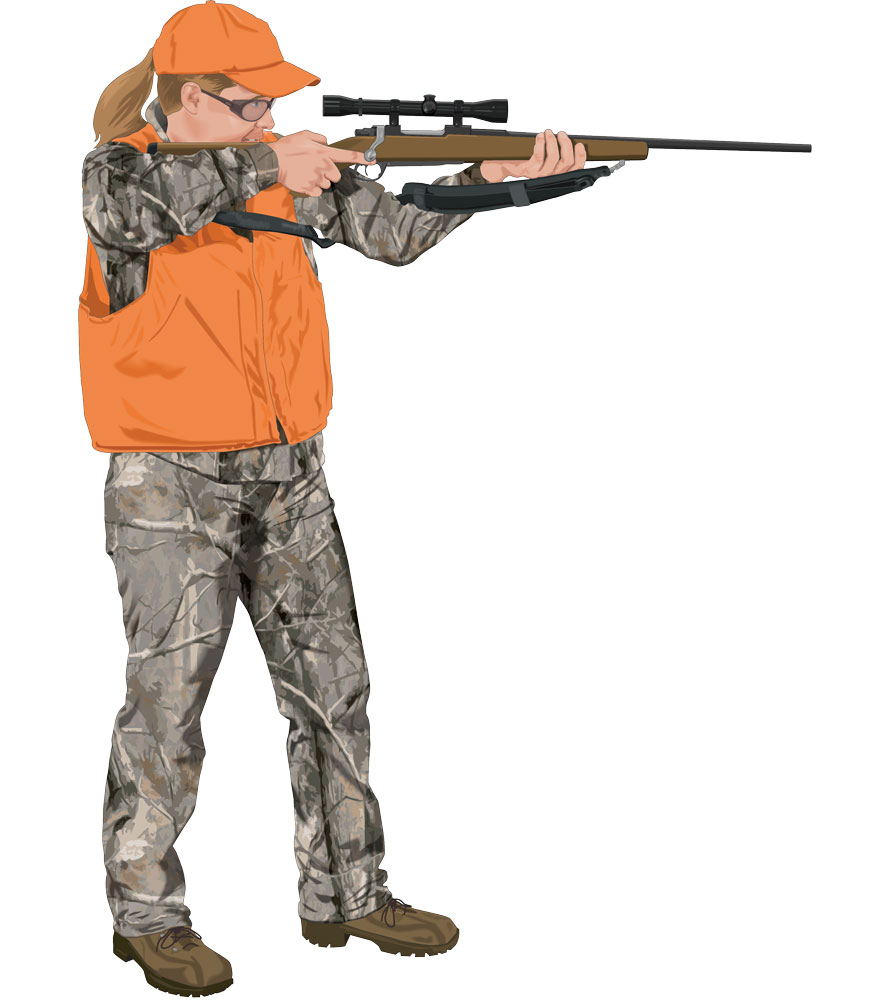
Firing Positions: Standing
There are four standard rifle-firing positions: prone, standing, sitting, and kneeling.
Standing
With neither arm supported, this is the most difficult position for firing an accurate shot. Rather than trying to hold the barrel steady, which is impossible, try to keep movement of the barrel to as small an area as possible. Smooth, natural motion will produce the best shot
Firing Positions: Sitting
There are four standard rifle-firing positions: prone, standing, sitting, and kneeling.
Sitting
Both arms are supported by your legs. Next to the prone position, this is the steadiest position.
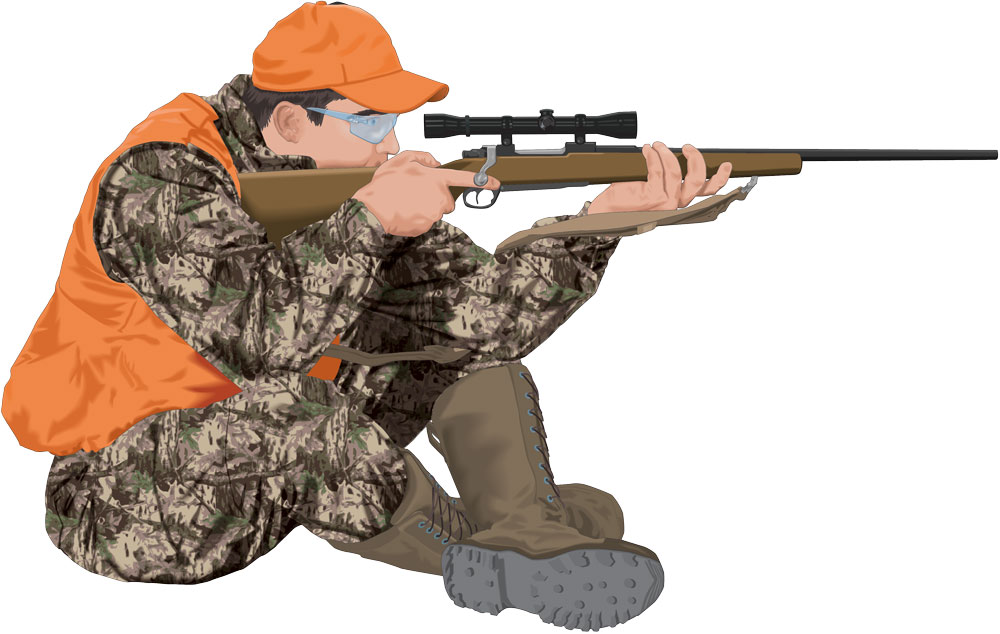
Firing Positions: Kneeling
There are four standard rifle-firing positions: prone, standing, sitting, and kneeling.
Kneeling
With only one arm braced, the kneeling position is less steady than the prone and sitting positions.

Topic 3: Shotgun Shooting
Shooting a Shotgun vs. a Rifle
Shotgun
- Point a shotgun.
- Focus your eye on the target.
- Pull the trigger.
Rifle
- Aim a rifle.
- Focus your eye on the crosshairs or front sight.
- Squeeze the trigger.
Hunter’s Tip
- Point a shotgun. Pull the trigger.
- Aim a rifle. Squeeze the trigger.
Choosing the Proper Choke
As with firing a rifle, good shotgun marksmanship begins with proper preparation, which includes adjusting your gun and ammunition for maximum performance and mastering shotgun techniques. You also must choose the proper choke.
- A choke allows you to fine-tune your shotgun for the type of game you’re hunting. Built-in or attached to the muzzle end of the barrel, the choke is a constriction that controls the shot string, thus affecting pellet density at various distances.
- The tighter the constriction, the greater the distance that the cluster of pellets stays together. The looser the constriction, the faster the shot pattern spreads.
- Here are the four most common chokes, ranging from most open to tightest.
- Cylinder (unchoked)
- Improved Cylinder
- Modified
- Full
Cylinder Choke
Improved Cylinder Choke
Modified Choke
Full Choke
Matching Choke to Your Quarry
Here are some examples for matching the choke to the quarry. Someone hunting small, fast, close birds would generally use an Improved Cylinder or Modified choke, which creates a broad shot pattern that spreads quickly at close ranges. Conversely, someone hunting a larger, less mobile bird that is usually farther away, such as a turkey, would select a Full choke, which concentrates the shot in a smaller area. Pellet size also varies based on the size of the game.
The chart below suggests choke selections for a variety of game. It is intended only as a guide—choice of choke may vary depending on ammunition, target distance, and hunting conditions. Always pattern your shotgun for the quarry you are hunting and the ammunition you are using.
| Quarry | Commonly Used Choke (based on typical distance from quarry) |
|---|---|
| Goose | Improved Cylinder or Modified |
| Duck | Improved Cylinder or Modified |
| Turkey | Full or Extra Full |
| Pheasant | Improved Cylinder, Modified, or Full |
| Grouse | Improved Cylinder or Modified |
| Woodcock, rail, or snipe | Improved Cylinder or Modified |
| Dove | Improved Cylinder or Modified |
| Quail | Improved Cylinder or Modified |
| Rabbit | Improved Cylinder or Modified |
| Squirrel | Modified or Full |
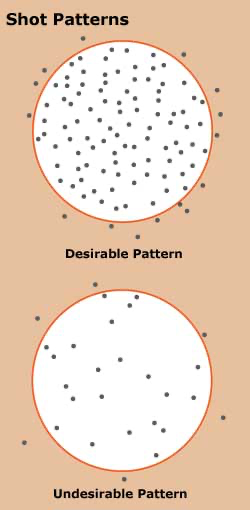
Patterning Your Shotgun
No two shotguns will shoot identical pellet patterns. In some cases, the pattern will be off-center. In other instances, there may be gaps in the pattern. In addition to the firing characteristics of the gun, the gun’s choke, the brand of shotshell, the shot size, and the type of shot also affect the pattern. In order to select ammunition that provides the best performance, it’s necessary to “pattern” your shotgun.
Important
Shots at game birds in flight should be limited to your “maximum effective range.” This is the distance at which you can hit the target consistently. Shooting beyond this distance leads to an increased number of birds wounded and lost. Also, firing at game too close may destroy the meat.
The Patterning Procedure
Patterning can be done with simple, homemade targets—sheets of blank paper about 4 x 4 feet in size. A commercial target with a bull’s-eye also can be used, but the bull’s-eye is used only to aim at—it is not used in steps 2–4 below. To pattern your shotgun, follow these steps:
- Fire one shot at the center of the target (or bull’s-eye) from the distance that you expect to be from your quarry (for example, 35 yards if hunting game birds). Repeat this two more times, each time with a new sheet of target paper.
- On each of the three targets, draw a 30-inch circle around the densest part of the shot pattern. (This is not necessarily the center of the paper.)
- On each of the three targets, count the number of pellet holes that fall within the 30-inch circle, marking them with the marker as you count each one.
- Calculate the percentage of the load that is expected to land in a 30-inch circle at the distance that you expect to be from your quarry.
a. Average the pellet counts within the 30-inch circles (add the three counts from the previous step, and divide the sum by three).
b. Then divide the average pellet count by the number of pellets in the load for the ammunition you are using, and multiply this result by 100.
When Is Your Shot Patterning Correct?
The pattern of pellets within a 30-inch circle should be of a proper, even density to ensure a clean kill. The pattern should contain a sufficient percentage of the load, which should be at least 55% to 60%.
Continue this process, trying different choke and load combinations, until you get an even pattern density with a sufficient percentage of the load within a 30-inch circle while shooting from the distance that you expect to be from your quarry.
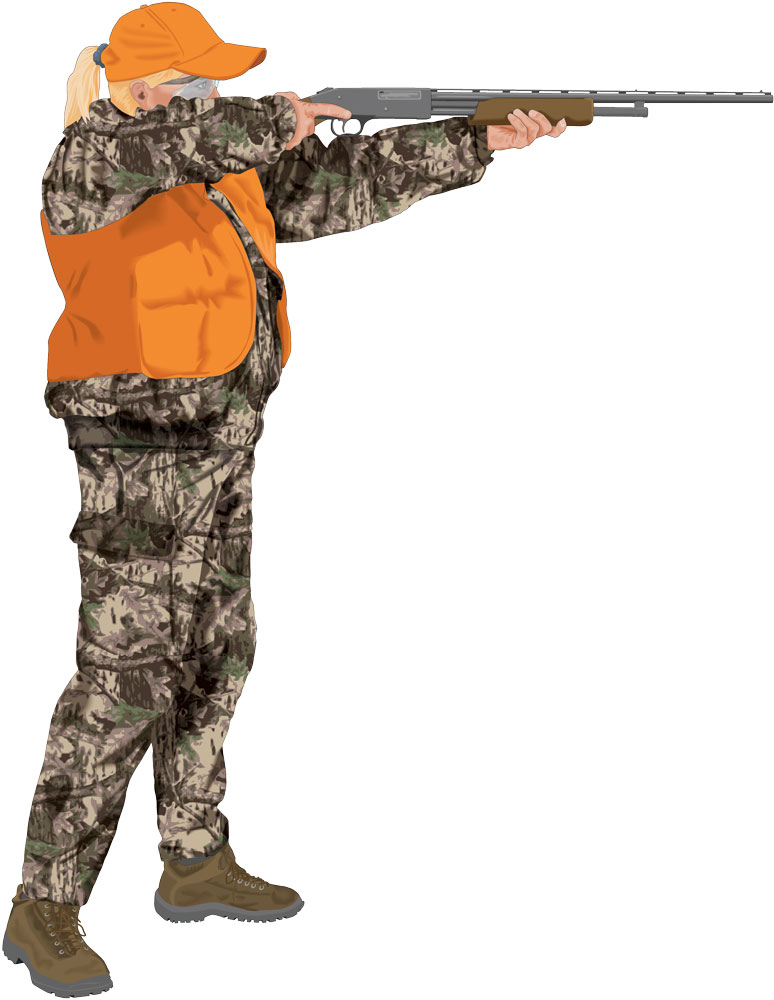
Shotgun-Shooting Stance
Unlike rifle firing, quick reflexes and flexibility are essential for effective shotgun shooting.
- Proper shotgun techniques will help you develop the rapid, fluid response you need to hit your target.
- A shotgun is almost always shot at a moving target from a standing position. You must be able to swing freely over a wide arc and maintain control. That requires a relaxed, balanced stance.
- Stand with your feet spread about shoulder-width apart and your knees bent slightly so that you are balanced perfectly. Bring your left foot slightly forward (if you’re a right-handed shooter), and lean your body in the same direction. The position of the feet is important. The toes of your forward foot should point at about 45 degrees toward the target. Take the time to place your feet properly, even for a quick shot.
- Keeping your knees slightly bent makes it easier to swing with a moving target. The bent leg to the rear supports the movements of your hips, allowing you to swing smoothly.
Shouldering, Pointing, and Pulling the Trigger of a Shotgun
Shouldering the Shotgun
- When you bring the shotgun to your shoulder, the stock should be brought to your cheek first and then back to your shoulder.
- A common error is lowering the head and cheek to the stock, instead of bringing the stock all the way up to the cheek. When done properly, with your head naturally erect, the gun butt always should come to the same spot on your shoulder.
Pointing a Shotgun
- Because targets usually appear suddenly and move quickly, there’s no time to “aim” a shotgun. It’s designed to be pointed, with the eye sighting along the top of the barrel or rib.
- The sight is usually a bead on the front of the gun. Your eye must be in line with the barrel, so it’s important to position your head properly on the stock.
- When you bring the gun to your face, the stock should fit snugly against your cheek with your eye on that side above the centerline of the gun. If you can’t assume that position comfortably, you may need to adjust the “gun fit.”
Pulling the Trigger
- Unlike rifle firing, quick trigger action is important when hunting with a shotgun. To fire, quickly slap the trigger with a firm motion, keeping a firm grip on the shotgun while pulling the stock rearward.
- Because the trigger is pulled quickly and the body and gun are typically in motion, breath control isn’t necessary.
- Continue the shotgun’s swing as you pull the trigger. Stopping the swing as you shoot will cause you to hit behind a moving target.
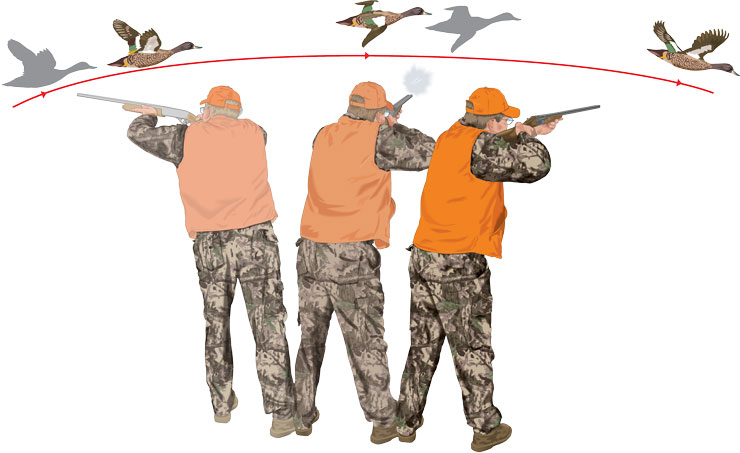
Leading the Target: Swing-Through Method
The two most common methods of leading targets at long distances are swing-through and sustained lead.
- Swing-through is the best technique for the beginning student.
- Point your shotgun at a moving target and swing with it. Increase the speed of the gun so that the muzzle passes the target, and then fire. In other words, literally “swing through” the target and fire at a blank space in front of the target.
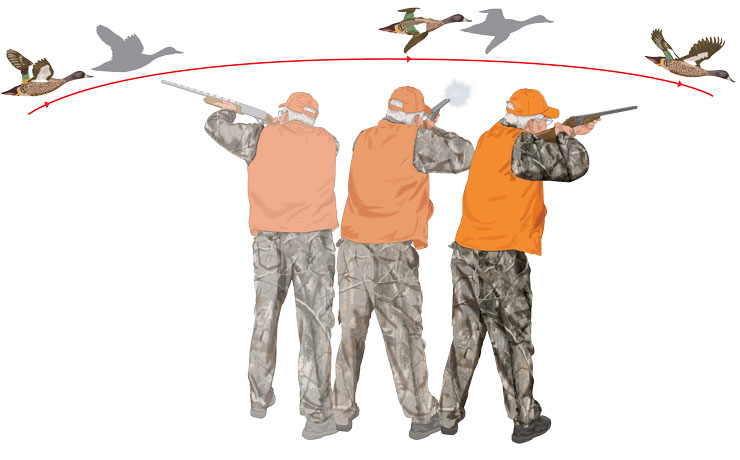
Leading the Target: Sustained Lead
The two most common methods of leading targets at long distances are swing-through and sustained lead.
- The sustained lead method is a little more challenging because it requires more experience.
- You estimate the length of the lead necessary to hit the target, and maintain that lead as you swing with the target, fire, and continue the swing.
Snap-Shooting
Snap-shooting is a technique to use if you must make a quick shot and the target is straight ahead at close range. You simply raise the shotgun, and point where you think the target will be when the shot arrives.
Topic 4: Handgun Shooting
Handgun Loading and Handling
Hunting with handguns has grown in popularity in recent years. Many of the fundamentals of rifle firing also apply to shooting handguns.
- Single-action revolvers typically load through a gate on the right side of the frame. To rotate the cylinder, pull the hammer back to half-cock. For a safer carry in the holster or hand, leave an empty chamber in front of the hammer.
- Double-action revolvers have cylinders that fall downward, exposing all chambers for loading.
- Semi-automatics usually fire rounds stored in a magazine that is inserted in the grip or handle.
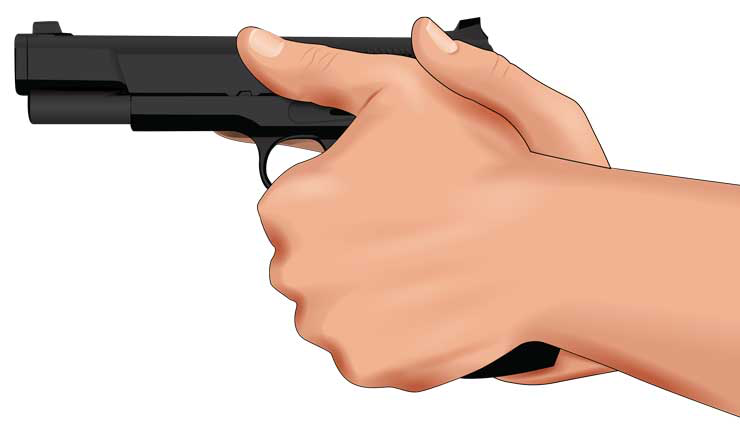
Handgun-Shooting Position and Grip
Body position and grip are vital to hitting the target. The hand position on the grip of a pistol is especially critical. Although the grip configuration of the revolver and semi-automatic are different, the gripping procedure is the same.
- Hold the handgun high on the grip so that the recoil is directed back to the hand and arm in a straight line. This allows better repeat shots and more accurate shooting.
- Use a two-handed hold whenever possible, applying pressure from front to rear.
When hunting, use a tree trunk, steady limb, or other stable object as a rest. Placing some padding, such as a hat or a jacket, on top of a hard rest helps with your aim.
Handgun Sight Alignment and Aiming
Sight Alignment
Sight alignment, which is important in rifle firing, is even more important in pistol shooting because of the shorter distance between the sights.
- Typically, handgun sights consist of a square rear notch sight and a heavy square front blade sight. This arrangement is easy to align.
- Most handguns are initially sighted-in at 50 feet.
Aiming
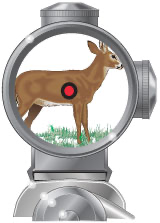
- At the shooting range, many handgunners use a sight picture that places the bull’s-eye on the top of the front sight, rather than placing it in the sights over the center of the target. However, hunters should hold the alignment directly over the vital area.
- Scopes with long eye relief have become popular with handgunners and offer exact sighting for hunters. Scopes may take longer to align on a target than open sights, but they’re usually more accurate.
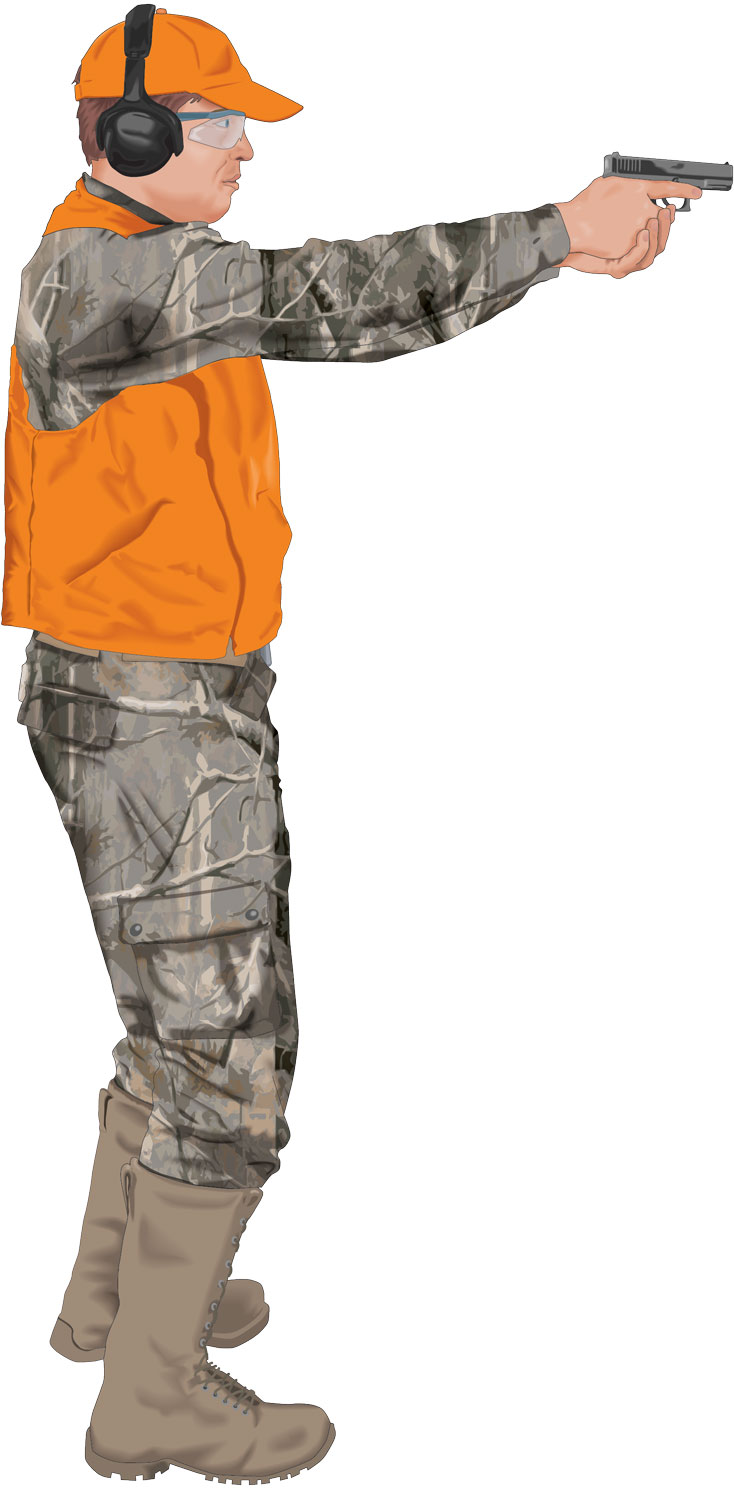
Handgun-Shooting Techniques
The pistol-shooting fundamentals of breath control, trigger squeeze, and follow through are almost identical to those in rifle firing. There are, however, some important differences to remember.
- The first joint of the finger should take up trigger pressure, not the tip, as is often done with rifles.
- When a revolver is fired, powder flashing at the front of the cylinder can cause burns. Be sure to keep your fingers away from the front of the trigger area.
- The slide and hammer of a semi-automatic gun can deliver a bruising blow when held too close to the body. All handguns should be fired at arm’s length.
Important
When using a handgun:
- Use a good holster with a safety strap.
- Draw a handgun only when you see game.
- Cock your gun only when ready to shoot.
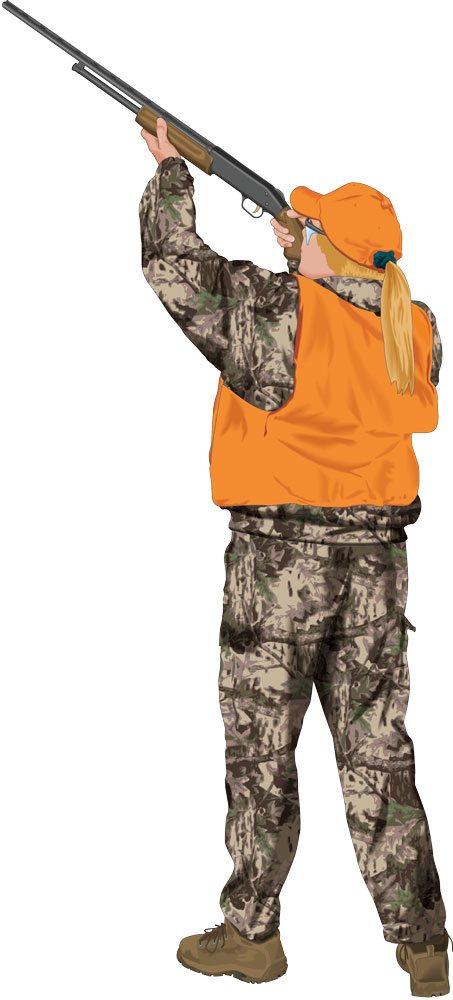
- Keep your finger outside the trigger guard until ready to shoot.
Unit 4: Basic Hunting Skills
Topic 1: Planning and Preparation
Steps You Should Take to Prepare for a Hunt
A successful hunt begins with careful planning and preparation. The process usually requires more time than the hunt itself. Here are some steps you should take to prepare for a hunt.
- Educate yourself about the game you’ll be hunting and its environment.
- Obtain the most current state regulations.
- Buy appropriate clothing and gear for the environment.
- Secure lease arrangements and permits (dogs and horses may require - a veterinarian’s certificate or a current vaccination record).
- Visit the site in the off-season to prepare blinds and cabin facilities.
- Sight-in rifles, handguns, and bows; pattern shotguns.
- Sharpen your skills at the shooting range.
- Pack extra firearms, scopes, bowstrings, etc.
Know Your Quarry
Of all the steps of preparation, educating yourself about the game you’re hunting is one of the most critical. Understanding your quarry will increase your success and add to the enjoyment of the experience as well.
- In many cases, knowing your quarry is also necessary to ensure that you’re taking legal game. For example, you may need to determine the sex of game birds on sight or quickly recognize protected species as they move into firing range. If you hunt in a region where white-tailed and mule deer occupy the same area, you’ll need to know how to identify both.
- There are many ways that wild animals are classified, but hunters are concerned with four basic categories.
- Large Mammals: Big game, such as deer, elk, and bear
- Small Mammals: Small game, such as rabbits, squirrels, and raccoons
- Upland Birds: Turkey, grouse, quail, and dove
- Waterfowl: Ducks and geese
Important
It is critical that you educate yourself about your quarry when preparing to hunt. Understanding game species will add to your enjoyment and increase your chances of success as well.
Understand Animal Characteristics
Whatever you’re hunting, a basic understanding of an animal’s characteristics will help you develop an effective strategy for identifying and tracking it.
- Animals can be identified by four basic characteristics.
- Distinctive Markings: The black cheek patch on male pronghorns; the “flags” of the white-tailed deer; the face pattern on a gray fox; the green head on a mallard drake; the red, white, and blue on the head of a male turkey
- Sounds: The wild call of the sandhill crane, the familiar honk of the goose, the gobble of a strutting “tom,” the grunt of the deer, the howl of the coyote
- Movement: The bounce of mule deer, the strut of a tom turkey, the fast or slow wing beats of some waterfowl, the zigzag in-flight pattern of the common snipe when flushed
- Group Behavior: Flock patterns, such as the familiar V shape of certain migratory birds; various types of herd behavior
- Further study will help you learn other ways to identify and understand your quarry, including signs the animal leaves, camouflage capability, and behavior.
Topic 2: Hunting Strategies
Introduction to Hunting Strategies
Hunting techniques are skills honed through education and experience. Ideally, beginners should seek the guidance of experienced hunters on their initial hunts
Still Hunting
As the name implies, still hunting is walking stealthily through an animal’s habitat, stopping frequently—sometimes for long periods—to scan and listen for game. Typically, big-game hunters use this method in unfamiliar terrain or where stands are impractical or forbidden.
- As a general rule, spend at least 10 times longer being still and observing than walking. Keep a low profile; a human silhouette will spook many game species. Use binoculars in open terrain to identify movement properly.
- If you still hunt effectively, game will be unaware of your presence, but so will other sportsmen. To avoid being mistaken for game by other hunters, always wear fluorescent orange.
Stalking
The difference between still hunting and stalking is that when stalking, you follow signs leading to a particular type of game or group of animals, or close the distance to game already spotted.
- You may follow tracks on trails or a morning “dew” trail through leaves and brush. Or you may follow sounds or scents of animals, such as elk, sheep, or collared peccaries. Or you may simply need to sneak closer to an animal for a better shot.
- Stalking requires total focus because you must remember to keep downwind, stay quiet, stay alert, and remain patient.
- When turkey hunting, the sound you hear may be another hunter “calling.” For safety, you should not stalk turkeys.
Posting
Posting involves sitting or standing in one spot.
- The location may offer a vantage point or a spot near the animal’s trails.
- The key to setting up a posting site is finding a location that allows you to freely swing your firearm or draw your bow.
- Posting is effective when you know where game is traveling each day and you’re not allowed to use a blind or stand.
Using Ground Blinds
Ground blinds are makeshift or temporary structures located on the ground that conceal the hunter. Ground blinds can be as simple as a natural blind built behind a tree, bush, log, or rock or as sophisticated as a portable, enclosed camouflage-cloth blind.
- You should situate ground blinds:
- Downwind, based on the normal wind pattern during a given time of day, such as morning
- Away from the sun
- Where the foreground and background are safest
- For safety when you are entering or exiting a ground blind:
- Keep the firearm’s muzzle pointed in a safe direction and…
- Safely unload the firearm and put the safety in the “on” position.

Ground blinds can provide effective camouflage to conceal the hunter.
Using Elevated Stands
Elevated stands (tower stands or tree stands) offer a number of advantages to both firearm and bow hunters. Tower stands are above-ground seats or blinds that conceal the hunter above the level of the quarry. Tree stands are stands placed in or against trees.
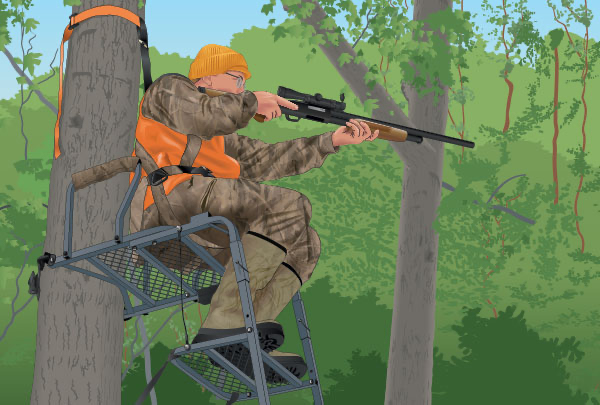
Important
You should check the condition of elevated stands routinely. Also, inspect for insects, owls, and small mammals before entering the stand.
Game Calling
Calling is an effective technique for most animals.
- There are hundreds of sounds that can attract all types of wildlife. A skillful hunter uses these sounds to attract animals close enough to him or her for an effective shot.
- Here are some of the sounds that can be imitated to draw game to you.
- Territorial sounds: Deer “rattle,” elk “bugle,” or a turkey “gobble”
- Feeding sounds: A duck’s feeding “chuckle”
- Distress sounds: Inviting coyotes, bobcats, or foxes to feed
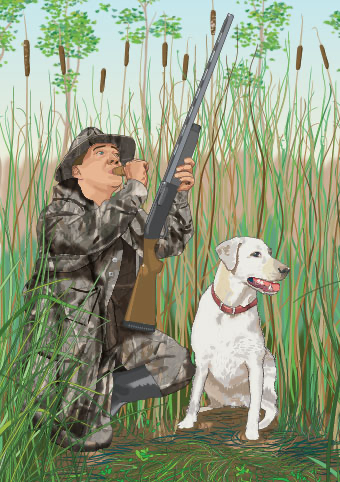
Driving
The purpose of the deer drive is to make the deer move, not run, out of their hiding places.
- Driving involves a group of hunters, some acting as “drivers” and others as “posters.”
- Drivers spread out across a field or woods and push game out of cover.
- Posters take positions at the end of the cover to intercept game pushed out by the drivers.
- The success of a drive depends on good organization and being familiar with the terrain.
- It is critical that everyone involved in the drive is aware of the position of other drivers and posters. Wear fluorescent orange, and never shoot in the direction of another hunter.
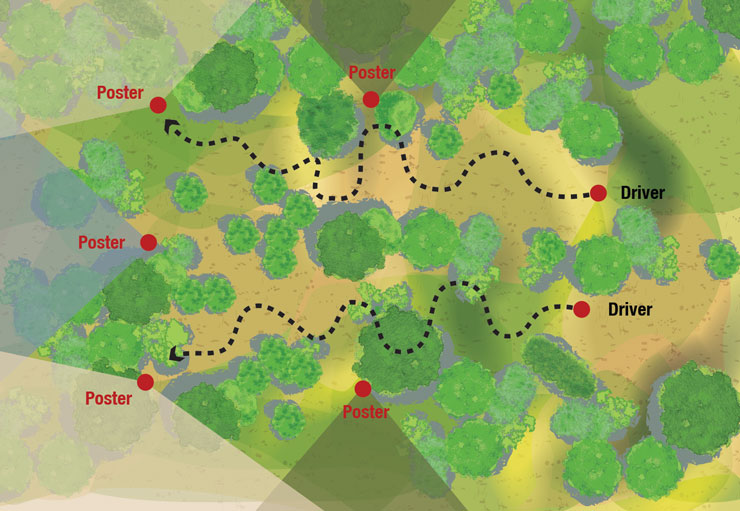
Important
Laws and regulations for driving game vary by state. Always consult your state or provincial laws and regulations before driving game during a hunt.
Flushing and Hunting With Dogs
Flushing
Flushing involves using noise, movement, or dogs to cause game to become nervous and leave cover.
- Pause frequently when attempting to flush game.
- When you vary your pace, your quarry may think it has been detected and be more likely to leave cover.
Dogs
There are several breeds of dogs that can be used for hunting different game species. Some dogs can be used to hunt several types of game animals.
- Pointers are used primarily for upland game birds.
- Retrievers are large, hearty dogs used primarily to retrieve waterfowl; they also can be trained to hunt other game birds.
- Spaniels are used mainly as flushers.
- Hunting hounds are used to hunt raccoons and rabbits in the Southeast, mountain lions and bears in the West, and deer in some states.
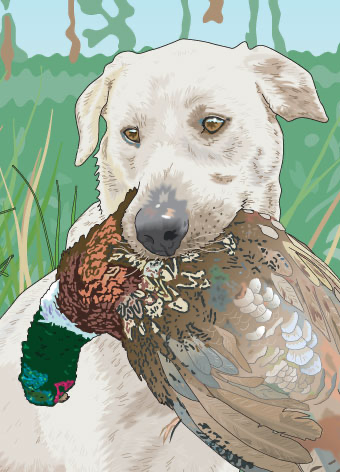
A trained hunting dog can be an excellent hunting partner.
Trapping
Trapping furbearing animals was once a full-time occupation. Today, regulated trapping is an important tool for managing our nation’s natural resources.
- Trapping helps control animal populations by minimizing starvation, reducing spread of disease, and controlling habitat damage or destruction.
- Trapping helps protect personal property by preventing or decreasing:
- Flooding caused by beaver dams
- Damage to homes, trees, gardens, and agricultural crops
- Killing of livestock or pets
- Trapping protects certain endangered or threatened species from predatory furbearers.
Trapper’s Code of Ethics
When used properly, trapping can be an alternative method to hunting for harvesting furbearers and an effective tool for wildlife management. Trappers should learn about the type of traps appropriate for the animal they’re seeking and follow the trapper’s code of ethics:
- Obtain the landowner’s permission.
- Avoid setting traps in areas where domestic animals may be caught.
- Set traps to capture the target animal in the most humane way possible.
- Check traps at least once every 24 hours, preferably in the early morning.
- Record trap locations accurately.
- Identify all traps with waterproof name and address tags.
- Use as much of the animal as possible. Dispose of animal carcasses properly.
- Make an effort to trap only the surplus animals from each habitat.
- Assist landowners who are having damage problems with wildlife.
- Dispatch trapped furbearers in a humane manner.
- Obtain all required licenses, tags, and permits. Because trapping laws vary by state, check the state’s regulations before you go trapping.
Types of Traps
Traps can be set either on land or in or near the water. Some types of traps are designed to kill the trapped animal, and others are designed to capture the animal alive and unharmed (live-restraining devices).
- The most common type of killing devices are bodygrip traps.
- Live-restraining devices include foothold traps, enclosed foothold devices, cage traps, and some types of cable devices. With these traps, you are able to release non-target animals.
- Some furbearers are found more often in or near water. For these animals, trappers use submersion trapping systems, which hold the animal underwater until it dies.
Bodygrip traps catch the animal’s entire body.
Foothold traps catch the animal when it steps on the trap.
Snares or cable devices use a loop of cable to catch a furbearer by the neck, body, or leg.
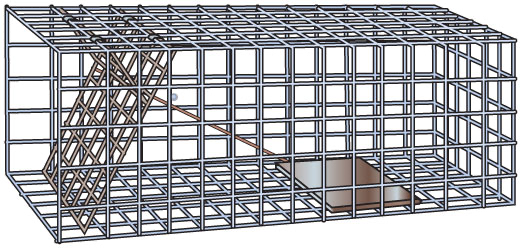
Cage (box) traps come in different lengths and have doors that vary in size.
dispatch: To put to death quickly
Topic 3: Vital Shots
Where to Shoot
Every hunter wants to bring home the game he or she is seeking; true sportsmen strive to do it by inflicting a minimal amount of suffering. To achieve these twin goals, it’s essential that you understand the anatomy of the game you’re after and learn how to place a shot for a clean kill.
- The most effective shots are delivered to an animal’s vital organs—heart and lungs. In large game animals, these organs lie in the chest cavity behind the front shoulder. A lung shot is the most effective shot for big game.
- The area of the vital organs also contains major blood vessels and arteries. A shot in this area causes considerable bleeding. If the animal doesn’t die immediately and tries to flee, it will leave a blood trail that’s easy to track.
- Aside from being a good marksman, the key to a clean kill is patience. Hunters should limit shots to the vital organs only. If you do not have a clear shot to the vital organs, wait until the animal presents the best possible shot.
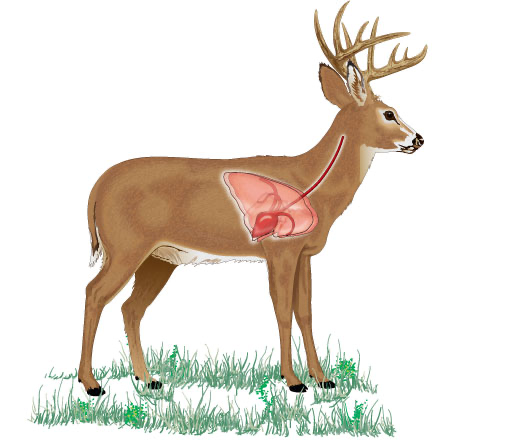
Shot Angles: Broadside
The broadside shot angle is the preferred shot angle for both firearm and bow hunters for larger game animals, such as elk, deer, and bear.
- Firearm: The broadside position offers several excellent shots for a firearm hunter. The best target is the shoulder and chest area. A bullet of the correct weight that is fired from a firearm adequate for the game will break the shoulder bone and enter the lungs or heart.
- Bow: The broadside angle offers the best shot for the largest big game animals, such as elk, deer, and bear. For most big game, the aiming spot is straight up from the back side of the front leg, one-third of the way up from the bottom of the chest. An arrow will penetrate the ribs but not the shoulder bone; wait until the near leg is forward, and aim behind the shoulder.
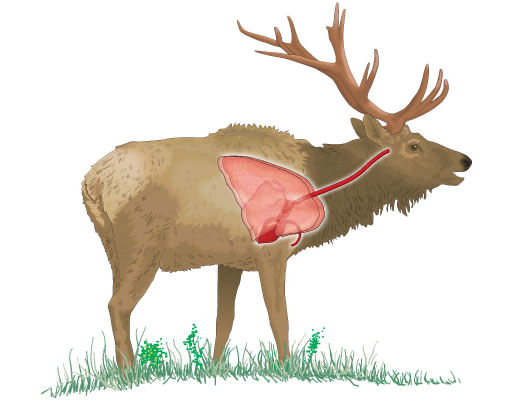
The preferred shot for larger game animals, such as elk, deer, and bear, is broadside.
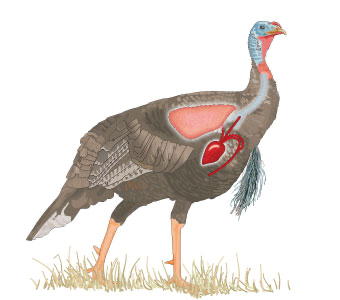
The most effective firearm shot for a turkey is to the head and neck. The preferred shot angle for bowhunters is broadside, aiming for the heart or lungs.
Shot Angles: Quartering-Away
The quartering-away shot angle is when your target is facing away from you, but at an angle. The animal is usually looking away from you.
- Firearm: For firearm hunters, the quartering-away position offers several aiming spots on all big game. The area just behind the shoulder is the best aiming spot for direct penetration of the vital organs. Focus on hitting the chest area above the opposite front leg.
- Bow: The quartering-away shot angle offers a good opportunity for a clean kill on antelope, white-tailed deer, mule deer, black bear, and other big game of similar size or smaller. This is not a good shot for bowhunters on larger game because their massive stomachs and intestines will block a clean shot to the lungs or heart. The opposite front leg is a good reference point for aiming.
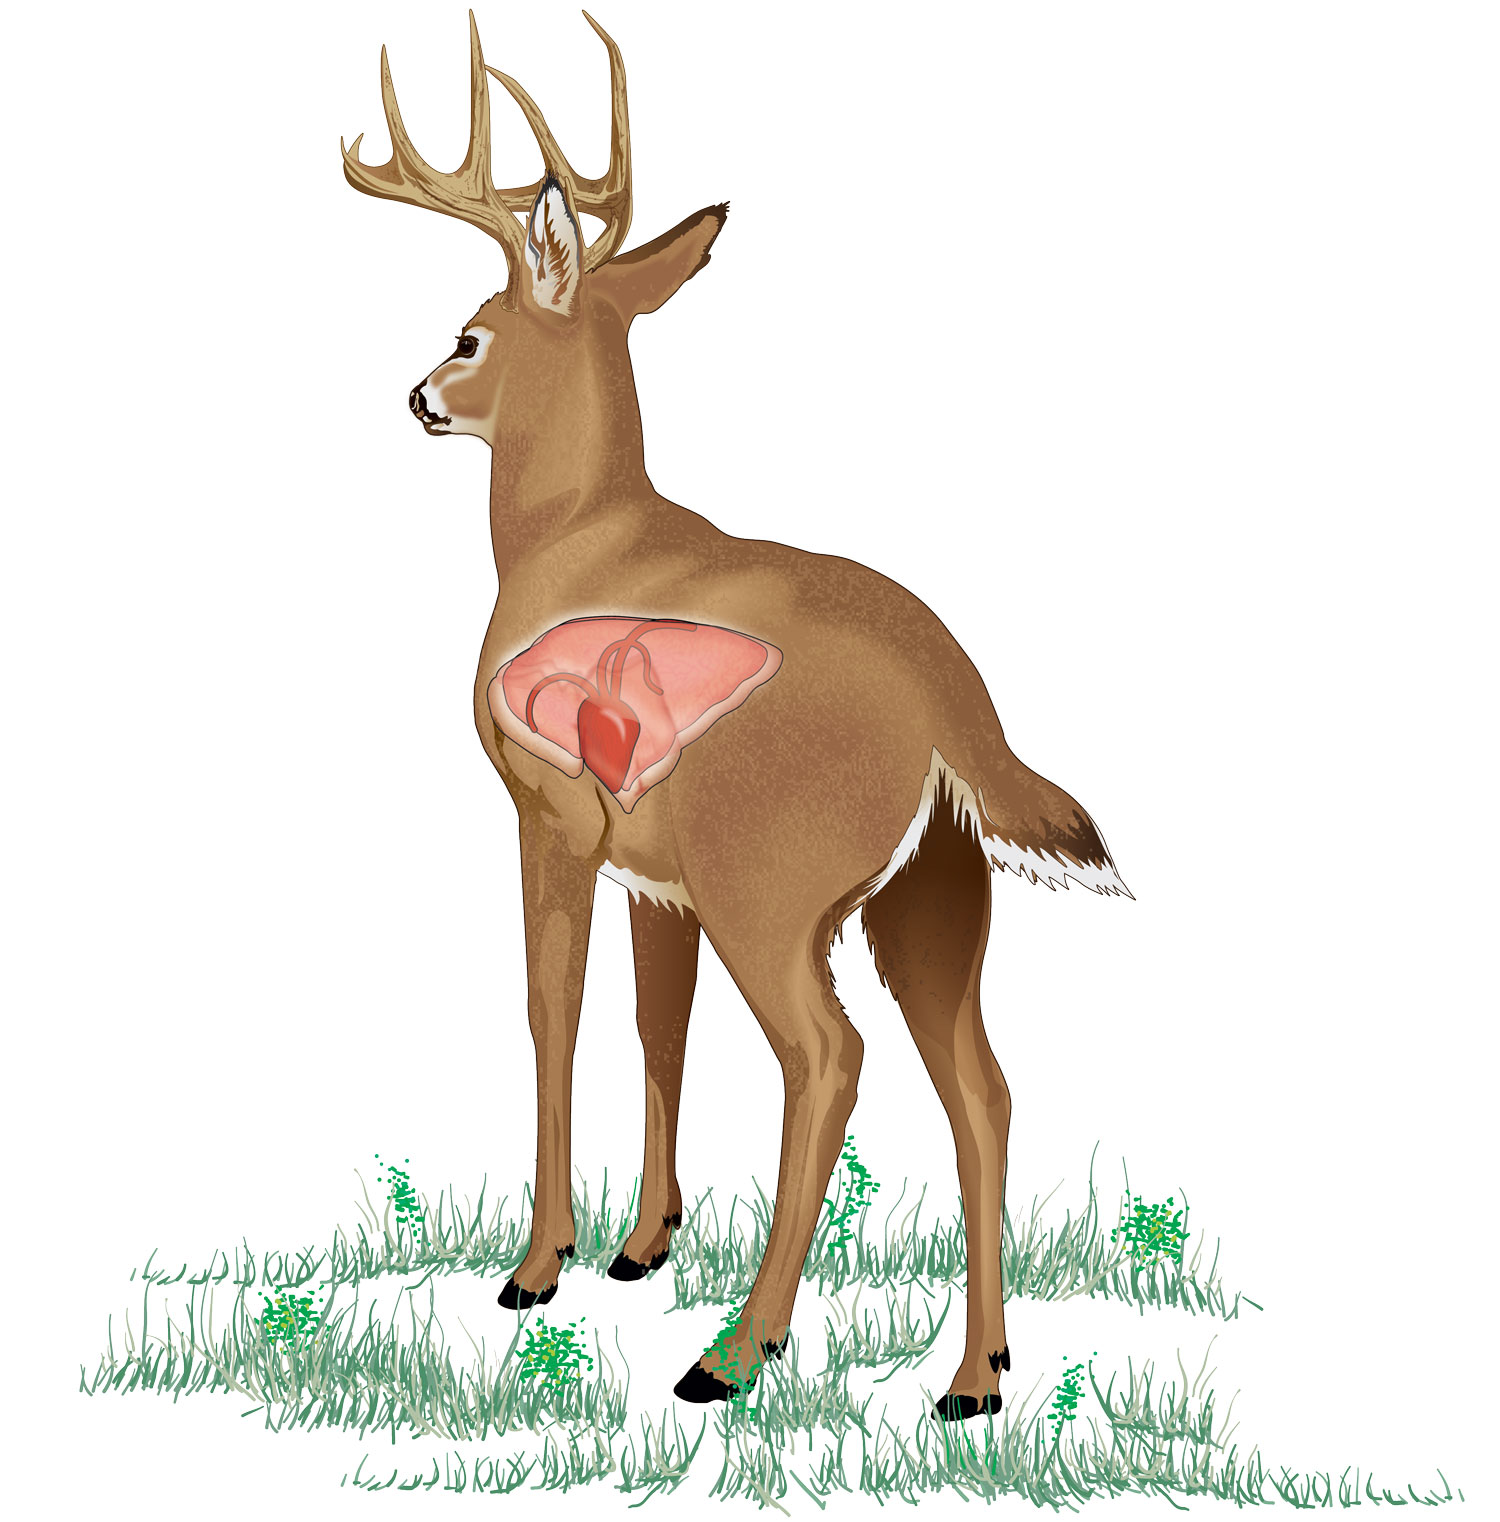
Shot Angles: Quartering-Toward
The quartering-toward shot angle is when the animal is facing toward you but at an angle. Because the animal is typically looking your way, it most likely will spot your movements.
- Firearm: The quartering-toward angle presents a clean shot to the vital organs. A shot can be taken at this angle if the gun is already trained on the animal. For an effective hit, aim at the front of the shoulder of the near front leg. Caution: A light bullet may deflect off the shoulder bones of large game, such as elk, deer, or large bears. Be certain to use a firearm and ammunition adequate for the game you hunt and the angle of shot you might select.
- Bow: This angle offers a poor shot opportunity and should not be taken. Heavy shoulder bones shield the majority of vital organs from broadhead-tipped arrow penetration. Also, bowhunters should never fire an arrow at an animal that is looking at them.
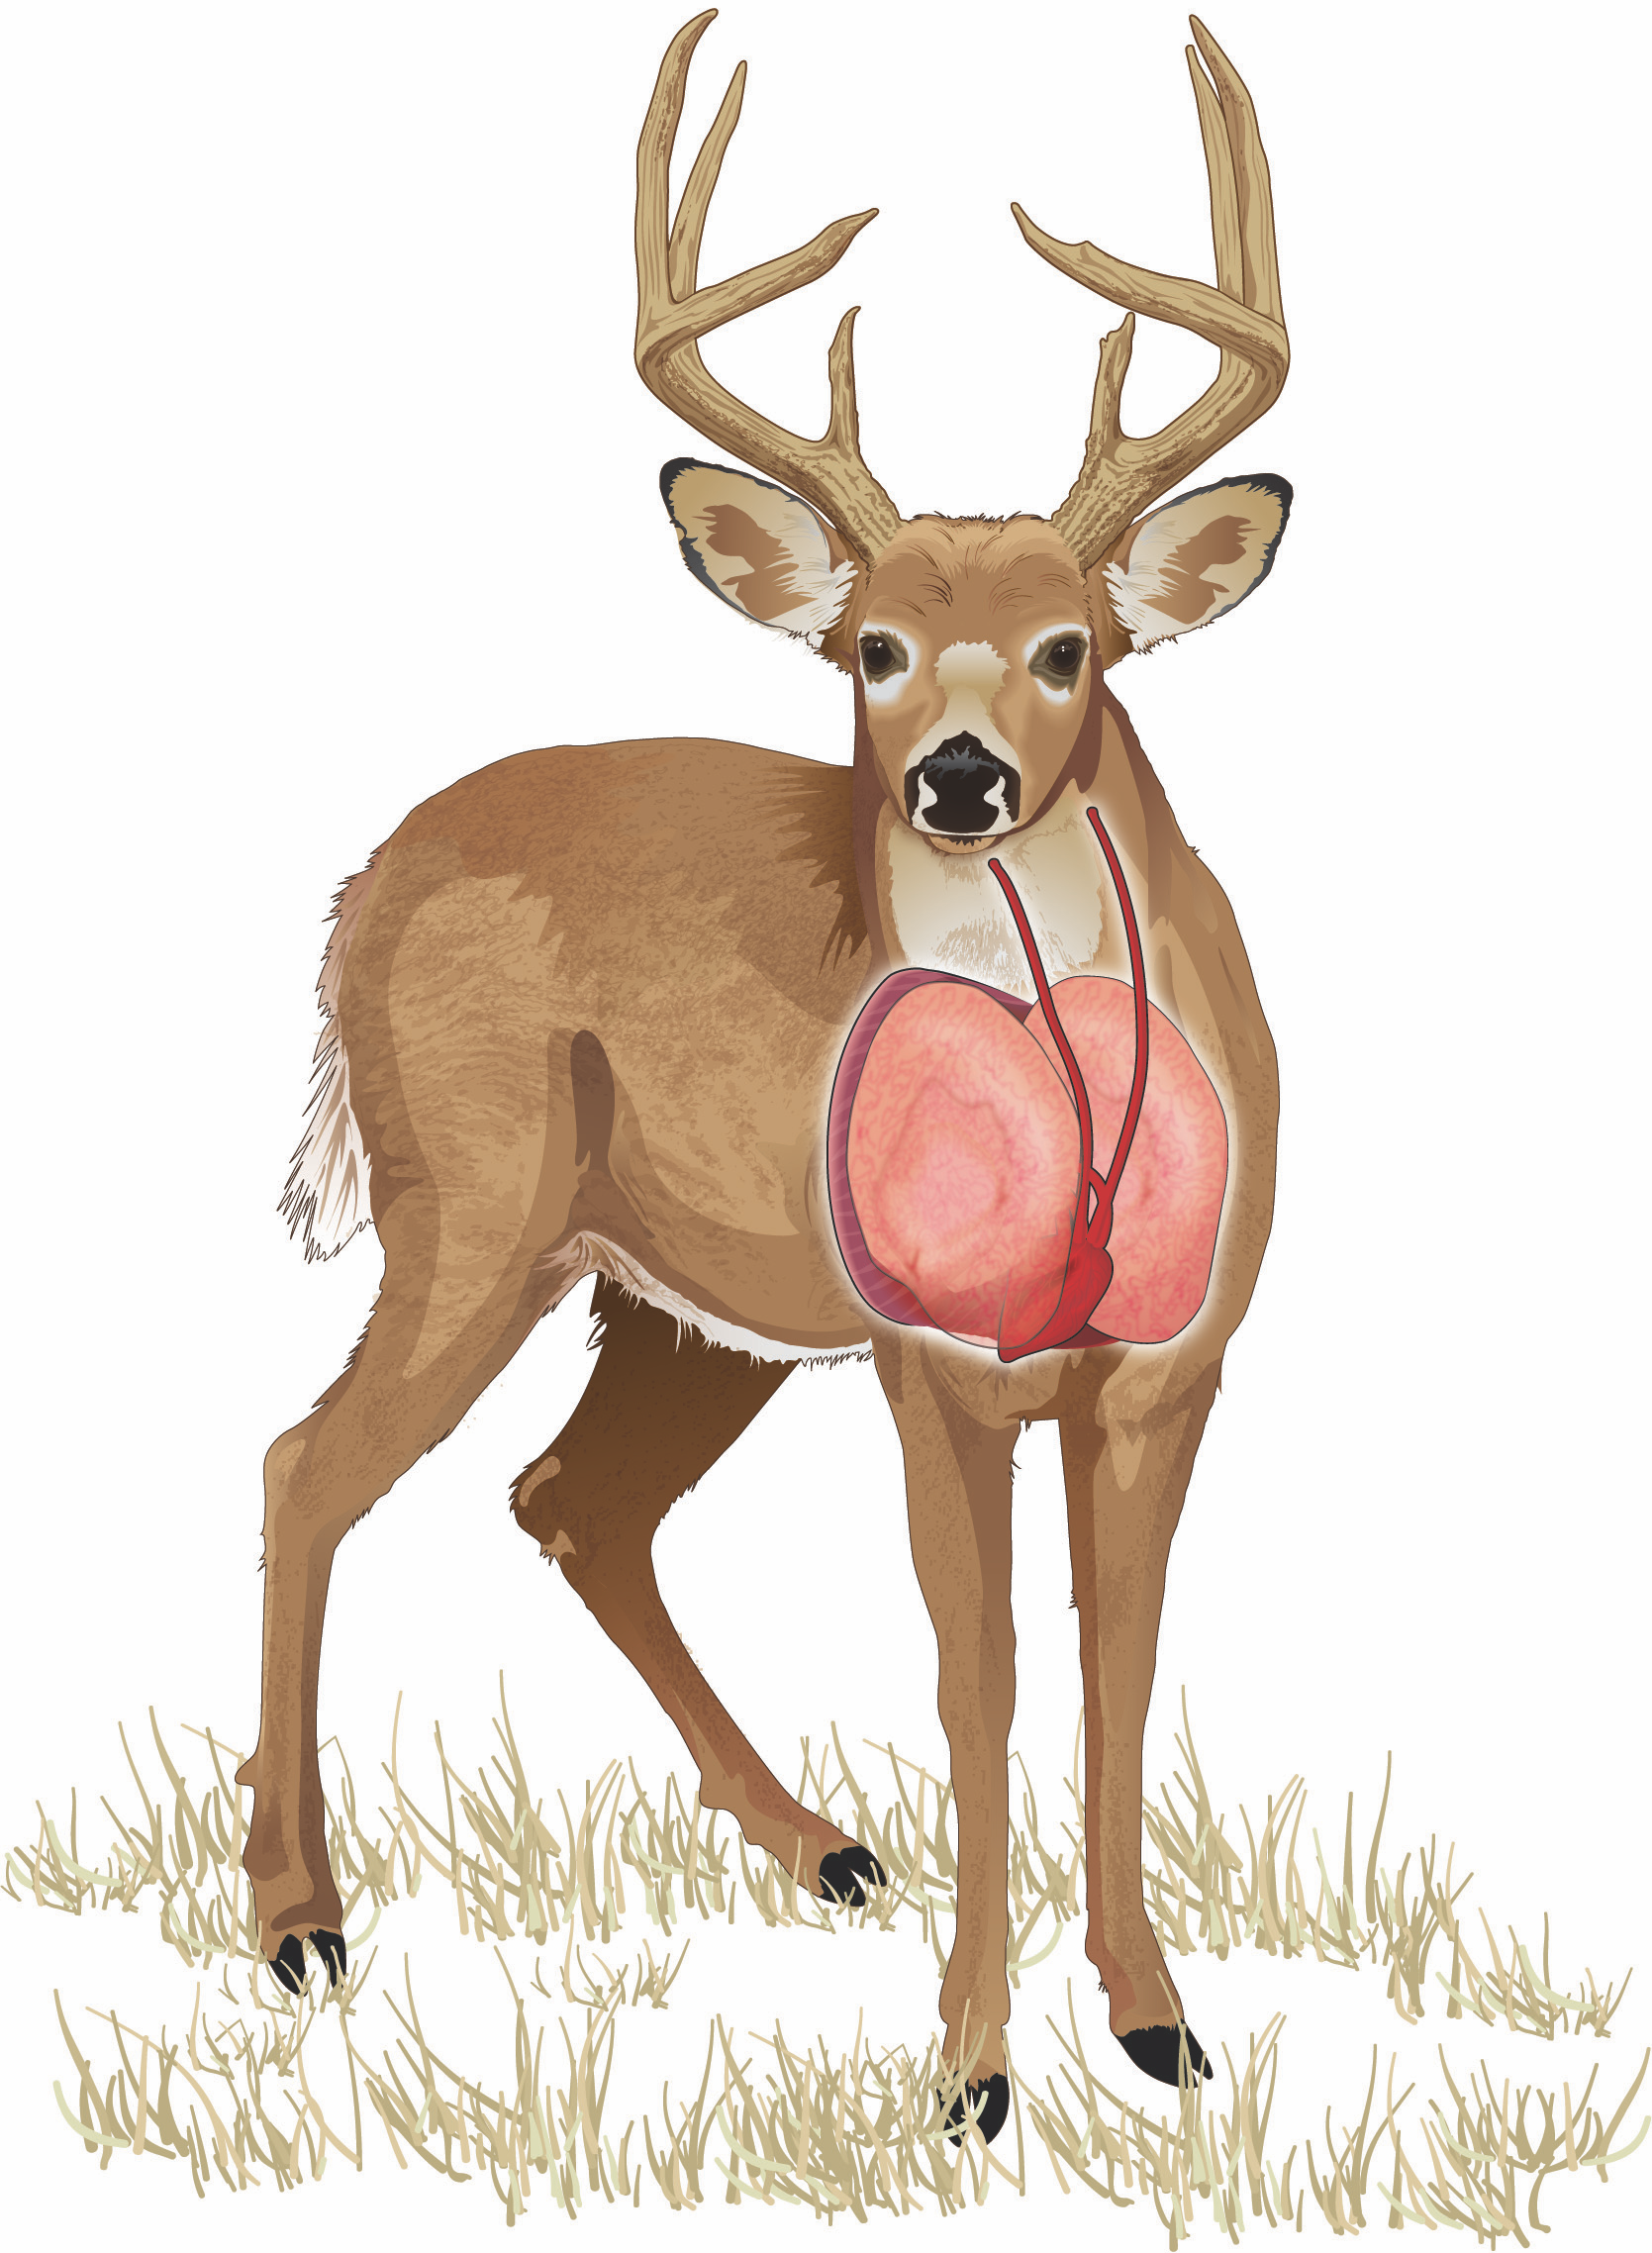
Shot Angles: Head-On
The animal will certainly detect your movements with a head-on shot angle.
- Firearm: A head-on shot can be effective if you have an adequate firearm and your firearm is already positioned for the shot. However, head-on shots rarely result in a clean kill and ruin a lot of meat. Aim at the center of the chest to hit the vital organs.
- Bow: These angles offer very poor shot selection and should not be taken. Heavy bones in front and muscle mass and non-vital organs in back block penetration of the main vital areas.
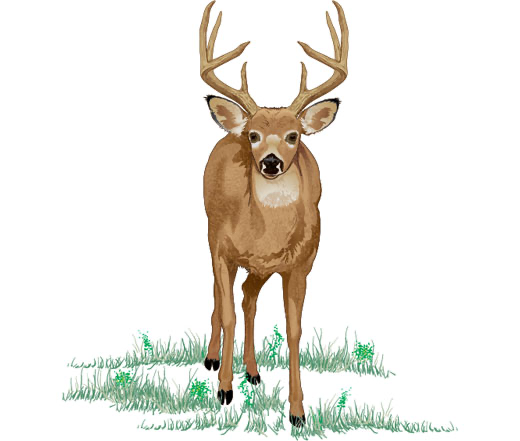
Shot Angles: Rear-End
The rear-end shot should not be taken by hunters using firearms or bows. It’s difficult to hit a vital area on an animal that is running or moving straight away from you. Rather than risk crippling the animal or ruining the meat, wait for a better shot.
Trailing Wounded Game
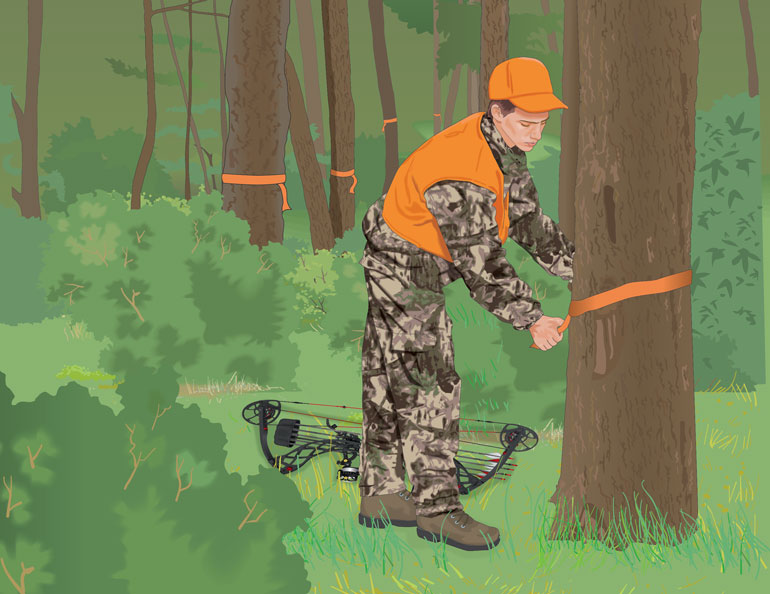
It is a hunter’s ethical responsibility to stop the hunt and search for any wounded animal.
- You should wait for at least a half-hour to an hour before trailing a deer, unless the downed deer is in sight.
- Make a practice of carefully observing every movement of a game animal after you shoot it. Investigate the ground and trail after shooting before assuming you missed.
- Once at the site of the shot, look for signs:
- Blood on the ground or vegetation
- Broken twigs or branches, or scattered leaves
- A “dew” line if early in the morning
- Tracks
- Hair, meat, or bone fragments
- Downhill trails, especially toward water
- If you lose a trail, search in a circular or grid pattern, and try to pick up the trail again.
- Use fluorescent orange flagging to mark the blood trail in case darkness or weather forces you to quit the search and return the next day. Marking the blood trail also shows where to look for more signs if you lose the trail. Be sure to remove the orange flagging after use.
Hunter’s Tip
A clean kill improves the flavor of game meat. A wounded animal that has to be chased down yields strong-flavored meat because waste products, produced by stress, accumulate in the flesh.
Approaching Downed Game
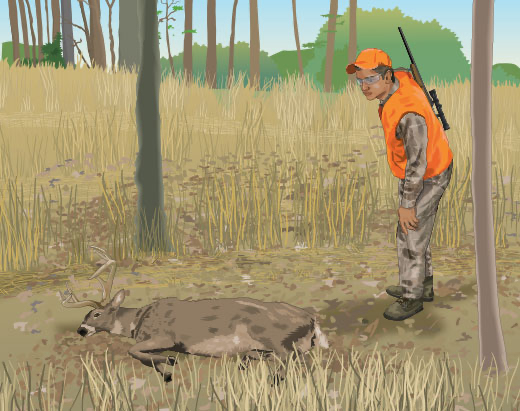
A downed deer or other large animal should be approached carefully from above and behind the head.
- If the animal appears to be dead, wait a short distance away for a few minutes. Watch for any rise and fall of the chest cavity.
- Notice whether the eyes are closed—the eyes of a dead animal are usually open. You can be certain that the animal is dead if the eye doesn’t blink when touched with a stick.
- If the animal is still alive, it should be finished with a quick shot to the base of the ear. If you wish to mount the head, place your shot in the heart-lung area. For bowhunters, the only option is placing an arrow in the heart-lung area.
- Once the animal is dead, follow the state regulations for reporting or recording a kill. Some states require you to tag the animal immediately and indicate the date of the kill. Then begin field dressing.
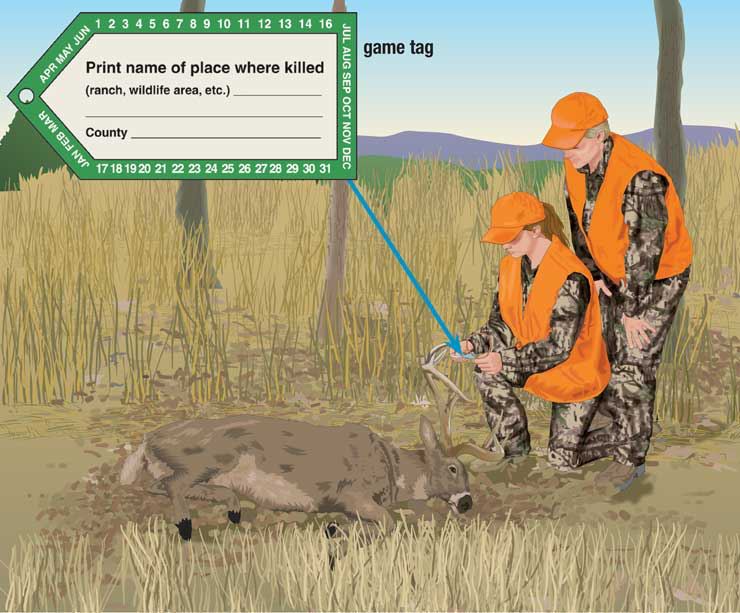
Topic 4: Field Care of Game
Field Care Basics
The way you handle game after it’s harvested can have a significant impact on the quality of the meat.
- The growth of bacteria is the cause of spoiled meat.
- Three factors contribute to bacteria growth.
- Heat: Heat is the number-one concern. Bacteria grow rapidly in a carcass, especially if it’s allowed to stay warm. Meat begins to spoil above 40° Fahrenheit. The higher the temperature—and the longer the meat is exposed—the greater the chance of spoilage. This is particularly true with large game.
- Moisture: Moisture also encourages the growth of bacteria.
- Dirt: Dirt can introduce bacteria.
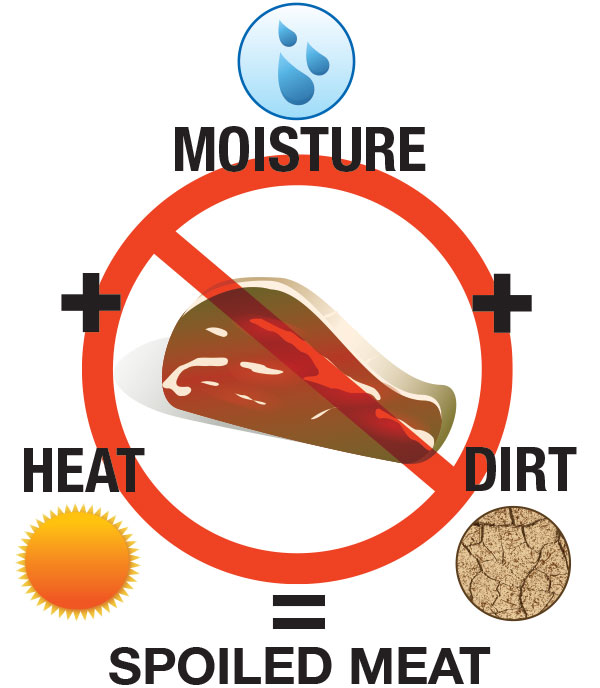
Field Dressing Techniques
Basic field dressing techniques help cool game by removing entrails. This lowers body heat by allowing air into the body cavity.
- As a rule, it’s best to field dress immediately.
- When cooling the body, use available shade. Hang deer, if possible. For larger animals, such as deer, elk, and moose, you should prop the carcass open with a clean stick to allow air to circulate.
- In warm weather, it’s helpful to place squirrels and doves in a cooler after dressing, as long as they remain dry.
- Dispose of entrails carefully. Don’t leave them lying by the side of a road or near a residence where they can be dragged home by a dog.
- Keep meat clean by covering it with cheesecloth. This also protects it from flies, which lay eggs in exposed flesh. Rubbing meat with black pepper also will repel insects. If you have to drag the game to camp, try to keep dirt and debris out of the chest cavity.
- Because moisture damages meat, don’t use excessive amounts of water to wash the cavity. Allow it to dry.
- If you plan to process the animal yourself, skin the animal as soon as possible to allow the carcass to cool.
- Wearing latex gloves while field dressing helps protect you from wildlife diseases.
Important
Hunters use harvested game to provide meat for the table. Harvested game should never be wasted.
A Game Care Kit
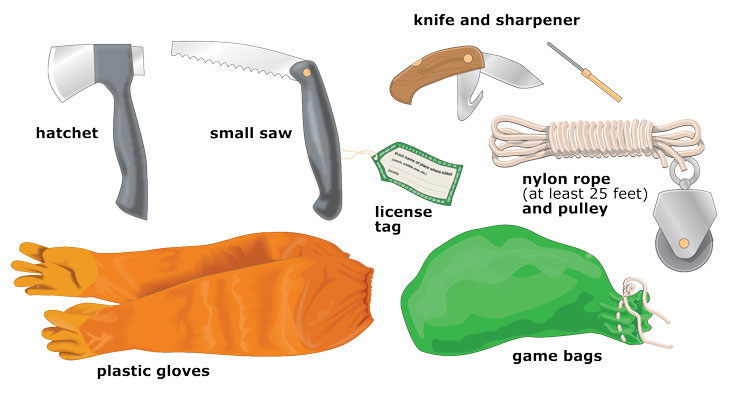
Other typical items include:
- Black pepper to repel insects
- Cheesecloth bags for organs you plan to use as meat (heart, liver)
- Cooler and ice
- Disposable plastic gloves
- Fluorescent orange flagging
- Foil
- Gambrel and pulley system
- Hand towels
- Large bag for caped or trophy head
- Plastic bags for cleanup
- Plastic or cotton gloves
- Salt (non-iodized) for hide care
Field Dressing Larger Game
Here are some additional tips for dressing large game.
- Because it’s harder to move larger animals, you may need to skin and quarter the animal to pack it out, particularly in a remote area.
- If you’re unable to hang the animal for skinning, begin by making a lengthwise cut and removing one side of the hide. Then turn the animal onto the skinned hide, and skin the other side.
- To keep dirt off the meat, use the inside of the removed hide as a protective mat as you quarter the animal.
- Put each quarter in a game sack and attach the sacks to a backpack frame for the hike out.
Transporting Game
Keep the dressed game cool and free of insects.
- A sure way to ruin meat—as well as earn the disdain of non-hunters—is to tie the animal to the hood or roof of a car, where it’s exposed to heat, exhaust fumes, road salt, and airborne dust.
- If you’ve quartered the animal, pack the quarters in ice chests—don’t process the deer beyond quartering until you reach your final destination. Be sure to keep proper “evidence of sex” if required by your game laws.
- Most hunters take their game to a commercial meat cooler, where a typical white-tailed deer can be properly aged up to three or four days at 40° Fahrenheit.
Important
When transporting game, be sure to keep it covered to avoid offending others.
Unit 5: Primitive Hunting Equipment and Techniques
Topic 1: Know Your Muzzleloader
Introduction to Primitive Equipment
Primitive equipment includes the muzzleloader firearm, the bow and arrow, and the crossbow. Today, this equipment is sought both as collector’s items and used for sporting purposes.
Parts of a Muzzleloader Firearm
Muzzleloader is the term given to early firearms because they are loaded from the muzzle or open end. Shown here are the parts of one type of muzzleloader—a muzzleloading flintlock rifle.
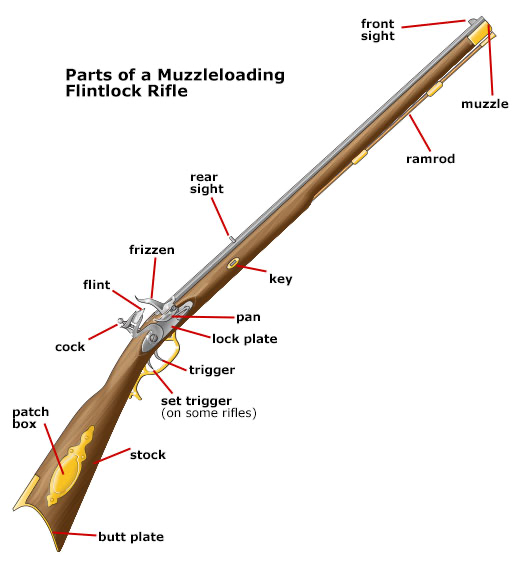
Muzzleloader Locks
On these early firearms, locks played the role of modern-day actions. Matchlock and wheel lock muzzleloaders are rare and valuable, but they also may be unsafe to use. Flintlocks and percussion locks are the muzzleloaders typically used for shooting competitions and for hunting. They are generally less expensive, lighter, more reliable, and easier to load and maintain than matchlocks and wheel locks.
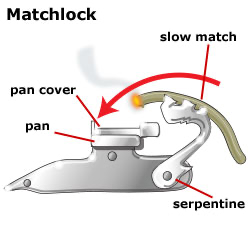
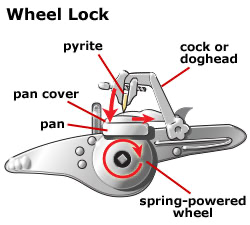
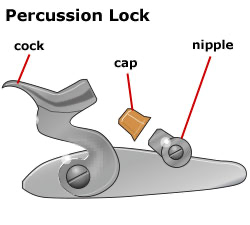
In-Line Muzzleloaders
In the in-line muzzleloader, either primer or a percussion cap is placed on the nipple or breech plug. An ignition system that is in direct alignment with the bore of the firearm causes the cap to ignite the black powder charge, and the gun fires.
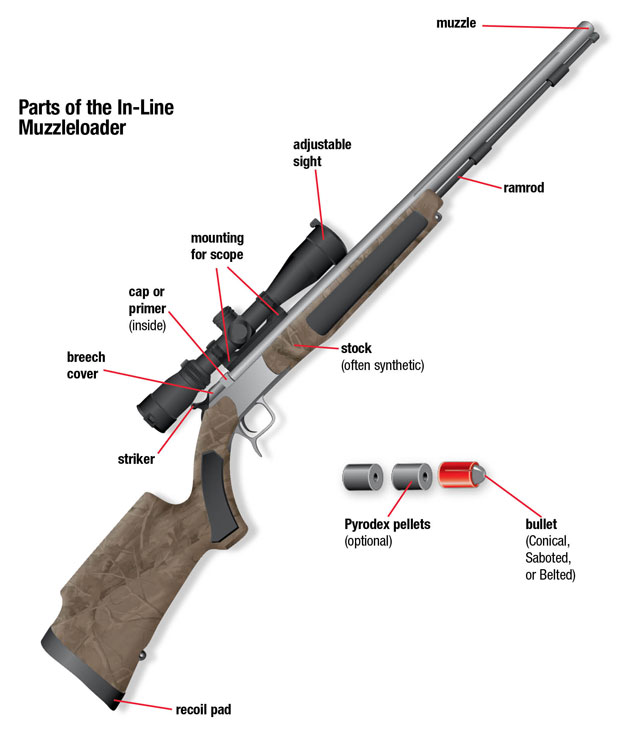
Muzzleloading Rifles, Shotguns, and Handguns
Muzzleloaders are most commonly rifles. However, there are also smooth-bored muzzleloaders—shotguns. Shotgun muzzleloaders can have either a single barrel or double barrels joined side-by-side. When loading the double-barreled muzzleloader, it’s critical to avoid putting the two loads down the same barrel. Double-barreled guns usually have two locks, one for each barrel. This allows the shooter to fire each barrel separately before the gun is reloaded. Most double-barreled guns were designed with two triggers.
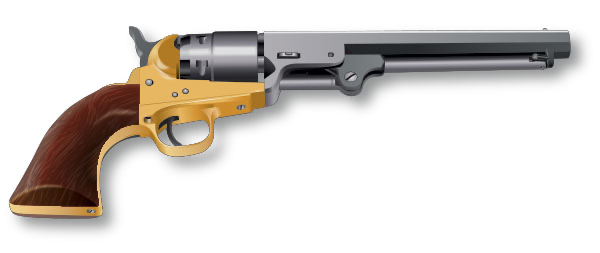
Muzzleloading handguns come as both pistols and revolvers. Pistols are mainly single-shot. The revolvers contain multiple-shot chambers. Chain firing muzzleloading revolvers can be dangerous. When the chamber round is fired, it produces sparks that could accidentally ignite loads in another cylinder(s). Therefore, be sure to protect each load in the cylinder with a coating of grease to prevent sparks from entering the open end of the other cylinders.
Powders for Muzzleloaders
Black powder is the only type of powder that should be used in muzzleloaders. However, synthetic substitutes, such as Pyrodex®, also can be used. Be sure to use only approved substitutes. Don’t use modern-day smokeless powders in black powder firearms. Smokeless powders can cause serious injury if used in muzzleloaders.
- Black powder is made of potassium nitrate (saltpeter), sulfur, and charcoal. When ignited, it causes a dense cloud of white smoke. It comes in four sizes or granulations.
- Fg: Coarse grain typically used in cannons, rifles larger than .75 caliber, and 10-gauge shotguns or larger
- FFg: Medium grain typically used in larger rifles between .50 and .75 caliber, 20-gauge to 12-gauge shotguns, and pistols larger than .50 caliber
- FFFg: Fine grain typically used in smaller rifles and pistols under .50 caliber and smaller shotguns
- FFFFg: Extra-fine grain typically used as a priming powder in flintlocks
- Black powder substitutes can be used in amounts equal to black powder, but loading may vary. Be sure to get instructions from a qualified gunsmith for loading procedures. Substitutes are not recommended for use in flintlocks because they may not ignite from sparks as easily.
Pyrodex is a registered trademark of Hodgdon Powder Co., Inc.


Projectiles for Muzzleloaders
Three types of projectiles—the round ball, the bullet, and shot—are used in muzzleloaders. Most are melted and cast from pure lead.
- Round balls are used mainly for target practice but also can be used for hunting.
- Bullets are preferred for hunting because they are generally more accurate at certain ranges.
- Shot pellets are designed to spread, just as with today’s shotguns.
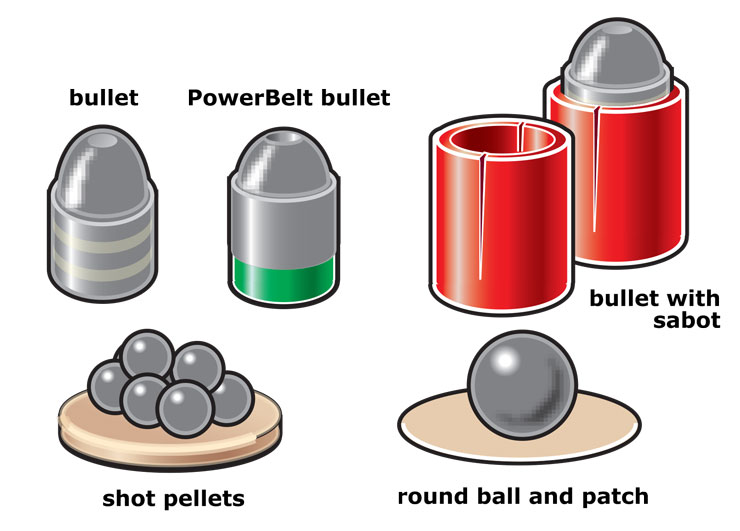
Topic 2: Basic Muzzleloader Safety and Skills
Basic Muzzleloader Safety
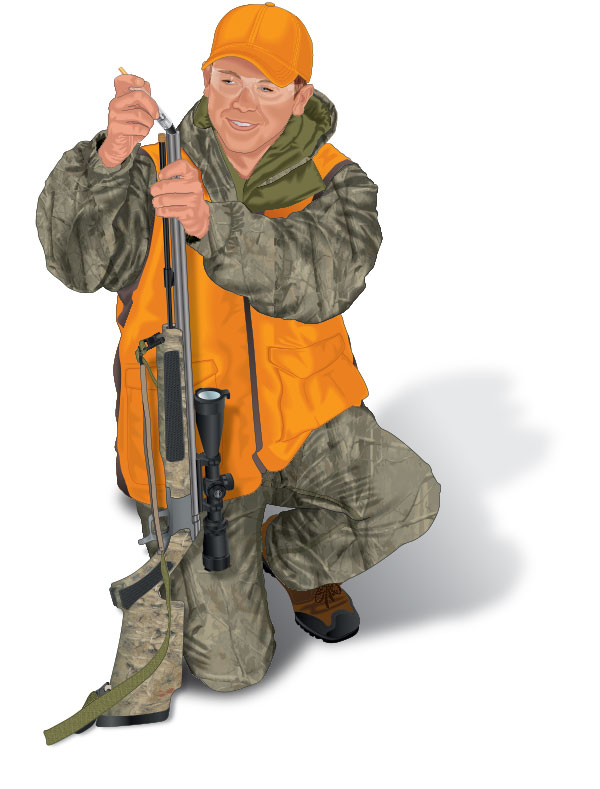
Muzzleloaders take significantly more knowledge to operate than modern firearms. They also present greater risks. Several rules must be followed to ensure safe operation.
- Keep the muzzle pointed in a safe direction. Do not lean over, stand in front of, or blow down the muzzle.
- Use only black powder or a safe substitute in a muzzleloading firearm.
- Wait until you’re ready to fire before you prime or cap a muzzleloader.
- Always wear shooting glasses and ear protection when shooting a muzzleloader; a long-sleeved shirt is also advisable.
- Never smoke while shooting or loading or when near a powder horn or flask.
- Load a muzzleloader directly from a calibrated powder measure—do not load from a horn, flask, or other container. A loose spark or glowing ember in the barrel can cause the powder to explode.
- Load only one charge at a time.
- Unload a muzzleloader before bringing it into your home, camp, or vehicle.
- Stay with your charged muzzleloader at all times.
Loading a Muzzleloader
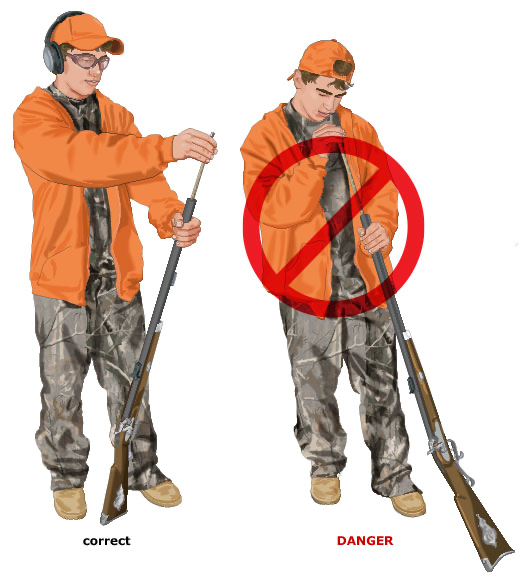
Loading or charging a muzzleloading firearm presents some special concerns because it requires the muzzle to be pointed upward.
- For rifles, position the butt on the ground between your feet. You should be facing the underside of the barrel. The muzzle should be pointed upward and away from your body. Never work directly over the muzzle.
- Determine if the gun is already loaded by checking the barrel with a marked ramrod, which has an “unloaded” or empty marking. If you aren’t sure, consult an experienced muzzleloader user or gunsmith.
- Measure out the proper amount and type of powder using the calibrated powder measure. Replace the powder flask’s cap, and swing the flask to the other side of your body. Pour the powder into the barrel from the measure. Tap the barrel to make sure all powder falls to the breech end.
- Center a lubricated precut patch over the muzzle. You can lubricate the patch using a manufactured lubricant or with saliva by placing it in your mouth. Lay the ball on the patch with the sprue or flat side up, if the ball comes with this feature. Then seat the ball and start it down the barrel using the short starter.
- Use the longer ramrod to push the ball the rest of the way, making sure it’s seated well on the powder charge. Push the ramrod in short strokes, gripping it just a few inches above the muzzle. If you use longer strokes, you might accidentally snap the rod and injure your hands or arm. Your ramrod should be marked to show when the ball is properly seated over a specific load, such as 70 grains of FFFg powder.
Steps for Loading a Muzzleloader
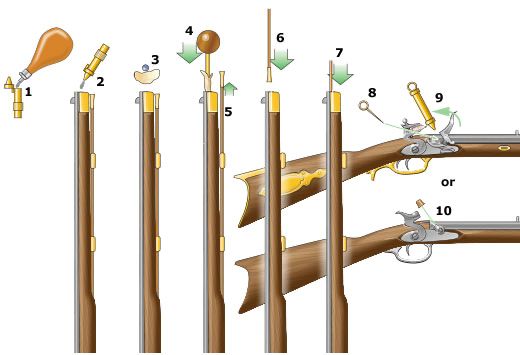
- Measure powder charge.
- Pour measured powder down barrel.
- Place patch and ball on muzzle.
- Tap ball into barrel with starter.
- Take out ramrod.
- Ram ball down barrel.
- Be sure ball is completely seated.
- Clear vent hole with pick if necessary.
- On flintlock muzzleloader, pour powder into pan and close frizzen.
- On percussion lock muzzleloader, place cap on nipple.
Steps for Loading an In-Line Muzzleloader
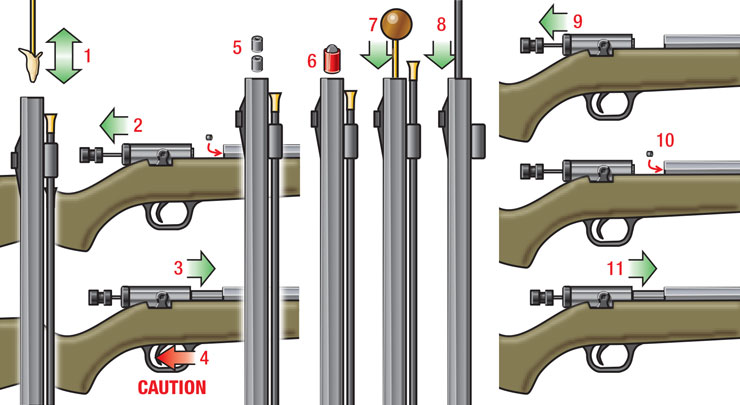
- Check for load and swab bore dry.
- Open breechblock to install cap/primer.
- Point in safe direction and close block.
- Clear channel by firing cap.
- Drop in powder or pellets.
- Place bullet in muzzle.
- Use starter to push bullet into muzzle.
- Use ramrod to seat bullet completely.
- Open breechblock.
- Install cap or primer.
- Close block and put on safe or fire.
Unloading a Muzzleloader
There are three ways to unload a muzzleloader.
- Unload a muzzleloader by discharging it into a suitable backstop. Do not fire into the air or into the ground at your feet in case the projectile ricochets.
- Use a CO2 discharger to clear the barrel.
- Percussion Lock Muzzleloader: Slip the discharger over the nipple.
- Flintlock Muzzleloader: Place the discharger against the touchhole.
- Modern In-Line Muzzleloader: Remove the breech plug. Then simply push the projectile and powder out the rear of the barrel.
When a muzzleloader is unloaded, place your ramrod or loading rod in the barrel before leaning the firearm against a good rest—this will prevent debris from falling down the barrel and blocking the touchhole.
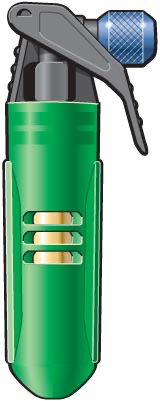
Important
If your muzzleloader has not fired in 30 seconds, re-prime the pan and try again. Wait another 30 seconds. If the muzzleloader still fails to fire, use a CO2 discharger to remove the projectile and powder charge. If the CO2 discharger fails, consult your owner’s manual for proper procedures to unload your firearm safely.
Firing a Muzzleloader
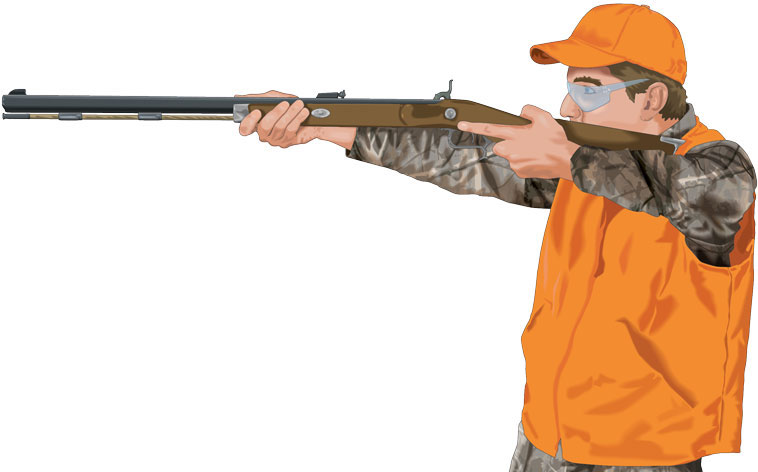
The firing procedure depends on the type of muzzleloader you are using.
- Percussion Lock Muzzleloader: When you’re ready to fire the muzzleloader safely, place the percussion cap on the nipple. Be sure that your surroundings and your backstop are safe. Then aim and fire.
- Flintlock Muzzleloader: When priming a flintlock, pull the hammer to a half-cock position and open the priming pan cover. Check your flint, making sure the setting is tight and properly adjusted. Insert a vent pick or fine wire into the barrel’s touchhole to make sure the opening is clear. With your pan primer, fill the pan about three-fourths full of FFFFg powder. Close the frizzen and pull the hammer to full cock when you’re ready to fire the shot safely.
After firing, place the hammer in the half-cock position and swab the barrel to remove sparks that might be inside.
Muzzleloader Hang Fire Situations
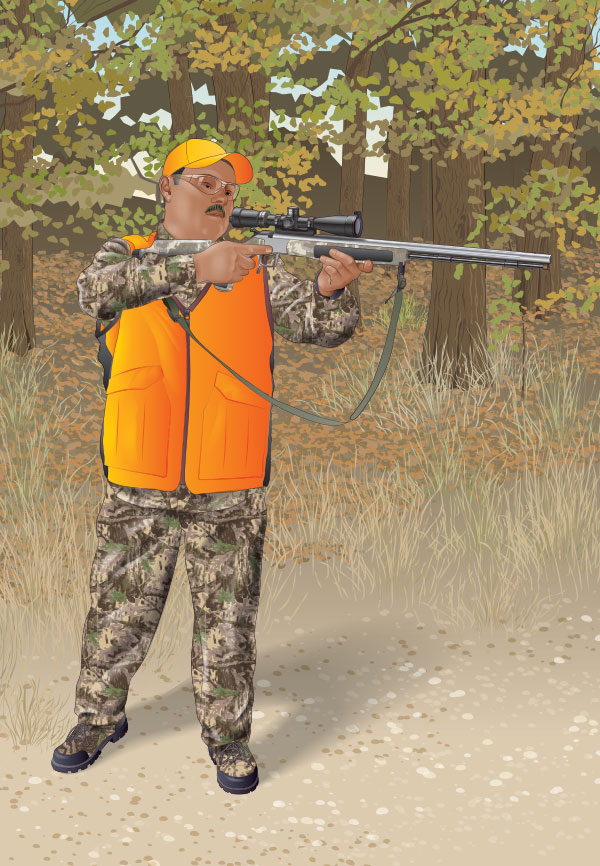
Sometimes a muzzleloader will not fire immediately when the trigger is pulled. This is known as “hang fire” and requires great caution because the gun might fire some time after the cap or flint created the initial sparks.
- Keep the gun pointed in a safe direction, preferably downrange.
- Don’t take it anywhere that it could injure someone or damage property if it fires.
- If a muzzleloader doesn’t fire properly, get help from an experienced shooter to unload it using a ball discharger.
Cleaning a Muzzleloader
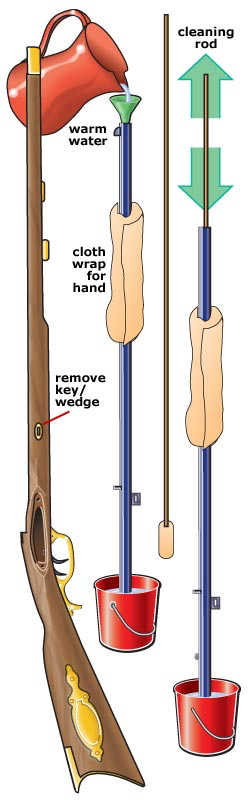
Firing a muzzleloader leaves a corrosive residue inside the barrel that causes pitting and reduces accuracy. The buildup of residue, called fouling, also will make loading difficult.
- To avoid fouling, swab the barrel with a moist patch after each shot. The patches or cleaning rags used to wipe the barrel must be the correct size and should be made of cotton or approved synthetic materials. Follow the recommendations of retailers who sell muzzleloaders or those who regularly use muzzleloaders.
- Thoroughly clean a muzzleloader after each shooting session. Black powder residue can damage the barrel if left overnight.
- Clean the gun’s lock periodically. Normally it’s held in place by one or two bolts. Once the lock has been removed, scrub both sides with an old toothbrush and hot water. Make sure the entire lock is completely dry, and then lightly oil and replace it.
Topic 3: Know Your Bow and Arrow
Speed and Range of Modern Bows
While modern bows can shoot arrows up to 400 yards at speeds of more than 200 miles per hour, the bow is a short-range hunting tool. Any bow can be dangerous at any range and should be handled responsibly. Shots are usually limited to 40 yards or less; and at this range, the arrow penetrates and can even pass through an animal. To ensure accuracy, most shots are taken at 15 yards.
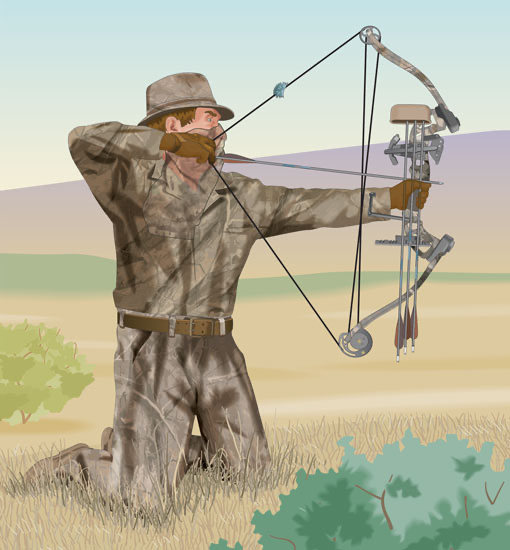
Common Bow Types: Longbow (Stick Bow)
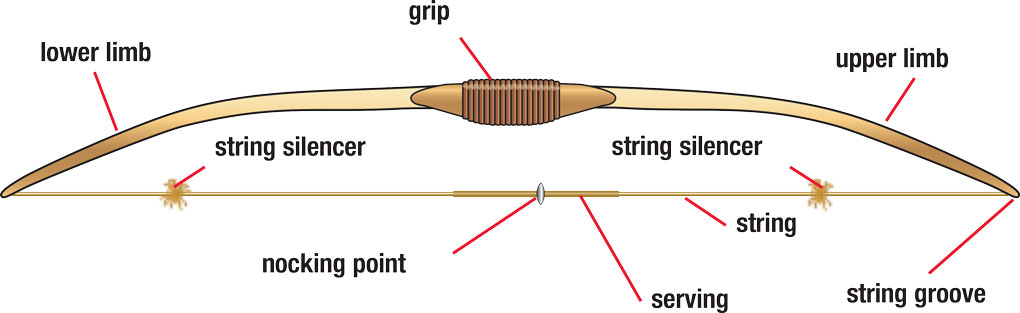
- The “traditional” bow, which has straight limbs that form an arc when strung
- Used by those interested in traditional shooting with little additional equipment
Important
Proper bow selection and fit are essential to your accuracy and performance when bowhunting.
Common Bow Types: Recurve Bow
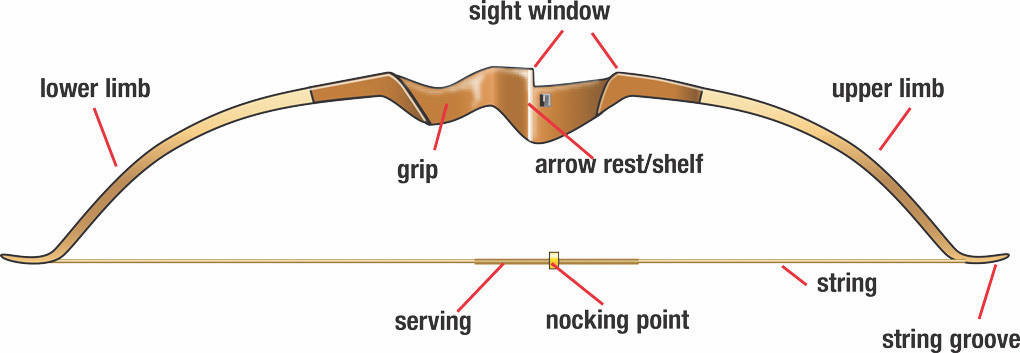
- Much like the longbow, but the limbs curve back away from the belly of the bow, which can provide more power in a shorter bow than the longbow
- A popular choice because it’s smooth and quiet
Common Bow Types: Compound Bow
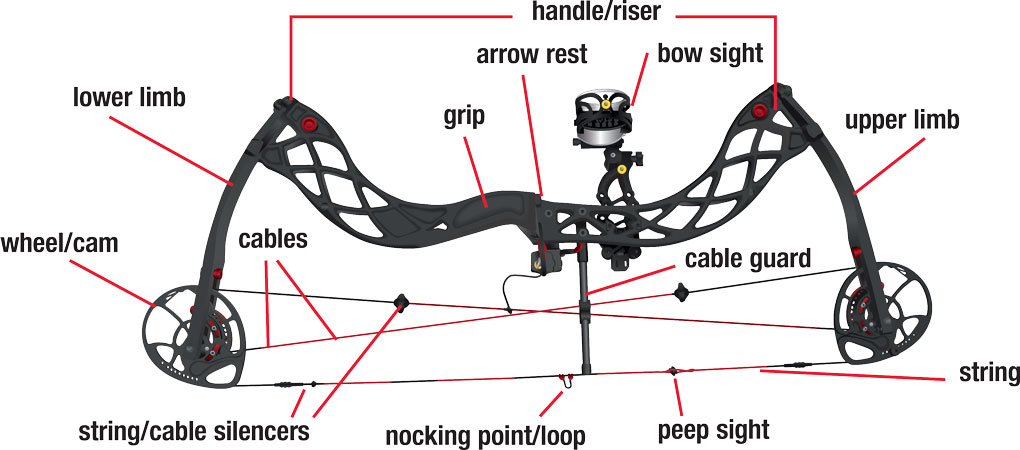
- The most popular bow for both hunting and target shooting
- A bow with many styles, but they work basically the same way; wheels and cables attached to the limbs make it easier to hold at full draw (pulled completely back) and able to propel an arrow faster than either a longbow or recurve bow
Stringing a Bow
Bowstringer: The safe and easy way to string a recurve bow or longbow is to use a bowstringer.
- The push-pull or step-through method can be hazardous to yourself or your bow.
- A bowstringer is simply a strong cord with a loop or pocket at each end that fits over the limb tip of recurve bows and some longbows. By standing on the loose middle of the cord after it’s attached to the tips, the limbs can be flexed as the handle is pulled. This allows the bowstring to be slipped safely into place.
Bow Press: To replace compound bowstrings, you must use a bow press. A bow press is used to place and hold tension on the limbs, allowing the strings to be changed. Inexperienced bowhunters should have a qualified dealer or individual replace the string on a compound bow.
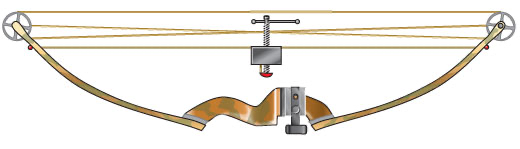
Parts of an Arrow
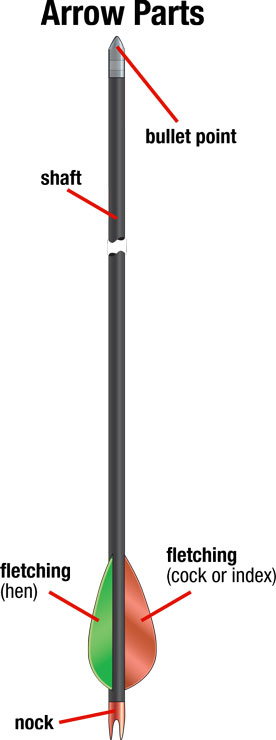
Arrows have four parts.
- Shaft: The long spine of the arrow. Modern arrow shafts are made of wood, fiberglass, aluminum, or carbon. The arrow, regardless of shaft material, must have the correct stiffness to match the bow. As an arrow is released, the shaft bends before straightening in flight. Incorrect stiffness will cause the arrow to fly erratically and inaccurately.
- Fletching: The plastic vanes or feathers on an arrow. Fletching creates wind drag and also can cause the arrow to spin similar to a rifle bullet, providing stability and accuracy in flight. Fletching is made up of three or more vanes or feathers. One of the feathers will be a different color and is called the “cock” feather. The remaining feathers are referred to as the “hen” feathers.
- Arrowhead: The point of the arrow. Many different kinds of arrow points are available, each with a different purpose and advantage.
- Nock: A slotted plastic tip located on the rear end of the arrow that snaps onto the string and holds the arrow in position. There is a certain point on the bowstring, called the “nocking point,” where arrows are nocked. Fine tuning of this location, by moving it up or down the bowstring, is usually required.
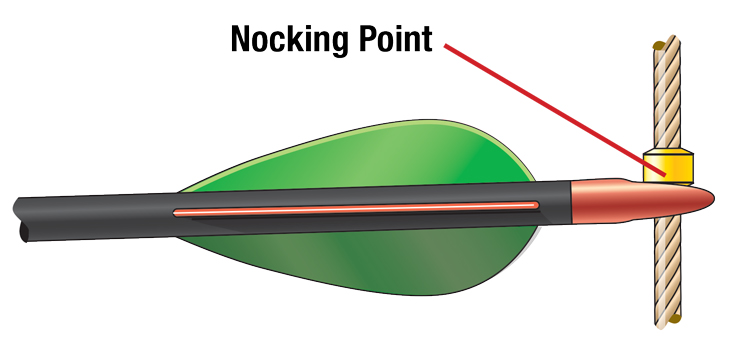
Common Types of Arrowheads: Points
Here are some common types of arrowheads.
- Bullet Point: Steel point used for target shooting and small game hunting.
- Blunt Point: Used for small game hunting and some types of target shooting; made of steel, hard rubber, or plastic.
- Field Point: Steel point used for target shooting and small game hunting.
- JUDO® Point: Designed with spring arms attached to catch in grass and leaves, preventing arrow loss; used for “stump” shooting and small game hunting.
- Fish Point: Long, barbed or spring-loaded arrowhead that spears fish and secures them until landed with an attached line.
JUDO is a registered trademark of Zwickey Archery, Inc.
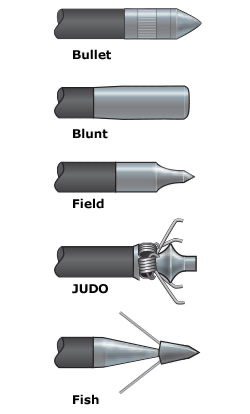
Common Types of Arrowheads: Broadheads
Broadhead: Used primarily for big game hunting. The number of steel blades it contains may vary. The only arrowhead that may be used for big game hunting is the broadhead. It must be solidly built and always razor-sharp. Many states have laws governing the minimum diameter and number of cutting edges of the broadhead used to hunt big game.
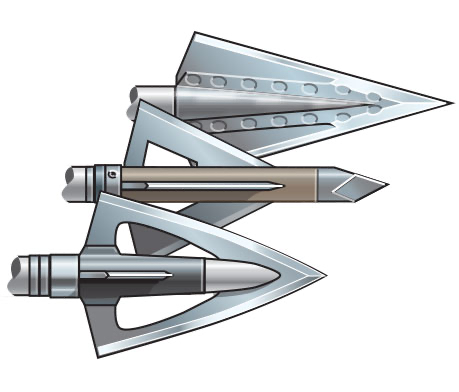
Mechanical (Expandable) Blade Broadhead: Blades are retracted close to the ferrule before the shot. Upon impact, the blades expand to expose the cutting edges. These are recommended for use only with bows rated 50 pounds or more because most require additional energy to open upon penetration.
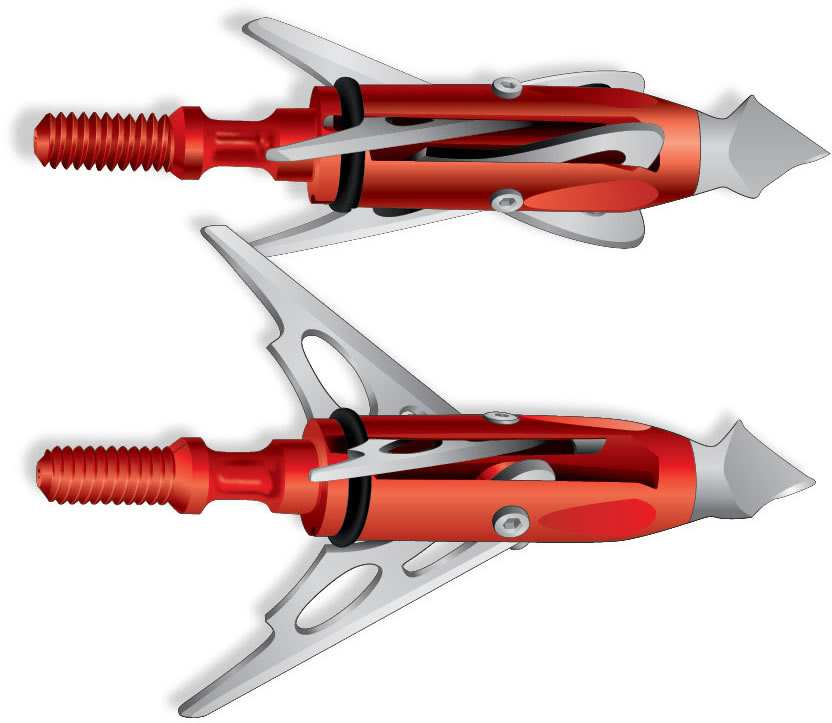
The Crossbow
A crossbow has a stock that is similar to a firearm, and it shoots shorter arrows than conventional archery equipment. These shorter arrows are sometimes referred to by the medieval term “bolts.”
Compound Crossbow
Safe use of a crossbow requires following the safety rules for both firearms and bows.
- Many states have laws which limit the use of crossbows.
- Never travel with a loaded, cocked crossbow.
- Like conventional bows, the crossbow is limited to short-range shooting.
Topic 4: Bowhunting Safety and Skills
Many states require a bowhunter education course to hunt legally with archery equipment. Even if not required, taking a course will give you an excellent start to becoming a safe and skillful bowhunter.
Before practicing or hunting, an archer must examine each arrow to make certain there are no cracks or breaks in the shaft and that the nock is in good condition. A cracked or broken nock can be replaced, but a shaft that has cracks or breaks should be discarded.
Never use a cracked arrow. The shaft may shatter on release and be driven into the shooter’s wrist or arm. Some common types of damage to look for are:
Cracks and splinters in wood arrows
Creases, dents, or cracks in aluminum arrows
Crushed sidewalls on fiberglass or graphite arrows
Preparing for Safety Before You Go Out
Many states require a bowhunter education course to hunt legally with archery equipment. Even if not required, taking a course will give you an excellent start to becoming a safe and skillful bowhunter.
- Before practicing or hunting, an archer must examine each arrow to make certain there are no cracks or breaks in the shaft and that the nock is in good condition. A cracked or broken nock can be replaced, but a shaft that has cracks or breaks should be discarded.
- Never use a cracked arrow. The shaft may shatter on release and be driven into the shooter’s wrist or arm. Some common types of damage to look for are:
- Cracks and splinters in wood arrows
- Creases, dents, or cracks in aluminum arrows
- Crushed sidewalls on fiberglass or graphite arrows
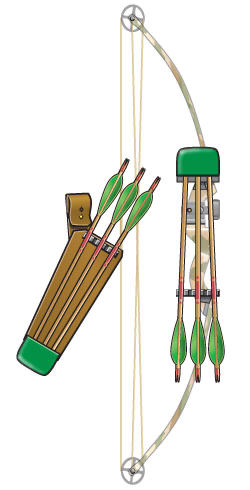
Always keep broadheads in a covered quiver.
Bow-Shooting Safety
An arrow is as deadly as a bullet, so the basic safety rules that govern firearm shooting also apply to archery. Although shooting accidents are rare among bowhunters, they do happen. Archers must obey a few common safety rules, whether on the range or in the field.
- Release an arrow only when the path to the target and beyond is clear.
- Make sure there’s something to stop the arrow if you miss—never shoot over the horizon.
- Avoid shooting an arrow in the general direction of another person. Arrows are easily deflected. A small twig, unseen by you, can cause an arrow to veer dangerously off course.
- Don’t shoot straight up. A falling arrow carries enough force to penetrate the human skull.
Carry arrows in the nocked position only when slowly approaching game—never nock an arrow or draw a bow if someone is in front of you.
Use a haul line to raise a bow and quiver into a tree stand to avoid serious injury.
Broadhead Safety
Broadheads kill by cutting blood vessels, unlike the high energy shock of bullets. Hemorrhage is typically the result.
- A responsible bowhunter will use razor-sharp broadheads and only take shots that allow a clear, close shot to the vital area of the game animal.
- Many archers’ injuries come from broadheads. Broadheads must be kept razor-sharp for hunting, which creates a safety problem if they are handled carelessly.
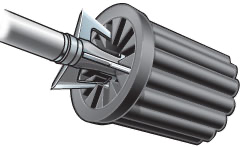
To prevent injury:
- Use a special wrench to screw on broadheads. This device covers the blades while a broadhead is being tightened on an arrow. If a wrench isn’t used, the slightest slip can cause a serious cut. When sharpening broadheads, always stroke the blade away from your hands and body.
- Keep broadheads covered with a quiver while traveling to and from the field. Many arrow injuries occur while loading or unloading equipment in vehicles.
- While dressing bow-killed game, remember that the broadhead may remain in the animal. Use great caution until all parts of the broadhead have been found.
Safety Accessories
To protect the three fingers that draw the bowstring, archers wear three-fingered gloves or finger tabs, or use mechanical releases.
A mechanical release snaps onto the string and is pulled back with the shooting hand. The archer pulls a trigger to release the string.
An armguard protects the inner part of the bow arm during release as the string snaps back. The armguard prevents the bowstring from hitting loose clothing and also helps protect the arm if an arrow breaks during release.
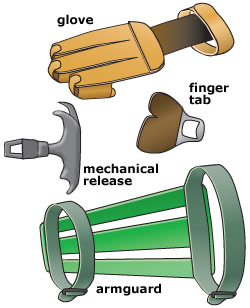
Bow-Shooting Position
Stand at a right angle to the target with your feet approximately shoulder-width apart. The stance should feel comfortable and balanced. If you prefer, you may slide your front foot back a little, creating a slightly open stance.
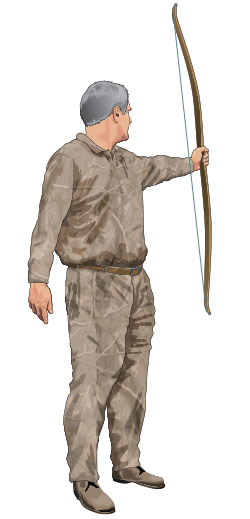
Nocking an Arrow
A nocked arrow should be positioned about a quarter inch above the arrow rest on the bow handle.
- On most bows, a small brass band called a “nocking point” is crimped onto the bowstring to mark the correct position.
- To nock the arrow:
- Grasp the arrow between the thumb and index finger of the right hand (if you’re a right-handed shooter).
- With your left hand, hold the bow parallel to the ground about waist high, string toward the body.
- Lay the arrow shaft on the bow’s arrow rest.
- Align the slot in the nock with the string, while making sure that the cock feather points up (while the bow is parallel to the ground).
- Pull the arrow back until the string snaps into the slot.
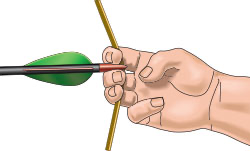
When the arrow is nocked and the bow is raised, the cock feather points to the left if you are right-handed.
Drawing and Anchoring the Bow
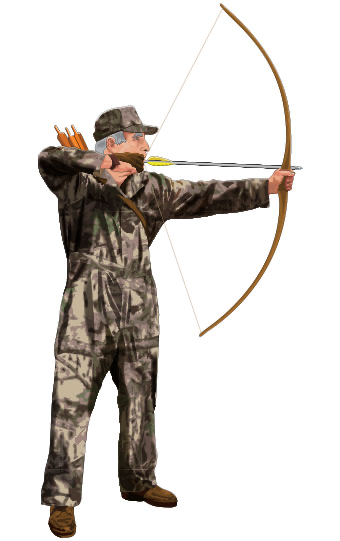
To draw the bow:
- If you are right-handed, grip the bow handle firmly in the left hand, but don’t squeeze.
- With your bow arm straight, raise the bow to a point that your arm is parallel to the ground. At the same time, draw the string back to your “anchor point” with the three drawing fingers of your shooting hand.
- The anchor point may be the corner of your mouth, your cheekbone, or your chin.
- Practice will help you determine your best anchor point—one that’s both comfortable and provides the most accurate shooting.
- Your fingers should touch the same anchor point each time you draw the bow.
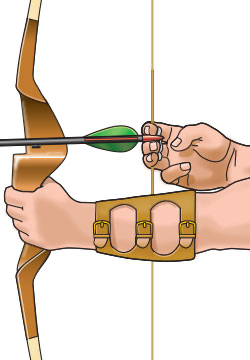
Aiming the Bow
There are two main methods for aiming bows—bow sights and instinctive aiming.
- Bow sights work best when the distance to the target is known. For instance, when hunting from a tree stand or blind, you can measure the distance to the area where you expect the game to appear. Then it’s a matter of lining up the appropriate sight pin on the target. In hunting situations where it’s hard to know the exact distance to the target, bow sights may not work well. The key to using bow sights is to practice judging distances.
- Instinctive aiming is more versatile than the bow sight method. You simply look at the intended target with both eyes open and release. You adjust the aim for different distances by instinct developed with practice. Instinctive aiming takes longer to perfect than the bow sight method, but it eliminates much of the guesswork from shooting under some hunting conditions.
Bow Sights vs. Instinctive Aiming
With bow sights, you line up the appropriate sight pin on the target.
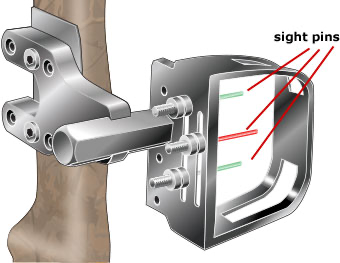
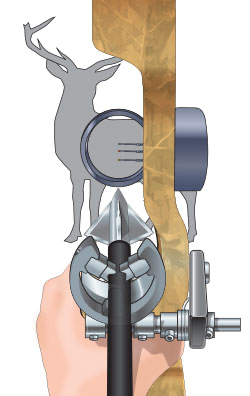
With instinctive aiming, you simply look at the intended target with both eyes open and release.
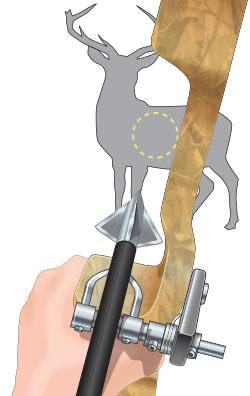
Holding and Releasing the Bow
To release the arrow:
- Allow your fingers to slip quickly away from the string. This gives the arrow a straight, stable flight.
Keep your bow arm pointed directly at the target after the release. - If the bow is jerked on release, the arrow will fly off target. - Follow through by leaving your drawing hand at the anchor point well after the string is released.
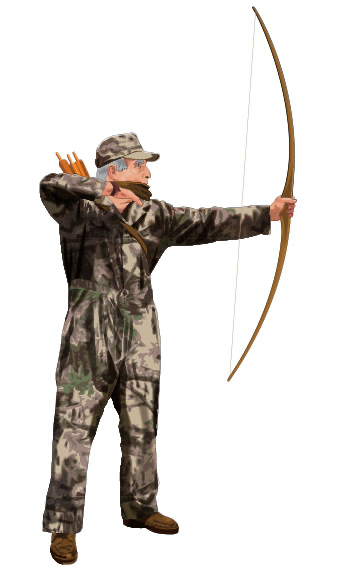
Important
A bow should never be “dry fired.” Releasing a string without an arrow nocked transfers energy back to the limbs instead of the arrow. The bow can fly apart, injuring anyone nearby.
Topic 5: History of Primitive Hunting Equipment
History of Firearms
The Chinese are believed to be the first to use gunpowder, now called “black powder.”
- The first firearms were tubes closed at one end, usually made of brass or cast iron. Early firearms were loaded by pouring black powder and shoving a projectile into the tube from the muzzle end, and then igniting the powder using a lighted wick or match. The powder burned, creating pressure that launched metal objects or arrows. These firearms are called “muzzleloaders” due to their loading process.
- Advances in ignition systems were the major changes that brought about modern firearms.
- Matchlock ignition was developed in the early 1400s. When the trigger is pulled, a lighted wick is lowered into a priming pan located next to a vent hole drilled into the closed end of the barrel. When the priming powder ignites, it lights the main charge.
- Wheel lock ignition replaced the wick of the matchlock in the 1500s. When the trigger is pulled, a coiled spring forces the rough-edged steel wheel to spin against a piece of iron pyrite, creating sparks to ignite the powder in the priming pan.
- Flintlock ignition appeared in the late 1600s. When the trigger is pulled, the hammer holding a piece of flint falls against a steel cover (the frizzen) sitting over the priming pan. The hammer knocks the cover out of the way, and the collision of flint and steel causes sparks that ignite the powder in the priming pan.
- The percussion lock (also called “caplock”) replaced the flintlock in the early 1800s. Early percussion locks used priming compounds inside a metallic foil cap placed over the vent hole. When the hammer strikes the cap, the resulting spark ignites the main charge.
- The next advance, in 1835, was to arrange a series of percussion locks and barrels on a rotating wheel (cylinder) to allow a rapid succession of shots (Paterson revolver). With a single hammer and trigger, multiple shots can be fired without reloading—a repeating firearm. The percussion cap revolvers are the forerunners of modern revolvers.
- The percussion cap also paved the way to the self-contained ammunition we have today—cartridges and shotshells. In the mid-1800s, gunpowder, the projectile, and the primer were put together into a single housing that could be loaded quickly.
- Actions were developed to allow shooters to load cartridges and shotshells at the rear, rather than the muzzle, end of the barrel.
History of the Bow and Arrow
The use of the bow and arrow is recorded as early as 3000 BC.
- The Egyptians used bows shorter than a man’s height, with arrows two feet long or more.
- Early bows were C-shaped. When shooting these bows, the archer would pull the string with a ring held around the thumb. The early longbow was 5–6 feet in length and was usually made of yew. The legend of Robin Hood romanticized the longbow.
- Native American Indians were America’s first bowhunters. European settlers brought their skills to America and contributed to the development of bows and arrows in the U.S.
- In 1879, the National Archery Association was founded. It initiated the first U.S.–sponsored tournament in 1879.
Bowhunting did not really take off until the 1950s and 1960s as hunters learned more about this sport and about newer bows that were being developed.
Like other methods of hunting, the bowhunter first must acquire the knowledge and skills necessary to be a safe and responsible hunter.
Unit 6: Be a Safe Hunter
Topic 1: Why Firearm Safety is Important
Introduction to Firearm Safety

The Four Primary Rules of Firearm Safety (During shooting)
- Point the muzzle in a safe direction.
- Treat every firearm with the respect due a loaded gun.
- Be sure of the target and what is in front of it and beyond it.
- Keep your finger outside the trigger guard until ready to shoot.
Firearm Safety in the Home

Statistics show that more than half of the fatal firearm incidents reported each year occur in the home. Since almost all incidents are caused by carelessness and lack of knowledge, it’s the hunter’s duty to help prevent firearm mishaps in the home.
- Most importantly, lock guns away where children can’t reach them, and store ammunition in a separate location. Check to see that a firearm is unloaded before allowing it in any building or living area.
- Practice these safety rules if handling a firearm in the home.
- Immediately point the muzzle in a safe direction when you pick up a firearm.
- Keep your finger off the trigger.
- Always check to see that the chamber and the magazine are empty.
- If someone shows you a firearm you are not familiar with, do not handle it until the action is opened and you are certain the gun is unloaded.
- If a gun is taken from storage to show friends, be sure they understand safe gun handling rules.
- When you are with others, pay attention to what everyone is doing, particularly children.
- Know where everyone is at all times.
- Anticipate when and where they will move.
Important
Everyone, including children, should always remember that once you pull the trigger, you cannot bring the bullet bac
Hunting Incidents
From a law enforcement perspective, a hunting incident occurs when a hunter directly or indirectly causes personal injury or death while using a firearm or bow.
- More broadly defined, a hunting incident is any unplanned, uncontrolled action that occurs while using a sporting arm. It can include near misses.
- Being responsible in order to prevent hunting incidents is your first priority. It is important to remember that:
- The most common hunting incidents result from hunter judgment mistakes.
- Eighty percent of all firearm incidents occur within 10 yards of the muzzle.
Main Causes of Hunting Incidents
The four main types of hunting-related shooting incidents are:
- Hunter Judgment Mistakes, such as mistaking another person for game or not checking the foreground or background before firing
- Safety Rule Violations, including pointing the muzzle in an unsafe direction and ignoring proper procedures for crossing a fence, obstacle, or difficult terrain
- Lack of Control and Practice, which can lead to accidental discharges and stray shots
- Mechanical Failure, such as an obstructed barrel or improper ammunition
From the National Shooting Sports Foundation’s (NSSF) 2007 Industry Intelligence Reports, these are the most common causes of hunting incidents:
- Failure to identify the target (15.5%)
- Shooter swinging on game (12.8%)
- Careless handling of a firearm (11.4%)
- Victim out of sight of the shooter (8.3%)
Importance of Safe Backstops
Hunters should always check for a safe backstop before shooting.
- Make sure the backstop is:
- Solid enough to capture fired bullets and…
- Constructed of a material that will not let the projectile ricochet.
- Remember that projectiles can travel for long distances. Here are some examples.
- A .22-caliber bullet can travel over 1½ miles.
- A centerfire bullet can travel several miles.
- Small shot can travel 200–350 yards.
- Larger shot can travel over 600 yards.
- Slugs can travel over 800 yards.
- Be sure of the target and what is in front of it and beyond it. Making sure you have a safe backstop helps ensure that the projectile cannot hit an unintended target. If you cannot see what lies beyond the target, do not take the shot.
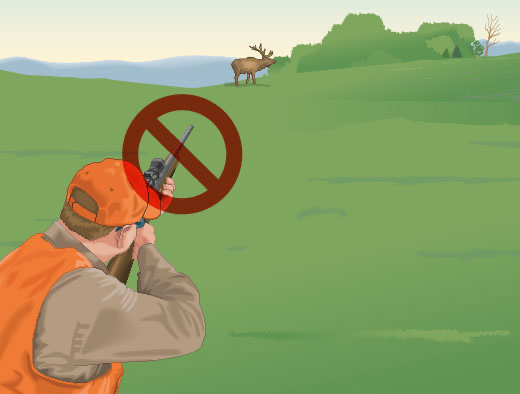
Firearm Safety at the Shooting Range
A successful hunt begins with target practice at the shooting range.
- Many of the rules that govern safe firearm handling in the field apply to the shooting range.
- But a shooting range has some additional requirements.
- Read all range rules that apply to the type of shooting you will do that day.
- If there is a range master, be sure to follow his or her instructions while shooting.
- When not shooting, unload your firearm, and leave it on the range line or bench until you’re given further instructions.
- Don’t handle your firearm while other shooters are downrange. Step away from the firing line or bench until the range is clear and the range master instructs you to approach the line or bench.
- If no range master is present, all shooters must decide on safety commands beforehand so that it’s clear when someone intends to go downrange.
- Before any person goes beyond the firing line or downrange, unload your firearm and step away from the line until the other person returns.
- Under no circumstances should you shoot a firearm when someone is downrange or past the firing line.
- Always wear hearing and eye protection, even if you’re watching others shoot.
- Respond immediately to anyone calling for a “cease fire.”
Topic 2: Safely Carrying Firearms in the Field
Introduction to Safe Carries
There are several ways to carry a gun safely and still have it ready for quick action. Three rules apply to all carrying methods:
- Muzzle pointed in a safe direction and under control
- Safety “on” until immediately before you’re ready to shoot
- Finger outside the trigger guard
Proper Field Carries: Trail Carry
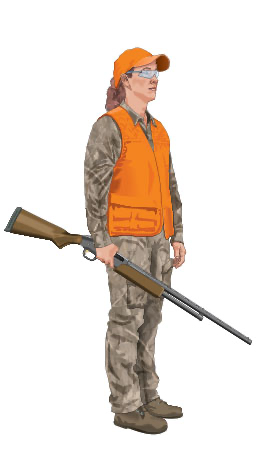
The trail carry leaves a hand free for balance, but don’t use it when you’re behind someone. This carry is not recommended when walking in snow or brush—debris can get in the barrel.
Proper Field Carries: Sling Carry
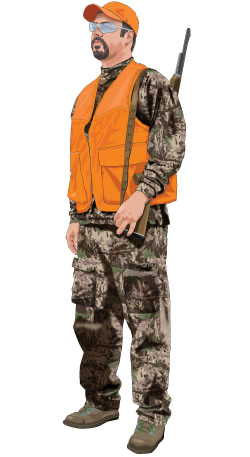
The sling carry is an easy carry for long treks through open country. Keep a hand on the sling when walking so that it doesn’t slide off your shoulder if you trip. This carry is not recommended for thick brush because the gun could be knocked from your shoulder.
Proper Field Carries: Elbow or Side Carry
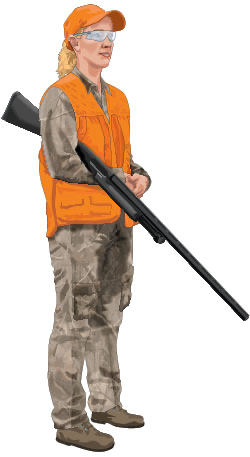
The elbow or side carry is comfortable, but it has the least muzzle control. It also can snag in brushy terrain. Use it when no one is in front of you.
Proper Field Carries: Two-Handed or “Ready” Carry
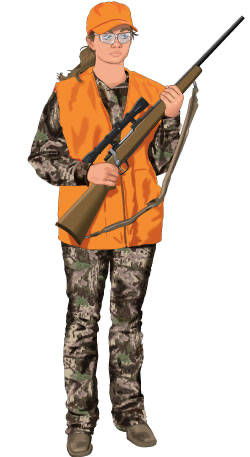
The two-handed or ready carry provides the best control, particularly in thick brush or weeds, or when you need to fire quickly. If you fall, this carry gives you better control of the gun and helps you keep the muzzle pointed in a safe direction. It can be used as either a right- or left-handed carry. Use this carry only if your gun would not be pointed at others while walking side-by-side.
Proper Field Carries: Cradle Carry
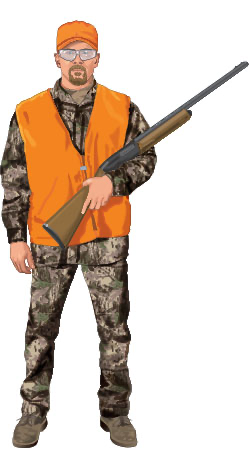
The cradle carry is comfortable and secure, and it reduces arm fatigue. Like the two-handed or ready carry, the cradle carry can be used as either a right- or left-handed carry. Do not use this carry if your gun would be pointed at others when walking side-by-side.
Proper Field Carries: Shoulder Carry
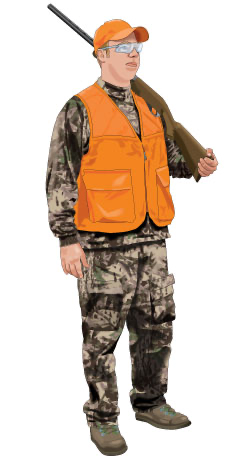
The shoulder carry is a good choice when walking beside or behind others. Don’t use it if someone is behind you.
Proper Field Carries: Three Hunters, Side by Side
Carry selection is based primarily on muzzle control and terrain. If three hunters are walking side by side:
- The ones at the sides may carry their guns pointing either to the side away from their party or to the front.
- The one in the center should keep the gun pointing to the front or up.
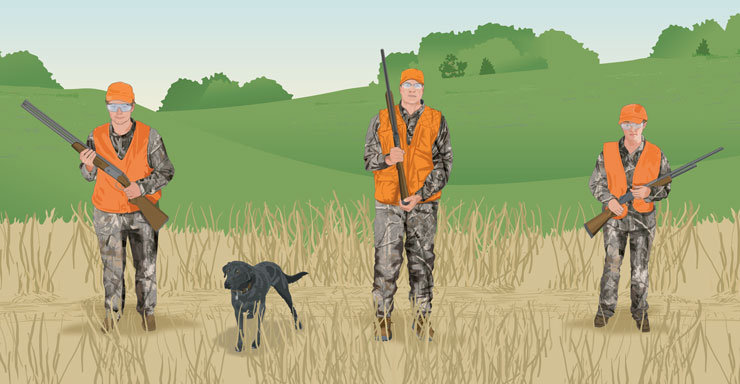
Proper Field Carries: Three Hunters, Walking Single File
Carry selection is based primarily on muzzle control and terrain. If three hunters are walking single file:
- The one in the lead should have the gun pointed ahead but never over the shoulder.
- The one in the middle must have the gun pointed to the side.
- The hunter in the rear may point the gun to either side or the rear.
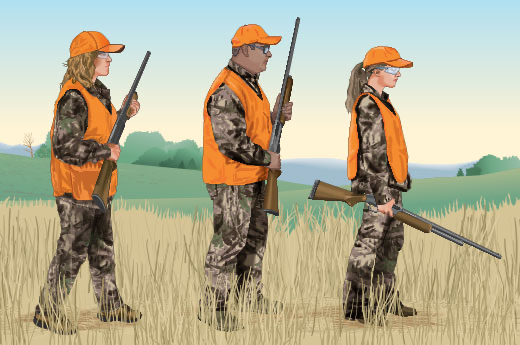
Proper Field Carries: Hunters Facing One Another
Carry selection is based primarily on muzzle control and terrain.
- When facing another hunter, any carry is safe except the trail carry or forward-facing elbow or side carry.
- Remember that the same rules for safe carry apply when your hunting companion is a dog.
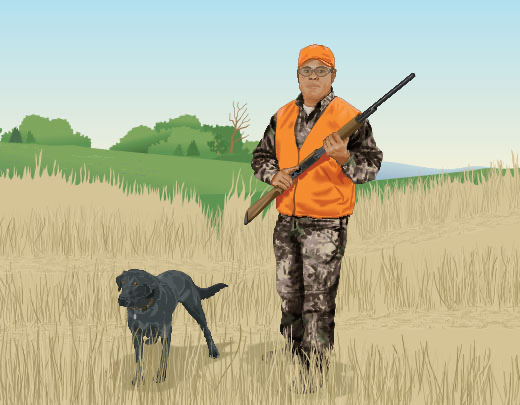
Crossing Obstacles: Alone
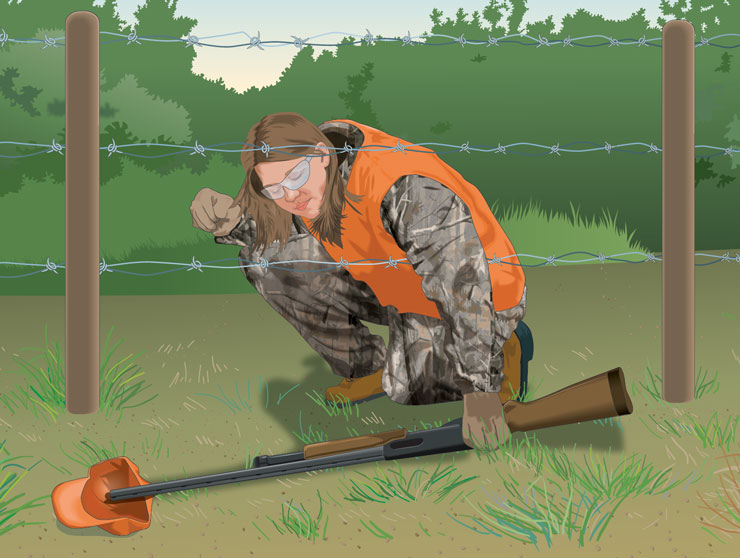
Always unload guns before crossing fences or other obstacles or before negotiating rough terrain. When crossing fences, logs, or other obstacles alone:
- Unload the firearm.
- Cover the muzzle or place something under it to help keep out debris.
- Place the firearm on the other side of the fence or obstacle to be crossed, with the muzzle pointed away from you and your crossing point.
- Cross the obstacle. If you are crossing a wire fence, cross close to a fence post to prevent damage to the fence.
- Retrieve the firearm, keeping the muzzle pointed away from you.
- Check the barrel for obstructions.
- Reload and continue the hunt.
Crossing Obstacles: With Others
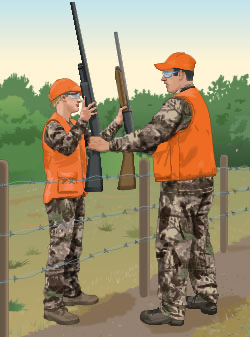
Always unload guns before crossing fences or other obstacles or before negotiating rough terrain. When crossing obstacles with others:
- Stand back-to-back and unload both firearms.
- Have one person hold both firearms, following the steps for passing a firearm to another person.
- Let the person without the firearms cross the obstacle.
- Hand both firearms to the hunter who has crossed. That person confirms that he or she has control of both firearms.
- Let the second person cross the obstacle.
- Return the firearm to the second person.
- Stand back-to-back to reload and continue the hunt.
Passing a Firearm to Another Person
When passing a firearm to another person, follow these steps.
- Keep the firearm pointed in a safe direction.
- Turn your back toward the other person, and unload the firearm.
- Put the safety on.
- With the action open, check the chamber and magazine to make sure there is no ammunition.
- Face the other person, and let him or her grasp the firearm securely.
- Continue to hold onto the firearm until the other person confirms that he or she is holding it securely by saying “Thank you,” “I’ve got it,” or something similar.
Checking for Obstructions
Always check that your barrel is clear of any obstruction, no matter how small. Stop immediately, and safely remove obstructions.
- Point the muzzle in a safe direction.
- Open the action, and make sure the chamber and magazine are unloaded.
- Check for debris in the barrel. If the firearm is a break-action, look through the barrel from the breech end, or use a barrel light to inspect the barrel for obstructions.
- Remove any obstructions with a cleaning rod.
- Check the barrel again to make sure no debris remains.
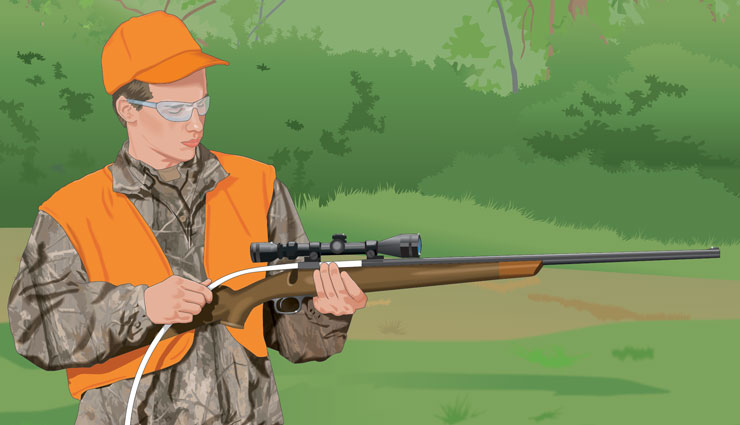
Topic 3: Safely Loading and Unloading Firearms
Loading Firearms
Even something as simple as loading or unloading a firearm can result in tragedy if it isn’t done properly. To load a firearm safely:
- Point the muzzle in a safe direction.
- If the firearm has a safety, put the safety on if you can open the action and load the firearm with the safety on.
- Keep your finger off the trigger and outside the trigger guard.
- Open the action. Make sure the firearm’s chamber and barrel are clear and unobstructed.
- Load the correct ammunition into the chamber or magazine.
- Close the action.
- Put the safety on if it is not on already.
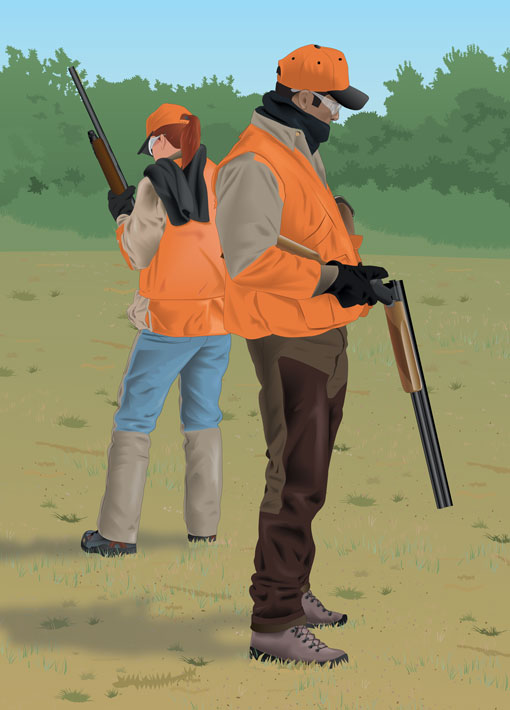
Unloading Firearms
To unload a firearm safely:
- Point the muzzle in a safe direction.
- If the firearm has a safety, put the safety on if you can open the action and unload the firearm with the safety on.
- Keep your finger off the trigger and outside the trigger guard.
- Remove the magazine.
- Open the action.
- Eject cartridges or shells if it is the only way to remove them.
- Make sure the firearm is empty by physically and visually checking both the chamber and the magazine well.
- Put the safety on if it is not on already.
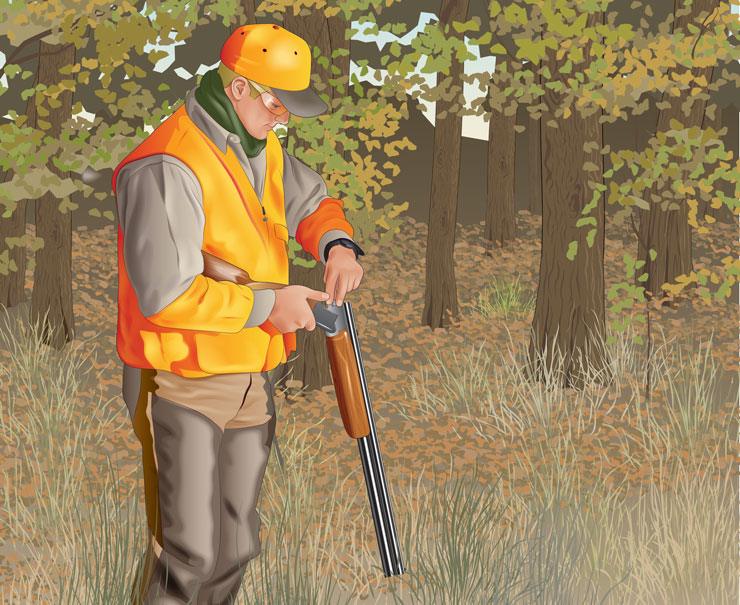
Important
Removal of ammunition from the magazine or removal of the magazine from the firearm does not mean the firearm is unloaded!
magazine well: The opening where a magazine is inserted into a firearm; also called the “mag well”
Topic 4: Transporting Firearms
Safely Transporting Firearms
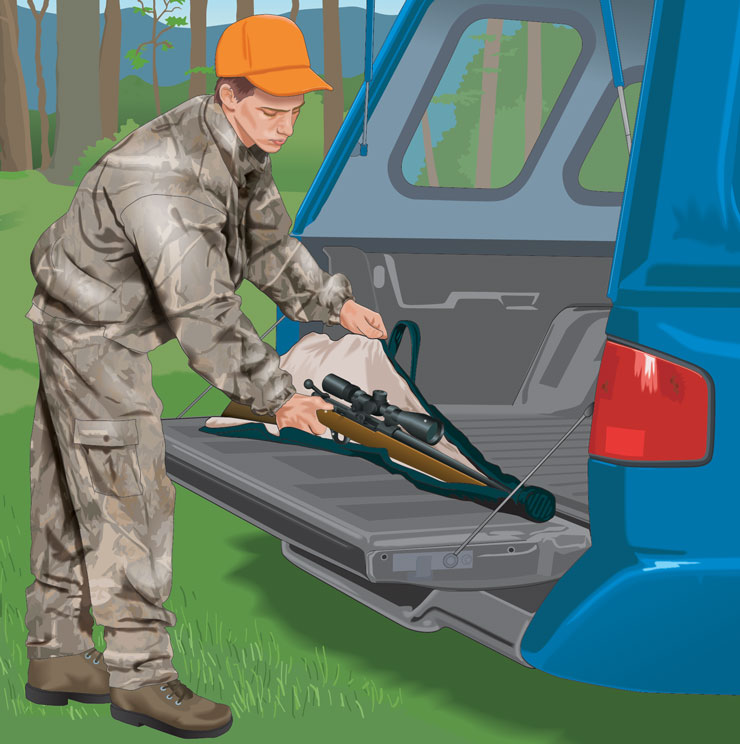
Transporting firearms involves both legal and safe practices. In addition to federal laws, there are regulations that vary from state to state.
General Rules
- Always unload and case firearms before transporting them. In many states, this may be the law. The action should be open or the gun broken down, whichever makes the firearm safest if it’s mishandled.
- Firearms should not be displayed in window gun racks because the display may provoke anti-hunter sentiment. It’s also an invitation to thieves.
- Lean a firearm against a secure rest only. A vehicle does not provide a secure resting place. A gun that falls over might accidentally discharge or be damaged.
Gun Cases for Transporting Firearms
Padded, Soft-Sided Case
Material: Canvas, nylon, neoprene, polyester, or leather
Advantages:
- Light, easy to handle and store
- Many designs accommodate scoped rifles
- Offered in camouflage
- Waterproof and floating cases available for duck hunters
- Less costly than hard cases
Disadvantage:
- Less protection than hard-sided cases
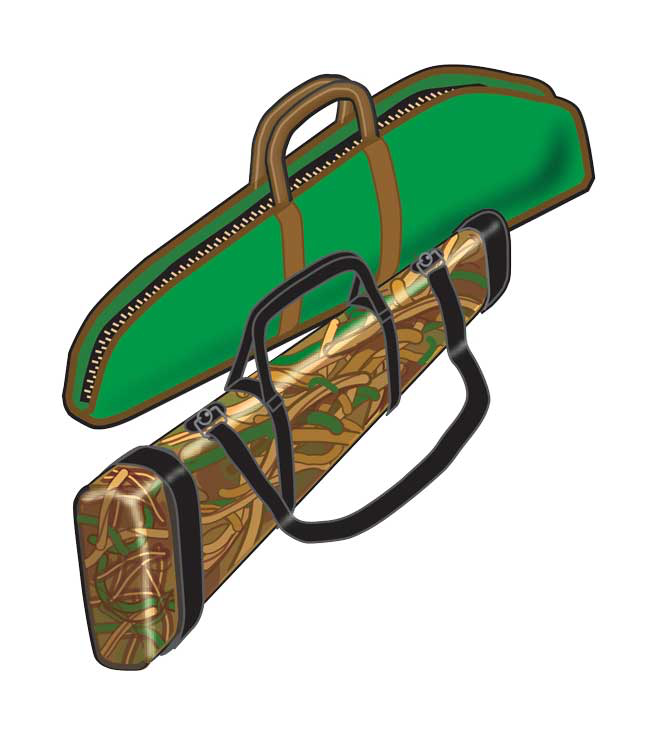
Lockable, Hard-Sided Case
Material: Aluminum or composite
Advantages:
- Lightweight but sturdy
- Meets airline standards
- Can include deep foam padding that holds firearm in place and cushions impact
- Composite models can be molded to fit firearm
- Available in waterproof models
Disadvantage:
- Bulkier and costlier than soft-sided cases
Gun Sock
Material: Durable stretch fabric (polyester/acrylic) or soft pile materials
Advantages:
- Lightweight protection from dust, dirt, and moisture
- Offered in camouflage
- Often used as a second case to carry a firearm from a vehicle into a hunting area
Disadvantage:
- Minimal protection from elements or impact
Topic 5: Safe Zone-of-Fire
What Is a Zone-of-Fire?
The area in which a hunter can shoot safely is referred to as a zone-of-fire. Before setting off in a group, hunters should agree on the zone-of-fire each person will cover. A zone-of-fire depends on many factors, including the hunter’s shooting ability, the game being hunted, the hunting environment, and the hunting strategy being used.
- A hunter’s zone-of-fire changes with every step. This is particularly true of groups hunting birds, rabbits, or other small game.
- A hunter must never swing or shoot outside the safe zone-of-fire.
- For safety purposes, it’s best to have no more than three hunters in a group. For new hunters, two is a safer number until they become familiar with maintaining a proper zone-of-fire.
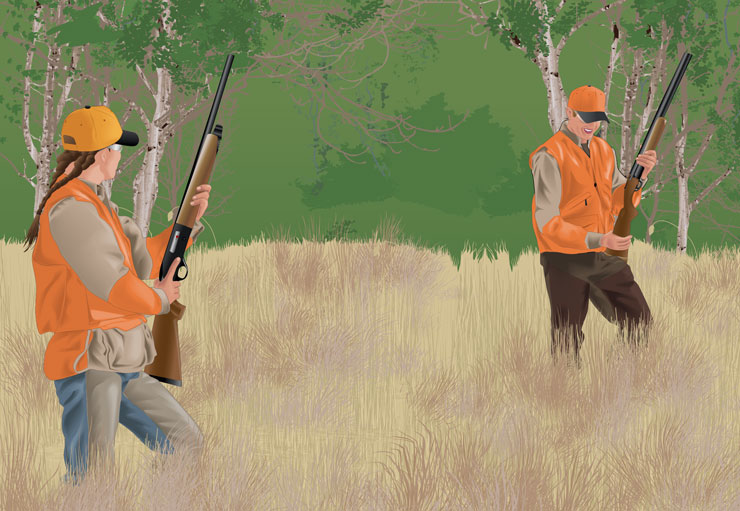
Important
A hunter’s zone-of-fire changes with every step. It’s important to remain alert and aware of your companions’ locations at all times.
Determining Your Safe Zone-of-Fire
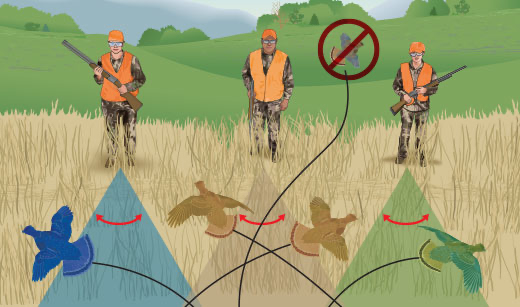
When hunting in a group with one or two other hunters, the hunters must walk abreast of one another, should be spaced 25 to 40 yards apart, and should always be in sight of one another.
- Each hunter has a zone-of-fire, which spans about 45 degrees directly in front of each hunter. (Some states require an adult to be immediately beside a youth hunter. In this case, the adult should be a supervisor only—not a hunter.)
- A way to visualize 45 degrees is to:
- Focus on a distant, fixed object that is straight out in front of you.
- Stretch your arms straight out from your sides.
- Make a fist with your thumbs held up.
- Gradually draw your arms in toward the front until both thumbs are in focus without moving your eyes. This will give you your outer boundaries.
Maintaining Your Safe Zone-of-Fire
When hunting in a group, hunters should shoot only at game in front of them.
- When hunting birds or small game, follow these rules.
- If three hunters are walking side by side hunting pheasants, the hunter in the center will shoot at birds flushed in the middle that fly straight away. The other hunters will shoot at birds flying toward their end of the line.
- If a bird turns and flies back across the line of hunters, it’s best if all three hold their swings and do not fire. The same is true of a rabbit scurrying back between the hunters.
- When using an elevated stand or ground blind:
- A hunter must notify all other hunters in the group before moving from the stand location.
- Changing locations changes the safe zone-of-fire not only for that hunter but also for the rest of the hunters in the group.
- When shooting at running or fast-moving game:
- Use extreme caution.
- Shoot only within your zone-of-fire.
- Only shoot when you are sure you can make an effective shot.
- No hunter, especially when swinging on game, should allow his or her gun to point at a person. Better to pass up a shot than risk injuring someone or damaging property.
- Only one hunter should aim at a target. Also, hunters should shoot only if there is an adequate backstop. Don’t shoot at a “skylined” animal.
- Everyone hunting in these situations should wear daylight fluorescent orange whether it’s required by law or not.
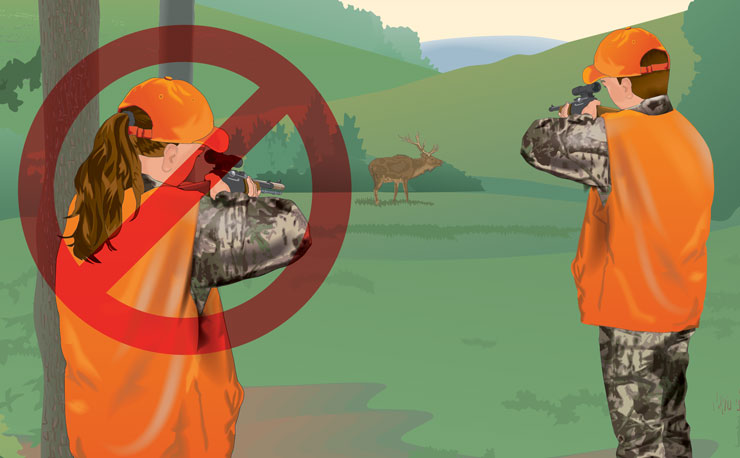
Topic 6: Other Safety Considerations
Self-Control and Target Identification
Some hunters may become overly anxious or excited on a hunt, which can lead to careless behavior.
- They may fire at sounds, colors, movements, or unidentified shapes, or simply shoot too quickly.
- In the excitement after hitting their target, they may swing a loaded firearm toward their companions or run with the safety off toward a downed animal.
- Slow, careful shooting is not only safer, but it also produces a higher degree of success.
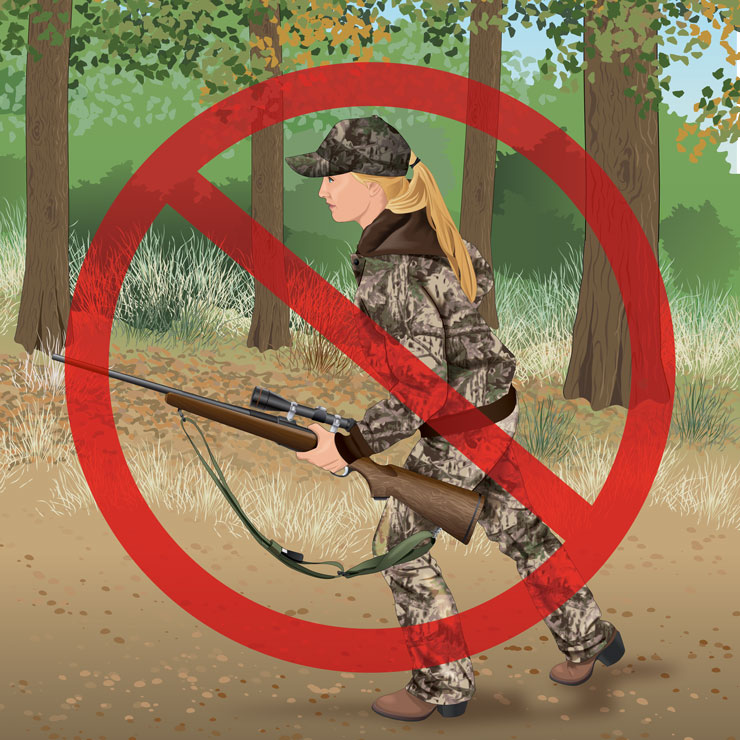
Hunter’s Tip
Self-control is an essential aspect of hunter safety. Only shoot when you know the target is legal game and that no people, domestic animals, buildings, or equipment are in the zone-of-fire—remember that bullets can pass through game and continue on for some distance with deadly force.
Important
In addition to gun handling, several other factors affect your safety during the hunt:
- Weather, especially the sun’s glare
- Pests, such as fire ants, snakes, and bees
- Your emotional state
- Your stamina, especially when hunts are physically demanding
Shooting Accuracy
Shooting accurately is not only the key to successful hunting, but it’s also a safety factor. Some incidents, often deadly ones, have occurred when stray bullets have hit people out of the shooter’s sight. Be sure you have a proper backstop before you shoot.
Accuracy is also essential for achieving a clean kill. No real sportsman wants to wound game and cause needless suffering. You must learn how to hit the vital organs of the game you hunt. Knowing your game, equipment, and skill level will tell you when you’re in position to make a clean kill.
Important
A rifle scope should never be used as a pair of binoculars.
Alcohol and Drugs
- Consuming alcohol before or during the hunt increases the risk of incidents because it impairs coordination, hearing, vision, communication, and judgment.
- Drugs can have a similar effect. If you have to take prescription medicine, check with your physician to see if it’s safe to take while hunting.
- Because you can drink faster than your system can burn the alcohol off, there is an increasing level of alcohol in your blood. This level is referred to as Blood Alcohol Concentration (BAC).
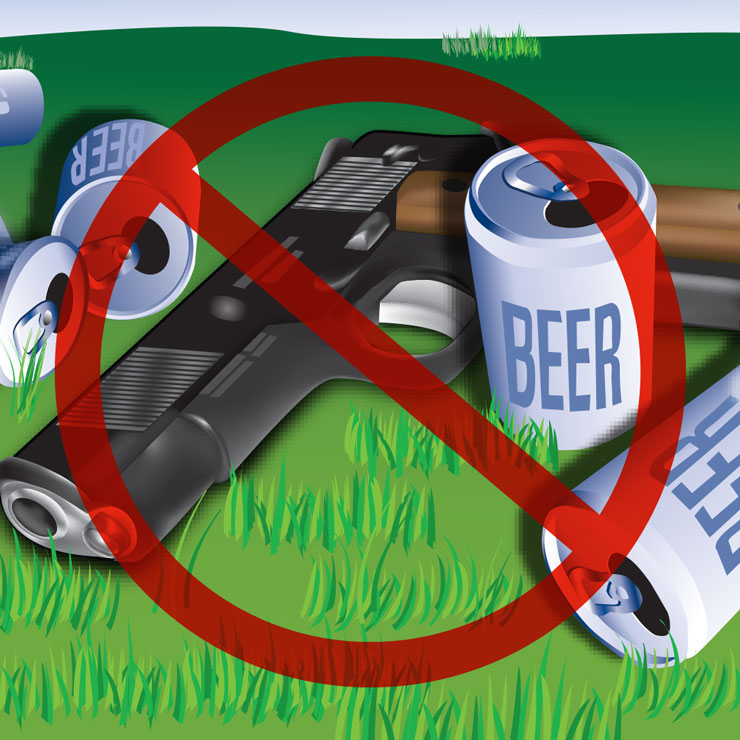
Important
The best thing you can do for your safety and the safety of others is simple… Don’t drink and hunt!
Beware of Hang Fires
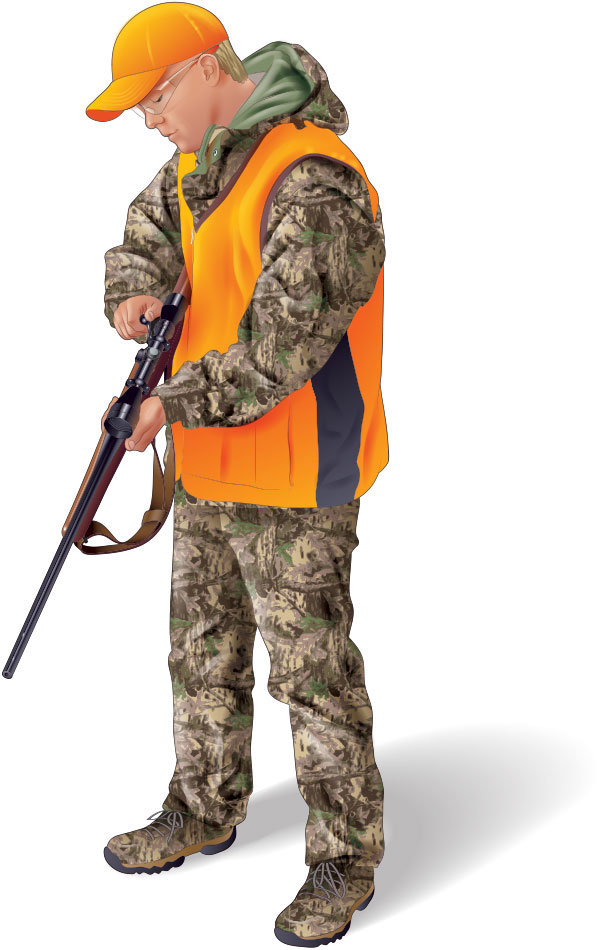
Hang fires happen when the firing pin has struck the primer and there is a delay before the gun fires. This can occur for several reasons, such as a faulty firing pin or spring, defective primer, or other cartridge-related problems. A misfire is when the primer fails to ignite the powder. Hang fires and misfires can happen with any kind of firearm.
To handle a hang fire or misfire:
- Maintain safe muzzle control at all times.
- Keep the action closed and the muzzle pointed at a safe backstop.
- Wait to see if the firearm fires. With a rifle, handgun, or shotgun, wait 15 seconds. With a muzzleloader, wait 60 seconds.
- If the firearm still has not fired, remove the cartridge or shotshell from the chamber.
Topic 7: Hunting from Elevated Stands
Introduction to Elevated Stands
Elevated stands place the hunter above ground level. They can be tree stands placed in or against trees, or freestanding structures. They have become increasingly popular in recent years with both firearm and bow hunters. While they offer certain advantages, they also have some drawbacks, including a degree of risk.
Pros and Cons of Elevated Stands

Advantages
- Provide a wider field of vision—game is spotted sooner than at ground level
- Allow time to plan for best shot through earlier detection of game
- Position a hunter above the animal’s normal field of vision
- Make a hunter’s scent harder to detect and movement less noticeable
- Make a hunter more visible to other sportsmen so that he or she is less likely to be hit by a stray bullet
- Provide a good backstop for arrows or bullets due to shooting at a downward angle
Disadvantages
- Increase risk of injury resulting from falling
- Can be difficult to carry, especially large portable stands
- Provide no protection from cold or wind
- Give little room for movement
- Cannot move toward game while hunting
Types of Portable Tree Stands
Portable tree stands can be safe and environmentally friendly. Homemade stands should not be used. Commercial stands that are manufactured, certified, and tested to industry standards are best. You should follow the manufacturer’s instructions and also practice installing a tree stand before you go hunting. Portable tree stands come in three basic types: hang-ons, climbing stands, and ladder stands.

Portable Tree Stands: Hang-On Stands
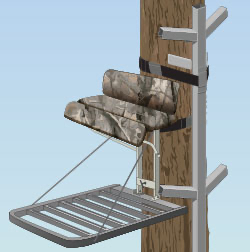
These simple stands provide about four square feet of space. They must be hauled into place and secured to the tree with belts or chains. These stands require separate climbing aids, such as segmented ladders or climbing sticks. When installing a climbing aid:
- Determine your climbing route first.
- Attach the aid to the tree so that it extends above the stand’s platform, and you can step down onto the center of the platform.
Portable Tree Stands: Climbing Stands
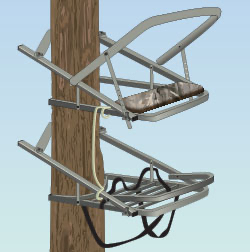
These self-climbing stands are designed for trees with straight trunks and consist of two sections. A hunter “walks” the stand up a tree by moving the top section with the hands and the bottom section with the feet.
- While still on the ground, adjust the stand to allow for the tapering of the tree that occurs as you go up.
- When climbing, go slowly, take small steps, and keep the two sections of the stand connected with a tether.
- Avoid using this type of stand on trees with shaggy bark or with branches between the ground and the desired elevation.
- Never use these stands on trees covered with ice or snow.
Portable Tree Stands: Ladder Stands
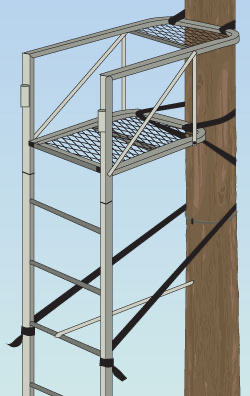
Ladder stands provide a platform 10 to 20 feet above the ground. The built-in ladder lets you use these stands with a wider range of trees. Due to their size and weight, hunters normally assemble and set up ladder stands before the first day of hunting. Three to five people are needed to erect or take down a ladder stand safely. When setting up the stand:
- Clear the base area of all rocks and debris, making sure the ground is level.
- Lean the stand against the tree, and chain or strap it into place.
- Using all parts, assemble the stand as instructed by the manufacturer.
Tripods, Quadpods, or Tower Stands (Freestanding)
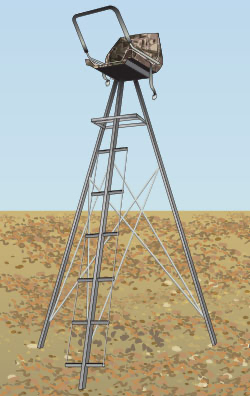
These stands are similar to a ladder tree stand but are freestanding and do not require a tree. They can be placed anywhere that has a firm base. Some resemble one or two chairs atop stilts. Others are enclosed, box-like platforms.
Elevated Stand Location
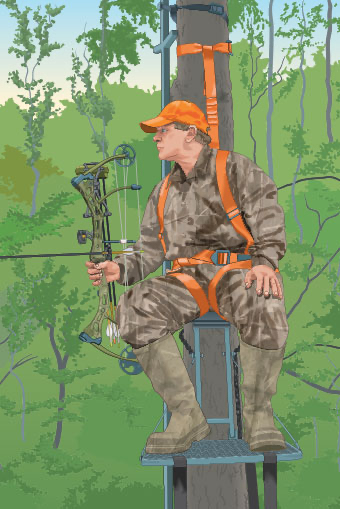
When choosing a stand location:
- Place a stand adjacent to game trails or where game sign is abundant.
- Place a stand no higher than necessary.
- Never place a stand in a dead tree, in trees with large overhanging dead limbs, or on or near utility poles.
- Select only trees that are straight.
- Locate the stand downwind from the animals’ expected route.
- Never place stands on fence lines or near another landowner’s property.
Fall-Arrest Systems (FASs)
You should use a fall-arrest system (FAS) that is manufactured to industry standards. Never use single-strap belts and chest harnesses—they can be deadly. Before hunting, carefully read the manufacturer’s instructions for proper use of your FAS and follow all safety guidelines.
Most tree stand falls occur when a hunter is climbing up or down a tree. Always use a properly fitting FAS that includes a full-body harness at all times when your feet are off the ground. This includes while climbing a tree, installing a tree stand that uses climbing aids, and hunting from a tree stand. (When using a ladder stand, attach your FAS to the tree and tighten the tether as soon as you reach the top of the ladder.)
Essential FAS Components: Make sure your FAS includes these components.
- Full-Body Harness: The vest harness is a very effective style of full-body harness.
- Tether: The tether attaches your full-body harness to the tree strap/belt or the tree stand safety line system and has a shock-absorbing feature.
- Suspension Relief Strap: This strap provides a loop to stand in if you fall.
Additional FAS Components: Your FAS also must have additional components that you use to attach yourself to the tree.
- Lineman’s-Style Belt or Climbing Belt: The lineman’s-style belt (or climbing belt) goes around the tree while you are climbing up and down the tree.
- Tree Strap/Belt: The tree strap goes around the tree after you are in your tree stand.
- Tree Stand Safety Line System: The tree stand safety line system is an alternative to using a lineman’s-style belt and a tree strap. When installed on a tree, a tree stand safety line system lets you remain attached to the tree with your FAS full-body harness and tether from the time you leave the ground until you return. A complete system includes these parts.
- Safety Rope/Line With Prusik Knot: The rope/line goes around the tree and extends from the base of the tree to a point at, or above, head level when you are standing on the tree stand platform. The prusik knot on the rope/line is designed to slide easily with one hand. If you should fall, the knot will tighten around the rope/line to keep you from falling to the ground.
Carabiner: This metal ring connects the tether from your full-body harness to the prusik knot on the safety rope/line.
Hunter’s Tip
If you are using your FAS with a tree stand safety line system and you are sliding the prusik knot on the rope/line, either slide it or push it from above or below. Never hold onto the prusik knot while you are going up or down. If you should fall and are holding onto the knot, it cannot tighten around the rope/line to stop your fall.
Fall-Arrest System Safety Guidelines
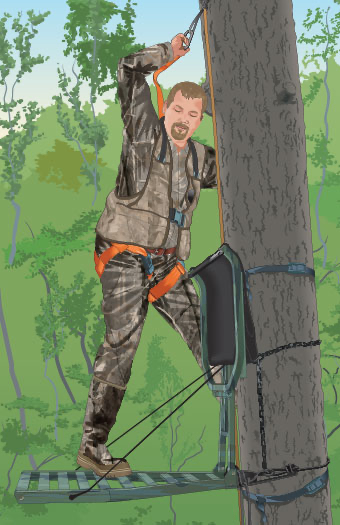
When using an FAS, follow these safety guidelines.
- With an adult present, practice adjusting and using your FAS, including the suspension relief strap, at ground level before hunting from an elevated stand.
- To protect yourself if you fall, always wear your FAS full-body harness, attaching it to the tree at ground level and keeping it attached throughout your hunt.
- Attach one end of the FAS lineman’s-style belt to one side of the FAS full-body harness, wrap the belt around the tree, and attach the other end of the belt to the other side of the harness.
- Use the FAS lineman’s-style belt with your FAS full-body harness when you are installing or uninstalling the stand or the climbing aids for a hang-on tree stand. Also use the belt with your full-body harness when you are climbing into or out of a hang-on stand.
When you are in any tree stand, including a ladder stand, use the FAS tree strap and tether to attach your FAS full-body harness to the tree. Attach the tree strap to the tree so that the strap is at, or above, head level when you are standing. After attaching the tether, adjust both the tree strap and tether so that you have no slack in the tether while seated in your stand. If you fall, you do not want to drop below a level that would keep you from returning to the platform.
Discard any FAS that shows signs of wear and tear or has been worn during a fall. Also adhere to the expiration date sewn into the FAS by the manufacturer.
Due to the risks of injuries or death, hunters who choose not to wear and use their FAS properly should stay on the ground to hunt.
Important
If you should fall while in your stand:
- Do not panic. Your FAS will hold you.
- Signal for help.
- Climb back onto the platform as quickly as possible.
- Take actions to avoid suspension trauma if you must wait for rescue. If you do not have a suspension relief strap, keep moving your legs.
Avoiding Suspension Trauma
Avoiding Suspension Trauma
Hanging motionless and suspended in your FAS after a fall can cause the leg straps to constrict blood flow. The pressure can make blood pool in the legs, limiting circulation and depriving organs of oxygen. This is called suspension trauma and can lead quickly to unconsciousness followed by death. To avoid suspension trauma while you wait to be rescued:
- Step into your suspension relief strap, and stand up to relieve the pressure caused by the leg straps.
- If you do not have a suspension relief strap, move your legs continuously by pushing off from the tree, or raise your knees and pump your legs frequently to keep your blood flowing until help arrives.
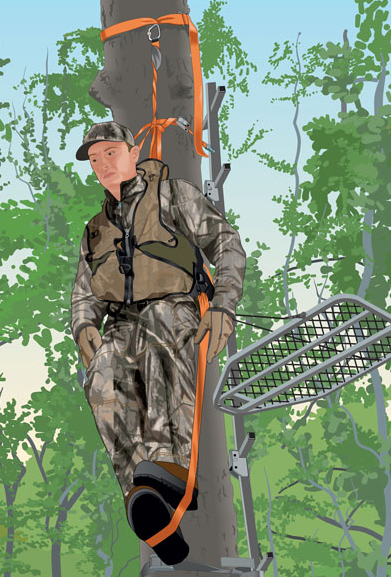
Hauling Hunting Equipment Into a Stand
Never carry your hunting equipment up or down the tree with you as you climb. Always use a haul line.
Before attaching the haul line to your hunting equipment:
- If using a firearm, unload it, and open the action.
- If using a bow, put the arrows in a covered quiver secured to the bow.
Use a haul line of heavy cord attached to your stand to bring up your hunting equipment or to lower it prior to climbing down from your stand.
- If using a firearm, attach the haul line to the firearm’s sling so that the firearm hangs with the muzzle pointed down.
- If using a bow, attach the haul line so that the arrow fletching points down when raising your equipment and points up when lowering it.
Slip the end of the haul line through your belt—leave it untied so that it can pull free if you fall. Put on your FAS full-body harness, secure yourself to the tree, and climb to your stand.
After you are in the stand and secure, haul up your hunting equipment, and untie the haul line.
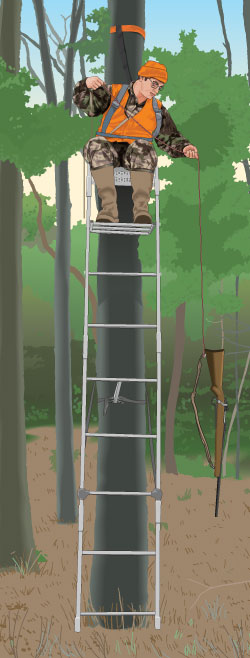
Hunter’s Tip
Before hauling a firearm into a stand, make sure it is unloaded. Also, you can avoid getting debris in the barrel by placing a cover over the muzzle. Once you are securely in the stand, check for obstructions before you load.
Elevated Stand Safety

The number one cause of injury or death when hunting from a tree stand or other elevated platform is falls.
Falls from elevated stands are caused by:
- Incorrect placement and use of equipment
- Mistakes while climbing into or out of the stand
- Equipment being damaged by exposure to the elements, the hunter’s lack of knowledge about the equipment, or excessive wear or stress on the equipment
To protect yourself, use good judgment and follow these precautions, always putting safety first.
- Purchase a commercial stand that is manufactured, certified, and tested to industry standards.
- Read the manufacturer’s instructions, and watch the video that accompanies the stand. Review this information each season before using the stand.
- Attach your FAS to the tree while at ground level, and keep it attached throughout your hunt—from the time you leave the ground until you get back down.
- Use a tree stand only during daylight hours.
- Practice first with your tree stand and FAS at ground level, using all safety devices that were included with the stand. Then continue to practice, gradually going higher.
- When climbing into or out of a tree stand, always use three points of contact with your hands and feet.
- Keep a firm hold on the climbing system as you enter or leave a platform, and don’t let go until you’re certain you are secure.
- Stay tethered to the tree.
- Step down onto the center of the platform.
- Get enough sleep to ensure that you are well-rested before using a tree stand.
- Carry a signaling device, such as a whistle, radio, or cell phone, to let others know if you have a problem.
- Take your time and plan every move you make while installing and using an elevated stand.
- Check your stand carefully prior to each use. Do not leave a stand attached to a tree for more than two weeks.
- Never exceed the weight limit of your stand or FAS. Remember that the weight includes you plus your equipment.
- Do not climb with anything in your hands or on your back. Use a haul line.
- Raise and lower all hunting equipment on the opposite side of the tree from your climbing route.
- Always tell someone where you are hunting and when you will return.
Important
Most tree stand falls occur when a hunter is climbing up or down a tree. Be sure to use a fall-arrest system at all times when your feet are off the ground.
Topic 8: Hunting with Boats
Trip Preparation When Hunting With Boats
Hunters often use boats in difficult conditions, such as wind, cold, and snow. Special care must be exercised to ensure a safe trip.
- Leave a hunting plan with family or friends with details on the boating portion of your trip. It should include your planned route and when you plan to return.
- Be sure the boat is large enough to carry you and your gear safely.
- Load gear low in the boat, and distribute the weight evenly.
- Have each person on board wear a personal flotation device (PFD), or life jacket. This can be a camouflage flotation jacket, instead of a traditional PFD, when hunting from a boat.
- Have throwable personal flotation devices on board in case someone falls overboard.
- Stow required visual distress signals.
- Check an up-to-date weather forecast before heading out.
- Cancel your trip if wind and water conditions aren’t safe.
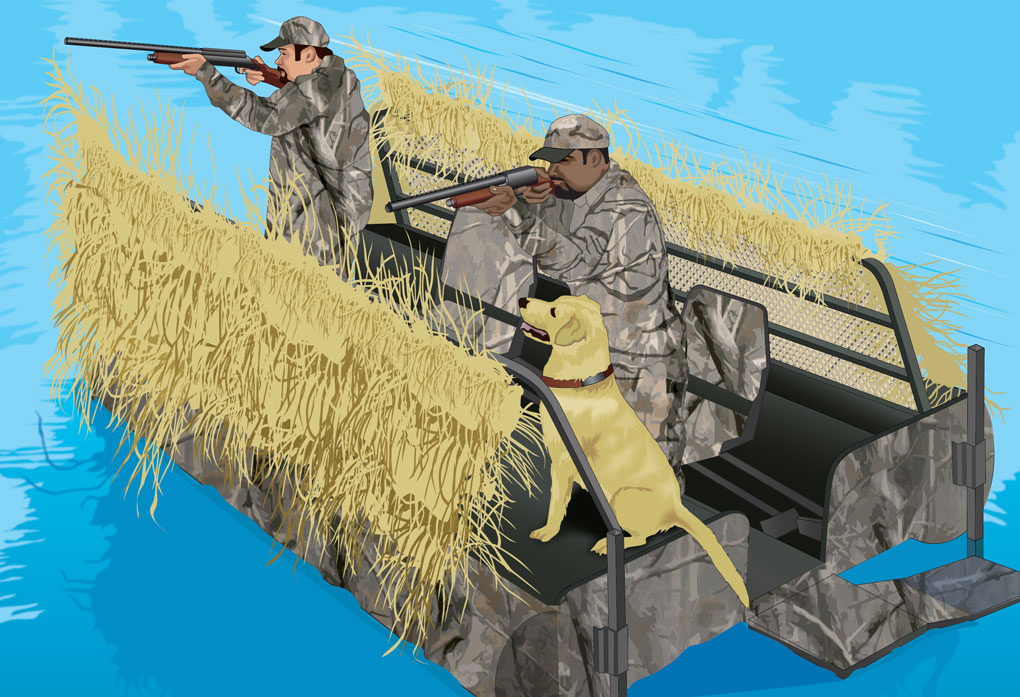
Transporting Firearms in a Boat
The same rules apply as when transporting firearms in a vehicle—unload and case firearms before you board or leave the boat. The action should be open or the gun broken down, whichever makes the firearm safest.
- Before boarding the boat, place the unloaded firearm into the bow (front) of the boat with its muzzle pointing forward.
- When hunting with others, the first person settles in the bow position facing forward after the first gun is placed. Next, place the second unloaded firearm in the stern (rear) of the boat with its muzzle pointing rearward. Then, the second person settles in the stern position facing rearward. Repeat the procedure when unloading.
Zone-of-Fire in a Boat
When duck hunting, the back-to-back position is the safest, with the zone-of-fire confined to a 180-degree area in front of each hunter.

Surviving Water Emergencies

Always wear a U.S. Coast Guard–approved personal flotation device or PFD (life jacket) while you’re in the boat. Wearing a PFD will keep you afloat in the water, prevent drowning, and delay the onset of hypothermia.
If you get caught in a storm and your boat swamps or capsizes, stay with the boat. Most small boats will float even when upside down or filled with water. Signal passing boats by waving a bright cloth, or raising an oar if one is available.
Placing an oar under your back and shoulders and another under your legs can help you float. If decoys are in reach, stuff them inside your jacket.
Chest waders and hip boots also will help you stay afloat.
- If in chest waders, trap air in the waders by bending your knees and raising your feet. Lie on your back.
- If in hip boots, trap air in the boots by bending your knees. Lie on your stomach.
Equip your boat with a means for re-entry (ladder, sling, etc.) to use if you should fall into the water.
Important
Don’t press your luck in bad weather. At the first sign of a storm, head for shore.
Types of Personal Flotation Devices
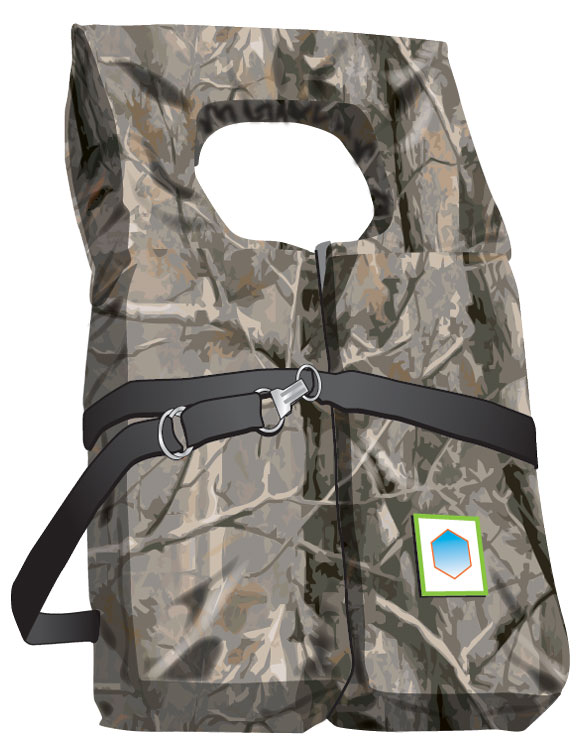
Type I: Wearable Offshore Life Jacket
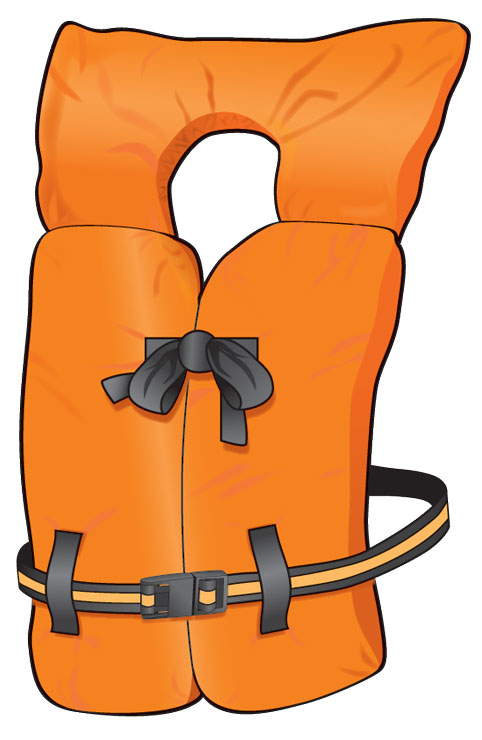
Type II: Wearable Near-Shore Vest
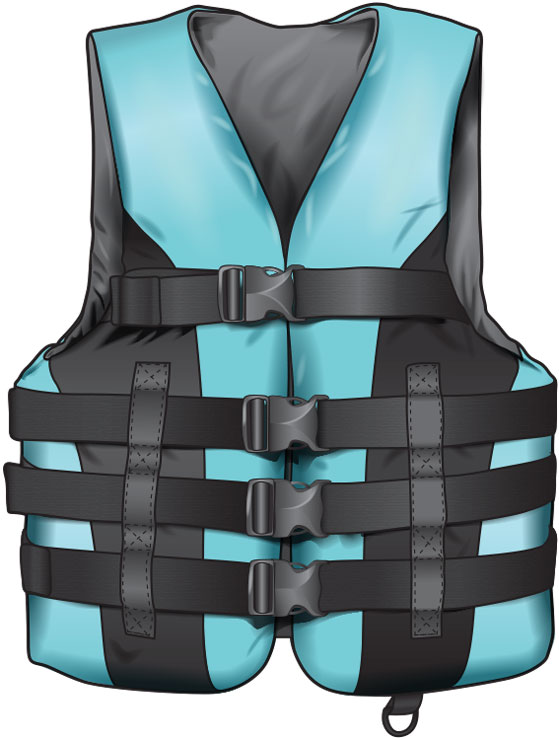
Type III: Wearable Flotation Aid
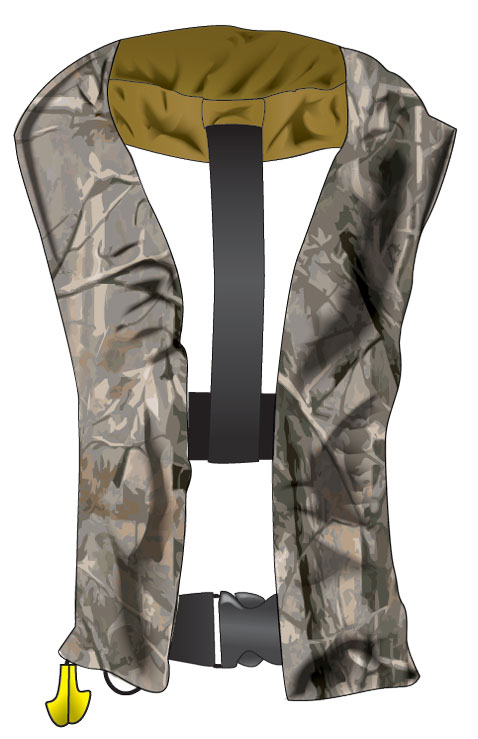
Type III: Wearable Inflatable Flotation Aid
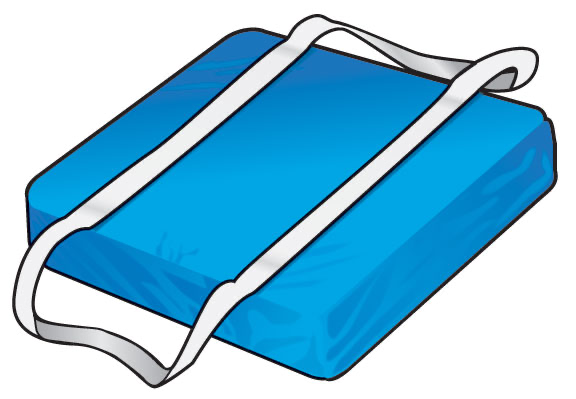
Type IV: Throwable Cushion
Type IV: Throwable Ring Buoy
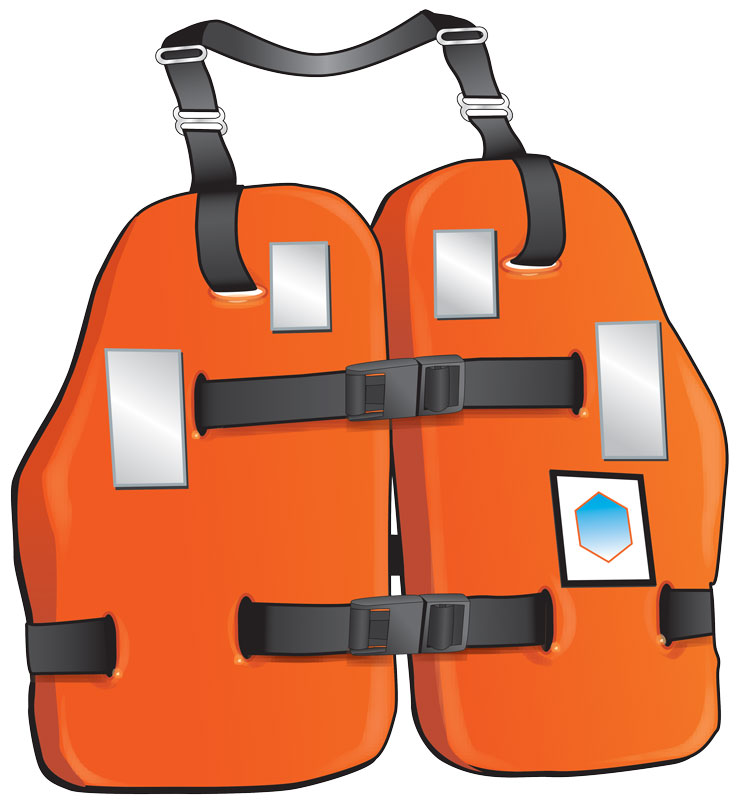
Type V: Special-Use Device
Dealing With Cold Water Immersion

Sudden immersion into cold water can cause immediate, involuntary gasping; hyperventilation; panic; and vertigo—all of which can result in water inhalation and drowning. Immersion in cold water can also cause sudden changes in blood pressure, heart rate, and heart rhythm, which also can result in death.
- Prepare for boating in cold water conditions by always wearing a secured PFD (life jacket). Also wear layered clothing for insulation.
- The best prevention is to take all measures necessary to avoid capsizing your boat or falling into cold water in the first place. If you do fall into cold water:
- Don’t panic. Try to get control of your breathing. Hold onto something, or stay as still as possible until your breathing is controlled.
- When your breathing is under control, perform the most important functions first before you lose dexterity (10–15 minutes after immersion).
- Put on a PFD immediately if you don’t already have one on. Don’t take your clothes off unless absolutely necessary—they help insulate you.
- Focus on getting out of the water quickly before you lose full use of your hands, arms, and legs. Try to reboard your boat, even if it is swamped or capsized. Get as much of your body out of the water as possible—the rate of heat loss will be slower than if immersed in water.
Important
If you fall into the cold water, remain clothed; clothing helps retain body heat.
Survival Steps If You Cannot Get Out of the Water
If you cannot get out of the water quickly, act to protect against rapid heat loss. In as few as 10 minutes, you may be unable to self-rescue.
- Stay as motionless as possible, protecting the high heat loss areas of your body, and keep your head and neck out of the water.
- Safety typically looks closer than it actually is, so staying with the boat is usually a better choice than swimming.
- Adopt a position to reduce heat loss. If alone, use the Heat Escape Lessening Posture (HELP) position; if there are others in the water with you, huddle together.
- Be prepared at all times to signal rescuers.
Advanced Stages of Hypothermia
When a victim has these symptoms, dry clothing, heat, and medical attention are required immediately:
- Bluish-white appearance
- Weak heartbeat
- Shallow breathing
- Rigid body muscles
- May be unconscious
The HELP and Huddle Positions
Heat Escape Lessening Posture (HELP): When you are alone, this position protects the body’s three major areas of heat loss (groin, head/neck, and rib cage/armpits). Wearing a PFD allows you to draw your knees to your chest and your arms to your sides.
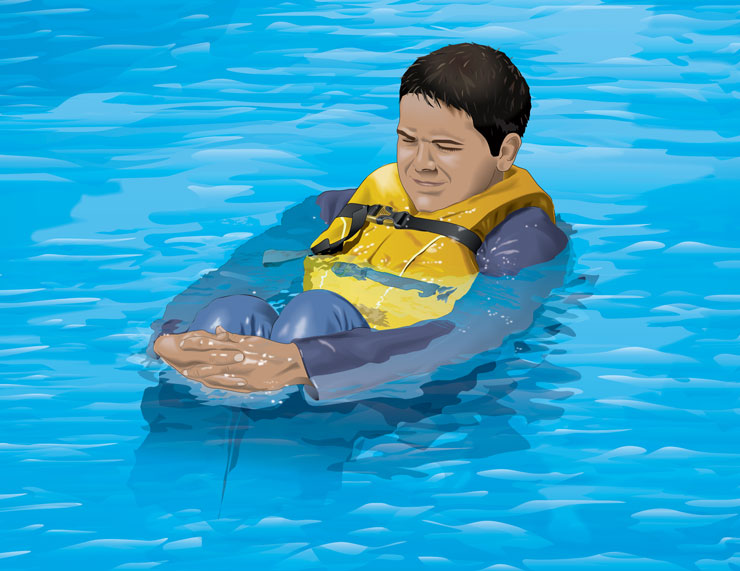
Huddling With Others: Huddling with other people in the water lessens the loss of body heat and is good for morale. Also, rescuers can spot a group more easily than individuals.
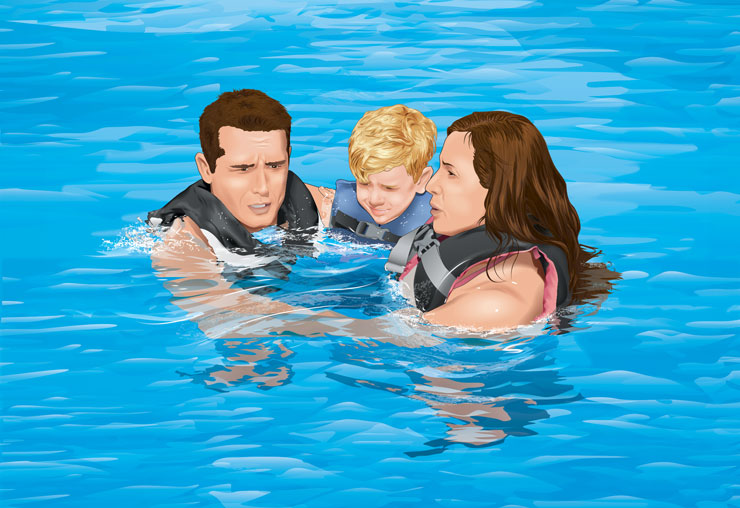
Topic 9: Hunting with All-Terrain Vehicles
Introduction to All-Terrain Vehicles
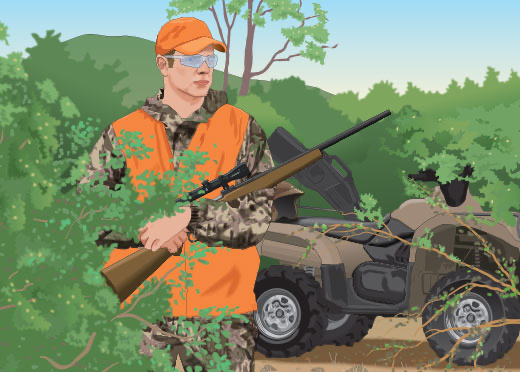
All-terrain vehicles (ATVs) are special-purpose vehicles that require careful, responsible handling and good judgment.
- They’re useful for traveling into back country, but they can damage the environment if used recklessly. It also requires training and practice to handle them safely on rough terrain.
- Studies show that the majority of ATV accidents occur when the rider unexpectedly encounters an obstacle, such as a rock or a ditch. Maintaining a safe speed is critical.
- If you use ATVs to hunt, prepare yourself and your family by attending an approved ATV course.
Before hunting with ATVs on private land, be sure to get the landowner’s permission.
Rules for Safe and Ethical Operation When Hunting With ATVs
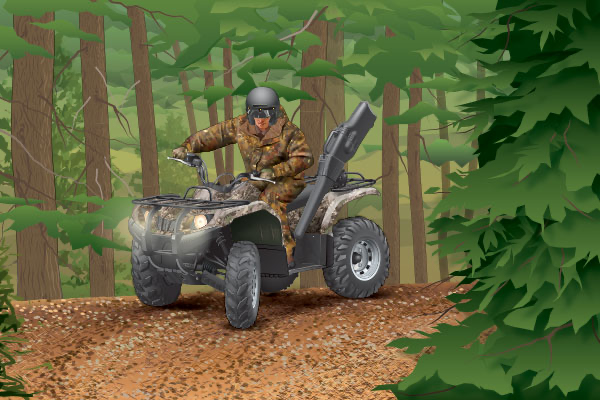
Always follow the rules for safe and ethical operation.
- Wear a helmet approved by the Department of Transportation.
- Wear protective clothing, including goggles, gloves, and boots.
- Carry firearms unloaded, cased, and on a proper gun rack.
- When using the plastic scabbard mounted on an ATV, clear the inside of the scabbard of debris, and check your firearm’s muzzle for obstructions.
- Stay on the main roads and trails open to ATV use.
- Pick your route carefully to minimize terrain damage.
- Don’t drive over crops or planted fields.
- Don’t shoot from an ATV.
- Use ATVs only to get to the hunting area or to haul an animal from the woods.
Know the Law Before Hunting With ATVs
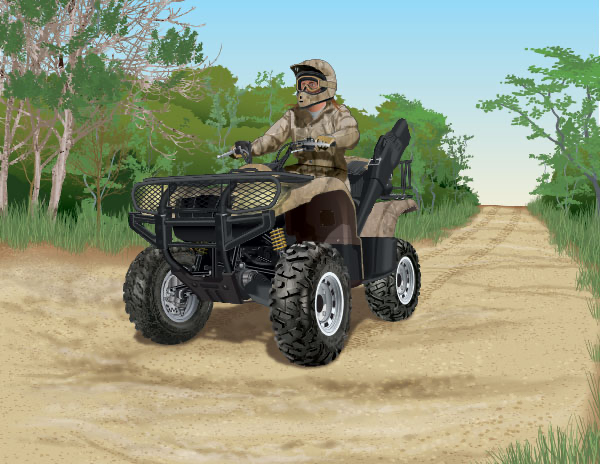
Shooting from vehicles is unsafe, unethical, and in many instances illegal.
- In many states, it is illegal to hunt from any motorized vehicle, including ATVs; this includes molesting, stirring up, or driving any game animals or game birds with a motorized vehicle.
- It is illegal in some states to operate an ATV off the trail, or there may be trails specifically closed to ATV use.
- In many states, it is prohibited to operate an ATV off-roads or trails in a manner that damages or disturbs the land, wildlife, or vegetation.
- Some states require that ATVs be equipped with approved and operating spark-arresting mufflers and that they comply with sound regulations.
Unit 7: Be a Responsible and Ethical Hunter
Topic 1: Why Do We Have Hunting Laws?
Before Hunting Laws
During the 19th century, many game animals were hunted nearly into extinction. The thundering herds of bison that once roamed the plains were reduced to about 800 head. The beaver was almost wiped out. Elk, deer, and pronghorn were reduced to a fraction of their once-plentiful numbers.
Benefits of Hunting Laws
Game Conservation
To conserve wildlife for future generations to enjoy, wildlife management laws were passed. These laws allow game to flourish by:
- Establishing hunting seasons that limit harvesting and avoid nesting and mating seasons.
- Limiting hunting methods and equipment.
- Setting “bag” limits on the number of animals that can be taken.
- Establishing check stations and game tag requirements to enforce the laws.
Safety, Opportunity, and Funding
In addition to ensuring the availability of game for future generations, hunting laws:
- Establish safety guidelines for hunting that protect both hunters and non-hunters.
- Offer equal opportunity for all hunters, whether they use modern firearms, muzzleloaders, or bows.
- Ensure adequate funding for wildlife programs by collecting license fees, which annually raises millions of dollars.
Fair Chase
Fair chase rules make sure hunters have no unfair advantage over wild game by balancing the skills and equipment of the hunter with the abilities of the animal to escape. The rules of fair chase are defined by law, regional preferences, and personal choice.
- Fair chase emphasizes self-restraint and skills development.
- Fair chase is primarily defined by individuals and their level of hunting ability.
- Expert hunters may use more restrictive and less effective techniques than novice hunters.
- Fair chase rules include banning the use of vehicles, airplanes, and radios; electronic calling; or shooting in a fenced enclosure. Many states have made these rules into law.
How Hunting Laws Are Passed
In most states, a wildlife management agency sets hunting regulations. These agencies will have regular meetings where the public can voice their concerns and make suggestions. Hunters wishing to propose changes to the regulations should participate in these meetings or join a hunting organization that interacts with the agency.
Hunting Law Resources
Responsible hunters know and follow the hunting laws and regulations for their hunting area.
- Resources you may use to find information on hunting regulations, places to hunt, and information on specific species include:
- Official state publications
- Wildlife agency websites
- Hunting access guides or booklets
- Mapping software
- Agency personnel
- Information available from these resources includes:
- Hunting license, permits, and stamp requirements
- Hunting seasons, locations, hours, and bag limits
- Legal methods for hunting different species
- Hunter orange requirements
- Prohibited activities
- Tagging, transporting, and reporting (checking) requirements
- Trespassing laws
- Enforcement agencies
Know the Law
Ignorance of hunting laws is not a valid excuse for violating them. It is the hunter’s responsibility to review state game laws before t
The Hunter’s Image Matters
Responsible hunters welcome laws that enforce sportsmanlike hunting practices because the behavior of irresponsible hunters has caused some people to oppose hunting.
- Nationally, about 5% of the population hunts, and roughly the same percentage actively opposes hunting.
- The rest of the population is predominantly neutral. However, bad behavior by hunters could sway some of the neutral crowd into the anti-hunting camp.
How Hunters Make a Positive Impact
To make a positive impact, hunters:
- Put in countless hours to improve wildlife habitat.
- Help biologists transplant game species and save other species from extinction.
- Encourage others to practice ethical behavior.
- Advocate and support legislation that protects wildlife resources.
- Present a professional image when talking to the media.
Topic 2: Hunter Ethics
Being an Ethical Hunter
While hunting laws preserve wildlife, ethics preserve the hunter’s opportunity to hunt. Because ethics generally govern behavior that affects public opinion of hunters, ethical behavior ensures that hunters are welcome and hunting areas stay open.
- Ethics generally cover behavior that has to do with issues of fairness, respect, and responsibility not covered by laws. For instance, it’s not illegal to be rude to a landowner when hunting on his or her property or to be careless and fail to close a pasture gate after opening it, but most hunters agree that discourteous and irresponsible behavior is unethical.
- Then there are ethical issues that are just between the hunter and nature. For example, an animal appears beyond a hunter’s effective range for a clean kill. Should the hunter take the shot anyway and hope to get lucky? Ethical hunters would say no.
The Hunter’s Ethical Code
As Aldo Leopold, the “father of wildlife management,” once said, “Ethical behavior is doing the right thing when no one else is watching—even when doing the wrong thing is legal.”
The ethical code hunters use today has been developed by sportsmen over time. Most hunting organizations agree that responsible hunters do the following:
- Respect natural resources
- Respect other hunters
- Respect landowners
- Respect non-hunters
ethics
Moral principles or values that distinguish between right and wrong; they are unwritten rules that society expects to be followed.
Respect Natural Resources
- Leave the land better than you found it.
- Adhere to fair chase rules.
- Learn about wildlife, and support wildlife conservation programs.
- Know your capabilities and limitations as a marksman, and stay within your effective range.
- Strive for a quick, clean kill.
- Make sure that meat and usable parts are not wasted by harvesting only as much as can be used or shared.
- Hunt only with other ethical hunters.
- Abide by game laws and regulations.
- Cooperate with conservation officers.
- Report game violations.
Hunter’s Tip
If you are approached by a conservation officer in the field, remember they are doing their job—ensuring compliance with state laws and regulations. As the officer approaches, keep the muzzle of your firearm pointed in a safe direction and open the action. The officer may ask to inspect your permits, firearms, game containers, and any wildlife you may possess. Always follow the officer’s instructions.
Respect Other Hunters
- Follow safe firearm handling practices, and insist your companions do the same.
- Refrain from interfering with another’s hunt.
- Avoid consuming alcohol, which can impair you to the point of endangering others.
- Share your knowledge and skills with others.
Respect Landowners
- Ask landowners for permission to hunt.
- Follow their restrictions on when and where you may hunt.
- Treat livestock and crops as your own.
- Offer to share a part of your harvest with the owner.
- Leave all gates the way you found them.
- If you notice something wrong or out of place, notify the landowner immediately.
- Never enter private land that is cultivated or posted unless you have obtained permission first. Some states require written permission from landowners.
How to Ask Landowners for Permission
- Make contact well ahead of the hunting season.
- Wear street clothes—no hunting gear or firearms.
- Don’t bring companions—a “crowd” could be intimidating.
- Be polite, even if permission is denied. Your courtesy may affect the outcome of future requests.
Landowner Complaints About Hunters
- Don’t get permission to hunt.
- Don’t tell the landowners when they arrive at or leave the property.
- Make too much noise.
- Leave litter behind.
- Carry loaded firearms in vehicles.
- Drive off the ranch roads.
- Don’t leave gates as they were found (open or shut) when the hunter arrived.
- Shoot too close to neighbors or livestock.
- Leave fires unattended.
- Violate game laws.
- Drink alcohol to excess.
Respect Non-Hunters
- Transport animals discreetly—don’t display them.
- Keep firearms out of sight.
- Refrain from taking graphic photographs of the kill and from vividly describing the kill while within earshot of non-hunters.
- Maintain a presentable appearance while on the street—no bloody or dirty clothing.
How to Behave if Confronted by Anti-Hunter Protesters
- Remain calm and polite, and do not engage in arguments—never lose your temper.
- Never touch an anti-hunter or use any physical force, and especially never threaten an anti-hunter with your firearm.
- Report hunter harassment to law enforcement authorities. If possible, record the vehicle license number of harassers.
Hunter’s Personal Code of Conduct
Responsible, ethical behavior is essential to the survival of hunting.
- Each hunter should develop a personal code of conduct (sportsman’s code), which includes but is not limited to:
- Following all laws and regulations
- Behaving properly and appropriately at all times
- By developing a personal code of conduct, you will be able to:
- Act more responsibly.
- Have more respect for your own behavior.
- As you develop your personal code, remember that:
- Your behavior as a hunter reflects on all hunters. How you behave may have a positive or negative effect on people’s opinions about hunters and hunting.
- Positive actions by responsible hunters lead to a more positive public image of hunters.
- One result may be greater acceptance of and support for hunting.
- In addition, others may be more interested in becoming hunters.
Gray Areas of Ethical Behavior
As in every human endeavor, there are gray areas of ethical behavior that come down to a matter of personal choice. Examples of gray areas of ethical behavior, which may even be illegal in some locales, are:
- Baiting deer with corn or protein pellets
- Shooting birds on the ground, on the water, or in trees
- Shooting from a vehicle or boat within private boundaries or on private waters
Important
Remember that hunting is a privilege and can be taken away if hunters fail to act responsibly.
Topic 3: The Five Stages of Hunter Development
Becoming a True Sportsman
It should be the goal of every responsible hunter to become a true sportsman.
As a hunter gains experience and skill, studies have shown that he or she will typically pass through five distinct stages of development. Keep in mind, however, that not everyone passes through all of these stages, nor do they necessarily do it in the same order.
The five stages of hunter development are:
- Shooting Stage
- Limiting-Out Stage
- Trophy Stage
- Method Stage
- Sportsman Stage
Five Stages: Shooting Stage
The priority is getting off a shot, rather than patiently waiting for a good shot. This eagerness to shoot can lead to bad decisions that endanger others. A combination of target practice and mentoring helps most hunters move quickly out of this stage.
Five Stages: Limiting-Out Stage
Success is determined by bagging the limit. In extreme cases, this need to limit out also can cause hunters to take unsafe shots. Spending time with more mature hunters helps people grow out of this phase.
Five Stages: Trophy Stage
The hunter is selective and judges success by quality rather than quantity. Typically, the focus is on big game. Anything that doesn’t measure up to the desired trophy is ignored.
Five Stages: Method Stage
In this stage, the process of hunting becomes the focus. A hunter may still want to limit out but places a higher priority on how it’s accomplished.
Five Stages: Sportsman Stage
Success is measured by the total experience—the appreciation of the out-of-doors and the animal being hunted, the process of the hunt, and the companionship of other hunters.
True Sportsmen Become Involved
Part of the process of becoming a true, responsible sportsman is becoming involved in efforts to make hunting a respected sport.
- That includes teaching proper knowledge and skills to others, working with landowners, and cooperating with wildlife officials.
- It also includes joining conservation organizations dedicated to improving habitat and management efforts. Young hunters can be involved by joining organizations such as 4-H, Boy Scouts, and Girl Scouts, as well as by participating in wildlife projects in their local communities.
- Responsible, ethical behavior and personal involvement are both essential to the survival of hunting. How you behave and how other people see you will determine whether hunting will continue as a sport.
Unit 8: Preparation and Survival Skills
Topic 1: Importance of Planning and Preparation
Preparing for Risks
Hunting is a safe sport, but it does involve a certain amount of risk. Aside from firearm safety issues, a variety of incidents can occur on a trip outdoors. The rougher the terrain—particularly when it’s unfamiliar terrain—the greater the chance of accidents. Climate extremes also increase the risk. In remote areas, there’s always the possibility of becoming lost.

Four Key Parts of Preparing
Not only will planning and preparation reduce the likelihood of serious emergencies while hunting, but a well-planned hunt is usually more successful. To plan properly, address these four areas.
- Be Ready: To help you avoid or minimize problems, it’s essential that you plan carefully for the hunt. Responsible hunters anticipate potential problems and make plans to deal with them. Considerations include terrain, location, weather, dangerous game, and the potential for forest fires.
- Know Your Location: Learn as much as you can about your chosen hunting area before you arrive.
- You can purchase topographic or aerial maps to familiarize yourself with the terrain.
- If the location is within a convenient drive, it’s a good idea to visit the area in the off-season.
- Prepare for Safety: You also need to assess your physical condition and equipment.
- Your physical and mental condition will affect your performance and safety on the hunt. Staying in shape also may prevent exhaustion and heart attacks.
- Refresh your memory of hunting and firearm safety rules, and review the rules with your hunting partners.
- Tell Others: Prepare a hunting plan in case you or someone in your group becomes lost, sick, or injured.
- Tell where and with whom you are hunting and when you expect to return.
- Give specific directions on your route to your destination and any alternate destinations.
- Leave the plan with a family member or friend so that searchers will know where to find you. Do not deviate from your hunting plan without notification.
- When hunting with a group, each person should discuss their route plan.
The Hunting Plan
Before you depart, leave a hunting plan with a family member or friend. A hunting plan tells where and with whom you are hunting and when you expect to return. It also should contain specific directions on your route to your destination and any alternate destination you may have if bad weather changes your plans. Be sure to include your cell phone number and cell phone carrier. Law enforcement officials can work with the carrier to locate your position using your cell phone even if you are injured and cannot answer.
Physical Conditioning
Hunting often demands more physical exertion and mental than you’re accustomed to doing.
- Conditions that may hamper your physical ability to perform safely and responsibly while hunting include:
- Allergies
- Asthma
- Excess weight
- Heart condition
- Impaired vision or hearing
- Poor physical conditioning
- Your mental condition impacts your performance as well.
- Prepare for your hunt by getting in shape well in advance. The amount of time that it will take to get in shape will depend on your physical condition and the difficulty of the planned hunt.
Clothing
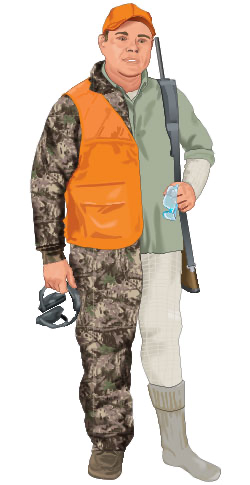
Clothing also can affect your ability to perform safely and responsibly. Select clothing based on the weather you expect while being prepared for the worst.
- In warm weather, wear a hat and light clothing that covers as much of your skin as possible to prevent heat exhaustion or sunburn.
- Cold weather conditions call for clothing that is worn in layers. Layers offer superior insulation. Also, as weather warms up, you can shed a layer at a time to stay comfortable. Layers should include:
- A vapor transmission layer (material such as polypropylene)—worn next to the body; it should release moisture from the skin while retaining warmth.
- An insulating layer—weightier or bulkier; it should hold warm air around you.
- A protective outer layer—available in various weights and materials according to conditions; it should protect the inner layers from water and wind.
- The most important clothing choices are a daylight fluorescent orange hat and daylight fluorescent orange outerwear—a shirt, vest, or jacket.
- Daylight fluorescent orange clothing makes it easier for one hunter to spot and recognize another hunter because nothing in nature matches this color. The orange color of the clothing should be plainly visible from all directions. This is required by law in many states.
- Daylight fluorescent orange is also called blaze orange or hunter orange.
Other Clothing Essentials
- A hat or cap with earflaps and gloves to retain body heat—most body heat is lost through the head and hands; gloves also protect your hands from abrasions and rope burns
- Footwear that is sturdy, suitable for the conditions you’ll encounter, and has been broken in before the hunt
- Two layers of socks—polypropylene against the skin and a wool outer layer
Important
Wool is the best all-around choice for insulation because it still provides warmth when wet. The best clothing combination in bad weather is polyester or polypropylene underwear and shirt, wool pants, heavy jacket, and water-repellent rain pants and parka. Soaking wet clothing can lose heat several hundred times faster than dry clothing. Cotton clothing (underwear, T-shirts, jeans, flannel shirts) is a poor choice for cold, wet weather. When wet, cotton loses its already limited insulating ability and can cause rapid transfer of heat away from the body, increasing the risk of hypothermia.
Day Pack-Survival Kit and Equipment
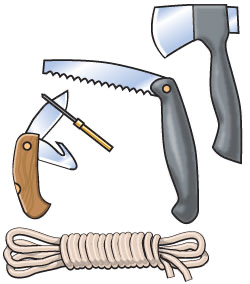
In addition to your hunting gear, which includes your firearm—or bow—and field-dressing equipment, you also should prepare a day pack that includes emergency supplies. Although the contents will vary based on conditions and personal preference, an emergency day pack could include:
- Base plate compass with signal mirror
- Candle
- Emergency high-energy food
- Extra boot laces
- Extra pair of glasses
- Extra two-day supply of prescription medicine
- Fire starters—waterproof matches, butane lighter, etc.
- First-aid kit
- Fishing line and hooks
- Flashlight with spare batteries and bulbs
- Folding saw
- Knives
- Map
- Metal, waterproof carrying case that can double as a cooking pot
- Nylon rope
- Plastic sheet or large garbage bag
- Poncho
- Signal flares
- Single-edged razor blade
- Small can of lighter fluid
- Snare wire or twine
- Thermal foil blanket
- Tissues
- Water
- Water purification tablets
- Whistle (plastic)
Additional Equipment
- Binoculars or spotting scope
- Biodegradable trail markers
- Duct tape
- Hatchet or ax
- Pencil and paper pad
- Shovel
- Sleeping bag appropriate for climate
Topic 2: Topographic Maps and Compasses
Reading a Topographic Map
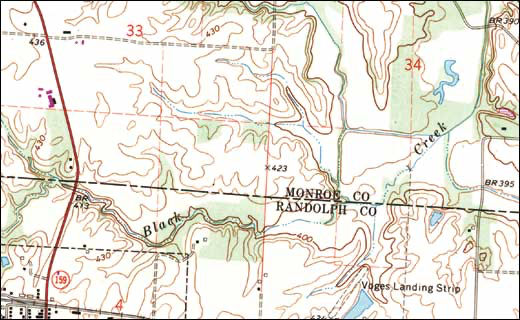
Whenever you’re in a remote or unfamiliar area, a topographic map and compass are a must.
Topographic maps are created from aerial photographs and reveal the contours of the land, including hills, ridges, and valleys, as well as lakes, rivers, creeks, trails, and roads.
- Contour lines show the elevation of the ground.
- Contour intervals reveal how much vertical distance there is between each contour line—closely spaced contour lines indicate very steep slopes.
- Contour lines that are sharply tapered indicate an uphill direction.
- Rounded contour lines typically indicate a downhill direction.
Hunter’s Tip
If you’re an experienced map reader, you can:
- Read terrain.
- Determine direction.
- Follow rivers, valleys, and ridges.
- Find your location in relationship to your camp.
- Identify areas preferred by game animals.
Selecting a Compass
The orienteering compass is a critical piece of equipment for outdoor travel. A good orienteering compass has these features:
- Clear base plate that allows you to see the map underneath
- Straight sides for aligning two points or for drawing lines
- Liquid-filled needle housing that keeps the magnetic needle relatively steady when taking readings
- Two arrows: a direction arrow painted on the base plate (or you may use the edge of the compass) is used to point the compass from your starting point to your destination; an orienting arrow, located in the needle housing, is used to orient your compass to your map
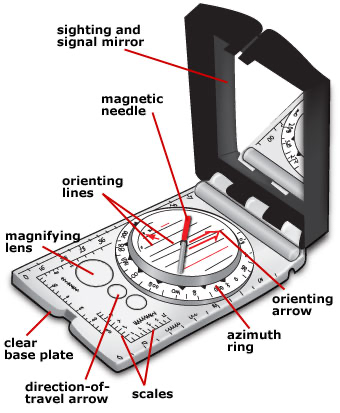
Important
Metal objects, such as knives, gun barrels, belt buckles, etc., will affect a magnetic needle.
Understanding Declination
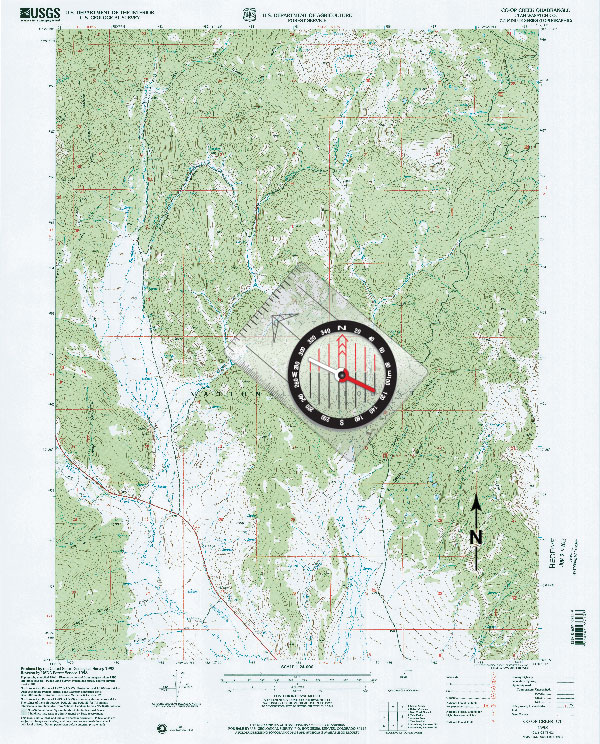
Topographic maps are drawn to true north (North Pole), which is indicated by the grid lines on the map. However, a compass will always point to magnetic north, which is in the Hudson Bay area. The difference between true north and magnetic north is called “declination.”
- When true north and magnetic north are aligned, you’re at zero degrees declination. Your compass needle will point to true north. However, if you’re east or west of zero degrees declination, your compass will not be in line with true north.
- To compensate for declination:
- Center the north arrow (the N) of the compass dial along a north/south line of the map.
- Check the diagram at the bottom of the map that shows whether magnetic north is to the left or right of true north.
- Turn the compass dial the correct number of degrees left or right as indicated on the map. The N is now pointing at magnetic north.
- Hold the compass level in front of you and rotate your body until the tip of the compass needle aligns with the N on the compass dial. The direction arrow on the base plate now points in the direction you want to go.
Plotting Your Progress
As you hike into unfamiliar terrain, you can keep your bearings by taking frequent compass readings and plotting your progress on a map.
- Note key points, such as stream crossings, to help you find your way back.
- Pay particular attention when you reach a high point at the top of a ridge; use the elevation to locate landmarks visible from there.
Learning to set a course and take bearings takes study and practice. The best way to become proficient with a compass is under the guidance of an experienced individual.
Global Positioning System (GPS)
The Global Positioning System (GPS) is a navigation system based on a network of satellites. Users with a GPS unit can determine their exact location (latitude and longitude) in any weather condition, all over the world, 24 hours a day.
- GPS satellites circle the earth twice a day and transmit information to the earth. GPS receivers use this information to calculate the user’s location by comparing the time a signal was transmitted by a satellite with the time it was received. The time difference tells the GPS receiver the distance from the satellite. By calculating the distances from several satellites, the receiver can determine and display the user’s location on the GPS unit.
- Once the user’s position is determined, a GPS unit can calculate other information—bearing, trip distance, distance to destination, sunrise and sunset times, and more.
- GPS receivers are accurate to within 15 meters (49 feet) on average. Certain atmospheric factors and other sources of error can affect the accuracy. Accuracy can be improved with a Differential GPS (DGPS) or Wide Area Augmentation System (WAAS).
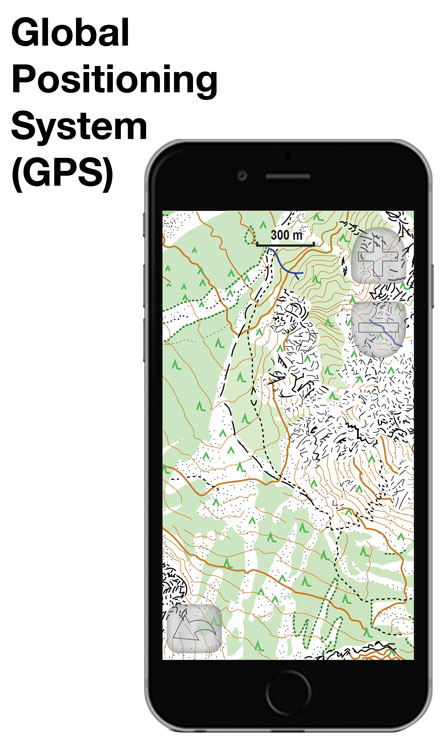
Topic 3: Survival Skills
Switching Into Survival Mode
Planning and preparation should keep you from having an outdoor misadventure. If something does go wrong, switch into survival mode.
Most everyone who treks into the wilderness gets turned around occasionally. How you respond in the early stages often determines whether your disorientation becomes a temporary inconvenience or a traumatic ordeal. If you keep a cool head, you’ll usually get your bearings fairly quickly.
Think through recent events to see if you can retrace your path. If you decide you cannot return to your camp or car, commit yourself to spending the night where you are. If you remain in one spot, it’s very likely that you will be found in a few days.
You now have three priorities: shelter, fire, and signal. Once you have shelter, fire, and your signal prepared, you can focus on water and food.
Rules of Survival

These rules may help you survive if something goes wrong.
- Give a responsible person your hunting plan.
- Don’t travel or hunt alone.
- Take enough food and water to last for several days in an emergency.
- Bring a map and compass, and always orient yourself before leaving camp.
- Wear layered clothing, and take extra clothing, preferably wool and polyester, with you.
- Plan your outings so that you can return to camp before dark.
- Never leave camp without taking fire-starting equipment and a foil blanket.
- Don’t panic if you become lost.
S.T.O.P.: Stop, Think, Observe, Plan
Planning and preparation should keep you from having an outdoor misadventure. If an emergency does occur, you should remember and follow the S.T.O.P. principle.
Stop: Remain calm, and analyze the situation.
Think: Decide what you need to do to survive.
Observe: Survey the terrain, and look for familiar landmarks.
Plan: Figure out the next best course of action. Don’t wait until dark to plan!

Preparing a Shelter
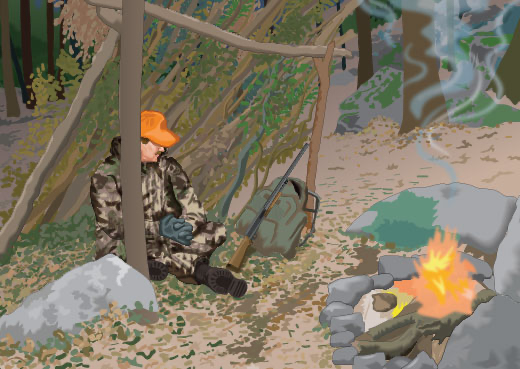
Start preparing your camp well before dark.
- Look for a natural shelter, such as a rock overhang or a thick stand of evergreens. The site should be dry and well drained, and protect you from the wind. Ideally, it also should be near water and plenty of firewood.
- If no natural shelter is available, pick an area with materials nearby to build a lean-to or debris hut.
- A lean-to is constructed by leaning branches against a horizontal support to form a frame for a roof. Be sure to orient the opening away from the wind.
- Cover the frame with evergreen branches to block wind or precipitation. Leaves and twigs are another option.
- If you need additional protection, you can add side walls.
- Build your fire where its heat will radiate into the shelter. Your sleeping area should be located between the shelter wall and the fire.
Starting a Fire
If there is snow on the ground, build the fire on a platform of green logs or rocks. If the terrain is dry, clear a patch of bare dirt to avoid starting a grass or forest fire.
- Gather everything you need before starting the fire. Pile fuel ranging from small twigs to fuel logs next to the fire site. Collect more fuel than you think you can use; you may need more than you estimate.
- Pile fine twigs, grass, or bark shavings loosely as a base. If you cannot find dry kindling, remove bark from trees. Use your knife to shave dry wood from the inside of the bark.
- Place slightly larger sticks on the starter material until you have a pile about 10 inches high. A tepee of larger sticks enclosing the kindling is a good way to start a fire.
- If there’s no breeze, light the kindling in the middle of the base. If there is a breeze, light one end of the kindling so that the flame will be blown toward the rest of the fuel. As the kindling lights and the flames spread to the larger twigs, slowly add more wood to the blaze. Add larger pieces as the fire grows. A large fire will throw more heat and be easier to maintain.
Signaling for Help
When you decide to stay put and wait for rescue, prepare help signals as soon as possible.
- The international emergency sign for distress is three of any signal: three shots, three blasts on a whistle, three flashes with a mirror, or three fires evenly spaced.
- If you’re near an open space, walk an X in the snow, grass, or sand. Make it as large as possible so that it can be seen easily from the air. Placing branches, logs, or rocks along the X will make it more visible.
- Do not light signal fires until you hear an aircraft. Adding green boughs, preferably pine if available, to the fire will help create smoke.
Personal Locator Beacons
Personal locator beacons (PLBs) provide a distress and alerting system for use in a life-and-death situation. A PLB is a small transmitter that sends out a personalized emergency distress signal to a monitored satellite system. When you buy a PLB, you must register it with the National Oceanic and Atmospheric Administration (NOAA). PLBs are a highly effective and internationally recognized way to summon help.
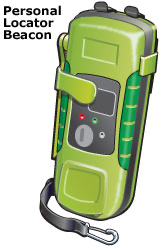
Drinking Enough Water

Even in cool weather, you need two to four quarts of water a day. Under most conditions, humans can only last about three days without water.
- Pure drinking water is rare, even in the most remote regions. Clear mountain streams often are contaminated by Giardia lamblia, a parasite that causes serious intestinal sickness in humans.
- The best way to purify water is by boiling. Chemical purifiers such as iodide/iodine or chlorine and filter systems can be used, but some may not be satisfactory. Never make survival problems worse by drinking unsafe water.
Finding Food
Humans can go for two weeks or more without food. Although the need for food is not that urgent, you’ll be more comfortable and clear-headed if you eat.
- Anywhere there is game, there is food, but probably not what you’re accustomed to eating. Before you head into a remote area, it’s a good idea to read up on what’s edible in that particular region. You may be able to harvest the bulk of your food with your hunting equipment.
- It is always a good idea to carry extra food, such as energy bars, with you.
Topic 4: Coping With Extreme Weather
Hypothermia
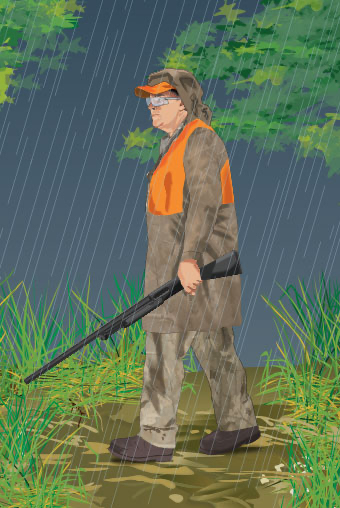
Some of the most common and dangerous risks to hunters result from exposure to extreme weather. Hypothermia occurs when your body loses heat faster than it can produce it, causing your core body temperature to fall.
- Hypothermia is often induced by cold, wet conditions, such as rain, snow, sleet, or immersion in water. However, hypothermia can occur at temperatures as high as 50° Fahrenheit.
- Moisture from perspiration, humidity, and dew or rain on bushes and trees also can soak your clothing over time, putting you at risk in cold weather. Wet or damp clothes will draw heat out of your body more rapidly than cold air. Wind lowers your body temperature as it evaporates moisture from your body.
- Resting against cold surfaces will also draw heat from your body.
Prevention of Hypothermia
Hypothermia can be prevented by dressing properly, by avoiding potentially dangerous weather conditions, and by drying out as quickly as possible when you get wet.
High-calorie foods, such as chocolate, peanuts, or raisins, provide quick energy that helps your body produce heat.
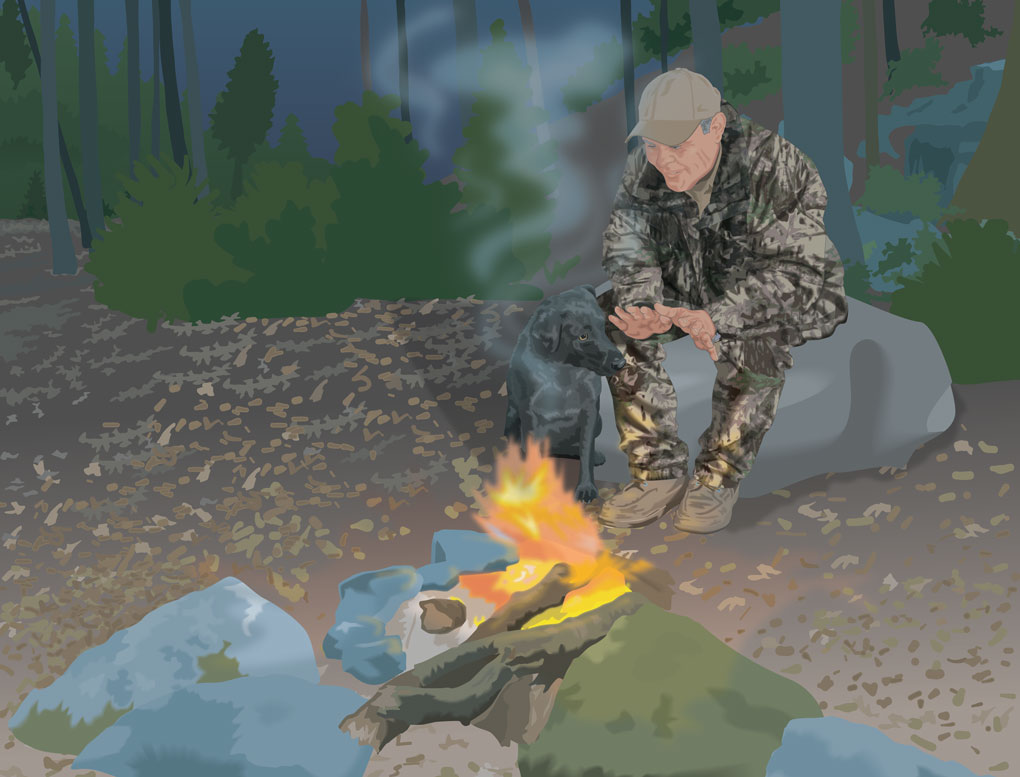
Symptoms and Treatment of Hypothermia
Symptoms of Hypothermia
- Uncontrolled shivering—usually the first obvious symptom, but ceases as hypothermia progresses
- Slow, slurred speech
- Memory loss
- Irrational behavior, such as removing clothing
- Lack of body movement
- Sleepiness
- Unconsciousness, which could lead to death
Treatment of Hypothermia
- Find shelter for the victim.
- Remove wet clothing, and replace with dry clothing and other protective covering. If there is no dry clothing, use a fire to dry one layer at a time.
- Give warm liquids to rehydrate and rewarm, but never give the victim alcohol to drink. Quick-energy foods also produce inner body heat.
- For mild cases, use fire, blankets, or another person’s body heat to warm the victim.
- In more advanced stages, rewarm the victim slowly by placing one or more persons in body contact with the victim. Place canteens of hot water insulated with socks or towels on the groin, armpits, and sides of the neck of the victim.
- A victim at or near unconsciousness must be handled gently and not immersed in a warm bath or exposed to a large fire, which can lead to traumatic shock or death. Immediately contact emergency medical personnel to evacuate the victim to a hospital for treatment.
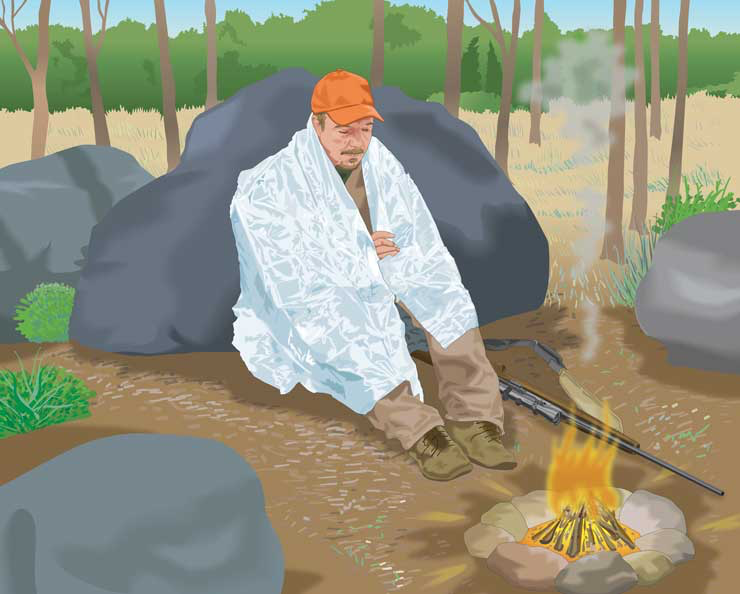
Frostbite
Frostbite occurs when tissue freezes. The best prevention is to avoid severe weather. If you’re caught in extremely cold weather, pay attention to your head and extremities, such as fingers, toes, ears, and nose. Wear a face cover if the temperature is below 0° Fahrenheit. If you experience any symptom of frostbite, treat immediately.
Symptoms of Frostbite
- Skin turns off-white.
- Prickly or tingling feeling occurs as ice crystals form.
- Pain may be present initially, then disappears as frostbite progresses.
- In severe cases, victim experiences a loss of feeling in the affected area.
Treatment of Frostbite
- Warm the affected area with body heat, but avoid rubbing the area—it can damage tissue.
- Don’t use hot water or other external heat sources, which could cause burns.
- Wrap with warm, dry clothing.
- Move to a warm shelter.
- Drink hot liquids.
- Get medical attention.
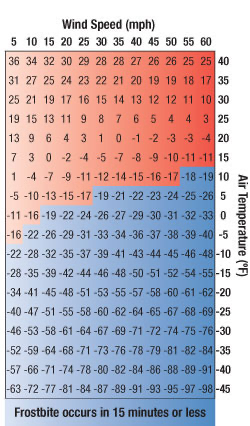
Wind chill is given in the body of this table.
Basics of Cold Survival Without Fire
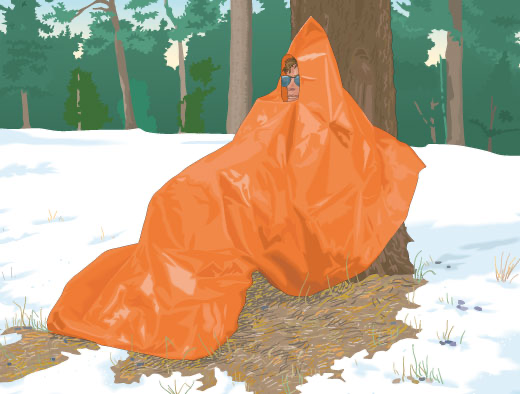
To survive cold weather when you cannot build a fire:
- Wear the proper type of clothing (no cotton).
- Stay dry. Use water-repellent outer garments.
- Build a shelter. The best is a nylon tarp shelter as it will protect you from wind, rain, and snow. Insulate the floor of the shelter with pine boughs, if available.
- Avoid contact with cold surfaces (the ground, rocks, or snow).
- Wrap your body in a thermal foil blanket. This will maintain a temperature of 60°F inside the wrap even when the outside temperature is –10°F.
- Limit your physical activity to conserve energy.
Heat Exhaustion and Heat Stroke
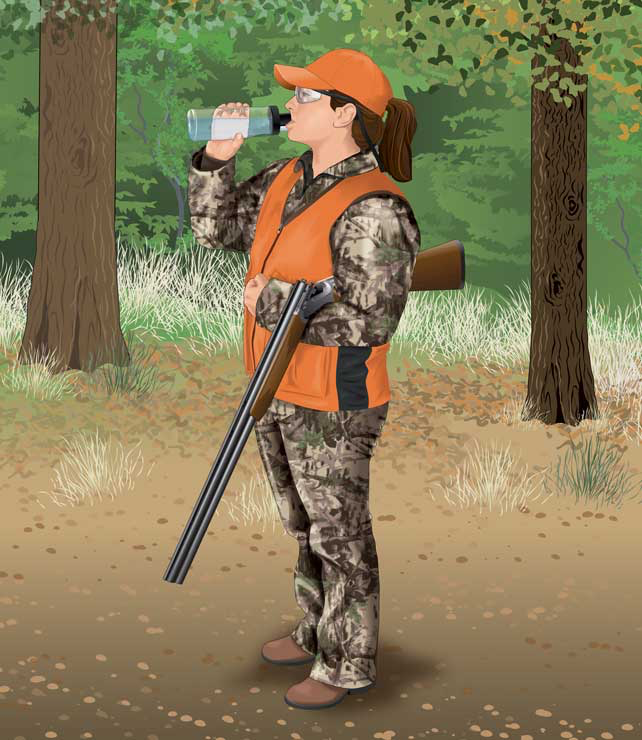
Heat Exhaustion
Heat exhaustion is the opposite of hypothermia—the core body temperature increases, usually as a result of hot and humid conditions, plus a lack of water.
Prevention of Heat Exhaustion
- Drink plenty of water.
- Take frequent breaks if you’re hiking to or from your hunting spot, especially when carrying a large load.
- Dress in layers, and shed layers as physical activity increases.
Symptoms of Heat Exhaustion
- Pale and clammy skin
- Dry mouth
- Fatigue
- Weakness
- Dizziness
- Nausea
- Headache
- Muscle cramps
Treatment of Heat Exhaustion
- Move the victim to a cooler place.
- Have the victim drink water or sports drinks.
- Keep the victim inactive.
- Fan to lower body temperature, but don’t over-chill.
- In severe cases, seek medical attention.
Heat Stroke
- Heat stroke should be treated as a medical emergency—it can be fatal.
Symptoms of Heat Stroke
- Dry, hot, and flushed skin—dark or purple in color
- Dilated pupils
- Rapid, weak pulse
- Shallow breathing
- High temperature—may be in excess of 106° Fahrenheit
Treatment of Heat Stroke
- Wrap in a sheet and soak with cool—not cold—water.
- Fan, but don’t over-chill.
- Get to a hospital immediately.
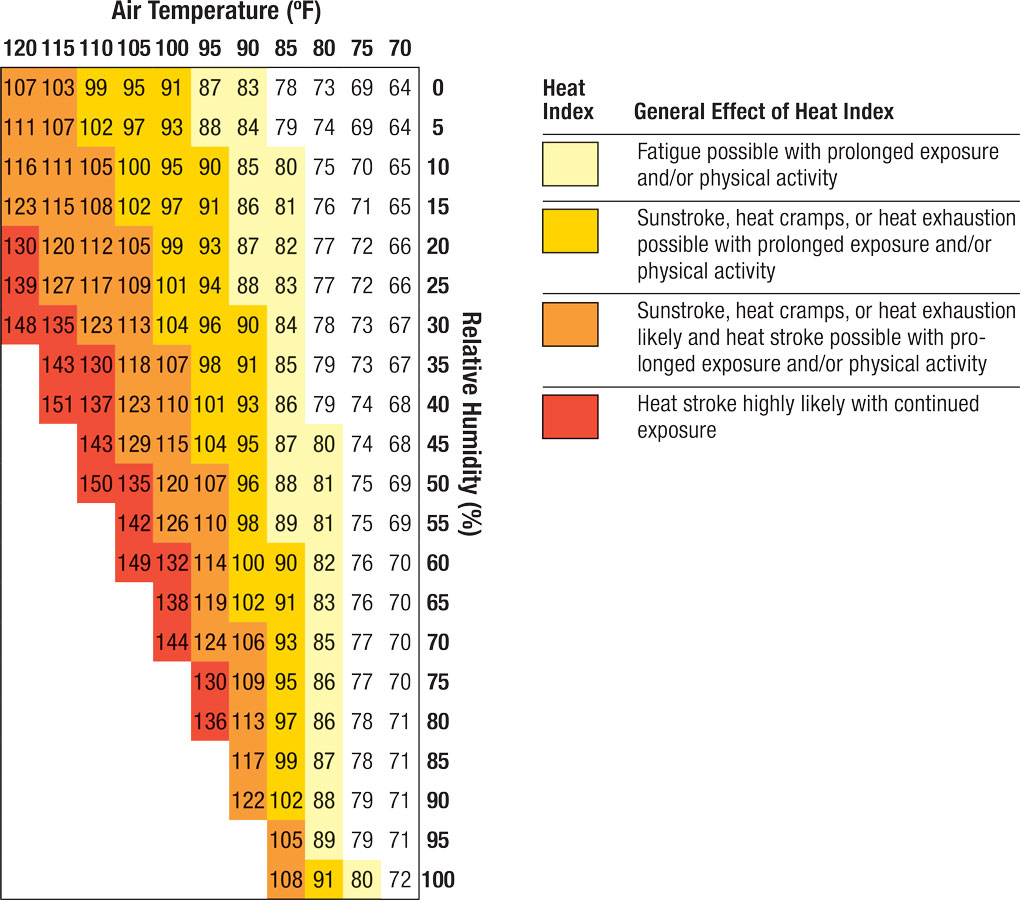
Topic 5: First Aid
Basic First Aid
Every hunter should take a first-aid course to learn what to do in case of injuries. Broken bones, bleeding, and burns are some of the common injuries that could occur while hunting.
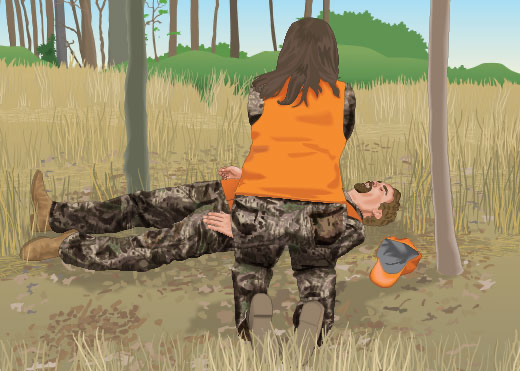
Important
Every hunter should take a first-aid course to be prepared to handle outdoor emergencies. A prepared hunter also will carry a complete first-aid kit.
First Aid: Bleeding
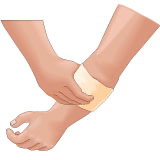
Severe bleeding is a life-threatening medical emergency. The rapid loss of just two pints of blood can result in shock and loss of consciousness. A victim can bleed to death in a short time.
- To stop bleeding:
- Apply direct pressure on the wound.
- Cover with a sterile gauze pad—or the cleanest cloth readily available. Concerns about infection are secondary when it comes to preventing massive blood loss.
- Press the pad firmly over the wound using the palm of your hand. Don’t lift the pad to check the wound—it will only renew bleeding.
- When a pad becomes soaked, put a fresh one directly over the old pad.
- If the wound is on a limb and there’s no fracture, raise the limb above the level of the heart. Gravity will reduce the blood pressure in the limb.
- Direct pressure and elevation are usually sufficient to stop bleeding. If profuse bleeding continues, try shutting off circulation in the artery that supplies blood to the injured limb.
First Aid: Broken Bones
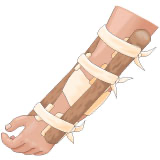
You can assume someone has a broken bone if pain lasts more than a few minutes, moving the injured area is difficult, or there is swelling in the injured area.
- If you have to transport the victim a long distance, it’s best to immobilize the joint above and below the break to prevent further injury and relieve pain. Don’t try to straighten the limb—splint it the way you found it.
- For a broken foot, do not remove the shoe. Tie a pillow or thick padding around the foot over the shoe.
- To splint a broken leg:
- Place a blanket or some other type of thick padding between the legs.
- Bind the injured leg to the uninjured one with strips of cloth.
- Bind the legs together snugly at several places above and below the painful area.
Moving an Injured Person
Moving a victim with a head, neck, or spinal cord injury should be left to paramedics or other professionals because permanent damage could result from improper handling.
If a victim must be pulled to safety, move him or her lengthwise and head first, supporting the head and neck. Keep the spine in alignment.
First Aid: Burns, CO Poisoning, and Chest Wounds
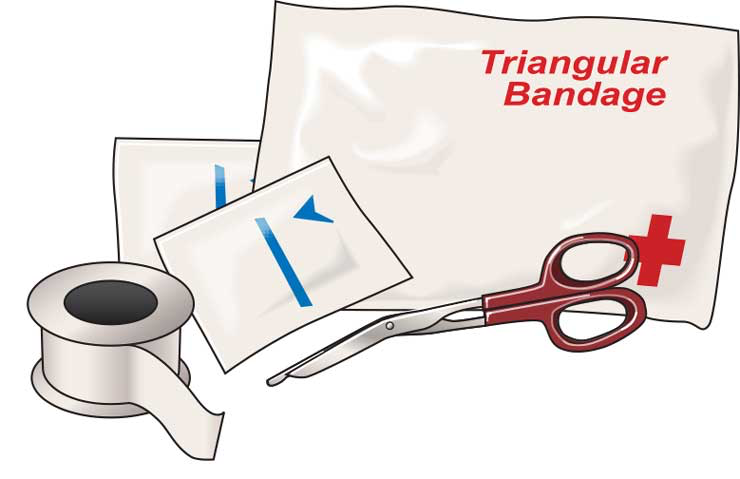
Treating Burns
For burns, the immediate goals are to relieve pain, prevent infection, and treat for shock.
- First- and second-degree burns with closed blisters are best treated with cold water.
- Immerse the burned area, or cover it with cloths that have been soaked in cold water—don’t use ice water.
- Avoid using butter or any type of greasy ointment because they can interfere with healing and cause an allergic reaction.
- Second- and third-degree burns with open blisters should be wrapped with a loose, dry dressing.
Treating Carbon Monoxide Poisoning
Improperly working camp stoves and lanterns, as well as wood and charcoal fires, can produce lethal carbon monoxide.
- Symptoms of carbon monoxide poisoning include headache, dizziness, weakness, and difficulty in breathing. The victim’s skin can turn red, and he or she can lose consciousness.
- Get victims into fresh air immediately, and keep them lying quietly. Prompt medical care is essential.
Treating a Chest Wound
A bullet striking the chest can cause a sucking chest wound—a deep, open wound of the chest wall that allows air into the chest cavity.
- All chest injuries are very serious and need immediate medical attention.
- To respond immediately to a chest wound:
- Use the palm of your hand to cover the wound until a bandage is located.
- Cover the wound with sterile gauze, a clean cloth, plastic, or foil.
- Make sure the wound cover forms an airtight seal.
- Hold the gauze in place with a bandage or tape.
- If the victim has trouble breathing, remove the bandage, and replace it quickly.
- Transport the victim to the hospital with the injured side down.
First Aid: Drownings, Heart Attacks, and Falls From Tree Stands
Treating Drownings and Heart Attacks
A heart attack or injury, such as drowning, that causes the victim’s heartbeat or breathing to stop will require CPR (cardiopulmonary resuscitation). Take a course to learn how to perform CPR properly.
Falls From Tree Stands
You’re always at risk of falling when you hunt from a tree stand. Make plans for a worst-case scenario. Establish a signal that will let your companions know if you fall. If you are hunting alone, what you do depends on your injuries.
- If your injuries are immobilizing, use your signal and then wait until you’re found.
- If you can move, consider your location and decide if you can make it to help.
- If you have broken bones, sprains, or cuts, use what you have available for first aid. Clothing and large handkerchiefs can be used to stop bleeding and provide padding. Belts, haul lines, and branches can be used for splints.
- When hanging from a fall-arrest system, use a rope or strap to relieve suspension trauma.
First Aid: Shock
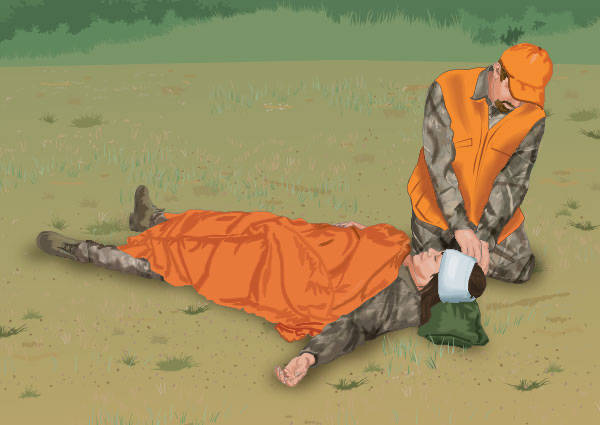
Shock can result from any serious injury.
- Symptoms include pale, cold, clammy skin; rapid pulse; shallow breathing; and fear in the victim.
- To treat shock:
- Keep the victim lying on his or her back.
- In some cases, shock victims improve by raising their feet 8–10 inches.
- If the victim is having trouble breathing, raise the victim’s head and shoulders about 10 inches rather than raising the feet.
- Maintain normal body temperature, and loosen any restrictive clothing.
- Try to keep the victim calm and comfortable, and get medical help as quickly as possible.
- Keep the victim lying on his or her back.
First Aid: Snakebite
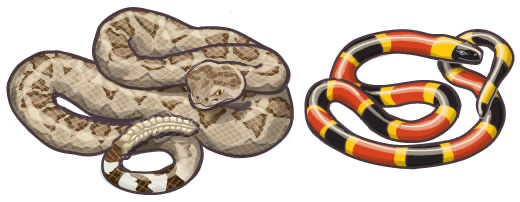
Most doctors agree that the best response is to rush the victim to a hospital emergency room.
- Do not try to remove poison from snakebites. Cutting and suctioning the bite can do more harm than good.
- Fear and panic aggravate snakebite reactions. Calm the victim as much as possible. Keep the victim in a reclining position to slow the spread of venom. If the bite is on a limb, keep the wound at or below the level of the heart.
First-Aid Kit
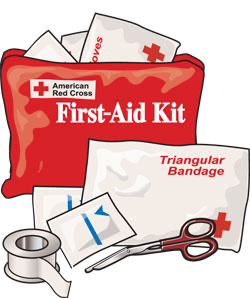
Suggested contents for a first-aid kit include:
- 2-inch-square sterile gauze pads
- 2-inch-wide gauze bandage roll
- 4-inch-square sterile gauze pads
- 42-inch-square cloth for triangular bandage or sling
- Antacid
- Antibiotic salve
- Aspirin
- Assorted adhesive dressings
- Assorted butterfly dressings
- Cell phone
- Cotton swabs
- Decongestant
- Eye dropper
- Hand sanitizer
- Instant chemical cold packs
- Instant chemical hot packs
- Latex gloves
- Moleskin
- Needles
- One-half percent hydrocortisone cream
- Petroleum jelly
- Roll of 1-inch adhesive tape
- Roll of 2-inch adhesive tape
- Safety pins
- Scissors
- Single-edged razor blades
- Sterile eyewash
- Thermometer
- Tweezers
Unit 9: Understanding Wildlife
Topic 1: Wildlife Conservation
Conservation and Preservation
- The concept of wildlife conservation has been around since ancient times.
- Restrictions on taking game are mentioned in the Bible, and the first official hunting season may have been established in the 13th century by Kublai Khan.
- Today, wildlife conservation has evolved into a science, but its goal remains essentially the same: to ensure the wise use and management of renewable resources.
- Given the right circumstances, the living organisms that we call renewable resources can replenish themselves indefinitely.
- Preservation is another means of protecting or saving a resource, such as by outlawing hunting of endangered species.
Both preservation and conservation are necessary to sustain resources for future generations.
conservation: Wise use of natural resources, without wasting them
preservation: Saving natural resources, but with no consumptive use of them
Lessons in Wildlife Management
Initially, wildlife management in the United States was skewed toward protection.
In the early 1900s, - for example, wildlife managers attempted to preserve a mule deer herd in the remote Kaibab Plateau of Arizona. Hunting was banned, and predators were destroyed. The result was severe overpopulation, habitat destruction, and mass starvation. The Kaibab Plateau was opened to hunting in 1929, which brought the population into balance with the habitat. Today, a large, healthy herd of mule deer inhabits the area.
- Around the same period, a similar event took place in Pennsylvania. Deer had been brought into the state after the native population was thought to be extinct. With most of the predators eliminated and little hunting allowed, the herd grew out of control. As the food supply dwindled, thousands of white-tailed deer starved to death.
- From these hard lessons, wildlife managers learned that there is more to conservation than just protecting wildlife. They discovered that nature overproduces its game resources and that good wildlife management yields a surplus that can be harvested by hunters.
habitat: Complete environmental requirements of an animal for survival: food, water, cover, space, and arrangement
wildlife management: Science and practice of maintaining wildlife populations and their habitats
The North American Model of Wildlife Conservation
In the first two decades of the 20th century, sportsmen from the United States and Canada developed a set of guiding principles for managing wildlife resources. Called the North American Model of Wildlife Conservation, these seven principles provide the foundation for the success of fish and wildlife conservation in North America.
- Fish and wildlife are public property. The government holds them in trust for the benefit of all people.
Wildlife cannot be slaughtered for commercial use. This policy eliminates trafficking in dead game animals. - Wildlife is allocated by law. Regulations determine how wildlife resources are managed, including hunting seasons and bag limits.
- The reasons for killing wildlife must be valid. Wildlife shall be taken by legal and ethical means, in the spirit of “fair chase,” and with good cause. Animals can be killed only for legitimate purposes—for food and fur, in self-defense, or for protection of property.
- Wildlife is an international resource. As such, hunting and fishing shall be managed cooperatively across state and province boundaries.
- Science plays a key role in managing wildlife. Wildlife populations are sustained and scientifically managed by professionals in government agencies.
- Hunting, fishing, and trapping shall be democratic. Every citizen in good standing—regardless of wealth, social standing, or land ownership—is allowed to participate in the harvest of fish and wildlife within legal limits.
Causes of Threatened and Endangered Species

Modern legal hunting is not shown in the pie chart because it does NOT cause a species to become threatened or endangered.
Habitat Management

The habitat is where a species fulfills its basic life needs: nourishment, procreation, and rest. If not managed properly, urban development can result in habitat loss, which presents the greatest threat to wildlife.
- Habitat management, the most essential aspect of wildlife management, safeguards the essential elements to meet these needs.
- Food and water are necessary to all wildlife. Competition for these elements among species makes cover, space, and arrangement top priorities.
- Cover protects animals from predators and the weather while they feed, breed, roost, nest, and travel. Cover ranges from thick weeds and brush to a few rocks piled together.
- Space is necessary for adequate food among wildlife, territorial space for mating and nesting, and freedom from stress-related diseases.
- The ideal arrangement places food, water, cover, and space in a small area so that animals minimize their energy use while fulfilling their basic needs for nourishment, procreation, and rest.
- Edge effect refers to the consequence of placing two contrasting ecosystems adjacent to one another. Most animals are located where food and cover meet, particularly near water. An example would be a river bottom, which offers many animals all their habitat needs along one corridor.
Habitat Balancing Act
Habitats must be in balance in order to support wildlife. Remove a certain population of plants or animals from a community, and the community may not survive. This typically happens when urban development pushes into wildlife areas.
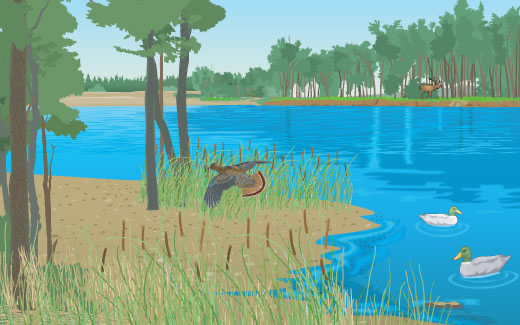
Before Urban Development
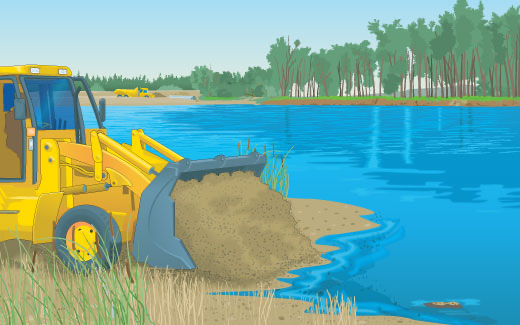
After Urban Development
Carrying Capacity
The resources in any given habitat can support only a certain quantity of wildlife. As seasons change, food, water, or cover may be in short supply. Carrying capacity is the number of animals the habitat can support all year long.
- The carrying capacity of a certain tract of land can vary from year to year. It can be changed by nature or humans.
- Factors that limit the potential production of wildlife include:
- Disease/parasites
- Starvation
- Predators
- Pollution
- Accidents
- Old age
- Hunting
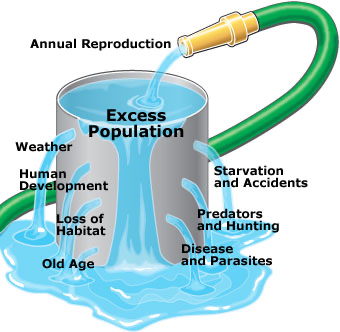
carrying capacity: The number of animals a given habitat can support all year long without damaging the animals or the habitat
Factors That Affect Surplus of Game Animals
If the conditions are balanced, game animals will produce a biological surplus, which can be harvested on an annual, sustainable basis.
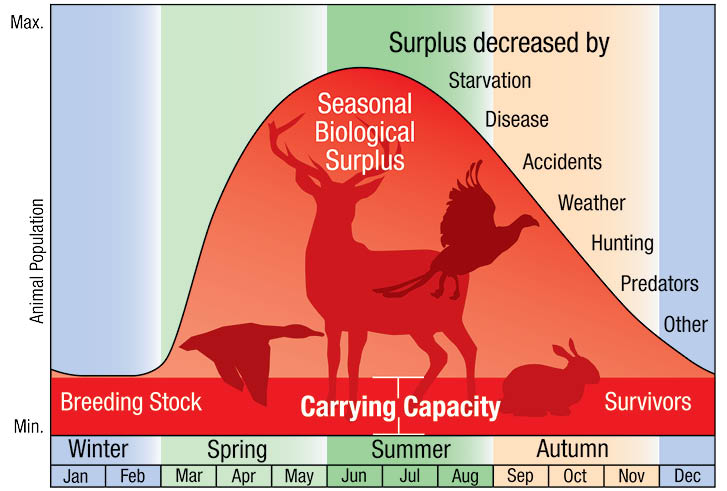
biological surplus: The number of animals in a population beyond the carrying capacity
The Hunter’s Role in Wildlife Conservation
Because wildlife is a renewable resource with a surplus, hunters help control wildlife populations at a healthy balance for the habitat.
- Regulated hunting has never caused a wildlife population to become threatened or endangered.
- Hunting is an effective wildlife management tool. Hunters play an important role by providing information from the field that wildlife managers need.
- Revenue from hunting licenses is a primary source of funding for wildlife management and has helped many game and non-game species recover from dwindling populations.
Hunters and Wildlife Conservation
Hunters spend more time, money, and effort on wildlife conservation than any other group in society. In addition to participating in the harvest of surplus animals, hunters help sustain game populations by:
- Filling out questionnaires
- Participating in surveys
- Stopping at hunter check stations
- Providing samples from harvested animals
- Helping fund wildlife management through license fees
Topic 2: Wildlife Management and Conservation Principles
The Wildlife Manager’s Role

The wildlife manager’s job is to maintain the number of animals in a habitat at or below the habitat’s carrying capacity so that no damage is done to the animals or to their habitat.
- In a sense, a wildlife manager’s task is similar to a rancher’s. Just as a rancher limits the number of animals in a cattle herd to a level that the habitat can tolerate, wildlife managers try to keep the number of animals in balance with their habitat. In addition to looking at the total number of each species in a habitat, wildlife managers also monitor the breeding stock—the correct mix of adult and young animals needed to sustain a population.
- To manage a habitat, wildlife managers must consider historical trends, current habitat conditions, breeding population levels, long-term projections, and breeding success. With that knowledge, wildlife managers have a variety of practices at their disposal to keep habitats in balance.
Wildlife Management Practices
Monitoring Wildlife Populations: Wildlife managers continuously monitor the birth rate and death rate of various species and the condition of their habitat. This provides the data needed to set hunting regulations and determine whether other wildlife management practices are needed to conserve wildlife species.
Habitat Improvement: As succession occurs, the change in habitat affects the type and number of wildlife the habitat can support. Wildlife managers may cut down or burn forested areas to promote new growth and slow down the process of succession. This practice enables them to increase the production of certain wildlife species.
Hunting Regulations: Hunting regulations protect habitat and preserve animal populations. Regulations include setting daily and seasonal time limits, bag limits, and legal methods for taking wildlife.
Hunting: Hunting is an effective wildlife management tool. Hunting practices help managers keep animal populations in balance with their habitats.
Predator Control: In rare instances, predators must be reduced to enable some wildlife populations to establish stable populations, particularly threatened or endangered species.
Artificial Stocking: Restocking of game animals has been successful in many parts of the nation. An example of restocking is trapping animals in areas where they are abundant and releasing them in areas of suitable habitat where they are not abundant.
Controlling or Preventing Disease and Its Spread: Disease can have a devastating effect on wildlife. Avian cholera, for example, poses a serious threat, especially to ducks and geese on crowded wintering grounds. Once avian cholera occurs, managers must work to prevent its spread by gathering and burning waterfowl carcasses daily.
Management Funds/Programs: In addition to Pittman–Robertson funds, many states have initiated programs that help finance conservation efforts.
birth rate: The ratio of number of young born to females of a species to total population of that species over one year
death rate: The ratio of number of deaths in a species to total population of that species spanning one year
predator: Animal that kills other animals for food
succession: Natural progression of vegetation and wildlife populations in an area; for example, as trees grow and form a canopy, shrubs and grasses will disappear along with the wildlife that use them as cover
Beneficial Habitat Management Practices
Beneficial habitat management practices include:
- Brush pile creation
- Controlled burning
- Diking
- Ditching
- Food plots and planting
- Mechanical brush or grass control
- Nuisance plant or animal control
- Timber cutting
- Water holdings
Topic 3: Wildlife Identification
Developing Wildlife Identification Skills
Developing wildlife identification skills is a basic requirement for hunters. Knowing the key characteristics of animals will help you distinguish between similar species and between the male and female of the same species.
Mistakes in identification can lead to:
- Illegally harvesting non-game animals or…
- Accidentally shooting a person who was mistaken for game.
Identifying animals accurately can be difficult, but it is a skill that improves with experience. To identify game animals properly, you must learn to recognize key characteristics of the animal you’re hunting. These characteristics include:
- The animal’s shape, size, coloring, and any other distinguishing features
- Wildlife sign, such as tracks, scat, and calls
- The animal’s habitat and range
- What the animal eats (herbivore, carnivore, or omnivore)
- Nesting locations for birds
- Daily habits, such as following a specific routine, being nocturnal, or being solitary
Many resources are available for learning about wildlife. Good sources are books, television shows that feature hunting and nature topics, and websites, such as that of the U.S. Fish & Wildlife Service.
Wildlife Categories
- It is common to categorize wild animals into groups that are similar in some way; for example:
- Large mammals
- Small mammals
- Upland birds
- Waterfowl and wetland birds
- Birds of prey
- Game animals are wildlife that can be hunted legally. To be classified as legal game, the animals must:
- Be useful, primarily for food.
- Be abundant with population levels that can be sustained.
- Offer a unique or traditional challenge for hunters.
- Species that are listed as “threatened” or “endangered” are protected by law.
- Some species are protected from hunting because their numbers are small and they produce no surplus to harvest.
- Examples of protected species are eagles, falcons, and owls.
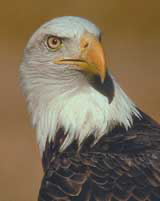
Bald Eagle
Large Mammals
The large mammal group typically includes horned animals, antlered animals, bears, and large members of the wild cat or wild dog families.
Horned or antlered animals have these key characteristics.
- Horns are hollow and are not shed. Wild sheep and goats have horns.
- Antlers are solid bone and are shed annually. Members of the deer family have antlers and rub their antlers on trees.
- Horned and antlered animals are cloven-hoofed (their hooves have two parts).
- Horned and antlered animals are ruminants (they chew cud). A ruminant digests its food in two steps. First they eat food and regurgitate it (cud), and then they eat it a second time. They have a hard upper pad that they use to mash their food.
Characteristics of Mammals
- Mammals are warm-blooded animals with hair. Young are nourished with milk from the mother.
- Mammals can be carnivorous (meat-eating), herbivorous (plant-eating), or omnivorous (meat- and plant-eating).
- Mammals seek to regulate their temperature. Mammals in cold climates must keep warm, and mammals in hot climates must keep cool.
- Small mammals live shorter lives than large mammals, in general.
- Mammals vary in social behavior—some species live in groups, and other species are solitary except when mating or raising offspring.
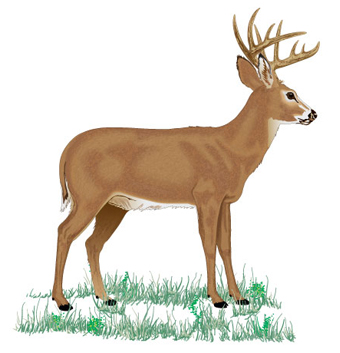
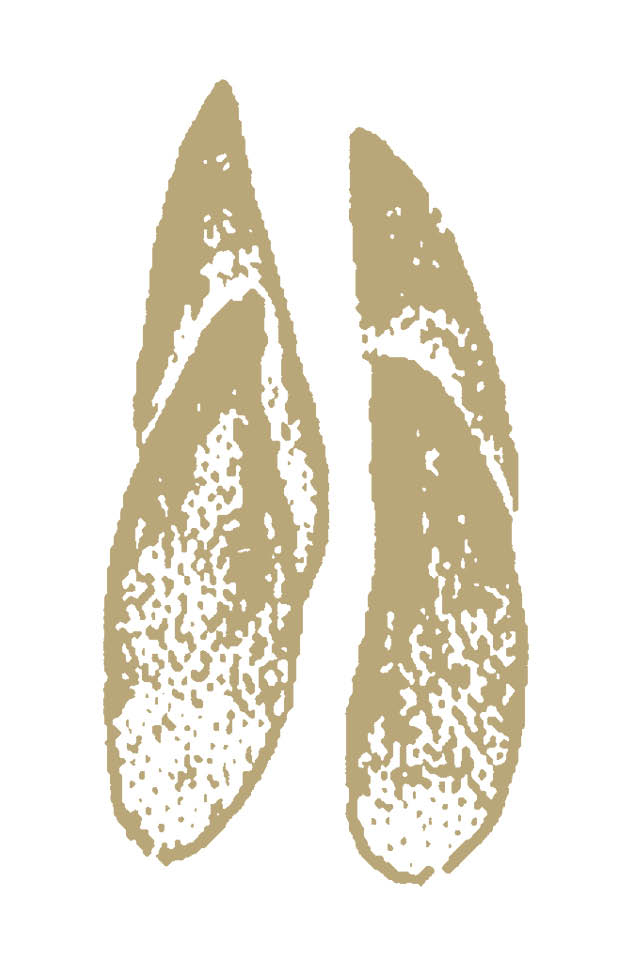
White-Tail Deer Track

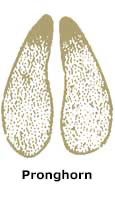
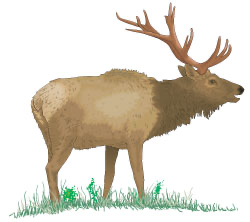
Rocky Mountain Elk Track
Small Mammals
Two of the most common small game animals are rabbits and squirrels. By studying these animals, you can learn to recognize their tracks.
Some small mammals that are sought after primarily for their pelts are called furbearers. Two popular breeds are fox and mink.
Some Small Mammals and Their Tracks


Red Fox
Red Fox Track
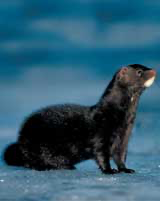
Upland Birds
Popular upland birds that are found across the country include turkeys, pheasants, grouse, and quail. The term “upland” refers to where they are often found.
The basic shape of upland birds is similar to chickens. They also have short rounded wings that are good for short flights and strong legs that are good for running.
Most male upland birds have more colorful feathers than females. The female’s plain feathers help her provide camouflage cover for her nest.
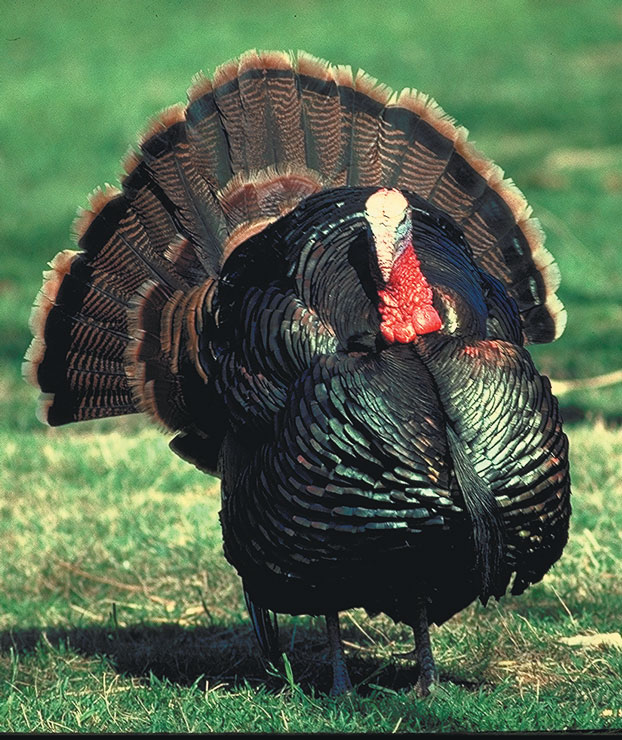
Wild Turkey
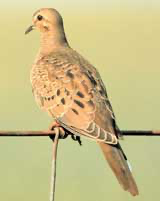
Mourning Dove
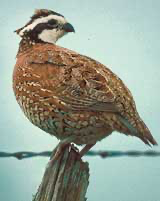
Bobwhite
Grouse Foot
Wild Turkey Foot
Waterfowl
Waterfowl are warm-blooded animals that live on or near water, and include diving ducks and puddle ducks.
Puddle Duck Foot
Puddle ducks are found primarily on the shallows of lakes, rivers, and freshwater marshes. Puddle ducks prefer to feed on or near the water’s surface. They launch themselves directly upward when taking off.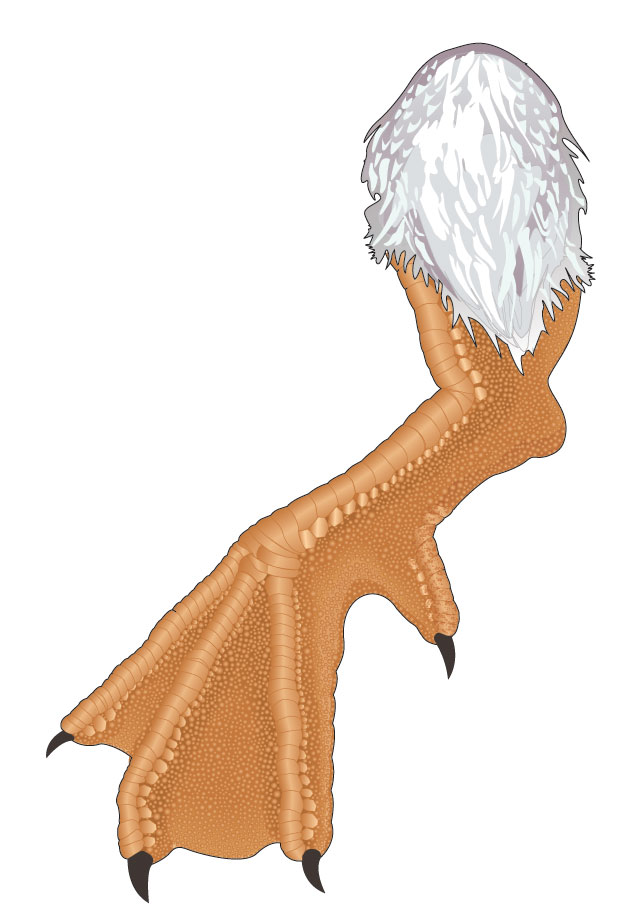
Diving Duck Foot
Diving ducks inhabit large deep lakes and rivers, coastal bays, and inlets. Diving ducks obtain most of their food by diving. They must run across the water to build up speed to take off.
Some Examples of Waterfowl
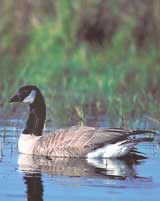
Canada Goose
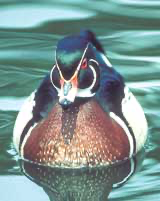
Wood Duck
Wetland Birds
Wetland birds live close to water in marshy and coastal areas. Examples are cranes and snipes.

Snipe
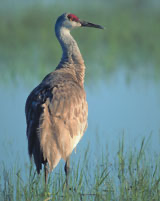
Sandhill Crane
Birds of Prey
Birds of prey feed on other birds or mammals. Examples are eagles, falcons, and owls. Birds of prey are found throughout North America. All of these birds are protected.
Burrowing Owl
Peregrine Falcon
Rare, Protected, or Endangered Species
Some species are protected from hunting because their numbers are small and they produce no surplus to harvest. Animals that are labeled “rare,” “threatened,” or “endangered” are all fully protected by law.
Golden Eagle
Continue Your Wildlife Education
The publication Today’s Wildlife gives the identifying characteristics, habitat, and range of most of the wildlife you may encounter.
As a responsible hunter, you should educate yourself about wildlife prior to your hunt. The ability to accurately identify species will make you a better hunter and will increase the enjoyment of your hunting experience.